
Chapter 2
Creating Your Business Page
In This Chapter
![]() Choosing your Page name and type
Choosing your Page name and type
![]() Modifying Page settings to match your needs
Modifying Page settings to match your needs
![]() Going through the steps to publish your new business Page
Going through the steps to publish your new business Page
![]() Sharing your business Page with customers
Sharing your business Page with customers
![]() Managing missteps
Managing missteps
This chapter is all about creating your business presence on Facebook by opening a Facebook Page. We always think it’s a good idea to read the instructions before building something new, and we suggest that here, too. Choosing your Page type and category might be very clear-cut for you — or maybe not. Reading and exploring how it works can be an interesting first step.
In this chapter, we take you through the steps to create your Facebook business Page. Then, we show you how to let people know that your Page is open for business. If you’re reading this after you’ve already created an account or a business Page on Facebook, but you might have done it the wrong way, we address that, too.
 One way that we enjoy exploring what other people have done is by going to www.facebook.com/pages. Check out the names of Pages: You can sort by the types at the top of the Page. Explore by clicking a few Pages. You can learn a lot by seeing how other businesses created their Pages.
Considering a Few Things before You Start
Creating your Facebook business Page is an important process, and we want you to be as awake as possible while going through it. Some of the selections you make will determine many future functions, such as the information fields on your Info Page that you’ll surely want to use in your marketing plan. In particular, you want to carefully consider what to name your Page and which type of business Page to create.
 You can change the Page type at any time, but making changes will affect the types of informational fields you have available for use, too.
Choosing the right name for your business Page
The name you give to your business Page is extremely important because it becomes the title of your Page. When a customer, fan, or Friend searches for your business Page on Facebook, this name/title will enable her to find you. Because naming your Page is so important, we’d like you to mull over a few things. Here are a few naming do’s and don’ts to consider before you create your business Page:
Page names must
- Use proper, grammatically correct capitalization
- Have logical, correct punctuation
- Include your name, if you’re branding yourself
- Include your business keywords, if you’re branding your niche or product
Page names can’t use the following:
- Excessive capitalization or all capitals
- Symbols such as ! or ® or TM (although you can use a hyphen)
- Repeated and unnecessary punctuation
- Abusive terms
- The word Facebook or any variation of it
Facebook wants you to create concise Page names without long tag lines after the name. You can use up to 75 character spaces for your Page name, but we encourage you to keep things short and sweet. All the businesses we know that created long Page names eventually wanted to shorten them. Consider this example of a Page created with a very long tagline: iPhoneLife Magazine & iPhoneLife.com — User created stories, tips & reviews. A real mouthful. Facebook approved it, and it was used that way for a year until Facebook gave Pages the capability to change their names — and this company jumped to truncate the name to iPhone Life magazine.
Typically, you can’t change a Page name after it has more than 200 likes, but this editing door opened for just a few days after a major Facebook update. This option to change a Page name has come and gone two times since we started writing this chapter. We don’t know whether it will be around when you create your Page, so think through your name carefully in case you can’t change it in the future. Facebook doesn’t want you to use superfluous descriptions or unnecessary qualifiers, such as the word official in a Page name. Campaign names and regional or demographic qualifiers, though, are acceptable. Nike Football Spain is just fine, for example.
Stay clear of generic terms for your Page name, too. If you name a Page using a generic reference to the category — such as Jewelry instead of Sparkle’s Jewelry Store — you may have your administrative rights removed, and the Page will become an uneditable, Facebook-generated Interest Page.
Choosing the right type of business Page
Facebook offers six types of Facebook Pages so that you can choose the one that best fits with your product, service, brand, or business. When you go to www.facebook.com/pages/create.php, you see the business Page options, as shown in Figure 2-1.
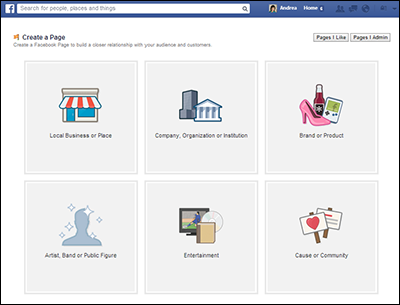
Figure 2-1: Choose one of these six options to create your business Page.
The following list gives you the skinny on what each Page type offers and when you should choose a particular Page type over another:
- Local Business or Place: This Page type is for bricks-and-mortar businesses. Choose this type only if you truly have a local, open-to-the-public type of business. When you choose this category, a Facebook Place is automatically created for you, as well where people can check in.
 Don’t list your home office as a Local Business!
The Local Business or Place option offers a drop-down menu with 40 category choices. You can choose one of these categories to create a Page. Or, if none of the categories fits your business, choose the Local Business category and go from there. The Info Profile for this type of business Page is very detailed, with editing fields for hours of operation, parking options, and price ranges.
- Company, Organization, or Institution: This Page type is for a company that isn’t necessarily open to the public the way a local business would be. Many of the categories in this drop-down menu are the same as those for the Local Business or Place type, but the resulting Info Page won’t have the same detailed interface to fill in for prices, parking, and so on.
If you have multiple stores in the same city, you need to sit down and decide on a company policy about Facebook Pages. Do you or your store managers want to manage one Page or a Page for each store? Starbucks runs one company Page, for example; Aveda has a custom link that helps you find a local store. Obviously, these are large corporations, but other companies give managers the option to open a Page as long as they adhere to company social media policies.
- Brand or Product: If you sell an actual physical product, this is the Page type to consider. Facebook offers many categories: cars, clothing, computers, pet supplies, and a generic product/service category.
- Artist, Band or Public Figure: Obviously, if you’re a band or artist, this type is the one to choose, but this Page type also covers politicians, businesspeople, chefs, dancers, and actors. You may think that the actor category would be in Entertainment (see the next bullet), but it isn’t! It’s here, under the Artist, Band or Public Figure.
Use this type for your band. However, if you’re promoting your CD on Facebook, use the Entertainment type with the category Album.
- Entertainment: If you have a TV show or a magazine, or are creating a Page just for your music CD, select this Page type. There are close to 30 different categories listed here. We’re still trying to figure out why Library is listed as a category under Entertainment. Is your library entertaining?
- Cause or Community: If you’ve been on Facebook for a while, don’t confuse this type of Page with the Causes application. If you’re new to Facebook and are creating a Page for a nonprofit or community organization, don’t select this Page type — instead, opt for Company, Organization, or Institution, and select the category of Non-Profit.
You must be the official, recognized, and authorized representative of whatever type and category of Page you create on Facebook.
Every Page type has an Info section (also known as the About section). Filling out your Info section completely is important because it’s is indexed in Google, and the Short Description gets used when someone shares your Page. Anyone can share your Page by using a Share link, which they can see after clicking the gear icon in the top-right corner of the Page. Most Page categories use the Short Description text to populate the Share invitation. Clicking that Share link autopopulates a post that goes on your personal account Timeline and is visible in the News Feed. Because you’re the Page Admin, you can use the Invite Your Friends function. Everyone else can only use the Share option.
You can share to your own Timeline, to someone else’s Timeline, to a group, or in a private message. You can add personal text with a share post but not with an Invite Your Friends function. We go into detail on how to do all that in Book IV, Chapter 1.
Don’t worry too much about the Page category. You can adjust the Page type and category setting later. The interface is a bit different and can be accessed right from the top of your Page. The steps to change your Page type and category are at the end of this chapter and in Chapter 3 of this minibook.
Setting Up Your New Business Page
Goodness. Finally. Time to set up a new business Page on Facebook!
Creating a business Page
Are you ready? Before you create your business Page, first read through these steps. Follow along when you read them again:
- Log in to your personal Facebook account.
- Go to http://facebook.com/pages/create.php.
Doing so brings up a screen showing six Page types.
- (Optional) Click each Page type and then click the drop-down category list, as shown in Figure 2-2. Look for a category that matches your business.
- Select the type of Page to create.
New options become available for you to fill in.

Figure 2-2: Find a category for your business.
- Select the category of Page you want.
The category you choose determines the types of Info fields that are available for your Page. All types, except Cause or Community, ask you to select a category for your Page. The reason to find the best category is that the category determines what details are shown on your business Page’s Info link. The Book category, for example, displays an Info link with fields for the International Standard Book Number (ISBN); the Café category gives you fields for hours and types of credit cards you take.
You can change the category later if needed. - Type the requested information.
Depending on which business Page type you choose, you see different text fields to fill in. The Name field ends up being the title of the Page. Each of the six types calls the Name field something different: Local Business calls it Business or Place Name; Company calls it Company Name; Brand or Product calls it Brand or Product Name; Artist or Band calls it Name; Entertainment calls it Name; and Cause or Community calls it Cause or Community Name.
Facebook likes (well, actually insists on) first letters being capitalized for Page names. And you need to fill out all fields to be able to create your Page.
Take the time to think through this whole naming business. Better yet, read the “Choosing the right name for your business Page” section, earlier in this chapter. You’ll be able to change a Page name only until you have 200 people who like your Page. After that point, you’re stuck with it unless Facebook opens the link to change it again. So think it through. You can send a request to Facebook to change the name, but it can be challenging to go that route. - Select the I Agree to Facebook Pages Terms check box.
You must be the official representative of this person, business, band, or product to create this Page. If you’re not, you’re in violation of Facebook Terms and Services; Facebook can (and will) remove your Profile and not reinstate it.
- Click the Get Started button.
You created a Facebook Page!
Opening your page
The first screen you see after clicking the Get Started button looks like Figure 2-3. Facebook takes you through a two- to three-step process (depending on your category) to fill in and open your Page to the public.

Figure 2-3: Facebook guides you as you customize your business Page.
- Upload your Profile image and click Next.
- Fill in a basic description about your Page.
This section is mandatory but can be edited later.
The basic description appears on your Timeline. You have a 155-character limit to describe your business, so don’t get too wordy!
- Add your website and any other site links, such as Twitter or LinkedIn.
In our testing, we found that you can add as many links as you want.
Always check the exact URL before entering it so that the links will be hyperlinked correctly. - Choose your unique Facebook web address.
We have to state right here that this section comes and goes. Sometimes we see this option available, and sometimes we don’t. And this section isn’t mandatory, so if you don’t want to set it right away, you can always set it later.
The unique web address is very good to have because you can then easily tell someone how to find your business on Facebook without someone having to use the Search bar which doesn’t always yield complete results.
The unique web address — sometimes called a vanity URL — is the part of a Facebook address for your Page:
http://facebook.com/TheMissPhyllisCollection
Before you get a username, the address might look like this:
https://www.facebook.com/pages/The-Miss-Phyllis- Collection/139008436119989
If you see this step, think this through: In our experience, you can change the URL for the Page only once more.
You can have capital letters in the unique web address (and the address is not case sensitive). For example, www.facebook.com/GrandmaMaryShow works just the same as www.facebook.com/grandmamaryshow and is more readable with the first letters of the words capitalized. We recommend using the capital letters for the first letter of each word when appropriate. You cannot use spaces, but you can use underscores.
- Click Save Info when you finish this section.
Step 2 of the process appears: to upload your profile picture.
- Upload a Profile picture.
A Profile picture isn’t the large Cover photo you see on other Pages. This is the smaller, square image located in the bottom-left corner overlaying the Cover photo. The image can be any shape, but the viewable part is square (180 x 180 pixels; px). In just a moment, you can specify what part of this image becomes the thumbnail that will accompany your posts.
You can choose to upload a profile picture from your computer or have Facebook find one from your website. Unless you happen to have the perfect sized photo on your website, we recommend uploading one that you have sized beforehand from your computer.
- Click Next.
- Click Add to Favorites. (This might not appear depending on your category.)
Facebook prompts you to add your new Page to your Favorites that appear on the left sidebar of your personal profile so you can easily access it later.
That’s it! You’re taken to your new Facebook Page with your Admin panel at the top of the Page.
You can see how that looks in Figure 2-4.

Figure 2-4: The Admin panel is your main interface for working with your new Page.
Unpublish your Page
When you create a new Page, Facebook defaults it as published! Yikes! You may want to unpublish your Page to the public so that you can continue to work on it privately. Just look for the Edit Page button, and follow these steps:
- Click the Edit Page button.
This button is at the top of your new Page.
- Choose Edit Settings from the drop-down menu.
- Click the Edit link on the right side of the Page Visibility setting.
- Select the Unpublish Page check box and click Save Changes, so that only Admins can see this Page.
This option, shown in Figure 2-5, effectively unpublishes your new Page, hiding it from everyone except Page Admins.
Your business Page is now visible only to you and any other Admins. After you deck out your Page with a Cover image, detailed info, photos, and other fun things, you can publish the Page for all to see by coming back to this Page and clearing the Page Visibility check box.

Figure 2-5: Hide your Page from the public.
Completing, Publishing, and Promoting Your Page
Now you need to complete your Page so that you can publish it and promote it. To see what a finished Local Business Page might look like for a food establishment, check out the Facebook business Page for Merante Brothers Market, at www.facebook.com/meranteboys. Figure 2-6 shows the Cover photo, the custom apps, the Page category, the address, the phone number, and the hours. This is what you’re going for when you go through this section and fill out more info.

Figure 2-6: This Local Business Page is full of vital information.
You have several steps to go through, as follows:
- Adding a Cover photo and adjusting your Profile image thumbnail
- Completing your About Page
- Adding Facebook-built apps and custom apps
- Posting status updates
- Publishing your Page
- Adding milestones
- Promoting this Page on your website
- Setting up your mobile phone so that you can check your Page on the go
In the following sections, we walk you through each step. Try not to skip ahead because these steps are important for forming your new Page!
Getting your Facebook images right
You know all about a picture saying a thousand words, right? Your Facebook Cover and Profile photos say a lot about you and your business, so be sure to have images for both that convey a positive message. And now that Facebook creates a nice little “hover card” when someone hovers over your Page name in the News Feed, you want to make sure it looks fantastic. This hover card will show the Cover photo, Profile photo, total number of Likes, who likes the Page, and the Page type.
Adding a Cover photo
You need to add a Cover photo to your Page — no ifs, ands, or buts about it.
If you’re branding yourself, feature your face in this Cover photo image, to help connect the human element to the rest of the Page that contains text and links. Adding this personal touch can make people feel more connected to you — and to what you’re selling.
If you’re branding your company, make sure that your logo or product image is on this image. Take care that nothing important in the image appears in the lower-left corner of the image. Your profile picture covers that section of your cover photo.
Whichever way you choose, the image fills the top position on your Page, as shown in Figure 2-7. If you’re branding yourself, we highly recommend that you create and use a custom image that contains your logo and your photo.
The image size is 851 x 315 px. The space you get for a Cover photo is quite a bit larger than the space for a Profile picture and can really make a statement on your Page.

Figure 2-7: Use the Cover photo to make an impression and connect with your audience.
Facebook allows website addresses or any text on a cover photo as long as it isn’t deceptive or misleading. Facebook does state that the cover photo space “isn’t meant for promotions, coupons, or advertisements,” but you can get creative to show what your business is about and have some text or taglines on the photo.
Try to think of this image as what you’re trying to brand as the “feeling” of your business. There are great strategies you can use with this image, which we outline in Books IV and IX. In general, think of changing this image with your other promotions so that they support one another.
To upload a cover photo from your hard drive to your Facebook Page, follow these steps:
- If this is the first Cover photo you’re adding, look for the Add a Cover button, where the Cover image will appear.
If you’re changing the Cover photo, just hover over the Cover photo and click the Change Cover button.
A hidden link with a pencil icon comes up, as shown in Figure 2-8.

Figure 2-8: Start by uploading a great cover image.
- Click Add a Cover or the Change Cover button.
If this is the first time you’re uploading a cover photo, a pop-up box tells you that the cover photo isn’t meant for promotions, coupons, or advertisements.
- Click the Okay button.
- Click the Upload photo in the Image dialog box that appears and then browse to and select the image on your computer that you want to upload.
- Click Open.
Facebook starts the upload process.
The best size is 851 x 315 px. If you upload a larger image, you can drag it around to get the best placement. If the image is larger than 851 x 315, only a portion of it will appear as the Cover photo for your Page; when clicked, the image opens to the complete size of the photo. If the image is less than 300 px wide, Facebook displays an error message and tells you that the image is too small to use in this space.
- Adjust the image as necessary.
- Click Save Changes.
After the file is uploaded, you go back to the Page.
- Click the image, click Edit, and add a description that includes your best link (back to your website, for example).
Adding a description — with a link to your website — for every image needs to be second nature on Facebook. See Figure 2-9 for that interface.
Cover photos are set to Public viewing. You can’t change that viewing setting (and why would you?). You see the globe icon that Facebook uses to denote Public when you upload the image.

Figure 2-9: Always add a photo description that includes a link to your website.
Adjusting your Profile thumbnail image
After you have your Cover image just right, you may want to check the thumbnail that Facebook generates for your Profile image. A thumbnail is a smaller version of your Profile image. In the world of Facebook, a thumbnail image shows up next to every status update or comment you make as your Page. As you can imagine, your thumbnail is a key component in branding your business Page.
And now that Facebook creates a nice, little “hover card” when someone hovers over your Page name in the News Feed, you want to make sure it looks fantastic. This hover card will show the Cover photo, Profile photo, and the Page type.
The Profile image is 180 x 180 px. If you upload an image larger than that, Facebook gives you a cropping interface to select a square part of the image.
After you have the Profile image uploaded, you may want to adjust the thumbnail image. Follow these steps to adjust the thumbnail image:
- Hover over your Profile image.
A hidden link with a pencil icon comes up.
- Click the Edit Profile Picture link.
You see several links: Choose from Photos, Take Photo, Upload Photo, Edit Thumbnail, and Remove.
- Click the Edit Thumbnail link.
Doing so pulls up the Edit Thumbnail dialog box, as shown in Figure 2-10.

Figure 2-10: You can adjust your thumbnail to look just right.
- Drag the thumbnail image around until it looks good as a thumbnail.
- Click Save.
This is an image; therefore, it has a description area where you can add text and hyperlinks. Click the Photos app box (located just under the cover photo); then click the Profile Pictures album and the image itself. Add text and hyperlinks in the top-right corner where you see the words Add a Description.
Completing the Info Page
The next step is filling in the fields on the Info Page, which is also known as the About Page. Depending on the Page type and category, the fields will be different. The TV Show category has a field called Plot, for example, whereas the Book category has a field for the ISBN.
The following examples use the Company Page type and the Company category. Follow these steps:
- At the top of the Admin panel, click the Edit Page button and then click Update Page Info.
This step opens the Page dashboard to the Page Info tab as shown in Figure 2-11.
- At the top of the Basic Information interface, you can change the name of your Page by clicking Edit on the right side of the Name field.
You can change the name of your Page until you have 200 likes. After you have 200 likes, you will have to request a name change from Facebook’s Help area, and they aren’t always very responsive.
- Add your Page Address if you haven’t done so in the setup by clicking Enter a Facebook Web Address.
If you already set your Page address in the “Setting Up Your New Business Page” section earlier in this chapter, you can don’t have to worry about this. If you have set it already, you may be able to change it one time, so use that change wisely.

Figure 2-11: The Page Info section of your Page dashboard.
- Select Create a Web Address for This Page.
You’re taken to a new page where you can check the availability of your custom URL.
- If you find one that’s available, click Confirm and then navigate back to the Page Info section.
- Change the Category if desired.
You can change the category of your Page if you find a better match for your business. The fields you have filled out in the About section are ported over to the new fields of the new category as best as possible. Some Categories also have the option to add Topics or Subcategories.
- Modify the Name and Start Info section.
You can change the name of your Page in this space. After you have more than 200 likes, you have the option to change the name just one more time.
The Start Info and date are important to modify. If you use the current day, month, and year, you won’t be able to add anything to the Page’s Timeline from the past. If you think that you’ll have milestones to add with a past date, make the Start date further back than that date. You can also decide whether you want this first date type to be Born, Founded, Started, Open, Created, or Launched. Milestones are explained in Book III of this minibook.
- In the Address section, add a physical address. Or not.
The Address section is important for local businesses.
If you add a physical address in this section, your Page is now a Places Page. You have a new function on your Page where anyone can add a public Recommendation. Think this through. It’s best to use this address space only if you have actual hours when your place of business is open. You will still have the subcategories you chose at the top of the Page, with a few added functions; people can check in to your business and use the Review function.
- In the Short Description field, enter your website URL and promotional or informational text.
The About field is vital. This bit of text is right below the Page’s Profile image. People will be able to see about 155 characters. Make sure that you have an http:// link as the very first thing so that you have a hyperlink to your website or products.
- Fill out the rest of the fields.
The next set of fields depends on your Page type. Fill out all the fields. One of them is the text that auto-populates the invitation that’s generated when you (or anyone) shares the Page.
Generally, the Company Overview or Long Description field is used for this sharing invite. You will check this sharing process in the next chapter, and this is where to revisit to edit the text. Add a lot of keywords in these sections because the About Page is indexed in Google.
- Add an Official Page (Optional).
Fill in this field only if you’re creating a Page about a brand, a celebrity, or an organization that you don’t officially represent. Don’t add any text in this field if this is not the case because Facebook will connect your Page to the Official Page, and it doesn’t make sense for your business to be connected to another Page. In most cases, there is no need to type anything here.
Leave it blank if this doesn’t apply to you.
Now you see the Short Description text below the Profile image and other information, depending on your Page type.
Adding Facebook-built apps
Facebook has a set of apps built for Pages: Photos, Events, Notes, and Video. They may not show up in the featured app space. You need to add them first. (The Photos App is usually added because you’ve uploaded a profile and cover photos.)
Don’t add these apps unless you plan on using them. After all: Why have an Events app showing if there will never be an Event?
Here’s how to add the Facebook apps:
- On your Facebook Page, click the down arrow on the right side of the Page next to the apps.
A second row of blank apps appears.
- Click the + symbol in the upper-right corner of any blank app (as shown in Figure 2-12).

Figure 2-12: Add the desired Facebook apps to your Page.
An Add to Favorites drop-down menu shows the app names. You can click Find More Apps to go to the Facebook Apps Center (covered in Book V).
- Click the name of the app you want to add: Events, Notes, or Videos.
The app appears in your Apps area.
Facebook doesn’t let you change the image or the hyperlinked text at the bottom of these apps. The image is connected to the last item created with that app. The Photo app shows the latest uploaded or tagged image; the Notes app shows a lined paper image with some of the words on the note; the Video app shows a screen shot of your latest video upload; and the Events app shows the image you’ve uploaded to the latest event listing.
The hyperlinked text below these boxes is only Photos, Events, Notes, or Video. You can change the image for any custom apps you add, and you can change the hyperlinked text, too.
Adding custom apps
The next most important task in developing your Page is organizing and adding a few custom apps. We talk a lot about adding apps in Book V, Chapter 1, but here’s a quick overview.
Right below the Cover photo are four featured apps. One of them is Photos, which is a Facebook app — and because it’s a Facebook app, you can’t move it, hide it, or change the hyperlinked text. The latest photo you’ve uploaded or tagged with the Page name is what shows up in this box.
The next three spaces are available to place custom apps. In fact, there are 12 more spaces for custom apps (more on that in a moment), but only a total of four apps show in this featured space. You can edit and modify the hyperlinked text and the image on the app box, and can change their order.
Depending on your business, the type of apps you set here can be different, but most businesses use three main types:
- Email Capture with a Free Gift: If you already use an e-mail list service (such as MailChimp, iContact, or Constant Contact), check to see whether it has a Facebook integration you can use for this app box. If not, you can always grab the HTML code for your sign-up form and place it in this space, using Heyo’s HTML app (https://heyo.com) or an HTML app from any other third party (Involver, Woobox, and so on).
- Event Announcement or flyer: If you have an event coming up or a sales flyer to promote, you don’t have to use the Facebook Event app; you can create a nice Page for your event by using any third-party app that allows you to add an image or HTML code.
- Sales Page: If your sales Page is 850 px wide or less, you can use Thunderpenny’s website app to pull the whole web page into Facebook. You can still use this app if your sales Page is wider, but the sales Page will be shrunk down smaller and may not be readable.
Figure 2-13 shows a Page that uses custom apps.

Figure 2-13: Here’s a great use of custom apps.
Currently, people can see custom apps only when they view your Page on a computer. The mobile view of a business Page through the Facebook app doesn’t show any custom apps. Also, if you create a post with a link to a custom app, and someone taps that link on a mobile app, he or she is just redirected back to the Page’s Timeline or taken to the browser interface. We all hope this changes in the future because many custom apps are important to a business on Facebook.
Make sure that you explore Book V to see how to add custom apps to your Page and Book VIII to see how you can use these apps to market effectively on Facebook.
Posting status updates
Posting a few interesting status updates before you publish your Page so as to populate your Timeline encourages people to stick around after they find your business on Facebook. We suggest adding informational posts about the purpose of your Page and its history, and also some introductory posts about you or your business. You should also include one post with a link to either your website or e-commerce site. Another good idea is to add at least one milestone to your Page, which we discuss a bit later in this chapter.
Posting to your Page is so important that we have an entire minibook devoted to that topic! Book III is a complete discussion of how to use this feature, but to get your Page ready to publish, you need at least a few posts.
On your Page, look for the publishing area, as shown in Figure 2-14.

Figure 2-14: Create posts to your Page.
Follow these steps to create a simple post:
- Click in the What Have You Been Up To? text field.
You also see several icons along the bottom of this space for scheduling, targeting, adding a location, and adding a file. Note that the targeting option only is available after you have 5,000 likes on your Page. Again, refer to Book III for more explanation about these icons.
- Type something interesting.
A complete discussion about posting is in Book III.
- Click Post.
This post shows up on the Timeline. No one will see it until you publish the Page. After the Page is published, you need to create more posts so that they go out into the News Feeds of the people who have liked your Page.
If you created a Local Business Page, you also have the ability to create an offer. We talk about offers in Book III.
Publishing your Page
Before you can invite your Friends and promote your business on Facebook, you need to publish your Page. Your Page is already published automatically when you first created it, but if you unpublished it to work on it first, you do need to publish it again. Here’s how:
- Go to your Page’s Admin panel.
- Click the Edit Page button, and choose Edit Settings from the drop-down menu.
- Click Edit on the right side of the Page Visibility section.
- Clear the Unpublish Page check box.
- Click the Save Changes button.
Now the Page is published. People can find it in a search, and it’s open for people to like.
Editing and adding milestones
One of the best posts for a new Page is a milestone. In fact, when you created your Page, Facebook created your first milestone! When you look at your Timeline, you see that the very first post is a milestone. It may read Founded on (and then the date you created the Page). The first thing you want to do is edit this milestone. If it stays at this point in time, you won’t be able to add any milestones in the past. Therefore, edit the date for this first milestone back before the milestones you want to add later.
Milestones are similar to Life Events on your personal account. They are similar in how they look and are placed on the Timeline structure. Whereas Life Events tell the story of your personal life, milestones help to tell the story of your business.
Creating milestones is fully discussed in Book III, Chapter 1.
Follow these steps to edit the first milestone:
- Find the first milestone: When Was This Founded?
- Hover over the top-right corner, and then click the down arrow and the Edit link that appear.
- Adjust the date to be as far back as you want.
You can also adjust the Milestone type (Opening, Started, Founded, Launched, Born, or Created).
- (Optional) Add the location, story, and upload a photo.
We love stories and photos, and Facebook does, too. Add them and make them as personal as possible, and you’ll get a better response for the milestone. Ideal image size for a milestone is 843 px x 403 px. Add the location if the milestone happened somewhere in particular.
- Click Save.
Now you’re free to add milestones to any date from this one to the present. You can’t add a milestone to a future date.
If you don’t see this starting milestone, when you try to create a milestone, Facebook asks you to create the first one first. Got that? Just go through the prompts, and remember to date it as far back as you can so that you can add other milestones that happened in the past.
Here’s how to create the next milestone:
- On your Page, click inside the publishing area.
- Click Event, Milestone + (or it may be listed as Offer, Event).
A menu opens with these choices: Offer, Event, and Milestone.
- Click Milestone.
See Figure 2-15 for the areas you need to fill in.
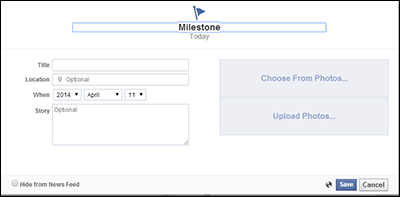
Figure 2-15: These are the fields for creating a milestone.
- In the Title field, add a title.
This becomes the title of the milestone. The large-font title at the top of this interface changes as you fill in this field. The flag icon doesn’t change.
- (Optional) Fill in the location if it’s important to the milestone.
- Add the date.
When you add a specific date, the milestone will attach to the Timeline at that particular date.
- Type the story.
Adding a story makes the milestone much more interesting.
- Upload an image that goes with the milestone.
The ideal image size is 843 px x 403 px.
- (Optional) To hide this milestone from the News Feed, select the Hide from News Feed check box.
- Click Save.
Milestones are formatted as highlights on the Timeline, which means that they span the whole Page from left to right.
Inviting your Facebook Friends
The next step is inviting your Friends to like your Page. We suggest customizing your Page as much as possible (with posts, photos, and apps) before inviting and sharing it, but if you feel that your Page is ready, inviting your Facebook Friends is next.
- Go to your Page as your Personal profile.
Notice that your name is in the upper-right corner of the page.
- On the Admin panel of your new Page, click the Build Audience button (at the top).
When you click that button, a drop-down menu appears.
- Click the Invite Friends link.
A new dialog box appears, in which you can select your personal Facebook Friends to invite them to like your Page.
- To select a Friend, click the Invite button next to that person’s name.
- Continue clicking until you select everyone you want to share your Page with.
Notice the Filter drop-down menu. If you have a lot of Friends, you can filter certain selections (by location or shared group, for example) for easier selection, as shown in Figure 2-16. You can also see who you have already invited and who already likes your Page.

Figure 2-16: Inviting your Friends is easier if you use the Filter drop-down menu.
- Click the Close button.
Your Friends get a generic-looking invitation delivered to their Notifications area.
Inviting e-mail contacts
Your contacts outside Facebook may be a gold mine of people who would benefit from your Page. With the help of the Invite Email Contacts dialog box, you can import the contact info for all the folks you know into a space where you can invite them to your Page.
Keep in mind a few things about this process:
- Only Admins of Pages with fewer than 5,000 likes can import their e-mail lists and invite people on those lists to like their Page, so invite your e-mail contacts before you reach that number.
- Facebook imports your contact file securely. You can suggest your Page to your contacts after that. If you use Gmail, for example, you need to export your contacts in CSV (comma-separated value) format and then upload the .csv file to Facebook.
To import your contacts, go to the Admin panel, and click Build Audience to access the drop-down menu; next, click the Invite Email Contacts link. Doing so brings up the Invite Email Contacts dialog box, as shown in Figure 2-17.

Figure 2-17: You can import your e-mail contacts to tell your Friends and contacts about your new Page.
The idea here is that you can do one of two things:
- Upload a contacts file you put together yourself.
- Have Facebook search your Constant Contact, MailChimp, VerticalResponse, Outlook, Hotmail, AOL, and Yahoo! accounts to find people who are already on Facebook. When you click the Invite Contacts link next to any of those services, type your e-mail address and password, and then click the Find Contacts button.
To help you create a contacts file to upload, Facebook has created instructions specific to whichever mail system you use. When you click the Other Email Service link and type a Gmail address, for example, Facebook presents instructions for exporting your Gmail contacts in a file that Facebook can use.
Then you can select the people you want to invite to your Page. The preview shown in Figure 2-18 depicts how the invitation looks to those whose e-mail address matches a personal Facebook account, as you can see at the top; the bottom shows how it would look if it were sent to an e-mail address that isn’t associated with a Facebook account.

Figure 2-18: Facebook sends a message to your e-mail contacts and invites them to like your Page.
For users already on Facebook, this invitation shows up on the right side of their News Feed as an invitation from your Page. If users don’t have a Facebook account, they get an e-mail suggesting that they join Facebook so that they can like your Page.
Facebook puts Page invitations in a fairly obscure place: www.facebook.com/pages. No one knows to go there, but Facebook has a link at the top of this webpage called Invites with all the invitations that have been sent to you. Currently, it’s the best place to go to see those invitations. Spread the word.
Sharing your Page
To find the Share Page option, go back to the Build Audience menu on your Admin panel. Keep in mind that you can only see this link if you’re viewing the Page as your Profile. The Share Page process looks the same whether or not you’re an Admin of the Page, but non-Admins will access the Share link through the gear icon located below the Cover photo to the right.
No matter where the link is found, when you click the link, the Share This Page dialog box (shown in Figure 2-19) appears. In this dialog box, you can create a nice invitation that you can post to your personal account Timeline, to someone else’s Timeline, to a group Page, to another Page for which you’re an Admin, or to a private Facebook Message.

Figure 2-19: The Share Page dialog box has a few things you need to check before you send out invitations.
Check out a few things before you send invitations:
- Review the autopopulated text. This text is pulled right off your Info tab — generally, the text in the Company Overview field. If you don’t like what’s written here, you have to go back to the Info tab and change the text there. Or you can click the text; an editor interface comes up, and you can type whatever text you want.
Other people will be using this Share function, so you want to enter the text that you want to show up here automatically so they don’t have to edit it. Go back to your Info tab to fix the text if needed.
- Review the image. This image is the Profile image, not the Cover image. If you want something else to show up there, you need to change the Profile image for the Page. It’s not editable from this Share interface.
- Add a message. Make sure that you list the benefits for liking the Page. You can create a nice, little message that’s compelling. You can mention that you have contests and free events — whatever is appropriate for your business.
- Decide where to Share. You can share on your own personal Timeline, on a Friend’s Timeline, in a group, on another Page for which you’re an Admin, or in a private Facebook Message. Click the drop-down menu to choose which one you want.
- Decide whether your shared update will be Public, Friends, one of your lists, or Custom. You can change the viewing filter by clicking the Public icon to reveal a drop-down menu and changing it to a Facebook Friends list or a custom list.
After you review the invitation, click Share Page.
The Buffer button (shown in Figure 2-19) appears because of an app called Buffer, which lets you schedule posts for later. Depending on what types of apps work with Facebook, you may see different sharing options.
Promoting this Page on your website
One of the best ways to have people connect with your business on Facebook is to place a Like Box (a box that can be placed in your website’s sidebar) on your website or blog.
To customize a Facebook Like Box, go to
https://developers.facebook.com/docs/reference/plugins/like-box
You can tweak the Like Box’s design to your heart’s content. When you’re done tweaking, you receive a code to place on your website or blog.
A complete description and instructions are in Book VII, Chapter 2, where all the Facebook social plug-ins are explained.
To be clear, there are social plug-ins, and there are badges. A badge contains a link that takes people back to your Page, whereas a social plug-in allows you to click the Like button for a Page without leaving the website on which the box is placed.
You can create four types of badges for your website. Two types work with your Page: the Like badge and the Page badge. You can find the interface to create them at www.facebook.com/badges. We don’t recommend using badges, however, they’re not helpful in attracting more likes; they don’t contain a built-in Like button, as Like boxes do.
Setting up your mobile phone
Facebook understands that you aren’t always at your desk or computer when you need to post an update to your business Page. If you’re on the go and need to share something with your fans, you can use your smartphone, and in this section, we show you how.
- Return to your Page’s Admin panel.
- Choose Edit Page⇒Update Page Info.
- From the menu across the top, choose More.
A drop-down menu appears.
- Choose Mobile.
Currently, you have three Mobile options:
- With Mobile Email: This option gives you the information you need to upload photos or post updates from your mobile e-mail account. Each Page can have its own Facebook e-mail address, which Facebook creates for you automatically. You can use this address to send e-mails that will post on your Page. If you want Facebook to send this e-mail address to you in an e-mail, click the Learn More button. This new interface lets you choose to have the e-mail sent to the e-mail address of your choice or to your phone. It also lets you refresh the e-mail to create a new one. You can refresh your e-mail only a few times. See Figure 2-20.
Do not share this e-mail address with anyone because whoever has the e-mail address is posting as your Page from their mobile device. It’s almost like giving away Admin privileges to your Page.
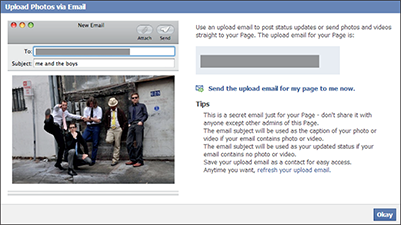
Figure 2-20: Facebook generates an e-mail address for your Page.
When you have the e-mail address in place and want to upload a photo, e-mail the photo to this address, and include a caption in the e-mail’s Subject line. To update your status, write in the e-mail Subject line and leave the e-mail body blank.
- With Mobile Web: This option reminds you how to find your Page when you’re using a mobile browser. Having a username set up simplifies this process. We talk about usernames in Chapter 1 of this minibook. You can also use the Pages App for phones.
- With the iPhone: Facebook continues to update its official app for all iOS devices. If you want to post directly to your Page, it might be better to use the Pages app Facebook developed instead of trying to create a bookmark on your phone, as Facebook suggests in the text currently on this Mobile tab. As with all things Facebook, the text here might change at any moment.
If you have a smartphone with a Facebook app, it’s probably easier just to open the app and post a status update inside the app. If you have an administrative team that will be posting to your Page, make sure that the team members get the mobile e-mail address.
Claiming a Facebook Place
If you have a bricks-and-mortar store, you need to claim your Places Page as it shows up in mobile Facebook. Then you can merge your Places information with your official business Page on Facebook. As we mention earlier, anyone can create a Facebook Place with their mobile phone.
To claim your Place, follow these steps:
- Go to www.facebook.com and search for your business name.
You don’t need to be on a smartphone to do this, but it’s not a bad idea. On your computer, you can use the Search bar at the top of every Facebook screen.
When you’re using the Facebook search bar, you can type Places named yourbusinessname. The unclaimed places typically have a generic icon next to them rather than a profile photo.
- If your business’s Place already exists on Facebook, click or tap it to visit its page.
If it’s a Facebook Places Page that is unclaimed, it looks similar to the unclaimed place shown in Figure 2-21.

Figure 2-21: A Places Page that is unclaimed.
- Click the gear icon in the upper right and choose Is This Your Business?
A pop-up window asks you to verify that you’re an official representative of the physical location.
- Select the I Am An Official Representative of Your Business Name check box (as shown in Figure 2-22). Then click the Continue button.
You see a Verify Page Info page.

Figure 2-22: Claim a Places Page.
- Enter your business information, and click or tap Continue.
Facebook asks you to provide the following information:
- Official name of business
- Business address
- Your job title
- Business phone number (optional)
- Business website (optional)
- Verify your business by providing additional information.
You’re asked to verify ownership through an e-mail or a document-verification process.
Your e-mail address must be a business address (one that has your business name in the domain name). If you choose document verification, you have to provide scanned images of a phone or utility bill that includes the business’s name and address. - Click or tap Submit.
After your claim is confirmed, you own your Place on Facebook. By claiming your Place (even if you already have the information on your regular business Page Info tab), you can manage your Place’s address, contact information, business hours, Profile picture, Admins, and other settings that people see on Facebook mobile.
Merging a Facebook Place with Your Page
After you claim your Place, Facebook may automatically merge the Place with your current Page if they have the same (or similar) Page name and address — but this doesn’t always happen.
To merge the Place and the Page, make sure both addresses match. Wait about a week to see whether they get merged automatically. If they don’t, you can take steps to request a merge because when you merge a Place and a Page, you keep the information, posts, and photos from just one of them. Decide which one you want to keep before you get started. Then follow these steps while logged in as your Personal profile:
- Go to the Page you want to keep. Click Edit Page at the top of the Admin panel.
- Choose Edit Settings from the drop-down menu.
- Select Merge Pages at the bottom of the page.
You can click the Learn More link to read more about merging.
- Click the Merge Duplicate Pages link.
A new page lists the precautions you need to be aware of with merging two pages.
- Select the I Have Read and Understand the Above Information check box.
You get the option to select the Page you want to keep in the merge.
- Choose the appropriate Page from the drop-down menu.
- Select the I Understand These Pages I Merge Must Be About the Same Thing check box.
Now you can select the other Page(s) you want to merge with the main Page.
- Select a Page from the drop-down menu, as shown in Figure 2-23.
You can merge up to five additional Pages with the one main Page, but you have to be Admin of all Pages.

Figure 2-23: Merging a Places Page with your Page.
- Click the blue Send button.
A dialog box thanks you for your submission and says you’ll get an e-mail from Facebook shortly.
Managing Missteps
You may discover that you made a mistake when you created your business Page. Maybe you created your personal Profile for your business instead of a business Page. Maybe you created the wrong kind of business Page and want to change it. Or maybe you created a Profile in your name, but most of your Friends are connected to your Profile because of the business you promote from this account. You can almost always fix your issue — but the sooner you realize and can correct your mistake, the better. It’s always easier to change a Page when you have fewer connections.
Creating personal Profiles with a business name
A misconception that users have is that it’s perfectly okay to create a Profile using a business name (first name O’Grady’s, last name Cleaners, for example). This is completely against Facebook rules. If you committed that misstep, don’t worry: It’s fixable. If you’ve developed an extensive group of Friends under this name, you can either ask them to move over and like your new business Page or change the name of this account to your actual name and activate the Follow button.
Sorting out or deleting a personal Profile set up as a business
If you created a Profile with your business name, you can change the name of your account to your actual name, as long as you don’t already have a personal account in your name. (If you already have a personal account with your real name, you’ll need to ask people to move to your business Page and then delete this account.) Follow these steps:
- Go to your Profile’s Account Settings by clicking the drop-down arrow in the top-right corner of your Facebook Page.
Or go directly to www.facebook.com/settings.
- Click the Edit link to the right of Name.
- Change the name to your actual name.
- Enter your Facebook password.
- Click Save Changes.
Alternatively, build your new, honest-to-goodness official business Page and then add a status message regarding the change to the original personal Profile you created for the business. The new status update should give your Friends the URL to the new business Page and explain that you created a new business Page to conform to Facebook guidelines. Tell them that you hope they’ll join you over there and like the Page.
If you created this Profile under the business name and won’t be changing the name to your actual name, you can also tell Friends that you’ll be deactivating the current Profile Page and explain what they can find at the new business Page (such as coupons, special deals, updates, and so on). You’ll likely need to post this status update several times before people migrate over. We suggest setting a deadline for moving to the new business Page so that your connections will know exactly when you’ll deactivate the business-name Profile Page.
If you go this route, make sure to designate your real personal account an Admin of the business Page before you delete the rogue personal account. Otherwise, you won’t be able to get back to the new business Page.
If you created a Profile in your real name but promoted your business from there, you can keep the original personal Profile as your personal account, activate the Follow button (as we describe earlier in this chapter), and post Public updates to subscribers.
Here’s a sample of a post that Jane wrote, asking her Friends to move over to her business Page:
- Hi everyone, I have a new Page for my new CD of contemporary lullabies, “Midnight Lullaby.” This project has been a long time coming, and I’m hoping you can check it out and click the Like button. Here’s the link: www.facebook.com/ladylullabymusic. I plan to add many things to this new Page, but for right now please Like it, and I’ll keep you posted from there. This new Page is where I will be spending my time on Facebook, so if you want to connect with me, please do it from there.
- Thank you!
- Jane (Jane Roman Pitt) www.facebook.com/midnightlullabyCD
She decided to keep her original Profile because it was under her name but moved all her posts about her business to her new Page. She had already created a vanity URL for her personal Profile with her CD’s name, which couldn’t be modified at the time.
If you set your personal account username to be your business name, you might be able to change it. Go to your Settings, and then General. If you can change it, the interface to do so will be there. If you have already changed it once, you will not be able to change it again.
Migrating your Profile to a Facebook Page
If every one of your friends on your Profile is truly interested in your business, you can migrate your Profile to a Page. All your friends will become fans of the new Page, but that is all. Your posts, photos, and Group memberships will be gone so be careful if you go this route!
To start the process, go to
https://www.facebook.com/pages/create.php?migrate
Then continue the Facebook Page setup as outlined in the first part of this Chapter.
Deleting a Personal account
Follow these steps if you decide to delete your personal account with the business name, but remember: You must have a personal account to have a business Page. So if you delete the personal account instead of changing the profile name to your real name, you’ll need to open another personal account before you open a Page.
If you already have a personal account, make sure to assign your real account the role of Page Admin before you delete the incorrectly created personal account.
Follow these steps:
- Log in to Facebook with the e-mail you used to create your business’s personal account.
- Click the down arrow in the top-right corner of your Page.
- Choose Settings from the menu.
- On the left menu, choose General.
On the bottom of this page you can download a copy of your Facebook data. If you do, click the link and follow the steps to create an archive of this personal account’s photos, posts, and messages.
- After downloading the data (optional), go back to the left menu under Settings and choose Security.
On the bottom of this page, look for the Deactivate Your Account link.
At this point, if you’re sure you won’t need this personal account, you can completely delete the account (instead of deactivating) by going to www.facebook.com/help/delete_account.
Otherwise, Deactivating leaves the door open to bring the personal account back at any time by logging in with this account’s e-mail and password. Deactivating hides all the data from this account, and keeps it in a drawer in Texas somewhere.
- If you Deactivate, click the link on the Security tab and go through the process. Otherwise, go to Step 7.
- If you decide to Delete, go to www.facebook.com/help/delete_account.
- After you deactivate or delete your personal account with the business name, sign in to Facebook with your new (or regular) personal account, go to your new official business Page, and start interacting with your connections! Welcome them to your new space, and encourage them to interact with you.
Changing your business Page type or name
Sometimes, people make a business Page and realize that they’ve made a mistake. Maybe they chose the wrong type of business Page, or they want to change the name of the Page or the category that’s associated with the Page. You can change the category or type of Page at any time, but you can change a business Page’s name only if fewer than 200 people like the Page. Sometimes, Facebook allows Pages with more than 200 likes to change their name, but this seems to be a random event.
To make those types of changes, follow these steps:
- Log in to Facebook.
- Go to your Page.
You can find your Page quickly by looking in the left menu while viewing your personal account news feed.
- In the Admin panel, click Edit Page; then click Update Page Info.
You arrive at the Basic Information tab, shown in Figure 2-24.

Figure 2-24: Change or modify a Page category or name here.
You can edit the category, subcategory, and name of your business Page. When you click the Category field, you see two drop-down menus. You can take any of the following actions to make desired changes:
- To change the category of your business Page: Click the first drop-down menu, and make your choice.
- To change the subcategory of your business Page: Click the second drop-down menu, and make your choice.
- To change your business Page name: Click the Name field, delete the existing name, and retype the new name. The new name appears as the title of your Page but won’t change your vanity URL (username).
If you have more than 200 likes but must change your business Page name, Facebook sometimes puts a Request a Change link in the Name field where you can go through the process of changing it one time. The only other recourse is to delete the original Page and start from scratch. We sincerely discourage you from doing this because you’ll lose all of your likes (connections) and will have to re-create your community from scratch. Also, changing your name after you have more than 200 likes may be confusing for your audience.
If you must delete your Page, however, follow these steps:
- Log in to Facebook.
- Find your Page name in the left menu.
If you don’t see the name of your Page, click the More link to see the list of all your Pages.
- Click the Edit Page button.
- Choose Edit Settings from the drop-down menu.
- Click the Remove Page link at the very bottom of the Page.
Another link appears: Delete <page name>.
- Click the Delete <page name > link.
A confirmation dialog box asks whether you really, really want to do this. After all, this deletion is permanent.
Any Admin can delete a Page that he administers. Please delete with caution, though, because you absolutely can’t bring back a deleted Page. - Click Delete.
Your Page is history.