
Chapter 4
Connecting Your Page to Twitter
In This Chapter
![]() Connecting to Twitter in various ways
Connecting to Twitter in various ways
![]() Using HootSuite to manage your accounts
Using HootSuite to manage your accounts
![]() Exploring other posting tools
Exploring other posting tools
![]() Adding a Twitter tab to your Facebook Page
Adding a Twitter tab to your Facebook Page
You likely know what Twitter is and how to use it. You may not have heard of HootSuite and Buffer, though, or know how to use them to your advantage when you coordinate your social networks in tandem with Facebook marketing.
Bottom line: In this chapter, we show you the benefits (and a few considerations) of connecting your Facebook presence with Twitter to complement and diversify your Facebook marketing campaigns. And, yes, we also show literally how to connect these so you can put them to best use.
 Some of these third-party applications may not get the same visibility as a traditional post that you put straight on your Timeline. Posts that come into Facebook via Twitter and the other apps mentioned here are sometimes hidden with other posts coming in from the same application, but at this writing, we did not find that to be the case. Watch your News Feed to see how the posts are being shown.
To Connect or Not to Connect
So do you want to tweet everything you post to your Page, post to your Page from Twitter, or update simultaneously? More important, should you? First, consider the implications of linking the two accounts.
Most social media thought leaders agree that posting in both Twitter and Facebook all the time isn’t a good idea because your Facebook community is different from your Twitter community; it expects different things. Twitter typically has more quick interactions and conversations, whereas a Facebook community expects fewer updates and more threaded conversations.
Also, if you’re participating on other social media sites, we recommend connecting them with your Facebook Page because people on Facebook may not be aware of where to find you on YouTube, Pinterest, Twitter, or LinkedIn. And adding your other accounts can give your users a richer experience through SlideShare presentations and YouTube videos. (Find out more about adding these apps in Book V, Chapter 1.)
To help you coordinate all your social networks, consider using a tool like HootSuite to simplify your life by creating a single dashboard where you can monitor your various social profiles and update from one place. You may also want to consider some of the other posting and scheduling tools mentioned in this chapter to help create a steady stream of good content for your audience.
Connecting Facebook and Twitter
How to connect Twitter and Facebook? Let us count the ways! There are many ways to link your Facebook Page to your tweets. (For those of you who aren’t familiar with Twitter, a tweet is equivalent to a status update in Facebook, but it’s only 140 characters long.) Here are some of the options for connecting Facebook and Twitter, each of which we cover in detail:
- En masse: Send every post on your Facebook Page to your Twitter account automatically.
- Selectively: Update Twitter and Facebook simultaneously or individually by using a tool like HootSuite, Sprout Social, SocialOomph, or Buffer.
Linking your Facebook Page to Twitter
If you want to send everything that you put on your Facebook Timeline to Twitter, you can do that easily and automatically through Facebook. This isn’t a bad thing to do because typically, you’re posting to your Facebook Page less frequently than you post to Twitter. Also, the Twitter community accepts more-frequent posts than the Facebook community does.
 Just keep in mind that Facebook status updates can be 60,000 characters long — way longer than the 140-character limit of a tweet. In a bit, we’ll show you how to handle that limitation.
Sending all your Facebook updates to Twitter can be a good way to connect your community on Twitter to your Facebook Page. Just be mindful that some people don’t like the duplication with Twitter and Facebook: If you’re going to tweet, just tweet as Twitter was meant to be used, without trying to fit more than the original 140 characters into your tweets.
That said, you must decide what is right for you and your brand. Automation between Facebook and Twitter can be a good thing for the following reasons:
- Saves you time
- Adds more content to your Twitter feed
- Can bring your Twitter community to your Facebook Page
To make the connection, log in to your Facebook Profile. (Logging in as your Page doesn’t work with these steps.) After you’re in the application, specify the Page where your tweets will be sent. Just follow these steps:
- Go to www.facebook.com/twitter.
You can open a new window in your browser or just type the URL in your browser window. You see the screen shown in Figure 4-1.

Figure 4-1: Send your Facebook Page updates to Twitter.
- Click the Link a Page to Twitter link, located just below the Link My Profile to Twitter button.
You go to a screen that shows the Pages where you are an Administrator.
- Click the Link to Twitter button next to the Page you want to link.
You go to Twitter to authorize this action; what you see is shown in Figure 4-2. If nothing happens when you click the Link to Twitter button, your pop-up blocker may be blocking the access to the site, and you may need to allow access.
If you’re not logged in to your Twitter account, you’ll be asked to log in at that time to authorize the postings. But if you are logged into Twitter, make sure you’re logged in to the Twitter account that you want to link to that Facebook Page, rather than a different one!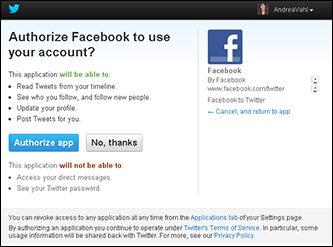
Figure 4-2: Twitter requires that you authorize the postings from your Page.
- Click the Authorize App button to allow posting to your Twitter account.
You’re redirected to Facebook, where your Page is now confirmed to be linked to Twitter, as shown in Figure 4-3. You can select exactly the types of posts you want to tweet.
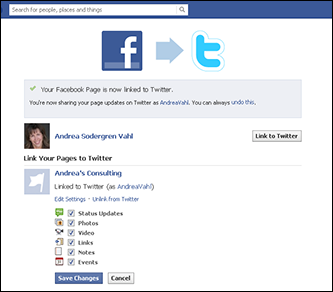
Figure 4-3: Your Facebook Page and Twitter are now linked, and you can select what to send to Twitter.
- Clear the check boxes of the items you don’t want to send to Twitter.
- Click Save Changes.
If you ever decide to stop tweeting your Page posts, just go back to www.facebook.com/twitter and click the Unlink from Twitter link to stop the tweeting. You can also use this link to change the settings of what is tweeted out, as shown in Figure 4-3.
Seeing what happens to too-long tweets
As we mention earlier in this chapter, status updates in Facebook are potentially longer than the ones allowed in Twitter. So what happens if you post something in Facebook that’s too long to tweet, but you have Facebook and Twitter linked? Well, Facebook automatically cuts off the tweet and posts a link to the actual Facebook update so that someone could click it to read the entire post.
Figure 4-4 shows a too-long tweet that was sent from a Facebook Page.

Figure 4-4: A too-long tweet sent from Facebook.
Someone following the post on Twitter who wants to read the rest of that sentence just clicks the link at the end of the tweet to be taken to the Facebook update, as shown in Figure 4-5.
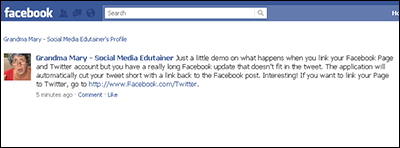
Figure 4-5: The whole status update is now visible within Facebook.
Notice in Figure 4-5 the two links that the person viewing the tweet could click to go to your Facebook Page:
- The link preceding the status update that reads Grandma Mary – Social Media Edutainer
- The link above the status update — in this example, Grandma Mary – Social Media Edutainer’s Profile
If there is a link in your update, the person who clicks the link in Twitter may not get to your Facebook Page to read the rest of the update but instead go directly to the site of the attached link.
Using HootSuite to Update Facebook
HootSuite is a free, web-based app you use to manage multiple social media accounts. Because it’s web-based, you can run the application from its website and have access to it from any computer. HootSuite also has a mobile app for your smartphone, which retains all your settings from the web application so that you can post on the go.
HootSuite was initially designed mainly for Twitter, but you can also use it to update multiple other social media platforms at the same time, such as LinkedIn, Facebook, Google+, and Foursquare.
Don’t post a lot of Twitter-specific lingo to your Timeline, such as messages with @reply or tweets with hashtags in them. Your Facebook community may not be on Twitter and won’t understand all the symbols and messages. And although Facebook does now include the use of hashtags, most Facebook users don’t use them in every post, only occasionally.
Walking you through the entire setup of HootSuite is beyond the scope of this book, and the install is pretty intuitive. We just want to show you how you can align your Facebook accounts with this applications and how it works.
HootSuite is a free app, but it does have some nice perks if you upgrade to its paid Pro Plan at $8.99 per month. The Pro Plan includes features such as the ability to adding more than five social media accounts, the ability to have a team member monitor the same social media accounts, and Google Analytics integration.
To start using HootSuite, go to www.hootsuite.com. Enter your name and e-mail address, choose a password, and then click the Create Account button to get started and walk through the configuration steps.
With HootSuite, you can add multiple social profiles. You may have added your profiles during the setup process. But if you didn’t, do so now by clicking your picture icon in the top-left corner of the page and then selecting Add a Social Network in the boxes on the lower part of the tab, as shown in Figure 4-6.
A dialog box like the one shown in Figure 4-7 appears; you can add your various social profiles by selecting the sites on the left side of the dialog box, as shown in the figure. With the HootSuite tool, you can update Twitter, Facebook, LinkedIn, Google+, WordPress, Mixi, and Foursquare. You can add your Facebook Profile as well as any Facebook Page that you administer. Having your Profile and Facebook Pages all in one place with HootSuite means that you can do all your updating in one place. You can also see your News Feed and comments within HootSuite.

Figure 4-6: Add social profiles to HootSuite here.
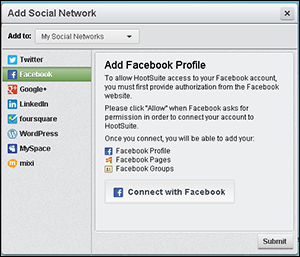
Figure 4-7: Configuring your social networks in HootSuite.
Figure 4-8 shows what the HootSuite dashboard looks like. The Compose Message field (top-left corner) is where you enter your status update for Twitter, Facebook, LinkedIn, or some combination of all these websites.

Figure 4-8: The HootSuite dashboard.
Next to the Compose Message field is a series of icons, all indicating the social media profiles that you can update at the same time. In Figure 4-8, left to right, are social media profile pictures with small icons for Twitter, Facebook, Facebook Page (a flag), and LinkedIn. The icons appear in the bottom-right corner of the pictures.
Suppose that you want to post a message and send it to your Facebook Profile, your Facebook Page, Twitter, and LinkedIn at the same time. You could click to select each of those profiles, enter your message, and then click Send Now to update all your profiles simultaneously, as shown in Figure 4-9. Note the Facebook preview link below your post when you check any of your Facebook Profiles. This preview link gives you the ability to customize the photo you attach to the post, just as you can do when you post a link in Facebook directly. Make any adjustments to the post and then click Send Now.
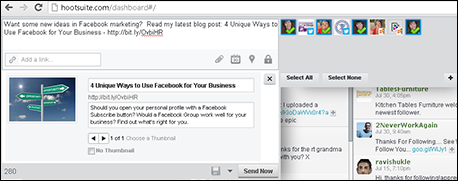
Figure 4-9: Click the profiles you want to update with the same message.
HootSuite can also schedule your status updates. If you’re going to be gone for the day or for a vacation, you can schedule a few updates to post to your social profiles when you’re gone. HootSweet!
Scheduling updates is good for your business so that you aren’t completely out of sight while you’re gone. Many businesses even let their community know that they will be gone but will be posting useful content or some of their best past blog posts. This technique is a good practice because your community members will know not to expect immediate return messages if they respond to a posting.
To schedule a post with HootSuite, compose your message just as you would a normal message; select the social media profile(s) to which you want the message to be sent; and then click the calendar icon below the update window, shown in Figure 4-10, to choose the time and date to send the message.

Figure 4-10: Click the calendar icon to schedule your message.
After you have the time and date set, click the Schedule button, which replaces the Send Now button.
Using Other Posting Applications
Many other applications are available that post to your Facebook Profile, your Page, and other social media profiles from one place. In fact, there are so many ways you can post to multiple social media profiles at once, that we can’t possibly list them all. All the applications have different features — some include automatic scheduling, some have statistics, and some have bulk uploading.
Understand that this isn’t an exhaustive list and that you have to choose which features are most important to you. Some of these applications are free, and others have a monthly fee. Many of them offer a few features for free but more options with a paid subscription.
SocialOomph
This web-based tool (available at www.socialoomph.com) focuses mainly on Twitter, but the paid version lets you update Facebook Profiles and Pages. As of this writing, the paid version is $17.97 every two weeks (a little different than your traditional weekly or monthly billing cycles), but some of the features are quite useful, as shown in Figure 4-11.
For example, you can bulk upload a file of posts and schedule them. Or you can use posts into a set of status queue reservoirs so that you always have posts to draw on when you need them. You can reword the post a bit and post it out again for some of the “evergreen” content on your website.

Figure 4-11: Use SocialOoomph for bulk uploading posts and recycling posts.
Buffer
This tool, available at www.bufferapp.com and shown in Figure 4-12, can schedule your posts to your sites a few different ways. You can either
- Let the application decide when to post based on times that it determines are the optimal times to share content for your audience. For example, if your audience is more active in the evening, your posts can be sent in the evening.
- Program the times to post the content for each social site. For example, you can program that you want four tweets per day going out at 7 a.m., 11 a.m., 1 p.m., and 4 p.m. You can also select that you want two Facebook posts per day: one at 9 a.m. and one at 2 p.m. Now you can “fill your buffer” with content, and the application puts the posts in the appropriate time slots for each social site. You can also program different posting schedules for each day of the week. Pretty slick!

Figure 4-12: Use Buffer to schedule your posts at particular times.
One other cool feature of Buffer is the available Chrome extension. If you’re using Chrome as your web browser, you essentially click one button at the top of the browser to add an item to your Buffer contents. So if you’re browsing around the web and you find an interesting article that you know you want to share to your social sites, just click the button, and a pop-up appears to add the content to your Buffer. Okay, it’s really two clicks, but having a second click ensures that you really want to share the content.
After the Buffer free trial, plans start as low as $8.50 per month.
Sprout Social
This tool, available at http://sproutsocial.com, also offers some helpful reporting features that you can use to automatically create shareable reports regarding your social media activity and growth. See Figure 4-13. The reports are especially useful if you’re managing someone else’s Facebook and/or Twitter accounts so you can easily show what has happened over the last month with their accounts.
You can monitor different “feeds” for content like a Twitter list, RSS feed, or LinkedIn news feed and then share posts from those Feeds. Sprout Social has a free trial and then starts at $39 per month.
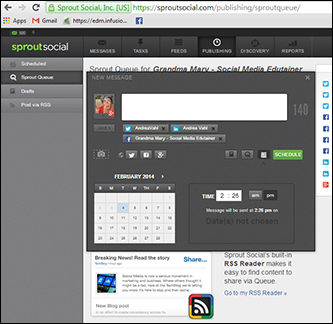
Figure 4-13: Use Sprout Social for scheduling and posting as well as reports.
We’ve touched on only a small sample of the posting clients that are available. More are being added every day! Some of these clients have analytics that track your followers, keywords, and retweets or give you the ability to schedule your updates in the future. Some have free features; others are available for a subscription price.
Adding a Twitter Tab to Your Facebook Page
Another thing you can do to connect Facebook and Twitter is add a custom tab to your Facebook Page that shows your recent tweets. (We cover adding applications more extensively in Book V.)
Adding an application like this can be a good way to add a little pizzazz to your Page and to let people know about your Twitter profile. You can use a few applications to showcase your tweets, but Woobox is one of the best options — and it’s free! Another notable option for adding a Twitter tab is TabSite.
To install the Woobox Twitter application, just go to www.woobox.com, and follow these steps:
- Click the green Get Started for Free button.
If you’re not logged in already, you’re prompted to log in to your Facebook account.
- Log in to Facebook.
You may be prompted to allow Woobox to manage your Pages and allow access your profile. If so, click Allow, and you’ll go to the Woobox dashboard.
- Select Static Tabs at the top of the page.
You see a list of all your tabs.
- Select Create a New Tab, as shown in Figure 4-14.
A drop-down menu appears.

Figure 4-14: Select the Twitter Tab to add to your Page.
- Select Twitter Tab.
You’re taken to a screen to customize the tab, as shown in Figure 4-15.

Figure 4-15: Add the features you want on your Twitter tab.
- Enter your Twitter username in the box, make any other changes, and then click Save Settings, as shown in Figure 4-15.
You don’t have to add the @ symbol in the text box. Just add your Twitter username.
Your Twitter tab is added to your Page. You can view it by clicking View Facebook Tab on the upper left.
You can also see your Twitter tab in your list of apps under the More link below your cover photo on your Page. You may want to switch the order of the applications or include a custom Cover photo. See Book V, Chapter 1, for information on how to do this.