
Chapter 3
Importing Your Blog Posts into Your Facebook Page
In This Chapter
![]() Obtaining the web address of your RSS feed
Obtaining the web address of your RSS feed
![]() Deciding which Facebook application to use to import your blog
Deciding which Facebook application to use to import your blog
![]() Installing and configuring the NetworkedBlogs application
Installing and configuring the NetworkedBlogs application
![]() Looking at Social RSS
Looking at Social RSS
![]() Exploring RSS Graffiti
Exploring RSS Graffiti
![]() Using the dlvr.it tool
Using the dlvr.it tool
If you have a blog, the easiest way to add new content on your Facebook Page is to import your blog posts. Easier yet would be getting this job done automatically.
You’re in luck because several Facebook applications (and some web-based tools) are available for doing just that. When you post something new on your blog, the application automatically creates a new entry on your Page, which in turn goes out to the News Feeds of people who like you. This automation means one fewer task for you after you post a new blog entry.
In this chapter, we tell you how to use four of the most popular applications for importing blog posts to your Facebook Page. Each application requires your RSS feed’s URL, so the chapter starts by telling you how to find that URL.
Importing your blog automatically saves you time and hassle. Luckily, you have lots of choices how. Try one. If it doesn’t work for you, you can always stop that application and install a different one.
 We believe that manually is the best way to post your blog posts. You have more control over how the post appears and it doesn’t take that long. But we also know that a few time-saving devices are always welcome.
Getting the Address of Your RSS Feed
No matter what blog-import application you decide to use, you need to know the web address, or URL, of your blog’s RSS feed. RSS, which stands for really simple syndication, is a standard used on the Internet to pull information from websites in an organized manner. It pulls only the text, leaving all the fancy graphics that appear on your blog behind.
Your RSS feed address is typically something like this: www.YourWebSite.com/feed. Depending on how your website is set up, though, this address could be something quite different. If you don’t know the address of your RSS feed, check with your web developer. If that’s not an option, here’s a handy trick for discovering your feed address.
On Internet Explorer
If you’re using Internet Explorer, follow these steps to find your RSS feed address:
- Go to your website or blog in Internet Explorer.
Above the website is the orange RSS icon, as shown in Figure 3-1. If the icon is gray, the browser can’t find an RSS feed on your site, and you need to contact your web developer (or you may want to try one of the other methods listed here).

Figure 3-1: The RSS icon appears in orange above your website.
- Click the main RSS feed listed (if you see more than one).
In Figure 3-1, Amy’s blog also shows the Comments feed for all the comments posted on her blog. You’re taken to the view of the RSS feed, and the address for that feed displays in the browser address window.
On Firefox
If you’re using Firefox, follow these steps to find your RSS feed address:
- Go to your website or blog in Firefox.
- Click Bookmarks on the menu bar.
A drop-down menu appears.
- Mouse over the Subscribe to This Page option.
A submenu appears.
- Click the main feed.
The RSS feed opens in a new window, and the address of the feed displays in the browser’s address bar.
In HTML code
Another handy trick for finding the RSS feed is looking at the HTML code of the website. You can do this in any browser although the steps may vary, depending on your browser. In this section, we offer the steps for several browsers.
If you’re using Firefox
- Go to the website or blog.
- Right-click anywhere on the page.
A drop-down menu appears.
- Choose View Page Source.
A new window opens, showing the HTML code.
If you’re using Internet Explorer
- Go to the website or blog.
- Click Page on the menu bar.
A drop-down menu appears.
- Choose View Source.
A new window opens, showing the HTML code.
If you’re using Google Chrome
- Go to the website or blog.
- Click the menu icon (three bars) in the top-right corner.
A drop-down menu appears.
- Choose Tools.
A drop-down menu appears.
- Select View Source.
A new tab opens, showing the HTML code.
If you’re using Safari
- Go to the website or blog.
- Click the page icon in the top-right corner.
A drop-down menu appears.
- Choose View Source.
A new window appears, showing the HTML code.
When you’ve opened the tab or window containing the HTML code in any of the browsers, press Ctrl+F (![]() +F on a Mac) on your keyboard to search for a phrase. Enter rss to find the RSS feed address. Using Amy Porterfield’s website as an example, you find the following when you search on the term rss:
+F on a Mac) on your keyboard to search for a phrase. Enter rss to find the RSS feed address. Using Amy Porterfield’s website as an example, you find the following when you search on the term rss:
<link rel="alternate" type="application/rss+xml" title="Amy Porterfield | Social Media Strategy Consultant RSS Feed" href="http://amyporterfield.com/feed/" />
The RSS feed address is right after the href= term and is http://amyporterfield.com/feed/.
Introducing the Facebook Blog-Import Applications
After you have the address of your RSS feed (as we discuss in the previous section), you’re ready to begin using one of Facebook’s applications to import your blog. But which one? Here’s a list of some ways to import your blog into Facebook automatically:
- NetworkedBlogs application
- Social RSS application
- RSS Graffiti
- dlvr.it
These applications were developed by third parties (not Facebook). All these applications have some benefits, and deciding which one to use is a matter of preference. As a metric, the number of users can indicate popularity. NetworkedBlogs has more than 100,000 monthly users, Social RSS has more than 10,000, and RSS Graffiti has more than 100,000. dlvr.it doesn’t have a use statistic available.
To help you decide which application is right for you, the following sections describe each application, show you how easy it is to set up, what features it has, and what the imported posts look like. All these applications are free although Social RSS has a paid option that provides a higher level of service.
Using the NetworkedBlogs Application
NetworkedBlogs is one of the most popular methods of importing your blog posts into your Page automatically. You import your blog into both your Page and your Profile. After you import your blog, a tab appears on your Page that contains your previous posts for people to reference; see Figure 3-2.

Figure 3-2: Your blog posts are stored on a tab when you use NetworkedBlogs.
Clicking one of these links takes a viewer directly to that blog post. Each post is also posted on your Timeline automatically (if you choose automatic posting) and looks similar to the one shown in Figure 3-3. The first few lines of the blog post, as well as a picture from the post, are pulled in automatically. You can tell where the post came from by the note below it (“via NetworkedBlogs”).

Figure 3-3: See where the post came from.
If you don’t have a picture embedded in your post, the NetworkedBlogs application displays a screen shot of your whole blog as the thumbnail picture next to your Timeline post.
Registering your blog on NetworkedBlogs
The NetworkedBlogs application can be a little tricky to navigate, but it has a good frequently asked questions (FAQ) section that can help you through the process. Your first step is to register your blog by following these steps:
- Log into Facebook as your personal Profile.
- Go to http://www.networkedblogs.com/ and click Get Started Now.
You may have to click through a couple of pages that ask you to follow some initial blogs. You don’t have to follow them. Click Next at the bottom of the Page.
- Click Allow to allow NetworkedBlogs to access your Facebook profile.
Remember that you choose where NetworkedBlogs will publish your content.
- Click the Register a Blog link at the top of the page.
A new page appears.
- Enter the home page of the blog and then click Next.
You’re taken to a page where you fill in the information about your blog, as shown in Figure 3-4.
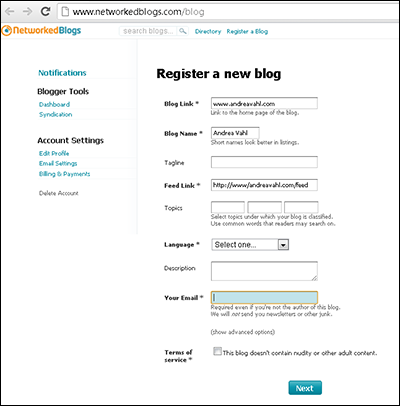
Figure 3-4: Fill in this information for your blog.
The items with asterisks in Figure 3-4 are mandatory; everything else is optional. You can edit any of this information later. Use these tips for filling in this information:
- Blog Link: The link to the home page of the blog.
- Blog Name: The title of your blog. Keep it short.
- Tagline: A little more space to tell people what your blog is about.
- Feed Link: The RSS feed link for your blog. (See “Getting the Address of Your RSS Feed,” earlier in this chapter.)
- Topics: Three keywords that indicate what your blog is about. These keywords can be any keywords that people who use the NetworkedBlogs app might use in searching for blogs that they’re interested in.
- Language: The language your blog is written in.
- Description: A description of your blog. What you enter here shows up in the NetworkedBlogs directory, so make it interesting, and tell people why they’d want to read your blog.
- Your Email: For NetworkedBlogs verification. You don’t receive e-mail from NetworkedBlogs.
- Terms of Service: An agreement that the blog doesn’t contain nudity or other adult content.
- Click the Next button at the bottom of the screen (refer to Figure 3-4).
A new screen asks whether you’re the author of the blog for which you just entered information.
- Click the Yes button.
Another screen appears, which determines the method you want to use to verify that you’re the owner of your blog.
- Choose a method to verify your ownership of the blog: Ask Friends to Verify You or Install the Widget.
You can have your Facebook Friends verify that you own the blog; if you select that option, you can select nine Friends and send the request for verification to them. The problem with this option is that not everyone sees that request in her notifications (people don’t always know to look there), so your verification can take a long time. The better option is to use the widget to verify ownership, if you can.
Verifying ownership of your blog
If you select the Ask Friends to Verify You option, a screen listing all your Facebook Friends appears, and you can select who gets a request to verify that you own your blog. After you select the Friends who will verify the ownership of your blog, you’re done. You can move to the next section on setting up syndication.
If you choose the widget to verify ownership, you just need to install this widget temporarily until the NetworkedBlogs application verifies that you put the widget on your blog; you get a notification; then you can remove the widget. You may choose to keep the widget to promote the fact that you’re part of NetworkedBlogs. If you keep the widget on your website, people can click the Follow This Blog button to follow your blog through the NetworkedBlogs app.
If you install the widget, you’re taken to the screen shown in Figure 3-5.

Figure 3-5: Choose Option 1 or Option 2.
Continue by following these steps:
- Choose Option 1 if you have a self-hosted WordPress blog or Tumblr or Blogger; choose Option 2 if you have your blog on WordPress.com, Drupal.com, or Posterous.com.
The code in Option 1 is for sites that allow JavaScript; the code in Option 2 is for sites (such as WordPress.com) that don’t allow JavaScript.
A self-hosted blog typically is on a site where you pay for hosting. The WordPress.com, Blogger.com, Drupal.com, and Posterous.com sites will host your blog for free, but they have some limitations. - Highlight the code for the appropriate option and press Ctrl+C (
 +C on a Mac).
 - Click the blue Click Here for Instructions link, shown in Figure 3-5.
A new window displays instructions for different platforms.
- Follow the instructions to install the code.
- Click the blue Verify Now button.
If you installed the widget correctly, you get a Verification Successful message. You can remove the NetworkedBlogs widget or badge, if you want.
Setting up syndication
Syndication tells NetworkedBlogs where you want your new blog posts to be posted in Facebook (and NetworkedBlogs can automatically tweet your new post, too). Syndication is a great tool to help you automate sending your blog content to Facebook and Twitter.
To set up your syndication, follow these steps:
- Click the Blogger Dashboard link in the top-right corner of the NetworkedBlogs application.
- If you’re using the application for the first time, click the Grant Permissions button.
A pop-up window asks you to allow the NetworkedBlogs app to post on your behalf and access your data. This request can look daunting, but the app is reputable.
- Click Allow.
You see your Blogger dashboard.
- Click Syndication in the left sidebar.
You see a drop-down menu with your blog and the places you want to send your post listed.
- From the drop-down menu, choose the blog you want to configure.
- Add Facebook targets and/or Twitter targets, as shown in Figure 3-6.

Figure 3-6: Click Add Facebook Target to select your Facebook Profile or Page.
You can also customize the post by clicking the Customize Post button at the bottom of the Syndication page (as in Figure 3-6). You can specify whether to include an image; we highly recommend that you do. You can also choose whether you want to hide the NetworkedBlogs toolbar when people navigate to your post from the NetworkedBlogs link. The toolbar can make it easier for people to share, but the choice is up to you.
If you get stuck, the NetworkedBlogs application has a support page at www.networkedblogs.com/help.
After you successfully configure your NetworkedBlogs application and post a new blog post, the application automatically sends the post to your Page or personal Profile (depending on how it’s configured). The post usually appears within a few minutes after you post to your blog, but we’ve seen it take as long as an hour. Just be patient if you don’t see it right away.
If your blog post isn’t updated in the NetworkedBlogs application, you have to click a Pull Now button to find any new blog posts on your blog and bring them into the application. To do so, go to the Blogger dashboard, click the name of your blog on the dashboard, and then click the Pull Now button shown in Figure 3-7.

Figure 3-7: Click Pull Now if your blog post hasn’t been brought into the application automatically.
Reposting a blog post with NetworkedBlogs
You can repost any of your old blog posts by clicking the Quick Publisher link below the post (refer to Figure 3-7). Just follow these easy steps:
- Click the Quick Publisher link.
A pop-up window appears.
- Select the target (where you want to send the blog post) by clicking the Publish To field.
You can select multiple targets.
- Select the post to send by clicking the Attach a Post from My Blog button.
A drop-down menu appears, listing your blog posts, as shown in Figure 3-8.
- Choose one from the list and then click the blue Publish button.
The post is sent.

Figure 3-8: Select which blog post you want to send to your networks in the Quick Publisher.
We recommend reposting some of your blog posts from time to time if they’re still relevant and helpful to your audience. New people who are coming to your Page won’t have seen all the posts when they first came out. Even longtime members of your community may have missed a post or didn’t have a chance to read it, so they’ll welcome the opportunity to view helpful posts. As long as you use the reposting feature prudently, it’s a good thing to do occasionally.
Many people ask whether they should post their business blog to their Profile as well as their Page. Our recommendation is that you should, unless you feel very strongly about “bothering” your Friends and family members. You probably aren’t posting to your blog that often, and your Friends and family should know what you’re doing in your business. Many referrals can — and should — come from your Friends and family, and seeing a blog post may spark a connection for them to share your post with one of their Friends.
Adding the NetworkedBlogs tab to your Facebook Page
NetworkedBlogs allows you to add a tab to your Facebook Page to display your blog posts, as shown in Figure 3-2. This paid feature costs $9.99 per month or $99 per year. The nice thing is that having a tab with all your blog posts on it gives your Facebook fans easy access to your blog from Facebook without having to go elsewhere.
Some people decide to use only NetworkedBlogs as a way to import their blog posts onto a Facebook tab, and they don’t use NetworkedBlogs to automatically post to their Page. But if that’s all you’re looking for, you may want to consider another free app that does this, such as Social RSS or TabSite.
 Manually posting your new blog post to the Timeline gives you more control of how the post looks and of the commentary that goes along with the post. Ultimately, you have to weigh the benefit of automation against the benefit of manually posting something that could be a bit more engaging because of the personal touch you add.
If you want to add a blog tab to your Page with NetworkedBlogs, follow these steps:
- Go to the Blogger dashboard.
- Find the blog you want to add.
- Select Add Tab to Facebook Page.
- Make payment when asked.
- Keep customizing your tab.
Installing Social RSS
Another Facebook application that you can use to import your blog posts automatically is Social RSS. Social RSS (part of Social Bakers) is a little easier to set up than NetworkedBlogs is, but the free version may not work for you if you’re posting more than three times per week. See “Deciding when to upgrade to paid service,” later in this chapter, for more information.
To start using the Social RSS app, follow these steps:
- Log in to Facebook as your personal Profile.
- Go to http://apps.facebook.com/social-rss.
You see information about the Pro version of the app at the top of the Page and Feed Settings below that.
- Select the Page you want to send your the RSS feed to from the Your Page drop-down menu.
- Add your RSS address in the Add Your First Feed box, as shown in Figure 3-9.
Refer to “Getting the Address of Your RSS Feed,” earlier in the chapter, for more information about this address. Notice that you can bring in multiple RSS feeds with this app.
- Select the Publish to Wall check box if you want your feed to be posted to your Timeline automatically.
- Select the post thumbnail image you want:
- Image from the RSS Feed: This is the default, and recommended, choice.
- Let Facebook Decide: The OpenGraph protocol selects the image from your post.

Figure 3-9: Configure the Social RSS application.
- Scroll down to and configure the tab settings if you want a tab on your Page for the RSS feeds you have listed.
These settings are for the tab that appears on your Page. Here’s some information about what to put in each field:
- Title: The title of your app as it appears below the app photo on your Page. If you’re pulling in multiple RSS feeds with the Social RSS app, all the feeds appear on the same Page. If you’re pulling in just your blog, you can title the app Blog. If you have multiple feeds coming in, you may want to call the app Industry News (or whatever characterizes those streams best).
- Website link: Your website address for people to click.
- Description: A brief paragraph about your blog or the set of RSS feeds. This description appears at the top of the page of posts.
- Timezone: Your time zone.
- Click the Save Settings button at the bottom of the page.
A pop-up window appears, saying that your feeds have been successfully updated. The window also promotes the Social RSS app’s paid service. The free service lets you import just one post per day; the paid service lets you import new articles each hour. Click the x to close the window.
Figure 3-10 shows what the Social RSS tab looks like on your Page.

Figure 3-10: The Social RSS tab on a Page.
Using Social RSS
After you configure Social RSS, it automatically adds your posts to your Page Timeline (if you selected that option) and to your RSS/Blog tab on your Page. You can always edit the settings or add more feeds from other places.
You also can add a feed to your Profile from the Social RSS application. Just choose User Profile Wall from the drop-down menu in the Social RSS configuration area.
Beyond that, Social RSS doesn’t have too many other features unless you upgrade to the paid service (described next), which gives you some added statistics.
Deciding when to upgrade to paid service
The Social RSS application (http://apps.facebook.com/social-rss) offers a paid service ($24 per year, as of this writing) that grants you more posts per hour (up to five per feed per hour, with a maximum of five feeds). By comparison, the free Social RSS currently allows for one post to your Timeline per day. If you’re using this application for multiple feeds that post every day, it’s not going to work.
If you’re using Social RSS to bring in your own blog to Facebook, the free option will probably work just fine because most people aren’t blogging more than once per day.
Using RSS Graffiti
Another Facebook application that you can use to post your blog entries automatically on your Facebook Timeline is RSS Graffiti. This app doesn’t limit you to importing only blog posts: You can use it to bring in any RSS feed from anywhere, much as you can with Social RSS. You can also use RSS Graffiti to post in Facebook Groups. You can control how many posts per day are pulled in, just in case the RSS feed you enter has more posts than you want to share with your community.
Adding RSS feeds can help you add content to your Page. You may want to use RSS feeds to import industry news or other helpful blogs. You can search some of the RSS-feed directories that are available, but you’re better off bringing in a feed from a site that you know, like, and trust.
RSS Graffiti is highly configurable. You can configure the post style, scheduling of updates, and times when the messages are posted. All these features translate into many settings, all of which you can change. Most of the settings can be left at their default values.
One thing that RSS Graffiti doesn’t have is a tab that you can add to your Page. It only posts the RSS feed on your Timeline. If you want a place to show your most recent blog posts on your Facebook Page, we recommend using Social RSS or TabSite.
To get started with RSS Graffiti, follow these steps:
- Log in to Facebook as your personal Profile.
- Go to http://apps.facebook.com/rssgraffiti.
If this is the first time using the app you see a pop-up window asking you to allow RSS Graffiti permission to post. Click Allow. You’re taken to the RSS Graffiti dashboard.
- Click Add New Publishing Plan.
A window appears, allowing you to name your publishing plan.
- Type a name in the text box and then click Create Publishing Plan.
A configuration area appears, as shown in Figure 3-11.

Figure 3-11: Select the source (RSS feed) and the target (Page or Profile).
- Click the New Sources button next to Sources.
A pop-up window appears, allowing you to add your RSS feed.
- Add the address of your RSS feed (refer to “Getting the Address of Your RSS Feed,” earlier in this chapter), and click Add Source.
A pop-up window appears, allowing you to configure the RSS feed, as shown in Figure 3-12.
As we mention earlier in this chapter, you can choose many features of RSS Graffiti, but the default settings work well for most people, and you can skip to Step7.
Or, if you want to customize your settings, you can read a little bit more about what each of the settings means here:
- Source Name Override: Change the name that appears when you post the article or blog post.
- Source URL Override: Override the URL that points to the website. Leave this field blank to use the feed’s URL.
- Scheduling: Change the maximum posts per update, and specify whether you want the newest posts to post first.

Figure 3-12: Configure your settings.
On the Advanced tab, you can set these options:
- Format Message: Add messages to each post, using these options. You may choose to add a static message such as New Post from My Blog or something similar.
- Filtering Options: Set the date and time after which posts can be published on your Timeline. Older posts won’t be published unless you change this option. You can indicate how long a post must be up (in minutes) before it’s posted to your Timeline by setting the Publish Delay option. You may want to use this option if you sometimes make minor edits in posts shortly after you publish them. That way, you have a buffer of time before the story is posted to your Facebook Timeline.
- Click Save after you configure your source RSS feed.
The pop-up window disappears, and you see the name of the feed in the Sources area (refer to Figure 3-11).
- Click New Target, next to Target.
A pop-up window appears giving you the choice between publishing to Facebook or CoveritLive (an online blogging tool).
- Select Facebook.
A new pop-up box appears showing the configuration for posting to Facebook including a drop-down menu for where you want to post.
- Select your target from the Target drop-down menu in the Target Setup section.
You can choose a Page or a Group.
- Select if you would like the post to be published on behalf of your personal profile or the Page.
If you choose a Group as the target then you can only publish on behalf of your personal profile.
- Select the post style.
You can choose Standard, Compact, or Status Updates. A preview window appears next to each selection. Choose what works best for you by selecting the appropriate radio button. You also have the option to shorten or append a URL depending on which Post style you choose.
- Click Save Changes.
Your publishing plan is finished, and your posts will start updating when you make a new blog post.
 Be careful about adding just any RSS feed to your Page. After all, you don’t control that content, and you may not agree with a post that’s brought in.
Using the dlvr.it Tool
dlvr.it is a great tool that you can use to automatically post your blog or any RSS feed to Facebook and Twitter. It’s a cinch to set up, and it offers analytics on the posted articles, which is a nice feature for helping you track clicks. You can also use the tool to schedule any post (not just a post from your blog) for later.
Signing up and getting started are easy. Just go to http://dlvr.it and follow these steps:
- Click Sign Up.
You’re given the option of signing up with your Facebook login, your Twitter login, or signing up with your e-mail address. Choose which option works best for you and follow the steps. You may need to grant permissions from Facebook or Twitter and also add your e-mail address depending on which option you choose.
- Click the + symbol next to Routes to add a new Route.
A dialog box lets you add your source and destination, as shown in Figure 3-13.

Figure 3-13: Add your RSS feed.
- Click the +Add button next to Sources.
A pop-up box appears where you can select the RSS feed symbol, the Twitter symbol or the e-mail symbol.
- Select the RSS feed symbol and then click Add Feed.
- Enter the RSS feed of your blog.
Refer to “Getting the Address of Your RSS Feed,” earlier in the chapter.
- Choose from the drop-down menu to indicate whether you want to post your first item now or the next time a new item is published, or to post all items in the feed.
- Click the Save Source button.
- Select the +Add button next to Destinations.
A pop-up box offers different icons for social site options.
- Click the Facebook button.
The application detects whether you’re logged in to Facebook and, if you’re not, it prompts you to log in to your account. If this is the first time using the app, you see a number of permission requests to post on your behalf. Click Agree on all of them.
- From the drop-down menu, choose the Facebook Page where you want to post your blog.
- Click Continue.
You get a message that the route (the automated posting from your blog to your Facebook Page), has been added, and you see your new route, as shown in Figure 3-14.

Figure 3-14: Your dlvr.it route.
You can add more routes (to Twitter, LinkedIn, or your Facebook personal Profile), if you want, by clicking the +Add Route button.
If you mouse over your Sources or Destinations (as in Figure 3-14), you see a pencil icon; click that icon to see advanced settings. These settings give you much more control of when your blog posts are posted, what text is displayed, what filters you can add to the RSS feed, and more. These settings are beyond the scope of this book, but Figure 3-15 shows you a snapshot of the types of customization that are available.

Figure 3-15: Advanced settings for the RSS feed gives you many customization options.
Don’t worry about duplicating content. Some people ask whether they should post on their blog and then repeat that information on their Facebook Page and on Twitter, and maybe also send a newsletter with the link to the post. Don’t worry that people are going to get sick of that post. They most likely see it in only one or two places unless you’re posting the same thing over and over. After all, you’re trying to get the word out about your blog post, and people need multiple opportunities to read it.