
Chapter 2
Facebook Apps 101
In This Chapter
![]() Defining Facebook apps
Defining Facebook apps
![]() Adding, rearranging, and deleting apps
Adding, rearranging, and deleting apps
![]() Customizing the app photo and title
Customizing the app photo and title
![]() Exploring the Facebook App dashboard
Exploring the Facebook App dashboard
You may have seen customized tabs or apps on some Facebook business Pages. The apps appear below the Cover photo on the left side column of a Page and can have a wide range of functions. You can use apps to showcase your other social sites, have a storefront, give a coupon, run a contest, and much more! Apps can also help contribute to the branding of your company and make your Facebook Page come alive.
The term Facebook apps encompasses a wide range of products. When someone refers to a Facebook app, he can mean everything from Facebook games like FarmVille to Facebook Events and highly customized apps that can be mini-websites within your Facebook Page.
In this chapter, you read about the apps — sometimes referred to as “tabs” — that can appear on your Facebook Page. (We use the terms apps and tabs interchangeably in this chapter.) You discover the basics about how to install apps and how to move them so that they’re featured more prominently. In Book V, we cover Facebook applications in much greater depth and discuss a wide range of specific apps to enhance your Page.
Defining Apps and Understanding Facebook Installed Apps
Facebook has developed four apps that are installed on your Page when you create it:
- Photos: Organized into Albums, Timeline Photos, and photos posted by fans
- Events: Upcoming and past events (covered in depth in Book VI)
- Video: Videos uploaded directly to Facebook
- Notes: Mini blog posts with photos or other text
Only Photos appears on your Timeline when you start your Facebook Page. The Video and Notes apps are on your Facebook dashboard under Apps.
The apps that Facebook has created can’t have custom names or custom Cover images. The Photos tab defaults to the last photo that was uploaded, and the Events tab defaults to a photo of the most recent event or the event that is coming up soonest. Notes and Video show snapshots of the notes and videos that you’ve uploaded most recently.
If you want any other apps on your Facebook Page, you have to install them. Facebook has created the four basic apps, but any other app has been created by an independent developer or third party. All Pages are capable of displaying 12 Facebook apps. You can have more installed, but only 12 will appear on your Page for your community to view, and Facebook displays only the first 3 apps on the left sidebar when someone navigates to your Page. Although Facebook displays only the first 12, you can see and access all your apps as Admin. Your community can access your apps also by clicking the More button right under your cover photo as shown in Figure 2-1.
It’s fun to look at all the ways you can spruce up your Page with apps. Pages are using apps in different ways, and the apps can be very engaging. Look at the interesting examples in Figure 2-1 as shown by accessing the More menu and in Figure 2-2 as shown on the left sidebar.
You can adjust the apps that appear first in the left column, but the About section can’t be moved. To see any additional apps, the user needs to either click the More button (as shown in Figure 2-1) or click the arrow next to the apps, as shown in Figure 2-2. Once you click the arrow, you get a pop-up box listing all the apps as shown in Figure 2-3.

Figure 2-1: Macy’s uses an app to list its job openings.

Figure 2-2: Guy Kawasaki uses an app to capture e-mail addresses and showcase his Instagram feed.

Figure 2-3: A pop-up box shows all the available apps.
When you click the photo of the app or select the app name from the More menu, you’re taken to the associated tab within your Page. If you click the Macy’s is hiring! link shown in Figure 2-1, for example, you’re taken into the app, which is a mini-website that allows people to search for jobs, as shown in Figure 2-4. You can see that you’re on the Macy’s Page because the cover photo is still at the top of the page. To navigate back to the main Macy’s Facebook Page, just click the Timeline link.
 Some apps that you find may not have been updated recently or may be a bit difficult to work with. All the third-party apps covered in this book work well, but so many apps are out there that it’s important to be aware of the potential pitfalls!

Figure 2-4: An interactive Facebook tab on Macy’s Facebook Page.
Adding an App to Your Page
Installing a new app can be a different process for each app because all but the four Facebook-created apps were developed by third parties. As we discuss each app in this book, we take you through the appropriate steps, but it helps you to have general knowledge of how apps work:
- Go to the app you want to install.
You see in Book V how to find appropriate apps to install. Usually, you install the app from within Facebook, but sometimes you have to navigate to the app’s website, configure the app there, and then install it.
- Give the app permission to access your information and permission to post to your Page.
Usually, you must be logged in as your Profile rather than as your Page, as shown in Figure 2-5. This process may make you nervous because you know that you want to add the app to your Page, not your Profile. But rest assured — you’ll be able to specify where the app is to appear! You may or may not see this step, depending on the app.

Figure 2-5: You must give permission for an app to post to your Pages from your personal Profile.
- Choose the Page where you want to add the app, as shown in Figure 2-6.
This process can be a bit different for each app, as you see throughout this book.

Figure 2-6: You have the chance to add the app to your Page.
When you complete these steps, the app appears in the Apps area on your Facebook Page.
As we mention earlier in this chapter, you can have more apps installed on your Facebook Page, but only the first 12 will be visible to anyone visiting your Page. As the administrator of a Page, you see all your apps. Just remember that your likers can see only the first 12 and only the first 3 apps are visible on the left sidebar. You can shift the positions of the apps as you see the in next section, “Rearranging the Positions of Your Apps.”
Also, you can have more apps that are not shown but are installed on your Page. To access those apps, go to the Apps section in your Page Dashboard. See the “Finding Apps in Your Page Dashboard,” section, later in this chapter.
Rearranging the Positions of Your Apps
The most visible apps are going to be the ones in the first row, so make them count! Put your best apps in the first row. (Because the Photos app is fixed, you have only three apps to work with in that row.) Then, of course, put any other apps you want to showcase in the next two rows. Many people don’t have more than 12 apps, but if you enjoy trying new apps, you can have more than the allotted 12.
Also note that you can’t move the Facebook Likes tab below the first three rows of apps to hide it. That tab is visible on every Facebook Page and can’t be hidden.
To swap the positions of the apps on your Facebook Page, follow these steps:
- Click the More button under your Facebook cover photo.
A drop-down menu appears with all the available apps and a Manage Tabs selection.
- Select Manage Tabs.
A pop-up box appears as shown in Figure 2-7.
- Click and hold the app that you want to move and drag it to the appropriate spot to re-order the tabs.
You cannot re-order the About section — it always appears first in the left column.
- Click Save.

Figure 2-7: Manage your tabs.
Deleting an App from Your Page
When you add an app to your Page, it doesn’t have to live there forever. You can delete it completely or just hide it so that it doesn’t appear on your Timeline. Go to the Settings at the top of your Page, and select Apps from the sidebar on the left. You can then remove the app from your added apps. The steps on how to do this are in Book V, Chapter 1.
If you have an app that isn’t functioning correctly, remove this app so that anyone who’s clicking around on your Page doesn’t stumble across it.
Customizing the App Title and App Photo
Two of the key parts of the apps you add to your Page are the app title and the app photo. The apps you install have a default title and photo, which usually aren’t that interesting. Figure 2-2 shows how customizing app photos can enhance your branding, draw attention to the app, and give your page a professional look.
App titles and photos that have a “call to action” in them are more likely to be noticed. Click Here, Free Report, and Get a Coupon, for example, are all valid and intriguing app titles containing a call to action.
The app photo is 111 pixels (px) x 74 px, which isn’t enough space for a very detailed photo. But even having a colored background with some interesting text, as shown in Figure 2-2 earlier in this chapter, is a good strategy.
To change your app title and app photo, follow these steps:
- Click the Settings link at the top of your Page.
You’re taken to your Page dashboard.
- Click Apps on the left sidebar.
You see all your available apps.
- Click the Edit Settings link within the app you want to edit.
A pop-up window appears, as shown in Figure 2-8.

Figure 2-8: Change the tab name and the tab image.
- Type the Custom Tab Name you want to use and click Save.
Only the first 15 characters appear on your Page; then the name is cut off.
- Click the Change hyperlink next to Custom Tab Image to change the tab image.
You’re taken to a new browser window, where you can upload a custom image.
- Mouse over the image and click Edit in the upper-right corner of the image.
A pop-up window appears, allowing you to choose a file. The image must be 111 px x 74 px (or an even multiple of that ratio); otherwise, it will be resized.
- Go to the file you want to upload and click Open.
Your image appears in the Image section, as shown in Figure 2-9.

Figure 2-9: Upload a custom image.
The photo changes, and now you can close the new browser window that was opened and navigate back to your Facebook Page; the other browser window should still be open. To see the change in effect, just refresh your Page in the browser window.
Finding Apps in Your Page Dashboard
As we mention earlier in this chapter, the Photos tab is the only one that appears on your Facebook Page when you first get started. You do have other Facebook apps installed on your Page, though. You just need to know where to look for them. To access all your apps, follow these steps:
- Click Settings at the top of your Page.
You are taken to your Page Admin Panel.
- Select Apps from the left sidebar.
You now see all the apps that you’ve installed on your Page (see Figure 2-10) and you also see the available Facebook apps to install.
Read more about adjusting, deleting, and adding the apps from the Page dashboard in Book V, Chapter 1.
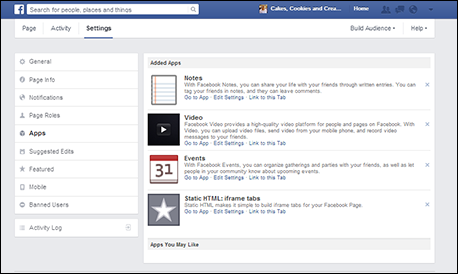
Figure 2-10: Viewing apps from your Page dashboard.