
Chapter 1
Posting to Your Page
In This Chapter
![]() Exploring the best practices for your posts
Exploring the best practices for your posts
![]() Becoming a pro at attachments
Becoming a pro at attachments
![]() Targeting your updates
Targeting your updates
The most critical aspect of your Facebook presence is your posts. What you put on your Timeline is the showcase of your business. After a Facebook user likes you, he most likely won’t go to your Page very often; typically, a user sees you only as an update in his News Feed. So you have to be interesting, engaging, responsive, useful, and fun. No pressure, right?
You want your posts to establish you as an authority and expert in your field, and this chapter tells you what types of material you can use to accomplish that goal.
Never forget, however, that Facebook is a place where people come to be social. It’s like a big cocktail party where people are having fun talking, so don’t be a wet blanket and talk only about the big sale you’re having. You don’t want to be that irritating sales guy at the networking event whom everyone avoids — or, worse, “un-likes”!
Helpful tips, useful information, links, and photos can go a long way toward making your Page engaging and popular. To that end, in this chapter, you find out how to post text updates, photos, links, and videos. You also discover how to target your updates to specific members of your community.
Posting Updates to Your Timeline via the Publisher
To post an update to your community, you do so in the Publisher, which is located on your Timeline and contains the prompt, What have you been up to? See Figure 1-1.
The function of the Publisher on your Page is very similar to that of the Publisher on your Profile. When you post a status update to your Profile, however, it goes out to the News Feed of all your Friends, whereas an update to the Timeline on your Page goes out to the News Feed of all those who like you. Then your Page’s status update shows up in the News Feed, just as a person’s status update shows up in the News Feed of Friends.

Figure 1-1: The Publisher is where you post information to your Timeline.
 Your update also appears in people’s Tickers (the scrolling real-time updates on the right side of the home page of your Profile). For more information on the Ticker, see Book II, Chapter 1. Realize that when you post to your Page Timeline, your post shows up in people’s News Feeds along with all the other posts of their Friends and Pages they like. Don’t refer to previous posts or things on your business Page that people can’t see right then. If you want people to come to your Page to see those things, make sure that you tell them to come to your Page. Also make sure that each post can stand alone as a complete thought.
 Not every single post on your Page will be seen by every single fan, and not every post actually makes it into your fans’ News Feeds. You can actually see how many of your fans potentially saw your post after you post it. Facebook determines whether your post goes into your fans’ News Feeds based on its News Feed algorithm. Find out more about the algorithm and getting your posts into the News Feed in Book IV, Chapter 2.
How long to make your post
Facebook extended the length of the status updates to a whopping 63,206 characters! It’s almost a small blog post. Note: After you type around 240 characters (depending on word structure), your post will be cut short, and a See More link appears, as shown in Figure 1-2.

Figure 1-2: A long status update is truncated in the News Feed, but the whole post is still there.
Keep your post short so that people can easily read it and not miss anything valuable if they don’t click the See More link.
How often to post an update
One of the most frequently asked questions is, “How often should I post?” The answer will vary depending on your goals and comfort level. Some people worry about “bothering” their community with too many posts, or they worry that some people will un-like or hide their Page if they post too much. We can assure you that most of your community members won’t mind your posts if you’re doing them in the right way. That’s why it’s important to provide value.
Also, many people aren’t on Facebook all the time and may not see your posts. Depending on how many Friends a user has or how many Pages a user likes, your post may go through a News Feed fairly quickly.
If you have one person who likes your Page and has ten Friends who post one update per day, and your Page is posting five updates per day, you’ll be very visible, occupying one-third of the daily News Feed. But if you have a person who likes your Page and has 500 Friends who post one update per day, your updates will just be one percent of the daily News Feed, and that person may miss your posts.
Bottom line: Don’t worry about posting too often. People will miss your updates, and you want to continue to stay visible.
Studies have shown that posting two to five times per day is ideal. If that sounds like too much, at least try to post once daily during the week. Weekends can also be a great time to post — people are checking on Facebook, and there may not be as many other Pages posting on the weekends. But you also need to take a break every once in a while!
What types of material to include
When you go to create a post, think about your community. What do its members need? What’s in it for them? Think of yourself as the funnel that guides the best information to your community — and that will be what keeps your community coming back for more. Also realize that you’re participating in a conversation. Just as you do at a cocktail party, you want to respond when people comment on your post. Don’t just post and run. (And don’t post when you’ve had too many cocktails; you may regret it in the morning!)
Be sure to vary the types of material you post, too. Following are types of posts that you can use to market yourself as an expert, have fun, and plug your business all at the same time without being annoying:
- Pictures of a great event you had
- Video of behind-the-scenes happenings at your business
- Questions that engage your audience and allow you to do some market research
- Links to blog posts that solve people’s problems within your niche
Don’t worry that you’re giving information away for free. Your community will appreciate the information and look to you when they need help that they can hire you for.
- Controversial news stories within your niche that will spark conversation
- Events you’re hosting that will benefit your community
- Links to resources that are helpful for your niche
Again, this is just a partial list of post types. How do you use these types to market your business? You establish yourself as the go-to person for your market. You notice that these posts aren’t all about you and what you’re selling, but you’re continually popping into the News Feed and reminding your community that you’re there. You’re branding yourself as an expert in your business.
Including Attachments
You may have noticed icons above the Publisher (refer to Figure 1-1). You use these icons to attach items to your post. The icons are, from left to right, Status, Photo/Video, and Offer, Event +. The plus sign (+) means that additional options for attachments are available when you click that selection, as shown in Figure 1-3.

Figure 1-3: Click the + symbol to see additional types of attachments.
We recommend varying your posts so that you use these attachments frequently. People like multimedia, and your status updates will be more visible when you use these features.
Updating status and posting links
Posting a status update is relatively straightforward, especially if you’ve been using your Facebook Profile for any length of time. All you do is start entering your text in the Publisher (shown in Figure 1-1) and click Post.
If you’d like to add a link to a website, all you need to do is to copy the website’s address (or type it yourself) into the Publisher area. When you post a link, you can use the 63,206 characters of the status box, or Publisher, to introduce the link and entice people to click the story. (There’s no need to be quite that verbose; a short introduction or comment is just fine.)
After you add the link to the Publisher, the website is represented as a title and a short description next to a thumbnail image, as shown in Figure 1-4. These items are pulled in from the website itself. You can edit this information by clicking the title or description. You also may have a choice of the thumbnail image to post, or you can click No Thumbnail if the image doesn’t match the story.

Figure 1-4: When you add a link, Facebook brings in the description and a picture.
To add a link with your status update, follow these steps:
- Copy the URL from the website you want to put into your post.
- Paste the URL into the Publisher or just type the address into the Publisher.
You see the website information, as shown in Figure 1-4.
- Adjust the information as necessary by selecting a thumbnail (or No Thumbnail), modifying the description of the site by clicking the description, and modifying the title of the site (by clicking it).
- Add some scintillating text to the Publisher right before the website address.
You can add the text after the address, but we recommend placing the text before it.
This text might be a short description of, or plug for, the site you’re linking to. The purpose of the text in this post is to give your community a reason to click the link.
- Click the blue Post button to post this status update with your link to your Timeline.
As mentioned in Step 3, you may be able to choose among several thumbnail images to go with your link. The images are pulled from the site and might include images from advertisements on the website’s sidebar, so the images may not match the story. If you can’t find an image that matches the link, you can select No Thumbnail.
 The title and description are pulled in from the metadata (title and description) on the website. Depending on the site, these items may not even match the story on that site that you’re trying to promote. The webmaster of the site has control of the metadata, but you can edit what shows up in your post by clicking the Title and Description before you attach the link.
Here’s another thing you can do when posting a link. After you have the link attached — meaning that the picture and description are shown as in Figure 1-4 — you can remove the link in the Publisher area. Then the post won’t have a clickable link in the text area, but if people want to read the story, they can just click the title, picture, or description that’s attached, and they’re taken to the website. You may want to use this option if the link is really long (or if it looks messy). All you need to do is to backspace or delete the link before you click Share. If you want to have a highlighted, clickable link in your text area, just leave the link in the Publisher.
You can also add a location to your status updates by clicking the Place icon in the bottom-left corner of the Publisher. When you click this icon, you can add a Facebook Place or Facebook Page name. This can be like your Page “checking in” at a Place to let people know where you are at. We see limited benefit from this feature, but it is available.
A different way to post a link is to post it with a photo. Sometimes posting a photo with a link gets more attention than posting just a link because the photo shows up larger in the News Feed. See the next section, “Attaching photos,” to find out how to post photos with a link.
Don’t post links only to your own website, though. Vary your content so that you become a funnel of information on the web for your community. So where do you find these interesting links to post? Here are several ways to attract interesting material so that you can share it with your community:
- Google Alerts: Get e-mail updates of the latest relevant Google results based on keywords in your niche. All you have to do is go to www.google.com/alerts, enter keywords you want to monitor, and then you can select how frequently you want to receive them (once per day, once per week, or as it happens).
We also recommend adding the name of your company as a keyword (unless it’s a common name) so that you can monitor a blog post or news about your company posted on the web that you need to be aware of.
- Feedly: Subscribe to other interesting blogs in your niche via an RSS feed, and check in with your blogs each day to find interesting posts. You can also share to your Facebook Page right from Feedly (http://feedly.com). You can find other tools to help bring in RSS feeds, but Feedly is a nice choice.
- Alltop: This site is a gathering of interesting blogs on various topics, arranged by topic and most recent posts (http://alltop.com).
- Other Pages in your niche: Make sure to like or follow a “competitor” Page to see what those folks are doing. It’s okay to repost a link if it’s an interesting bit of news. You can also add these Pages to a Facebook Interest list on your Profile.
- Twitter: A lot of interesting links are on Twitter (www.twitter.com). Follow the top people in your niche, and when you find something newsworthy, post it to your Page.
Sometimes, a link doesn’t post correctly and doesn’t pull any metadata or website information in with the link. In that case, you can try to debug the link in the Facebook Developers area before posting. Just go to http://developers.facebook.com/tools/debug, paste the link into the Debug field, and click Debug. You get information on why the link may not have been working, but usually, there’s nothing you need to do with this information. Just go back to your Facebook Page and try pasting the link into your Publisher again. This works 99 times out of 100!
Attaching photos
People love multimedia, so attaching photos is a great strategy for getting more interaction with your audience and marketing your brand. A photo is more noticeable than just a status update because it takes up more space in the News Feed. Disney Pixar posts a lot of photos of its movies with a little caption to engage. Take a look at Figure 1-5 for an example.
If you’re a speaker, a photo of you speaking at an event will market your business in a more exciting way than if you just post an update saying, “Spoke at an event with business owners today.” The great thing is that you can “show and tell” — that is, post the status and show the picture.

Figure 1-5: Disney Pixar gets thousands of likes and hundreds of shares on each photo posted from its movies.
Or suppose that your business is a restaurant. You can post pictures of your food, kitchen, busy Friday-night crowd, and so on. The possibilities are endless! Spend some time thinking of all the picture posts you can have about your business.
To attach a photo, just click the Photo/Video icon in the Publisher. Then you have the choice to upload a photo or video, or create a photo album, as shown in Figure 1-6.

Figure 1-6: You have two choices for uploading your photos.
You can also post a photo as a link from a third-party site, such as Instagram or TwitPic. When you upload a photo to the Publisher as an attachment, however, it’s stored on your Photo tab for people to reference easily later. If you share a photo from Flickr as an attachment, it’s just a Timeline post that will be harder to get back to and enjoy.
Another tactic is to post a photo or screen shot and then add other interactive things, such as a link to a website and tags for other Pages. Whenever you add a photo, you can always add a tag and a link within your status update that goes with the photo. The benefit of posting your update as a photo is that it appears larger in the News Feed. In Figure 1-7, you see that Mari Smith added the following:
- An actual photo from the article she’s talking about
- The link to the article
- A tag for the Page
Read more about tagging other Pages in Book IV, Chapter 2.

Figure 1-7: Add a photo and then include a link and/or tags to other Pages.
You may have multiple photos to post on a certain topic at one time. In that case, you should select the Create Photo Album option (refer to Figure 1-6). When you do, you can select the photos on your computer, and as they upload, you can add more. You can add captions, tag the photos, and select an album cover before you post the photo album. The photo album posts at one time, with multiple photos showing up in the News Feed.
You can upload multiple photos by just adding another photo using the plus symbol, as shown in Figure 1-8, after you’ve uploaded one photo. In this case, both photos will be in your Timeline Photos album.
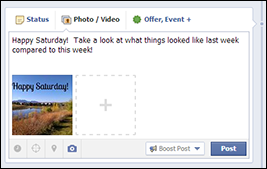
Figure 1-8: Add additional photos to a status update.
As of this writing, you can add unlimited photos by using the + symbol, but only the first three photos will be displayed in the update. If you attach more than three photos to your status update, a note lets people know there are more photos to see.
Attaching video
Video is a powerful tool to help your audience get to know you. When you click the Photo/Video icon in the Publisher, you’re given the choice to upload a file from your computer. Facebook will be able to tell right away if it is a photo or video after you select the file (refer to Figure 1-6).
 The uploaded video must be shorter than 20 minutes, be smaller than 1024MB, and made by you or your Friends per Facebook terms. Again, you always want to abide by Facebook’s Terms and Conditions; otherwise, your Page will be in danger of being shut down.
You can upload video files in many formats, but MP4 format works best. You can find the entire list of supported video formats here:
www.facebook.com/help/?faq=218673814818907
After you select the video that you want to upload from your computer and type a comment about the video, click the Post button. Facebook shows your video upload progress as a bar at the bottom of the Publisher, and you’re alerted when it’s done.
The video processing can be slow; sometimes, it can stall. Files in MP4 format typically work best.
While the video is processing, you can click the Edit Video button to edit some of the details in the screen shown in Figure 1-9.

Figure 1-9: Edit the details of your uploaded video.
Uploaded videos can play right within the Facebook status update and will stay in your Videos area for your community to reference later.
Another advantage to uploading videos directly to Facebook is that when non-likers view your videos on Facebook, they see the Like button for your Facebook Page in the top-left corner of the video screen, as shown in Figure 1-10. This is a great way to make it easy for people to like your Page.

Figure 1-10: A Like button appears in the corner of your video to let non-likers connect with you easily.
You can also post videos by posting a link to a third-party video site, such as YouTube or Vimeo. Most of these sites allow the video to be played within the update. These videos aren’t stored on your Facebook Page for people to see later, however, and there’s no Like button in the corner.
Scheduling posts
Facebook allows you to schedule posts in the future or to add posts to the past (although milestones are better for that). As of this writing, you can schedule only status updates (with or without links in them), photos, and videos. You can’t schedule event postings, questions, offers, or postings of photo albums. You also can’t schedule a post that you’re sharing from another Facebook Page. If you find a great post or image from another Page that you follow, and you want to use the Share button, you cannot schedule the post to be shared later — you have to share it immediately.
To schedule a post, just follow these steps:
- Complete your post just as you would if you were to post it immediately.
- Click the clock symbol in the bottom-left corner of the Publisher, as shown in Figure 1-11.
When you click the calendar, the Date drop-down menu appear where you can specify details exactly when you want to have the post scheduled.
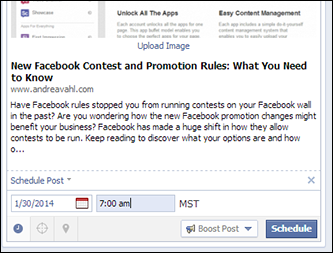
Figure 1-11: Click the clock symbol in the bottom-left corner of the Publisher.
- Add the date and time that you would like the post to be published.
- Click the blue Schedule button to schedule your post.
Your post is scheduled.
To view the post, check your Activity Log, which you access from your Admin panel. Click the Edit Page button, and choose Use Activity Log from the drop-down menu. You see your scheduled posts, as shown in Figure 1-12.

Figure 1-12: View your Activity Log to see your scheduled posts.
From here, you can reschedule, edit, publish, or delete your scheduled posts by mousing over the upper-right corner area of your post and clicking the down arrow that appears, as shown in Figure 1-12.
Adding events
You can also post an event directly from the Publisher. A word of caution, however: Every time you use the Event option to publish, you’re creating a brand-new Facebook event.
To create a new event from the Publisher, just click the Offer, Event + icon (note that you may have a different combination for this icon depending on the category of your Page but the one you want includes “Event”). A pop-up window appears; you can create your event in this window.
See Book VI, Chapter 1 for more information on creating and marketing your Facebook event.
Adding milestones
Milestones are big events in your company’s history that you want to highlight. Milestones appear slightly different from traditional updates, as shown in The New York Times’ milestones for 1912 (see Figure 1-13). Milestones are a great way to showcase awards, new products, and other momentous occasions.

Figure 1-13: Milestones from The New York Times.
When you publish a milestone, it’s placed in the appropriate area of your Timeline. You can add a photo, if you want, or just a status update about what happened at that time. Milestones are great for letting people know more about the history of your business and can be fun for people to discover on your Timeline. They can give people a reason to hang out on your Timeline longer.
People can go to your milestone or periods of time on your Facebook Page by using the months and years chart on the right side of your Timeline. The milestones are individually listed on your About page. Go to any Page and have fun with this feature by jumping around to see the posts at that point in the Page history. Try this with www.facebook.com/cocacola to see the history of Coca-Cola, for example.
To add a milestone to your Page, simply click the Event, Milestone + icon (or the Offer, Event + icon, depending on what you have). In the pop-up window that appears, you can fill in the details of your milestone, as shown in Figure 1-14.
Your milestone is published in your News Feed (which is also a fun way to tell your audience about cool things that are happening). If you have several milestones to add, space the milestones out so that you don’t have so many posts at the same time, or select the Hide from News Feed check box so that it posts on your Timeline but doesn’t overwhelm your audience.

Figure 1-14: Fill in the details of your milestone.
Using Facebook Offers
Posting a Facebook Offer is also done through the Publisher. A Facebook Offer is like a coupon that people redeem and then claim either at your place of business or online. After you post your offer, it goes out into the News Feed, and your fans can click it to claim it. When they claim it, they add their e-mail addresses to the form, and the offer is sent to them. The great thing about offers is that they can be very viral. When someone claims your offer, they can share your offer posts to their News Feed, and then all that person’s Friends can see it and possibly claim it for themselves, as shown in Figure 1-15.

Figure 1-15: A claimed offer in the News Feed.
Facebook Offers are for local businesses and do cost money to run. Find out how to set up the offer and some of the best practices in Book VII, Chapter 1.
Targeting Your Updates by Location and Language
A little-known trick that you can do with the Publisher is to target your updates to certain members of your community. As of this writing, targeting is still being rolled out to all Pages, and you may not yet have access to this feature, but it is scheduled to roll out to all Pages with 100 likes or more. You can target your updates by the following options:
- Gender: Men or Women
- Relationship Status: Single, In a Relationship, Engaged, or Married
- Educational Status: In High School, In College, College Grad
- Interested In: Men or Women
- Age: Select a range between 13 and 65
- Location: Country, Region or State, City
- Language: Type the language
When you select the targeting, only those likers whom you specify in your target will see your status update in their News Feeds. This can be very helpful when you’re posting something where you want a certain demographic to respond or if you have a local event. Say, you have an Event happening in San Francisco: You can update only the people who live near there, meaning that your community members in New York won’t see those posts in their News Feeds.
To use this feature, follow these steps after you type your status update:
- Click the target icon (to the right of the clock icon) in the Publisher, as shown in Figure 1-16.
You then see an additional link to Add Targeting.

Figure 1-16: Click the Target icon to enable the targeting options.
- Click the Add Targeting link.
A drop-down menu appears where you can select which options you want to target, as shown in Figure 1-17.
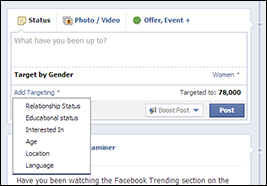
Figure 1-17: Choose a specific audience for your status update.
- Select a target demographic from the drop-down menu.
You see the selection listed as shown in the Target by Gender field in Figure 1-17.
- Use the drop-down menu next to the demographic to select which part of the demographic you want to target.
For example, in Figure 1-17, Women is selected.
If you select Target by Location, a pop-up box appears (as shown in Figure 1-18) from which you can select the radio buttons for Country, Region or State, or City. You can select many countries to target, many states or regions within one country, or many cities within one country. After you make all your location selections, click the Choose Locations button.

Figure 1-18: You may choose to target regionally.
- Click the blue Post button after making all your targeting selections and writing your post in the What have you been up to? field.
Your post will then go out into the News Feeds of only those targeted fans of your Page. The post won’t show that it’s been targeted, but you will be able to see that it’s been targeted if you mouse over the world icon on the post when it’s on your Timeline. You will see the exact demographic that you selected in the targeting options listed in a small pop-up.
In Figure 1-18, notice that the number of people in the targeted demographic are listed in the post. You may want to use the targeting option just to see more about your demographics.
Boosting posts
In the Publisher, you have the option to boost a post, which is a way to pay to have that particular post pushed out to more of your fans. You pay a set fee to get your post shown in the News Feeds of more of your likers than would have seen it organically. You can do this as you get ready to post your update or after the fact.
Read more about boosting posts in Book VIII, Chapter 2.
Pinning and highlighting posts
After you publish a post, it’s time to have a little fun by highlighting certain posts or by pinning a post to the top of your Timeline for a certain period to draw more attention to it.
When you highlight a post, the post spans the width of your Timeline. Kia Motors does a great job of highlighting a photo, as shown in the post in Figure 1-19.

Figure 1-19: Use highlighted posts to emphasize something on your Timeline.
To highlight a post, you first have to post it; then click the down arrow in the the top-right corner of the post to access the drop-down menu as shown in Figure 1-20. Select Highlight to highlight the post.

Figure 1-20: Click the down arrow to access the drop-down menu.
Note: Highlighting a post doesn’t affect how it shows up in the News Feeds of your likers. It affects only how the post is displayed on your Timeline.
Pinning a post to the top of your Timeline can be a great way to draw attention to one of your posts for people who visit your Page. You can pin a post for a total of seven days. Then the post automatically returns to the area of your Timeline where it belongs.
You may decide to pin a promotion to the top of your Page, a question, or a video. Try it to see how it works for you. To pin a post to the top of your Page, just follow these steps on any published post:
- Click the down arrow in the top-right corner of the post (refer to Figure 1-20).
- Choose Pin to Top.
Your post appears at the top of your Timeline with a small orange flag on it indicating that it’s a pinned post. To unpin it, click the down arrow in the top-right corner of the post and then choose Unpin from Top.