
Chapter 1
Creating Facebook Events
In This Chapter
![]() Creating an event: the basics
Creating an event: the basics
![]() Working around Page event limitations
Working around Page event limitations
![]() Sharing your event with your community
Sharing your event with your community
Using the Facebook Events feature can create a lot of buzz around an event, your store, an online event, or even a product or book launch. Facebook Events show up on people’s Timelines and within their Events area, and are even searchable by anyone on Facebook. Add to the mix the fact that any time a Friend interacts with your event, that person’s Friends all see something in their News Feeds about the event, which gives it a lot of free publicity courtesy of Facebook.
If you’ve been on Facebook for very long, you’ve probably received an event invitation yourself, so you may be familiar with Facebook Events. If not, don’t worry; in this chapter, you see how to set up an event, the best practices for getting the word out about your event, and tips on using events with your Page.
Getting Started with Facebook Events
Facebook Events can be a powerful way to get your event noticed and shared within the Facebook community. But just as with any marketing activity in Facebook, you need to be mindful of the balance between sharing your event and spamming people with unwanted posts about it.
Because Facebook Events show up in multiple places within Facebook, they are more visible than just Timeline posts. Facebook makes it easy to have Friends invite other Friends to events, and if an event is public, anyone who has a Facebook account can RSVP. Figure 1-1 shows a fundraising event.
 Don’t make your event public if your event is at your home. Random strangers have shown up to events that were posted on Facebook publicly and then vandalized the homes.
Facebook Events can be beneficial for many types of events:
- Charity events
- Book tours
- Virtual webinars
- Open houses
- Big sales at your store
 When you create a Facebook Event on your Page, you won’t be able to invite your fans directly; see the section “Uncovering Limitations of Facebook Events,” later in this chapter. However, other people can invite guests if they RSVP to your event. Note that after you “Join” or respond Maybe to the event, you can invite your friends. News of a Facebook Event can spread through Friends inviting other Friends.

Figure 1-1: A fundraising event.
Social Media Examiner has done a great job of promoting its virtual webinars and live conferences through Facebook Events. (Figure 1-2 shows an example.) It uses the Event page actively to answer questions about the event and give new information about the event.

Figure 1-2: Social Media Marketing World had over 2,000 attendees.
You can create Facebook Events through your Profile, and you can create them through your business Page (or Page; we use those terms interchangeably). Depending on the type of event you’re promoting, we recommend creating an event through your Facebook Page because it’s better for your branding and complies with Facebook’s terms that disallow you from using your Profile for your own commercial gain. There are some limitations involved with creating events on your Page, and we cover the best ways to get around those limitations later in this chapter, in “Uncovering Limitations of Facebook Events.”
Showing Your Facebook Events in Different Places
Facebook Events are potentially seen in five places, which is why you want to create them. You give your connections five ways to find out about your event, as follows:
- The right sidebar of the home page lists the next upcoming event.
- The Events link on the left sidebar of the home page shows a link to all the current events you’ve created or are invited to.
- When an event is created, it appears in the News Feeds and tickers of all your Friends (if you create the event on your Profile) or in the News Feeds and tickers of all your likers. Facebook Events created by a Page are always public. Facebook Events created by personal Profiles can be visible only to invitees or certain personal lists.
- When people are invited to an event, they get a notification in their notifications area.
- When people are invited to an event, they get an e-mail about the event (if they have e-mail notifications enabled).
On the right sidebar of your home page, you see the most current event coming up, as shown in Figure 1-3. You may have to expand the events to see all the ones coming up, as shown.

Figure 1-3: Events appear on the home page.
Having the events listed on the home page of Facebook makes them very visible to potential customers, which is a perfect reason to create events for your business. The events listed are happening now or coming up next, so this area is good for reminding people of near-future events — just not as effective for events further in the future.
You also find a link to all your events on the left sidebar of your home page. When you click that link, all the events you’ve been invited to appear on the Events page, as shown in Figure 1-4.
You can see your events two ways, and you get to choose the way:
- List form: See Figure 1-4. This is the default view.
- Calendar form: See Figure 1-5.
To open Calendar view, click the Calendar button in the top-left corner, near the Events heading.
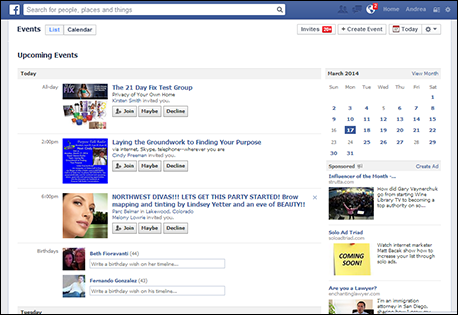
Figure 1-4: All your events on the Events page (in List view).

Figure 1-5: See your events in Calendar view.
When you get invited to an event, it also shows up in your notifications area (see Figure 1-6). This is another way that your event gets increased visibility. Everyone you invited or who is attending receives notifications when you change something about the event or post about the event. (See SummerToast’s post notification in Figure 1-6.) The only people who won’t see the notifications are those who weren’t invited or have declined the invite. These postings can be great reminders and can give your event increased visibility.

Figure 1-6: You’re notified about posts regarding events you’re invited to.
Adding the Events app to your Page
When you start your Facebook Page, the Events application is available although it may not be immediately visible under the More link just below your cover photo as shown in Figure 1-7. Events is a Facebook application (meaning that it was created by Facebook, and not by a third party).
If you don’t have any upcoming events, the event tab does not show up in your left sidebar of Apps. Once you do create a Facebook Event, the tab does show up and you can rearrange the left sidebar to move the tab higher up the sidebar to a more prominent position.
If the Events tab isn’t there, follow these steps:
- Click Manage Tabs from the More menu.
You see a pop-up box with all the installed apps.
- Select Add or Remove Tabs.
You are taken to the Page dashboard, displaying all the current apps and the available apps you can add as shown in Figure 1-8.
- Select Add App next to the Events app, as shown in Figure 1-8.
The Events app is added to your tabs.

Figure 1-7: Look for the Events tab under the More menu.

Figure 1-8: Add the Events App to your tabs.
Once you create an event, the event shows in the left sidebar as an upcoming event. But you may want to position the tab higher up the page so that it is more visible to visitors. To swap the Events app with one of the other apps:
- Click the More menu under the cover photo.
A drop-down menu appears.
- Select Manage Tabs.
A pop-up box appears; see Figure 1-9.
- Click and hold on the Events tab and drag it up to a higher position.
The About Tab cannot be moved. See Book III, Chapter 2 for more information about adding apps to your Page.
- Click Save.

Figure 1-9: Swap app positions to make sure that the Events app is more visible.
To create an event from your Facebook Page:
- Click the Events app.
- Click the Create Event link, as shown in Figure 1-10.
Note: You can also click the Create Event button in the top-right corner (see Figure 1-10).

Figure 1-10: Click the Create Event link to start creating your event.
 You can also create an event from the Publisher directly on your Timeline. See Book III, Chapter 1 for more information about using the Publisher to create an event.
Entering the event details
When you’re creating an event, you have to enter details. See Figure 1-11.

Figure 1-11: Enter event details here.
You can’t start working on an event and save it as a “draft” and then publish it later. So before you start, make sure that you have all the details ready! As soon as you click the Create button, the event will be published. (You can make changes, however, which we discuss in the later section, “Editing your event.”)
Enter your event details in the following fields:
- Name: The event name will show up in people’s calendars, their notifications, and posts about the event, so make the name compelling and descriptive.
- Details: Write a description about the event, what you plan to do, why someone should attend, and so on. Put the main information in the first seven lines because that’s what people see. After seven lines, users have to click the See More link to see the rest of the description.
As of this writing, Facebook doesn’t offer a way for attendees to pay to register for events. If your event requires paid registration, you need to send attendees to another site where you can accept payments (such as Eventbrite); put the link to this site in the first part of your description. You can have a very long description in the Details field, and giving people as much information as possible here is a good idea.
- Where: Fill in this field with a description of where the event is to be held. The information in the Where field also shows up if you post a link to this event or share this event, so make sure that you provide the name of the venue and a description.
If the event is going to be held at a place that has a Facebook Page, or if the place has been categorized as a Facebook Place, you can start typing the place’s name and link to it. That way, people will be able to see more information about the place within your event. If you start typing the address of your event, the Place or Page may come up in the field that’s tied to that address, and you can select the Facebook Place or Page.
If you’re holding an online or virtual event, you can add more description to market it, such as “In your pajamas at home” or “An online exclusive event.”
- Tickets: If you have an external website where people need to register or buy tickets, enter that in this field.
- When: For typical events, you have a beginning time and an end time. If you’re promoting an occurrence such as a book launch, you can specify a range of time during which you’ll be promoting the event. The benefit of using a range of time is that your event will show up on people’s sidebars for the duration of your event.
To enter a range of time, enter the exact time when the event begins, rather than just the date. After you enter the time when the event begins, an End Time? link appears to the right of the time field; click that link to enter the end time for your event.
- Only Admins Can Post to the Event Wall: By default, this check box is deselected. If you don’t allow attendees to post on the Event page (also called the Event Wall), they can’t ask questions, communicate about the event, or connect with other people — all things that you want them to do! Disable this feature by selecting this check box.
- Add Targeting: You can select some targeting based on Gender, Relationship status, Educational status, Interested In, Age, Location, or Language so that the initial post about the Event is only shown to those people. In general, we recommend not restricting the post because it’s better to have it be seen by as many people as possible.
Click the Create button when you’ve filled out all the fields. You are taken into the Event where you can add a photo as shown in Figure 1-12.
Your event will be immediately posted to your Page Timeline, so we recommend adding a photo right away. You can’t add a photo until you create the event, though. You can immediately hide the event if you aren’t ready to announce it to the world, but your event shows up on your Events tab.
Even if you don’t have a specific picture to go with the event, find one on the web (making sure that you have the appropriate permissions or that the picture is royalty free), or use one of your previous photos you have uploaded to Facebook. You want a picture to go with your event to make your display more visibly interesting. See Figure 1-13.

Figure 1-12: Add an Event photo right after creating the Event.

Figure 1-13: Your Event is posted to your Timeline.
If you’re hosting a large event, design a picture or image specifically for it. You’ll have more branding for your event and get a better response. The best Event photo size is 801 x 250 pixels.
Synching events with your personal calendar
After you create an event or RSVP to someone else’s event, you can easily export this event to your personal calendar so you don’t miss the event.
- Click the three dots in the top-right corner of the Facebook Event page.
A drop-down menu appears.
- Choose Export Event.
A pop-up window appears, as shown in Figure 1-14.
- Select the Save to Calendar radio button.
- Click the Export button.
The event is downloaded as an ICS (.ics) calendar file, which works with Outlook.
You can turn off notifications for the event from the three dot’s drop-down menu (top-right corner) if needed. The three dots appear only after you confirm you are Going (by clicking Join) or Maybe going to the event.
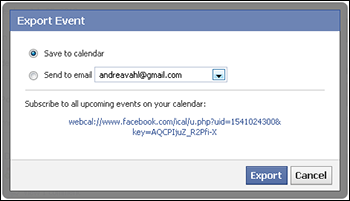
Figure 1-14: Choose where to export the Facebook Event.
Editing your event
In case you need to make a change to your event after you create it, editing the event is very simple. From your Facebook Page, follow these steps:
- Click the Events tab below your Cover photo.
You see your events listed, as shown in Figure 1-15.

Figure 1-15: Your events are listed when you click the Events tab.
- Click the title of the event you want to edit.
You’re taken to the Event details area.
- Click the Edit button under the event photo, as shown in Figure 1-16.
- Edit any of the event details just as though you were creating the event.
- Click the Save button after you make your changes.
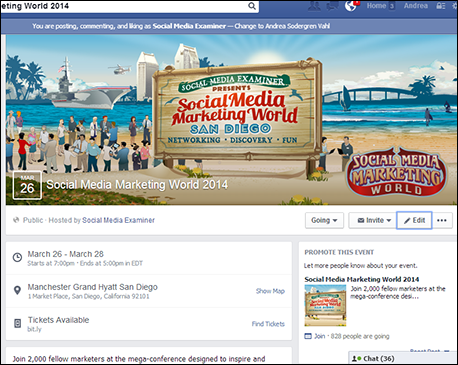
Figure 1-16: Click the Edit button under the Event photo.
Canceling your event
Canceling a Facebook Event is easy. Of course, you can edit the Event information if you need to, as we discuss in the preceding section. If you accidentally create multiple events or need to cancel an event, however, follow these steps:
- Go to your event by clicking the Events tab below your Cover photo.
- Click the title of the event.
You’re taken to the Event details area.
- Click Edit.
- Select Cancel Event in lower-left corner of the pop-up box that appears (see Figure 1-17).
A warning asks whether you’re sure you want to cancel.

Figure 1-17: Cancel an Event here.
- Click the blue Yes button.
Your event is canceled. As the warning reads, the cancellation can’t be undone, and you’ll no longer be able to see the event. Invited guests receive a notification that the event has been canceled.
Uncovering Limitations of Facebook Events
Creating a Facebook Event on your Facebook Page is different from creating the event on your Facebook Profile in two main ways:
- When you create an event via your Page, you can’t directly invite your fans to your event. You can log in as your Profile, join the event, and then invite your personal friends to it. You may have some friends who overlap as fans of your Page and it can be helpful to invite them. When you create an event on your Profile, you can select the guests whom you want to invite from your list of Facebook Friends. These people receive a notification that you’ve invited them to your event; they also get an e-mail notification if they have that feature enabled. But because Facebook Pages can’t invite their fans, you have to get the word out about your event by posting it to your Timeline and encouraging others to invite their Friends from within the event itself.
A business Page can’t invite its fans to an event because the guest list could be public information. Facebook does watch out for privacy concerns at times!
- When you create the Event via your Page, you can’t send Facebook e-mails to the people who will be attending the event. Facebook e-mails are very visible and helpful when you need to let people know about a major change. Any activity within the event will still show up in a user’s notifications area (unless they declined), which is also visible.
Even though you have these limitations when you create an event on your Page, we still recommend that you use your Page for any business activities. Facebook Events can still be beneficial ways to promote your event to your community.
Promoting an Event
After you create your Facebook Event, promote it. Make your promotion fun and exciting; post a few teaser announcements to let your community know to be watching your Page. Something like “Big news coming tomorrow about something you won’t want to miss” can work well to create some buzz before you post the actual event.
Remind people about your event often, just in case they missed the post in their News Feeds. Having said that, there’s a line between getting the word out about your event and overpromoting it. To avoid crossing this line, make sure that you still have plenty of value in your other posts. Also, don’t just post your event over and over, or people will unlike or hide your Page! A good general rule is to have no more than ten percent of your posts promotional.
Inviting your community to your event
Because you can’t invite your community via a standard Facebook invitation, try these main ways to get the word out about your event:
- Post your event to your Timeline as a link.
- Tag your event in a Timeline post.
- Post updates.
You may also think about running a Facebook ad campaign that targets your audience or using Facebook Promoted Posts. See Book VIII for more information on advertising.
Vary your posts and keep them fun.
Notifying your Page community of your event
Your event was posted to your Timeline when you created it, but you should repost your event regularly. Some people will have missed the initial post, and others may need to be reminded to RSVP to your event.
To continue getting the word out about your event, share the event as a link on your Page at least once or twice per week. Include the link your updates — just click the Link button in your update and paste the link.
Each Facebook Event has its own unique URL, just like any other website. You can find the link to the event this way:
- Click the Event tab on your Facebook Page.
- Select the event.
See Figure 1-18. The picture for your event is the one posted next to the event.

Figure 1-18: Copy the Event’s link, and paste it into a post on your Page.
When you post your event as a link, it’s easy to share with other people. If the event link is in the News Feed, people can click Share to see a pop-up window that lets them fill out their own invitation to the event, as shown in Figure 1-19. In the status part of your post, ask people to click the Share button and spread the word about your event.

Figure 1-19: Encourage people to Share to post your event to their News Feeds.
Find ways to vary your posts about your event. Give away a promotional item, feature a particular vendor or sponsor of your event, or add something new to the event to give you a reason to make a new announcement about it.
Inviting Friends to the event
After you create your event, you can invite your Friends. If you don’t have any Friends who are also fans of your page or who are interested in your business, this might be a step you don’t need to take.
If you have some overlap between your Friends and fans, though, take some time to invite your Friends:
- Click the down arrow in the upper-right corner. Select your Profile from the drop-down menu under Use Facebook As.
You have to be logged in as your Profile rather than your Page to invite your Friends.
- Go to your Facebook Page but remain logged in as your Profile.
You can do this by typing the URL of your Facebook Page in your browser window or selecting your Facebook Page name from the left sidebar of your personal Profile home Page under the Pages heading.
- Click the Events tab on the left sidebar our under the More menu under the cover photo.
You see all your upcoming events listed.
- Click the event you will be inviting your Friends to.
You see the Event page.
- RSVP to the event as your personal Profile by clicking Join (assuming you’re going; after all, you did create the event).
- Click the Invite button under the Event photo.
A drop-down menu appears.
- Select Choose Friends.
A window shows a list of your Friends, as you can see in Figure 1-20.

Figure 1-20: Select the Friends you want to invite to your event.
- Select the Friends you want to invite and click the blue Send button.
You see a message that your Friends have been invited and that you’re done. Your Friends receive a notification that you invited them, and the event will appear in their Events area. If your Friends have already RSVP’d to the event, they will be grayed out.
There is no Select All button when inviting your Friends to an event; you have to individually select the check boxes next to your Friends’ Profile pictures. You can also filter your Friends by using the Search by Name drop-down menu (refer to Figure 1-20). You can then display all the Friends from one of your Facebook Lists to make selecting them easier. This works well if you have created a Facebook List just for your business contacts.
Asking attendees to share the event
The people who are attending the event can be your best advocates for spreading the word, but you may need to educate people about how to share the event and invite their Friends.
Anyone can share an event, regardless of whether that person has RSVP’d or has even been formally invited. However, you can invite your Friends only to an event that you have RSVP’d for. Even if you declined the invitation, you can still invite your Friends to the event.
Your invitees have three ways to share:
- Click the Share link in the post when the event has been shared as a link as described earlier.
- Paste the direct link to the event as shown in Figure 1-18 into their Facebook status area.
- After people have RSVP’d to the event, they can invite their Friends to the event using the Invite button that appears in the upper-right corner of the Event page (refer to Figure 1-21) in the same way you invited your Friends. The person must have responded to the event by clicking the Join, Maybe, or Decline button of an event before she can invite Friends.
The fewer steps you ask users to take, the better. Telling people to share the post by clicking the Share link is the easiest way; don’t make the process too hard! You may need to educate your connections about how to share this event:
- When you post your event in a Timeline post, include a call to action such as “Feel free to share this event with your Friends by clicking the Share link below this post.”
- E-mail people, asking them to help promote your event by going to your Facebook Event URL and clicking the Share link in the bottom-left corner.
- If you want to tell someone how to Invite their Friends to the event, share your event as a Link, tell people to click the event (if they’ve already RSVP’d), and then click the Invite Friends button to invite their Friends directly.

Figure 1-21: Click the Invite button in the upper-right section of the event and select Share Event.
Encouraging interaction within your Facebook Event
Your Facebook Event contains its own page on which people can post messages about the event. Here’s what you should do on that page:
- Respond ASAP. If people are posting about the event, make sure that you’re responding and connecting. People may have questions about the event, and you want to answer those questions as quickly as possible. Other people likely have the same questions, and the sooner you address any issues that arise, the better for your business.
- Post evidence. If your event is recurring, post some pictures of past events to show people how much fun or well attended the past events were. You may also want to post pictures of past events on your Page Timeline and then tag the events.
- Enlist friends’ help. Ask some of your close friends who are coming to the event to post on the event’s Timeline to get buzz going, as well as to provide social proof — when you can see your Friends or other people giving good feedback about something, you’re more likely to respond favorably to it or to give it a try.
The Event postings aren’t sent to the News Feeds of people attending the event, but they’re visible on the Facebook Event page. People you’ve invited also get a notification when someone posts to the Timeline of the event, which can be a good reminder to RSVP.
Sharing your Facebook Event outside Facebook
Part of your promotion strategy should be to share your event on other sites as well. When you drive traffic to the Facebook Event, you also increase exposure to your Facebook Page.
When you send the link to your event, just copy and paste the URL (refer to Figure 1-18). Here are some places to share your event:
- Blog or website: If you have a blog, post a blog entry when your event is announced. If you have a professional logo, place it on the sidebar of your blog or website, with a clickable link that goes back to the Facebook Event.
- E-mail subscribers: Send an update about your event to your subscribers. If they’re not on Facebook, they won’t be able to RSVP there, but they will be able to view the event. Give them an alternative way to RSVP if they’re not on Facebook.
- Twitter, LinkedIn, and other social media: If you’re on Twitter, tweet the link to your event at least a couple times a week after you announce your event. This can depend on how much you post on Twitter. You want your promotional tweets to stay under ten percent of your total tweets. Also send a message to your LinkedIn connections and to any other social or professional networks you belong to, if appropriate. If your event is local, for example, make sure that you’re inviting only local people from your LinkedIn network, and if certain colleagues have a completely different business focus from the topic of your event, don’t invite them.