
Chapter 3
Administering Your Facebook Business Page
In This Chapter
![]() Interacting with Facebook as your Profile or as your Page
Interacting with Facebook as your Profile or as your Page
![]() Understanding what other people see when they visit your Page
Understanding what other people see when they visit your Page
![]() Knowing how to use your Page Admin panel and editing dashboard
Knowing how to use your Page Admin panel and editing dashboard
After you become a Page Admin, Facebook grants you an additional permission: You can view Facebook as yourself (that is, through your Profile) or as your Page (that is, through your business Page). This particular administrative perk can be a little confusing at first, but by the end of this chapter, you’ll completely understand how and when to use this option.
As Admin of your Facebook business Page, you need to maintain it. An important part of maintenance is simply understanding how your Page looks to visitors and fans, what you can customize and control, and what Page elements are visible only to you when you’re acting as the Admin and when you are viewing your Page “as” your Page. This chapter explains the elements of your business Page and then shows you how to use your Admin panel and administrative editing dashboard to control some of those aspects.
Viewing Facebook as Your Page
Now that you have a Facebook business Page, you have two separate Profiles with Facebook: your personal Profile and your Page Profile. Each Profile allows you to view Facebook, post status updates, and comment on other posts. Depending on which Profile you’re using, though, you show up as either your Profile (you) or your Page Profile (your business).
In addition, each Profile has its own News Feed:
- Your Profile News Feed: Based on your Friends’ status updates and the business Pages you’ve liked as your personal Profile
- Your Page Profile News Feed: Based solely on the Pages you’ve liked as your Page (which we explain in a minute)
In this section, we explain how and when you may want to use each of your Profile options. Before we do, though, you may find it helpful to see each of these Profile options in action. Start by changing your Profile view from (personal) Profile to Page Profile. To do that, follow these steps:
- Log in to Facebook as you normally do.
- Click the wheel in the top-right corner of the page.
- From the drop-down menu, choose the Page link that you want to use.
This menu is where you toggle among your personal and Page Profiles. If you’re an Admin of several pages, you need to select the correct Page.
After you click the preferred Page link, you’re taken directly to that Page. Now you’re viewing your Page “as” your Page, not as your personal account with Admin privileges for the Page. This point is an important one to understand, and you may need to switch between your personal Profile and your Page Profile to see the differences.
When you change over to working as your Page, you should see your Page’s Admin panel expanded to include these sections: Notifications, Messages, See Likes (with a Promote Page button underneath), Pages to Watch, and Page Tips. See Figure 3-1 for that view.

Figure 3-1: This Admin panel is available for every Page you create.
We go over all those sections later in this chapter. For now, we stick to the two different Profiles you have available and how those views look while you’re on your Page.
We’re sure that you’re used to seeing your personal account News Feed. Well, a business Page can have a News Feed, too! Your Page Profile News Feed is based solely on the Pages you’ve liked as your Page. To see that News Feed, click the link in the top-right of the Page called Home. This feed functions just the same as your personal Profile News Feed, except that it’s filled with posts from other Facebook Pages that you (as your Page) have liked. If you haven’t liked any Pages yet as your Page, you won’t have anything in this News Feed. You can’t like a personal account as a Page, so this feed shows only Page updates.
How does a Page like another Page? The next section explains how. Right now, to switch back to your personal Profile, follow these steps:
- Click the down arrow in the top-right corner of the page.
- From the drop-down menu, choose Use Facebook as your personal account name.
This menu is where you toggle your personal and Page Profiles.
There’s one more little view that you need to understand. When you’re on Facebook as yourself, and you go to your Page, you see a notification bar at the top of the page that looks like Figure 3-2. Facebook adds this notification to make it very obvious “who” you are while you’re on your Page — your personal account or your Page. We know that this feature has a little Dr. Seuss feeling to it, but the more you test it, the more you’ll understand it. If you switch to posting or commenting as your Personal profile, you can comment as yourself on the Page. You may want to do that for a company page, so you can interact personally.

Figure 3-2: Change who (your personal Profile or business Page) will post on the Page.
 Now that you’ve had a chance to see your Profile options and are comfortable switching between them, we have a few tips for you:
- If you’re viewing Facebook while logged in as your Page, and you go to another business Page for which you’re an Admin, you won’t be able to do any Admin stuff (editing, posting as that Page, and so on) until you switch back to your personal Profile.
- You can’t post as your Page on anyone’s personal Facebook Profile, but you can post as your Page on another Page.
- Try not to be too spammy by posting as your Page all the time. Yes, this option is a great way to promote your Page, but remember that Facebook is a social network, not a place to go dropping your business name everywhere!
- You can also easily toggle back and forth between your Personal Profile and your Page by going to Edit Page at the top of your Admin Panel and selecting “Use Facebook as your profile or your Page whichever you need to switch to” from the drop-down menu.
Liking other Pages as your Page
If you’ve been on Facebook for a while, maybe you’ve already liked your favorite business Pages as yourself (that is, your personal Profile). If so, you know that when you like a Page, any status updates or shared content for that Page make their way into your News Feed. Liking a Page is one more way to keep up with the brands you enjoy.
Commenting as your business Page instead of yourself is one way to promote your own business Page and increase its visibility in new communities.
We encourage you to spend some time developing a strategy around which Pages you want to have associated with your own business Page. When you’re choosing which Pages to like, it’s a good idea to choose Pages that you think will fit with your audience’s expectations. Liking the NFL Page, for example, would seem incongruous with your Doll Factory Page and wouldn’t mesh well with your established community. On the other hand, that same community may appreciate a link to another business Page about restoring antique dolls.
If you’re viewing a Page as your Page, and you prefer to comment as your personal Profile instead, you need to switch back to your Profile (by choosing your Profile from the Account drop-down menu). When you switch back, you’re deposited on your Profile News Feed instead of the Page you were just viewing. You need to navigate back to that Page and then leave your comment as your personal Profile.
Follow these steps to like a Page as your business Page:
- Switch to your business Page, as noted previously.
- Navigate to a Page you want to like.
You can either search for that Page name or type in the Page URL in your browser navigation window.
- Click the Like button under the cover photo of the Page.
Note that this process is the same one you use when you like a Page as your personal Profile.
- (Optional) Post a comment.
Pages don’t receive notification when a Page likes them, so it’s nice to leave a comment as your Page to say hello. The Page owner will, however, be able to see that you’ve liked his Page as a Page when he looks through his likers and filters for Pages (more on that coming up). When you leave your comment, the posting name and thumbnail image are that of your Page Profile, not your personal Profile.
 When one business Page likes another business Page, that like doesn’t count toward the total number of likes. Suppose that Blogging Basics 101 has 800 likes. If the Simply Amusing Designs Page decides to like Blogging Basics 101, the total number of likes on Blogging Basics 101 stays at 800 instead of increasing to 801. That way, the likes on a Page aren’t artificially inflated by personal and business Profiles owned by the same person.
Using a strategy of liking certain Pages as your Page gives you a curated News Feed for you to view (as your Page). It’s a bit like creating a list of the businesses you want to keep up with. The Home News Feed for your Page Profile can be a great place to view what other Pages are doing for marketing on Facebook, too.
Changing voice preferences
By default, your Facebook business Page settings are such that when you’re on your own business Page, any post you make appears to be from your Page. (In other words, the Page image thumbnail and name are what people see for those posts.) You can change this setting and post as yourself (your personal Profile) on your own Page, too. Your Page may be for your magazine, for example, but you want to post as yourself — the publisher — for a particular reply or comment to a post. You need to change the voice by clicking the link shown in Figure 3-2, earlier in this chapter. You see this link only if you’ve gone to the Page as your personal Profile. Businesses have to decide how they want their Admins to post and comment on the Page. Some businesses “sign” their posts with their real names, and some switch between Page Profile and personal Profile, depending on what they’re posting on the Page.
How an Admin posts on a Page should be spelled out in a social media policy so that everyone is on the same page (pun intended).
Touring the Admin panel
The general layout of the Admin panel is shown in Figure 3-3. The panel has five sections, and you can expand each section by clicking the blue highlighted link to the right of its name. Also, you can Show or Hide the Admin panel itself by clicking the Show/Hide button in the top-right corner of the Page. In this section, we give you a quick tour of the Admin panel’s sections.

Figure 3-3: The Admin panel.
Posts/Notifications
The Posts/Notifications section sits in the top-left corner of the Admin panel. You can toggle between the list of recent posts on your Page and the Notifications for your Page by clicking the highlighted Posts or the highlighted Notifications.
The Posts section shows your five most recent posts with the Total Reach of each post. You also have the option to Boost the Post (pay to push it into the News Feeds) right from this screen. The stars next to your post indicate which ones are performing a little better in terms of engagement; Facebook wants you to consider boosting those further with an ad. Find out more about Boosting Posts in Book VII.
The Notifications section contains a chronological list of actions on your Page: likes, comments, shares, posts to your Timeline, and so on. You can see at a glance the last five or six actions. You also see a red number if there are any notification actions that you haven’t viewed yet, and you can click the See All link to open a list of all notifications. When you click any notification, the activity opens. If you click a notification about someone liking an image, for example, when you click the notification, you go right to that image and can view all the comments.
Messages
The Messages section, to the right of the Notifications section, is an inbox containing messages that people have left for your Page to answer. You can turn on the Message feature or turn it off. (In Figure 3-3, earlier in this chapter, the feature is turned on.) You need to make sure that you’re aware of this section and either get e-mail notifications when someone leaves a message or check this section often so you can answer messages in a timely manner.
To turn the Message feature on or off, follow these steps:
- Click the Edit Page button at the top of your Page.
- Choose Edit Settings from the drop-down menu.
- Click Edit next to the Messages section.
- Select the box next to “Allow people to contact my page privately by showing the Message button.”
If you don’t want the message button showing, uncheck this box.
- Click the Save Changes button.
To read and reply to your messages, go to the Messages section on the Admin Panel and select See All. You can use the search box or click on the magnifying glass as shown in Figure 3-4 to filter by Unread Messages, Archived Messages, Sent Messages, Email only, and Spam.
Messages are private to the Admins of a Page. Posts left on your Page’s Timeline are public. These are two different types of notifications you need to address as an Admin of your Page. Later on in this chapter, we have a more detailed explanation of Page Messages.
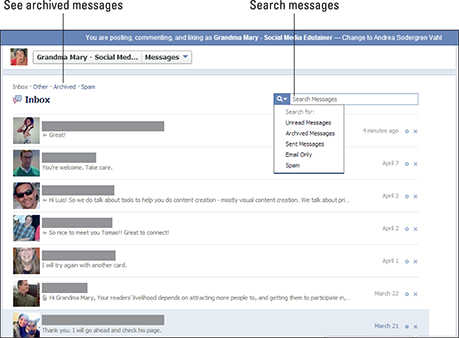
Figure 3-4: The Messages interface lets you archive or search for messages left for your Page.
Get More Likes
The Get More Likes section, below the Posts/Notifications section, is mostly an advertisement by Facebook to tell you to promote your Page — but you can click the See Likes link to see a list of all the people who have liked your Page. Note that you can scroll down the list and click See More to get a look at more of the people who have Liked your Page.
Choose Pages That Like This from the drop-down menu that appears if you click People Who Like This (see Figure 3-5) to see the list of Pages who have liked your Page. If you’re viewing your Page as your Page, you can click those Page names to go to their Page and like the Page as your Page. If you’re viewing your Page as yourself as an Admin, when you click the Page names and go to their Page, clicking the Like button is a personal like. You can also click the X next to a Page or a person and Remove them as a fan.
 Notice you can also make someone an Admin from this screen by clicking the gear icon and then selecting Make Admin as shown in Figure 3-5. Be careful you don’t accidentally make an unsuspecting fan an Admin.

Figure 3-5: See who likes your Page.
Check your new likes on a regular basis, and welcome new people to your Page by posting their first names or by tagging their business Pages. (Find out all about tagging in Book IV, Chapter 2.) Sort the new likes by Page; then like those Pages as your Page and leave comments.
Pages to Watch
The next section inside your Admin panel is Pages to Watch, which is a way to track the progress of other Facebook Pages. You can add up to five Facebook Pages and watch how many new Likes they get over the previous rolling one-week period. Click the blue Add Pages link to search for Pages you want to add.
In theory, you can add any Page but you may want to focus on adding your competition so you can keep tabs on what they are doing on Facebook to get new Likes.
After you add a Page here, the Page Admin gets a notification: Another Page Added your Page name as a Page to Watch. They aren’t told which Page added them.
After adding the Pages in the Pages to Watch area (remember, this is optional), you can get a snapshot of how many new Likes they have and click over to their Page to see what’s been going on.
Page Tips
Currently, the last section of the Admin panel is a space where Facebook can post things it wants you to see. On one day, for example, Facebook offered a promotion for business cards from Moo.com, so you could click the Next link to scroll through the promotions. We can imagine this space being used for all sorts of announcements and promotional offers.
Understanding How Other People See Your Page
We think it’s a good idea to give you an overview of some fully functioning Pages so you can see how business Pages look to the public. The best place to start is www.facebook.com/pages (you must be logged in as your profile, not your Page). Click any of the Pages listed, and note these Page features:
- Cover photo
- Profile photo
- Featured apps
- Profile image
- Friends (mutual connections)
- About section
- Talking about This (number of people who are interacting with your Page)
- Likes (number of personal Profiles that have liked the Page)
- Message button (may not be available if the Page has not enabled it)
- Latest posts from the Page
Figure 3-6 has callouts for each item on this list so you can see how these elements appear on a business Page. The following sections explain these elements. Also note that you can see additional information by clicking on the Likes, About, Photos, Apps, and More links.

Figure 3-6: A business Page as seen by the public.
Cover photo
One of the biggest changes in Facebook Pages recently was the format change to Timeline. Now personal accounts and business Pages have the Timeline structure, and one of the most important components of the Timeline is the Cover photo. This image is 851 pixels (px) x 315 px.
We don’t know whether you’ve noticed, but now when you hover over any account in the News Feed (personal or business Page), a box called the hover card pops up, showing you the Profile image, the Cover photo, and some text related to that account. The text that appears for a business Page is the category. New Media Expo does a great job of using a Cover image and a Profile image to create a great effect, as shown in Figure 3-7.
The hover card can be considered a free ad. If done well, like in the New Media Expo example, branding and information can be conveyed beautifully. Notice in the example how you see the date of the event, thumbnails of any Facebook Friends who are attending (social proof), an image of the excitement of attending (the Cover image), and a quick way to like the Page.
Check your Page’s hover card by going to your Page and hovering over your own Page’s name on a recent post. Does the hover card fully convey the qualities or products and services your business provides?

Figure 3-7: Here’s a great example of why a Cover photo, Profile image, and page category are important.
Featured apps
If you have a brand-new Page and haven’t added any Facebook apps or custom apps yet (more on that soon), your visitors see only one or two app boxes below your Cover photo: Photos and Likes (if you or someone else has liked the Page). You want to add apps as you develop your Page, and we show you how to do that in Chapter 2 of this minibook. You may want to add your e-commerce page, newsletter sign-up page, YouTube videos, and many more things.
Your visitors see these Featured apps on your Page and are able to click through all of them. If you have more than three app boxes, visitors to your site can expand or contract the apps by clicking the See all link in the Apps section or by clicking the More link under the cover photo.
Keep two things in mind:
- Currently, you can’t see any custom apps through the official Facebook mobile app unless the app developers have a mobile-ready link available.
- Most people don’t know how to click the More link to reveal the other apps.
Three highly functional apps probably are plenty to have in the beginning. As you create contests and other offers, you can add apps that contain that information.
Profile image
The Profile image is important for many reasons; its thumbnail is what accompanies your posts, it’s on the hover card (previously mentioned), and you can use promotional text on it.
If you’re branding your business logo, the Profile image is a great place to put it. If you’re branding yourself, your lovely face needs to be in this position. If you have events, you can use the Profile image to promote the date and location (see the New Media Expo example in Figure 3-7).
Friends (Mutual connections)
Facebook has a section in the top-right corner of personal Profile Timeline that shows friendship connections. If you’re viewing Facebook with your personal Profile and go to someone’s personal Profile, you can see which Friends you have in common with that person, which photos you and that person tagged have in common, and Pages that both of you liked.
Facebook created a similar space for Pages. When you visit any Facebook Page, you see in the top-left corner (below the Cover photo) a similar space showing which of your personal Profile Friends have liked that Page too. You see this display only if you’re viewing Pages as your personal Profile. If you switch over to viewing Facebook as your Page, that section disappears.
About section
Below the Cover photo on the left side is a little section that shows a little bit of text. This area contains some of the words you put in the Short Description on the Page Info section when you started your Page.
To adjust the text that shows up here, follow along:
- Click the About area or the word “About.”
You’ll see the Basic Information for your page.
- Hover over the top-right corner of About and click the hidden Edit button.
The Page Info section opens.
- Click Edit next to the field and type your changes.
- Click Save Changes when you’re done.
Any web address you enter in the About field on the Basic Information page (if it contains the http:// part) will be hyperlinked, so make sure that you type it in full so that people go to the correct page when they click the address.
Notice what’s appealing in the About section on other Pages. Some Pages use the space to give viewers a quick explanation of the Page and to list a call to action. You can even put customer testimonials in this section. Here are a few good examples:
- Mari Smith (https://www.facebook.com/marismith/info): This is a great example of using links to products and a complete description of her services. Mari is a must-Like on Facebook — she provides a ton of great information!
- Inbound Zombie (https://www.facebook.com/InboundZombie/info): See how you can use customer testimonials and information about actual results to showcase a business.
- New York Times (https://www.facebook.com/nytimes/info): The New York Times uses Milestones effectively on its Facebook Page. The Milestones are listed on the About page.
The numbers
When you click the Likes link below the cover photo, you can see more data about a Page. Two numbers are listed below the name of any business Page. Everyone can see these public numbers:
- Total Page Likes: The number of people who have clicked the Like button at the top of the Page. This number doesn’t include business Pages that have liked the Page — only personal Profiles that have done so.
- People Talking About This: The “talking about this” number, discussed fully in Book IX, is the number of people who have interacted with your Page in any way, such as liking it, posting to your Timeline, commenting, or sharing one of your posts in a rolling one week period.
- New Page Likes: You can see how many new Likes the Page has gotten over the past 7 days, and the graph also compares this week’s new Likes with last week’s Likes as shown in Figure 3-8.
Note: If you have a local business and your Page is a Places Page (see Chapter 1 of this minibook), there’s a third number, for check-ins.

Figure 3-8: If you click Likes on any Page, you can see more information.
As you build the number of people who click the Like button, and you follow the suggestions in this book about creating a good community on your Page, you’ll naturally find more interaction on your Page. You also have a better chance of getting into the News Feed of your community (more about that in Book IV, Chapter 2) and, we hope, increased revenue or branding awareness — whatever main goal you chose for your Page (see Book I, Chapter 2).
Some Facebook consultants say that a good time to start running contests is when you reach more than 1,000 likes because you should have plenty of entries then. You know your niche better than anyone else, though. When you reach a milestone number, do something special for your Page community. Some Pages celebrate milestones at 100, 500, 1,000, 2,000 likes, and so on. Think up something special for each milestone. If you decide to give away something, make sure that you follow Facebook’s guidelines for sweepstakes and contests. You can find all the info in Book VI, Chapter 2.
The likes
Below the Cover photo is the Likes section. If you selected Manage Permissions, Post Visibility check box, there will be a box for Post to Page above the Likes section. In the Likes section, you and your visitors can see other Pages that your business Page has liked, as shown in Figure 3-9. This section shows up to three other Pages. Every time anyone refreshes your Page, the Pages listed are in a different order. Also, you can set your Admin dashboard to display three Featured likes. We show you how to do that a little later in this chapter.

Figure 3-9: A Page has liked these other business Pages.
You need to decide whether you want your visitors to see these Pages. Some businesses like to associate themselves with certain Pages to add to their reputations; others don’t want to show anything that takes someone off their Page.
These Pages are not the ones that you liked as your personal Profile. Pages that you like as yourself (that is, as your personal Profile) are listed on your personal Profile’s Info page.
Message button
You have the option to turn on or off the private Message button on your Page. If the button is turned on, you see it on the Page. If the button is turned off, you won’t see it.
This Message button functions just like a Private Message on your personal account. Your Page can receive private messages, too. You can think of Messages as a kind of e-mail inbox. That’s the way Facebook wants you to look at Page Messages.
To turn on the Message button on your Page, follow these steps:
- Click Edit Page in the Admin panel.
- Select Edit Settings.
- Click the Edit link next to Messages.
- Select the Allow People to Contact My Page Privately By Showing the Message Button check box to activate the Message button on your Page.
- Click Save Changes.
When you have the Message button turned on, you need to check the Messages section of your Admin panel regularly. Reply to messages just as you reply to e-mails. You cannot send outbound messages as your Page without first receiving an inbound messages. Pages can only Reply to messages, not send them out unsolicited.
Drop-down menus on Pages
All Pages have a couple of drop-down menus, as shown in Figure 3-10. Click the icon to see a variety of links that we’ll go through next. What regular visitors see through this gear icon on your Page and what you (and any Admin of any Facebook Page) see will be different. Also, if you’re viewing your Page as your Page, you see a different view from the Admin view.

Figure 3-10: Clicking the gear icon drops down a list of handy links.
If you haven’t Liked the Page yet, you only see the Like button and then once you have Liked it, you have some additional options if you click the Liked drop-down menu:
- Get Notifications: This option turns on notifications for you for this Page so that any time this Page has a new post, you get a notification on your personal profile. Turn on Notifications for Pages that you really care about so you don’t miss anything. But don’t turn on Notifications for every Page you Like or you will be overwhelmed.
- Add to Interest Lists: This option enables you to add the Page to a Facebook Interest List. Using Interest Lists can be a strategy to get your Page seen by a larger audience. Book VIII, Chapter 1 discusses advanced marketing strategies. This Add to Interest link is seen by anyone on any Page.
- Unlike: You can Unlike the Page with this selection.
Under the drop-down menu shown with the three dots you see a couple of options.
- Report Page (visible on other Pages, not your own): You can report any Page if you feel that it’s breaking Facebook rules, and other people can report your Page if they feel that it’s breaking Facebook rules. When you click this link, you bring up a dialog box that takes you through the process of reporting the Page. If you don’t see this as a link, you can click the Visit Help Center link and search for Reporting a Page.
- Create a Page: This is a quick link to go to the interface to create a new Page. Everyone sees this link.
Between the two drop-down menus you see two options.
- Following: You can unfollow a Page you Like which means that you won’t get updates in your News Feed from this Page even though you Like the Page.
- Share: This option is by far the most important. You want visitors to your Page to choose it! Doing so brings up a post (that you can edit) that appears on their Timelines for all their Friends to see. (We talk about sharing in detail in Book IV, Chapter 1.) Go ahead and choose this option on any Page to see what happens. All the information in the post comes from particular fields on the Info link for the Page you’re viewing. If the Page didn’t put information in the Company Overview section (or other fields — again, review Book IV, Chapter 1), there will be no text, just the name of the Page hyperlinked back to the Page. You may want to adjust your own Page after seeing how it looks on someone else’s Page.
Editing Your Page
Now that you know how other people see your Page, you can see how it looks from the inside! This section explores all the ways you can edit your Page. You see where you add applications (apps), change the information people see about your Page, change your Profile image, and do many other things.
To start, click the Edit Page button at the top of your Admin panel, as shown in Figure 3-11.
You can click Update Page Info, Edit Settings, or Manage Admin Roles. It doesn’t matter, because clicking any of these will put you on your Page’s editing dashboard. You’ll be able to choose the item you want from the top menu. The other two selections — Use Activity Log and See Banned Users — are covered a bit later in this chapter.

Figure 3-11: Click this button to find the interface for editing your Page.
You’re looking at your business Page’s administrative dashboard, as shown in Figure 3-12. This dashboard is where you edit and modify your Page. Notice the nice collection of navigation links across the top. In the following sections, we walk you through each of these options.

Figure 3-12: The Page dashboard for editing your Page.
Remember all that work you did to figure out the type and category you wanted when you created your Page? Remember the Info editing? Well, if not, that’s okay. You can edit everything on your Page’s Info tab by clicking the Update Page Info link on your administrative dashboard. Each section can be edited by clicking the Edit link on the right side of the name of the field.
The fields you find on the Page About tab are specific to the category and Page type you selected when creating your Page. You can change the category and Page type for your Page by choosing new settings from the drop-down menus. The first drop-down menu allows you to choose a new category for your Page; the second drop-down menu allows you to choose a new Page type. Make sure that you click Save Changes before editing the fields, because those fields might change with the category change.
Fill in all the fields, remembering that you don’t have to stick to what the fields are asking for. The Founded field, for example, allows you to have up to 260 characters, but you don’t have to use that many.
You can also add your Twitter username, website address, LinkedIn profile page, and any number of other things. If you include a web address, make sure to include http:// so that the address will be hyperlinked.
When you create your Page, the URL is long and unwieldy because it contains your Page’s ID number. It looks something like this:
http://www.facebook.com/pages/The-Social-Classroom-with-Phyllis-Khare/123451234512345
What you want is a vanity URL (or pretty URL). Facebook also calls it a “username.” You want it to look like this:
http://facebook.com/TheSocialClassroom
When you set up your business Page, or when you’ve reached the requested 25 likes on your Page, navigate to the Basic Information tab from your administrative dashboard, or go directly to www.facebook.com/username.
You can use the Username page to set your Profile username, too. Make sure that you don’t set your business Page name to your personal name! Notice the username page has two sections (see Figure 3-13): one for your personal name and one for your Pages. Your best bet is to set your personal account to your name (such as www.facebook.com/andreavahl) and then set your Page URL.
Click the Check Availability button to check available usernames. A Username Available box comes up, displaying several things to keep in mind about a username, such as making sure that you have the right to use the name you’ve selected.

Figure 3-13: When setting your username for your Page, make sure you are selecting for Pages, not your personal account.
When you have something that you like, and it’s available, click Confirm. Now you have a nice, neat URL for your Facebook Page. You can use this URL on everything, including letterhead, websites, and e-mail signatures. We go into great detail on how to use this URL in Book IV. In the meantime, put this URL in your next e-mail to your customers so that they can find you easily on Facebook.
Edit Settings
The Settings section gives you options that determine how a person can interact with your Page, as shown in Figure 3-14. We want to explain each option on this page because these options directly affect how first-time and loyal visitors see and network on your Page. Click the Edit link next to the name of each section to open up the options for each section.

Figure 3-14: Change how people can interact with your Page.
- Page Visibility: We discuss the Page Visibility check box in detail in Chapter 2 of this minibook. Selecting this check box hides your Page from the public until it’s ready for viewing.
- Posting Ability: This section has two check boxes: Everyone Can Post to the Page’s Timeline and Everyone Can Add Photos and Videos to the Page’s Timeline. Selecting these check boxes allows anyone to create a new post directly on the Page’s Timeline. If you prefer to have people only be able to comment on the Page’s own posts and not as a new post on the Timeline, then clear these two check boxes. You can read Book IV, Chapter 2, where we discuss this more thoroughly.
Sometimes you want (or don’t want) random visitors to be able to post videos or photos on your Page. You can always remove random spam posts, but you can nip spam in the bud by not allowing outside posts.
- Post Visibility: You can collect all the posts that others make on your Timeline by selecting this check box. Then you can decide whether you want to make these posts visible or hide them from the Page. After reviewing the posts, you can highlight any of them so they show up in the Highlight view.
You can also choose to remove the Recent Posts by Others box by clearing the Highlight Recent Posts by Others in a Box at the Top of My Page Timeline check box. This doesn’t prevent people from posting but may make other people’s comments less obvious to visitors to your Page. On the other hand, it’s nice to show that you’re getting interaction on your Page and responding to it.
- Post Targeting and Privacy: By default, this option is off. Turning it on allows you to select an audience each time you post where you can target by country or language. This is different than the Targeting option on the posts that exists because when you use Post Privacy Gating, the post is actually hidden from your Timeline from everyone except that audience.
- Messages: When you select this check box, people can message the Page just like they can message a person’s personal Profile. We discussed this earlier in this chapter in the section, “Touring the Admin panel.”
- Tagging Ability: Select this check box to allow people to tag photos they take with the name of your Page. Think this one through. If your business sponsors events or has products that are sold in stores, you want your fans to be able to take a photo and tag your Page so those photos end up in your Page’s albums. But some people use this feature to get the attention of a Page or to spam the Page. To remove a tag, view the photo, click the Options button at the bottom of the photo, and then select Report/Remove tag. Then select the radio button to remove the tag.
- Notifications: You can choose to get notifications On Facebook, which means you get a notification on your personal Profile as well as your Page which works well if you are on Facebook frequently. You can also select Email notifications. Each admin will have their own preferences set up in this section. E-mail notifications work well if you aren’t on Facebook that often and want to be notified if someone posts on your Page or comments on a Post.
- Country Restrictions: When you leave this field blank, anyone can see the Page whether she is logged into Facebook or not. When you type a country’s name in this field, you can select the country’s name that is autosuggested. Then you have two radio button choices: Only Show This Page to Viewers in These Countries, or Hide This Page from Viewers in These Countries.
Be careful about setting the Country Restrictions or Age Restrictions because these settings will cause your Page not to be visible unless someone is logged in to Facebook. The person needs to be logged into Facebook before Facebook can determine whether they live in the right country or are the right age. These restrictions even affect your Like Box not showing up on your website unless someone is logged into Facebook.
- Age Restrictions: The default setting allows anyone older than 13 to see your Page. If you need to restrict viewing to people older than 17, 18, 19, or 21, you can set that level by choosing it from the drop-down menu.
If you’re promoting a business connected with alcohol, the Alcohol-Related age restriction sets the minimum age based on the location of the user. Only users in Canada and South Korea who are 19 or older, users in Japan and Paraguay who are 20 or older, users in India who are 25 or older, and users elsewhere (including the United States) who are 21 or older can view your Page. Facebook makes the point quite clearly that you are ultimately responsible for who sees your Page, however.
- Page Moderation: You can add comma-separated keywords that Facebook automatically marks as spam if they show up in a post to your Page or in a comment on a post.
- Profanity Filter: The drop-down list gives you three choices; None, Medium, and Strong. We know that we should come up with a witty description here, but &*%@# if we can! Seriously, if you think that people might come by your Page and use profanity, choose Medium or Strong.
- Similar Page Suggestions: Facebook has a feature that when someone Likes a Page, a section appears where Facebook shows similar pages that they can Like if they want. Including your Page in this option means that your Page gets suggested to others but it also means that other Pages (and possibly competitors Pages) are suggested to people when they Like your Page. If you have concerns about that happening, clear the check box to opt out of this feature.
- Replies: The comment replies allows you to reply to a specific comment, and it will be indented to show that the reply is for that comment alone. Before this option, the comments were in one long thread, and it was hard to tell who was talking to who so you always had to mention the person’s name.
- Merge Pages: This option is for merging duplicate Pages and Places. We cover this in more detail in Chapter 2 of this minibook.
- Remove Page: This deletes your Page. Keep in mind that you can’t undo this action. Deleting a Page deletes everything — photos, posts, and so on. Make sure that you copy everything you want from the Page before you choose this option.
If you delete a Page for which you had already set a vanity URL (and you want to use that particular URL for a new Page), that URL won’t be available for at least 14 days after deletion. If it isn’t available after that period, you need to file an infringement form with Facebook and ask to use it again. It may be easier to just hide the Page by selecting the Page Visibility check box at the top of the Manage Permissions section. Find the infringement form at
Below the Email Notifications check box, look for the View All Email Settings for Your Pages link. See it? We suggest that you click it. When you do, you’re taken to your personal Profile settings that shows all your e-mail notification settings. You may want to go through this page, as we were surprised by how many e-mail notification settings we needed to change, especially for apps.
Admin Roles
Admins are people who can administer your Page. To get to the Admins, click Edit Page and Manage Admin Roles. There are five types of Admin roles, which we describe in this list:
- Manager: The Manager role is what you are when you create the Page. You and anyone else with this designation can edit and delete items on your Page, ban users, post status updates and comments, and send messages to fans. Everything you can do with your Page, Manager Admins can do, too.
- Content Creator: Anyone with the Content Creator Admin status can edit the Page, create a status update, create ads, and view Insights on your Facebook business Page, and it will look as though the Page made the update, not them personally (unless they change the voice, as discussed at the beginning of this chapter). The status update has the Page thumbnail image and the Page name listed. A Content Creator can do everything that a Manager can do except add or remove Admins.
- Moderator: The Moderator Admin status allows someone to reply to comments, ban and block people, send messages, create ads, and view Insights, but not to create a post on the Page.
- Advertiser: The Advertiser Admin status allows someone to view Insights and to create and manage ads on behalf of the Page.
- Insights Analyst: The Insights Analyst Admin status lets someone into the Insights interface and download data from that area.
Here are some quick points about being an Admin of a Page:
- You can have as many Admins and Admin types as you want.
- Always have at least one other person as your Manager Admin in case you’re unavailable to make changes in other Manager roles.
- All Admins need to click the Your Settings link on the navigation menu to adjust the e-mail notification settings and must understand the voice process. By default, Facebook selects the e-mail notification check box for all activity on the Page. This setting means that all Admins receive e-mail notification whenever someone posts or comments on the Page unless Admins deselect it. We discuss this topic in the “Your Settings” section, earlier in the chapter.
- As a Manager Admin, you can remove your own Admin status or another Admin. Then you view your Page just the way any fan of your Page does. You don’t see the Admin panel, and when you post, you post from your personal Profile. You don’t receive any e-mail notifications for the Page.
- Facebook requires each Page to have at least one Manager Admin. If you try to remove yourself as a Manager Admin before adding someone else, you won’t be able to remove yourself.
Here are the steps for adding someone to your Page as any type of Admin:
- Go to your Page, and click the Edit Page button.
- Choose Manage Admin Roles from the drop-down choices.
- Type the name or e-mail address of the person you want to add as an Admin.
If you start typing the name, Facebook displays suggestions; just click a name to select it. You need to be a Friend of this person to be able to add him as an Admin this way.
If you aren’t the person’s Facebook Friend, you can add the e-mail address that he used to open the Facebook account. The person receives a Facebook notification that they have been made an Admin of the Page. If you’re having trouble adding the Admin, it can help to have them make sure they like the Page.
- Choose the Admin role from the drop-down menu.
- Click the Save Changes button.
A security dialog box appears where you have to enter your personal Facebook password.
- Enter your Facebook password as a security step and click Confirm.
That person is added to the list of Admins for the Page.
Here are the steps for removing someone as an Admin of your Page:
- Go to your Page, and click the Edit Page button.
- Choose Manage Admin Roles in the drop-down choices.
- Click the X next to the name of the person you want to remove.
If you’re removing yourself, click the X next to your name.
You won’t be able to edit your Page or gain access to Insights, ads, notifications, and so on when you remove yourself as an Admin. If you try to remove yourself as an Admin before adding another Manager Admin, you won’t be able to remove yourself. - Click Save Changes.
- Enter your Facebook password as a security step and click Confirm.
Apps
Under the More menu in the Page dashboard, Apps is the first selection. Apps (applications) are developed by third parties, or by Facebook itself, to expand the functions of Facebook. Thousands of apps are available. You can connect an app to your Page to expand what people can do on your Page. Facebook has an App Center that you can explore but the App Center tends to focus more on Facebook games. You can see the Apps here: https://www.facebook.com/appcenter/.
When you create a new Page, you need to activate a few apps right away because they create important links that people will be looking for on your Page. These apps, developed by Facebook, are
- Photos
- Video
- Events (if your business will be having them)
Chapter 4 of this minibook explains all the steps for adding applications to your new Page.
Applications are so important to Facebook that we discuss them in all nine minibooks, especially Book V.
Audience Suggestions
The second menu item under the More drop-down menu in the Page dashboard is Audience Suggestions. The audience of your Page can make suggestions to improve your Page’s information. You can review and accept or decline the suggestions here.
Featured
The third selection under the More menu on the Page dashboard is Featured. The Featured tab has two parts: Likes and Page Owners. We describe both in the next sections.
Editing Featured Likes
The Likes section lets you feature up to five Facebook Pages in a section of your Timeline. You can specify which Pages you’ve liked as your Page will be shown there by selecting five of them as Featured. The steps for liking a Page as your Page and featuring a Page are outlined earlier in this chapter. Click the Edit Featured Likes button and select the check box next to the five Pages you’d like to feature on your Page. Any time you want to feature different Pages, just return to this tab and click the button again and check the five you want.
To have Pages show up in the Likes section of your business Page, follow these steps:
- Log in to Facebook as you normally do.
- Click the drop-down arrow in the top-right corner of the page.
- Choose the Page you want to switch to under the “Use Facebook as” prompt.
This menu is where you toggle between your personal and Page Profiles. If you’re an Admin of several Pages, you need to select the correct Page, or you can select your profile name to return back to your personal profile.
- Navigate to the Page you want to include in your Like section.
- Click the Like button at the top of that Page.
When you return to your own business Page, the Page that you liked is listed in the Likes section of your own Page’s Timeline. After you like more than three Pages, you need to decide which of these Pages you want to feature.
To adjust which Pages are featured on your Page, follow these steps:
- Log in to Facebook as you normally do.
- Go to your Page.
You can do this next step as an Admin or as your Page.
- Click the Edit Page button at the top of the Admin panel and choose Update Page Info.
This step gives you access to your editing menu.
- Click the More link and then choose Featured from the drop-down menu.
- Click the Edit Featured Likes button.
You see all the Pages that you’ve liked as your Page.
- Select the five Pages that you want to feature.
If you don’t want to feature any Pages, clear all check boxes.
- Click Save.
As we explain at the beginning of this chapter, you can like Pages as your Page now, so if you have been on Facebook for a while and have liked certain business Pages through your personal Profile, you can log in as your Page and like those Pages as your Page.
Editing Featured Page Owners
The second section of the Featured tab — Page Owners — raises the curtain on the Admins of the Page. Some businesses want to keep that information private; others want the world to know. This section is where you get to make that decision. When you Feature any or all of the Admins, the Admins have their personal-account thumbnail images and their names listed on the Page’s Timeline.
Mobile
The last selection under the More menu on the Page dashboard is Mobile. When you select the Mobile link, you have the opportunity to create three kinds of mobile connections to your Page:
- With Mobile E-mail: We discuss your mobile e-mail options in Chapter 1 of this minibook, but to recap, you can send a post or upload a photo to your Page by using an e-mail address created specifically for your Page. Facebook puts your unique e-mail address in this section for easy reference. What you type in the subject line of the e-mail on your mobile phone becomes the update to your Page, or if you’re uploading a photo, the subject line becomes the caption. Nothing that you type in the body of the e-mail shows up, so leave it blank.
- With Mobile Web: You can see how your Page looks on a mobile phone by typing its URL in the phone’s browser. It’s easier to type in a custom URL on a mobile device, so Facebook put a link for creating a Page username in this part of the dashboard. The link to create a custom URL is http://facebook.com/username.
If you type www.facebook.com/grandmamaryshow on an Android phone, for example, you’re redirected to http://m.facebook.com/grandmamaryshow (notice the m that precedes facebook). It turns out that your phone is so smart, it knows when you’re looking at Facebook on a phone, so it directs you to the mobile interface for Facebook. Your Page will look a bit different from how it looks on a computer, so make sure that you check it.
You can also type http://touch.facebook.com/yourpagename to see how your Page will look to those who view it on a phone.
- With the iPhone: First, install the Facebook app on your iPhone or iPad; then log in. When you click the menu icon (a box with three horizontal lines), you see the Pages for which you’re an Admin in the left navigation menu.
We recommend that you get the Facebook Page Manager app. You can do a search in the App Store for it. It’s really handy if you manage several Pages.
For the remainder of the Admin tour, go back to the Admin panel on your main Page.
Use Activity Log
Access the Activity Log by clicking Edit Page and then Use Activity Log from your Admin panel. The Activity Log shows everything that happens on your Page from the time you started it. You can see all the Photos, Comments, Posts by Others, Spam, and more listed chronologically. You can scroll through the posts or skip to a certain time frame by clicking on the date on the right (although that feature doesn’t always work that well). You can filter what you are looking at by clicking the selection on the left sidebar, as shown in Figure 3-15.

Figure 3-15: The Activity Log allows you to sort by certain types of posts on your Page.
If you have scheduled posts, you also find those posts here so that you can edit them or delete them.
Notice that you can view Spam from the Activity Log. We recommend you regularly check this section to see whether any posts are being “accidentally” marked as Spam that you want to allow on your Page. To unmark a post as spam, click the “circle with the line through it” symbol that appears to the right of the Post. A drop-down menu appears where you can select Unmark as Spam. Now the post appears on your Page, and you can answer it as your Page.
See Banned Users
When you select this option from the Admin panel, a pop-up box appears showing you the banned users and giving the option to unban them. This pop-up box is actually the same one that appears when you click See Likes on the Admin Panel but is just defaulted to showing you the banned users. Hopefully you won’t have to ban too many users along your Facebook marketing journey. We find that we mostly ban people for excessive spam, but that doesn’t happen too often.
Build Audience
When you click the Build Audience selection, you see different options if you’re logged in as your Page (you only get the Promote Page option) or if you’re logged in as your personal Profile (you see Invite Friends, Share Page, and Promote Page).
We cover the Invite Friends and Share Page options extensively in Chapter 2 of this minibook and the Promote Page option is for advertising your Page. We cover that much more extensively in Book VII.
See Insights
Clicking the Insights link on your administrative dashboard takes you directly to your Insights dashboard.
Insights is Facebook’s analytics system. You can see who uses your Page, as well as see her interactions, age, and gender; where she lives; and her cats’ names (well, no, not yet). You can also see very detailed graphs about the users of your Page and their interactions with it. Get acquainted with the Insights dashboard because it can really help you see who your audience is and give you insight into what people respond to most on your Page.
There’s so much to this wonderful analytics program that we dedicate an entire chapter — Book IX, Chapter 2 — to it.
Help
This selection has a drop-down menu to get you to various types of help. If you select Visit Help Center, it links directly to the business Pages Help section rather than to some general Facebook help page. The page has many sections with a wealth of information to help you with your Page.
We feel that it’s good to go straight to the horse’s mouth (what does that mean, anyway?) when we have a question about Facebook. That’s why this link to the Help section for Pages is handy to have on the editing menu.
Interactive help from Facebook can also be hard to come by, though, and that’s why the Facebook Help Community selection from the drop-down menu can be a good place to go as well. Here you can post questions or search for answers to your particular problem when the Facebook Help Center isn’t enough.
Facebook also has a Getting Started section of their Help which can be good for beginners. (But you won’t need that because you have this lovely book to help you out!)
The last option from the Help drop-down menu is Send Feedback. You can use this link to provide Feedback to Facebook about something not working on your Page or a suggestion for Pages.