
Chapter 3
Exploring Power Editor
In This Chapter
![]() Understanding when to use Power Editor
Understanding when to use Power Editor
![]() Creating and managing multiple ads and campaigns
Creating and managing multiple ads and campaigns
![]() Taking advantage of scheduling tools for Promoted posts
Taking advantage of scheduling tools for Promoted posts
![]() Using Power Editor features to reach known customers or prospects
Using Power Editor features to reach known customers or prospects
![]() Optimizing your campaign bidding for special actions
Optimizing your campaign bidding for special actions
Power Editor makes it easy to create, edit, and manage accounts and campaigns in bulk. It also contains some advanced target marketing tools that enable you to pinpoint your ideal audience for Facebook advertising.
Now that Facebook has moved many capabilities formerly limited to Power Editor — such as mobile ads and conversion pixels — into the regular Ads Create tool (see Chapter 2 of this minibook) or Ads Manager (see Chapter 4), there are only two primary reasons for using Power Editor.
First, if you’re an advanced Facebook Ads power user — that is, you create a lot of Facebook ads with a large budget, or need to segment target audiences at a very detailed level — you may want to use Power Editor to manage multiple campaign variations from one access point.
Second, if you work for an ad agency with many clients who advertise on Facebook, Power Editor is an efficient tool for administering client accounts and campaigns from one convenient dashboard.
In this chapter, we detail the steps required to create and manage multiple accounts, campaigns, ad sets, and ads through Power Editor, and explore advanced tools to pinpoint customers and prospects within your target market.
Deciding Whether Power Editor Is for You
Because Power Editor was developed to enhance advertisers’ ability to bulk manage multiple ads, ad sets, campaigns, or accounts, it offers specific features for this purpose:
- Mass editing of campaign settings, bids, budgets, audience targeting, and flight dates
- Easy modifications to creative elements
- Specialized targeting tools to narrow ad placements to an audience of known customers and prospects or to audiences that are similar to them
- Monitoring advertising statistics and making modifications to improve performance within the tool itself
- Uploading and downloading data to or from Excel or other spreadsheet applications
You can manage up to 25 accounts at one time in Power Editor. If you are an agency managing multiple clients, rest assured that each account will retain its own access credentials, permissions, billing, preferences, and other characteristics.
 Become familiar with the Ads Create tool first. Unless you have a large Facebook advertising budget and the staff time to delve deeply into analytics for multiple campaigns, you will probably find that the Ads Create tool is more than adequate for managing your Facebook advertising. Power Editor is intended for experienced users who find the Ads Create tool too limited for managing complex campaigns or multiple accounts.
Enabling Power Editor
Start by logging in as an admin and accessing Power Editor at www.facebook.com/ads/manage/powereditor. Alternatively, click Power Editor in the left sidebar of the Ads Manager (refer to Figure 4-2 in Chapter 4 of this minibook).
As soon as you do that, the Download Facebook Ad Accounts pop-up window appears (see Figure 3-1). If you have already downloaded one or more accounts into Power Editor, those account numbers will appear in the drop-down account field (to the right of the words Power Editor) in the dark blue row at the top of the main Power Editor screen.
 The Power Editor runs only under the Google Chrome browser. If you don’t already have it, download and install Chrome first from:
www.google.com/intl/en/chrome/browser
Once you see the pop-up window in Figure 3-1, follow these steps:
- Select the account you want to download to Power Editor.
There are several methods for choosing:
- Choose your accounts by name or number. Use the Ad Accounts tab at the top of the pop-up window to display a list of your accounts. (This view is shown in Figure 3-1.) Check the one(s) you want to download.
- Choose by Page ID. Click the Pages tab at the top of the pop-up. The pop-up window changes to reveal a field to enter a Page ID number.

Figure 3-1: Start by choosing ad account(s) to download into Power Editor.
- Search by account ID or name. Click the More Options tab. The pop-up window will change to reveal a field to enter an account ID number, as well as options to search for accounts or download deleted campaigns or ads.
- For the first and third options, you will see a note and a drop-down list where you can add inactive campaigns to Power Editor.
From the drop-down list, you can select the campaigns from within the past 1, 3, 6, or 13 months, or from the start of time. The default is from the start of time, which produces the most data.
The 13-month choice is often quite valuable, since it allows you to compare ad performance to the same time frame in the prior year. This takes into account how seasonal or other cyclical factors may affect advertising. For instance, you would expect ads for school supplies to perform better from August through September, at the start of school, than during the rest of the year. - Click the Download button in the lower-right corner of the pop-up window.
Depending on how many ads, campaigns, and accounts you’ve run in the past, downloading may take a while. When the download completes, you’re ready to use Power Editor.
 You must always click the Upload Changes button, located in the blue toolbar at the top of Power Editor (refer to Figure 3-1), to save any new items or edits from Power Editor to the Ads Manager. Otherwise, the changes you make in Power Editor won’t be implemented.
Navigating Power Editor
After you have completed downloading, you are ready to start using Power Editor, which has a rather complex layout, as shown in Figure 3-2. You have interdependent options to do the following:
- Click the tabs in the top row to toggle among the choices to view information organized by Campaigns, Ad Sets, or Ads.
- Left Pane (Block Number 1 in Figure 3-2): Allows you to filter results by campaigns, ad sets, or tags. Click the + sign next to each filter to reveal your list of options. The selections that appear vary according to the filter you choose.
- List view (Block Number 2 in Figure 3-2): The table displayed varies depending on your choice of view in the top row of data. You will see relevant columns of data for each respective row within the account you selected. These pre-set columns change according to your choice of view.
- Work Space (Block Number 3 in Figure 3-2): This displays editable fields for campaigns, ad sets, or ads, depending on which view you select. If you select multiple ads, ad sets, or campaigns, you can make similar changes to all of them at once.
- Manage Ads drop-down menu (see Figure 3-8 later in this chapter): This menu will be discussed later in this chapter.
To select multiple ads, ad sets, or campaigns at the same time in List view (Block Number 2), hold down the Shift key while you click rows in sequence. Hold down the Ctrl/![]() key to select rows that are separated.
key to select rows that are separated.
After you select Campaigns, Ad Sets, or Ads view, you see a row of additional icons and buttons above the List view. The buttons available depend on your choice of view. These options may include:
 Create: Creates a new ad, ad set, or campaign, depending on which view you’re in.
 Duplicate: Makes an identical copy of a selected row or set of rows in the List view and appends a version number. It works for any view.
 Revert: Undoes any changes made to a selected ad, ad set, or campaign since it was downloaded to Power Editor — that is, as long as the changes have not yet been uploaded to the Ad Manager.
 Delete: Removes selected row(s) for an ad, ad set, or campaign from Power Editor.
 Export & Import: Transfers information to and from spreadsheets. Works for any view.
 Save Audience (for the Ads view only): Creates and saves a Profile for a target audience to use in other ads or campaigns. We discuss saving targeted audiences later in this chapter.
 Tags (for Campaigns view only): Tags are used to label, identify, and organize similarly themed or timed campaigns (for example, Christmas, running shoes, white sales). You can assign as many or as few tags as you like to a campaign. For convenience, you can use the Filter by Tag option in the left pane of Power Editor to display similarly tagged campaigns together.
 View Campaigns (for Ad Sets view only): View Campaigns in which specified Ad Sets appear.
 View Ad Sets (for Campaigns and Ads views only): View Ad Sets included in a specified campaign or to which specified ads belong.
 View Ads (for Campaigns and Ad Sets views only): View ad(s) included in specified Campaigns or Ad Sets.
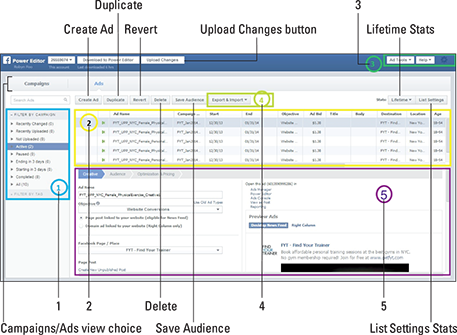
Figure 3-2: The main screen for Power Editor as it appears when viewing by Ads.
 Stats (for Ad Sets and Ads views only): Allows you to select the time frame to display performance statistics for ads or ad sets. The menu defaults to Lifetime, but you can choose Last 7 Days, Yesterday, Today, or Custom.
 List Settings (for Ad Sets and Ads views only): Lets you select the performance metrics you want to review for your ads or ad sets.
At some point, you simply have to get your hands dirty. Try things out. Experiment with the various display choices to see which one is best for your needs. The more you use Power Editor, the more comfortable with it you will become.
Campaigning in Power Editor
Whatever you can do in Ads Create, you can do in Power Editor. Rather than jumping back and forth between the two, you may find it more convenient to create or edit campaigns, ad sets, or ads directly within Power Editor while you are actively using it to manage or review multiple campaigns.
To create a campaign in Power Editor, follow these steps:
- Choose Campaigns⇒Create Campaign + icon.
The Create Campaign pop-up window appears, as shown in Figure 3-3.
- Complete the details in the Create Campaign pop-up: Name, Buying Type (Auction or Fixed Price), and Objective.
The objectives are the same as in the Ads Create tool (see Chapter 2 of this minibook), except that Power Editor further distinguishes between desktop and mobile app installs and engagement. See Chapter 1 of this minibook for a discussion of auction versus fixed-price bids.
- Click the Create button in the lower-right corner of the pop-up.
Your new campaign now appears within the Campaign list view.
- Click the Upload Changes button in the top row of the main Power Editor screen.
This uploads your changes to the Ads Manager. If you refresh or return to your Power Editor screen, your new campaign will now appear in the left pane under Filter By Campaign when you click the arrow next to the sub-tabs for Recently Changed or All.
The Upload Changes button changes from gray to green if you’ve created or edited campaigns, ad sets, or ads in the Power Editor workspace that you haven’t uploaded yet.
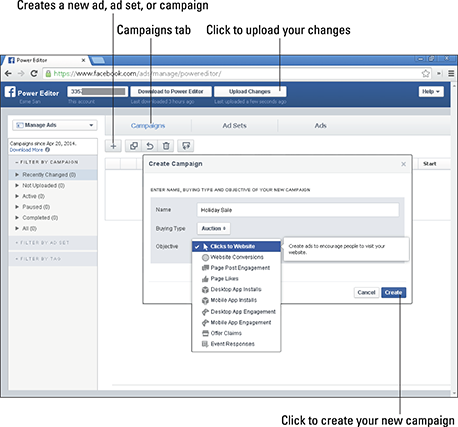
Figure 3-3: Creating a campaign in Power Editor.
Creating and importing a campaign from Excel
To import a campaign from a spreadsheet, you must download a template to Excel or an equivalent program, create your campaign, and then upload it. Follow these steps:
- Under Campaigns, click the Export & Import icon above the list view.
- From the drop-down menu that appears, select Download Template.
- Save the template, which will be in .xltx format, to your hard drive.
Use this template to create your campaign.
- Save your file as a tab-separated text file. If you are using Excel, you may need to export your file to Unicode Text.
- Back in Power Editor, click the Export & Import icon, and select Import Ads in Bulk from the drop-down menu that appears.
- On the Bulk Import pop-up window that shows up, select the File radio button under Import.
- Click the Choose File button to select the file(s) you want to import into Power Editor.
- Be sure to click the Upload Changes button at the top of the Power Editor screen to save your campaign to the Ads Manager.
Your imported campaign will appear in the Campaigns list view.
The process is the same to import Ad Sets or Ads from a spreadsheet. First, select Ad Sets or Ads view from the top row of tabs. Then click the Export & Import icon and select Download Template. Follow the rest of the steps previously mentioned.
Creating ad sets in Power Editor
As with the Ads Create tool, you can create ad sets for an existing campaign or after creating a new campaign.
To create an ad set in Power Editor, follow along:
- Choose Ad Sets⇒Create Ad Set + icon.
The Create Ad Set pop-up shown in Figure 3-4 appears.
- Select either the Use Existing or Create New radio button under Choose a Campaign for This Ad.
If you choose the first button, a drop-down list appears listing your existing campaigns, as seen in Figure 3-4. If you choose the second button, the pop-up expands to display the same Buying and Objective options that appear under Creating a New Campaign.
Take advantage of one of the few time-savers in Facebook! Since you can create a campaign directly from the Create Ad Set or Create Ad pop-ups, you can bypass the separate step of setting up a new campaign. - Name your new Ad Set.
- Click the Create button in the bottom-right corner of the pop-up.
- Fill out the additional budget and scheduling fields in the workspace (see Figure 3-5).
Complete these fields just as you would in the Ads Create tool. (See Chapter 2 of this minibook.)
- Click the Upload Changes button to save your changes to the Ads Manager.

Figure 3-4: Creating a new Ad Set within Power Editor.

Figure 3-5: Fill in the budget and scheduling details for your new Ad Set in the Power Editor workspace.
You must always click the Upload Changes button in the top row of the Power Editor screen to save any new or changed content from the Power Editor to the Ads Manager. If you don’t do that, your ads won’t run, and you won’t see any performance results.
Creating an ad in Power Editor
As with Campaigns and Ad Sets, you can create an ad directly from Power Editor without jumping back and forth to the Ads Create tool. Follow these steps:
- Choose Ads⇒Create Ad + icon.
The Create Ad pop-up shown in Figure 3-6 appears.
- Select either the Use Existing or Create New radio button under Choose a Campaign for This Ad.
If you choose the first button, a drop-down menu appears listing your existing campaigns, as seen in Figure 3-6. If you choose the second button, the pop-up expands to display the same Buying and Objective options that appear under Creating a New Campaign, as discussed previously.

Figure 3-6: Creating a new Ad within Power Editor.
- Select either the Use Existing or Create New radio button under Choose an Ad Set for This Ad.
If you choose the first button, a drop-down menu appears listing your existing ad sets. If you choose the second button, you’ll be asked to enter a name for your new Ad Set.
- Below the Name New Ad header, enter the name of your ad.
- Click the Create button in the bottom-right corner of the pop-up.
Your ad will be added to the list under the Ads view in Power Editor.
- Fill out the additional fields in the workspace (as displayed in Figure 3-7), just as you would in the Ads Create tool.
The workspace has tabs for Creative, Audience, and Optimization & Pricing. (See Chapter 2 of this minibook for more details.)
- Click the Upload Changes button to save your changes to the Ads Manager.

Figure 3-7: Fill in the details for your new ad in the Power Editor workspace.
Modifying existing campaigns, ad sets, or ads
You can modify some of the settings for existing campaigns, ad sets, or ads in a manner similar to creating them. Again, you can choose to do this directly in Power Editor, return to the Ads Create tool, or work from a spreadsheet. You can make different changes at different levels:
- At the campaign level, you can edit only the name and the objective, as long as ads aren’t already running.
- At the Ad Set level, you can edit the name, budget, start and end dates, and status.
- For ads, you can edit the creative, audience, optimization, and pricing sections.
Don’t try to switch objectives at the campaign level if ads are already running. It’s better to create a new campaign with a new objective.
Choose which view you want: Campaigns, Ad Sets, or Ads. Then follow these steps:
- Using the filters, select the campaign(s), ad set(s), or ad(s) you want to edit from the left pane.
- Hold down Shift to select multiple items in sequence or the Ctrl/
 key for separated items.
The selected items will appear grouped together in the list view.
- Click the row for the item(s) you want to edit.
The selected item will appear in the workspace so you can edit it.
- You can choose to edit more than one item at once within the list view. Press the Shift key for items in sequence, or the Ctrl/ key for separated items.
When you change one item in the workspace, it will make the same change for all the other rows you selected.
- Click the Upload Changes button to save your changes to the Ads Manager.
Visit your Ads Manager after uploading new or modified campaigns, ad sets, or ads to confirm that all the changes you made in Power Editor appear properly.
Editing Campaigns, Ad Sets, and Ads with Excel
If you have exported your campaigns to Excel as we discuss in the previous section, you can copy and paste to and from your spreadsheet to make changes.
Start by selecting the campaign you want in the left sidebar. Then follow these steps:
- From your choice of view, select one or multiple campaigns, ad sets, or ads to edit.
- Press Ctrl+C/+C.
- Open your corresponding Excel spreadsheet and select a cell.
- Press Ctrl+V/+V in Excel.
All your campaigns or ads will appear, with headers for each column. You can edit all the fields of your ads and campaigns in Excel except Ad ID, Campaign ID, and Image Hash.
- Make your edits.
- Select all the rows in your Excel table, including headers.
- Press Ctrl+C/+C.
- Go back to Power Editor and select a campaign, ad set, or campaign to receive your changes.
- Press Ctrl+V/+V.
You can also use the Import Ads in Bulk function to import individual images or a zip file of multiple images. This is especially useful if you want to keep the copy for a string of ads but refresh them with new, eye-catching art.
Managing multiple items with the Manage Ads drop-down
Busy advertising managers, marketing directors, and account executives may want to take advantage of features available from the Manage Ads drop-down menu, which appears above the Filters section in the left pane.
These tools, which are shown in Figure 3-8, offer easy access to features and components that affect or are accessed by multiple advertising campaigns. The options include:
- Audiences: Lists all the custom audiences you’ve created. (We discuss this topic later.)
- Campaign Dashboard: Displays active and recently completed campaigns.
- Image Library: Shows all images you’ve uploaded for use in ads.
- Conversion Tracking: Lists all the conversion pixels you’ve created. (We discuss this topic later.)
- Reporting: Returns you to the Ads Manager Report section.
- Billing: Returns you to the Ads Manager Billing section.
- Account Settings: Returns you to the Ads Manager Ad Account Settings section.
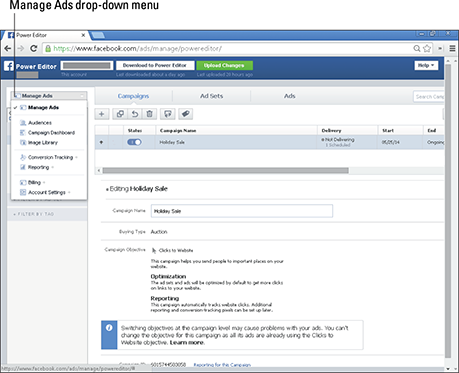
Figure 3-8: The options in the Manage Ads drop-down menu access elements applicable to or used by multiple campaigns.
Using Power Editor to Create and Promote Posts
Just as you can create and promote a post via the Ads Create tool, you can create and promote a post in Power Editor.
There’s a subtle difference between posts created in the two places: In the Ads Create tool, posts publish immediately to your Page and will show up in the News Feeds of your fans and their Friends. With Power Editor, you have an option to create and promote a post without publishing it to the Timeline on your Page.
Huh? This feature may sound a bit arcane, but it has real-world marketing benefits. Specifically, it means you can test different versions of posts to see which version will be the most successful without having multiple variations appear on your Page and confuse your viewers. Or you can promote various versions of a post as an ad in News Feeds to different selected audiences.
Power Editor also allows you to schedule the publication of posts in advance, which is very convenient for management purposes. Scheduled posts will appear on your Page like regular posts at the time you specify.
You can create Link, Photo, Video, Status, or Offer posts in Power Editor.
Creating a post in Power Editor
To create a status post, link post, photo post, or a video post from Power Editor, follow these steps:
- Select Manage Pages from the drop-down field for Account number in the upper-left corner of the main Power Editor page.
See Figure 3-9.
- Select the Page you want to manage from the left-side column.
A list of posts for that Page will appear.
- Click the Create Post button on the left side of the top row of buttons.
A pop-up called Create Unpublished Page Post will appear, as shown in Figure 3-10.

Figure 3-9: A list of posts in Power Editor; posts with a crescent-moon symbol are unpublished.

Figure 3-10: Use the Create Unpublished Page Post pop-up to develop variations on posts.
- On the top row of the pop-up, select the type of post to create: Link, Photo, Video, Status, or Offer.
We discuss types of posts in Chapter 1 of this minibook.
- Fill in the information for your post on the rest of the pop-up.
If you select the option to publish the post on your Page, the pop-up window will expand to show targeting options for language and location. Alternatively, you can publish the post only as an ad.
If your post will also run as an ad, the language and location choices must match the Audience selection in Power Editor. Otherwise, your ad won’t run. - Click Create Post in the bottom-right corner of the pop-up.
This post isn’t published yet; it will be added to your list of posts with a crescent-moon symbol, which indicates its unpublished status. Refer to Figure 3-9.
- After creating your post, select it for publication from your list of unpublished posts.
- Click the Publish Post button.
It’s in the top row of the workspace. A small pop-up will appear.
- To publish the post immediately, select the Publish Now radio button in the pop-up window; then click the Publish button.
To publish a post that will appear in the future, select the Schedule a Time to Publish radio button, fill in the desired date and time, and click the Publish button.
- Click the green Upload Changes button.
Your post(s) should appear on your Page or be scheduled to appear.
If you use your post only as an ad (without publishing it on your Page), it won’t get organic distribution in News Feeds, which means that it won’t be seen by Friends of Friends. This is a strategic marketing choice. If you are comparing several versions of a post to see which gets the best response, you would publish them only as ads, not on your Page. Once the results indicate the best performing post, you can change the distribution to include publication on your Page.
Promoting a post from Power Editor
You have an option in Power Editor to manage your posts that’s not available with other post-creation methods. You can create an ad from your post, as we discuss in Chapter 2 of this minibook, without actually publishing it on your Timeline.
Such promoted post ads can appear on both desktop and mobile environments. This option allows you to see which version of a post is most worth promoting with paid advertising.
When Promoted posts appear as ads in a News Feed or in the right-hand column, viewers can still like or comment on them.
To create a Promoted post, follow these steps:
- Select the Manage Pages option from the drop-down menu in the top row of the main Power Editor page.
- In the left column, select the Page for which you want to promote a post.
A list of posts appears.
- Select the post you want to promote.
It will be highlighted.
- Click the Create Ad button.
The Create Ad button is in the top row above the list of posts (refer to Figure 3-9). A pop-up appears.
- On the small pop-ups that appear, select the existing Campaign and Ad Set you want the ad created in.
Alternatively, you can create a new campaign or ad set.
- Fill in the Promoted post details located in the workspace for Creative, Audience, and Optimization & Pricing.
- Click Upload Changes to save your Promoted Post to the Ads Manager.
As with any other ad, your Promoted post won’t run until Facebook approves it. You’ll be notified when that happens.
Pinpointing Your Ideal Audience
Everything in marketing is about reaching your ideal target audience. Your advertising dollars are best spent talking to people who match your model for leads or customers, when you’re trying to do any of the following:
- Reach people just when they are ready to purchase.
- Stay “top of mind” with existing customers.
- Build brand identity.
- Reach new prospects.
- Encourage identified prospects to learn more about your business.
In addition to the powerful audience tools available in the Ads Create tool (refer to Chapter 2 of this minibook), Power Editor offers several additional methods for targeting your audience to meet your marketing needs: Facebook and Partner Categories, Custom Audiences, Lookalike Audiences, and Saved Target Groups. We look at each of these in turn.
Pinpoint marketing works well for large companies with multiple, large target audiences and the financial resources to reach them. However, even if you have a limited budget — meaning, you can afford only a few clicks — targeting may be worth the effort, especially if the average purchase price is large and you have the staff and time to analyze results and continuously refine your advertising.
Reaching your ideal audience with Facebook and Partner Categories
Facebook Categories and Partner Categories are available in the Audience targeting section of Power Editor.
Facebook Categories define your audience based on what information users have included on their Profiles or actions they’ve taken on Facebook.
Partner Categories, like the Behaviors section in the Ads Create tool, enable you to target the audience for your Facebook ads based on activities users engage in away from Facebook, either elsewhere online or in the real world. For instance, if you sell home furnishings or painting services, you might want to target people who just bought a house. If you sell childcare services or baby clothes, you might want to find someone who is expecting or has adopted a baby. The target audiences defined in the Partner Categories are created by matching Facebook user Profiles with outside data provided by third-party sources.
These targeting methods are best used to identify new prospects whose Profiles match known prospects, reach people just when they are ready to purchase, or build brand identity. If you try to over-specify your audience, Facebook will prompt you to broaden your categories to produce a larger pool of potential viewers.
Selecting Facebook and Partner Categories
Follow these steps to select Facebook or Partner Categories, as shown in Figure 3-11.
- Select the Ads view in the top row of the Power Editor.
- Select an ad that you want to target with either (or both) of these methods.
- Select the Audiences tab in the Power Editor workspace.
- Scroll down in the Audience section and click on either the Facebook Categories or the Partner Categories section as shown in Figure 3-11.
They’re below the Categories heading.
- If you choose Facebook Categories, you select one or more options from a list of Custom Categories. Choices may vary among ad accounts based on which sorts Facebook thinks might apply.
In Figure 3-11, the options shown are Hispanics, Online Spenders, Online Spenders Active, Online Spenders Engaged, and Technology Late Adopters.
- If you chose Partner Categories, click the right-pointing arrow to view detailed subsections for Acxiom or Datalogix.
They’re the data-mining companies that provide this information to Facebook.
- Scroll through the subsections (such as demographics, lifestyle, politics, and work), and click an arrow to reveal additional details.
Dive into each category that interests you until you see items without an arrow to the left; these are the classifications that you can select.
A clicked category is pinned right below the gray Categories heading. You can pick as many classifications as you want; if you change your mind, click the X to the right of the pinned item.
- Click the Information icon (the lower case “i” in a circle) to the right of a classification.
You get details on the number and description of members of a classification.
Partner Categories offer data only on U.S. users at this time.

Figure 3-11: Selecting a Facebook Category in the Audience tab of the ad workspace.
It can be a bit tricky to determine whether Facebook or Partner Categories are a good fit for your needs. Try split-testing, as we discuss in Chapter 4 of this minibook. Use the same ad with different categories for at least a week. Then look at the metrics in the List View of Power Editor or visit the Ads Manager for a full report. Adjust your selections as needed.
Reaching existing customers and prospects with Custom Audiences
The Custom Audiences method allows you to target an ad to your existing customers or known prospects who also happen to have Facebook accounts. After you create a list, Facebook will use e-mail addresses, phone numbers, Facebook user IDs, app user IDs, or mobile advertiser IDs to match people on your list to people with active Facebook pages. You can create a Custom Audience using either the Ads Create tool or Power Editor.
To have meaningful reach, your Custom Audience should end up with at least 1,000 people; you’ll need more than that on your original list because not all your users will have Facebook accounts. Consequently, this technique is particularly useful for companies that have been in business long enough to acquire enough names. If you have a new business, you may find other targeting techniques more helpful, unless you have permission to use a list from a third party.
Use the Custom Audiences technique to stay “top of mind” with existing customers, encourage repeat purchases, maintain business relationships, or encourage identified prospects to learn more about your business.
You may want to select subsets of current customers or prospects by
- Product or service area
- Subscribers to your e-newsletter
- Members of your loyalty program
- People who have downloaded a white paper
- Current or lapsed users who registered on your website
For example, you could target current customers who haven’t already liked your Facebook Page to do so. You can micro-target individuals to whom you want to send a highly targeted message as long as they have Facebook accounts.
Creating custom lists
After you select a list, Facebook will match your data against its list of active users. This process is hashing. If there is no match, the e-mail address or other content is dropped from the list. Facebook will then build a new Audience in your account that consists of the resulting matches. The Facebook version will identify your target market only by Facebook IDs.
Both hashing and encryption make information more secure. Encrypted files can be decrypted to reveal the original content. Hashing creates a “fingerprint” that can’t be decrypted. Facebook claims that it can find your ideal audiences without compromising your data.
If you plan to create a custom audience from a data file, identify an existing data source in advance or get a list ready by creating a CSV or TXT file in Excel. The file should be a single column of data without a heading. You can use e-mail addresses, phone numbers, Facebook user IDs, or app user IDs. Use only one.
To create a custom audience, follow these steps:
- Choose Audiences from the Manage Ads drop-down menu located in the top-left corner of Power Editor.
- Choose Create Audience⇒Custom Audience.
Create Audience is in the top-left corner of the main Audiences screen, as shown in Figure 3-12. A pop-up appears.
- Select the type of list you intend to use:
- Data File Custom Audience
- MailChimp Custom Audience
- Custom Audience from Your Mobile App
- Custom Audience from Your Website
- Follow the steps in the pop-up for each option.
You create your custom audience.

Figure 3-12: Choose a list type to create a Custom Audience in Power Editor.
- Click the Create button.
It may take half an hour or more for your Custom Audience to upload to Facebook. You’ll be notified when it’s done. Your Custom Audience will appear under the Type column in the ad List view, as shown in Figure 3-13.
- In the ad workspace, choose Create Ad Using Audience.
- Follow the standard steps to create or edit an ad as we describe earlier.
- In the ad workspace, click the Audience tab. Scroll down until you see Custom Audiences.
The custom audience you created may be selected in this field, or you can enter the name of the custom audience you want to use.

Figure 3-13: Your custom list will appear in the List view for Audiences.
Discovering similar users with Lookalike Audiences
Lookalike Audiences is a variation on Custom Audiences. It lets you reach additional, new people with Facebook accounts who behave similarly to the people in your Custom Audience list. Facebook says it will compare your list with conversion tracking records and outside data sources to identify Facebook users who match yours in terms of fan acquisition, site registration, off-Facebook purchases, coupon claims, and/or brand awareness.
Discovering similar users with Lookalike Audiences
Use Lookalike Audiences to acquire new prospects. None of the people on your Custom Audience list will be included in a Lookalike Audience.
To create a Lookalike Audience, follow these steps:
- Create your Custom Audience as described in the preceding section.
- From the Manage Ads drop-down menu in the top-left corner of Power Editor, choose Audiences.
The main Audience page appears.
- From the Create Audience drop-down menu, select Lookalike Audience.
The Create Lookalike Audience pop-up shown in Figure 3-14 appears.

Figure 3-14: Creating a Lookalike Audience in Power Editor.
- Click in the Source field in the pop-up window.
A drop-down list with available sources appears.
- Choose one of the custom audiences, conversion pixel results, or Facebook Pages on the list.
Alternatively, you can begin typing your selection; a narrower list of choices appears as you type.
- Click in the Country field.
A drop-down list of available countries appears. Alternatively, you can begin typing your choice and a drop-down list with narrowed down choices will appear.
- Move the Optimize For slider bar toward either Similarity or Reach.
The closer you move the slider toward Similarity, the more like your source the Lookalike Audience will behave. The closer you move the slider toward Reach, the larger the audience, but the less similar it will be.
- Click the Create Audience button in the bottom-right corner of the pop-up window.
Facebook may take a day or more to create your Lookalike Audience. Facebook will notify you when the Lookalike Audience is ready.
A Lookalike Audience can include people from only one country, even if your Custom Audience has people from several countries. To identify residents of multiple countries, create several Lookalike Audience profiles from the same Custom Audience list, one for each nation.
If you receive a message that “You need an audience that includes at least 100 people,” you won’t be able to create a Lookalike Audience from the Custom Audience you selected. Try selecting Greater Reach in the preceding Step 6 to see if that helps you reach the minimum 100 number.
Saving time with saved target groups
To save time when creating new ads or campaigns aimed at an existing audience, try using a Saved Target Group. Available only in Power Editor, this option allows you to reuse any targeted profile you have already created, except for a Custom Audience.
To create a saved target group, follow these steps:
- Select Audiences from the Manage Ads menu.
- From the Create Audience menu, choose Saved Target Group.
Options to customize your saved target group appear in the workspace below the list view of audiences, as shown in Figure 3-15.
- Complete the relevant fields for your new saved target group.
You may enter a name, custom audience to include or exclude, location, age range, gender, languages, more demographics, interests, behaviors, and categories (Facebook and Partner). You can now select this saved target group when creating an ad.

Figure 3-15: Choose a list type to create a Custom Audience in Power Editor.
To use a group, follow these steps:
- Select the Audience tab in the Ad workspace.
- Select Use Existing Targeting Group.
A pop-up appears at the top of the page.
- Choose the saved target group you want and click OK; see Figure 3-16.
Alternatively, you can create a saved target group from the audience you define while creating an ad, ad set, or campaign in the workspace. Establish the profile for your target market using the Audience tab in the workspace as usual.
- To save the profile for later use, click the Save Audience icon (the small icon with people in Figure 3-2) that appears in the row of icons above the List View section.
This creates a new Saved Target Group.
The option to use a Saved Target Group doesn’t work for Custom Audiences. To re-use a specific Custom Audience, simply select it when you pick an audience.

Figure 3-16: After clicking the Use Existing Target Group field under the Audience tab, a pop-up window appears with a list of available groups.
Optimizing Ad Bids in Power Editor
Power Editor lets you choose the standard options for bidding, as we discuss in Chapters 1 and 2 of this minibook.
Review the bidding choices and when to use them:
- CPC (cost per click): Best for getting people to click on your ad; distributed evenly across all active ads
- CPM (cost per 1,000 impressions): Best for branding and getting people to view your ad; distributed evenly across all active ads
- oCPM (optimized CPM): Best for showing your ad to people who are most likely to take an action, such as liking a Page or clicking a link to your website
If you’re not sure what to bid under the option you want, choose the Default Bid, which appears in a list that expands below the bid type you select. (See Figure 3-17.) Facebook will set the maximum bid to show your ad to the most audiences.
Setting up manual bids
If you’re targeting a specific audience or want to use a higher bid than the default, use the option to set up bids manually.
The manual setting also lets you further decide whether to optimize for
- Clicks: Encourages more people to click on your ad
- Reach: Shows your ad to more people who are different from your target audience
- Social: Shows your ad to more people through their Friends
For example, when someone likes your ad, more of his Friends will see the same ad.
- Actions: Optimizes for people taking Facebook actions on your ad, including likes, comments, shares, and app installs
Specifying a type of action for optimized CPM
It’s simple to select or edit an action option from the preceding bulleted list for use with a specific ad. Follow these steps:
- In Power Editor, choose Ads View.
- Select an existing ad from the List view.
Or create a new ad by clicking the + symbol button in the top row.
- Choose the tab for Optimization & Pricing in the ad workspace.
- Select the Optimized CPM radio button.
- Choose Manually Set Up Bids, as shown in Figure 3-17.
- Enter a maximum bid value for your choice of Clicks, Reach, Social, or Actions.
Each field can have a different maximum bid.
- Proceed as you would with any other ad, ad set, or campaign as we describe in the preceding sections of this chapter and in Chapter 2 of this minibook.
- As always, click the Upload Changes button to save your work to the Ads Manager.

Figure 3-17: You can accept default bids or set bids manually for each type of bidding.
Optimizing Ads for Ideal Placement
Power Editor offers one more advantage over the Ads Create tool described in Chapter 2 of this minibook: It gives you greater control over ad placement.
Use the results that appear in List view or in the Ads Manager to determine which placements provide the best bang for your buck. (See Chapter 4 of this minibook.) Revise your placement settings accordingly.
Within Power Editor, you target the appearance of your ads through ad placement radio buttons.
- From Power Editor, create or select the ad you want to run in a specific placement.
- Click the Creative tab in the ad workspace, as shown in Figure 3-18.
- Scroll down to Placements and select the radio button you want.
- Under Mobile Devices, select the radio button for your target device choice.
- (Optional) Select the check box if you want your ads to show only when someone is using a Wi-Fi connection.
For more information on mobile marketing, see Book VIII, Chapter 4.

Figure 3-18: Choose placement options for your ad in Power Editor.
Tracking Conversions
Conversion tracking is the be-all and end-all of advertising. It allows you to see which of your advertising efforts really produce results after people view your ad. It is the Holy Grail for measuring return on investment (ROI), but it can measure only online actions.
To track conversions that happen on your website, access the Conversion Tracking dashboard in any of three ways:
- Select Conversion Tracking from the Manage Ads drop-down in Power Editor.
- Go to the Ads view in Power Editor. Select the Creative tab and scroll down to the subhead Conversion Tracking Pixels.
- Select Conversion Tracking from the left pane in the Ads Manager (www.facebook.com/ads/manage).
Whichever way you get there, the process is the same. Click Create New Pixel. In the pop-up window, name the pixel and select its purpose from the list. After you click Create Pixel in the pop-up, Facebook generates a snippet of code for you to save and e-mail to your programmer, who will place it on appropriate pages of your website.
Generally, the code goes on a “Thank You” or “Confirmation” page. We discuss conversion pixels in greater depth in Chapter 2 of this minibook.