
25
Managing Report Approval with SharePoint Workflow
In SharePoint workflow, it is important that the Require Content Approval option in the Library Settings be set to Yes. Otherwise, content will be published automatically. You can find this option under Versioning Settings on the Library Settings page. Also be sure to set the Draft Item Security options on the same page so only approvers and the person who published the document can view it before it is approved.
In this lesson, you will learn how your organization can benefit from using SharePoint workflow. You will also learn how to enable and implement this useful feature.
INTRODUCTION TO SHAREPOINT WORKFLOW
Workflows in SharePoint are a great way to automate business processes. This may be a very simple task such as managing a set of values on a SharePoint list. For instance, there may be a list of products and a price associated with each. If this list is supposed to contain only items that are proposed new products that have a price tag of under $1000, a workflow could automate that process. Rather than having an employee monitor the list and remove items that have a value listed in the price column of $1000 or more, a combination of approval and workflows can take care of this. Simply tell the list that all items must be approved before being shown, and create a workflow that will look at all new list entries and automatically switch them to Rejected if the price is $1000 or greater. Even a very simple example such as this can save considerable time and money in the long term.
Some places where workflows can help your business may include:
- Escalating tasks that have gone past their due date
- Report approval
- Travel reimbursement approval
- Human Resources tasks
- Task tracking through a team of developers
Not all business processes are going to be that cut and dry. More often than not they are much more complicated. Someone will inevitably have to review a portion of the work or item uploaded, especially in the case of dashboard content, Excel workbooks, and Word files. Workflows can still assist in this process to help alleviate some of the communication breakdowns that can prove to be very costly.
The process of approving a report can be quite cumbersome in certain situations; for instance, if a report needs to have the approval of all members of a team before being approved. An e-mail may be sent out from the report writer to your management staff of five people. Three of those five see that the report meets their portion of the requirements and approve it. However, the other two staff members do not see all of their requirements being met. To fix this, a series of e-mails and phone calls may take place and the staff members who were satisfied may be left out of the loop by accident. Fortunately, a workflow could be customized and created for purposes such as this.
The goal of a workflow shouldn't necessarily be to automate the entire process, because that could be an unrealistic goal in many cases. Workflows should, however, help automate the collaboration and communication process between individuals. As a result, you will notice a streamlined process, which will raise your organization's efficiency and ultimately lower downtime and mishaps.
In the preceding example of the team approving an item, the process was not fully automated. A workflow could have allowed each member of the team to make comments on the pending report, approve or reject accordingly, and have the report sent back to the person who authored it. Everyone would have known that the report was ultimately rejected and would be waiting to review it again as soon as the changes were made, eliminating confusion around why the report had not yet been made live.
Many organizations struggle to build and maintain standards. Oftentimes a standard is designed and documented but difficult to implement or track. Workflows help maintain the standards necessary to keep certain processes running at an efficient level. If all contracts for an organization are required to go to the legal department before being signed by anyone in upper management, a workflow could help keep that standard in place. Without it, a contract could inadvertently be passed to the president and get signed without being reviewed by the legal department. However, a workflow set up to monitor new documents being added to a Contracts document library could notify legal for approval before notifying the president. Not only does this help keep the process going in the correct order, but it also helps ensure that the right people are involved each step of the way.
Seven templates are included in SharePoint 2010 to help get you started:
- Approval
- Collect Feedback
- Collect Signatures
- Disposition Approval
- Issue Tracking
- Three-State
- Translation Management
Each of these has its own unique advantage. Later, this lesson focuses on a derivative of the Approval template.
You have several options for creating and customizing workflows: SharePoint Designer 2010, Visio 2010, and Visual Studio 2010. Each has its own learning curve and advantages.
Workflows can be created and used in association with a list, library, or content type. If a workflow is added directly to a list, it can only be used there. Conversely, if you create a global workflow, it can be assigned to multiple lists or libraries.
This lesson focuses on workflows being used for report approvals.
BUILDING SIMPLE WORKFLOWS FOR REPORT APPROVAL
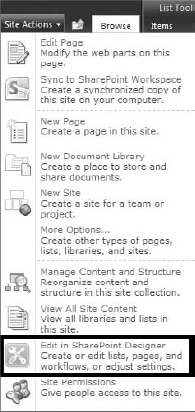
The easiest way to build workflows in SharePoint 2010 is by using the SharePoint Designer 2010 available for download free from Microsoft. Once the SharePoint Designer is installed, you can access it from the Start menu or from the Site Actions menu, as shown in Figure 25-1. If you are opening the site from inside SharePoint Designer, simply enter the URL of your site and all your site information will be loaded.
Once your site is open for editing in the designer, click the Workflows icon on the left side of the screen, as shown in Figure 25-2. Several pre-made workflows will be shown in the window: Approval, Collect Feedback, Collect Signatures, and Publishing Approval. If you are not a site administrator and you click any of the predefined workflows, a message will appear for you to edit a copy. Either way, it is generally a good idea to create a copy of any workflow you want to change so that if anything breaks, you have a safety net to fall back on.

You can build your own workflows by clicking Reusable Workflow or selecting a list from the drop-down. Another option, which for simple tasks is a great choice, is to edit one of the existing workflows. As mentioned before, it is a good idea to make a copy before making changes. To create a copy of an existing workflow, right-click it then select Copy and Modify. Change the name to something unique that identifies the workflow's function and click OK. The copy of the workflow will open automatically. Click the Save button and close the newly created workflow. This will bring you back to the Workflows tab that was previously open where you will see the copy has been added to the list. If you click the Approval workflow that is already in place and then click the Edit Workflow button in the center of the page, you will notice there is only one step in the workflow. This step will run the Approval process. Click Approval, which is underlined, to open the options for this process.
Under the Customization section there is an option to Change the Behavior of a Single Task. This will allow you to edit the individual tasks that make up the process. You can edit any of these items such as logging and notifications, customize e-mails, and add or remove steps you don't want to include. Click the link for Change the Completion Conditions for This Task Process. The screen shown in Figure 25-3 will appear and you will be able to change options such as number of users who have to approve the item before it is shown as approved in the library. You can change this to a lower number or even a percentage of approvers.

Click the Workflow Settings icon on the ribbon to return to the workflow editor. There are several important options to take into consideration when customizing this workflow. They are Disable Automatic Start on Item Creation and Disable Automatic Start on Item Change, as shown in Figure 25-4. Checking these prevents those options from being used and thus prevents the workflow from being run accidentally.

While still on the workflow editor screen, the link for Initiation Form Parameters on the ribbon will allow you to customize the form used when setting up and starting the workflow. Here you can change the fields that are available to the users and add new fields as well.
Once all your options are set up the way you want, this workflow is ready to be used in conjunction with your SharePoint library. Just click the Save button and then Publish from the ribbon. The workflow will be validated and if there are no errors, it will be deployed and ready to use. Change as many settings as you would like or change no settings at all. Either way, this is a very easy way to get an approval workflow created complete with notifications and a simple set of parameters.
USING VISIO TO BUILD WORKFLOWS
One of your options for creating workflows for SharePoint is Visio 2010. Workflows can be created and imported into the SharePoint Designer for deployment to your site. To create a workflow in Visio 2010, click New and select the Flowchart category from the template selection screen. Then select the Microsoft SharePoint Workflow template, as shown in Figure 25-5. Click the Create button on the far right side of the screen to open the blank document.

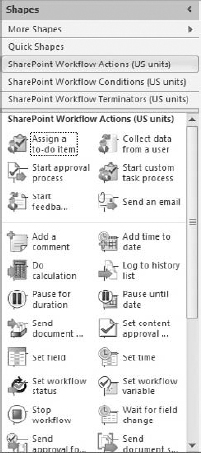
The left side of the screen, as shown in Figure 25-6, shows the toolbox that contains all the items necessary to create a workflow. These items include the Start and Stop functionality listed under the SharePoint Workflow Terminators as well as all the actions, such as sending e-mail, under the SharePoint Workflow Actions. Simply drag and drop the items you want to be a part of your workflow. Be sure to always start the workflow with the Start icon and always end it with the Terminate icon.
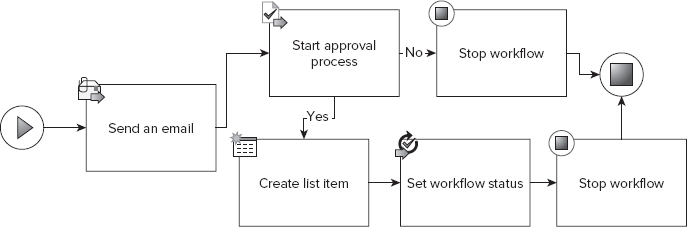
Once you have your workflow created, save it someplace on your local system. When saving locally, you will save the file as a standard Visio diagram. This will enable you to make changes at a later date if necessary. Then click the Process tab at the top of the ribbon and choose Export. The workflow will be validated and require you to resolve any issues. You will then be prompted to save the export to your machine; this will be in the form of a Visio Workflow Interchange (.vwi file). In the SharePoint Designer go back to the main Workflow page. On the ribbon at the top select Import from Visio and locate the .vwi file on your machine. Select whether the workflow is to be reusable or assigned to an existing SharePoint object and click Finish. Finally, the workflow will be opened; make any modifications necessary then save and publish. A sample of what the workflow will look like in Visio is shown in Figure 25-7.
TRY IT
In this Try It, you create a workflow to allow users to approve or deny reports that are deployed to a SharePoint library.
Lesson Requirements
Create a workflow that will change the status of an uploaded Excel workbook to Approved or Rejected based on the end users' feedback. It should be set up so that if 80 percent of the users accept it, the status will be set to Approved. You will need to use an already existing Excel library.
Hints
- Use SharePoint Designer 2010.
- Modify the preexisting Approval workflow.
- You will need to change the completion condition in the Approval process.
- The workflow should run automatically anytime a new Excel sheet is uploaded.
- Enable content approval on your library.
Step-by-Step
- Open Internet Explorer and enter the URL to your SharePoint site.
- Navigate to the library called Excel Reports.
- Under Library Tools on the ribbon click Library.
- Select Library Settings on the right side of the ribbon.
- Click the Versioning Settings link.
- Change the Content Approval option to Yes and Draft Item Security to Only Users Who Can Approve Items (and the author of the item).
- Click OK.
- Open SharePoint Designer 2010.
- Click Open Site, enter the URL for your site, and click Open.
- Under Site Objects select Workflows.
- Right-click the item labeled Approval – SharePoint 2010 and select Copy and Modify.
- In the Name field enter Excel Reports. The screen should look like Figure 25-8. Click OK.

- The workflow editor will appear. Click the link between the words “Start” and “process” to open that process.
- Click the link for Change the Completion Conditions for This Task Process under the Customization section.
- Locate the second IF statement.
- Click the text Task Process Requests Number of Approved.
- Change the Field From Source value to Percentage of Approved.
- Click the word “equals” to open the drop-down menu.
- Change the option to Is Greater Than or Equal To.
- Click the blue link labeled Value and enter the number 80.
- When your screen looks like Figure 25-9, click Save on the ribbon and then click Publish.
- Go back to your SharePoint site (it should still be open).
- If the Library Settings page is not still open, navigate back to it.
- Select the option for Workflow Settings under the Permissions And Management section.
- In the Workflow section highlight Excel Reports, the workflow you just created and published.
- In the Name box type Excel Report Approval.
- Make note of the list that is shown next to the Task List option because you will need to navigate to this list later.
- Check the box next to Start the Workflow When a New Item Is Created. This allows the workflow to start automatically, as was mentioned in the requirements.
- Click Next and enter all the users who will be doing report approval. In this case enter only your account.
- In the Request box enter a note for the recipient. For instance, A new report has been published, please review.
- Click Save.
- Navigate back to your Excel library and upload any Excel workbook. Give it just a moment and then refresh the page. The last column should be labeled Excel Report Approval and say In Progress next to your Excel workbook. The Approval Status should read Pending.
- Navigate to the task list that you made note of previously in step 28.
- In this list click the title for the workbook you just uploaded. It will read Not Started in the Status column.
- A box will appear for you to enter comments and choose to approve, reject, request changes, or reassign approval to someone else. Click Approve. The screen will look like Figure 25-10.


Congratulations, you have just created and used your first workflow. Workflow creation can get complicated, so be sure to test each thoroughly. Also, don't forget that custom code can be added when creating workflows in Visual Studio 2010. That is, however, outside the scope of this book.
 Please select Lesson 25 on the DVD to view the video that accompanies this lesson.