
Chapter 9. Use Other Visual Elements
Chapter at a Glance
In this chapter, you will learn how to | |
✓ | |
✓ | |
✓ | |
✓ | |
We have looked at some of the more common graphic elements you can add to a document, such as pictures, diagrams, and charts. These elements reinforce concepts or make a document more attention grabbing or visually appealing. But for some documents, you might need other more specialized visual elements.
In this chapter, you’ll create text and picture watermarks, insert a symbol, and build a simple equation. You’ll also draw shapes to create a simple picture, and insert a screenshot.
Practice Files
Before you can complete the exercises in this chapter, you need to copy the book’s practice files to your computer. The practice files you’ll use to complete the exercises in this chapter are in the Chapter09 practice file folder. A complete list of practice files is provided in Using the Practice Files at the beginning of this book.
Adding Watermarks
There might be times when you want words to appear behind the text of a printed or online document. For example, you might want the word CONFIDENTIAL to appear faintly behind the text in a contract. When you want to dress up the pages of your document without distracting attention from the main text, you might consider displaying a faint graphic behind the text. These faint background effects are called watermarks. Watermarks are visible in a document, but because they are faint, they don’t interfere with the readers’ ability to view the document’s main text.
In this exercise, you’ll first add a text watermark to every page of a document, and then you’ll add a graphic watermark.
Set Up
You need the AuthorsDraft_start document and the OTSI-Logo picture located in your Chapter09 practice file folder to complete this exercise. Open the AuthorsDraft_start document, and save it as AuthorsDraft. Turn off formatting marks and the ruler, and set the magnification so that you can see all the text. Then follow the steps.
On the Page Layout tab, in the Page Background group, click the Watermark button.
The Watermark gallery appears.
Scroll to the bottom of the gallery, noticing the available options.
Clicking any of these options inserts the specified watermark in pale blue on every page of the current document.
At the bottom of the gallery, click Custom Watermark.
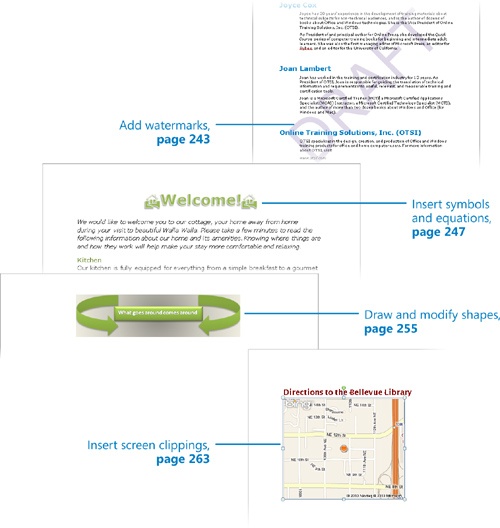
The Printed Watermark dialog box opens.
Click Text watermark, display the Text list, and then click DRAFT.
Ensure that Verdana appears in the Font box.
Click the Color arrow, and then click the purple box (Purple, Accent 4).
With the Semitransparent check box and Diagonal option selected, click OK.
The specified text is inserted diagonally across the page.
On the Page Layout tab, in the Page Background group, click the Watermark button, and then click Custom Watermark.
In the Printed Watermark dialog box, click Picture watermark, and then click Select Picture.
The Insert Picture dialog box opens.
Navigate to your Chapter09 practice file folder, and double-click the OTSI-Logo picture file.
In the Printed Watermark dialog box, change the Scale setting to 200%, and then click Apply.
Drag the dialog box by its title bar until you can see the watermark. Then change the Scale setting by typing 400%, and click Apply.
With the Washout check box selected, click Close.
The picture is inserted as a watermark at the size you specified.


Inserting Symbols and Equations
Some documents require characters not found on a standard
keyboard. These characters might include the copyright (©) or
registered trademark (®) symbols, currency symbols (such as € or £),
Greek letters, or letters with accent marks. Or you might want to add
arrows (such as ![]() or
or ![]() ) or graphic icons (such as
) or graphic icons (such as ![]() or
or ![]() ). Word gives you easy access to a huge array of
symbols that you can easily insert into any document.
). Word gives you easy access to a huge array of
symbols that you can easily insert into any document.
Like graphics, symbols can add visual information or eye appeal to a document. However, they are different from graphics in that they are characters associated with a particular font.
Keyboard Shortcut
You can insert some common symbols by typing a keyboard combination. For example, if you type two consecutive dashes followed by a word and a space, Word changes the two dashes to a professional-looking em-dash—like this one. (This symbol gets its name from the fact that it was originally the width of the character m.) To use these keyboard shortcuts, display the Backstage view, click Options, and on the Proofing page of the Word Options dialog box, click AutoCorrect Options. On the AutoCorrect page of the AutoCorrect dialog box, ensure that the Replace Text As You Type check box is selected, and then select or clear check boxes in the Replace Text As You Type area of the AutoFormat As You Type page. You can see many of the available shortcuts on the Special Characters page of the Symbol dialog box.
See Also
For more information about keyboard shortcuts, see Appendix A at the end of this book.
You can insert mathematical symbols, such as π (pi) or Σ (sigma, or summation), the same way you would insert any other symbol. But you can also create entire mathematical equations in a document. You can insert some predefined equations, including the Quadratic Formula, the Binomial Theorem, and the Pythagorean Theorem, into a document with a few clicks. If you need something other than these standard equations, you can build your own equations by using a library of mathematical symbols.
Equations are different from graphics in that they are accurately rendered mathematical formulas that appear in the document as fields. However, they are similar to graphics in that they can be displayed in line with the surrounding text or in their own space with text above and below them.
The buttons for inserting symbols and equations are in the Symbols group on the Insert tab:
Clicking the Symbol button displays a Symbol gallery of commonly used symbols.

The Symbol gallery is dynamic and changes to reflect recent symbol selections, such as the house symbol in the first row.
From this gallery, you can also open the Symbol dialog box, where you can select from hundreds of symbols and special characters in a variety of fonts.
Clicking the Equation arrow displays the Equation gallery of commonly used equations.
Clicking the Equation button inserts a box where you can type an equation, and also adds the Design contextual tab to the ribbon. This tab provides access to mathematical symbols, structures such as fractions and radicals, and the Equation Options dialog box. After building your equation, you can add it to the Equation gallery so that it is readily available the next time you need it.
In this exercise, you’ll insert a symbol into a document. Then you’ll build a simple equation, and you’ll add the equation to the Equation gallery.

With the cursor to the left of the document’s title, on the Insert tab, in the Symbols group, click the Symbol button, and then click More Symbols.
The Symbol dialog box opens.
In the dialog box, display the Font list, scroll to the bottom, and then click Webdings.
In the rows of symbols, click the ninth icon in the third row (the house), click Insert, and then click Close.
Word inserts the house symbol at the insertion point.
Press the End key, and in the Symbols group, click the Symbol button.
The Symbol gallery appears, with the icon you just inserted at the top.
Click the house symbol.
The house icon now appears at both ends of the title.
Display formatting marks, and then press Ctrl+End to move to the end of the document.
On the Insert tab, in the Symbols group, click the Equation button.
An equation field is inserted into the document at the cursor so that you can type the equation. The Design contextual tab appears on the ribbon.
Troubleshooting
The appearance of buttons and groups on the ribbon changes depending on the width of the program window. For information about changing the appearance of the ribbon to match our screen images, see Modifying the Display of the Ribbon at the beginning of this book.
In the field, type (p-3)*.
The asterisk is a multiplication symbol.
On the Design tab, in the Structures group, click the Fraction button.
The Fraction gallery appears.
In the gallery, click the first thumbnail in the first row (Stacked Fraction).
The structure for a simple fraction is inserted in the field at the cursor.
Click the top box in the fraction structure, and type t. Then click the bottom box, and type 3.
Click the blank area to the right of the equation field. Then press the Spacebar, and type where p is the number of people and t is the base cost. (Include the period.)
This equation subtracts 3 from the total number of people and multiplies the result by a per-person amount to calculate the cost of a specific number of additional people. Word has taken care of formatting the equation so that it looks professional.
Click the equation, click the arrow that appears to the right, and then click Save as New Equation.
The Create New Building Block dialog box opens.
See Also
For more information about building blocks, see Inserting Saved Text in Chapter 2.
In the Name box, type Additional people cost, and then click OK.
Press End to release the selection. Then on the Insert tab, in the Symbols group, click the Equation arrow, and scroll to the bottom of the Equation gallery.
Your custom equation is now available in the Equation gallery.
Press the Esc key to close the gallery without making a selection.
In the document, click the equation, click its arrow, and then click Change to Display.
Word inserts a line break before and after the equation and positions it in the center of the page.
Click the equation’s arrow, point to Justification, and then click Left.
Click the equation’s arrow, and then click Change to Inline to move the equation back in line with the text.


Clean Up
Save the Welcome document, and then close it. When you exit Word, remember to click Don’t Save when you are asked whether you want to save changes to the Building Block template.
If you frequently create documents that contain mathematical formulas, you don’t have to rely on the Design tab to insert mathematical symbols. Instead, you can type a predefined combination of characters and have Word automatically replace it with a corresponding math symbol. For example, if you type infty, Word replaces the characters with the infinity symbol.
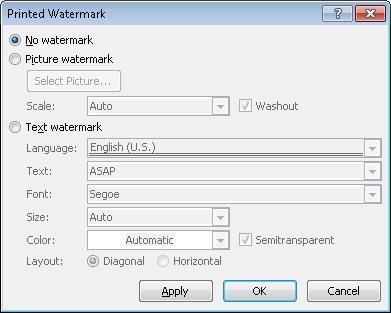
This replacement is made possible by the Math AutoCorrect feature. You can view all the predefined combinations by displaying the Backstage view, clicking Proofing, and then clicking AutoCorrect Options. Then in the AutoCorrect dialog box, click the Math AutoCorrect tab.
Tip
You can create custom Math AutoCorrect entries in the same way you create text AutoCorrect entries. For information, see Correcting Spelling and Grammatical Errors in Chapter 2.
Clicking Recognized Functions at the bottom of the AutoCorrect dialog box displays the Recognized Math Functions dialog box, which lists the math expressions Word recognizes.

If you use a math expression that is not included in the list, you can easily make it available in the future by clicking Add.
Drawing and Modifying Shapes
If you want to add visual interest and impact to a document but you don’t need anything as fancy as a picture or a clip art image, you can draw a shape. Shapes can be simple, such as lines, circles, or squares, or more complex, such as stars, hearts, and arrows.
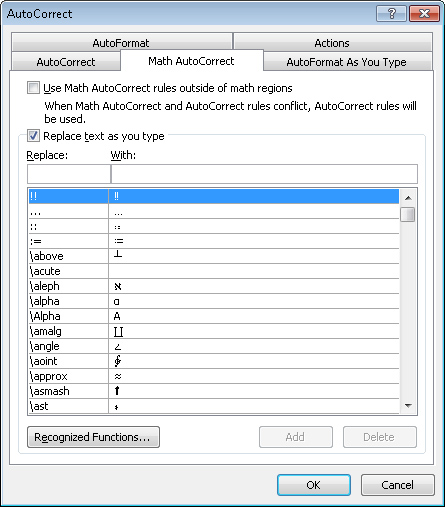
To draw a shape directly on the page (Word’s default setting), you click the Shapes button in the Illustrations group on the Insert tab, and click the shape you want in the Shapes gallery.
The Recently Used Shapes area of the Shapes gallery is dynamic and reflects any shapes you have drawn.
After selecting the shape you want, you can do one of the following:
Click the document where you want a drawing with the default size and shape to be placed.
Drag the pointer across the page to create a drawing the size and shape you want.
When you finish drawing the shape, it is automatically selected. Later, you can select the shape by clicking it. While the shape is selected, you can move and size it, and you can modify it by using commands on the Format contextual tab to do the following:
Change the shape.
Change the style, fill color, outline, and effects assigned to the shape, including the three-dimensional aspect, or perspective, from which you are observing the shape.
Specify the position of the shape on the page, and the way text wraps around the shape.
Control the order of the shape in a stack of shapes.
Specify the shape’s alignment and angle of rotation.
Precisely control the size of the shape.
You can right-click a shape and click Add Text to place a cursor in the center of the shape. After you type the text, you can format it with the commands in the WordArt Styles group and control its direction and alignment with the commands in the Text group.
If you build a picture by drawing individual shapes, you can group them so that they act as one object. If you move or size a grouped object, the shapes retain their positions in relation to each other. To break the bond, you ungroup the object.
If your picture consists of more than a few shapes, you might want to draw the shapes on a drawing canvas instead of directly on the page. The drawing canvas keeps the parts of the picture together, helps you position the picture, and provides a frame-like boundary between your picture and the text on the page. To open a drawing canvas, you click New Drawing Canvas at the bottom of the Shapes gallery. You can then draw shapes on the canvas in the usual ways. At any time, you can size and move the drawing canvas and the shapes on it as one unit.
Tip
If you prefer to always use the drawing canvas when creating pictures with shapes, display the Backstage view, click Options, and in the Word Options dialog box, click Advanced. Then under Editing Options, select the Automatically Create Drawing Canvas When Inserting AutoShapes check box, and click OK.
In this exercise, you’ll draw two shapes and a text box on a drawing canvas to create a logo. Next, you’ll change the style of the shapes and the color of the text box. Then you’ll size and position the canvas.
Set Up
You don’t need any practice files to complete this exercise. Open a blank document, and save it as CSC-Logo. Display the rulers, and then follow the steps.
On the Insert tab, in the Illustrations group, click the Shapes button, and then at the bottom of the Shapes gallery, click New Drawing Canvas.
Word inserts a drawing canvas and displays the Format contextual tab on the ribbon.
On the Format tab, in the Insert Shapes group, click the More button to display the Shapes gallery, and then under Block Arrows, click the first shape in the second row (Curved Right Arrow).
Point to the upper-left corner of the drawing canvas, and then drag down and to the right to draw an arrow about 1.5 inches tall and 1.5 inches wide.
Tip
To draw a shape with equal height and width, such as a square or circle, hold down the Shift key while you drag, and then release the mouse button before releasing the Shift key.
When you finish drawing, the arrow is selected, as indicated by the handles around it.
In the Size group, set the Height and Width to precisely 1.5.
Hold down the Ctrl key, drag a shadow outline of the arrow to the upper-right corner of the drawing canvas, and release first the mouse button and then the Ctrl key.
Word creates a copy of the arrow in the location where you release the mouse button.
In the Arrange group, click the Rotate button, and then click Flip Horizontal.
The copy of the arrow is now facing to the left.
In the Insert Shapes group, click the Draw Text Box button, and drag a text box between the two arrows. Then type What goes around comes around.
Select the left arrow, hold down the Shift key, and then select both the text box and the right arrow.
All three shapes are now selected.
In the Arrange group, click the Group button, and then click Group.
The three shapes are grouped as one object.
In the Shape Styles group, click the More button, and in the Shape Styles gallery, click the fourth thumbnail in the last row (Intense Effect – Olive Green, Accent 3).
The style is applied to all the grouped shapes.
Select the text in the text box, and in the WordArt Styles group, display the WordArt Quick Styles gallery. Then click the third thumbnail in the first row (Fill – White, Drop Shadow).
Click a blank area of the drawing canvas to release the selection.
You can now see the results.
In the Size group, click the Width down arrow until the drawing canvas is as narrow as it can be without the word around disappearing from the text box or wrapping to a second line.
Point to the sizing handle (the four dots) in the middle of the bottom border of the drawing canvas frame, and drag upward until the drawing canvas is just tall enough to contain the logo.
In the Arrange group, click the Wrap Text button, and then click Top and Bottom.
You can now move the drawing canvas independently of the text around it.
See Also
For information about text wrapping, see Arranging Objects on the Page in Chapter 10.
In the Arrange group, click the Position button, and click More Layout Options to display the Position page of the Layout dialog box.
In the Horizontal area, set Alignment to Centered, relative to Column. Then in the Vertical area, set Absolute position to 0.5”, below Top Margin. Click OK.
The logo is now centered at the top of the page.
In the Shape Styles group, click the Shape Fill arrow, and then under Theme Colors, click the third box (Tan, Background 2).
Click the Shape Fill arrow again, point to Gradient, and then under Variations, click the second thumbnail in the second row (From Center).
Click outside of the drawing canvas.
The logo is now ready to use as part of a letterhead.


Inserting Screen Clippings
These days, many people rely on the Web as a source of the information they use in their daily life. Sometimes that information is presented in a graphic that would be useful in a Word document. Included in Word 2010 is a screen clipping tool that you can use to capture an image of anything that is visible on your computer screen.
After you display the content you want to include in a document, you click the Screenshot button in the Illustrations group on the Insert tab. You can then insert a screen clipping in one of two ways:
Clicking a window thumbnail in the Screenshot gallery inserts a picture of that window into the document at the cursor.
Clicking Screen Clipping at the bottom of the gallery enables you to drag across the part of the screen you want to capture, so that only that part is inserted as a picture into the document.
In this exercise, you’ll insert a screen clipping from a Web site into a document.
Set Up
You need the AgendaDraft_start document located in your Chapter09 practice file folder to complete this exercise. Open the AgendaDraft_start document, and save it as AgendaDraft. Then follow the steps.
Press Ctrl+End to move to the end of the document, and then at the right end of the program window title bar, click the Minimize button.
Start your Web browser, and display a Web site from which you want to capture a screen clipping.
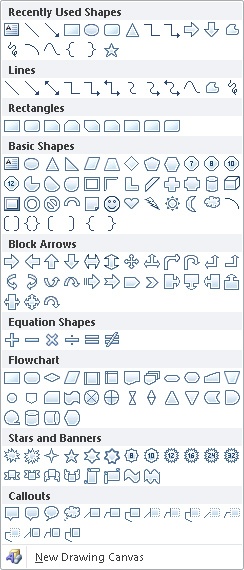
For example, we searched for a map showing the location of the Bellevue public library. You might want to display a map of the location of your office or a local landmark.
On the Windows Taskbar, click the button for the AgendaDraft document. Then on the Insert tab, in the Illustrations group, click the Screenshot button.
A gallery displays the open windows from which you can capture a screen clipping.
At the bottom of the gallery, click Screen Clipping.
The Word program window is minimized on the Windows Taskbar, and a translucent white layer covers the entire screen.
Drag to select the area of the Web page you want.
For example, we dragged across the map showing the Bellevue public library location.

As you drag, the white layer is removed from the selected area so that you can see what you are selecting.
When you release the mouse button, Word inserts the screen clipping into the document at the cursor.

The screen clipping is a picture that can be formatted by using the commands on the Format contextual tab, just like any other picture.
See Also
For information about formatting pictures, see Inserting and Modifying Pictures in Chapter 5.


Key Points
By using a watermark, you can flag every page of a document with a faint word, such as Confidential, or a faint picture. Watermarks appear behind the text of the document, so the text can still be read.
The Symbols dialog box provides access not only to the symbols you might need in a professional document but also to little icons that add pizzazz.
You can construct complex math equations in your documents and have Word display them in traditional math formats.
To dress up a document, you can draw shapes. You can also group shapes on a drawing canvas to create simple pictures.
You can capture graphical information from other programs by using the Screenshot command.