
Chapter 11. Create Documents for Use Outside of Word
Chapter at a Glance

In this chapter, you will learn how to | |
✓ | |
✓ | |
✓ | |
Sometimes you’ll create a document in Microsoft Word 2010 and then want to send it to someone who doesn’t have Word 2010 installed on his or her computer. Word comes with several conversion utilities that you can use to save documents in other file formats so that you can distribute documents that your colleagues can read and use in almost any program.
If you need to distribute a document electronically but you don’t want to share the actual file, you can “print” the document to a new file in Portable Document Format (PDF) or XML Paper Specification (XPS) format. When people view the PDF or XPS file, they see it just as it would look if you printed it. If they print the file, no matter what computer or what printer they use, the pages look just as they do when printed from your computer on your printer.
One way of distributing the information in your documents is by converting them to Web pages so that people can read them on the Web. The Web has become a major part of our everyday lives. We use it to research topics, shop, check the news, and find out how our favorite sports team is doing. It’s also a great publishing tool if you are trying to reach a broad audience. For example, your organization might want to publish a Web newsletter to provide information while advertising its goods or services. Or you might want to use built-in Word tools to create and post articles to a blog (short for Web log) about a particular topic.
In this chapter, you’ll first save a document in a different file format. Then you’ll preview a document in Web Layout view, save the document as a Web page, and make any adjustments necessary for optimum presentation in a Web browser. Finally, you’ll create a blog post, register an existing blog account, and then publish the blog post.
Practice Files
Before you can complete the exercises in this chapter, you need to copy the book’s practice files to your computer. The practice files you’ll use to complete the exercises in this chapter are in the Chapter11 practice file folder. A complete list of practice files is provided in Using the Practice Files at the beginning of this book.
Saving Files in Different Formats
When you save a Word document, the default file format is the Word 2010 .docx format. To save a document in a different file format, you display the Backstage view, click Save As to open the Save As dialog box, and then change the Save As Type setting to the format you want to use.
If you want to save the file so that it can be used with an earlier version of Word, you need to save it in the .doc format. You do this by changing the Save As Type setting to Word 97-2003 Document.
If you want to save a Word document in a format that can be opened by the widest variety of programs, use one of the following formats:
Rich Text Format (*.rtf). This format preserves the document’s formatting.
Plain Text (*.txt). This format preserves only the document’s text.
If you want people to be able to view a document but not change it, you can save the document in one of two formats:
PDF (.pdf). This format is preferred by commercial printing facilities. You should also use this format if you know that recipients have a PDF reader, such as Adobe Acrobat Reader, installed on their computer.
XPS (.xps). This format precisely renders all fonts, images, and colors on recipients’ computers.
Both the PDF and XPS formats are designed to deliver documents as electronic representations of the way they look when printed. The text and graphics in .pdf and .xps files are essentially static and content cannot be easily edited, so these formats are ideal for legal documents. Both types of files can easily be sent by e-mail to many recipients and can be made available on a Web page for downloading by anyone who wants them. However, the files are no longer Word documents, and they cannot be opened, viewed, or edited in Word.
When you indicate that you want to save a Word document in PDF or XPS format, the Save As dialog box expands so that you can optimize the file size of the document for your intended distribution method. You can also click Options to display a dialog box where you can do the following:
Specify the pages to include in the .pdf or .xps version of the document.
Include or exclude comments and tracked changes.
Include or exclude items such as bookmarks and properties.
Set specific PDF options.
Tip
Another way to create an .xps file or a .pdf file is to display the Backstage view, and in the left pane, click Save & Send. Then in the File Types area of the center pane, click Create PDF/XPS Document to display information about this task in the right pane. Clicking the Create PDF/XPS button displays the Publish As PDF Or XPS dialog box, in which you can save (publish) the file in the usual way.
You can also click Change File Type in the center pane of the Save & Send page to display information about common file formats. Selecting a format and then clicking the Save As button in the right pane opens the Save As dialog box with that file type already selected.
In this exercise, you’ll save one page of a multipage document in XPS format for publication online. Then you’ll view the XPS page.
Set Up
You need the ParkingRules_start document located in your Chapter11 practice file folder to complete this exercise. Open the ParkingRules_start document, and then follow the steps.
Scroll down to page 3 of the document.
You want to save only this page in XPS format.
Display the Backstage view, and then in the left pane, click Save As.
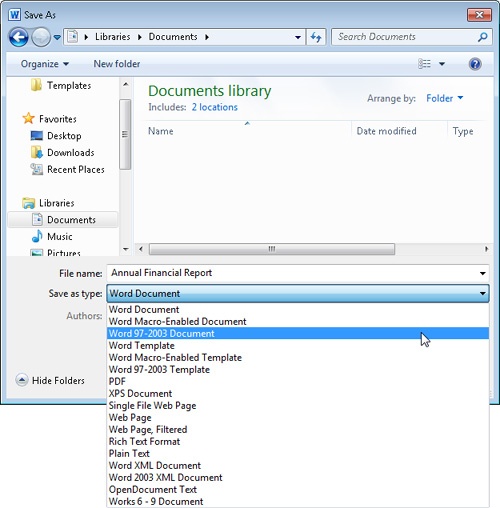
In the File name box of the Save As dialog box, change the name to ParkingRules.
Display the Save as type list, and click XPS Document.
The Save As dialog box expands so that you can select options for the file.
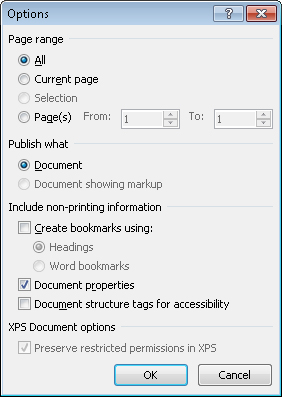
In the Optimize for area, click Minimum size (publishing online). Then click Options.
The Options dialog box opens.
In the Page range area, click Current page.
In the Include non-printing information area, clear the Document properties check box, and then click OK.
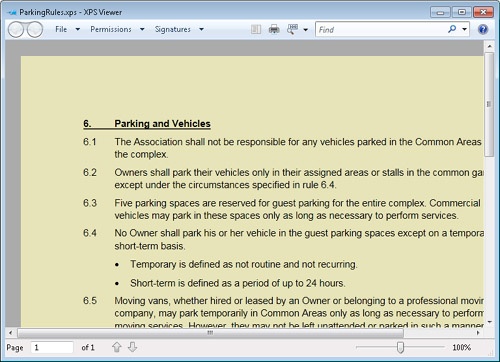
Back in the Save As dialog box, select the Open file after publishing check box, and then click Save.
The document is saved in XPS format. Because you indicated that you wanted to open the file after saving it, the XPS Viewer starts and displays the file.

Creating and Modifying Web Documents
You don’t need to be a Web designer to create a Web page. From within Word 2010, you can view a document in Web Layout view, make any necessary adjustments in Word, and then save the document as a Web page, as easily as you would save it in any other format. During the process of saving the Web page, you can assign a page title that will appear in the title bar of the viewer’s Web browser.
When you save a document as a Web page, Word converts the styles and formatting in the document to Hypertext Markup Language (HTML) codes, which are called tags. These tags tell a Web browser how to display the document. During the conversion, some of the document’s formatting might be changed or ignored because it is not supported by all Web browsers. If that is the case, Word alerts you and gives you the option of stopping the conversion process so that you can make adjustments to the formatting to make it more compatible.
Tip
In the Web Options dialog box, you can specify which browsers you anticipate will be used to view your Web pages. You can also have Word disable any features that are incompatible with the specified browsers.
You can save a document as a Web page in any of three formats:
Web Page. This format saves the Web page as a .htm file with a folder of supporting files that ensure the page is rendered exactly as you want it.
Single File Web Page. This format embeds all the information necessary to render the Web page in one MIME-encapsulated aggregate HTML (.mhtml) file that can be distributed via e-mail.
Web Page, Filtered. This format removes any Office-specific tags from the file and significantly reduces the size of the Web document and its accompanying folder of supporting files. However, it can also radically change the look of the document. For example, it might change a shaded background to a solid color, making the resulting page difficult to read.
After you save a document as a Web page, it is no longer a Word document. However, you can still open, view, and edit the Web page in Word, just as you would a normal document. (You can also open and edit HTML-format Web pages created in other programs.) Making changes can be as basic as replacing text and adjusting alignment, or as advanced as moving and inserting graphics. When you finish modifying the Web page, you can resave it as a Web page, or save it as a regular Word document.
In this exercise, you’ll check that your computer is optimized for displaying documents as Web pages in Windows Internet Explorer 6, Internet Explorer 7, or Internet Explorer 8. You’ll preview a document in Web Layout view and make adjustments necessary for online presentation. Finally, you’ll save the document as a Web page, provide a title for the Web page, open the Web page in Word to make some modifications, and then save and view your changes.
Set Up
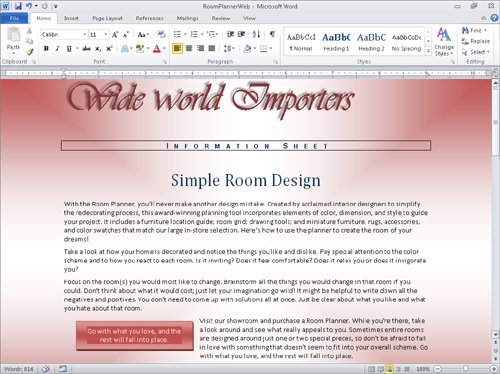
You need the RoomPlannerWeb_start document located in your Chapter11 practice file folder to complete this exercise. You also need a Web browser. Internet Explorer 8 is recommended; the steps might be different for other browsers and versions. Open the RoomPlannerWeb_start document, and save it as RoomPlannerWeb. Hide formatting marks, display the rulers, and be sure the zoom percentage is set to 100%. Then follow the steps.
Display the Backstage view, and in the left pane, click Options.
The Word Options dialog box opens.
In the left pane, click Advanced. Then at the bottom of the Advanced page, in the General area, click Web Options.
The Web Options dialog box opens.
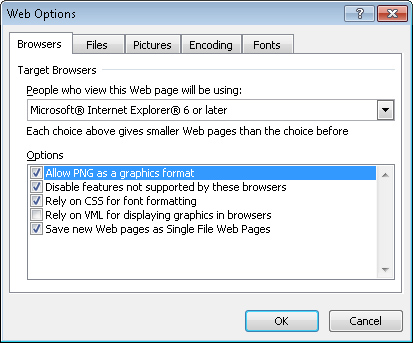
On the Browsers page, verify that the People who view this Web page will be using option is set to Microsoft Internet Explorer 6 or later and that under Options, all five check boxes are selected.
If you want, view the other pages of the Web Options dialog box to familiarize yourself with the kinds of settings available for your Web pages. Then click OK.
Click OK to close the Word Options dialog box.
On the View Shortcuts toolbar in the lower-right corner of the screen, click the Web Layout button.
Word displays the page as it will appear in your Web browser.
Troubleshooting
The appearance of buttons and groups on the ribbon changes depending on the width of the program window. For information about changing the appearance of the ribbon to match our screen images, see Modifying the Display of the Ribbon at the beginning of this book.
As you can see, the page margins are ignored. The page will be easier to read if the text lines are shorter, which you can accomplish by indenting the paragraphs. You also need to adjust the size of the quote box for a more dramatic visual effect.
On the Home tab, in the Editing group, click the Select button, and then click Select All.
See Also
For more information about keyboard shortcuts, see Appendix A at the end of this book.
With the document selected, click the Paragraph dialog box launcher.
On the Indents and Spacing page of the Paragraph dialog box, in the Indentation area, change the Left and Right settings to 1.25”, and then click OK.
The text is now indented from the left and right edges of the window.
Click the frame of the quote box to select it, and then on the Format contextual tab, in the Size group, change the Width setting to 2.5”. Press Enter to implement the change, and then click away from the quote box to release the selection.
Troubleshooting
If the quote box jumps to the middle of the window when you change its size, select it and then in the Arrange group, click the Wrap Text button, and click Square to reapply that text wrapping option.
The Web document is now more readable. (Depending on your screen configuration, your line breaks might be different than those shown here.)
Display the Backstage view, and in the left pane, click Save As.
With the contents of the Chapter11 practice file folder displayed in the Save As dialog box, type My Web Page in the File name box.
Display the Save as type list, and click Web Page. Then when the Save As dialog box expands, click Change Title.
The Enter Text dialog box opens.
In the Page title box, type Room Planner, and click OK.
This title will appear in the title bar of the Web browser window when the Web page is displayed.
In the Save As dialog box, click Save.
The Microsoft Word Compatibility Checker tells you that the Small Caps effect used for the Information Sheet subtitle is not supported by the specified Web browsers and will be changed to all capital letters.
In the Compatibility Checker, click Continue.
Word saves the document as an HTML file called My Web Page.
Press Ctrl+End to move to the end of the document, and then type Looking for free advice? Check our schedule of decorating seminars. (Include the period.)
If you want, format the text to make it stand out. Then save the Web page.
Open Windows Explorer, and navigate to the Chapter11 practice file folder.
The Chapter11 folder contains the My Web Page file and a folder named My Web Page_files, which contains supporting files for the Web page.
Double-click My Web Page.
Your Web browser starts, and the Web page opens.
You can scroll to the bottom of the page to see the changes you made to the HTML file in Word.


Creating and Publishing Blog Posts
Blogs used to be personal Web sites—online spaces where individuals expressed their opinions about anything and everything. With the evolution of social sites such as Facebook and MySpace, blogs are now less likely to be personal online diaries intended for a limited audience, such as the author’s family or circle of friends, and are more likely to serve a promotional purpose. For example, they might provide news and information about an industry. Or they might offer commentary on a specific subject, such as a genre of music, a political point of view, a medical condition, or local news.
A blog consists of posts that can include text, images, and links to related blogs, Web pages, and other media. Word 2010 makes it easy to create posts that you can upload to your blog. If you have already set up a blog account with a blog service provider, you can register your account with Word the first time you create a blog post. If you haven’t yet set up the blog account, you’ll need to register with a service provider before you can publish your first post. Thereafter, Word uses your registered account information when you create or publish a blog post.
To create a blog post, you can use a template designed specifically for that purpose. You then publish a draft of the post to your blog space, where you can review and make any necessary changes before actually publishing the final version.
If you create a regular document and then want to publish it as a blog post, display the Backstage view, and in the left pane, click Save & Send. Then in the Save & Send area of the center pane, click Publish As Blog Post to display information about blogging in the right pane. Clicking the Publish As Blog Post button converts the active document to a new blog post containing the content of the document. You can then save and publish the blog post the same way you would a regular blog post.
In this exercise, you’ll register your existing blog account in Word, create a blog post, publish it to your blog, and then view the published blog post.
Set Up
You need the BlogPost document located in your Chapter11 practice file folder to complete this exercise. You need to have an existing blog account with Windows Live Spaces or another blog service provider, with e-mail publishing or the equivalent turned on. Then follow the steps.
Display the Backstage view, and in the left pane, click New.
In the center pane of the New page, under Available Templates, click Blog post. Then in the right pane, click Create.
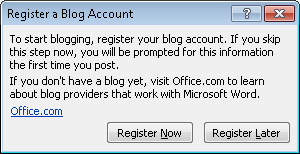
Word creates a document and the Register A Blog Account dialog box opens. If you already have a blog account, you can click Register Now, and follow the instructions to register your existing account. If you don’t have a blog account, you can click the Office.com link for information about getting an account.
Before setting up a blog account, you must decide which blog service provider you want to use. Many service providers, such as Windows Live Spaces (spaces.live.com) and Blogger (www.blogger.com), offer blog spaces free of charge. If your organization is running Microsoft SharePoint 2007 or SharePoint 2010, the site manager might be able to set up a blog space for you.
Tip
The following instructions were current at the time of writing, but because the Windows Live site is constantly being updated, the steps might have changed.
To open a Windows Live Spaces account and create a blog space:
Start your Web browser, and then in the Address bar, type spaces.live.com, and press Enter. Then if necessary, enter your credentials to sign into your account.
On the Spaces - Windows Live home page, click Create Your Space.
On the [Your Name] Space page, under Welcome To Your Space, click Choose A Web Address.
In the box between http:// and .spaces.live.com on the Web Address page, enter the address you want to use. Then click Check Availability.
If Windows Live Spaces reports that the Web address is available, click Save; if the address is not available, repeat step 4 with another name.
You can then enter information about yourself (your profile), give access to friends, and add content directly on your blog’s home page.
If you want to publish to your blog from Word, you need to activate the blog and turn on e-mail publishing.
To activate the blog:
Under Welcome To Your Space, click Add Blog Entry.
A Blog button is added to the toolbar of your blog page header, and a window opens so that you can enter a blog post.
Click Cancel, and then in the Exit Without Saving Changes message box, click OK.
At the right end of the toolbar of your blog page header, click Options, and then click E-mail Publishing.
On this page, you specify the locations from which you will post blog materials.
On the E-mail Publishing page, do the following:
Select the Turn On E-mail Publishing check box.
Type up to three e-mail addresses from which you’ll publish blog posts.
Type a secret word (the password you’ll use to register your blog account in Word).
Select photo albums to share (optional).
Choose whether to publish e-mail submissions immediately or review them online before publishing.
Record the e-mail addresses given at the bottom of the page, and then click Save.
Tip
If you don’t already have a blog account, you can click Register Later and skip to step 8. Word will prompt you again to register your account the first time you publish a blog post or the next time you create a blog post.
The following steps are for registering a blog account created on Windows Live Spaces.
Click Register Now.
The New Blog Account dialog box opens.
In the Blog list, click Windows Live Spaces, and then click Next.
The New Windows Live Spaces Account dialog box opens.
Enter your space name and secret word, and then click OK.
Tip
With Windows Live Spaces, your space name is part of your space address. For example, if your space address is http://lucernepublishing.spaces.live.com/, the space name is lucernepublishing.
The Picture Options dialog box opens.
In the Picture Options dialog box, verify that None – Don’t upload pictures is selected in the Picture provider box, and then click OK.
Tip
If you want to be able to upload pictures, you can get information about setting up a provider by clicking the links in the Picture Options dialog box.
A message box appears when your account has been successfully registered.
In the Microsoft Word message box, click OK.
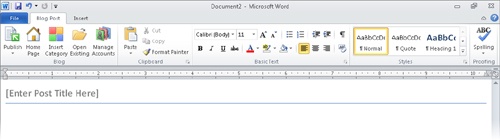
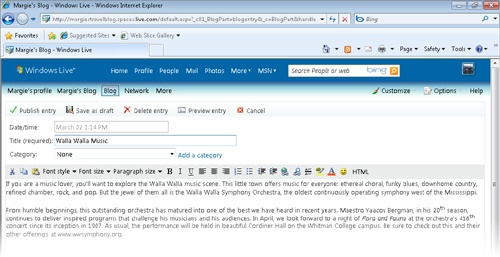
Word displays a blank blog post with a title placeholder at the top.
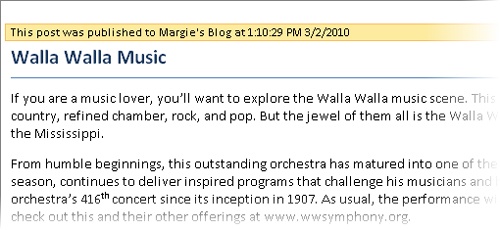
Click the title placeholder, and type Walla Walla Music.
Display the Backstage view, and in the left pane, click Open. Then in the Open dialog box, navigate to your Chapter11 practice file folder, and double-click the BlogPost document.
Select and copy the two paragraphs, and then close the BlogPost document.
In the blog post, click below the line, and then paste the two paragraphs from the Microsoft Office Clipboard.
If you want, use the commands in the Basic Text group on the Blog Post tab to format the title and text.
We left the default formatting.
Tip
Before you publish this blog post, you can turn wwsymphony.org in the last line of the second paragraph into a Web link by clicking the Hyperlink button in the Links group on the Insert tab. For information about inserting Web links, see Adding Hyperlinks in Chapter 12. You can also insert tables and illustrations by clicking their buttons and using the techniques you would use in a regular Word document.
On the Quick Access Toolbar, click the Save button.
With the contents of your Chapter11 practice file folder displayed in the Save As dialog box, type My Blog Post in the File name box, and then click Save.
On the Blog Post tab, in the Blog group, click the Publish arrow, and then click Publish as Draft.
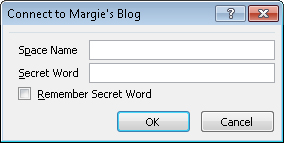
The Connect To <Blog Title> dialog box opens.
Enter your space name and secret word, and then click OK.
A message appears when the blog post has been published to your blog.
In the Blog group, click the Home Page button.
Your default Web browser opens, displaying the home page of your registered blog space.
Under Blog, click Summary. On the Web page that opens, click the Walla Walla Music link.
Word displays the draft of the Word blog post in the Windows Live Spaces blog window.
After making any necessary changes, click Publish Entry.
Word publishes the post to your blog.


Key Points
You can save a document in a file format that allows it to be opened in other programs.
To distribute information in a format that cannot be easily changed, you can save the document as an XPS file so that it looks on the screen the way it will when it is printed.
A Word document can easily be converted to a Web page. You can see how it will look in a Web browser, and you can adjust the layout from within Word.
If you have a blog space, you can easily create and publish blog posts in Word.