
Chapter 13. Use Reference Tools for Longer Documents
Chapter at a Glance

✓ | |
✓ | |
✓ | |
If you create long documents and are concerned about helping your readers find the information they’re looking for, you can rely on the following Microsoft Word 2010 tools to do the job:
Table of contents. You can provide an overview of the information contained in a document and help readers locate topics by compiling a table of contents from the document headings. Depending on the intended delivery format (printed or electronic), you can choose to include page numbers or hyperlinks to each heading.
Index. You can help readers locate specific information by inserting index entry fields within a document and compiling an index of keywords and concepts that directs the reader to the corresponding page numbers.
Information sources and a bibliography. You can appropriately attribute information to its source by inserting citations into a document. Word will then compile a professional bibliography from the citations.
In this chapter, you’ll create and update a table of contents. Then you’ll mark index entries in a document and compile an index. Finally, you’ll use the Source Manager to enter source information, insert a few citations, and compile a bibliography.
Practice Files
Before you can complete the exercises in this chapter, you need to copy the book’s practice files to your computer. The practice files you’ll use to complete the exercises in this chapter are in the Chapter13 practice file folder. A complete list of practice files is provided in Using the Practice Files at the beginning of this book.
When you want to make a comment about a statement in a document—for example, to explain an assumption or cite the source for a different opinion—you can enter the comment as a footnote or an endnote. Doing so inserts a number or symbol called a reference mark, and your associated comment appears with the same number or symbol, either as a footnote at the bottom of the page or as an endnote at the end of the document or document section. In most views, footnotes or endnotes are divided from the main text by a note separator line.
To create a footnote or endnote:
With the cursor where you want the reference mark to appear, on the References tab, in the Footnotes group, click either the Insert Footnote or the Insert Endnote button.
See Also
For more information about keyboard shortcuts, see Appendix A at the end of this book.
Word inserts the reference mark in the document and creates a linked area at the bottom of the page or end of the section.
Type the note text.
Word applies default styles to the reference marks for footnotes and endnotes. By default, footnote reference marks use the 1, 2, 3 format, and endnote reference marks use i, ii, iii.
To change the number format of footnotes or endnotes:
On the References tab, click the Footnotes dialog box launcher.
The Footnote And Endnote dialog box opens.
In the Location area, click Footnotes or Endnotes.
In the Format area, display the Number Format list, and click the number format you want.
With Whole Document shown in the Apply Changes To box, click Apply.
All footnotes or endnotes change to the new number format.

To change the formatting applied to existing footnote or endnote reference marks:
In the document text, select the reference mark for any footnote or endnote.
On the Home tab, in the Editing group, click the Select button, and then click Select Text With Similar Formatting.
All the footnote or endnote reference marks are selected.
On the Home tab, apply the character formatting you want the reference marks to have.
All the reference marks in the body of the document now appear with the character formatting you applied.
Creating and Modifying Tables of Contents
If you create a long document with headings and subheadings, such as an annual report or a catalog that has several sections, you might want to add a table of contents to the beginning of the document to give your readers an overview of the document’s contents and help them navigate to specific sections. In a document that will be printed, you can indicate with a page number the page where each heading is located. If the document will be distributed electronically, you can link each entry in the table of contents to the corresponding heading in the document so that readers can jump directly to the heading with a click of the mouse.
By default, Word expects to create a table of contents based on paragraphs within the document that you have formatted with the standard heading styles: Heading 1, Heading 2, and so on. (Word can also create a table of contents based on outline levels or on fields that you have inserted in the document.) When you tell Word to create the table, Word identifies the table of contents entries and inserts the table at the cursor as a single field. You can modify the elements on which Word bases the table at any time.

See Also
For information about applying styles, see Quickly Formatting Text in Chapter 3.
The Table Of Contents gallery offers three standard table options:
Automatic Table 1. This option inserts a table of contents with the heading Contents.
Automatic Table 2. This option inserts a table of contents with the heading Table of Contents.
Manual Table. This option inserts a table of contents with placeholders that you replace manually.
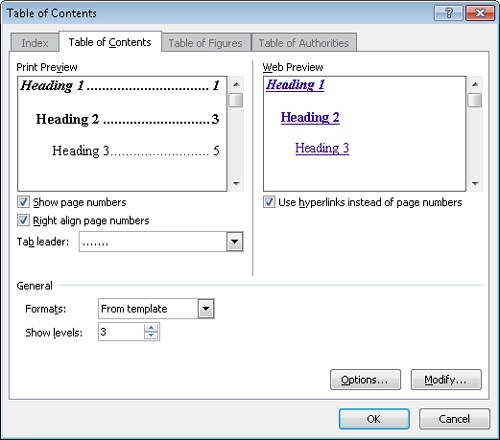
The formatting of the entries in a table of contents is controlled by nine levels of built-in TOC styles (TOC 1, TOC 2, and so on). By default, Word uses the styles that are assigned in the template attached to the document. If you want to use a different style, instead of clicking one of the three options in the Table Of Contents gallery, you can click Insert Table Of Contents below the gallery to display the Table Of Contents dialog box, where you can choose from several variations, such as Classic, Fancy, and Simple.
After you create a table of contents, you can format it manually by selecting text and then applying character or paragraph formatting or styles.
If you change a heading in the document or if edits to the text change the page breaks, the easiest way to update the table of contents is to click the Update Table button and have Word do the work for you. You have the option of updating only the page numbers, or if you have changed, added, or deleted headings, you can update (re-create) the entire table.
In this exercise, you’ll create a table of contents for a document based on heading styles. You’ll alter the document by deleting page breaks, and then you’ll update the table of contents to reflect your changes.
Set Up
You need the ProceduresContents_start document located in your Chapter13 practice file folder to complete this exercise. Open the ProceduresContents_start document, and save it as ProceduresContents. Display formatting marks, and then follow the steps.
Click to the left of GENERAL ADMINISTRATION, and then on the References tab, in the Table of Contents group, click the Table of Contents button.
The Table Of Contents gallery appears.
In the Table of Contents gallery, click Automatic Table 1.
Press Ctrl+Home to return to the beginning of the document.
Word has inserted a table of contents at the cursor.
In the Table of Contents group, click the Table of Contents button, and then below the gallery, click Remove Table of Contents.
Click at the right end of the Office Procedures title, and press Enter. Then type Table of Contents, and make this heading bold.
Click at the left end of GENERAL ADMINISTRATION, and on the Insert tab, in the Pages group, click the Page Break button. Then press the Up Arrow key to position the cursor at the left end of the empty page-break paragraph.
On the References tab, in the Table of Contents group, click the Table of Contents button, and then below the gallery, click Insert Table of Contents.
The Table Of Contents dialog box opens.
In the General area of the Table of Contents page, display the Formats list, and click Classic.
Examples of entries with the Classic table of contents styles applied appear in the Print Preview and Web Preview boxes.
Tip
If you create a table of contents based on the document’s template, you can customize the TOC styles during the creation process. With Formats set to From Template in the General area of the Table Of Contents dialog box, click Modify. The Style dialog box opens, displaying the nine TOC styles. You can modify the font, paragraph, tabs, border, and other formatting of these styles the same way you would modify any other style. For information about creating styles, see Working with Styles and Templates in Chapter 16.
Display the Tab leader list, click the dotted leader option, and then click OK to insert the table of contents.
Press Ctrl+Home to move to the beginning of the document, and then point to any entry in the table of contents.
A ScreenTip tells you that you can hold down the Ctrl key and click any entry in the table of contents to jump to that heading in the document.
Click anywhere in the table.
The table of contents is contained in one large field, and clicking anywhere in the field selects the entire field.
See Also
For information about fields, see Inserting Fields in Chapter 12.
Scroll down to page 2, click in the selection area to the left of the page break, and then press the Delete key to delete the page break.
The Contact Information heading is now on page 2.
Scroll down to the next page break, and delete it.
The Facilities heading is now also on page 2.
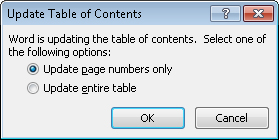
On the References tab, in the Table of Contents group, click the Update Table button.
The Update Table Of Contents dialog box opens.
Click Update entire table, and click OK. Then press Ctrl+Home.
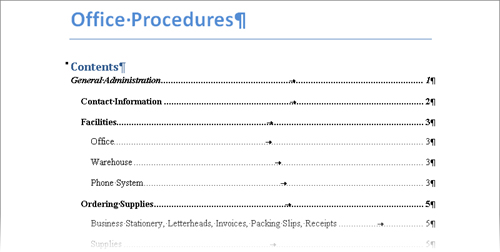
Word has updated the table of contents to reflect the new page numbers.
Drag in the selection area to select all the lines of the table of contents.
On the Home tab, in the Paragraph group, click the Line and Paragraph Spacing button, and then click Remove Space Before Paragraph.
Press Ctrl+Home to release the selection and move to the top of the document.
Word has removed the extra space between the lines in the table of contents.


Creating and Modifying Indexes
To help readers find specific concepts and terms that might not be readily located by looking at a table of contents, you can include an index at the end of a document. Word creates an index by compiling an alphabetical listing with page numbers based on index entry fields that you mark in the document. As with a table of contents, an index is inserted at the cursor as one field.
Tip
You don’t need to create indexes for documents that will be distributed electronically because readers can use the Navigation task pane to search for the information they need. For information about searching for information in a document, see Finding and Replacing Text in Chapter 2.
In the index, an index entry might apply to a word or phrase that appears on one page or is discussed on several pages. The entry might have related subentries. For example, in the index to this book, the main index entry text effects might have below it the subentries applying and live preview of. An index might also include cross-reference entries that direct readers to related entries. For example, the main index entry text wrapping breaks might be cross-referenced to line breaks.

To insert an index entry field into the document, you select the text you want to mark, and click the Mark Entry button in the Index group on the References tab to open the Mark Index Entry dialog box, where you can do the following:
Use the selected text as is, modify the entry, or add a subentry.
Format the entry—for example, to make it appear bold or italic in the index—by right-clicking it, clicking Font, and selecting the options you want; or by using keyboard shortcuts.
Designate the entry as a cross-reference, one-page entry, or a page-range entry.
Specify the formatting of this entry’s page number.
After you have set the options in the dialog box the way you want them, you can insert an index entry field adjacent to the selected text by clicking Mark, or adjacent to every occurrence of the selected text in the document by clicking Mark All. The Mark Index Entry dialog box remains open to simplify the process of inserting multiple index entry fields, so you don’t have to click the Mark Entry button for each new entry. You can move the dialog box off to the side so that it doesn’t block the text you’re working with.
Tip
When building an index, you should choose the text you mark carefully, bearing in mind what terms readers are likely to look up. One reader might expect to find information about cell phones by looking under cell, whereas another might look under mobile, another under phones, and another under telephones. A good index will include all four entries.
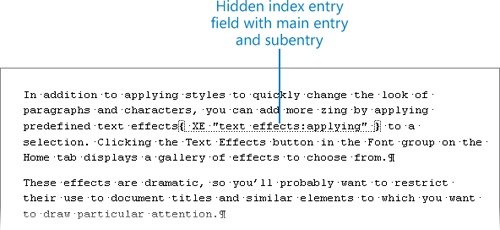
Index entry fields are formatted as hidden; you cannot see them unless you click the Show/Hide ¶ button in the Paragraph group on the Home tab to turn on formatting marks and hidden characters. When the index entry field is visible, it appears in the document enclosed in quotation marks within a set of braces, with the designator XE and a dotted underline.
Tip
You can hide any text in a document by selecting it, clicking the Font dialog box launcher on the Home tab, selecting the Hidden check box, and clicking OK. When you print the document, Word will not include the hidden text unless you select the Print Hidden Text check box in the Printing Options area of the Display page in the Word Options dialog box.
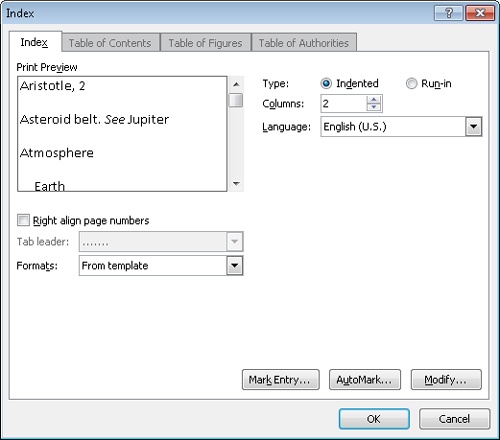
To create an index based on the index entries in a document, you position the cursor where you want the index to appear and then click the Insert Index button in the Index group on the References tab. The Index dialog box opens, and you can then specify the following:
Whether the index formatting should use styles from the current template or be based on one of four predefined formats that you can preview in the Print Preview box.
Whether page numbers should be right-aligned, and if so whether they should have dotted, dashed, or solid tab leaders.
Whether the index should be indented, with each subentry on a separate line below the main entries, or run-in, with subentries on the same line as the main entries.
The number of columns you want.
When you click OK in the Index dialog box, Word calculates the page numbers of all the entries and subentries, consolidates them, and inserts the index as one field in the specified format at the specified location in the document.
Tip
If you make changes to the document that affect its index entries or page numbering, you can update the index by clicking it and then clicking the Update Index button in the Index group on the References tab. You can also right-click the index and then click Update Field.
You can edit the text of the index generated from the entries, but the changes you make are not permanent; regenerating the index restores the original entries. It is more efficient to edit the text within the quotation marks in the index entry fields. To delete an index entry, you select the entire hidden field and then press the Delete key. You can move and copy index entries by using the techniques you would use for regular text.
Tip
Dragging through any part of an index entry field that includes one of the enclosing braces selects the entire field.
In this exercise, you’ll first mark a few index entries and a cross-reference entry. Then you’ll create and format an index, delete an index entry from the document, and update the index.
Set Up
You need the RulesIndex_start document located in your Chapter13 practice file folder to complete this exercise. Open the RulesIndex_start document, and save it as RulesIndex. Then display formatting marks, and follow the steps.
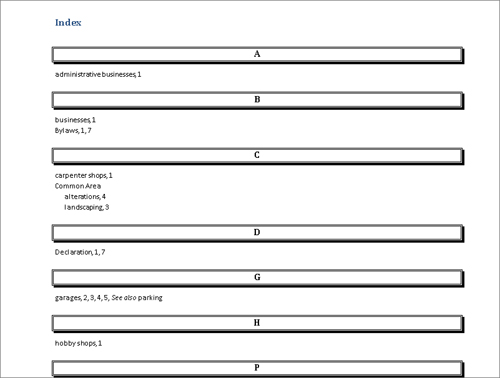
In the first item in the first bulleted list, select the word Declaration. Then on the References tab, in the Index group, click the Mark Entry button.
Drag the dialog box by its title bar to the upper-right corner of the screen. Then click Mark All.
Word inserts hidden index entry fields adjacent to every occurrence of the word Declaration in the document.
In the same paragraph, select the word Bylaws, and click the title bar of the Mark Index Entry dialog box to activate it and enter the selected text. Then click Mark All.
In section 2.1, select the word professional, and click the dialog box title bar. Then click at the right end of the entry in the Main entry box, press the Spacebar, and type businesses. Click Mark. Then select and mark administrative businesses.
In the Main entry box, delete the word administrative, and then click Mark.
In section 2.4, select the words hobby shop, click the dialog box title bar, and in the Main entry box, add an s to shop to make it shops. Then click Mark. Repeat this step to mark carpenter shop, and then create an entry for shops.
In section 4.3, select the word garage, change the entry in the Mark Index Entry dialog box to garages, and click Mark All.
In the Mark Index Entry dialog box, in the Options area, click Cross-reference. The cursor moves to the space after the word See in the adjacent box.
Without moving the cursor, type also parking. Select the word also, press Ctrl+I to make it italic, and then click Mark.
A cross-reference to the garages index entry appears adjacent to the word garage.
In section 7.2, select the words Common Area, and click the dialog box title bar. Then type landscaping in the Subentry box, and click Mark.
Word inserts an index entry with the entry and subentry separated by a colon.
In section 8.2, mark the words Common Area with a subentry of alterations.
Close the Mark Index Entry dialog box.
Press Ctrl+End to move to the end of the document, press Enter, and then press Ctrl+Enter to insert a page break.
The cursor moves to the top of the new page.
Type Index, and press Enter. Apply the Heading 1 style to the new heading, and press Ctrl+End to move to the empty paragraph.
On the Home tab, in the Paragraph group, click the Show/Hide ¶ button to hide formatting marks and hidden characters.
On the References tab, in the Index group, click the Insert Index button.
The Index dialog box opens.
In the Columns box, change the setting to 1.
Display the Formats list, and click Fancy. Then click OK.
Word compiles a short index based on the index entries you just marked.
This index is formatted in one column with the page numbers adjacent to their index entries.
Display hidden characters so that you can see the index entry fields in the document, and scroll up to section 4.3.
Select the entire cross-reference entry following garage, and press the Delete key.
Troubleshooting
If you find it hard to select just this entry, try pointing to the right of the closing brace ( } ) and dragging slightly to the left.
The cross-reference entry is deleted from the document.
Press Ctrl+End to move to the end of the document, and click anywhere in the index to select its field.
Hide the formatting marks and hidden characters. Then on the References tab, in the Index group, click the Update Index button.
The index is updated to reflect that you have deleted the cross-reference.


Adding Sources and Compiling Bibliographies
In Word 2010, you can use the Source Manager to help you keep track of sources you use while researching a document and to ensure that you reference them in the proper format. Whether your sources are books, periodicals, Web pages, or interviews, you can record details about them and then select a common style guide, such as the Chicago Manual of Style, to have Word automatically list your sources in that style guide’s standard format.
There are two ways to enter a new source:
You can enter all the sources in the Source Manager dialog box and then insert the sources from the Source Manager into the document.
You can enter the information for one specific source in the Create Source dialog box and click OK to insert the citation at the cursor.
No matter which method you use to enter the source information, Word stores the sources in a separate file on your computer’s hard disk so that you can cite them in any document you create. You can view this Master List and select which sources will be available to the current document from the Source Manager dialog box.
After you enter citations in a document, you can easily compile their sources into one of two types of lists by clicking the Bibliography button in the Citations & Bibliography group on the References tab:
Bibliography. This option inserts the source list with a Bibliography heading.
Works Cited. This option inserts the source list with a Works Cited heading.
You can also click Insert Bibliography at the bottom of the gallery to insert the source list without a heading. The type of bibliography you use is usually specified by the organization or person for whom you are preparing the document, such as your company, your instructor, or the publication in which you intend to publish the document.
When you compile a bibliography, Word inserts it at the cursor as one field. You can edit the text of a bibliography, but if the source information changes, it is more efficient to edit the source in the Source Manager and then update the bibliography the same way you would update a table of contents or index.
Tip
You can update a bibliography by clicking the bibliography and then clicking the Update Citations And Bibliography button that appears above the field. If you used the Insert Bibliography command to compile the source list, the Update Citations And Bibliography button does not appear when you click the field. In that case, you can update the bibliography by right-clicking anywhere in the field and then clicking Update Field.
In this exercise, you’ll enter information for a couple of sources, insert citations for existing sources, add a new source, compile a bibliography, and then change its format.
Set Up
You need the AllAboutBamboo_start and BambooBibliography_start documents located in your Chapter13 practice file folder to complete this exercise. Open the AllAboutBamboo_start document, and save it as AllAboutBamboo. Then follow the steps.
On the References tab, in the Citations & Bibliography group, display the Style list, and then click Chicago Fifteenth Edition.
Any sources you create and citations you insert will be formatted according to the Chicago Manual of Style rules.
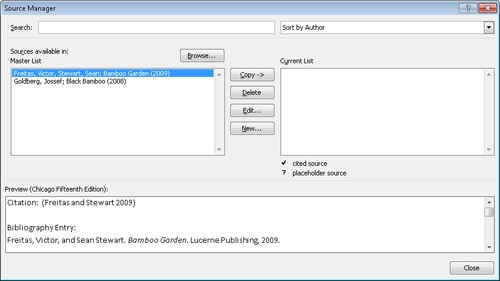
In the Citations & Bibliography group, click the Manage Sources button.
The Source Manager dialog box opens.
In the Source Manager dialog box, click New.
The Create Source dialog box opens.
Ensure that Book is selected in the Type of Source list. Then in the Bibliography Fields for Chicago Fifteenth Edition area, type Goldberg, Jossef in the Author box, Black Bamboo in the Title box, 2008 in the Year box, and Litware in the Publisher box. Then click OK.
The new source is added to the Source Manager and appears not only in the Master List but also in the Current List, which is the list of sources that can be used in this document.
In the Source Manager dialog box, click New, and then in the Create Source dialog box, click Edit.
The Edit Name dialog box opens.
Under Add name, type Freitas in the Last box, type Victor in the First box, and then click Add.
Freitas, Victor appears in the Names box.
To enter a second author for the same book, type Stewart in the Last box, type Sean in the First box, click Add, and then click OK.
In the Create Source dialog box, type Bamboo Garden in the Title box, 2009 in the Year box, and Lucerne Publishing in the Publisher box. Then click OK.
The new source is added to the Master List and the Current List.
Close the Source Manager dialog box.
Open the BambooBibliography_start document, and save it as BambooBibliography. Then open the Source Manager dialog box.
The two sources you just entered appear in the Master List but not in the Current List, meaning they are not available for use in this document.
With the Freitas source selected in the Master List box, click Copy to make that source available in this document. Then copy the Goldberg source to the Current List box, and click Close.
In the document, position the cursor to the right of Black Bamboo on the last line of the first paragraph. Then in the Citations & Bibliography group, click the Insert Citation button, and in the list of citations, click Goldberg, Jossef.
Word inserts the source in parentheses.
Insert a Freitas, Victor, Stewart, Sean citation to the right of Bamboo Garden (but before the period) at the end of the same paragraph.
Click to the right of Entire books (one line up in the same paragraph). Then in the Citations & Bibliography group, click the Insert Citation button, and in the list, click Add New Source.
In the Create Source dialog box, display the Type of Source list, and click Web site.
In the Name of Web Page box, type American Bamboo Society, and in the Year box, type 2006. Then type www.americanbamboo.org/BooksOnBamboo.html in the URL box, and click OK.
Word inserts the source in parentheses at the insertion point.
In the Citations & Bibliography group, click the Manage Sources button.
In the Source Manager dialog box, the new citation appears in both the Master List and the Current List.
Close the Source Manager dialog box, and then press Ctrl+End to move to the end of the document.
In the Citations & Bibliography group, click Bibliography.
The Bibliography gallery appears.
In the gallery, click Bibliography.
Word inserts a bibliography of all the citations in the document in alphabetical order.
In the Citations & Bibliography group, display the Style list, and click APA Fifth Edition.
Tip
You don’t have to select the bibliography to apply this change; you can do it from anywhere in the document.
The format of the bibliography and of the citations changes to bring it in line with the style specified by the Publication Manual of the American Psychological Association.


Key Points
A table of contents provides an overview of the topics covered in a document and lets readers navigate quickly to a topic.
After marking index entries for key concepts, words, and phrases, you can use the Insert Index command to tell Word to compile an index.
Word can keep track of sources and compile a bibliography of cited sources based on the style of your choosing.