
Chapter 12. Explore More Text Techniques
Chapter at a Glance

✓ | |
✓ | |
✓ | |
Microsoft Word 2010 has several tools that make creating professional documents easy and efficient:
Hyperlinks. To help a reader move to a location in the same file, in another file, or on a Web page, you can add links from text or graphics to the target location.
Fields. Instead of typing information that is associated with a document, you can have Word insert it for you in a field. Then if the information changes, you can simply update the field to ensure that the information is current.
Bookmarks. You can quickly return to a specific location in a document by inserting a bookmark. You can jump to a bookmarked location by selecting it from a list, and you can help a reader find information by inserting hyperlinks or cross-references to bookmarks.
Cross-references. To help a reader move to a related location in a document, you can insert a cross-reference. Then if the text at the location changes, you can tell Word to update the cross-reference to reflect the change.
In this chapter, you’ll insert two different kinds of hyperlinks and three different types of fields. Then you’ll create and modify bookmarks and cross-references.
Practice Files
Before you can complete the exercises in this chapter, you need to copy the book’s practice files to your computer. The practice files you’ll use to complete the exercises in this chapter are in the Chapter12 practice file folder. A complete list of practice files is provided in Using the Practice Files at the beginning of this book.
Adding Hyperlinks
Like Web pages, Word documents can include hyperlinks that provide a quick way to perform tasks such as the following:
Open another document.
Link to a Web site.
Download a file.
Send an e-mail message.
You insert hyperlinks into a Word document by displaying the Insert Hyperlink dialog box, specifying the type of link you want to create, and then entering an appropriate destination for that type of link.
While creating a hyperlink to a document or a Web page, called the target, you can specify whether the target information should appear in the same window or frame as the active document or in a new one. You can also make a particular setting the default for all hyperlinks.
Within a document, hyperlinks appear underlined and in the color specified for hyperlinks by the document’s theme. You can jump to the target of the hyperlink by holding down the Ctrl key and clicking the link. After you click the hyperlink, its color changes to the color specified for followed hyperlinks.
To edit or remove a hyperlink, you can select it and click Hyperlink in the Links group on the Insert tab or you can right-click the selection and then click the appropriate command.
In this exercise, you’ll insert and test a hyperlink to a different document. Then you’ll insert, modify, and test a hyperlink that opens an e-mail message window.
Set Up
You need the VisitorGuide_start and Conductors documents located in your Chapter12 practice file folder to complete this exercise. Open the VisitorGuide_start document, and save it as VisitorGuide. Then follow the steps.
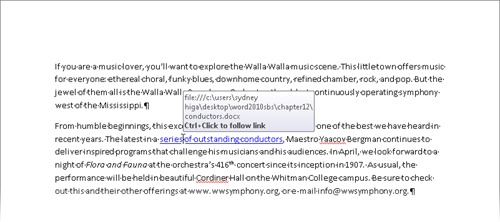
In the second sentence of the second paragraph, select series of outstanding conductors. Then on the Insert tab, in the Links group, click the Hyperlink button.
See Also
For more information about keyboard shortcuts, see Appendix A at the end of this book.
The Insert Hyperlink dialog box opens. On the Link To bar, Existing File Or Web Page is selected, and the dialog box shows the contents of your Chapter12 practice file folder.
In the list of file names, click (don’t double-click) the Conductors document, and then click Target Frame.
The Set Target Frame dialog box opens with Page Default (None) selected as the frame in which the document will open.
Display the Select the frame list, and click New window. Then click OK.
Click OK to close the Insert Hyperlink dialog box.
Word inserts a hyperlink from the selected text in the VisitorGuide document to the Conductors document. The hyperlink is indicated by an underline and the color assigned to hyperlinks by the document’s theme.
Point to the hyperlink.
Word displays a ScreenTip.
Hold down the Ctrl key, and then click the hyperlink.
Word opens the Conductors document in a new window.
On the View tab, in the Window group, click the Switch Windows button, and then click VisitorGuide.
In the VisitorGuide document, the color of the hyperlink has changed to indicate that you have followed this link to its target.
In the last line of the document, select e-mail us, and then on the Insert tab, in the Links group, click the Hyperlink button.
At the bottom of the Link to bar of the Insert Hyperlink dialog box, click E-mail Address.
The dialog box changes so that you can enter the information appropriate for an e-mail hyperlink.
In the E-mail address box, type [email protected].
Tip
When you begin typing in the E-Mail Address box, Word inserts mailto: in the box, in front of the address you type.
When a person clicks the link, Word will start his or her default e-mail program and open a new e-mail message window.
In the Subject box, type Flora and Fauna inquiry.
This text will be automatically entered in the Subject box of the new e-mail message window.
Click OK.
The hyperlinked text is indicated by an underline and its assigned theme color. Pointing to it displays a ScreenTip with the hyperlink’s target.
Right-click the e-mail us hyperlink, and then click Edit Hyperlink.
The Edit Hyperlink dialog box opens with the current destination for this link in the E-Mail Address box.
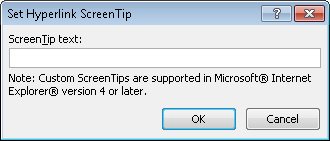
In the upper-right corner of the dialog box, click ScreenTip.
The Set Hyperlink ScreenTip dialog box opens.
In the ScreenTip text box, type Send e-mail message to Margie’s Travel, and then click OK.
In the Edit Hyperlink dialog box, click OK.
Point to the hyperlink.
Word displays your custom ScreenTip.
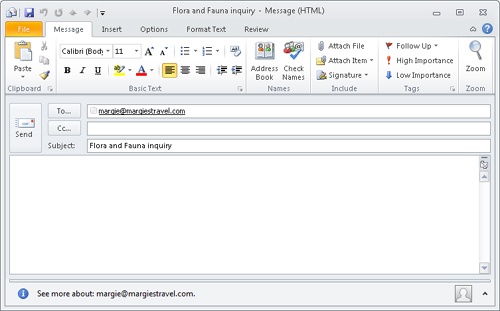
Hold down Ctrl, and click the hyperlink.
Your e-mail program starts, and a message window opens. (This is the message window displayed by Microsoft Outlook 2010.)
Close the message window, clicking No when asked whether you want to save the changes.
The hyperlinked text is now displayed in the color assigned to followed hyperlinks by the document’s theme.


Inserting Fields
When you insert a hyperlink into a document, you are actually inserting a HYPERLINK field. A field is a placeholder that tells Word to supply the specified information or perform the specified action in the specified way.
Word inserts fields to control certain processes, such as the creation of a table of contents or the merging of a form letter with a data source. You can use fields to insert information that can be updated with the click of a button if the information changes. You can’t type a field in your document; instead, you must tell Word to insert the field you want. You do this by clicking the Quick Parts button in the Text group on the Insert tab and then clicking Field to display the Field dialog box.

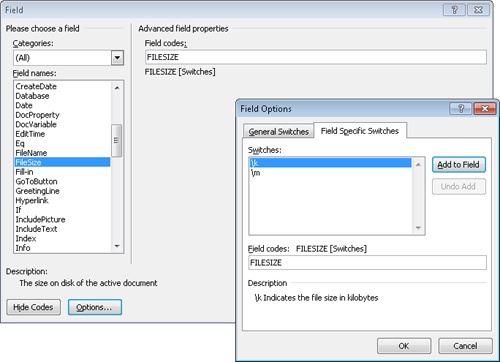
The Field dialog box provides a comprehensive list of all the available fields. In this dialog box, you can also set options that refine the field.
Each field consists of a set of curly braces containing the field name and any required or optional instructions or settings. These settings, called switches, refine the results of the field—for example, by formatting it in a particular way. When you insert a field from the Field dialog box, you can click Field Codes in the lower-left corner of the dialog box to display the field’s syntax. Clicking Options in the lower-left corner displays the Field Options dialog box, in which you can add general and specific optional settings to the field code.
Tip
After Word inserts the field, you see the field results; for example if you insert a FILESIZE field, you see the size of the file. To see the field code that tells Word to insert the file size, either click the field to select it and press Alt+F9, or right-click the field and click Toggle Field Codes.
Inserting some types of fields requires advanced knowledge of the fields and how to control them. However, some fields are very easy. For example, to insert today’s date or the current time in a document, you simply click the Date & Time button in the Text group on the Insert tab to display the Date And Time dialog box and select the format you want. to use. To insert the information as regular text, you click OK. If you want to be able to update the date or time, you insert the information as a field by selecting the Update Automatically check box. Word then inserts a Date or Time field matching the format you selected and retrieves the date or time from your computer’s internal calendar or clock.
Tip
You can insert other types of date and time fields, such as a PrintDate field or an EditTime field. Insert a date or time field in the usual way, right-click the field, and then click Edit Field to display the Field dialog box. Then change the Categories setting to Date And Time, and in the Field Names list, click the field you want. (Clicking a field in the list displays a brief description, so it is easy to choose the one you want.) When you click OK, the information corresponding to the field type you specified is shown in the document.
By default, date and time fields are updated every time you open the document. You can prevent this updating by selecting the field and pressing Ctrl+F11 to lock the field; press Ctrl+Shift+F11 to unlock it again. If a field is not locked, you can click it and then click the Update button that appears above it or press the F9 key to update it with the most current information.
Another type of field you might want to insert in a document—for example, in its header or footer—is one that contains a document property, such as the author, title, or last modification date. This type of information is easily inserted by clicking the Quick Parts button, pointing to Document Property, and then clicking the property you want. If you insert the field and then you edit the contents of the field in the document, the change is carried over to the list of properties displayed on the Info page in Backstage view.
See Also
For information about document properties, see Preparing Documents for Electronic Distribution in Chapter 6.
In this exercise, you’ll insert a field that displays the current date and time in the footer of a document, and you’ll update the field. Then you’ll insert a field that displays the Title property, and you’ll change the property by changing the field. You’ll also add the file name. Finally, you’ll convert the current date and time to the date and time when the document was last saved.
Set Up
You need the ProceduresFields_start document located in your Chapter12 practice file folder to complete this exercise. Open the ProceduresFields_start document, and save it as ProceduresFields. Display formatting marks, and then follow the steps.
On the Insert tab, in the Header & Footer group, click the Footer button, and then click Edit Footer.
Word dims the text and displays the footer area at the bottom of the first page of the document.
With the cursor in the blank paragraph of the footer, on the Design contextual tab, in the Insert group, click the Date & Time button.
The Date And Time dialog box opens.
In the Available formats list, click the first format that combines the date and time.
Ensure that the Update automatically check box is selected, and then click OK.
Press the Tab key. Then in the Insert group, click the Quick Parts button, point to Document Property, and then click Title.
Word inserts a field for the Title property in the document.
With the Title property active, type Office Procedures. Then press the Right Arrow key to release the selection.
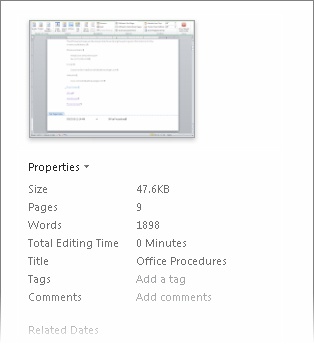
Display the Backstage view, and if the Info page is not displayed, click Info.
Notice that under Properties in the right pane, the Title property is Office Procedures.
Click the Design contextual tab to redisplay the document footer.
Press the Tab key, type File name: (including the colon), and press the Spacebar. Then in the Insert group, click the Quick Parts button, and click Field.
In the Field names list in the Field dialog box, click FileName. Then in the Format list, click Lowercase, and click OK.
Save the document.
At the left end of the footer, the date and time still reflect the moment when you inserted that field.
Click the field, and then click the Update button that appears.
The time is updated to reflect the current time. You want this field to reflect the date and time when the document was last saved.
Right-click the field, and click Edit Field.
In the Field dialog box, display the Categories list, and then click Date and Time.
The list is filtered to display only the fields that relate to dates and times.
In the Field names list, click SaveDate, and in the Date formats list, click the first format that combines the date and time.
Select the Preserve formatting during updates check box, and click OK.
Save the document. Then right-click the field, and click Update Field.
The time is updated to reflect the most recent save.


Adding Bookmarks and Cross-References
Word provides two tools that you can use to jump easily to designated places within the same document:
Bookmarks. Whether the document you are reading was created by you or by someone else, you can insert bookmarks to flag information to which you might want to return later. Like a physical bookmark, a Word bookmark marks a specific named place in a document. After inserting a bookmark, you can quickly jump to it by displaying the Bookmark dialog box, clicking the bookmark you want to locate, and then clicking Go To.
Cross-references. You use cross-references to quickly move readers to associated information elsewhere in the document. You can create cross-references to headings, figures, and tables, for which Word automatically creates pointers. You can also create cross-references to manually inserted bookmarks. If you delete an item you have designated as the target of a cross-reference, you must update the cross-reference.
See Also
For information about using hyperlinks to jump to other locations, see Adding Hyperlinks earlier in this chapter. For information about using the Navigation task pane to jump to any paragraph styled as a heading, see Viewing Documents in Different Ways in Chapter 1.
In this exercise, you’ll insert a bookmark and then jump to it. You’ll also create a cross-reference, edit the referenced item, and then update the cross-reference.
Set Up
You need the RulesBookmarks_start document located in your Chapter12 practice file folder to complete this exercise. Open the RulesBookmarks_start document, and save it as RulesBookmarks. Then follow the steps.
On the Home tab, in the Editing group, click the Find arrow, and in the list, click Go To.
The Find And Replace dialog box opens, with the Go To page active.
With Page selected in the Go to what list, in the Enter page number box, type 5. Then click Go To, and click Close.
On page 5, click to the left of the 10. Building Maintenance heading. Then on the Insert tab, in the Links group, click the Bookmark button.
The Bookmark dialog box opens.
In the Bookmark name box, type Maintenance, and then click Add.
The Bookmark dialog box closes, and although you can’t see it, a bookmark named Maintenance is inserted into the document.
Below the 10.3 paragraph, select the six bulleted items. Then display the Bookmark dialog box, type LimitedCommon in the Bookmark name box, and click Add.
Press the Home key to release the selection. Then display the Advanced page of the Word Options dialog box, and under Show Document Content, select the Show Bookmarks check box. Click OK.
The location of the bookmark you inserted without selecting text is identified by a large, gray I-beam. The location of the one you inserted after selecting the bulleted items is identified by large, gray square brackets around the selection.
Press Ctrl+Home to move to the beginning of the document. Then display the Go To page of the Find and Replace dialog box.
In the Go to what list, click Bookmark.
The dialog box changes so that you can specify the bookmark you want to jump to.
Display the Enter bookmark name list, click Maintenance, and then click Go To.
The cursor moves to the location of the bookmark. The dialog box remains open in case you want to move somewhere else.
Close the Find and Replace dialog box.
Tip
You can also jump to a bookmark by displaying the Bookmark dialog box, clicking the bookmark you want, and then clicking Go To. In the Bookmark dialog box, you can sort the bookmarks alphabetically or in the order in which they are located. To delete a bookmark, click its name, and then click Delete.
Scroll upward to page 2, and click at the end of the 4.2 paragraph. Press the Spacebar, type See also, and then press the Spacebar again.
On the Insert tab, in the Links group, click the Cross-reference button.
The Cross-Reference dialog box opens. You can specify the type of item you want to reference and what you want the cross-reference inserted in the document to say.
Display the Reference type list, and click Heading.
The list box in the Cross-Reference dialog box now displays all the headings in this document.
With Heading text selected in the Insert reference to box, click 6. Parking and Vehicles in the For which heading list. Then click Insert, and click Close.
The text 6. Parking and Vehicles appears in the document at the cursor. Although it’s not obvious, the text is inserted as a field.
Hold down the Ctrl key, and then click the cross-reference to move to the 6. Parking and Vehicles heading.
In the heading, delete and Vehicles.
Move back to page 2, and at the end of the 4.2 paragraph, click 6. Parking and Vehicles to select the cross-reference field.
Right-click the selected cross-reference, and then click Update Field.
Word deletes the words and Vehicles at the end of the cross-reference.
Hold down Ctrl, and click the cross-reference to jump to the associated heading.


Key Points
Documents can contain hyperlinks to Web pages, files, or e-mail addresses.
You can use fields to tell Word to supply the specified information or perform the specified action in the specified way.
Flagging information with a bookmark makes it easy to look up the information later.
Using Word to insert cross-references makes them easier to maintain.