
Chapter 2. Edit and Proofread Text
Chapter at a Glance

✓ | |
✓ | |
✓ | |
✓ | |
✓ | |
As you learned in Chapter 1, entering text is a simple matter of typing. However, even the most accurate typists occasionally make mistakes, also known as typos (for typographical errors). Unless the documents you create are intended for no one’s eyes but your own, you need to ensure that they are not only correct but also persuasive. Whether you are a novice or experienced writer, Microsoft Word 2010 has several tools that make creating professional documents easy and efficient.
Editing tools. These tools provide quick-selection techniques and drag-and-drop editing to make it easy to move and copy text anywhere you want it.
Search tools. These tools can be used to locate and replace words, phrases, and special characters, either one at a time or throughout a document.
See Also
For information about using the search tools to find and replace formatting, see the sidebar Finding and Replacing Formatting in Chapter 3.
Research tools. These tools make it easy to find synonyms, look up information, and translate words and phrases.
AutoCorrect and Spelling And Grammar. These features make it easy to correct typographical and grammatical errors before you share a document with others.
Quick Parts. These building blocks can be used to save and recall specialized terms or standard paragraphs.
Tip
Word also includes formatted building blocks for document elements such as cover pages, headers, and footers. For information, see Inserting Building Blocks in Chapter 5.
In this chapter, you’ll edit the text in a document by inserting and deleting text, copying and pasting a phrase, and moving a paragraph. Then you’ll replace one phrase with another throughout the entire document. Next, you’ll replace a word with a synonym and translate another word. You’ll also add misspelled words to the AutoCorrect list and check the spelling and grammar of a document. Finally, you’ll save a couple of building blocks for insertion later in a document.
Practice Files
Before you can complete the exercises in this chapter, you need to copy the book’s practice files to your computer. The practice files you’ll use to complete the exercises in this chapter are in the Chapter02 practice file folder. A complete list of practice files is provided in Using the Practice Files at the beginning of this book.
Making Text Changes
You’ll rarely write a perfect document that doesn’t require any editing. You’ll almost always want to add or remove a word or two, change a phrase, or move text from one place to another. You can edit a document as you create it, or you can write it first and then revise it. Or you might want to edit a document that you created for one purpose so that you can use it for a different purpose. For example, a letter might make an ideal starting point for a flyer, or a report might contain all the information you need for a Web document.
Inserting text is easy; you click to position the cursor and simply begin typing. Any existing text to the right of the cursor moves to make room for the new text.
Deleting text is equally easy. If you want to delete only one or a few characters, you can simply position the cursor and then press the Backspace or Delete key until the characters are all gone. Pressing Backspace deletes the character to the left of the cursor; pressing Delete deletes the character to the right of the cursor.
To delete more than a few characters efficiently, you need to know how to select the text. Selected text appears highlighted on the screen. You can drag through a section of text to select it, or you can select specific items as follows:
Word. Double-click anywhere in the word. The word and the space immediately following it are selected, but not any punctuation following the word.
Sentence. Click anywhere in the sentence while holding down the Ctrl key. Word selects all the characters in the sentence, from the first character through the space following the ending punctuation mark.
Paragraph. Triple-click anywhere in the paragraph. Word selects the text of the paragraph and the paragraph mark.
Adjacent words, lines, or paragraphs. Position the cursor at the beginning of the text you want to select, hold down the Shift key, and then press the Arrow keys to select one character or line at a time; hold down the Shift and Ctrl keys and press the Arrow keys to select one word at a time; or click at the end of the text that you want to select.
Non-adjacent words, lines, or paragraphs. Make the first selection, and then hold down the Ctrl key while selecting the next text block.
Tip
When you select text, Word displays a box called the Mini Toolbar so that you can quickly format the selection. You can ignore this toolbar for now. For more information, see Manually Changing the Look of Characters in Chapter 3.
As an alternative way of selecting, you can use an invisible area in the document’s left margin, called the selection area, to select items.
Line. Click in the selection area to the left of the line.
Paragraph. Double-click in the selection area to the left of the paragraph.
Entire document. Triple-click in the selection area.
See Also
To see a complete list of keyboard shortcuts, see Appendix A at the end of this book.

After selecting the text you want to delete, press either Backspace or Delete.
If you want to move or copy the selected text, you have three options:
Drag-and-drop editing. Use this feature, which is frequently referred to simply as dragging, when you need to move or copy text only a short distance—for example, within a paragraph. Start by using any of the methods described previously to select the text. Then point to the selection, hold down the mouse button, drag the text to its new location, and release the mouse button. To copy the selection, hold down the Ctrl key while you drag.
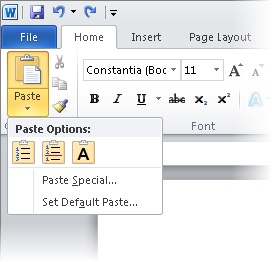
Cut, Copy, and Paste buttons. Use this method when you need to move or copy text between two locations that you cannot see at the same time—for example, between pages or between documents. Select the text, and click the Cut or Copy button in the Clipboard group on the Home tab. (The cut or copied item is stored in an area of your computer’s memory called the Microsoft Office Clipboard, hence the name of the group.) Then reposition the cursor, and click the Paste button to insert the selection in its new location. If you click the Paste arrow instead of the button, Word displays a list of different ways to paste the selection.
Pointing to a button under Paste Options displays a preview of how the cut or copied item will look when pasted into the text in that format, so you can experiment with different ways of pasting until you find the one you want.
See Also
For more information about the Clipboard, see the sidebar About the Clipboard later in this chapter.
Keyboard shortcuts. It can be more efficient to press key combinations to cut, copy, and paste selections than to click buttons on the ribbon. The main keyboard shortcuts for editing tasks are shown in the following table.
Task
Keyboard shortcut
Cut
Ctrl+X
Copy
Ctrl+C
Paste
Ctrl+V
Undo
Ctrl+Z
Repeat/Redo
Ctrl+Y
Using a keyboard shortcut to cut or copy a selection stores the item on the Clipboard, just as if you had clicked the corresponding button.
Tip
No matter which method you use, when you cut text, Word removes it from its original location. When you copy text, Word leaves the text in the original location and repeats it in the new location.
If you make a change to a document and then realize that you made a mistake, you can easily reverse the change. You can undo your last editing action by clicking the Undo button on the Quick Access Toolbar. To undo an earlier action, click the Undo arrow and then click that action in the list.
Tip
Selecting an action from the Undo list undoes that action and all the editing actions you performed after that one. You cannot undo only one action other than the last one you performed.
If you make a change to a document and want to repeat that change elsewhere, you can click the Repeat button on the Quick Access Toolbar. If the last task you performed was to undo an action, the Repeat button is replaced by the Redo button. So if you change your mind about whatever you undid, you can click the Redo button to return the text to its previous state. You can’t redo multiple actions by clicking them in a list as you can with the Undo button, but you can click the Redo button repeatedly until the text is restored to what you want.
In this exercise, you’ll edit the text in a document. You’ll insert and delete text, undo the deletion, copy and paste a phrase, and move a paragraph.
Set Up
You need the Orientation_start document located in your Chapter02 practice file folder to complete this exercise. Open the Orientation_start document, and save it as Orientation. Then follow the steps.
If formatting marks such as spaces and paragraph marks are not visible in the document, on the Home tab, in the Paragraph group, click the Show/Hide ¶ button.
In the second bullet point under Project Goals, double-click the word natural to select it, and then press Backspace.
In the third bullet point, click to the left of the a in the word and, hold down the Shift key, and then click to the right of the e in the word motivate.
Word selects the text between the two clicks.
Press Delete to delete the selection.
Word also deletes the space after the selection.
In the fourth bullet point, double-click the word Forge, and then replace it by typing Build.
Notice that you don’t have to type a space after Build. Word inserts the space for you.
Tip
Word inserts and deletes spaces because the Use Smart Cut And Paste check box is selected on the Advanced page of the Word Options dialog box. If you want to be able to control the spacing yourself, click the Options button in the Backstage view, click Advanced, clear this check box (located in the Cut, Copy, And Paste area), and then click OK.
Scroll the page, and position the mouse pointer at the edge of the page to the left of the first bullet point under Questions for Team Leaders. Then with the pointer in the selection area, click to select the entire paragraph.
On the Home tab, in the Clipboard group, click the Copy button.
The selection is copied to the Clipboard.
If you can’t see the bulleted list under Questions for Department Reps, click the Next Page button below the vertical scroll bar to move to the beginning of the next page. Then click to the left of What in the first bullet point under Questions for Department Reps, and in the Clipboard group, click the Paste arrow.
The Paste Options menu opens.
Point to the Merge List button, notice how the text will look with this paste option implemented, and then click the button.
The Paste Options button appears below and to the right of the inserted bullet point. You can click this button to display a list of paste options if you want to change the way the text has been pasted or the default way Word pastes. In this case, you can just ignore it.
In the Set Up Team section, triple-click anywhere in the paragraph that begins The Committee will pursue to select the entire paragraph.
In the Clipboard group, click the Cut button.
Press the Up Arrow key to move to the beginning of the preceding paragraph, and then in the Clipboard group, click the Paste button.
The two paragraphs switch places.
On the Quick Access Toolbar, click the Undo arrow, and then in the Undo list, click the third action (Paste Merge List).
Word undoes the previous cut-and-paste operation and the pasting of the copied text.
Press Ctrl+Home to move to the top of the document. Then position the pointer in the selection area adjacent to the third bullet point under Project Goals, and click to select the paragraph.
Point to the selection, hold down the mouse button, and then drag the paragraph up to the left of the word Make at the beginning of the preceding bullet point.
When you release the mouse, the bullet point moves to its new location.
With the text still selected, press the End key.
Word releases the selection and moves the cursor to the end of the paragraph.
Press the Spacebar, and then press Delete.
Word deletes the paragraph mark and merges the two bullet points.


Clean Up
If you prefer not to see formatting marks, turn them off. Then save and close the Orientation document.
You can view the items that have been cut or copied to the Clipboard in the Clipboard task pane, which you display by clicking the Clipboard dialog box launcher on the Home tab.
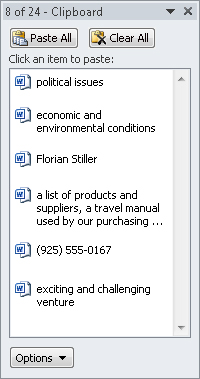
To paste an individual item at the cursor, you simply click the item in the Clipboard task pane. To paste all the items, click the Paste All button. You can point to an item, click the arrow that appears, and then click Delete to remove it from the Clipboard and the task pane, or you can remove all the items by clicking the Clear All button.
You can control the behavior of the Clipboard task pane by clicking Options at the bottom of the pane, and choosing the circumstances under which you want the task pane to appear.
To close the Clipboard task pane, click the Close button at the right end of its title bar.
Finding and Replacing Text
One way to ensure that the text in your documents is consistent and accurate is to use the Find feature to search for every occurrence of a particular word or phrase. For example, if you are responsible for advertising a trademarked product, you might want to search your marketing materials to check that every occurrence of the product’s name is correctly identified as a trademark.
Clicking the Find button (not the arrow) in the Editing group on the Home tab displays the Navigation task pane with the Search tab active. As you type characters in the Search Document box at the top of the task pane, Word highlights all occurrences of those characters in the document and displays them in the search results list in the Navigation task pane.

The Navigation task pane shows enough of the text surrounding the search term to identify its context.
When you point to a particular search result in the Navigation task pane, a ScreenTip displays the number of the page on which that result appears. You can click a search result to scroll the document to display the result’s location.
Tip
The beauty of the Navigation task pane is that you can continue editing your document as you normally would, without closing the pane.
If you want to be more specific about the text you are looking for—for example, if you want to look for occurrences that match the exact capitalization of your search term—click the arrow at the right end of the Search Document box in the Navigation task pane and then click Advanced Find to display the Find page of the Find And Replace dialog box. Clicking More in the lower-left corner expands the dialog box to make additional search options available.

You can make a search more specific by using the criteria in the Search Options area of the Find And Replace dialog box.
In the expanded dialog box, you can do the following:
Guide the direction of the search by selecting Down, Up, or All from the Search list.
Locate only text that matches the capitalization of the Find What text by selecting the Match Case check box.
Exclude occurrences of the Find What text that appear within other words by selecting the Find Whole Words Only check box.
Find two similar words, such as effect and affect by selecting the Use Wildcards check box and then entering a wildcard character in the Find What box. The two most common wildcard characters are:
?, which represents any single character in this location in the Find What text.
*, which represents any number of characters in this location in the Find What text.
Find occurrences of the search text that sound the same but are spelled differently, such as there and their, by selecting the Sounds Like check box.
Find occurrences of a particular word in any form, such as try, tries, and tried, by selecting the Find All Word Forms check box. You can match a prefix or a suffix, and you can ignore punctuation and white space.
Locate formatting, such as bold, or special characters, such as tabs, by selecting them from the Format or Special list.
See Also
For information about finding and replacing formatting, see the sidebar Finding and Replacing Formatting in Chapter 3.
If you want to substitute a specific word or phrase for another, you can use the Replace feature. Clicking the Replace button in the Editing group of the Home tab displays the Replace page of the Find And Replace dialog box.

Tip
If the Navigation task pane is open, you can click the arrow at the right end of the Search Document box and then click Replace. The Find And Replace dialog box opens with the search term from the Navigation task pane already in the Find What box.
On the Replace page, you can click the following:
Find Next. Finds the first occurrence or leaves the selected occurrence as it is and locates the next one
Replace. Replaces the selected occurrence with the text in the Replace With box and moves to the next occurrence
Replace All. Replaces all occurrences with the text in the Replace With box
As on the Find page, clicking More displays the options you can use to carry out more complicated replacements.
In this exercise, you’ll find a phrase and make a correction to the text. Then you’ll replace one phrase with another throughout the entire document.
Set Up
You need the RulesRegulations_start document located in your Chapter02 practice file folder to complete this exercise. Open the RulesRegulations_start document, and save it as RulesRegulations. Then follow the steps.
With the cursor at the beginning of the document, on the Home tab, in the Editing group, click the Find button (not its arrow).
The Navigation task pane opens, displaying the Search tab.
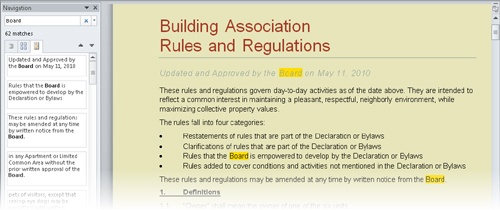
With the cursor in the Search Document box, type Board. (Don’t type the period.)
The Navigation task pane displays 62 matches with the word Board and highlights every occurrence in the document.
In the Navigation task pane, click the fifth match in the search results to jump to page 2.
Notice that under the heading 4. Storage, Word has highlighted the board portion of skateboards. You need to restrict the search to the whole word Board.
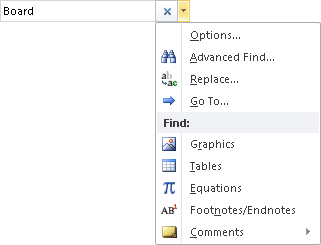
In the Navigation task pane, click the arrow at the right end of the Search Document box.
A menu of options for refining the search appears.
In the top part of the list, click Advanced Find.
The Find And Replace dialog box opens with the Find page displayed. The Find What box already contains the search term from the Navigation task pane.
In the lower-left corner of the dialog box, click More.
The dialog box expands to display options for refining the search.
In the Search Options area of the dialog box, select the Match case and Find whole words only check boxes. Then click Reading Highlight, click Highlight All, and click Close.
Under the 4. Storage heading, the word skateboards is no longer highlighted.
Press Ctrl+Home to move the cursor to the beginning of the document.
In the Navigation task pane, display the search options list again, and then click Replace.
The Find And Replace dialog box opens with the Replace page active. The Find What box retains the entry from the previous search, and the Match Case and Find Whole Words Only check boxes are still selected.
Click Less to reduce the size of the box, and then drag the box by its title bar toward the top of the document.
Click the Replace with box, type Association Board, and then click Find Next.
Word highlights the first occurrence of Board.
In the dialog box, click Replace.
Word replaces the first occurrence of Board with Association Board and then finds the next occurrence.
When Word tells you how many replacements it made, click OK to close the message box. Then in the Find and Replace dialog box, click Close.
Press Ctrl+Home to move to the beginning of the document.
In the Updated and Approved line of text, the word Association is now duplicated.
Use your new find and replace skills to replace any instances of Association Association in the document with Association.

Fine-Tuning Text
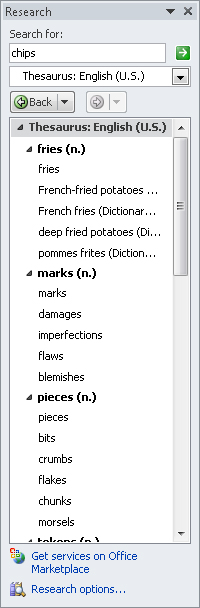
Language is often contextual—you use different words and phrases in a marketing brochure than you would in a letter requesting immediate payment of an invoice or in an informal memo about a social gathering after work. To help you ensure that you’re using the words that best convey your meaning in any given context, Word provides a thesaurus where you can look up alternative words, called synonyms, for a selected word. The Thesaurus is one of a set of research services provided by Word.
To look up alternatives for a word, you can right-click the word, and then click Synonyms to display a list from which you can choose the one you want. Alternatively, you can select the word and then click the Thesaurus button in the Proofing group on the Review tab. The Research task pane opens, displaying the selected word in the Search For box and synonyms for that word in the Thesaurus list.
Keyboard Shortcuts
Press Shift+F7 to open the Research task pane and display Thesaurus entries for the active word, which is also displayed in the Search For box.
To replace the selected word with a synonym, point to your chosen synonym, click the arrow that appears, and then click Insert.
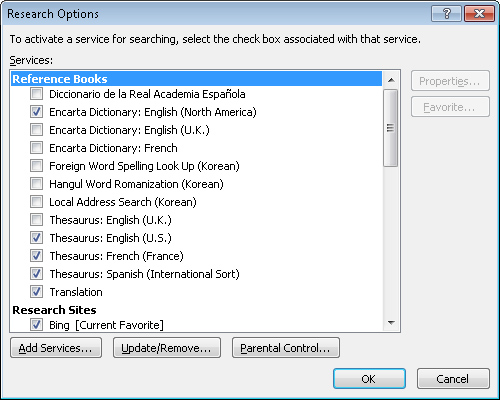
In addition to the Thesaurus, the Research task pane provides access to a variety of informational resources. You first open the Research task pane by clicking the Research button in the Proofing group and then enter a topic in the Search For box, specifying in the box below which resource Word should use to look for information about that topic.
Keyboard Shortcut
Press the Alt key and click anywhere in the document to display the Research task pane.

You can choose a specific resource from the list or click All Reference Books or All Research Sites to widen the search.
Clicking Research Options at the bottom of the Research task pane displays the Research Options dialog box. In this dialog box, you can specify which of a predefined set of reference materials and other Internet resources will be available from the list.
Word also comes with three translation tools with which you can quickly translate words and phrases, or even entire documents.
Mini Translator. You turn the Mini Translator on or off by clicking the Translate button in the Language group of the Review tab and then clicking Mini Translator. When the Mini Translator is turned on, you can point to a word or selected phrase to display a translation in the specified language. When the box containing the translation is displayed, you can click the Expand button to display the Research task pane, where you can change the translation language. You can also copy the translated word or phrase, or hear the word or phrase spoken for you.
Online bilingual dictionary. To obtain the translation of a word that does not appear in the text of a document, you can click Translate Selected Text in the Translate menu to display the Research task pane, type the word in the Search For box, specify the language you want, and then click Start Searching. Word consults the online bilingual dictionary for the language you chose and displays the result. You can then click Insert to enter a translated word in the document at the cursor.
Online machine translator. To translate an entire document, you can click Translate Document on the Translate menu. When Word displays a message that the document will be sent for translation by the Microsoft Translator service (which is free), click Send. The document and its translation then appear side by side in your Web browser. You can set the translation from and translation to languages in the boxes at the top of the Web page and click buttons to change the view.


To change the default language used by the Mini Translator or the machine translator, you click Choose Translation Language on the Translate menu. Then in the Translation Language Options dialog box, you can select different language pairs for each type of translator.

You can translate from and to many languages, including Arabic, Chinese, Greek, Hebrew, Italian, Japanese, Korean, Polish, Portuguese, Russian, Spanish, and Swedish.
In this exercise, you’ll use the Thesaurus to replace one word with another. Then you’ll experiment with the Mini Translator.
Set Up
You need the Brochure_start document located in your Chapter02 practice file folder to complete this exercise. Open the Brochure_start document, and save it as Brochure. Then follow the steps.
Double-click the word acclaimed in the second line of the first paragraph.
On the Review tab, in the Proofing group, click the Thesaurus button.
The Research task pane opens, listing synonyms for the word acclaimed.
In the task pane, under much-admired, click commended.
The word commended replaces acclaimed in the Search For box at the top of the task pane.
Point to the word celebrated, click the arrow that appears to its right, and then click Insert.
The word celebrated replaces acclaimed in the document.
Close the Research task pane.
In the Language group, click the Translate button, and then click Choose Translation Language.
The Translation Language Options dialog box opens.
Under Choose Mini Translator language, click the Translate to arrow, click French (France) in the list, and then click OK.
In the Language group, click the Translate button, and then click Mini Translator [French (France)].
The Mini Translator is now turned on.
In the last paragraph of the document, point to the word wardrobe, and then move the pointer over the shadow box that appears above the word.
The Mini Translator appears, showing two French translations for the word wardrobe: armoire and garde-robe.
In the Mini Translator box, click the Expand button.
The Research task pane opens, displaying the settings for translating from English into French.
Under Bilingual Dictionary in the Research task pane, double-click armoire to select it.
Right-click the selection, and click Copy.
In the document, double-click the word wardrobe.
Right-click the selection, and under Paste Options in the list, point to (don’t click) the Keep Text Only button.
Word displays a live preview of what the text will look like if you replace wardrobe with armoire.
Press the Esc key to close the shortcut menu and leave the word wardrobe in the text.


Correcting Spelling and Grammatical Errors
In the days of handwritten and typewritten documents, people might have tolerated a typographical or grammatical error or two because correcting such errors without creating a mess was difficult. Word-processing programs such as Word have built-in spelling and grammar checkers, so now documents that contain these types of errors are likely to reflect badly on their creators.
Tip
Although Word can help you eliminate misspellings and grammatical errors, its tools are not infallible. You should always read through your document to catch any problems that the Word tools can’t detect—for example, homonyms such as their, there, and they’re.
Word provides these three tools to help you with the chore of eliminating spelling and grammar errors:
AutoCorrect. This feature corrects commonly misspelled words, such as adn to and, so that you don’t have to correct them yourself. AutoCorrect comes with a long list of frequently misspelled words and their correct spellings. If you frequently misspell a word that AutoCorrect doesn’t change, you can add it to the list in the AutoCorrect dialog box. If you deliberately mistype a word and don’t want to accept the AutoCorrect change, you can reverse the correction by clicking the Undo button before you type anything else.
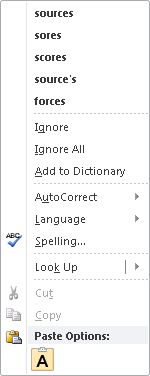
Error indicators. Word underlines potential spelling errors with red wavy underlines and grammatical errors with green wavy underlines. You can right-click an underlined word or phrase to display suggested corrections in a shortcut menu.
Spelling and Grammar dialog box. If you want to check the spelling or grammar of the entire document, you can click the Spelling & Grammar button in the Proofing group on the Review tab. Word then works its way through the document and displays the Spelling And Grammar dialog box if it encounters a potential error.
Keyboard Shortcut
Press F7 to start checking the spelling and grammar from your current location in the document.
If the error is a misspelling, the Spelling And Grammar dialog box suggests corrections; if the error is a breach of grammar rules, the Spelling And Grammar dialog box tells you which rule you have broken and suggests corrections. You can implement a suggestion by double-clicking it in the Suggestions box.

In this exercise, you’ll change an AutoCorrect setting and add a word to the AutoCorrect list. You’ll check the spelling in the document and add terms to the custom dictionary, and then you’ll find, review, and correct a grammatical error.
Set Up
You need the Letter_start document located in your Chapter02 practice file folder to complete this exercise. Open the Letter_start document, and save it as Letter. Then follow the steps.
Click immediately to the left of negative in the last line of the first paragraph, and then type coresponding, followed by a space.
As soon as you press the Spacebar, AutoCorrect changes coresponding to corresponding.
Click the File tab to display the Backstage view, and then click Options.
In the left pane of the Word Options dialog box, click Proofing, and then on the Proofing page, click AutoCorrect Options.
The AutoCorrect dialog box opens, displaying the AutoCorrect page.
In the Replace box, type avalable.
Word scrolls the list below to show the entry that is closest to what you typed.
Press the Tab key to move the cursor to the With box, and then type available.
Click Add to add the entry to the correction list, and then click OK.
Click OK to close the Word Options dialog box.
Position the cursor at the end of the second paragraph, press the Spacebar, and then type Sidney will not be avalable May 10-14 followed by a period.
The word avalable changes to available.
In the first paragraph, right-click sorces, the first word with a red wavy underline.
Word lists possible correct spellings for this word.
In the list, click sources.
Word removes the red wavy underline and inserts the correction.
Tip
Word’s grammar checker helps identify phrases and clauses that don’t follow traditional grammatical rules, but it’s not always accurate. It’s easy to get in the habit of ignoring green wavy underlines. However, it’s wise to scrutinize them all to be sure that your documents don’t contain any embarrassing mistakes.
Press Ctrl+Home to move to the beginning of the document, and then on the Review tab, in the Proofing group, click the Spelling & Grammar button.
The Spelling And Grammar dialog box opens, with the duplicate word to in red in the Repeated Word box.
Troubleshooting
If the errors we mention don’t appear to be in the practice file, click Options at the bottom of the Spelling And Grammar dialog box. Then in the Word Options dialog box, under When Correcting Spelling And Grammar In Word, click Recheck Document. Click Yes to reset the spelling and grammar checkers, and then click OK.
Click Delete.
Word deletes the second to and then displays the first word it does not recognize, commited, in red in the Not In Dictionary box.
With committed selected in the Suggestions box, click AutoCorrect.
Word adds the misspelling and the selected correction to the AutoCorrect list, so that the next time you type commited by mistake, the spelling will be corrected for you as you type. The program then identifies a possible grammatical error.
You need to read the sentence and then decide whether and how to correct the error. In this case, the error is not related to the comma after venture but to the fact that there is no verb in the first half of the sentence.
In the Comma Use box, double-click the word An at the beginning of the sentence with the error, and type The import business is an. Then click Change.
Word flags Contoso as a word it doesn’t recognize.
Troubleshooting
If Word does not proceed to the next potential error after you click Change, click Resume to tell Word to continue with the spelling and grammar check.
Contoso is a proper noun and is spelled correctly. You could click Ignore All to cause Word to skip over any other instances of this word in this document. However, if this name appears frequently in your documents, you can prevent Word from continuing to flag it by adding the word to the custom dictionary.
Click Add to Dictionary.
Word displays a message indicating that it has finished checking the spelling and grammar of the document.
Click OK to close the message box.


As you type, Word keeps track of the number of pages and words in your document and displays this information at the left end of the status bar. To see the number of words in only part of the document, such as a few paragraphs, simply select that part. The status bar then displays the number of words in the selection, expressed as a fraction of the total, such as 250/800.
You can see more statistics in the Word Count dialog box, which you open by clicking the Word Count button in the Proofing group on the Review tab.

Word also gives you the option of including or excluding words in text boxes, footnotes, and endnotes.
Inserting Saved Text
Another way to ensure consistency in your documents while also saving time is to use building blocks. These are saved items that are available for use in any document. Word 2010 comes with many built-in building blocks for formatted items such as cover pages, headers and footers, tables, and text boxes. You can also save your own building blocks by using the Quick Parts feature.
See Also
For information about the building blocks that come with Word, see Inserting Building Blocks in Chapter 5.
A custom building block can be a simple phrase or sentence that you type often, or it can include multiple paragraphs, formatting, graphics, and so on. The trick is to first ensure that the text is exactly the way you want it. Then you can save the building block and use it confidently wherever you need it.
To create a building block, you select the item you want to save, click Quick Parts in the Text group on the Insert tab, and save the selection in the Quick Parts gallery with an assigned name. You can then insert the building block at the cursor by clicking Quick Parts to display the gallery and clicking the thumbnail of the building block you want. Or you can insert it elsewhere by right-clicking the thumbnail in the gallery and then clicking one of the specified locations.

Tip
In a document, you can type the name of any building block and then press the F3 key to insert it at the cursor.
When you create a custom building block, Word saves it in a special file called the Building Blocks template. When you exit Word, you’ll be asked whether you want to save this template. If you want to discard the building blocks you have created in this Word session, click Don’t Save. If you want them to be available for future documents, click Save.
In this exercise, you’ll save a company contact-information block and the Latin name of a plant as building blocks so that you can insert them elsewhere in a document.
Set Up
You need the Bamboo_start document located in your Chapter02 practice file folder to complete this exercise. Open the Bamboo_start document, and save it as Bamboo. Then follow the steps.
At the top of the document, select the first four lines by using any of the selection techniques described earlier in this chapter.
On the Insert tab, in the Text group, click the Quick Parts button, and then click Save Selection to Quick Part Gallery.
The Create New Building Block dialog box opens.
In the Name box, type Contact Block, and then click OK.
Word saves the selection in the Quick Parts gallery.
In the third paragraph of the document, select otatea acuminata aztectorum (don’t select the period). Then in the Text group, click the Quick Parts button.
Notice that the company contact information now appears as a building block in the Quick Parts gallery.
Click Save Selection to Quick Part Gallery, type oaa in the Name box, and then click OK.
Press Ctrl+End to move the cursor to the end of the document, and then press the Spacebar.
Press F3, and then type a period.
Word replaces oaa with its building block, otatea acuminata aztecorum.
Troubleshooting
Pressing F3 substitutes the corresponding building block only if there is a space to the left of the building block name and the cursor is immediately to its right. If you want to enter a building block in existing text (rather than at the end of it), you need to ensure that there is a space after the cursor. Type two spaces, position the cursor between them, type the building block name, and then press F3.
Press Enter. Then in the Text group, click the Quick Parts button, and in the gallery, click the Contact Block entry.
The company contact information appears at the cursor.


Key Points
You can cut or copy text and paste it elsewhere in the same document or in a different document. Cut and copied text is stored on the Clipboard.
Undo one action or the last several actions you performed by clicking the Undo button (or its arrow) on the Quick Access Toolbar. Click the Redo button if you change your mind again.
You can find each occurrence of a word or phrase and replace it with another.
Rely on AutoCorrect to correct common misspellings. Correct other spelling and grammatical errors individually as you type or by checking the entire document in one pass.
You don’t have to type and proof the same text over and over again. Instead, save the text as a building block and insert it with a few mouse clicks.