
Chapter 1. Explore Word 2010

In this chapter, you will learn how to | |
✓ | |
✓ | |
✓ | |
✓ | |
When you use a computer program to create, edit, and produce text documents, you are performing a task known as word processing. Microsoft Word 2010 is one of the most sophisticated word-processing programs available. With Word 2010, it is easy to efficiently create a wide range of business and personal documents, from the simplest letter to the most complex report. Word includes many desktop publishing features that you can use to enhance the appearance of documents so that they are visually appealing and easy to read. Even novice users will be able to work productively in Word after only a brief introduction to the program.
For many people, Word is the first—or possibly the only—Microsoft Office program they will use. All the Office 2010 programs share a common working environment, called the user interface, so you can apply basic techniques that you learn in Word, such as those for creating and working with files, to other Office programs.
In this chapter, you’ll first familiarize yourself with the Word working environment. Next you’ll create and save a document and then save an existing document in a different location. Then you’ll open an existing Word document, learn ways of moving around in it, and close it. Finally, you’ll explore various ways of viewing documents so that you know which view to use for different tasks and how to tailor the program window to meet your needs.
Practice Files
Before you can complete the exercises in this chapter, you need to copy the book’s practice files to your computer. The practice files you’ll use to complete the exercises in this chapter are in the Chapter01 practice file folder. A complete list of practice files is provided in Using the Practice Files at the beginning of this book.
Working in the User Interface
As with all programs in Office 2010, the most common way to start Word is from the Start menu displayed when you click the Start button at the left end of the Windows Taskbar.

When you start Word without opening a specific document, the program window appears, displaying a new blank document. The program window contains the following elements:
The title bar displays the name of the active document. At the left end of the title bar is the Word icon, which you click to display commands to move, size, and close the program window. At the right end of the title bar are three buttons that control the window. You can temporarily hide the program window by clicking the Minimize button, adjust the size of the window by clicking the Restore Down/Maximize button, and close the active document or exit Word by clicking the Close button.
By default, the Quick Access Toolbar appears to the right of the Word icon at the left end of the title bar, and displays the Save, Undo, and Redo buttons. You can change the location of the Quick Access Toolbar and customize it to include any command that you use frequently.
Tip
If you create and work with complicated documents, you might achieve greater efficiency if you add all the commands you use frequently to the Quick Access Toolbar and display it below the ribbon, directly above the workspace. For information, see Customizing the Quick Access Toolbar in Chapter 16.
Below the title bar is the ribbon. All the commands for working with your Word document content are available from this central location so that you can work efficiently with the program.
Troubleshooting
The appearance of buttons and groups on the ribbon changes depending on the width of the program window. For information about changing the appearance of the ribbon to match our images, see Modifying the Display of the Ribbon at the beginning of this book.
Across the top of the ribbon is a set of tabs. Clicking a tab displays an associated set of commands.
Commands related to managing Word and Word documents (rather than document content) are gathered together in the Backstage view, which you display by clicking the colored File tab located at the left end of the ribbon. You access commands in the Backstage view from the left pane. Simple file-management commands that interact with the Windows operating system—Save, Save As, Open, and Close—are available at the top of the pane. Two program management commands—Options and Exit—are available at the bottom of the pane. Commands related to managing Word documents are organized on pages, which you display by clicking the tabs in the pane.
Commands related to working with document content are represented as buttons on the remaining tabs. The Home tab is active by default.
On each tab, buttons are organized into named groups.
Tip
You might find that obscure commands you used in the past are not available from the ribbon. However, these legacy commands are still available. You can make legacy commands accessible by adding them to the Quick Access Toolbar. For more information, see Customizing the Quick Access Toolbar in Chapter 16.
If a button label isn’t visible, you can display the command, a description of its function, and its keyboard shortcut (if it has one) in a ScreenTip by pointing to the button.
Tip
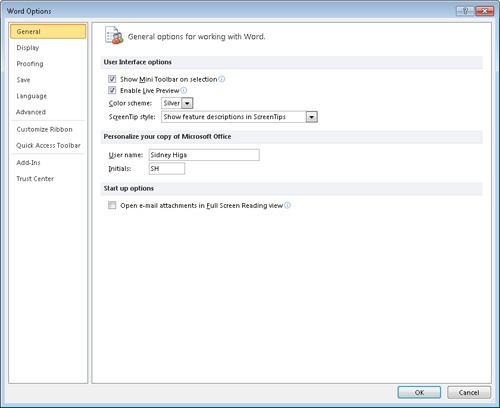
You can control the display of ScreenTips and of feature descriptions in ScreenTips. Simply display the Backstage view, click Options to open the Word Options dialog box, and change settings in the User Interface Options area of the General page. You can also change the language of ScreenTip content on the Language page and control the display of keyboard shortcuts in ScreenTips in the Display area of the Advanced page. For more information, see Changing Default Program Options in Chapter 16.
Related but less common commands are not represented as buttons in a group. Instead they are available in a dialog box or task pane, which you display by clicking the dialog box launcher located in the lower-right corner of the group.
Some buttons include an integrated or separate arrow. To determine whether a button and arrow are integrated, point to the button or arrow to display its border. If a button and its arrow are integrated within one border, clicking the button will display options for refining the action of the button. If the button and arrow have separate borders, clicking the button will carry out the default action indicated by the button’s current icon. You can change the default action of the button by clicking the arrow and then clicking the action you want.
To the right of the ribbon tab names, below the Minimize/Maximize/Close buttons, is the Minimize The Ribbon button. Clicking this button hides the commands but leaves the tab names visible. You can then click any tab name to temporarily display its commands. Clicking anywhere other than the ribbon hides the commands again. When the full ribbon is temporarily visible, you can click the button at its right end, shaped like a pushpin, to make the display permanent. When the full ribbon is hidden, you can click the Expand The Ribbon button to redisplay it.
See Also
To see a complete list of keyboard shortcuts, see Appendix A at the end of this book.
Clicking the Word Help button at the right end of the ribbon displays the Word Help window in which you can use standard techniques to find information.
See Also
For information about the Word Help system, see Getting Help at the beginning of this book.
Across the bottom of the program window, the status bar displays information about the current document and provides access to certain program functions. You can control the contents of the status bar by right-clicking it to display the Customize Status Bar menu, on which you can click any item to display or hide it.
At the right end of the status bar are the View Shortcuts toolbar, the Zoom Level button, and the Zoom Slider. These tools provide you with convenient methods for adjusting the display of document content.


See Also
For information about changing the document view, see Viewing Documents in Different Ways later in this chapter.
The goal of all these features of the Word environment is to make working on a document as intuitive as possible. Commands for tasks you perform often are readily available, and even those you might use infrequently are easy to find.
For example, when a formatting option has several choices available, they are often displayed in a gallery of thumbnails. These galleries give you an at-a-glance picture of each choice. If you point to a thumbnail in a gallery, the Live Preview feature shows you what that choice will look like if you apply it to your document.

In this exercise, you’ll start Word and explore the tabs and groups on the ribbon. Along the way, you’ll get a glimpse of galleries and Live Preview.
On the Start menu, click All Programs, click Microsoft Office, and then click Microsoft Word 2010.
Tip
If this is the first time you have started an Office 2010 program, Office prompts you to enter your full name and initials. The programs in the Office 2010 use this information when tracking changes, responding to messages, and so on. Next, Office prompts you to select the type of information you want to share over the Internet, and offers the option of signing up for automatic program updates from the Microsoft Update service. None of these options places you at risk, and all can be quite useful.
The Word program window opens in Print Layout view, displaying a blank document. On the ribbon, the Home tab is active. Buttons related to working with document content are organized on this tab in five groups: Clipboard, Font, Paragraph, Styles, and Editing.
Point to each button on the Home tab.
Word displays information about the button in a ScreenTip.
Click the Insert tab, and then explore its buttons.
Buttons related to all the items you can insert into a document are organized on this tab in seven groups: Pages, Tables, Illustrations, Links, Header & Footer, Text, and Symbols.
Click the Page Layout tab, and then explore its buttons.
Buttons related to the appearance of your document are organized on this tab in five groups: Themes, Page Setup, Page Background, Paragraph, and Arrange.
In the Page Setup group, display the ScreenTip for the Margins button.
The ScreenTip tells you how you can adjust the margins of the document.
In the lower-right corner of the Page Setup group, click the Page Setup dialog box launcher.
The Page Setup dialog box opens.
Across the top of this dialog box are three tabs: Margins, Paper, and Layout. Clicking a tab displays a page of related options.
See Also
For information about the Page Setup dialog box, see Previewing and Adjusting Page Layout in Chapter 6.
In the Themes group, click the Themes button.
A gallery of the available themes appears.
Press the Esc key to close the gallery without making a selection.
In the Page Background group, click the Page Color button, and when a color palette appears, point to each box in the top row under Theme Colors.
The blank document page shows a live preview of what it will look like if you click the color you are pointing to. You can see the effect of the selection without actually applying it.
Press Esc to close the palette without making a selection.
Click the References tab, and then explore its buttons.
Buttons related to items you can add to documents are organized on this tab in six groups: Table Of Contents, Footnotes, Citations & Bibliography, Captions, Index, and Table Of Authorities. You will usually add these items to longer documents, such as reports.
Click the Mailings tab, and then explore its buttons.
Buttons related to creating mass mailings are organized on this tab in five groups: Create, Start Mail Merge, Write & Insert Fields, Preview Results, and Finish.
Click the Review tab, and then explore its buttons.
Buttons related to proofreading documents, working in other languages, adding comments, tracking and resolving document changes, and protecting documents are organized on this tab in seven groups: Proofing, Language, Comments, Tracking, Changes, Compare, and Protect.
Click the View tab, and then explore its buttons.
Buttons related to changing the view and other aspects of the display are organized on this tab in five groups: Document Views, Show, Zoom, Window, and Macros.
On the ribbon, click the File tab, which is color-coded to match the color assigned by Microsoft to the Word program.
The Backstage view of Word 2010 is displayed. Commands related to managing documents (rather than document content) are available in this view.
If the Info page is not already displayed in the Backstage view, click Info in the left pane.
On the Info page of the Backstage view, the middle pane provides commands for controlling who can work on the document, removing properties (associated information), and accessing versions of the document automatically saved by Word. The right pane displays the associated properties, as well as dates of modification, creation, and printing, and who created and edited the document.

The Info page of the Backstage view provides commands for changing the information attached to a document.
See Also
For information about working with properties, see Preparing Documents for Electronic Distribution in Chapter 6.
In the left pane, click Recent.
The Recent page displays the names of the documents you recently worked on. By default a maximum of 20 names is displayed. You can change this number on the Advanced page of the Word Options dialog box.
See Also
For information about the Word Options dialog box, see Changing Default Program Options in Chapter 16.
The New page displays all the templates on which you can base a new document.
See Also
For information about creating documents, see the next topic, Creating, Entering Text in, and Saving Documents.
In the left pane, click Print.
The Print page gathers together all print-related commands and provides a pane for previewing the current document as it will appear when printed.
See Also
For information about printing, see Chapter 6.
In the left pane, click Save & Send.
The Save & Send page displays all the commands related to making the current document available to other people.
See Also
For information about working with other people on documents, see Chapter 15.
In the left pane, click Help.
The Help page displays all the ways you can get help and support for Word.
On the Help page, under Tools for Working With Office, click Options.
The Word Options dialog box opens. In this dialog box are program settings that control the way the program looks and behaves.
See Also
For information about the Word Options dialog box, see Changing Default Program Options in Chapter 16.
At the bottom of the Word Options dialog box, click Cancel.
You return to the current document with the Home tab active on the ribbon.


Creating, Entering Text in, and Saving Documents
When you start Word without opening a specific document, a blank document is displayed, and you can simply type your content. The blinking cursor shows where the next character you type will appear. When the cursor reaches the right margin, the word you are typing moves to the next line. You press the Enter key only to start a new paragraph, not a new line.
If you want to create a document during a Word session, you display the Backstage view by clicking the File tab on the ribbon, and then click New.

Troubleshooting
Because more types of documents are constantly being added to the list of those available, your New page might be different from ours.
The documents listed on the New page are based on templates, which are sets of formats that have been saved in such a way that you can use them as a pattern for new documents. The icons in the top row are:
Blank document. This type of document is selected by default.
Blog post. Clicking this icon opens a document suitable for posting to a blog.
Recent templates. Clicking this icon displays a page with icons for the last few templates you have used.
Sample templates. Clicking this icon displays a page with the icons of sample documents that come with Word.
My templates. Clicking this icon displays a dialog box in which you can select a template you have created as the basis for a new document.
New from existing. Clicking this icon displays a dialog box in which you can select an existing document as the basis for a new document.
The icons in the Office.com Templates section represent categories of common types of documents. Clicking one of these icons displays the templates available from the Office.com Web site. You can also search for specific documents by entering the type you want in the Search Office.com For Templates box and clicking the Start Searching button.
See Also
For information about templates, see Working with Styles and Templates in Chapter 16.
When you find a template you might want to use as the basis for your new document, clicking its icon displays a preview of that type of document in the right pane. You can then click the Create button in the right pane to create the document.
Tip
Double-clicking an icon creates that type of document without first displaying it in the preview pane.
Each document you create is temporary unless you save it as a file with a unique name or location. To save a document for the first time, you click the Save button on the Quick Access Toolbar or click Save in the Backstage view. Either action displays the Save As dialog box, where you can assign the name and storage location.

Troubleshooting
This graphic shows the Save As dialog box as it appears when Word is running on Windows 7. If you are using a different version of the Windows operating system, your dialog box will look different but the functionality will be similar.
Troubleshooting
If you don’t see the Navigation pane and toolbar, click Organize on the toolbar, click Layout, and then click Navigation Pane.
If you want to save the document in a folder other than the one shown in the Address bar at the top of the dialog box, you can click the arrow or chevrons in the Address bar or click locations in the Navigation pane on the left to display the folder you want. If you want to create a folder in which to store the document, you can click the New Folder button on the toolbar.
After you save a document the first time, you can save changes simply by clicking the Save button. The new version of the document then overwrites the previous version.
If you want to keep both the new version and the previous version, click Save As in the Backstage view, and then save the new version with a different name in the same location or with the same name in a different location. (You cannot store two files of the same type with the same name in the same folder.)
Tip
By default, Word periodically saves the document you are working on in case the program stops responding or you lose electrical power. To adjust the time interval between automatic saves, display the Backstage view, click Options, click Save in the left pane of the Word Options dialog box, and specify the period of time in the box to the right of the Save AutoRecover Information Every check box. Then click OK.
In this exercise, you’ll create a blank document, enter text, and save the document in a folder that you create.
On the ribbon, click the File tab. Then in the left pane of the Backstage view, click New.
On the New page, double-click Blank document.
Word creates a blank document temporarily called Document2 and displays it in its own program window in Print Layout view. Document1 is still open, but its window is hidden by the Document2 window.
See Also
For information about switching between open windows, see Viewing Documents in Different Ways later in this chapter.
With the cursor at the beginning of the new document, type Parks Appreciation Day, and then press the Enter key.
The text appears in the new document.
Type Help beautify our city by participating in the annual cleanup of Log Park, Swamp Creek Park, and Linkwood Park. This is a lot of fun! Volunteers receive a free T-shirt and barbeque lunch. Bring your own gardening tools and gloves. (Include the period.)
Notice that you did not need to press Enter when the cursor reached the right margin because the text wrapped to the next line.
Press Enter, and then type The Service Committee is coordinating groups to participate in this event. If you are interested in spending time outdoors with your family and friends while improving the quality of our parks, contact Paul Shen at [email protected].
On the Quick Access Toolbar, click the Save button.
The Save As dialog box opens, displaying the contents of the Documents library. In the File Name box, Word suggests the first words of the document as a possible name.
Using standard Windows techniques, navigate to the location where you have stored the practice files for this book. Then double-click your Chapter01 practice file folder.
On the dialog box’s toolbar, click the New folder button, type My New Documents as the name of the new folder, and press Enter. Then double-click the My New Documents folder.
In the File name box, click anywhere in Parks Appreciation Day to select it, and then replace this name by typing My Announcement.
Important
Programs that run on the Windows operating systems use file name extensions to identify different types of files. For example, the extension .docx identifies Word 2010 documents. Windows 7 does not display these extensions by default, and you shouldn’t type them in the Save As dialog box. When you save a file, Word automatically adds whatever extension is associated with the type of file selected in the Save As Type box.
The Save As dialog box closes, Word saves the My Announcement document in the My New Documents folder, and the name of the document, My Announcement, appears on the program window’s title bar.
Display the Backstage view, and then click Save As.
The Save As dialog box opens.
In the Address bar of the Save As dialog box, to the left of My New Documents, click Chapter01.
The dialog box now displays the contents of the Chapter01 folder, which is the folder that contains the My New Documents folder.
See Also
For information about saving a document in a different file format, see Saving Files in Different Formats in Chapter 11. For information about working with the file properties that appear at the bottom of the Save As dialog box, see Preparing Documents for Electronic Distribution in Chapter 6.
Word saves the My Announcement document in the Chapter01 folder. You now have two versions of the document saved with the same name but in different folders.


Opening, Moving Around in, and Closing Documents
If Word isn’t already running, you can start the program and simultaneously open an existing Word document from Windows Explorer by double-clicking the document’s file name. While Word is running, you can open an existing document from the Backstage view. If you have recently worked on the document you want to open, you can display the Recent page and simply click the document you want in the list. If the document is not available on the Recent page, clicking Open in the left pane displays the Open dialog box.
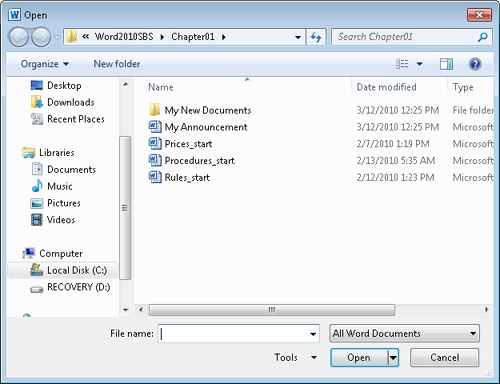
The first time you use this command, the dialog box displays your Documents library. If you display the dialog box again in the same Word session, it displays the contents of whatever folder you last used. To see the contents of a different folder, you use standard Windows navigation techniques. After you locate the document you want to work with, you can click its file name and then click Open in the lower-right corner of the dialog box, or you can simply double-click the file name.
Tip
Clicking a file name and then clicking the Open arrow displays a list of alternative ways in which you can open the document. To look through the document without making any inadvertent changes, you can open it as read-only, or you can open an independent copy of the document. After a computer crash or similar incident, you can tell Word to open the document and attempt to repair any damage. And you can display the file in other versions and formats, discussion of which is beyond the scope of this book.
If you open a document that is too long to fit entirely on the screen, you can bring off-screen content into view without changing the location of the cursor by using the vertical scroll bar.
Click the scroll arrows to move up or down by one line.
Click above or below the scroll box to move up or down one windowful.
Drag the scroll box on the scroll bar to display the part of the document corresponding to the location of the scroll box. For example, dragging the scroll box to the middle of the scroll bar displays the middle of the document.
If the document is too wide to fit on the screen, Word displays a horizontal scroll bar that you can use in similar ways to move from side to side.
You can also move around in a document by moving the cursor. To place the cursor in a specific location, you simply click there. To move the cursor one page backward or forward, you click the Previous Page and Next Page buttons below the vertical scroll bar.
You can also press a keyboard shortcut on the keyboard to move the cursor. For example, pressing the Home key moves the cursor to the left end of a line, and pressing Ctrl+Home moves it to the beginning of the document.
Tip
The location of the cursor is displayed on the status bar. By default, the status bar tells you which page the cursor is on, but you can also display its location by section, line, and column, and in inches from the top of the page. Simply right-click the status bar and click the option you want to display.
The following table lists ways to use your keyboard to move the cursor.
Cursor movement | Key or keyboard shortcut |
Left one character | Left Arrow |
Right one character | Right Arrow |
Down one line | Down Arrow |
Up one line | Up Arrow |
Left one word | Ctrl+Left Arrow |
Right one word | Ctrl+Right Arrow |
To the beginning of the current line | Home |
To the end of the current line | End |
To the beginning of the document | Ctrl+Home |
To the end of the document | Ctrl+End |
Up one screen | Page Up |
Down one screen | Page Down |
To the beginning of the previous page | Ctrl+Page Up |
To the beginning of the next page | Ctrl+Page Down |
In a long document, you might want to move quickly among elements of a certain type; for example, from graphic to graphic. Clicking the Select Browse Object button at the bottom of the vertical scroll bar displays a gallery of browsing options, such as Browse By Page and Browse By Graphic. (These options are also available on the Go To page of the Find And Replace dialog box, which you display by clicking the Find arrow in the Editing group of the Home tab and then clicking Go To.) You can also display the Navigation task pane and move from heading to heading or page to page.
See Also
For information about using the Navigation task pane to search for specific content in a document, see Finding and Replacing Text in Chapter 2.
If more than one document is open, you can close the active document without exiting Word by clicking the Close button at the right end of the title bar. If only one document is open, clicking the Close button closes the document and also exits Word. If you want to close that document but leave Word running, you must click Close in the Backstage view.
In this exercise, you’ll open an existing document and explore various ways of moving around in it. Then you’ll close the document.
Set Up
You need the Rules_start document located in your Chapter01 practice file folder to complete this exercise.
With Document1 open, display the Backstage view, and then click Open.
The Open dialog box opens, showing the contents of the folder you used for your last open or save action.
If your Chapter01 practice file folder is not displayed, navigate to that folder.
Click the Rules_start document, and then click Open.
The Rules_start document opens in the Word program window.
Display the Backstage view, and in the left pane, click Save As.
In the Save As dialog box, change the file name to Rules, and then click Save.
Now you can experiment with the document without fear of overwriting the original.
In the second line of the document title, click at the right end of the paragraph to position the cursor.
Press the Home key to move the cursor to the beginning of the line.
Press the Right Arrow key six times to move the cursor to the beginning of the word and in the heading.
Press the End key to move the cursor to the end of the line.
Press Ctrl+End to move the cursor to the end of the document.
Press Ctrl+Home to move the cursor to the beginning of the document.
At the bottom of the vertical scroll bar, click the Next Page button.
Click above the scroll box on the scroll bar to change the view of the document by one windowful.
Drag the scroll box to the top of the scroll bar.
The beginning of the document comes into view. Note that the location of the cursor has not changed—just the view of the document.
Click to the left of the first line of the title to place the cursor at the top of the document, and then near the bottom of the vertical scroll bar, click the Select Browse Object button.
A gallery of browsing choices appears.
Move the pointer over the buttons representing the objects you can browse among.
As you point to each button, the name of the browsing option appears at the top of the gallery.
Click the Browse by Page button.
The cursor moves from the beginning of page 1 to the beginning of page 2.
Click the View tab, and then in the Show group, select the Navigation Pane check box.
The Navigation task pane opens on the left side of the screen, displaying an outline of the headings in the document. The heading of the section containing the cursor is highlighted.
In the Navigation task pane, click the Landscaping heading.
Word scrolls the document and moves the cursor to the selected heading.
In the Navigation task pane, click the Browse the pages in your document tab (the one with the icon of four small pages). Then scroll the thumbnails in the task pane, and click page 5.
At the right end of the Navigation task pane title bar, click the Close button.
At the right end of the program window title bar, click the Close button.
The Rules document closes, and Document1 becomes the active document.
Display the Backstage view, and then click Close. If Word asks whether you want to save changes to this document, click Don’t Save.
Document1 closes, leaving Word running.


Viewing Documents in Different Ways
In Word, you can display a document in a variety of views, each suited to a specific purpose. You switch the view by clicking the buttons in the Document Views group on the View tab, or those on the View Shortcuts toolbar in the lower-right corner of the program window.
Print Layout view. This view displays a document on the screen the way it will look when printed. You can see elements such as margins, page breaks, headers and footers, and watermarks.
Full Screen Reading view. This view displays as much of the content of the document as will fit on the screen at a size that is comfortable for reading. In this view, the ribbon is replaced by one toolbar at the top of the screen with buttons for saving and printing the document, accessing reference and other tools, highlighting text, and making comments. You can move from page to page and adjust the view by selecting options from the View Options menu. You can edit the document only if you turn on the Allow Typing option on this menu, and you can switch views only by clicking the Close button to return to the previous view.
Web Layout view. This view displays the document the way it will look when viewed in a Web browser. You can see backgrounds and other effects. You can also see how text wraps to fit the window and how graphics are positioned.
See Also
For information about Web documents, see Creating and Modifying Web Documents in Chapter 11.
Outline view. This view displays the structure of a document as nested levels of headings and body text, and provides tools for viewing and changing its hierarchy.
See Also
For information about outlining, see Reorganizing Document Outlines in Chapter 10.
Draft view. This view displays the content of a document with a simplified layout so that you can type and edit quickly. You cannot see layout elements such as headers and footers.
When you want to focus on the layout of a document, you can display rulers and gridlines to help you position and align elements. Simply click the corresponding check boxes in the Show group on the View tab. You can also adjust the magnification of the document by using the tools available in the Zoom group on the View tab or the Zoom Level button or Zoom Slider at the right end of the status bar. Clicking either the Zoom button or Zoom Level button displays a dialog box where you can select or type a percentage; or you can drag the Zoom Slider to the left or right or click the Zoom Out or Zoom In button on either side of the slider to change the percentage incrementally.
You are not limited to working with one document at a time. You can easily switch between open documents, and you can display more than one program window simultaneously. If you want to work with different parts of the same document, you can open the active document in a second window and display both, or you can split a single window into two panes and scroll each pane independently.
Tip
At the right end of the View tab is the Macros group, which includes commands for viewing, recording, and pausing macros. A discussion of macros is beyond the scope of this book. If you are interested in finding out about them, enter macros in Word Help.
Not represented on the View tab is a feature that can be invaluable when you are fine-tuning the layout of a document. Clicking the Show/Hide ¶ button in the Paragraph group on the Home tab turns the display of formatting marks and hidden characters on and off. Formatting marks, such as tabs and paragraph marks, control the layout of your document, and hidden characters provide the structure for behind-the-scenes processes, such as indexing. When you are developing a document, you might want to turn these marks and characters on, and when you want to see what the finished piece will look like to other people, you will want to turn them off.
Tip
You can hide any text by selecting it, clicking the Font dialog box launcher in the lower-right corner of the Font group on the Home tab, selecting the Hidden check box, and clicking OK. When the Show/Hide ¶ button is turned on, hidden text is visible and is identified in the document by a dotted underline.
In this exercise, you’ll first explore various ways that you can customize Print Layout view to make the work of developing documents more efficient. You’ll turn white space on and off, zoom in and out, display the rulers and Navigation task pane, and view formatting marks and hidden characters. Then you’ll switch to other views, noticing the differences so that you have an idea of which one is most appropriate for which task. Finally, you’ll switch between open documents and view documents in more than one window at the same time.
Set Up
You need the Procedures_start and Prices_start documents located in your Chapter01 practice file folder to complete this exercise. Open the Procedures_start document, and save it as Procedures. Then follow the steps.
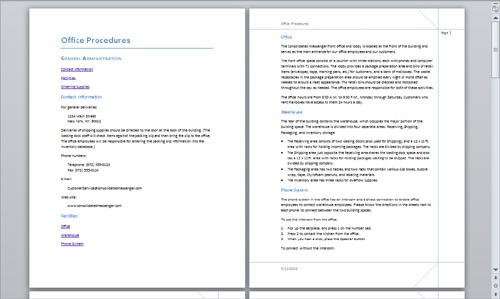
With the document displayed in Print Layout view (the default), scroll through the document.
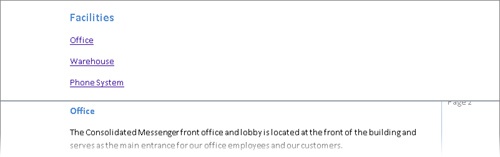
As you can see, on all pages but the first, the printed document will have the title in the header at the top of the page, the page number in the right margin, and the date in the footer at the bottom of each page.
See Also
For information about headers and footers, see Inserting Building Blocks in Chapter 5.
Point to the gap between any two pages, and when the pointer changes to two opposing arrows, double-click the mouse button. Then scroll through the document again.
The white space at the top and bottom of each page and the gray space between pages is now hidden.
Restore the white space by pointing to the line that separates one page from the next and double-clicking the mouse button.
Press Ctrl+Home to move to the top of the document, and then on the View Shortcuts toolbar near the right end of the status bar, click the Zoom Level button, which currently indicates that the document is displayed at 100%.
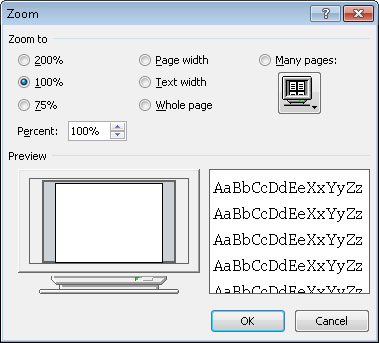
The Zoom dialog box opens.
Click Many pages. Then click the monitor button, click the second page thumbnail in the top row, and click OK.
The magnification changes so that you can see two pages side by side.
At the bottom of the vertical scroll bar, click the Next Page button to display the third and fourth pages of the document.
On the View tab, click the Zoom button. Then in the Zoom dialog box, click 75%, and click OK.
Notice that the Zoom Level percentage and slider position are adjusted to reflect the new setting.
At the left end of the Zoom Slider, click the Zoom Out button two times.
As you click the button, the Zoom Level percentage decreases and the slider moves to the left.
At the right end of the Zoom Slider, click the Zoom In button until the Zoom Level percentage is 100 percent.
On the View tab, in the Show group, select the Ruler check box.
Horizontal and vertical rulers appear above and to the left of the page. On the rulers, the content area of the page is white and the margins are gray.
On the Home tab, in the Paragraph group, click the Show/Hide ¶ button.
Formatting marks such as spaces, tabs, and paragraph marks are now visible.
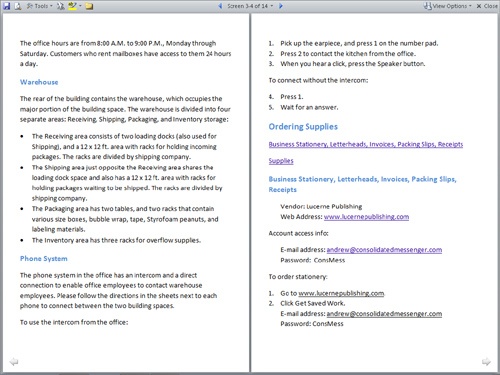
On the View Shortcuts toolbar, click the Full Screen Reading button.
Word displays the document in a format that is easy to read.
In the lower-right corner of the window, click the Forward button.
You can now read the next two screens of information.
To the right of the screen indicator at the top of the window, click the Previous Screen button.
Point to each button on the toolbar at the top of the window to display its ScreenTip. Then in the upper-right corner, click the Close button to return to Print Layout view.
Press Ctrl+Home. Then on the View Shortcuts toolbar, click the Web Layout button, and scroll through the document.
In a Web browser, the text column will fill the window, and there will be no page breaks.
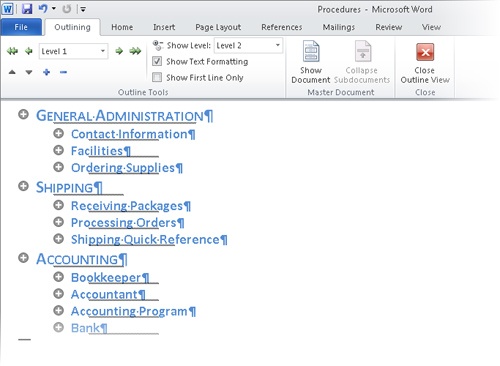
Press Ctrl+Home, and then on the View Shortcuts toolbar, click the Outline button.
Word displays the document’s hierarchical structure, and the Outlining tab appears on the ribbon.
On the Outlining tab, in the Outline Tools group, click the Show Level arrow, and in the list, click Level 2.
The document collapses to display only the Level 1 and Level 2 headings.
On the View Shortcuts toolbar, click the Draft button, and then scroll through the document.
You can see the basic content of the document without any extraneous elements, such as margins and headers and footers. The active area on the ruler indicates the width of the text column, dotted lines indicate page breaks, and scrolling is quick and easy.
Display the Backstage view, click Open, and then in the Open dialog box, double-click Prices_start.
The Prices_start document opens in Print Layout view in its own window. Notice that the telephone number in the body of the memo has a dotted underline, which indicates that it is formatted as hidden.
Save the Prices_start document as Prices so that you can work with it without overwriting the original.
On the Home tab, in the Paragraph group, click the Show/Hide ¶ button to turn it off.
The telephone number is no longer visible.
On the View tab, in the Window group, click the Switch Windows button, and then in the list of open documents, click Procedures.
The Procedures document is displayed in Draft view with formatting marks and hidden text turned on. You can control the view and formatting marks for each window.
On the View tab, in the Window group, click the Arrange All button.
The open windows are sized and stacked one above the other. Each window has a ribbon, so you can work with each document independently.
At the right end of the Procedures title bar, click the Close button.
At the right end of the Prices title bar, click the Maximize button.
The window expands to fill the screen.
On the View tab, in the Show group, clear the Ruler check box to turn off the rulers.


Key Points
You can open more than one Word document, and you can view more than one document at a time, but only one document can be active at a time.
You create Word documents by selecting a template and typing text at the cursor. It’s easy to move the cursor by clicking in the text or by pressing keys and keyboard shortcuts.
When you save a Word document, you specify its name, location, and file format in the Save As dialog box.
You can view a document in a variety of ways, depending on your needs as you create the document and on the purpose for which you are creating it.