
Chapter 10. Organize and Arrange Content
Chapter at a Glance

In this chapter, you will learn how to | |
✓ | |
✓ | |
✓ | |
Microsoft Word 2010 gives you the following tools for organizing and arranging your document’s content:
Outlining tools. You can use these tools to control the organization of the content in a styled document. In Outline view, you can reorganize content by moving it or by promoting or demoting it.
Object arranging tools. You can use these tools to control the layout of objects on the page. You can precisely position objects and control their alignment and stacking order.
Nested tables. You can use a table to control the positions of blocks of information on the page. For example, a table with two columns and two rows can hold a set of four paragraphs, four bulleted lists, or four tables in a format in which they can be easily compared.
In this chapter, you’ll first reorganize a document by working with its outline. Then you’ll modify the text-wrapping, position, and stacking order of multiple pictures in a document. Finally, you’ll create a table to hold nested tables of information.
Practice Files
Before you can complete the exercises in this chapter, you need to copy the book’s practice files to your computer. The practice files you’ll use to complete the exercises in this chapter are in the Chapter10 practice file folder. A complete list of practice files is provided in Using the Practice Files at the beginning of this book.
Reorganizing Document Outlines
When you create a document that contains headings, you can format the headings with built-in heading styles that include outline levels. Then it is easy to view and organize the document in Outline view. In this view, you can hide all the body text and display only the headings at and above a particular level. You can also rearrange the sections of a document by moving their headings.
See Also
For information about formatting headings with styles, see Quickly Formatting Text in Chapter 3. For information about styles in general, see Working with Styles and Templates in Chapter 16.
When you view a document in Outline view, the document is displayed with a hierarchical structure, and the Outlining tab appears on the ribbon.

Troubleshooting
The appearance of buttons and groups on the ribbon changes depending on the width of the program window. For information about changing the appearance of the ribbon to match our screen images, see Modifying the Display of the Ribbon at the beginning of this book.
The indentations and symbols used in Outline view to indicate the level of a heading or paragraph in the document’s structure don’t appear in the document in other views or when you print it. To the left of the document, the style area pane shows the style applied to each paragraph. This pane is available only in Draft and Outline views, and it is not visible by default.
Tip
By default, the style area pane is 0 inch wide, which effectively closes it. We find it useful to work in Outline view with the style area pane open. If you want your screen to look like the ones shown in our graphics, display the Advanced page of the Word Options dialog box and in the Display area, change the Style Area Pane Width In Draft And Outline Views setting to 1”.
You can use commands in the Outline Tools group of the Outlining tab to do the following:
Display only the headings at a specific level and above.
Promote or demote headings or body text by changing their level.
Move headings and their text up or down in the document.
Tip
You can click the buttons in the Master Document group to create a master document with subdocuments that you can then display or hide. The topic of master documents and subdocuments is beyond the scope of this book. For information, see Word Help.
In this exercise, you’ll switch to Outline view, promote and demote headings, move headings, and expand and collapse the outline.
Set Up
You need the OfficeProcedures_start document located in your Chapter10 practice file folder to complete this exercise. Open the OfficeProcedures_start document, and save it as OfficeProcedures. Turn on formatting marks, open the style area pane (see the tip at the top of the page), and then follow the steps.
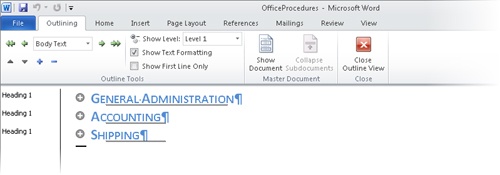
In the lower-right corner of the window, on the View Shortcuts toolbar, click the Outline button.
The document is displayed in Outline view, and the Outlining tab appears at the left end of the ribbon.
On the Outlining tab, in the Outline Tools group, click the Show Level arrow, and in the list, click Level 1.
The document collapses to display only level-1 headings.
In the Outline Tools group, click the Expand button.
See Also
For more information about keyboard shortcuts, see Appendix A at the end of this book.
Word expands the ACCOUNTING section to display its level-2 headings.
In the Outline Tools group, click the Demote button.
The ACCOUNTING heading changes to a level-2 heading.
On the Quick Access Toolbar, click the Undo button.
The ACCOUNTING heading changes back to a level-1 heading.
In the Outline Tools group, click the Collapse button.
Click the Demote button.
Again, the ACCOUNTING heading changes to a level-2 heading.
Click the Expand button.
Because the subheadings were hidden when you demoted the ACCOUNTING heading, all the subheadings are demoted to level 3 to maintain the hierarchy of the section.
Click the Collapse button, and then in the Outline Tools group, click the Promote button.
The ACCOUNTING heading is now a level-1 heading again.
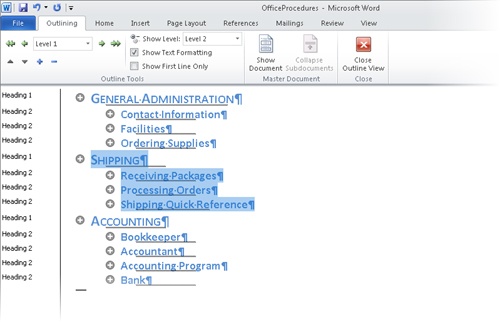
Press Ctrl+Home to move to the top of the document, and then in the Outline Tools group, in the Show Level list, click Level 2.
The outline shows all the level-1 and level-2 headings.
Click the plus sign to the left of the SHIPPING heading, and then in the Outline Tools group, click the Move Up button five times.
The SHIPPING heading and all its subheadings move above the ACCOUNTING heading.
Press Ctrl+Home to release the selection, and then in the Outline Tools group, in the Show Level list, click All Levels.
You can now scroll through the document to see the effects of the reorganization.
In the Close group, click the Close Outline View button.
Word displays the reorganized document in Print Layout view.


Arranging Objects on the Page
You have already learned basic ways to control how text wraps around an object such as a picture and to position an object on the page. However, sometimes things don’t work out quite the way you expect them to, especially when you are dealing with multiple objects.
Tip
In the exercise for this chapter, you work with photographs, but the concepts discussed here also apply to other graphic objects, such as clip art images, diagrams, and shapes.
When you choose a text wrapping option other than In Line With Text, you can specify that an object be positioned in one of two ways:
Absolutely. This option positions the object at a distance you set from a margin, page, paragraph, or line.
Relatively. This type of positioning is determined by the relationship of the object to a margin or page.
However, you can take the guesswork out of setting an object’s position by choosing one of nine predefined position options from the Position gallery. These options all implement square text wrapping in a specific location relative to the margins of the page.
If you use one of the position options to locate an object, you can still move it manually by dragging it. Often it is easier to drag objects into position if you display an onscreen grid to align against. You can also use alignment commands to align objects with the margins and with each other.
After you position an object, adding text might upset the arrangement of the page. You can specify whether the object should move with its related text or should remain anchored in its position. You can also specify whether the object should be allowed to overlap other objects.
If you insert several objects and then position them so that they overlap, they are said to be stacked. The stacking order (which object appears on top of which) is initially determined by the order in which you inserted the objects, but can also be determined by other factors such as the type of text wrapping assigned to each object. Provided all the objects have the same kind of text wrapping, you can change their order by selecting an object and clicking the Bring Forward or Send Backward button in the Arrange group to move the object to the top or bottom of the stack. If you click either button’s arrow and then click Bring Forward or Send Backward, the object moves forward or backward in the stack one position at a time.
After you have arranged objects on the page, you can use the Selection And Visibility task pane to hide and show them so that you can judge each object’s contribution to the whole.
In this exercise, you’ll modify the text-wrapping, position, and stacking order of pictures that have already been inserted into a document. Then you’ll hide one of the pictures.
Set Up
You need the BambooInfo_start document located in your Chapter10 practice file folder to complete this exercise. Open the BambooInfo_start document, and save it as BambooInfo. Turn off formatting marks and the rulers, and set the zoom percentage so that you can see the entire first page. Then follow the steps.
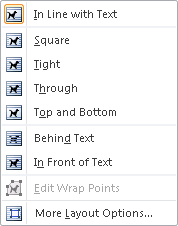
Click the first picture, and on the Format tab, in the Arrange group, click the Wrap Text button.
The Wrap Text gallery appears.
In the Wrap Text gallery, click More Layout Options. Then in the Layout dialog box, click the Position tab.
All the options on the Position page are unavailable. You cannot manually change these settings when text wrapping is set to In Line With Text.
Click the Text Wrapping tab, and in the Wrapping style area, click Tight. Then in the Wrap Text area, click Right only. Finally, in the Distance from text area, set both Left and Right to 0.3”.
Click the Position tab.
The options on the Position page are now available. Notice that the Horizontal and Vertical settings are Absolute and that the Move Object With Text check box is selected.
Click OK.
The text now wraps to the right of the picture.
Click anywhere in the first line of text to the right of the picture, and press the Home key to position the cursor at the beginning of the line. Then press Enter.
Word inserts a blank paragraph below the document title.
On the Quick Access Toolbar, click the Undo button to remove the blank paragraph.
Click the picture to select it. Then on the Format tab, in the Arrange group, click the Position button.
The Position gallery appears.
In the Position gallery, point to each thumbnail in turn to see a live preview of its effects. Then under With Text Wrapping, click the first thumbnail in the first row (Position in Top Left with Square Text Wrapping).
The picture moves to the upper-left corner of the document.
Click to the left of Beautiful in the title, and press Enter.
Word inserts a blank paragraph above the document title, but the picture does not move down with the title.
Click the picture, and then at the bottom of the Position gallery, click More Layout Options to display the Position page of the Layout dialog box.
Notice that the Horizontal and Vertical settings have changed to Alignment and that the Move Object With Text check box is no longer selected. The relationship of the picture with the text is broken, and the picture is now sitting in a fixed position relative to the margins of the page.
Click Cancel to close the dialog box.
Click the second bamboo picture, display the Position gallery, and under With Text Wrapping, click the third thumbnail in the first row (Position in Top Left with Square Text Wrapping).
Selecting one of the predefined Position options is a quick way of both setting text wrapping and breaking the relationship of the picture with the text.
In the Arrange group, click the Align button.
The Align gallery appears.
Tip
When pictures have a text wrapping setting other than In Line With Text, you can use the options in the Align gallery to align multiple objects horizontally or vertically. You can also distribute selected objects equally between the first and last objects in the selection. Understanding how these options work takes practice. It is a good idea to test various settings with multiple objects to see the results. Remember, the Undo button is your ally!
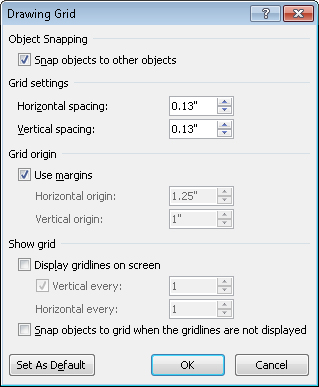
At the bottom of the gallery, click Grid Settings.
The Drawing Grid dialog box opens.
In the Grid settings area, set both Horizontal spacing and Vertical spacing to 0.25”. Then in the Show grid area, select the Display gridlines on screen check box, and click OK.
The text column is filled with a grid of quarter-inch squares.
Drag the selected picture down and to the left until it sits three squares from the top margin and three squares from the left margin, overlapping the first picture.
Notice as you drag that the picture snaps to the grid.
Click the third picture in the document, set its position to Position in Bottom Left with Square Text Wrapping, and then drag it up and to the right until it sits six squares from the top margin and six squares from the left margin, overlapping the second picture.
The text wraps on both sides of the picture, which is not the effect you want.
Click the first picture, display the Text Wrapping page of the Layout dialog box, and in the Wrapping style area, click Tight. In the Wrap Text area, ensure that the setting is Right only. Then in the Distance from text area, ensure that both Left and Right are set to 0.3”, and click OK.
Repeat step 19 for the second and third pictures.
With the third picture still selected, in the Arrange group, click the Send Backward button.
The middle picture now overlaps the first and third pictures.
In the Arrange group, click the Align button, and click View Gridlines to turn them off. Then click away from the picture to release the selection.
The text now wraps to the right of the pictures.
Click the third picture, and then in the Arrange group, click the Selection Pane button.
The Selection And Visibility task pane opens, identifying the three objects on this page.
At the bottom of the task pane, click the Hide All button. Then in turn, click the boxes adjacent to the three pictures.
When an object is hidden, its box is blank, and when it is visible, its box contains an eye icon.
Click the check box for Picture 3 to hide just that picture. Then close the task pane.


Using Tables to Control Page Layout
Most people are accustomed to thinking of a table as a means of displaying data in a quick, easy-to-grasp format. But tables can also serve to organize your pages in creative ways. For example, suppose you want to display two tables next to each other. The simplest way to do this is to first create a table with one tall row and two wide columns and no gridlines. You can then insert one table in the first cell and the other table in the second cell. These nested tables then seem to be arranged side by side.

As with regular tables, you can create a nested table in one of three ways:
From scratch
By formatting existing information
By inserting Microsoft Excel data
And just like other tables, you can format a nested table either manually or by using one of the ready-made table styles.
When creating a table to contain other elements, you might want to take advantage of the Word table-drawing feature. If you click Draw Table below the grid displayed when you click the Table button on the Insert tab, the pointer changes to a pencil you can use to draw cells on the page. You can set up the container table visually, without having to fuss with dialog boxes and precise dimensions while you are designing the layout. Then after everything is set up the way you want it, you can use the Table Properties dialog box to fine-tune the table specifications.
In this exercise, you’ll draw a table to contain two other tables. You’ll then insert and format the nested tables.
Set Up
You need the Loan workbook, the DeliveryTruckPurchase document, and the LoanComparisons_start document located in your Chapter10 practice file folder to complete this exercise. Open the Loan workbook in Excel, and open the DeliveryTruckPurchase document in Word. Then open the LoanComparisons_start document, and save it as LoanComparisons. Turn on formatting marks and the rulers, and then follow the steps.
With the LoanComparisons document active, on the Insert tab, in the Tables group, click the Table button, and then click Draw Table.
The pointer becomes a pencil.
Point below the last paragraph mark in the document, and drag across and down to create a cell about 3 inches wide and 1.5 inches tall.
Point to the upper-right corner of the cell (you don’t have to be precise), and drag to create another cell about the same size as the first.
When you release the mouse button, Word joins the two cells.
On the View tab, in the Window group, click the Switch Windows button, and then click DeliveryTruckPurchase.
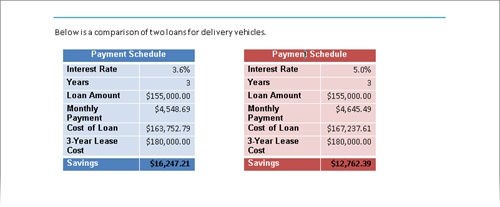
Scroll to the bottom of the page, and click anywhere in the Payment Schedule table. Then on the Layout contextual tab, in the Table group, click Select, and click Select Table.
On the Home tab, in the Clipboard group, click the Copy button.
Switch to the LoanComparisons document, right-click the first cell in the table, and then under Paste Options, click the Nest Table button.
Word inserts the table you copied into the cell and adjusts the height of the container table to fit the size of the nested table.
On the Windows Taskbar, click the Microsoft Excel button to activate Sheet1 of the Loan workbook. Then select cells A1:B8, and on the Excel Home tab, in the Clipboard group, click the Copy button.
Switch back to the LoanComparisons document, click the second cell in the table, and then on the Home tab, in the Clipboard group, click the Paste button.
Word inserts the worksheet data as a nested table in the cell.
Move the pointer to the selection area adjacent to the container table, and then click to select its two cells.
On the Home tab, in the Paragraph group, click the Border arrow, and then in the list, click No Border.
Word removes the borders from the container cells.
Click anywhere in the left table, and on the Design contextual tab, in the Table Style Options group, ensure that the Header Row check box is selected, select the Total Row check box, and clear any other check boxes.
In the Table Styles group, display the Table Styles gallery, and click the thumbnail of the table style you want to apply to the nested table.
We used Medium Grid 3 – Accent 1.
Repeat steps 12 and 13 to format the right table, perhaps using a similar table style with a different color.
We used Medium Grid 3 – Accent 2.
Turn off formatting marks to see the results.
The nested tables now clearly contrast the two loans.


Key Points
If you take the time to apply heading styles to a document, you can use the document’s outline to rearrange its sections.
You can position an object in relation to the text that surrounds it and in relation to other objects on the page.
By using tables in creative ways, you can place information in non-linear arrangements for easy comparison or analysis.