
Lesson Files | Motion3_Book_Files > Lessons > Lesson_14 |
Media | Motion3_Book_Files > Media > Audio |
Motion3_Book_Files > Media > Rocket_Boy | |
Time | This lesson takes approximately 90 minutes to complete. |
Goals | Mixing sound effects |
Using the waveform editor | |
Using the Keyframe Editor | |
Using the Timeline | |
Adding markers | |
Driving animation using Audio behaviors |
Sound is an important component of many motion graphics projects. Music can reinforce the mood or momentum of your project, and sound effects enhance the impact of onscreen motion. Synchronizing animation to sound is made much easier in Motion by the new Audio parameter behavior. You can automate many routine animation tasks using an audio source to drive changes in scale, shape, opacity, and color.
Motion also includes a waveform editor that allows easy manipulation of volume levels, pan settings, and more. You can use keyframes to animate volume and pan changes.
Markers can help in matching graphics animation with audio cues. As with all markers in Motion, markers added to the Timeline appear in all three tabs of the Timing pane.
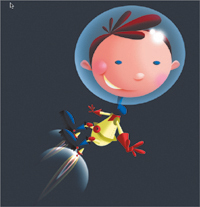
For this exercise, you’ll return to Will, the Rocket Boy you worked with in Lesson 10. You’ll add a soundtrack of rocket noise to go with the small jets on his boots. Because he starts offscreen in the final project, you’ll keyframe the volume levels to match his entry into the frame.
Start by importing the audio files of the rocket sound.
Press Command-Option-W to close any open projects. Press Command-O and open Motion3_Book_Files > Lessons > Lesson_14 > Lesson_14_Will_Audio_Start_01.
Note
In Lesson 10, you used parameter behaviors to animate the umbrella jets and flames on the bottoms of Will’s feet. In this lesson, you use the Audio parameter behavior to synchronize the graphic animation with sound.
Press Command-1 to open the File Browser.
Navigate to Motion3_Book_Files > Media > Audio.
Click Left_Shoe_Sound.
Note
Sounds automatically play when you click them. You can pause playback using the Play button, or mute sounds by clicking the Play/Mute button located in the Preview area at the top of the File Browser. To prevent sounds from playing automatically when clicked, go to General Preferences and deselect “Play items automatically on a single click.”
In the Preview area at the top of the File Browser, click Import to add the sound to your project.
Press F5 to display the Project pane.

Audio files do not appear in the Layers tab. This can be confusing at first, and you may be tempted to add a sound that’s already a part of your project. To view audio that’s been added to your project, use the Audio tab.
Click the Audio tab.
If all the options in the Audio tab are not already visible, click the column pop-up menu at the right edge of the Audio tab and choose Mute/Solo.

Resume playback.
Will now floats in space with the added sound of the jets firing. Later you’ll use Sound parameter behaviors to tie the sound to the animation of the flame graphics.
When you add a sound in Motion, it plays back as it was created. Often it’s necessary to change the volume and pan settings (left-to-right position), and whether the sound is output in a mono, stereo, or multi-channel surround format.
Drag the Level slider left and right while you listen to the changes in volume. You can use the Level slider in the Audio tab or the Heads Up Display (HUD).
A Level value of zero plays the sound at original volume. A value of -96 will effectively mute the sound, although it is still playing. Values over 0 will increase sound volume. It’s important to watch the Audio meters at the lower right of the Audio tab to make sure that the audio does not clip (distort by exceeding the maximum allowable volume). The clipping indicators (the small red dots over the meters) turn red and remain red when the audio has clipped. They are sticky and can be reset by being clicked.
You can also tell if audio levels are clipping by viewing the waveform in the Audio Editor tab.

The flat area of the waveform where it hits the upper edge of the display area indicates that the audio has clipped, which causes distortion.
Return the Level value to zero.
While playing the sound, drag the Pan slider left and right.

A Pan value of 000 centers the audio between the left and right channels. A value of -100 is full pan left, and 100 is full pan right. If you have stereo speakers or headphones, you’ll hear the pan in real time as you drag the slider. You can use the Pan slider in the Audio tab, the HUD, or the Audio Editor.
Return the Pan value to 000.
Stop playback and make sure that, in the Audio tab, Left_Shoe_Sound is selected.
In the final project, Rocket Boy Will does not appear completely onscreen until frame 100. You’re going to fade in the rocket audio over the first 100 frames so that the audio will match the final animation.
Press Command-9 to open the Audio Editor, if necessary.
The Audio Editor timeline is independent of the main Timeline in several ways. It has its own Play/Pause button and current frame field. The Audio Editor can display either an individual sound file or the Master output settings and waveform. When using the Spacebar to play or pause audio, be aware which window—the Audio Editor or Canvas—is active. It’s possible to have both timelines playing at the same time, which can be quite confusing.
In the Audio Editor, go to frame 100.

Press Shift-M to add a project marker to the Audio Editor timeline.
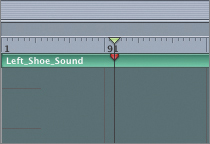
Double-click the marker to open the Edit Marker dialog. Name the marker Fade-in Complete.

Project markers for all objects are visible as faint vertical lines on the mini-Timeline. You can snap to the markers by holding down the Shift key as you scrub the playhead.
Now you’ll use the marker as a guideline to fade in your audio. In Motion, you can fade in individual audio objects, as well as the Master output track. If you add fade keyframes to the Master track, any audio added to your project will automatically fade in over the first 100 frames of the Timeline.
In the Audio tab, click the Master track section at the bottom of the tab to select it.
In the Audio Editor, make sure you are on frame 1.
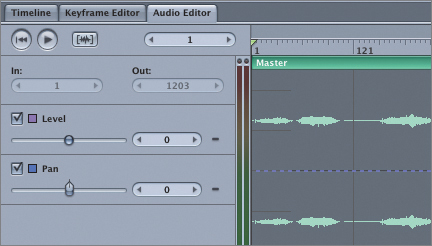
Choosing the Master track in the Audio tab also selects it for the Audio Editor. You’ll notice that the waveform display changes slightly and the word Master appears in the Audio Editor on the layer indicator.
Note
You can also view audio waveforms in the Timeline and Keyframe Editor tabs by clicking the Show/Hide Audio button in the lower left.

Deselect the Pan checkbox to hide the Pan curve and see the Level curve more clearly.

Hiding the Pan curve also allows you to see level values along the left side of the waveform display.
Option-click the Level Animation menu (the dash to the right of the Level value field) to add a keyframe.
Set the Level value to -96.
While holding down the Shift key, scrub the playhead in the Audio Editor to the Fade-in Complete marker at frame 100. With the Shift key held down, the playhead will snap to the marker.
Option-click the Level Animation menu to add another keyframe. Set Level to 0.

For audio, a Level value of 0 restores the clip to its original volume. The Master track volume now fades in over the first 100 frames of the project.
Click the Canvas window to select it, and resume playback.
When working in the Audio Editor, you hear the entire audio file. Playing back the Canvas will sample the audio file only for the play range set in the mini-Timeline.
Stop playback and save the file in Motion3_Book_Files > Lessons > Lesson_14 > Student Saves as Lesson_14_Will_Audio_Start_02. You’ll come back to it in a while after we’ve gotten our feet wet with Audio parameter behaviors.
Audio parameter behaviors allow Motion to drive animations using sounds to generate an animation curve. The behavior performs an analysis of a specified frequency range of an audio track—such as bass, midtone, or treble—and uses that information to create animation keyframes.
Note
The Audio parameter behavior does not create editable keyframes. You can change the animation by changing the way that the sound is analyzed prior to creating the animation curve.
You’ll practice by applying the Audio parameter behavior to several simple projects before returning to Will, the Rocket Boy.
Press Command-Option-W to close any open projects.
While holding down Option, choose File > New from Preset. Select NTSC Broadcast SD, and click OK.
Press Command-1 to open the File Browser. Navigate to Motion3_Book_Files > Media > Audio.
Before performing the next step, you may want to reduce your speaker volume, particularly if you’ve set your preferences to play sound files automatically when you click them.
Select the Drums sound file and click the Import button.
Start playback.
The sound has a nice, pulsing beat that will be great at driving a “drumbeat” animation.
Now you’ll draw a simple circle and add the Audio parameter behavior to the Scale parameter.
Using the Circle tool, draw a large circle in the center of the Canvas.

Press F1 to display the Properties tab.
Control-click Scale, and choose Audio.

The Behaviors tab is displayed automatically. The Audio parameter behavior is a single behavior that can be modified in many ways, allowing you to use the same sound object to create animation curves that respond to the sound in multiple ways.
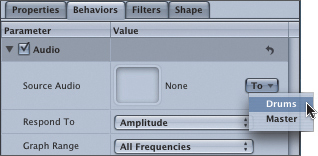
In the Behaviors tab, click the Source Audio pop-up menu and choose To > Drums.
As soon as you specify which audio source to use, the circle shape immediately begins to pulse in time to the beat. (Resume playback, if necessary.) Let’s change a few settings to see how they affect the animation.
At the bottom of the Audio parameter behavior, reduce the Scale value to keep the shape onscreen while it pulses. For the circle, a value of .25 works well.

Click the Respond To parameter’s pop-up menu and choose Transients.
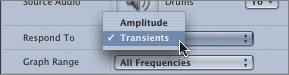
When set to Amplitude, the behavior responds to peak values of a particular frequency—think of it as responding to volume. If set to Transients, the behavior responds to rapid changes in frequency—think of it as responding to sharp changes in the sound. The shape now responds much more harshly to the drum beat.
Choose Respond To > Amplitude.
Choose Apply Mode > Subtract.
The shape now gets smaller to the beat of the music. You can modify the way the animation curve is applied to the parameter by changing the Apply Mode. Try the other modes to see how they affect the animation.
Now let’s combine the Audio parameter behavior with the Randomize Shape Behavior.
By combining behaviors, you can create complex animations without using any keyframes. For this exercise, you’ll combine two behaviors to get your shape to dance to the music.
In the Layers tab, delete the Audio parameter behavior.
Make sure that the circle shape is selected; then click the Add Behavior icon and choose Shape > Randomize Shape.
Resume playback, if necessary. The shape randomly varies over time. Now you can use the Audio parameter behavior to move the shape randomly to the audio beat.
In the Behaviors tab, Control-click Amount and choose Audio.
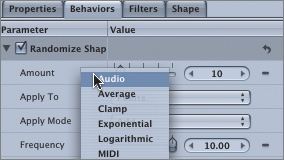
From the Source Audio pop-up menu, choose To > Drums.
At the bottom of the Audio behavior, increase Scale to 100.
A larger Scale value increases the change in the size of the circle, making the effect more dramatic. The circle gets larger in response to the music.
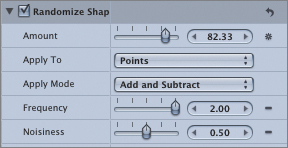
Set Apply Mode to Add and Subtract.
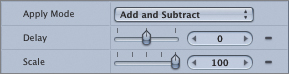
Using Add and Subtract causes the circle to grow and shrink—an even more dramatic result.
Reduce the Frequency of the Randomize Shape behavior to slow down the “dance steps.” A value of 2 works well.
To create a more even motion, set the Randomize Shape behavior’s Apply Mode to Add and Subtract.
Now the circle moves down and to the left, as well as up and to the right. Because the circle is moved by the Randomize Shape behavior, positive values move to the right, toward the top of the canvas, and negative values move to the left, toward the bottom of the canvas. The Add and Subtract mode creates both positive and negative values, so the circle moves in all directions.
Note that the Animation menu icon to the right of the Amount parameter has the form of an asterisk; this icon state is called Behavior Applied. It indicates that the Amount parameter is controlled by a parameter behavior.
You’re done with this exercise. You used the Audio parameter behavior to animate the shape of an object in response to a sound. Next, you’ll return to Will and use the Audio parameter behavior to animate the rocket exhaust in response to the shoe sounds.
You’re going to import a second audio file so that each rocket has its own sound track. This will allow you to create a more complex animation with little additional effort.
Press Command-Option-W to close any open projects.
Open File > Open Recent > Lesson_14_Will_Audio_Start_02.
Go to frame 1.
Press Command-1 to open the File Browser. Navigate to Motion3_Book_Files > Media > Audio.
Select the Right_Shoe_Sound sound file and click the Import button.
Start playback.
Because you added keyframes to the Master track earlier in this chapter, the new sound object automatically fades in over the first 100 frames.
Press Command-6 to display the Audio tab.
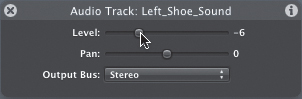
In the Audio tab, select the Right_Shoe_Sound and set the Pan value to -100. Set the Pan value of the Left_Shoe_Sound to +100.

Things get a little confusing from here. Because Will is facing the viewer, his left foot is toward the right side of the screen, and his right foot is toward the left side of the screen. To ensure that the animation and audio will match, you need to pan the Right_Shoe_Sound toward the left speaker to match Will’s orientation onscreen.
Set the Level of the Right_Shoe_Sound to -6.

Since the right foot is a little farther away from the viewer, lowering the Level setting reduces its volume to match the difference in distance.
To hear each sound by itself, use the Solo buttons.
Click the Solo button for the Right_Shoe_Sound audio object.

Using the Solo button allows you to isolate a sound by muting all other audio tracks. You can solo several tracks by clicking the Solo button for each track. Click the Solo button again to return audio playback to normal.
Before you continue, make sure neither track is in Solo mode.
The last step in finishing Will’s animation is to animate the jets on his feet in response to the shoe sounds. You’ll apply the Audio parameter behavior to both the flames and the umbrella jets.
Press Command-4 to display the Layers tab, if necessary.
In the Layers tab, click the disclosure triangles as necessary until the “left flames” group is open.
Select the “left umbrella” layer and press F1 to open the Properties tab.
Control-click Scale and choose Audio.

Set Source Audio to Left_Shoe_Sound. Resume playback, if necessary.
It may take a few moments for Motion to analyze the sound. The left umbrella graphic should now scale in response to the Left_Shoe_Audio track. (Remember that Will’s left leg is toward the right of the Canvas.)
Set the Audio behavior Apply Mode to Multiply, and set Scale to 1.50.
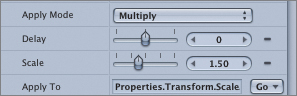
When Apply Mode is set to Multiply, the scale value drops to 0 when no sound is present, which works well to simulate the jet exhaust. A Scale value of 1.5 causes the umbrella graphic to get a little larger than normal, allowing it to respond more dynamically to louder jet sounds.
Now let’s repeat these steps for the left flames group.
In the Layers tab, select the left flames group and press F1 to display the Properties tab.
Control-click Scale and choose Audio.
Set Source Audio to Left_Shoe_Sound. Resume playback, if necessary.
Set the Audio behavior Apply Mode to Multiply and set Scale to 1.50.
The umbrella graphic and the flames animate in response to the Left_Shoe_Sound audio track. Rather than repeat the steps for the right leg, you’ll copy and paste the Audio parameter behaviors you’ve already created.
Click disclosure triangles as necessary to display the “right leg” layers.
In the Layers tab, select the Audio behavior below the left umbrella layer and choose Edit > Copy.

Select the “right umbrella” layer and choose Edit > Paste.
Select the new Audio copy behavior below the right umbrella layer.
In the Behaviors tab, change Source Audio to Right_Shoe_Sound.
Change Scale to 2.
Because you lowered the volume of the Right_Shoe_Sound earlier, you need to scale the right leg graphics larger than the left leg graphics so that they appear to be the same size.
In the Layers tab, select the Audio behavior below the left flames group and choose Edit > Copy.

Select the “right flames” group and choose Edit > Paste.
Select the new Audio copy behavior below the right flames group.
In the Behaviors tab, change Source Audio to Right_Shoe_Sound.
Change Scale to 2.
Choose Mark > Reset Play Range to allow Motion to play the entire project Timeline. Resume playback, if necessary. Remember that deselecting the Audio parameter behavior will increase your playback frame rate.
Save the project to Motion3_Book_Files > Lessons > Lesson_14 > Student Saves.
That’s it! Will is floating in space, held up by his amazing shoe jets, which animate perfectly to the matching audio tracks.