
Lesson Files | Motion3_Book_Files > Lessons > Lesson13 |
Media | Motion3_Book_Files > Media > Suzuki |
Time | This lesson takes approximately 60 minutes to complete. |
Goals | Smooth unwanted motion in footage |
Utilize tracking information | |
Use Hinting features in the tracker | |
Match move graphic elements to a background |
A common task for all Motion artists is to track an element or group of elements to movement inherent in an underlying background shot. This is not a pleasant task if you have to manually move a client’s graphic element frame by frame to match a specific point or group of points in your background footage. Without automatic motion tracking, the task of integrating motion-matched elements into your material is an exercise in patience and frustration.
Motion tracking is performed in Motion 3 by using the new Motion Tracking behaviors. They serve a different purpose than other behaviors. Rather than immediately animating the object to which it is applied, a tracking behavior analyzes an object’s motion, or the motion in a clip.
The application of the analysis data varies depending on your desired results. For example, the Stabilize behavior stabilizes movement in a clip that may have been created by camera shake. The Match Move behavior analyzes the motion in an object (such as a clip) and applies that motion to another object to integrate it with the tracking source.
In this lesson, you will perform a simple-corner pinning exercise to lock the corners of a rectangular shape into a moving background. Then, you’ll work on a more complex project for Ducati in which the background footage is full of erratic motion and your foreground elements must track movement that originates from a single point.
Clients often request that a graphic or similar element be tracked to a portion of an underlying layer to make it appear that it is part of that footage. Think, for example, of replacing an image on a LCD TV or an advertisement on the side of a bus. What makes this more interesting (and challenging) is when the underlying video, like the bus, is moving.
Motion has two ways to deal with this moving action. In the case of an LCD screen, you have a rectangular shape for the match move. This process is almost so automatic that it’s amazing clients will pay for the process. (We’ll keep this as our secret.)
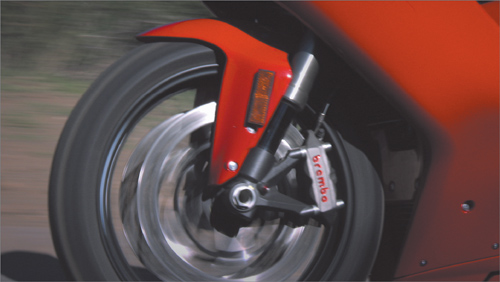
The second method is a little more involved. In the case of the Ducati request, you manually track the brake calipers, as they are not a simple rectangular shape. Don’t worry. Motion has made this incredibly simple.
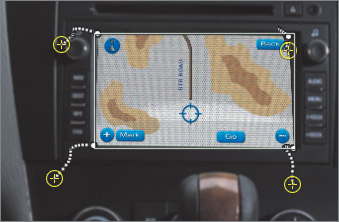
Your editor has rushed into the room in a panic. Her current client needs to see how a map graphic will look when placed in an SUV’s dashboard GPS screen.
Looking at the material, it is evident that the client wanted the cleanest possible look for this graphic and chose not to have it in place during the actual shoot. Instead, he marked up a green screen so that you could corner-pin it in postproduction. During the shoot, the camera was bumped around a bit to simulate a vehicle in motion, so using only a simple static placement will not suffice.
Corner-pinning your graphic through the Match Move behavior will take care of this movement and allow you to return the shot to your editor as soon as possible.
Open Motion3_Book_Files > Lessons > Lesson13 > A.CornerPin.
In the File Browser, navigate to Motion3_Book_Files > Media > Suzuki. Drag sat_nav_graphic.mov into the Layers tab, or drag it into the Canvas and snap it to the center guides.
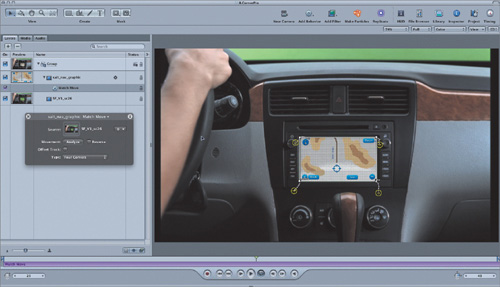
In the Toolbar, click the Add Behavior icon and choose Motion Tracking > Match Move.
You have a map graphic with four corners to follow or “pin” to the four corners of the GPS screen. You set up this corner pinning in the Match Move type.
In the HUD, set Type to Four Corners.

Note
The Match Move behavior will automatically analyze the layer beneath the layer you are working on for the match move. If you wish to use another layer as the base, drag its thumbnail from the Layers tab into the Source well.
Four circles with yellow crosshairs appear at the four corners of your graphic.
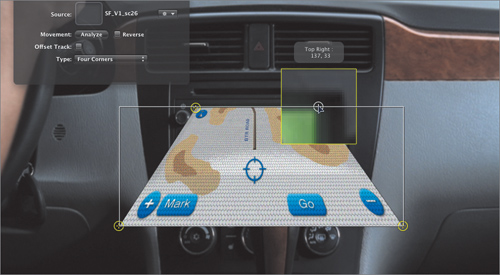
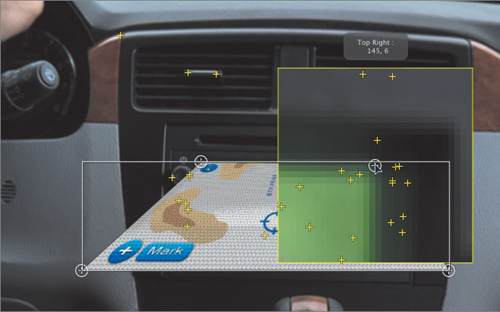
In the Canvas, drag the top right corner of the graphic to the top right corner of the GPS screen.
As you drag, a zoom window will appear to help you locate a suitable point in the background layer to pin your corner.

In the Canvas, drag each corner in turn to the four corners of the GPS screen.
Deselect the Activation checkbox for sat_nav_graphic.mov.
A wireframe display remains with the four corners highlighted in yellow.
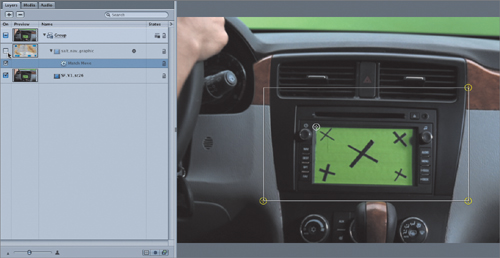
Select the Activation checkbox for sat_nav_graphic.mov to enable the GPS map.
To assist you in choosing suitable locking points in the background clip, Motion 3 offers a handy hinting option. Option-drag your corner point around the Canvas and the pop-up zoom window will display yellow crosshairs to indicate potential locking points. As your pointer gets close to each yellow crosshair, the corner pin will snap to it.
After you have placed all four corners to your liking, move the playhead to the first frame of the sequence (press Home); and in the Match Move HUD, click Analyze.

The analysis of the movement in the underlying footage is completed in a moment.
Press Home and play your sequence to review it.
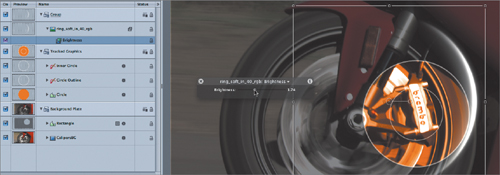
Click the Add Filter icon and choose Color Correction > Brightness. Bring the level down to 0.86.
This will ensure that the brightness of sat_nav_graphic.mov more closely matches that of the SUV’s internal lighting.
Press Command-S to save your work and close the project.
Since you are sharing material with your editor, she can import your Motion project into Final Cut Pro and show the client your results. If any adjustments need to be made, she can round-trip the project back to you.
The ease of performing a match move with four corners makes it simple to place images on moving buses, charts in frames, video in windows, and so on. The possibilities are endless. Remember to adjust brightness levels and color saturation to give the final track that “always been there” look. If necessary, add a slight blur if the optical plane in the original footage is slightly soft.
For the rest of the lesson, you will see how Motion 3 has brought simplicity and grace to the normally arduous tasks of both stabilizing shaky footage and matching elements to a specific point contained within that footage.
Your client, in this case, is Ducati.
The motorbike company is bringing out a new model and looking for a video package that points out the unique features of the new speed demon. They are not interested in boring lists; they want the information presented in an attractive fashion and want the visual style to reflect their print materials.
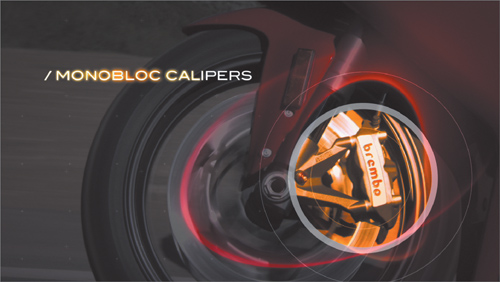
Your Final Cut Pro editor has assured the client that you are the one for this job. Under her breath, however, she mutters something to you along the lines of “That footage is kinda shaky and stuff, and good luck with that. Oh yes, the client also wants you to highlight the great Monobloc calipers somehow. Their graphics guys gave me some sort of Photoshop circle elements that match their print designs.”
You offer her a cup of coffee and assure her that all will be well. After all, you now have Motion 3’s automated stabilization and match moving behaviors at your fingertips.
You will use Motion Tracking behaviors to perform two key tasks in this exercise:
Stabilize motion in a shaky shot
Match the movement of graphic elements to a specific element within your background clip
When you are finished, your footage will match the design aesthetics of the client’s print campaign and satisfy the need for a clean, integrated look.
Before you start motion tracking, you need to make sure the project is set up appropriately for your footage format.
Press Command-Option-W to close any open projects.
Press Command-N to open the New Project dialog.
From the Preset pop-up menu, choose Custom.

The footage was shot in high definition at a resolution of 1920 x 1080 pixels and with a 23.98 frames per second (fps) frame rate. It was imported to Final Cut Pro using the new Apple ProRes 422 codec. This codec preserves resolution while creating files in smaller, more manageable sizes. It’s an absolute delight when working with high-definition material.
In the General tab of the Project Properties dialog, do the following:
Set Width to 1920 and Height to 1080.
Set Bit Depth to 8 Bit.
Make sure that Pixel Aspect Ratio is set to Square.
Set Field Order to None.
Set Frame Rate to 23.98.
Set Duration to 34 and choose Frames from the pop-up menu to the right.
In the File Browser, navigate to Motion3_Book_Files > Media > Ducati. Drag CalipersBG.mov into the Canvas and snap it to the center guides. (In the filename, BG stands for background.)
Tip
To make it easier to read the names of files, you may want to click the List View button at the top of the File Browser.
Let’s face it: HD is big. Even 720p resolution—the humbler HD format—has an effective screen resolution of 1280 x 720 pixels. So there’s a good chance that you won’t be able to fit the whole image on your screen, especially if the Layers tab is visible.
In the upper right corner of the Canvas, click the Zoom button and choose 50%.
Press the Home key to snap to the head of the clip.
Begin playback.
As you were warned by your editor, the footage is a little shaky. This is a problem because you want to attach graphic elements and apply smooth motion to them, but you do not want the background footage skipping around nervously. You can improve the situation by applying a little stabilization to the background plate.
In Motion 3, stabilization is a simple and elegant way to smooth out footage wrinkles while preserving intentional camera movement, if you so desire. With the abundance of material currently being captured using lightweight HDV and DV cameras, you couldn’t ask for a more useful tool to have in your post-production pocket. (Just don’t tell the crew how easy it is to fix their production problems. It is always best to capture material as cleanly and smoothly as you can.)
Even in the best of circumstances, footage is likely to suffer from camera shake or bumpiness. Either the shooting environment itself is challenging, which is certainly the case in your motorbike footage, or intentional camera movement appears overdone when juxtaposed with more stable footage. The basis of stabilization is to analyze your footage, or an element in your footage, and apply opposite motion to the parameters of that movement to create a completely stable shot.
In this portion of the exercise, you will stabilize your footage, smoothing out some of the more egregious movement in the background footage, so that you have a good base starting point to match elements to later.
Make sure that CalipersBG.mov is selected in the Layers tab, and then click the Add Behavior icon in the Toolbar and choose Motion Tracking > Stabilize.
If the Heads Up Display (HUD) is not visible, press F7.
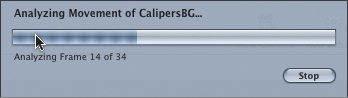
In the HUD, click the Analyze button.

This single-step process is as simple as it sounds—for you, anyway. Your Mac crunches away, doing the heavy lifting, analyzing movement across the image to give you the best possible results.
A progress window will appear while Motion analyzes the clip.
Once the analysis is complete, play the sequence.
Two things might strike you. The image is stable but has moving black borders around the image. This is a natural result of asking Motion to stabilize your material. In doing so, it moved and shifted the original footage to make sure that the wheel of the motorbike was centered and stable.
Stop playback and set the playhead to frame 28.
At frame 28, you can clearly see that Motion moved the frame up and to the left to carry out your stabilization request. Therefore, the rest of the working frame is revealed, and, in this case, black borders result at the bottom and to the right of the image, filling the rest of the frame.

In the HUD, set Border to Zoom.

Motion will expand the image as needed to fill the composition’s dimensions. It does this on a frame-by-frame basis throughout the sequence.
Go to the start of the sequence and play.
The screen is filled with lovely, stable video material; but after seeing the result, the client decides that a little too much of the intentional camera movement has been lost.
You agree, as there isn’t much space available to the left of the motorbike’s wheel for you to add your text.
Thankfully, Motion has you covered again. You can choose to preserve some of the camera movement, while still losing a lot of the jittery camera shake—and you don’t even have to re-analyze your footage.
In the HUD, set Method to Smooth.

Resume playback of the sequence if necessary.
The result is much better for your needs. The image also shows less evidence of degradation because Motion did not have to perform as severe a zoom operation to fill the frame.
In the HUD, you can dial in just how much smoothness you might need. The default of 2.5 is perfect for this project. On occasion, however, you might need to push the smoothness a bit more or reduce it a bit.

Experiment by dragging the Translation Smooth control left and right as the material plays. A lower value will decrease the smoothness; a higher value will increase it. When done, return the level to 2.5.
Press Command-S to save your project.
The background shot now has a smoother appearance while retaining a good sense of the motorbike’s motion.
Earlier in this lesson, you performed a simple corner-pinning method for tracking a foreground element to a background in the Suzuki footage.
For your Ducati project, you need to match your foreground elements to a single point in the background footage. The task is to combine circles created in Motion 3 with Adobe Photoshop elements that the client provided, and then use motion tracking to add them to the shot and follow the movement of that specific point.
To do this, you will create a manual match move for the Ducati brakes.
You will start this phase of the project by creating a simple circular shape.
Press Home to go to the beginning of the sequence.
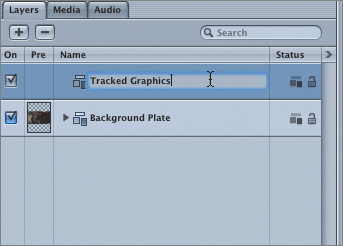
In the Layers tab, rename the Group layer to Background Plate.
In the Layers tab, add a second group (Command-Shift-N) and name it Tracked Graphics.
In the top left corner of the Canvas, choose the Circle tool.

In the Canvas, hold down Shift while dragging out the circle to preserve its aspect ratio. Place the shape over the calipers and the Brembo brakes in the background clip.

When you have finished creating the circle, you will notice that it has a default white color. You can change the fill color to orange, which is more appropriate for highlighting the calipers.
Press Shift-S to choose the Select/Transform tool. In the Shape Circle HUD, click the pop-up menu to the right of Fill and use the eyedropper that appears over the color palette to select a nice orange.

To give this circle a motion that integrates well with the footage, you will add a track to the CalipersBG layer that the circle can follow.
In the Layers tab, select the CalipersBG layer in the Background Plate group.
At the top right of the Canvas, click the Add Behavior icon and choose Motion Tracking > Analyze Motion.
This adds a behavior layer from which you can choose to create a tracking point.
Open the Behaviors tab of the Inspector (press F2).
This allows you to clearly see the addition of another Analyze Motion behavior.
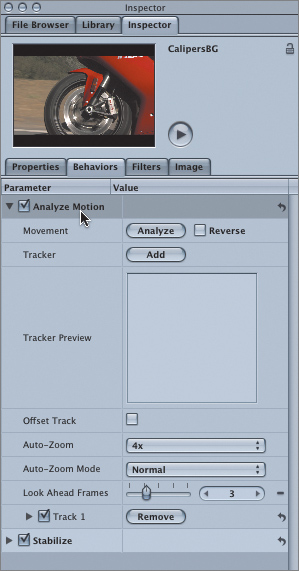
A Track labeled Track 1 at the bottom of the Analyze Motion behavior area is available by default. Display the Track 1 parameters by clicking the disclosure triangle to the left of Track 1.
Enter -98 for the X-axis and -25 for the Y-axis. These values will give you a good point on the bike to track from.
In reality, of course, you would have to manually move the crosshair in the Canvas to choose a point that you think works best. This can take some experimentation. To save yourself the frustration of choosing bad points to track from, stick with the values presented here.

In the Canvas, click the Track 1 crosshair.
You have selected a highlight area on the bolt that attaches the mudguard to the wheel assembly. The key idea here is to find a relatively stable item that is visible throughout the sequence.

In the HUD, click the Analyze button.
As your Mac analyzes the point of reference for the track, a circle with a dark outline will appear to indicate frame by frame where your track point is located. A trail of red diamonds will emanate from this circle to show where the track point was in previous frames. It’s a very handy reference if you later need to manually adjust the track point in a particular frame.

Go to the start of your sequence by pressing the Home key, and in the Layers tab select the Circle layer.
In the Canvas, click the Add Behavior icon and choose Motion Tracking > Match Move.
In the HUD, click the pop-up menu to the right of the Source well and choose CalipersBG: Analyze Motion.

The Match Move for the circle will utilize the movement data gathered from the track you just created in the background footage. If you had generated multiple tracks for various layers and/or groups, you would see a list of options to choose from.
Play your sequence.
The circle now moves in a smooth manner that is consistent with the motion of the bike within the frame.
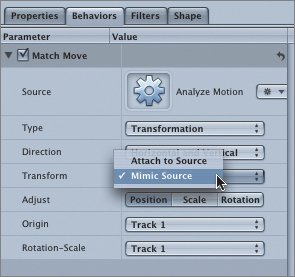
In the Behaviors tab of the Inspector, set Transform to Mimic Source.
Enabling Mimic Source allows you to move the Circle layer to a different position in the Canvas while retaining the flow of movement from the source material’s tracker. You will move the entire group of circles in a moment.
In the Layers tab, select the Circle layer and duplicate it (Command-D).
You want to add a circle highlight around the edge of the circle, and you can do this in the HUD by selecting Outline and deselecting Fill.
In the HUD, deselect Fill and select Outline.
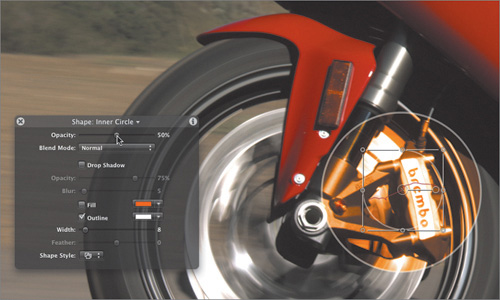
You could have done this on the original circle, but the client would also like an inner white circle. Having created this independent outlined circle, you can duplicate it for use as your smaller, white inner circle.
In the Canvas, drag the Circle outline back over the original circle so that it outlines the original circle, if necessary.
In the HUD, drag the Width slider to 8 to use a thicker white line for your circle outline.

You are now ready to create the smaller, inner circle outline.
In the Layers tab, select the Circle copy and duplicate it. Stop playback and move to frame 1.
In the Inspector, click the Properties tab and set the Scale of Circle Copy 1 to 50%.

In the Layers tab, rename the Circle copy layer to Circle Outline and the Circle copy 1 layer to Inner Circle.
By naming and renaming layers and objects in a manner that suits your project, you can avoid confusion later.
Now that you have all three circles created, you can select all of their layers as a group and place them more appropriately over the bike’s calipers.
In the Layers tab, select the Tracked Graphics group, and in the Canvas, drag the group to a more appropriate position over the calipers. Just to the right of the wheel bolt looks good.

Clearly, you are having a hard time seeing the calipers. It’s time to pretty-up this circle.
In the Layers tab, select the Circle layer, and in the HUD, change Blend Mode from Normal to Overlay.
In the Layers tab, select the Circle Outline and Inner Circle layers, and in the HUD, drag the Opacity slider to 50%.
Press Command-S to save your work and resume playback to take a look.
The calipers are nicely highlighted, but the client feels that darkening the footage outside of your circles would augment the effect. To do this, you will create a black rectangle to cover the background plate. You can control the opacity level of this rectangle to determine just how dark the footage will appear. To hold out your moving circles, you can add an image mask to retain the brightness settings of the highlighted area, the moving circle.
The Circle layer and its tracked motion will be the source of the mask, and all its movement that was derived from the tracking you performed earlier will be maintained.
You will start by creating a simple rectangular shape to cover the whole frame.
Stop playback, if necessary, and press the Home key to make sure the playhead is at the beginning of the sequence.
Press Shift-Z to see the whole frame of your composition in the Canvas.
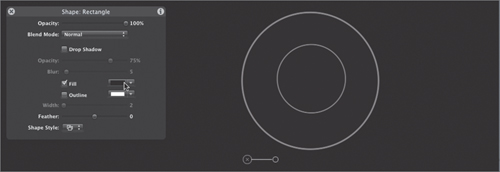
In the Layers tab, select the Background Plate layer, and in the Toolbar, click the Rectangle tool. Drag the pointer over the frame from the top left to bottom right corners, ensuring that you cover the whole frame.
Press Shift-S to choose the Select/Transform tool and in the HUD change the Fill to black.
With the Rectangle layer selected, from the Object menu bar choose Object > Add Image Mask (Command-Shift-M).
The HUD updates to show you the Mask Source well.
Drag the Circle layer into the well.

The Circle layer is now deselected in the Layers tab, as Motion assumes that you are using it just as a mask source. You need it to serve multiple roles, so you need to make it visible.
Re-enable the Circle layer.
The mask has certainly worked, but it is displaying the circle as black instead of what’s outside the circle. By default, the mask is affecting the image within the mask. That’s why you have to invert the mask to affect the image outside the mask.
In the HUD, select the Invert Mask checkbox.

The black now obscures the rest of your image. A more transparent black will lead the viewer’s eye to the circle area around the brakes and calipers while still allowing him or her to see the rest of the bike.
In the Layers tab, select the Rectangle layer, and in the HUD, drag the Opacity slider down to 50%.
Go to the head of your sequence and play it.
The sequence could do with a little fade-in on your Circle to ease the transition to the graphic.
In the Layers tab, select the Circle layer. In the Canvas, choose Add Behavior > Basic Motion > Fade In/Fade Out. In the HUD, drag the shaded triangle on the left to create a ten-frame fade-in, and drag the shaded triangle on the right completely to the right because you don’t need a fade-out.

Copy the Fade In/Fade Out behavior and paste it onto the Rectangle layer in the Background Plate group.
Now the footage will darken as the circle fades in.
Copy and paste the Fade In/Fade Out behavior to the Circle Outline and Inner Circle layers.
Save the project.
The calipers are nicely highlighted, and the circles move with the interior motion of the bike footage.
The project is looking good, but it could do with a little more pizazz. You’ll achieve that by adding the graphic elements that the client created in Photoshop.
Go to the start of the sequence.
In the File Browser, navigate to Motion3_Book_Files > Media > Ducati. Drag ring_soft_in_40_rgb.psd to the top of the Layers tab.
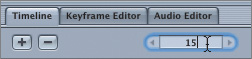
If your Timeline is not visible, press F6. To position the ring graphic appropriately, go to frame 15 in the Timeline.
In the Properties tab of the Inspector, set the X Position and the Y Position parameters to 207 and -82, respectively.
You could simply drag the ring into an approximate position in the Canvas, but these parameter values will position the ring nicely to the right of your circle and aid in consistency throughout the rest of the exercise.

The color and brightness of your ring are a little unexciting and not particularly related to the look of your composition. Let’s add some color and brightness, and then blend it in seamlessly.
Click the Add Filter icon and choose Color Correction > Brightness.
In the HUD, drag the Brightness slider to 1.74.
This value will allow the ring to stand out a little more when you use a blend mode in step 10.
Click the Add Filter icon and choose Color Correction > Colorize.
Ensure that you are around frame 15 of the sequence, and click the eyedropper in the HUD to the right of Remap White To.
Sample the orange from the Circle layer in the Canvas.

Select the ring_soft_in_40_rgb layer in the Layers tab, and choose Add for the blend mode in the HUD.
Go to the start of the sequence and play.
The color and the Add mode have helped the look by creating a matching visual partner for the circles that you created manually in Motion, but your element has no motion. To rectify this, you must add a parameter behavior that controls the rotation of your ring. In addition, to match the movement of your circles, you will apply a Match Move behavior.
In the Layers tab, select the ring_soft_in_40_rgb layer. Click the Add Behavior icon and choose Parameter > Rate.
In the Behaviors tab of the Inspector, set the Rate slider to 271. From the Apply To pop-up menu choose Properties > Transform > Rotation > Z.
The parameter behavior allows you to easily apply a rate of movement to a particular parameter—Rotation, in this case—while also choosing the axis around which the movement occurs.
To make sure that the element follows the circle’s movement over time, you can simplify the match move by applying a copy of your Match Move behavior to the group that was created when you added the ring_soft_in_40_rgb layer. As you add other elements to this group, each will inherit the match move tracking points.
Copy the Match Move behavior from the Circle layer, and in the Layers tab select the Group layer that contains the ring_soft_in_40_rgb layer. Paste the Match Move into Group.

Play the sequence, if you want to see the results.
The half-ring orbits the full circle and tracks, but still looks flat. In Lesson 3, you discovered the joy of three dimensions. Let’s angle the ring to create a sense of depth as it orbits the full circle.
Select the ring_soft_in_40_rgb layer. In the Properties tab of the Inspector, click the disclosure triangle for Rotation and set the Y value to -60°.

The ring now rotates around the circles in an interesting fashion, but in playing the sequence you can see that it’s at full opacity from beginning to end. Adding a Fade In/Fade Out behavior will smooth its introduction.
In the Layers tab, select the ring_soft_in_40_rgb. layer. Click the Add Behavior icon, and choose Basic Motion > Fade In/Fade Out.
In the HUD, drag Fade In to 10 frames and Fade Out to 0.
Building upon your look, you can now add the client’s second graphic element. In doing so, you can save time and effort by copying behaviors and filters already used on your first ring and adjusting specific parameters to suit your visual goals.
Stop playback and park the playhead at frame 14.
In the File Browser, navigate to the folder Motion3_Book_Files > Media > Ducati. Drag ring_soft_in_80_rgb.psd into Group in the Layers tab.

From the ring_soft_in_40_rgb layer in the Layers tab, copy the Colorize, Brightness, Fade In/Fade Out, and Rate filters and behaviors, and paste them into the ring_soft_in_80_rgb layer.
Navigate to frame 24 of the sequence.
To spice up this element, the client suggests that you change the color to match the red of the bike, and elongate the edge of the ring to more of an oblong, stretching out the shape in front of the wheel.
For the ring_soft_in_80_rgb layer, select the Colorize filter. In the HUD, click the eyedropper to the right of Remap White To, and in the Canvas, click a bright red on the bike.

Navigate to around frame 30 of the sequence. In the Canvas, select the red ring and drag out the left edge of the ring to 133%.

If you play the sequence, you will find that the red ring looks good, although its rotation rate is higher than necessary.
In the ring_soft_in_80_rgb layer, select the Rate behavior, and drag the Rate slider to -6°.

The rate is much more appropriate now, but the ring is facing in the wrong direction. You can quickly reverse the angle by rotating the Y-axis.
In the Properties tab of the Inspector, click the Rotation parameter disclosure triangle to display the options, if they aren’t already visible, and set Y rotation to -180°.
Play the sequence and save.
You’ve made a lot of progress, but to augment the technical callout to the calipers, the client would like you to use their last element, the tick field. This still image consists of a series of simple white crosshairs that the client has used in other print collateral. They feel it will add to the design sense of the piece in a “Look, we designed this especially for you” way.
Go to the start of the sequence.
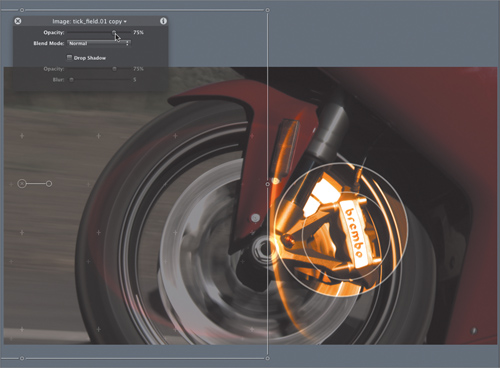
In the File Browser, navigate to Motion3_Book_Files > Media > Ducati. Drag tick_field.01.psd into Group in the Layers tab.
The tick field is all over the footage, so you’ll drag it down to the bottom left corner of the composition’s frame and bring down the opacity so that it doesn’t dominate the design.
In the Canvas, drag the tick_field.01 layer to the left corner of the frame, and in the HUD, set Opacity to 50%.

In the Canvas, click the Add Behavior icon and choose Basic Motion > Fade In/Fade Out. Drag the Fade Out duration to 8 frames.
Your ticks might look a little too subtle for the client, so you’ll duplicate and rescale the tick field to beef it up a little.
In the Layers tab, duplicate the tick_field.01 layer, and then move the playhead to frame 20 of your project
In the Canvas, drag the duplicate layer up and to the right. In the HUD, set the Opacity slider to 75%.
Go to the start of the sequence and play it.
Excellent. It’s finally time to place your text. Before you do so, however, consolidate your groups to help keep the project organized.
In the Layers tab, rename the Group layer to Lightsweep feature.
In the Layers tab, drag the Lightsweep feature group onto the Tracked Graphics group.
You have gathered all your graphical elements into one place.
Close all open groups and save the project.
To complete your composition, the all-important label or text element needs to be added. Also adding a couple of subtle movement behaviors and a little glow to match the orange shade in your circle highlight work will give it all a nice finishing touch.
Create a new Group in the Layers tab and rename it Text.

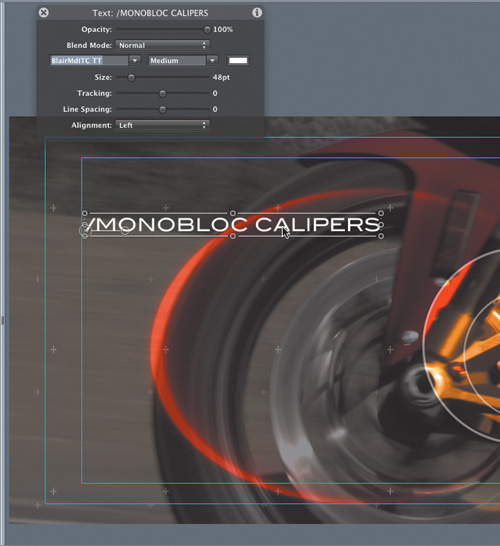
Choose the Text tool; then, in the Canvas, enter /MONOBLOC CALIPERS. Press Esc to exit text entry.
In the HUD, set the font to BlairMdITC TT and set Size to 48 points.

Press ‘ (apostrophe) to display the Safe Zones boundaries. In the Canvas, drag the text object to a position just within the Title Safe area to the left and within the tire vertically.
In the Canvas, click the Add Behavior icon and choose Text-Move > Slide In from Right.
In the mini-Timeline, go to frame 11 and set an Out point for the Slide In from Right behavior.
In the Canvas, click the Add Behavior icon and choose Basic Motion > Throw.
In the HUD, drag the arrow for the Throw a small distance to the left.
You don’t need the text to scream out of the frame; you’re looking for a subtle move to mimic the bike’s movement.
Go to frame 5 in the sequence, and in the Toolbar, click the Add Behavior icon and choose Text Animation > Sequence Text.
The look the client wants cannot be achieved using one of Motion’s supplied behaviors. You are going to add a nice glow that flows over each letter, using the customization feature of the Sequence Text behavior.
In the Behaviors tab of the Inspector, click the Add pop-up menu to the right of Parameter and choose the following four parameters:
Add > Glow > Color
Add > Glow > Blur
Add > Glow > Radius
Add > Glow > Scale

Set the following values:
Color to Orange
Blur to 13
Radius to 19
Scale to 105
For the orange shade, you can either sample an orange from the circles in the Canvas or choose a similar shade of orange in the pop-up Color palette.

Finally, you need a quick fade-out on your text element to complete its look.
In the Layers tab, select the /MONOBLOC CALIPERS layer, and in the Canvas, click the Add Behavior icon and choose Basic Motion > Fade In/Fade Out.
In the HUD, drag the Fade In to 0 and the Fade Out to 8 frames.
Go to the start of the sequence and play it.
Save the project.
Your composite has achieved the client’s goals. You have smoothed out a rather bumpy piece of footage and added graphic elements and text, all in a manner that feels integrated and whole.
This is the joy of tracking.
A lot of very serious math is going on in the background, all to give you points and tracks that you can pin your materials to. The elegant integration of your graphics, titles, and video elements into the background plate is greatly enhanced using a tool that offers simplicity as well as customization when you need it.