
IN THIS CHAPTER
Server behaviors are the heart of Dreamweaver, the essential engine that puts the dynamic in dynamic Web applications. Server behaviors insert server-model–specific code that handles everything from displaying dynamic data to authenticating users. Even the basic data source connection and the establishment of a recordset are, in reality, server behaviors. Without server behaviors, no dynamic capabilities would be possible in Dreamweaver.
Server behaviors are valuable for novices and veteran coders alike. They enable designers who have never heard of an ASP Request collection to gather information from a form—a procedure that utilizes the ASP Request collection—with point-and-click ease. Even serious code jockeys can appreciate the productivity potential of server behaviors, especially the capability to create their own. With the Server Behavior Builder, programmers can build a library of their custom functions, complete with fully functional dialog boxes for maximum flexibility. After these functions are crafted, you can drop any of the custom server behaviors directly onto the page—and, if need be, easily alter the parameters.
This chapter includes an overview of server behaviors as well as basic information about their use and management. For your reference, you also find a detailed description of each of the standard Dreamweaver server behaviors. Finally, you look at ways to extend Dreamweaver's core functionality with the Server Behavior Builder.
In contrast to Dreamweaver's JavaScript behaviors—with their numerous required functions and many more optional ones—a server behavior may be as simple as one line of code. The difference, and it's a key one, is that the code is intended to be executed by the application server, not the browser.
Another difference between server behaviors and JavaScript behaviors is that server behavior code may exist outside the bounds of the HTML page. Any page with a recordset has a section of code before the opening <html> tag, and a smaller block of code after the closing </html> tag. Dreamweaver automatically places the code in the proper place—and code placement is very important on the server side—when any of its standard server behaviors are used. Dreamweaver includes more than 25 standard server behaviors; the exact number varies for each server model. Figure 34-1 displays the available server behaviors for ASP.
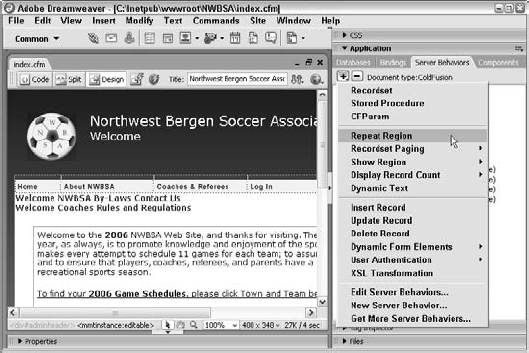
The Server Behaviors panel is the focal point for inserting, removing, and managing server behaviors. Unlike the Behaviors panel, which only displays the JavaScript behaviors attached to the selected tag, the Server Behaviors panel displays all the server behaviors included in the current page, in the order in which they were applied. Selecting a specific server behavior listed in the Server Behaviors panel highlights the attached page element, if visible in the Document window. Some server behaviors, such as Recordset, have their own Property inspector, whereas others display dynamic code as an attribute in a text or other Property inspector.
Although the simplest server behaviors can insert code without any additional user input, each built-in server behavior has a dialog box for specifying parameters. These vary in complexity from a single drop-down list to multiple-section dialog boxes with every type of input element available. As you learn in the next section, after you have inserted a server behavior, you can easily modify its parameters.
If you have ever completed any Web applications in Dreamweaver, you've likely already discovered how to apply and update a server behavior. The Server Behaviors panel is the primary tool for inserting, modifying, and removing server behaviors. You can display the Server Behaviors panel in several ways:
Choose Window

Select the Server Behaviors tab from the Application panel.
Use the keyboard shortcut, Ctrl+F9 (Command+F9).
The Server Behaviors panel remains available regardless of whether you are in Design view, Code view, or the split-screen Code and Design view.
To add a particular server behavior to your page, click the Add (+) button in the Server Behaviors panel and select the desired behavior from the list. Many of the server behaviors have prerequisites that must be in place—such as a recordset, form, or selected element—before they can be installed, but these requirements vary from server behavior to server behavior. If you attempt to insert a server behavior and some precondition has not been met, Dreamweaver alerts you to the missing element; you are prevented from inserting the server behavior until all the required pieces are in place.
After you select the server behavior from the Add drop-down list, a dialog box appears to enable you to select or enter the needed parameters. Each dialog box is specific to the chosen server behavior, and they vary widely in terms of parameters offered and complexity. For information about a specific server behavior, see the corresponding section for that server behavior later in this chapter. Each section provides step-by-step explanations about completing the pertinent dialog box.
Removing an existing server behavior is simple. Select the entry for the server behavior in the Server Behaviors panel and click the Remove (–) button. Dreamweaver immediately removes all the associated code without requesting confirmation.
Warning
With JavaScript behaviors, if you delete a page element that has a client-side behavior attached, you automatically delete that behavior. This is not always the case with server behaviors, and it's best to always use the Server Behaviors panel's Remove (–) button before deleting any associated text, graphics, or form elements.
To modify the attributes or parameters of an inserted server behavior, double-click its entry in the Server Behaviors panel. You can differentiate between multiple applications of the same server behavior in two ways. First, the entry for each server behavior lists one or two of its key attributes in parentheses. For example, a Dynamic Text server behavior applied to the LastName column in the rsMaillist recordset is displayed as follows:
Dynamic Text(rsMaillist.LastName)
Second, you can tell which server behavior is associated with which page element by selecting the server behavior—the associated text, graphic, or other page element is also selected in Design or Code view.
When the dialog box for a server behavior reopens, you can alter any of the parameters that remain active. In some situations, as with the Go To Detail Page server behavior shown in Figure 34-2, one or more fields may be disabled and so rendered unable to be changed. If you need to alter a disabled parameter, delete the server behavior and reapply it.

Dreamweaver ships with more than 25 server behaviors, and it offers the option to add many more. The default server behaviors are geared toward handling basic Web application tasks such as repeating an area and inserting records in a data source.
In the following sections, each server behavior is briefly described, along with any prerequisites. Step-by-step instructions for including the server behavior are provided; for more contextual information on using the particular server behavior, see the cross-referenced chapter.
To create a simple recordset, follow these steps:
From the Server Behaviors panel, click the Add (+) button and choose Recordset (Query) from the drop-down list. The Recordset dialog box, shown in Figure 34-3, is displayed.
In the Recordset dialog box, enter an identifying label for your recordset in the Name field. It's considered good practice to prefix your recordset name with
rs—as inrsDBA. This prefix quickly identifies the recordset in the code.Select a connection from the drop-down list of that name.
If the desired connection has not been declared, choose Define to open the Connections dialog box. After a connection has been selected, the available tables are shown.
Select a table to work with from the Tables drop-down list. The chosen table's fields are displayed in the Columns list.
By default, all the columns are included in the recordset. To specify certain columns, choose the Selected option and select any desired field. Shift+click to select contiguous columns, and Ctrl+click (Command+click) to select noncontiguous columns.
By default, all the records in the selected columns are available. To limit the recordset further, use the four Filter drop-down lists as follows:
Choose the field on which you want to base your filter from the first drop-down list. This list changes dynamically according to which table you've selected.
From the second drop-down list, select the expression with which to compare the data from the selected column in the first drop-down list. Available expressions are =, >, <, >=, <=, <>, begins with, ends with, and contains.
Choose the type of value to compare to the selected field from the third drop-down list. Available types are URL Parameter, Form Variable, Cookie, Session Variable, Application Variable, and Entered Value.
In the fourth input field, enter the value to compare to the selected field. Values entered are not case-sensitive.
To sort the data, select a column from the first drop-down list under Sort and choose either Ascending or Descending from the second list.
At any time, you can see what results will be returned for the recordset by clicking Test.
Tip
To see how your simple recordset translates into SQL, click the Advanced button. You can return to the original dialog box by clicking Simple on the advanced Recordset dialog box.
Click OK when you're finished.

Note
For more information on defining recordsets, see Chapter 19.
The Repeat Region server behavior replicates a selected page area as many times as specified. If the Repeat Region surrounds dynamic data, the record pointer advances for each repetition. A tab and highlight note the boundaries of the Repeat Region when Invisible Elements is enabled.
Requirements: One or more selected page elements, such as a table row or a line ending in a line break tag (<br>).
To implement a Repeat Region, follow these steps:
Select the dynamic data and the surrounding code you'd like to repeat.
From the Server Behaviors panel, click the Add (+) button and select Repeat Region from the list.
The Repeat Region dialog box, shown in Figure 34-4, appears.
From the Repeat Region dialog box, choose the recordset you want to work with from the Recordset list.
If you want to display a subset of the recordset, enter the number of records you'd like to display in the Show Records field.
If you want every record in the recordset to be displayed, choose the Show All Records option.
Click OK when you're done.

Note
For more information on the Repeat Region server behavior, see Chapter 21.
The Recordset Paging server behaviors move the record pointer to the indicated data record in a given recordset. They are frequently used in combination to navigate through a recordset. In all, five Recordset Paging server behaviors exist; however, you insert the following four in an identical fashion:
Move To First Record
Move To Previous Record
Move To Next Record
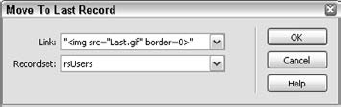
Move To Last Record
The fifth server behavior in this category, Move To Specific Record, uses a different procedure, which is covered in the following section.
Requirements: A selected page element and at least one recordset with more than one returned row.
To use any of the four basic Recordset Paging server behaviors, follow these steps:
Select the text or image to which you'd like to attach the server behavior.
From the Server Behaviors panel, click the Add (+) button and choose the desired behavior from the Recordset Paging submenu. The appropriate Recordset Paging dialog box appears. Your selection is highlighted in the Link list, as shown in Figure 34-5.
Make sure that the link selected is one of those showing in the Link list.
Choose the recordset you want to work with from the Recordset drop-down list.
Click OK when you're finished.
Note
For more information on these Recordset Paging server behaviors, see Chapter 21.
The Move To Specific Record server behavior is used after a recordset has been created to navigate through the records. To use the Move To Specific Record server behavior (not available in ColdFusion or PHP), follow these steps:
Select the text or image to which you'd like to attach the server behavior.
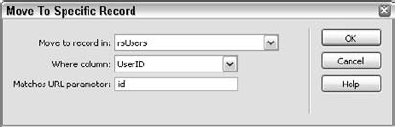
From the Server Behaviors panel, choose Move To Specific Record from the Recordset Paging submenu. The Move To Specific Record dialog box is displayed, as shown in Figure 34-6.
Select the desired recordset from the list labeled Move To Record In.
Choose the field referenced in the URL parameter from the Where Column field.
Enter the variable in the URL parameter in the Matches URL Parameter field.
Click OK when you're finished.
Note
For more information on the Move To Specific Record server behavior, see Chapter 23.
The Show Region server behavior displays an area of the screen if a particular condition is true. These are often called conditional regions. A different set of server behaviors applies for each server model.
ColdFusion and PHP:
Show If Recordset Is Empty
Show If Recordset Is Not Empty
Show If First Page
Show If Not First Page
Show If Last Page
Show If Not Last Page
ASP.Net C# and ASP.Net VB:
Show If DataSet Is Empty
Show If DataSet Is Not Empty
Show If First Page
Show If Not First Page
Show If Last Page
Show If Not Last Page
JSP, ASP JavaScript, and ASP VBscript:
Show Region If Recordset Is Empty
Show Region If Recordset Is Not Empty
Show Region If First Record
Show Region If Not First Record
Show Region If Last Record
Show Region If Not Last Record
Requirements: One or more selected page elements and at least one recordset.
Applying a Show Region server behavior is straightforward. Just follow these steps:
Select the page area you'd like to show conditionally.
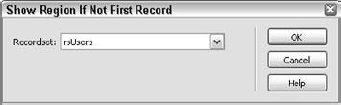
From the Server Behaviors panel, click the Add (+) button and select one of the server behaviors from the Show Region submenu. The dialog box for the specific Show Region server behavior you chose is displayed, like the one shown in Figure 34-7. The dialog boxes for all the Show Region server behaviors are identical.
Select the recordset on which to base the Show Record condition from the Recordset list.
Click OK when you're finished.
Note
For more information on the Show Region server behavior, see Chapter 21.
The Go To Detail Page server behavior is used in master-detail Web applications to navigate from a chosen link on the master page to a designated detail page. This server behavior passes a unique record ID via the URL query string method. The Go To Detail Page server behavior isn't available in ColdFusion, .NET, or PHP.
Note
For more on master-detail Web applications, see Chapter 23.
Requirements: A selected page element and at least one recordset.
To attach a Go To Detail Page server behavior, follow these steps:
Select the page element—text, graphic, or dynamic data—you'd like to use as the link to the detail page.
From the Server Behaviors panel, click the Add (+) button and select Go To Detail Page from the drop-down list. The Go To Detail Page dialog box, shown in Figure 34-8, is displayed.
Make sure that the page element selected is represented in the Link field. If no selection was made, Dreamweaver creates a new Detail text link.
Enter the path to the detail page in the Detail Page field or click Browse to locate the file in the Select File dialog box.
Enter the variable name you'd like to be sent in the Pass URL Parameter field. You can use a name of your own choosing or the name of the field in the database. Whichever name you decide upon, make a note of it somewhere because you need to reference it when the detail page itself is constructed.
Select the recordset of the URL parameter from the Recordset list.
From the Column list, choose the field to which the URL parameter's value is related.
Unless you have preexisting URL or Form parameters to send to the detail page, leave the Pass Existing Parameters options unchecked.
Click OK when you're finished.

Note
For more information on the Go To Detail Page server behavior, see Chapter 23.
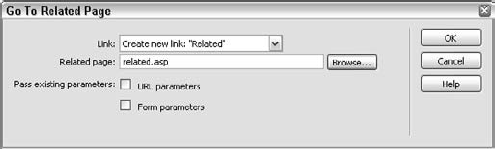
The Go To Related Page server behavior links to a new page that conveys the form and/or URL variables previously passed to the current page.
Requirements: A selected page element and at least one recordset. The page on which the server behavior is inserted must have had form or URL values passed to it.
To attach a Go To Related Page server behavior, follow these steps:
Select the page element—text, image, or dynamic data—you'd like to use as the trigger for your behavior.
From the Server Behaviors panel, click the Add (+) button and select Go To Related Page from the list. The Go To Related Page server behavior dialog box appears, as shown in Figure 34-9.
In the dialog box, verify that the text or code for the selected element displayed in the Link field is correct.
Enter the path to the target page in the Related Page field or click Browse to locate an existing dynamic page.
If you want to carry over values received from a query string, select the URL Parameters option.
If you want to pass values received from a form, select the Form Parameters option.
Click OK when you're finished.
Note
For more information on the Go To Related Page server behavior, see Chapter 23.
The Insert Record server behavior adds a new record to a chosen table in a data source.
Requirements: A form with form elements and a Submit button.
To add the Insert Record server behavior, follow these steps:
From the Server Behaviors panel, click the Add (+) button and select Insert Record. The Insert Record dialog box appears, as shown in Figure 34-10.
From the Insert Record dialog box, choose the connection from the drop-down list. If you need to establish a new connection, click Define.
Select the data table you want to use from the Insert Into Table list.
Enter the path to the destination page in the After Inserting, Go To field, or click the Browse button to locate the file. It's important that you select a confirmation or other page to go to after the form is submitted. If you don't, no feedback is provided to the user, and no change is apparent.
Select the name of the form to be used from the Get Values From list. If there is only one form on the page, the form is preselected.
For each object listed in the Form Elements area:
Select the data source field into which the form object's value is to be inserted from the Column list.
Choose the data source type for the data from the Submit As list. The options are Text; Numeric; Date; Date MS Access; Checkbox Y, N; Checkbox 1,0; Check −1,0; and Checkbox MS Access.
Note
Be sure to give your form fields meaningful names so you can easily choose which form field goes into each database column.
Click OK when you're finished.

Note
For more information on the Insert Record server behavior, see Chapter 23.
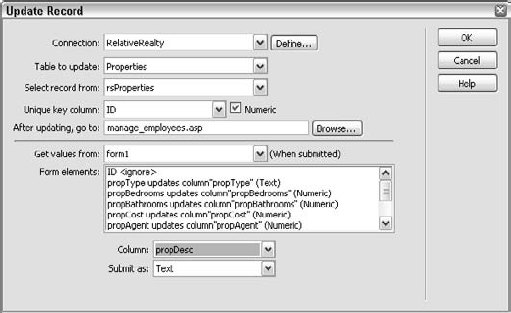
Use the Update Record server behavior to modify existing records in a data source.
Requirements: A recordset, a form with form elements linked to the dynamic data, and a Submit button.
To insert an Update Record server behavior, follow these steps:
From the Server Behaviors panel, choose Update Record. The Update Record dialog box appears, as shown in Figure 34-11.
From the Update Record dialog box, choose a connection from the drop-down list. To establish a new connection, click Define.
Select the data table you want to use from the Table to Update list.
Choose the data source on which to base your update from the Select Record From list.
Select the key field from the Unique Key Column list. Dreamweaver attempts to detect whether the field is a number type and, if so, selects the Numeric option.
Enter the path to the destination page in the After Updating, Go To field or click the Browse button to locate the file.
Select the name of the form to be used from the Get Values From list. If there is only one form on the page, the form is preselected.
For each object listed in the Form Elements area:
Select the data source field into which the form object's value is to be inserted from the Column list.
Choose the data source type for the data from the Submit As list. The options are Text; Numeric; Date; Date MS Access; Checkbox Y, N; Checkbox 1,0; Check −1,0; and Checkbox MS Access.
Click OK when you're finished.
Note
For more information on the Update Record server behavior, see Chapter 23.
The Delete Record server behavior is used to remove existing records from a data source.
Requirements: A recordset, a form, and a Submit button.
To attach a Delete Record server behavior to a form, follow these steps:
Make sure that a form exists on a dynamic page that includes at least one recordset.
From the Server Behaviors panel, choose Delete Record. The Delete Record dialog box is displayed, as shown in Figure 34-12.
From the Delete Record dialog box, choose a connection from the drop-down list. If you need to establish a new connection, click Define.
Select the data table you want to modify from the Delete From Table list.
Choose the data source on which to base your update from the Select Record From list.
Select the key field from the Unique Key Column list. Dreamweaver attempts to detect whether the field is a number type and, if it is, selects the Numeric option.
Enter the path to the destination page in the After Deleting, Go To field or click the Browse button to locate the file.
Choose the form that contains the Delete button.
Click OK when you're finished.

Note
For more information on the Delete Record server behavior, see Chapter 23.
The World Wide Web is all about accessing information from anywhere in the world. Sometimes, however, you need to restrict access to certain areas of your site to authorized users. Dreamweaver supplies a full complement of server behaviors to support authenticating the user against a specified data source. The user authentication server behaviors are not available for .NET.
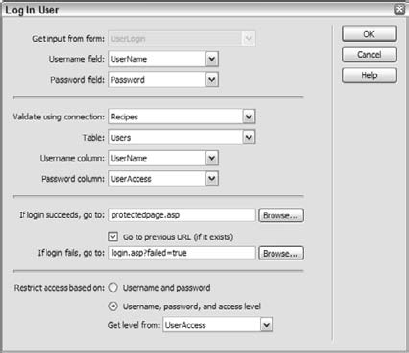
The Log In User server behavior redirects authorized users to one page and unauthorized users to another and creates a session variable for the username.
Requirements: A recordset, a form, appropriate form elements for a username and a password, and a Submit button.
From the Server Behaviors panel, click the Add (+) button and choose User Authentication
If there is more than one form on the page, select the form containing the username and password fields from the Get Input From Form list.
Select the form element used to gather the username from the Username Field list.
Select the form element used to gather the password from the Password Field list.
Choose a connection to the data source containing the table of registered users from the Validate Using Connection list.
Select the table of registered users from the Table list.
Choose the field containing the username from the Username Column list.
Choose the field containing the password from the Password Column list.
Enter the path to the page for the authorized user in the If Log In Succeeds, Go To field.
If you want the user to proceed to the previously selected link, rather than the page entered in step 9, select the Go To Previous URL option.
Enter the path to the page for the unauthorized user in the If Log In Fails, Go To field.
If access levels should be evaluated as part of the authentication:
Select the Restrict Access Based On Username, Password, and Access Level option.
Choose the data source field containing the access level data from the Get Level From list.
Click OK when you're finished.
Note
For more information on the Log In User server behavior, see Chapter 23.
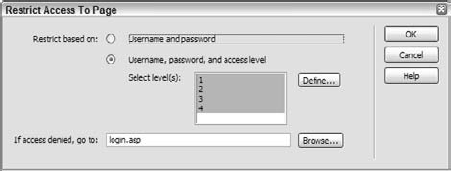
The Restrict Access To Page server behavior prevents unauthorized users from viewing specific pages by checking a session variable. After it is defined, the server behavior can be copied and pasted onto another page by using the context menu commands from the Server Behaviors panel.
Requirements: A dynamic page.
To apply the Restrict Access To Page server behavior, follow these steps:
From the Server Behaviors panel, click the Add (+) button and choose User Authentication
If you don't want to restrict admission by access levels, be sure that the Restrict Based On Username and Password option is selected.
To set group permissions for the page:
Choose the Restrict Based On Username, Password, and Access Level option.
Choose one or more groups from the Select Level(s) area.
To add new groups to the Select Level(s) list:
Click Define. The Define Access Levels dialog box opens.
Enter the name for the access level in the Name field. The name must match a value stored in your data source in whichever column is designated for the group access levels.
To add additional levels, click the Add (+) button and enter another name.
To delete any levels, choose the level in the list area and click the Remove (–) button.
Click OK to close the Define Access Levels dialog box.
Enter the path to the file to which you want to redirect unauthorized users in the If Access Denied, Go To field. Alternatively, click the Browse button to locate the file.
Click OK when you're finished.
Note
For more information on the Restrict Access To Page server behavior, see Chapter 23.
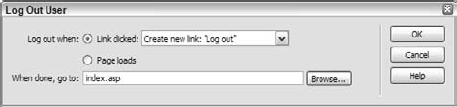
The Log Out User server behavior clears the username session variable established by the Log In User server behavior and redirects the user to an exit page. You can set up the Log Out User server behavior so that a user selects a link to log out or is automatically logged out when a particular page, such as one confirming the completion of an order, is viewed.
Requirements: A Log In User server behavior on another page.
To use the Log Out User server behavior, follow these steps:
To apply the server behavior to a specific link on the page, select that link.
From the Server Behaviors panel, click the Add (+) button and choose User Authentication
To trigger the server behavior with a link, choose the Log Out When Link Clicked option and make sure that your selected link is chosen in the list. If no link was preselected, Dreamweaver offers to apply the server behavior to a new link, Log Out.
To automatically log out users when the current page is viewed, select the Log Out When Page Loads option.
If you're using a link as a trigger, enter the path to the destination page in the When Done, Go To field. Alternatively, click the Browse button to locate the file.
Warning
Do not use the When Done, Go To option if you are automatically logging out a user when the page loads. If you do, the user never sees the current page.
Click OK when you're finished.
Note
For more information on the Log Out User server behavior, see Chapter 23.
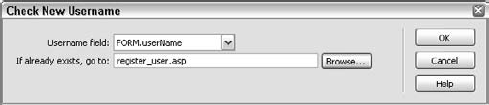
The Check New Username server behavior verifies that the requested username is not already in the data source, redirecting the user if it is.
Requirements: An Insert Record server behavior, a form, and appropriate form elements.
From the Server Behaviors panel, click the Add (+) button and choose User Authentication
Select the form element that contains the requested username from the Username Field list. If a form element is called USERNAME, Dreamweaver automatically selects that entry.
In the If Already Exists, Go To field, enter the path to the file you want a user to see if the name the user requests is already stored in the data source. You can also click Browse to locate the file.
Click OK when you're finished.
Note
For more information on the Check New Username server behavior, see Chapter 23.
With one exception, dynamic elements in Dreamweaver refer to form elements, linked to a data source field. Data-connected form elements are typically used in Web applications that update records. The single exception is Dynamic Text, which is described in the following section. Dynamic Form Elements (which aren't available in .NET) are covered later.
Inserting a Dynamic Text server behavior is the same as dragging a field from a recordset on the Bindings panel onto the page. It's a matter of individual preference which technique you use; personally, I find dragging-and-dropping from the Bindings panel much faster and more intuitive than using the Dynamic Text server behavior.
Requirements: A dynamic page.
To use the Dynamic Text server behavior, follow these steps:
Place your cursor on the page where you'd like the dynamic text to appear.
From the Server Behaviors panel, choose Dynamic Elements
If necessary, expand the recordset or other data source to select the desired dynamic data.
Choose any necessary server format from the Format list.
Enter any required adjustments to the dynamic data in the Code field. In most situations, no changes are necessary.
Click OK when you're finished.

Note
For more information on adding dynamic text, see Chapter 23.
The Dynamic List/Menu server behavior binds data to one or more aspects of a drop-down list. Dynamic data from a recordset is typically bound to both the values and labels of a list or menu element; static values and labels may also be combined with the dynamic data. In addition, you have the option to dynamically set the selected value, a feature often used when updating a record.
Requirements: A list/menu form element and a recordset.
To link a drop-down list to dynamic data, follow these steps:
Insert a list/menu form element on a dynamic page with a recordset.
If you have more than one list/menu on the page, select the one you want to convert.
From the Server Behaviors panel, choose Dynamic Form Elements
Verify that the desired drop-down list is displayed in the Menu list.
In the Static Options box, add any nondynamic items you want to the top of the list menu. This could be something as simple as a label for the list menu or as complicated as a full URL with query strings for search pages.
Choose the recordset you want to work with from the Options From Recordset list.
Choose the field from your data source containing the items that you want displayed to the user from the Labels list.
Choose the field from your data source containing the items you want submitted by the user from the Values list.
To preselect an item, enter its value in the Select Value Equal To field or use the lightning bolt icon to choose a value from the established data sources.
Click OK when you're finished.

Note
For more information on the Dynamic List/Menu server behavior, see Chapter 23.
Unlike the Dynamic Text server behavior, the Dynamic Text Field server behavior is not just for show. The Dynamic Text Field server behavior is often used for applications that update records and may be applied to either a text field or text area form element. According to the server model used, the data in the text field can be formatted server-side in a number of ways, such as upper- or lowercase.
Requirements: A text field or text area form element and a recordset.
To link a text field or text area to dynamic data, follow these steps:
Insert a text field into a form on a page with a recordset or other data source. It's a good idea to name the text field and form at this point. Although you can always change the names later, naming the elements early on avoids problems later.
Select the text field.
From the Server Behaviors panel, choose Dynamic Form Elements
Warning
Be sure to choose Dynamic Text Field and not Dynamic Text from the Dynamic Elements submenu. If you select Dynamic Text while your text field is highlighted, the form element is replaced.
In the Dynamic Text Field dialog box that appears (see Figure 34-19), verify that the correct form element was chosen in the Text Field list. If necessary, choose a different text field.
Click the Set Value To lightning bolt icon to display the available data sources.
Choose a field from the Dynamic Data dialog box.
If desired, you can apply a server format to the data by choosing an entry in the Format list.
Click OK to close the Dynamic Data dialog box and, after reviewing your choices, click OK again to close the Dynamic Text Field dialog box.

Note
For more information on the Dynamic Text Field server behavior, see Chapter 23.
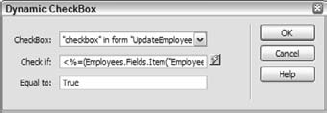
Checkboxes provide users with a method of selecting one or more options in a group; a Dynamic CheckBox server behavior marks any affiliated checkbox as selected if the desired criteria are met. This server behavior is often used in conjunction with a Boolean data field, also known as a True/False or Yes/No data field.
Requirements: A checkbox form element and a recordset.
To convert a static checkbox to a dynamic one, follow these steps:
Select a checkbox in a form on a page with a recordset.
From the Server Behaviors panel, choose Dynamic Form Elements
Verify that your selected checkbox is correctly named in the CheckBox list.
Click the Check If lightning bolt icon to display the available data sources.
Choose a field from the Dynamic Data dialog box.
If desired, you can apply a server format to the data by choosing an entry in the Format list. Click OK when you're finished to close the Dynamic Data dialog box.
Enter the value expected for a selected checkbox in the Equal To field. This value is data source–dependent. For many data sources, 1 is used to represent True; for others, a −1 is used. When working with Yes/No fields from Access databases, enter True; be sure to capitalize the word, because lowercase does not work properly.
Click OK when you're finished.
Note
For more information on the Dynamic CheckBox server behavior, see Chapter 23.
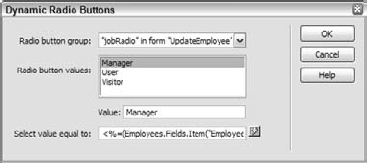
Radio buttons are employed in a form when the designer wants the user to make an exclusive choice among a set number of options. As with the Dynamic CheckBox server behavior, the Dynamic Radio Buttons server behavior is used to mark a particular element as selected when the defined criteria are met.
Requirements: Two or more radio button form elements and a recordset.
To link radio buttons to dynamic data, follow these steps:
Select a group of radio buttons on a dynamic page with an available data source.
From the Server Behaviors panel, choose Dynamic Form Elements
Verify that your selected form element is displayed in the Radio Button Group list.
In the Radio Button Values area, choose the first entry shown and, if necessary, change the Value field to reflect the expected data.
Repeat step 4 for every radio button in the group.
Click the Select Value Equal To lightning-bolt icon to display the available data sources.
Choose a field from the Dynamic Data dialog box. Be sure to select a data source field with values parallel to those entered in the radio button group.
If desired, you can apply a server format to the data by choosing an entry in the Format list. Click OK to close the Dynamic Data dialog box.
When you're finished, click OK to close the Dynamic Radio Buttons dialog box.
Note
For more information on the Dynamic Radio Buttons server behavior, see Chapter 23.
Many advanced Web applications use a stored procedure application object. Stored procedures are known under a variety of names: ASP users call them commands, whereas JSP developers know them as callables; only ColdFusion users refer to them solely as stored procedures. Stored procedures are complete SQL queries that may return recordsets or other data. Stored procedures are often used for complex data source management such as inserting new tables on-the-fly.
Stored procedures are created and compiled in the data source itself, such as Microsoft's SQL Server. Because they are precompiled, they execute faster than similar SQL statements entered directly into the Web application. Stored procedures, like recordsets, can be defined as a data source through either the Bindings panel or the Server Behaviors panel.
To define a stored procedure as a data source through the Server Behaviors panel, follow these steps:
From the Server Behaviors panel, click the Add (+) button and, depending on your server model: for ASP, choose Command (Stored Procedure); for ColdFusion, choose Stored Procedure; and for JSP, choose Callable (Stored Procedure). The stored procedure dialog box for the appropriate server model is displayed; for example, Figure 34-22 shows the Command dialog box seen by JSP users.
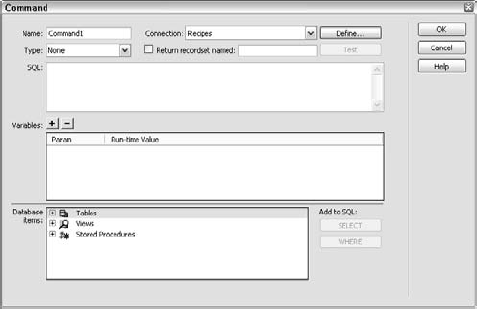
Figure 34-22. Stored procedures must be included in the data source before they can be added as a data source in Dreamweaver.
Note
Stored procedures and the variables necessary to use them are database- and server model–dependent. A stored procedure on SQL server is completely different from a ColdFusion stored procedure or another SQL-type database. The Stored Procedure/Command/Callable dialog box may change based on the type of database to which you're connecting, as well as the server model.
In the Command/Callable/Stored Procedure field, enter a unique name.
From the Connection list, choose the connection in which this stored procedure may be found.
ASP users should choose Stored Procedure from the Type list.
Note
The ASP Command (Stored Procedure) server behavior includes additional types: Insert, Update, and Delete. These work identically to the Prepared (Insert/Update/Delete) server behavior described in the following section on JSP server behaviors.
If the stored procedure returns a recordset, choose the Return Recordset option and enter a name in the Returned Recordset Named field.
From the Database Items area, expand the Stored Procedure list and choose the desired stored procedure. It's a good idea to click Test to be sure your connection is working properly at this point.
To modify the stored procedure, select any other element in the Database Items area and click the Column or Where button.
Enter any necessary variables by clicking the Add (+) button in the Variables area and entering the values under each column: Name, Type, Direction, Size, Default Value, and Runtime Value.
Click OK when you're finished.
A number of server behaviors are only available for sites based on the JSP server model. An important feature of JavaServer Pages is the capability to use JavaBeans. JavaBeans are Java components or classes that process events and transmit results to the calling program and other JavaBeans. Dreamweaver offers two JavaBean-related server behaviors: JavaBean and JavaBean Collection.
JSP users may employ what's referred to as a Prepared command to insert, update, or delete data sources.
To use a Prepared command, follow these steps:
From the Server Behaviors panel, click the Add (+) button and choose Prepared (Insert/Update/Delete) from the list. The Prepared (Insert/Update/Delete) dialog box, shown in Figure 34-23, is displayed.
In the Name field, enter a unique name that will appear in the Server Behaviors panel.
From the Connection list, choose the connection in which your stored procedure may be found.
Select the prepared statement you want to insert from the Type list: Insert, Update, or Delete. Dreamweaver inserts appropriate code into the SQL area for each selection.
Complete the SQL code manually by entering columns and values in the SQL area.
As an alternative to manually entering the column names in the SQL statement, you can select any other element in the Database Items area and click the Select or Where button to insert them.
Enter any necessary variables by clicking the Add (+) button in the Variables area and entering the values under each column: Param and Runtime Value.
Click OK when you're finished.

To insert a JavaBean as a data source, follow these steps:
From the Server Behaviors panel, click the Add (+) button and select JavaBean from the list. The Java Bean dialog box, shown in Figure 34-24, is displayed.
If desired, enter a unique name in the Name field.
Set how the JavaBean variables may be accessed. Methods include selecting a Scope: page, request, session, or application.
Select a JavaBean class from the Class field or click the Browse button to locate the file. JavaBeans may be in CLASS (
.class), ZIP (.zip), or JAR (.jar) files.To set the default value of any of the bean's properties, select the item from the Properties area and enter a new value in the Default Value field. To set the default value to dynamic value, click the lightning-bolt icon.
Click OK when you're finished.

To insert a JavaBean Collection as a data source, follow these steps:
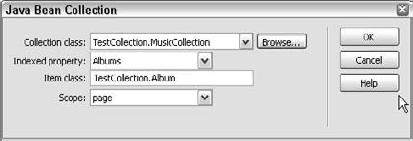
From the Server Behaviors panel, click the Add (+) button and choose JavaBean Collection from the list. The JavaBean Collection dialog box, shown in Figure 34-25, is displayed.
Select a JavaBean class from the Class field or click the Browse button to locate the file.
Select an Indexed Property to use from the list.
Make sure that the Item Class entered by Dreamweaver is correct, modifying it if necessary.
Set how the JavaBean variables may be accessed by choosing a Scope: page, request, session, or application.
Click OK when you're finished.
Two special server behaviors make displaying dynamic data quick and easy: DataGrid and DataList.
The DataGrid server behavior enables you to rapidly add an editable DataGrid to your page. The DataGrid can also include Insert, Update, and Delete buttons.
Requirements: One DataSet on the current page.
To add a DataGrid, follow these steps:
From the Server Behaviors panel, click the Add (+) button and select DataGrid from the list. The DataGrid dialog box, shown in Figure 34-26, is displayed.
In the ID field, enter a unique name that will appear in the Server Behaviors panel.
From the DataSet list, select the DataSet you want to display.
Enter the number of records to display in the Show box.
Choose the type of navigation from the Navigation list: Links to Previous and Next pages, or Numbered Links to Every Page.
In the Columns area, use the Add (+) and Remove (–) buttons to change the columns displayed in the DataGrid. You can add five different types of fields:
Simple Data Field
Free Form
Hyperlink
Edit, Update, Cancel Buttons
Delete Button
Click Edit to change the way a specific column is submitted to the database and displayed in the grid.
Click Change Column Type to change the type of a column already in the Columns list.
Click OK when you're finished.

Using the .NET DataList provides a quick way to add columnar or repeating data to your page.
Requirements: One DataSet on the current page.
To add a DataList, follow these steps:
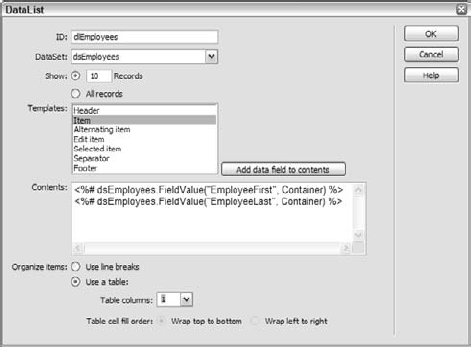
From the Server Behaviors panel, click the Add (+) button and choose DataList from the list. The DataList dialog box, shown in Figure 34-27, is displayed.
In the ID field, enter a unique name that will appear in the Server Behaviors panel.
From the DataSet list, select the DataSet you want to display.
Enter the number of records to display in the Show box.
The Templates box contains the seven template regions of the DataList. Select each region and enter the content to be displayed in the Contents box. Click the Add Data Field to Contents button to add data from your DataSet. The seven template regions are as follows:
Header: The style for the header at the beginning of the list (if any)
Item: The style for individual items
Alternating Item: The style for every other item (alternating item)
Edit Item: The style for the item being edited
Selected Item: The style for the selected item
Separator: The style for the separator between each item
Footer: The style for the footer at the end of the list (if any)
Use the Organize Items radio buttons to specify how to organize the list, either using line breaks or a table. Choosing Use a Table enables the table controls at the bottom of the dialog box.
If you've chosen Use a Table, specify a number of table columns and how to wrap the cell contents.
Click OK when you're finished.
Although Dreamweaver's standard cserver behaviors perform many important functions, they're just the tip of the iceberg in terms of what's possible. You can add additional server behaviors—whether created by Adobe, yourself, or a third party—at any time. Although you can transfer files to the appropriate places in the Dreamweaver Configuration folder, most custom server behaviors rely on the Extension Manager for installation.
The Extension Manager is an auxiliary program that installs files compressed in the Adobe Extension Program format; such files carry an .mxp file extension. To access the Extension Manager, choose Commands
The Web offers numerous sources for MXP files, but perhaps the best known is the Dreamweaver Exchange, located on the Adobe site. After you've downloaded the file, you can install it by following these steps:
From Dreamweaver, choose Commands
Tip
Dreamweaver need not be open for you to install an extension—just double-click the MXP file to invoke the Extension Manager and begin the installation process. However, if you have multiple Adobe products on your system, it's better to open the Extension Manager before beginning the installation.
From the Extension Manager, choose File
Use the Select Extension to Install dialog box to locate the desired MXP file.
When you've located the file, click Install (Open). As part of the installation process, Dreamweaver displays the Adobe Extensions disclaimer.
Click Accept in the Adobe Extensions Disclaimer dialog box to continue. Dreamweaver continues to install the extension, and alerts you if a problem is encountered or if the procedure was successful.
Dreamweaver notifies you if the installed extension requires you to restart Dreamweaver before it can be used.
After the server behavior has been properly installed, it appears in the standard list found under the Add (+) button of the Server Behaviors panel, and it can be applied like other server behaviors. Any special requirements or directions are noted in the bottom pane of the Extension Manager.
Dreamweaver provides a very sophisticated tool for creating custom server behaviors, the Server Behavior Builder. With the Server Behavior Builder, you can modify an existing server behavior you've created or create a new one from scratch. You can use the Server Behavior Builder in any server model configuration supported by Dreamweaver.
Tip
By default, you're not allowed to edit or copy the default Dreamweaver server behaviors. See the sidebar "Editing Existing Server Behaviors" to learn how to access all the built-in server behaviors.
The Server Behavior Builder breaks up any server behavior into discrete segments called code blocks. Each code block is surrounded by the delimiters for the particular server model: <%. . .%> for ASP, .NET, and JSP; <cftag>. . .</cftag> for ColdFusion; and <?. . .?> for PHP. Each code block may contain one or more user-supplied parameters. The user enters the parameters in a dialog box; the Server Behavior Builder even creates the dialog box for you.
The Server Behavior Builder can also control the positioning of any individual code block. On the server side, code is executed from the top of the page to the bottom, and it is often critical that a particular code segment follows another to be processed properly.
You have the option of modifying an existing server behavior, modifying a copy of an existing server behavior, or creating an entirely new server behavior. The process is about the same for all three methods:
Choose your server behavior. If it already exists, select it from the list; if it's new, give it a name.
Work in the Server Behavior Builder to modify and create code blocks and parameters. The Server Behavior Builder is also used for code block positioning.
Set up the dialog box for any parameters. The Generate Server Behavior Dialog Box command enables you to determine the type and order of any parameter elements.
To modify an existing server behavior, follow these steps:
From the Server Behaviors panel, click the Add (+) button and select Edit Server Behaviors from the list. The Edit Server Behaviors dialog box, shown in Figure 34-28, appears.

Figure 34-28. You can create server behaviors for different server models, regardless of the server model of the current site.
If you want to create a new server behavior, select New Server Behavior instead of Edit Server Behaviors and skip to step 4.
From the Server Model list, select the type of code you want to modify.
From the Server Behaviors list, select the specific server behavior you want to adapt. Dreamweaver posts a warning that if you are modifying a server behavior, the Server Behaviors panel may not be able to identify any instances of it already inserted into the current page. In this situation, it is strongly recommended that you choose New Server Behavior (see Figure 34-29) instead and create a different server behavior based on an existing server behavior.

Figure 34-29. When creating a new server behavior, you can either model it on an existing one or start fresh.
After selecting the desired server behavior, the Server Behavior Builder opens, as shown in Figure 34-30.
Highlight the code block you want to change.
Modify the code as desired in the Code Block area.
To insert a new parameter, place your cursor in the Code Block area where you want to place variable and click Insert Parameter in Code Block.
Tip
To replace a value with a variable, select the value in the Code Block before clicking Insert Parameter in Code Block.
Enter a unique name for the variable in the Parameter Name field of the Insert Parameter in Code Block dialog box. Click OK when you're finished. The new parameter is inserted in the following format:
@@parametername@@.Determine the positioning of the code by first choosing an option from the Insert Code list: Above the
<html>tag, Below the</html>tag, Relative to a Specific Tag, or Relative to the Selection.If you've chosen Insert Code: Relative to a Specific Tag, select the tag name from the Tag list that appears.
From the Relative Position list, select the option best suited for the code block.
If you've chosen Relative Position: Custom Position, enter a numeric value in the Custom Position field.
Warning
Positioning of code blocks is very important. In particular, make sure you don't insert code that depends upon a recordset above the code that creates that recordset.
Repeat steps 4 through 11 for every code block you need to modify.
Click the Advanced button, and choose how you want the server behavior to be displayed in the Server Behaviors panel. You can add or remove parameters to customize the display. If you don't want it to show in the Server Behaviors panel at all, uncheck the Identifier checkbox.
In the Code Block area, choose which code block you want Dreamweaver to select when it chooses from the Server Behaviors panel.
Click Next to proceed. If there are parameters in your server behavior, the Generate Behavior Dialog Box dialog box appears.
Set the position of your parameters by selecting an item in the list and using the up and down arrows.
Set the type of control for the parameter by choosing the down arrow next to the Display As column.
Dreamweaver offers 17 controls to choose from:
Recordset Menu
Recordset Field Menu
Editable Recordset Menu
Editable Recordset Field Menu
CF DataSource Menu
Connection Menu
Connection Table Menu
Connection Column Menu
Text Field
Dynamic Text Field
URL Text Field
Numeric Text Field
Recordset Fields Ordered List
Text Field Comma Separated List
List Menu
Checkbox
Radio Group
Note
If you choose List Menu, you must manually open the created server behavior file to populate the list menu.
The Text Field control is the default.
Click OK when you're finished.

Dreamweaver builds the new or modified server behavior and includes it in the Server Behaviors panel.
Server behaviors are, quite literally, essential to building dynamic pages in Dreamweaver. Without the server-side code that they insert, Web pages would just be static HTML. As you begin to investigate all that server behaviors can do for you, keep the following points in mind:
Although Dreamweaver provides many of the same server behaviors for ASP, ColdFusion, JSP, ASP.NET, and PHP, each server behavior outputs code specific to the site's chosen server model.
The Server Behaviors panel is the primary conduit for applying, removing, and modifying server behaviors.
After a server behavior has been inserted, you can modify the user parameters at any time by double-clicking the item in the Server Behaviors panel.
Server behaviors often have requirements—such as forms or other server behaviors—that must be in place on the page before they can be inserted.
Dreamweaver enables you to modify standard server behaviors. You can also create new ones based on the standard server behaviors or build them from the ground up with the Server Behavior Builder.