
Chapter 29. Deleted Data
Information in this chapter:
• How data is stored on a hard drive
• Deleted file recovery
• Evidence of data destruction
One of the foundations of digital forensics is data recovery. Luckily for digital forensics examiners, truly deleting data on digital devices, especially computers, is quite hard to do. This chapter explains the ins and outs of what a computer does when it deletes data, and the different ways it does so. Usually in digital forensics, it is not a matter of whether data still exists or is really gone. The black and white are thin lines bordering the chasm of grey when it comes to deleted data. Usually it is just a matter of to what degree the data has actually been deleted. This chapter will explain the different levels of deletion, such as the Recycle Bin and unallocated space, and how this data is recovered and used.
Keywords
Data Recovery, Data Destruction, File Carving, Unallocated Space
Introduction
One of the foundations of digital forensics is data recovery. Truly deleting data from a computer hard drive so that nothing is recoverable is quite hard to do. This chapter explains the ins and outs of how a computer stores data and what it does when it deletes data.
In digital forensics, it is rarely a case of whether some form of deleted data still exists; it is a matter of locating and recovering deleted data. This chapter will explain the different levels of deletion, such as the Recycle Bin and unallocated space, and how this data is recovered and used.
29.1. How data is stored on a hard drive
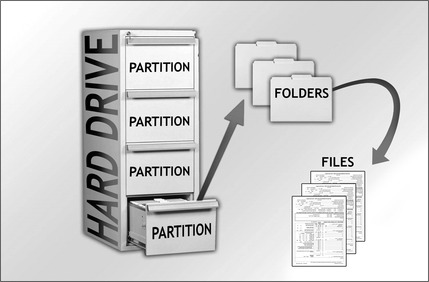
Think of a hard drive as a filing cabinet, with drawers, folders, and files. The cabinet itself would be the hard drive; and each of the drawers in the cabinet would be a partition or volume, with each partition containing folders and the folders containing files. Figure 29.1 is a visual representation of the filing cabinet paradigm.
Before a hard drive or any other data storage device can be used, it must prepared for use in a format that the operating system can recognize. In Microsoft Windows, the most common formats are FAT, FAT32, and NTFS. The Apple Mac file format and the Linux file formats are different from Windows, and Windows cannot read a disk formatted for a Mac or a Linux computer unless there is a special portion of the disk formatted in one of the Windows formats. However, the Mac operating system and the Linux operating system can read some or all of the Windows formats.
However, before a hard drive can be formatted, it must first be prepared at an even lower level by creating partitions on the hard drive or other media. A partition is a way of dividing up a hard drive or storage media so you can either apply different formats to each of the partitions, or use them for different purposes. Figure 29.1 shows this in a visual way, while Fig. 29.2 shows it in the way you would view this in Windows.

Figure 29.2 is a screenshot of the Microsoft Windows Disk Management application. This application allows the user to view the details of the hard drives installed in the computer. It also provides a simple and easy way to create partitions and format volumes. Disk 0 in this example is a 1-terabyte hard drive, divided into three partitions or volumes. Disk 1 is a 2-gigabyte USB stick with a single partition or volume.
You can also see in Fig. 29.2 that the two disks are formatted using different file systems. Disk 0 is formatted using the NTFS file system and Disk 1 is formatted using the FAT32 file system. By default, USB storage devices, smart cards, and other small-scale storage devices are formatted as FAT32 at the factory.
This USB drive will be used for our illustrations in this chapter by writing files to the drive, deleting the files on the drive, and then showing the recovery of those files.
The point of showing the screenshots in Figure 29.3, Figure 29.4 and Figure 29.5 is to illustrate that Windows cannot see deleted files. There is no special command or different view the user can switch to that will show deleted files on a drive. However, be aware that all of the data from the files deleted in this example is still present on the hard drive.
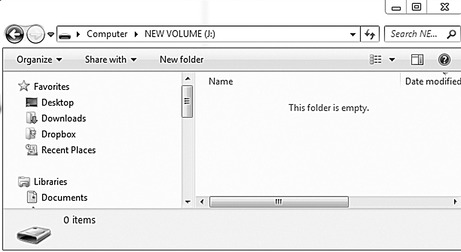
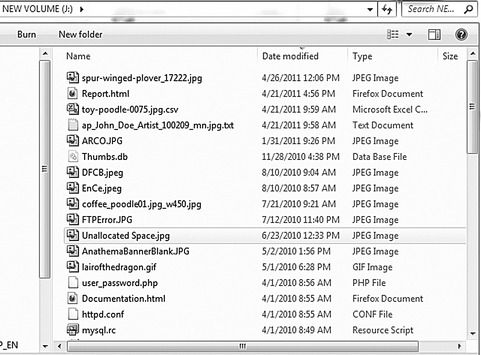

Figure 29.3 shows the empty USB drive as a user would see it in Windows.
In Fig. 29.4 we see how Windows sees the drive after we have copied files to it.
And lastly, Fig. 29.5 shows the same drive after all of the files were deleted, as viewed in the Microsoft Windows Explorer program.
29.1.1. Hard drive data storage structure
On a hard drive, the sectors are always the same size of 512 bytes. Depending on the file system used to format the hard drive, the sectors will be clumped together into clusters. For instance, in Windows NTFS, the standard size for a cluster is four sectors. This means that a cluster is (4×1024=4096) bytes. A cluster is the smallest unit the file system can use for saving data. Each of the clusters can be completely filled by the data from a file or only partially filled, leaving a little bit of space called file slack space.
29.1.1.1. A little computer storage math
Let’s say you have a file that is 4608 bytes in size. In order for the operating system to save the file, it will use one cluster for the first 4096 bytes and a second whole cluster of 4096 bytes for the last 2560 bytes.
Figure 29.6 shows a graphical illustration of this storage layout.
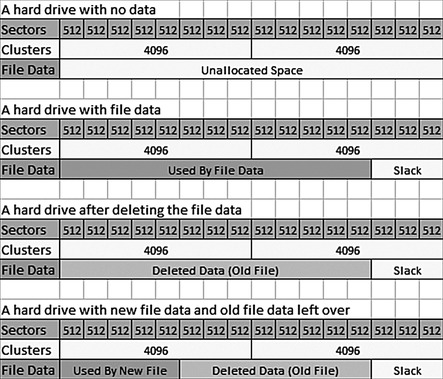
In Fig. 29.6 the first grid is an empty formatted hard drive. In the second grid, a file has been saved to the hard drive, filling one whole cluster and part of a second cluster. In the third grid, the file has been deleted, but the data is still present on the hard drive, but no longer viewable in Windows.
In the fourth grid, a new smaller file has been written to the same place as the old file. This leaves the data from the original file still on the hard drive in the area called slack space. The data in the slack space can be recovered by file carving. File carving is covered in the sections that follow.
29.2. Deleted file recovery
Recovering files or data from hard drives and other media that have been deleted is part and parcel of a forensic examination. Even if you are not interested in the contents of a particular file, it is sometimes critical to simply know that it was deleted. This can be used in a civil case to show spoliation if the file was deleted after a preservation order was issued.
29.2.1. Simple file recovery
The simplest method of file recovery is simply to open the Recycle Bin on the computer and restore the files. This is something any user can do.
However, if the user has emptied the Recycle Bin, Windows does not offer the user any other method for recovering their files. In Fig. 29.7 you see two views of a Recycle Bin, one with files still present and recoverable by the user and one of the Recycle Bin after the user empties it.

29.2.1.1. Simple file recovery using forensic software
The first method for recovering files uses information stored in the file system itself to locate deleted files. This will find files that have been recently deleted and that have not been damaged in some way by being partially overwritten by other files.
Figure 29.8 is a view of the drive in EnCase forensic software showing the file entries along with one of the pictures on the drive. This is an example of simple file recovery.
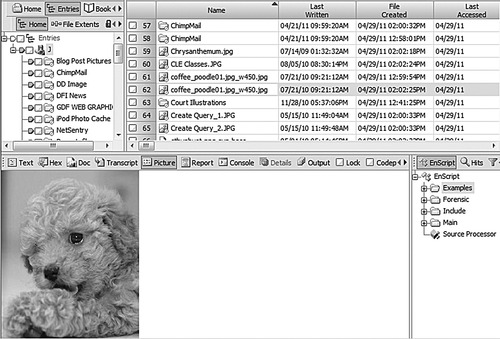
Figure 29.8 gives a listing of all of the deleted files that the forensic software can see without having to perform any special recovery operations, along with the dates and times that the files were written to the drive, when they were created or first appeared on the drive, and when they were last accessed. Since this USB stick is formatted as FAT32, you can only get the date it was last accessed, not the time. What is important to note from the screenshot in Fig. 29.8 is the Last Accessed time column. A file must be accessed to be deleted, and this will update the last accessed date.
Also, as shown in Fig. 29.8, if the files on the hard drive have only been recently deleted and removed from the Recycle Bin, forensic software can easily find deleted files.
29.2.2. Advanced file recovery: file carving
When an examiner is presented with a hard drive that does not reveal data of interest, there are several possible reasons for this. If the data was deleted at some time in the past and the files are partially overwritten, they will only exist in the area of the drive that is unallocated. If the drive has been reformatted to get rid of the data, then the data will only be in the unallocated space.
This is the part of the hard drive that the operating system considers available for use by any new data it needs to save to the hard drive.
In Fig. 29.7 we see a view of the USB hard drive in EnCase Forensic software showing the unallocated space. In the figure, the unallocated space is seen as the part of the image that has nothing in it except for the little bump in the center of the square. Each of the little squares shown in the upper-right panel of Fig. 29.9 is a sector. Sectors are covered later in this chapter.
29.2.2.1. File carving
A better view of how this works on a conceptual level is shown in Fig. 29.10. Think of the files in unallocated space as just like files that have been run through the office shredder.
 |
| Figure 29.10 |
What file carving does is to find the pieces of the deleted files in unallocated space and electronically tape them back together, in the same way you could try to find all the pieces of a paper document in a shredder bin and tape them back together.
Figure 29.11 shows what a file carved from unallocated space looks like in EnCase forensic software. The important take-away from this is that, as you will notice, all of the date and time information is missing. This is because files carved from unallocated space are not known in any way by the file system and no longer contain the file system metadata.

We can also see in Fig. 29.11 that while about 90 percent of the picture is back from the unallocated space, the software could not get all of it. This is very common when doing file carving because the operating system will eventually use the space on the hard drive for new files and overwrite all or part of any file that was previously deleted. However, it is typically enough to be used as evidence. All kinds of files can be recovered from unallocated space, not just pictures. Files such as e-mail, web pages, documents, and databases can all be recovered using file carving.
In a case where a husband suspected his wife of having an affair, he asked that the hard drive be examined for any evidence of e-mails, chat logs, or other documents that could confirm his suspicions. Initial examination of the hard drive did not reveal any information that would show that his wife was involved with anyone, at least based on the computer evidence. However, by carving files out of unallocated space from the hard drive using the suspected paramour’s e-mail address, web-based e-mails were located and produced that showed conversations between the wife and the suspected paramour of a very graphic nature along with planning to leave their current spouses to be together. This also led to locating the real name of the paramour and the location of her Facebook page showing her real information and pictures of her and her family.
29.3. Evidence of data destruction
In some cases, the lack of recoverable data is just as much evidence as having the data. However, to be cautious, it is very hard to prove a negative. A person can destroy data in many ways without physically destroying the storage device.
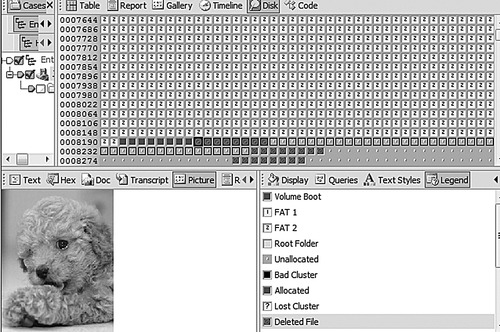
Data-wiping software is used to destroy data so that it cannot be recovered using forensic methods. This is accomplished by overwriting the sectors with ones, zeroes, or random data. Figure 29.12 shows the USB stick that has been used in these examples after it has been wiped using a disk-wiping program. The area in the bottom left of the pane is a view of the hard drive in hexadecimal. Notice that there is a continuous set of zeroes. To a forensic examiner, this is clear evidence that the drive has been wiped with disk-wiping software.

On the other hand, if someone on one side of a case is claiming that a person intentionally wiped a hard drive using disk-wiping software and the forensic examination does not show evidence of such, that is, the examiner does not find repeated patterns of ones, zeroes, or random data, then that is evidence of the opposite situation and can be used to dispute such a claim.
29.3.1. Physical destruction
Even when someone does attempt to destroy a physical storage device, the data may still be recovered in whole or in part. Physical destruction can happen intentionally or unintentionally. Simple hardware failure would be a good example of unintentional data destruction. However, hardware failure, fires, floods, and even intentional attempts to destroy data are not always the end of the story.
One case involved a client who brought a hard drive that had been sitting in a bucket of water in the backyard for over two years. Allowing the hard drive to dry out for a few days was all that was necessary to bring the drive into working order. Examination of the drive revealed evidence of an affair that the husband had thought was long gone and unrecoverable. This is because hard drives are completely sealed to keep out even the tiniest speck of dust. Unless the seals on the hard drive are broken, fresh water will not damage the drive in such a short period of time.
If the electronics board on the bottom of the hard drive is broken, there is a good chance that the data can still be recovered by replacing the electronic board with one from an identical hard drive. In many instances drives have been brought in that had a bad electronic board due to cracking or physical damage. Replacing the board from an identical hard drive allowed full recovery of the data.
Even in the case of small devices like USB sticks that have the metal end that goes into the USB port on the computer snapped off, the data may possibly be recovered if both pieces are available or a compatible USB stick can be found for parts.
In one data recovery case, a doctoral student had all of his research and dissertation on a USB thumb drive. When the drive stopped working, he thought he had lost two years of work. Examination of the USB drive showed that the connection was cracked and had separated from the data store chip. Some delicate soldering allowed all of the data to be recovered.
It is never safe to assume that data cannot be recovered by a forensic examiner or a data recovery lab, even in extreme circumstances. Even in the case of a cell phone where the phone itself may have a cracked screen or other damage, if the phone will still power up, there is a possibility of getting the data from the phone.
Summary
In this chapter we looked at data storage and recovery in detail. We learned about both simple recovery of files that the user can perform by restoring files from the Recycle Bin and how forensic software can easily locate and recover files that have been recently deleted from a hard drive or other storage device. Advanced data recovery was also covered including how forensic software can “carve” files from the unallocated space on a computer hard drive or other storage device. How file destruction software works and how evidence of that kind of destruction can be detected was also covered. We also discussed physical damage to hard drives and storage devices and how, even in those circumstances, data can be recovered.
..................Content has been hidden....................
You can't read the all page of ebook, please click here login for view all page.