
6
Data Output from Tableau Prep Builder
In the previous three chapters, we learned about preparing, cleaning, and transforming data using Tableau Prep Builder. In this chapter, we will look at the final step of creating a data model in Tableau Prep Builder, the output step.
When using Tableau Prep Builder to create our data models, the transformed data always needs to have a destination location. This means that when using Tableau Prep Builder, after preparing our data for analysis, it needs to be loaded to a new location before it can be consumed. This is different than Tableau Desktop and Tableau web editing, which also allow the option of creating a data model on a live connection.
Tableau Prep Builder gives four choices for where we can load our data through the output step. These are flat files, Tableau published data sources, database tables, and CRM analytics.
Note
The option to output to CRM analytics was added in the 2022.3 release of Tableau Prep Builder. To use this output option, we need a Salesforce organization for our output. As the requirement for a Salesforce organization is beyond the scope of this book, we do not have an exercise with this output option.
This chapter will explore each of the other three output options and when to use them.
In this chapter, we’re going to cover the following main topics:
- Outputting our data models to files
- Outputting our data models to published data sources
- Outputting our data models to database tables
To view the software requirements for this chapter, please see the Technical requirements section in Chapter 1.
Outputting our data models to files
The first option we will look at is data output to a flat file. This is a great option when prototyping and when we are still in development and want to check our progress. The other use case for the file output type is when we are creating a data model for our own analysis and do not have a plan to share the data model more broadly.
The comma-separated values (CSV) and Microsoft Excel (.xlsx) file outputs serve very similar purposes. The CSV values option is the more lightweight option, meaning you can use it if you don’t use Microsoft Excel.
The Tableau Data Extract (.hyper) option will load your data into Tableau’s high-performance analytical data store, Hyper. This is the best option when we are creating a data model for personal analysis. The Hyper file gives us the balance of low maintenance with the fastest query performance.
Before beginning the exercise in this section, please open the Tableau Prep Builder client and open the Chapter 4.tfl file we created in Chapter 4:
- We can open our saved flow by clicking on the Open a Flow button, finding the file, and pressing OK. Alternatively, if the Chapter 4 card is shown under Recent Flows, we can double-click on the image associated with the Chapter 4 card, as seen in Figure 6.1:

Figure 6.1 – Selecting from recent flows
- In this flow, we have two output steps that we created in the exercises in Chapter 4. Find the step labeled Output. This step should be to the right of the Sales & Product step, as seen in Figure 6.2. Click on the Output step with the left mouse button:

Figure 6.2 – Find the Output step
- The bottom of your screen should now show the output pane, as seen in Figure 6.3. Let’s look at each of the options available in the Output step when you choose Save output to with the File option:

Figure 6.3 – Output pane options
Once you select File, the following options are available to you:
- Browse – the Browse button will open a dialog box, allowing you to name your file and save it to a file system location of your choice.
- Name – the name of the file. This will change after you select a file name in the Browse section.
- Location - the location of the file on your file system.
- Output type – we have three options for file output types:
- Comma Separated Values (CSV)
- Microsoft Excel (XLSX)
- Tableau Data Extract - the Tableau proprietary database engine, Hyper (.hyper).
- Write Options – the two options are Create Table and Append Table. The Create option will load all data into the file, overwriting the file if a file with the same name in the same location exists. The Append option will add new rows to the file if it already exists, otherwise, it will create the file.
- After selecting the file name and type that you would like, click the Run Flow button at the bottom of the output pane and Tableau Prep Builder will create the file for you. Leave your Tableau Prep Builder client in this state. In the next section, we will pick up from this point.
In this section, we discussed the file output options from Tableau Prep Builder. Tableau Prep Builder allows for three different file types: CSV, Microsoft Excel, and Tableau Hyper files. These flat file options are used for prototyping and analysis in Tableau when the data model does not need to be shared with others.
In the next section, we are going to explore Tableau published data sources, the best practices method of sharing our data model with a broader data analyst community.
Outputting our data models to published data sources
The second output option is a Tableau published data source. This is the best option when we are sharing our data model more broadly. When we output to a published data source, other analysts can connect to our data model without needing to recreate all the data modeling work we have done every time they create a new workbook. It also allows us to have organizational definitions for data and standardized calculations, and allows us to decide which fields from the underlying data source we will make broadly available. We will now create a published data source by connecting to Tableau Server or Tableau Cloud:
- To begin the process of a published data source output, we are going back to our last step from the previous section, but we will change our Save output to option to Published data source, as seen in Figure 6.4:

Figure 6.4 – Changing output to a published data source
- We should now see our output pane change to ask for different options, namely to connect to a Tableau Server (or Cloud), as seen in Figure 6.5:

Figure 6.5 – Output pane with the Published data source option
- The first thing we need to do is to sign into our Tableau Server or Tableau Cloud. Click on the dropdown next to Server and click on Sign in…, as seen in Figure 6.6. When prompted for a username and password combination, please enter your credentials. If you are using Tableau Cloud, you may get prompted with a multi-factor authentication as well:
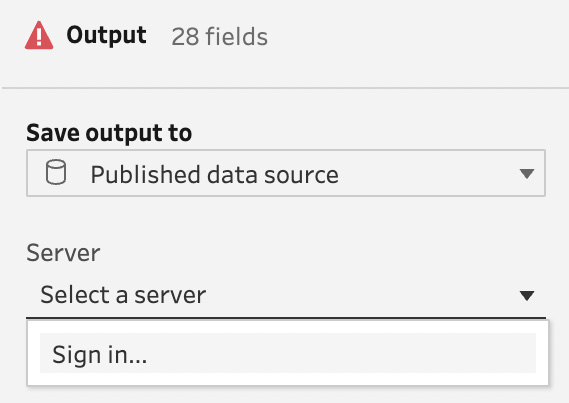
Figure 6.6 – Sign in dialog for the published data source
- After connecting to your Tableau Server or Tableau Cloud, your input pane should change to match the image in Figure 6.7:

Figure 6.7 – Output to the published data source after connection
- Project – a project on Tableau Server and Tableau Cloud is analogous to a file folder in most file systems. It is a place to put content and can be secured to users and groups of users. Select a folder to publish your data source.
- Name – the name of your data source. In this case, type in Product Sales.
- Description – this is an optional field that you can use to describe your published data source. The text will appear next to the published data source in the web user interface of Tableau Server and Tableau Cloud.
- Write Options – the two options are Create Table and Append Table. The Create option will load all data into the published data source, overwriting the published data source of the same name and location, if it exists.. The Append option will add new rows to the published data source if it already exists, otherwise, it will create a new published data source.
- After selecting the project and typing in the published data source name, click the Run Flow button at the bottom of the output pane and Tableau Prep Builder will create the published data source for you. Make note of the project where you published the data source as we will connect to it from Tableau Desktop in the next chapter. Leave your Tableau Prep Builder client in this state. In the next section, we will pick up from this point when we look at outputting to database tables.
In this section, we discussed the published data source option. This is the best option when you want to share your data model with others in your organization, leading to the best scale and data governance. We will talk more about extending Tableau published data sources in the next chapter.
Outputting our data models to database tables
The third and final output option is the option to output to a database table. If you want to leverage the enterprise security and scalability of a database server, this option provides you the ability to output your data to a single database table. This option may also make sense if you are consuming your data model in other analytics tools in addition to Tableau:
- To begin the process of a database table output, we are going back to our last step from the previous section, but we will change our Save output to option to Database table, as seen in Figure 6.8:

Figure 6.8 – Publishing to a database table
- We should now see our output pane change to Add a connection to a database server, as seen in Figure 6.9. The list of available database servers is always being updated. At the time of writing, the list of supported databases matches the list in Figure 6.9:

Figure 6.9 – Database server options
- It is beyond the scope of this book to install and/or configure a database server. If we were to connect to a database server, we would be asked for similar information to the published data source from the last section, namely, the database to publish to, the name of the table, and whether to create a new table or append an existing table. Running the flow to generate the output matches the process for both file and published data source outputs.
In this section, we learned about the third and final output option for Tableau Prep Builder: output to database tables. This option allows us to leverage the enterprise security and scalability features of enterprise database servers and makes our model available for applications in addition to Tableau.
Summary
In this chapter, we learned about the output options for Tableau Prep Builder.
The output to a flat file option works well when prototyping and when we are still in development and want to check our progress. It also meets the use case of creating a data model for our own analysis.
The Tableau published data source output is the best option when we are sharing our data model more broadly. It allows other analysts to connect to our data model without needing to recreate the work that went into the data modeling. It also allows us to have organizational definitions for data and standardized calculations, and allows us to decide which fields to make available for analysis.
The output to database table option allows us to leverage the enterprise security and scalability features of enterprise database servers. It also allows access to our model from tools and applications in addition to Tableau.
This was the final step of our Tableau Prep Builder learning, which started in Chapter 3 and continued through Chapters 4 and 5. While the output step is the final step in the Tableau Prep Builder journey, it is not the final step for creating data models in Tableau. The next chapter is the first of four chapters that explore the role of Tableau Desktop in creating and extending data models.
In the next chapter, we will explore basic data modeling in Tableau Desktop, including connecting to the published data source that we created in this chapter.