
Chapter 6. RAM
This chapter covers a portion of the CompTIA A+ 220-701 objectives 1.2 and 1.6 and CompTIA A+ 220-702 objectives 1.1 and 1.2
When it’s time for the CPU to process something, RAM (random access memory) is the workspace it uses. RAM is one of two types of memory found in your computer; the other type of memory is ROM (read-only memory). What’s the difference? RAM’s contents can be changed at any time, while ROM’s contents require special procedures to change. Think of RAM as a blank sheet of paper and a pencil: you can write on it, erase what you’ve done, and keep making changes. On the other hand, ROM is like a newspaper. If you want to change what’s printed on the newspaper, you must recycle it so it can be reprocessed back into newsprint and sent through the newspaper’s printing presses again. This chapter focuses on the types, installation, and troubleshooting of RAM.
“Do I Know This Already?” Quiz
The “Do I Know This Already?” quiz allows you to assess whether you should read this entire chapter or simply jump to the “Exam Preparation Tasks” section for review. If you are in doubt, read the entire chapter. Table 6-1 outlines the major headings in this chapter and the corresponding “Do I Know This Already?” quiz questions. You can find the answers in Appendix A, “Answers to the ‘Do I Know This Already?’ Quizzes and Troubleshooting Scenarios.”
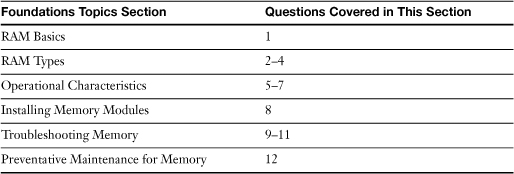
Table 6-1 “Do I Know This Already?” Foundation Topics Section-to-Question Mapping
1. Which of the following loses its contents when you shut down the computer?
a. Hard disk drive
b. USB flash drive
c. RAM
d. ROM
2. Which memory module is much bulkier and more expensive than DRAM?
a. SDRAM
b. SRAM
c. DRAM
d. DDR
3. What type of RAM must be installed in pairs?
a. DDR
b. SDRAM
c. DDR2
d. Rambus
4. Which type of memory was the first to run in sync with the memory bus?
a. DDR2
b. SDRAM
c. SRAM
d. Rambus
5. Name the two methods that are used to protect the reliability of memory.
a. Parity-Checking
b. System checking
c. ECC (error-correcting code)
d. Smart checking
6. Most types of desktop memory modules use which kind of memory?
a. Unbuffered memory
b. No memory
c. SIMM module
d. Stable memory
7. Critical applications and network servers have a special type of memory. What is it called?
a. ECC memory
b. unbuffered memory
c. static memory
d. desktop memory
8. To correctly install a DIMM or Rambus module, what should you do? (Choose all that apply.)
a. Line up the module connectors with the socket
b. Verify that the locking tabs on the socket are swiveled to the outside (open) position
c. After verifying that the module is lined up correctly with the socket, push the module straight down into the socket until the swivel locks on each end of the socket snap into place at the top corners of the module
d. None of these options is correct
9. Which of the following is the name for running the processor or memory at speeds faster than what is recommended?
a. CPU tweaking
b. Overclocking
c. Memory leak
d. CPU duplicating
10. Which of the following are types of metal used for contacts on SIMMs? (Choose two.)
a. Tin
b. Copper
c. Zinc
d. Gold
11. Which of the following are utilities that are used to check memory? (Choose all that apply.)
a. CheckIT
b. AMIDiag
c. RAMExam
d. All of these options are correct
12. To prevent overheating memory modules, which of the following tasks should you perform? (Choose all that apply.)
a. Keep the surfaces of the modules clean. You can use compressed air or a data-rated vacuum cleaner to remove dust.
b. Make sure you are using the recommended voltage level for the memory installed if your system’s BIOS setup permits voltage adjustments.
c. Install additional case fans over or behind the location of memory modules to pull hot air out of the system.
d. All these options are correct.
Foundation Topics
RAM Basics
RAM is used for programs and data, and by the operating system for disk caching (using RAM to hold recently accessed disk sectors). Thus, installing more RAM improves transfers between the CPU and both RAM and disk drives. If your computer runs short of RAM, Windows can also use the hard disk as a very slow substitute for RAM. The swapfile (Windows 9x/Me) or paging file (Windows NT/2000/XP/Vista) is a file on the hard disk used to hold part of the contents of memory if the installed RAM on the system isn’t large enough for the tasks currently being performed.
Although the hard disk can substitute for RAM in a pinch, don’t confuse RAM with magnetic storage devices such as hard disks. Although the contents of RAM and magnetic storage can be changed freely, RAM loses its contents as soon as you shut down the computer, while magnetic storage can hold data for years. Although RAM’s contents are temporary, RAM is much faster than magnetic storage: RAM speed is measured in nanoseconds (billionths of a second), while magnetic storage is measured in milliseconds (thousandths of a second).
Even though every computer ever made is shipped with RAM, you will probably need to add more RAM to a computer as time passes. Ever-increasing amounts of RAM are needed as operating systems and applications get more powerful and add more features. Because RAM is one of the most popular upgrades to add to any system during its lifespan, you need to understand how RAM works, what types of RAM exist, and how to add it to provide the biggest performance boost to the systems you maintain.
When you must specify memory for a given system, there are several variables you need to know:
• Memory module type (240-pin DIMM, 184-pin DIMM, 168-pin DIMM, and so on)— The module type your system can use has a great deal to do with the memory upgrade options you have with any given system. Although a few systems can use more than one memory module type, in most cases if you want to change to a faster type of memory module, such as from 184-pin DIMM (used by DDR SDRAM) to 240-pin DIMM (DDR2 SDRAM), you need to upgrade the motherboard first.
• Memory chip type used on the module (SDRAM, DDR SDRAM, RDRAM, and so on)— Today, a particular memory module type uses only one type of memory. However, older memory module types such as 72-pin SIMM and early 168-pin DIMMs were available with different types of memory chips. You need to specify the right memory chip type in such cases to avoid conflicts with onboard memory and provide stable performance.
• Memory module speed (60ns, PC-133, PC800, PC2700, and so on)— There are three ways to specify the speed of a memory module: the actual speed in ns (nanoseconds) of the chips on the module (60ns), the clock speed of the data bus (PC-133 is 133MHz; PC800 is 800MHz), or the throughput (in MBps) of the memory (PC2700 is 2,700MBps or 2.7GBps). The throughput method is used by current memory types.
• Error checking (parity, non-parity, ECC)— Most systems don’t perform parity checking (to verify the contents of memory) or correct errors, but some motherboards and systems support these functions. Although parity-checked memory mainly slows down the system, ECC memory can detect memory errors as well as correct them. If a system is performing critical work (high-level mathematics or financial functions, departmental or enterprise-level server tasks), ECC support in the motherboard and ECC memory are worthwhile options to specify. Some systems also support registered or non-registered modules. Registered modules are more reliable, but are slower because they include a chip that boosts the memory signal.
• Allowable module sizes and combinations— Some motherboards insist you use the same speeds and sometimes the same sizes of memory in each memory socket, while others are more flexible. To find out which is true about a particular system, check the motherboard or system documentation before you install memory or add more memory.
• The number of modules needed per bank of memory— Systems address memory in banks, and the number of modules per bank varies with the processor and the memory module type installed. If you need more than one module per bank, as with SIMM memory on a Pentium-class system, and only one module is installed, the system will ignore it. Systems that require multiple modules per bank require that modules be the same size and speed.
• Whether the system requires or supports dual-channel memory (two identical memory modules instead of one at a time)— Dual-channel memory treats two matched modules as a single unit, similar in some ways to the way that older systems use two or more modules per bank. However, dual-channel memory is faster than single-channel memory, and is becoming common on more and more systems.
• The total number of modules that can be installed— The number of sockets on the motherboard determines the number of modules that can be installed. Very small-footprint systems (such as those which use microATX, flexATX, or Mini-ITX motherboards) often support only one or two modules, but systems that use full-size ATX motherboards often support three or four modules.
RAM Types
While today’s systems use memory modules built from a combination of chips, rather than individual chips plugged into the motherboard as with early PC systems, it’s still necessary to understand the different types of memory chips that have been and are used to build memory modules.
DRAM
Virtually all memory modules use some type of dynamic RAM, or DRAM chips. DRAM requires frequent recharges of memory to retain its contents. Early types of DRAM, including variations such as fast-page mode (FPM) and extended data-out (EDO), were speed rated by access time, measured in nanoseconds (ns; smaller is faster). Typical speeds for regular DRAM chips were 100ns or slower; FPM memory, used primarily in 30-pin and 72-pin SIMM modules, ran at speeds of 70ns, 80ns, and 100ns. EDO DRAM, which was used primarily in 72-pin SIMM modules and a few 168-pin DIMM modules, typically ran at 60ns.
While these types of DRAM are long obsolete, other types of DRAM, including SDRAM, DDR SDRAM, DDR2 SDRAM, and Rambus, are used in more recent systems.
SRAM
Static random-access memory (SRAM) is RAM that does not need to be periodically refreshed. Memory refreshing is common to other types of RAM and is basically the act of reading information from a specific area of memory and immediately rewriting that information back to the same area without modifying it. Due to SRAM’s architecture, it does not require this refresh. You will find SRAM being used as cache memory for CPUs, as buffers on the motherboard or within hard drives, and as temporary storage for LCD screens. Normally, SRAM is soldered directly to a printed circuit board (PCB) or integrated directly to a chip. This means that you probably won’t be replacing SRAM. SRAM is faster than, and is usually found in smaller quantities than its distant cousin DRAM.
SDRAM
Synchronous DRAM (SDRAM) was the first type of memory to run in sync with the processor bus (the connection between the processor, or CPU, and other components on the motherboard). Most 168-pin DIMM modules use SDRAM memory. To determine if a DIMM module contains SDRAM memory, check its speed markings. SDRAM memory is rated by bus speed (PC66 equals 66MHz bus speed; PC100 equals 100MHz bus speed; PC133 equals 133MHz bus speed).
Depending upon the specific module and motherboard chipset combination, PC133 modules can sometimes be used on systems that are designed for PC100 modules.
DDR SDRAM
Many recent systems use double-data-rate SDRAM (DDR SDRAM). DDR SDRAM performs two transfers per clock cycle, instead of one as with regular SDRAM. 184-pin DIMM memory modules use DDR SDRAM chips.
While DDR SDRAM is sometimes rated in MHz, it is more often rated by throughput (MBps). Common speeds for DDR SDRAM include PC1600 (200 MHz/1600 MBps), PC2100 (266 MHz/2100 MBps), PC2700 (333 MHz/2700 MBps), and PC3200 (400 MHz/3200 MBps), but other speeds are available from some vendors.
DDR2 SDRAM
Double-double data rate SDRAM (DDR2 SDRAM) is the successor to DDR SDRAM. DDR2 SDRAM runs its external data bus at twice the speed of DDR SDRAM, enabling faster performance. However, DDR2 SDRAM memory has greater latency than DDR SDRAM memory. Latency is a measure of how long it takes to receive information from memory. 240-pin memory modules use DDR2 SDRAM.
DDR2 SDRAM memory might be referred to by the effective memory speed of the memory chips on the module (the memory clock speed ×4 or the I/O bus clock speed ×2), for example DDR2-533 (133 MHz memory clock×4 or 266 MHz I/O bus clock ×2)=533 MHz) or by module throughput (DDR2-533 is used in PC2-4200 modules, which have a throughput of more than 4200 MBps). PC2- indicates the module uses DDR2 memory, while PC- indicates the module uses DDR memory.
Other common speeds for DDR2 SDRAM modules include PC2-3200 (DDR2-400; 3200 MBps throughput); PC2-5200 (DDR2-667); PC2-6400 (DDR2-800); PC2-8500 (DDR2-1066).
Rambus
Rambus Direct RAM (RDRAM) memory was used by early Pentium 4-based chipsets from Intel, including the i820, i840, and E7205 Granite Bay workstation chipset, but has not been used by more recent systems. RDRAM modules are known as RIMMs and were produced in 16-bit and 32-bit versions.
16-bit RIMMs use a 184-pin connector, while 32-bit RIMMs use a 232-pin connector. 32-bit motherboards that use RIMMs must use pairs of 16-bit modules. Empty RIMM sockets must be occupied by a continuity module (resembles a RIMM but without memory; also known as a CRIMM).
Common Rambus 16-bit module speeds include PC600 (1200 MBps bandwidth); PC700 (1420 MBps bandwidth); PC800 (1600 MBps bandwidth); PC1066 (also known as RIMM 2100; 2133 MBps bandwidth); and PC1200 (also called RIMM 2400; 2400 MBps bandwidth).
32-bit (dual-channel) RIMM modules use the RIMM xxxx identifier, listing the throughput in MBps as part of the name, for example, RIMM 3200 (3200 MBps bandwidth); RIMM 4200 (4200 MBps bandwidth); RIMM 4800 (4800 MBps bandwidth); and RIMM 6400 (6400 MBps bandwidth).
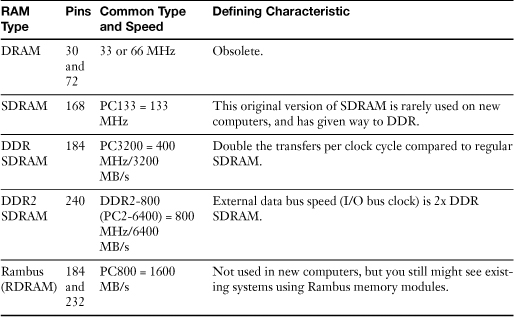
Table 6-2 shows a comparison of the types of RAM you need to know for the exam.
![]()
Operational Characteristics
Memory modules can be classified in various ways, including:
• The amount of memory (in bits) found on the module
• The differences between parity and non-parity memory
• The differences between ECC and non-ECC memory
• The differences between registered and unbuffered memory
• The differences between single-sided and double-sided memory
The following sections deal with these operational characteristics.
Comparison of Memory Modules
All systems built since the early 1990s have used some form of memory module, and most of these systems have used standard versions of these modules. These modules come in these major types:
• Single Inline Memory Module (SIMM)— Has a single row of 30 or 72 edge connectors on the bottom of the module. Single refers to both sides of the module having the same pinout.
• Single Inline Pin Package (SIPP)— A short-lived variation on the 30-pin SIMM, which substituted pins for the edge connector used by SIMM modules.
• Dual Inline Memory Module (DIMM)— These are available in 168-pin, 184-pin, and 240-pin versions. Dual refers to each side of the module having a different pinout.
• Small Outline DIMM (SODIMM)— A compact version of the standard DIMM module, available in various pinouts for use in notebook computers and laser/LED printers.
• Rambus RDRAM Module— A memory module using Direct Rambus memory (RDRAM) chips. Kingston Technology has copyrighted the name RIMM for its Rambus RDRAM modules, but Rambus RDRAM modules are often referred to as RIMMs, regardless of their actual manufacturer.
• Small Outline Rambus Module—A compact version of the standard Rambus module for use in notebook computers.
Figure 6-1 illustrates SIMM, SIPP, and DIMM modules used in desktop computers.
Figure 6-1 Desktop memory modules (SIMM, SIPP, and DIMM) compared.

![]()
Memory Module Width
Memory modules are classified in a variety of ways, including size, speed, memory type, and width in bits. A byte is the basic building block used to determine storage and RAM capacity, and eight bits make a byte. Memory module widths (in bits) have become wider as the memory bus sizes of processors have increased.
Memory must be added in banks, and a bank of memory refers to a memory module, or modules, whose width in bits add up to the width of the memory bus and are identical in other characteristics, such as size and speed.
Table 6-3 lists memory bus sizes, memory module bus sizes, and the number of identical modules needed to make a bank of memory for processors from the 386 to today’s Core 2 Duo/Core 2 Quad and Athlon 64 x2 and Phenom processors.
Table 6-3 Processor Memory Banks and Module Bus Size Comparisons

Parity and Non-Parity Memory
There are two methods that have been used to protect the reliability of memory:
• Parity-checking
• ECC (error-correcting code)
Both of these methods depend upon the presence of an additional memory chip over the chips required for the data bus of the module. For example, a module that uses eight chips for data would use a ninth chip to support parity or ECC.
Parity checking, which goes back to the original IBM PC, works like this: Whenever memory is accessed, each data bit has a value of 0 or 1. When these values are added to the value in the parity bit, the resulting checksum should be an odd number. This is called odd parity. A memory problem will typically cause the data bit values plus the parity bit value to total an even number. This triggers a parity error, and your system halts with a parity error message. Note that parity checking requires parity-enabled memory and support in the motherboard. On modules that support parity-checking, there’s a parity bit for each group of eight bits.
The method used to fix this type of error varies with the system. On museum-piece systems that use individual memory chips, you must open the system, push all memory chips back into place, and test the memory thoroughly if you have no spares (using memory testing software), or replace the memory if you have spare memory chips. If the computer uses memory modules, replace one module at a time, test the memory (or at least run the computer for awhile) to determine if the problem has gone away. If the problem recurs, replace the original module, swap out the second module and repeat.
Tip
Some systems’ error message tells you the logical location of the error so you can take the system documentation and determine which module or modules to replace.
Note
Parity checking has always cost more because of the extra chips involved and the additional features required in the motherboard and chipset, and it fell out of fashion for PCs starting in the mid-1990s. Systems that lack parity checking freeze up when a memory problem occurs, and do not display any message onscreen.
Because parity-checking “protects” you from bad memory by shutting down the computer (which can cause you to lose data), vendors have created a better way to use the parity bits to solve memory errors using a method called ECC.
ECC and Non-ECC Memory
For critical applications, network servers have long used a special type of memory called error-correcting code (ECC). This memory enables the system to correct single-bit errors and notify you of larger errors.
Although most desktops do not support ECC, some workstations and most servers do offer ECC support. On systems that offer ECC support, ECC support might be enabled or disabled through the system BIOS, or it might be a standard feature. The parity bit in parity memory is used by the ECC feature to determine when the contents of memory is corrupt and to fix single-bit errors. Unlike parity checking, which only warns you of memory errors, ECC memory actually corrects errors.
ECC is recommended for maximum data safety, although parity and ECC do provide a small slowdown in performance in return for the extra safety. ECC memory modules use the same types of memory chips used by standard modules, but they use more chips and might have a different internal design to allow ECC operation. ECC modules, like parity-checked modules, have an extra bit for each group of eight data bits.
To determine if a system supports parity-checked or ECC memory, check the system BIOS memory configuration (typically on the Advanced or Chipset screens). Systems that support parity or ECC memory can use non-parity checked memory if parity checking and ECC are disabled. Another name for ECC is EDAC (Error Detection and Correction).
Registered and Unbuffered Memory
Most types of desktop memory modules use unbuffered memory. However, many servers and some desktop or workstation computers use a type of memory module called registered memory. Registered memory modules contain a register chip that enables the system to remain stable with large amounts of memory installed. The register chip acts as a buffer, which slightly slows down memory access.
Registered memory modules can be built with or without ECC support. However, most registered memory modules are used by servers and include ECC support. Figure 6-2 compares a standard (unbuffered) memory module with a registered memory module that also supports ECC.
Figure 6-2 A registered module with ECC (top) compared to a standard unbuffered module (bottom).

Single-Sided and Double-Sided Memory
A double-sided SIMM acts like two conventional SIMMs in one, and can be recognized by having data chips on both sides of the module. Some systems work with both double-sided and single-sided SIMM memory modules, while others restrict the number of double-sided modules you can use or won’t let you use them at all. Read the manual for the system or motherboard to determine if you can use double-sided SIMMs.
On modern systems that use DIMMs, the term “double-sided” refers to a module that contains two memory banks. On systems that restrict the number of banks that can be installed, you can install more single-sided DIMMs than double-sided DIMMs. To determine if a particular system (motherboard) has this type of restriction, see its documentation.
Installing Memory Modules
Memory modules are the memory “sticks” that are installed into the slots of a motherboard. Installing memory modules is fairly easy, and can be a fun initial task for people who have never worked on a computer before. However, precautions must be taken not to damage the memory module or the motherboard. Before working with any memory modules, turn the computer off, and unplug it from the AC outlet. Be sure to employ ESD protection in the form of an antistatic strap, and antistatic mat. Use an antistatic bag to hold the memory modules while you are not working with them. Before actually handling any components, touch an unpainted portion of the case chassis in a further effort to ground yourself. Try not to touch any of the chips, connectors, or circuitry of the memory module; instead hold them from the sides.
Installing DIMMs and Rambus RDRAM Modules
DIMM and Rambus RDRAM module sockets have an improved keying mechanism and a better locking mechanism compared to SIMMs.
To install the DIMM or Rambus RDRAM module, follow these steps:
Step 1. Line up the modules’ connectors with the socket. Both DIMMs and Rambus modules have connections with different widths, preventing the module from being inserted backwards.
Step 2. Verify that the locking tabs on the socket are swiveled to the outside (open) position.
Step 3. After verifying that the module is lined up correctly with the socket, push the module straight down into the socket until the swivel locks on each end of the socket snap into place at the top corners of the module (see Figure 6-3). A fair amount of force is required to engage the locks. Do not touch the gold-plated connectors on the bottom of the module; this can cause corrosion or ESD.
Figure 6-3 A DIMM partly inserted (top) and fully inserted (bottom). The memory module must be pressed firmly into place before the locking tabs will engage.

![]()
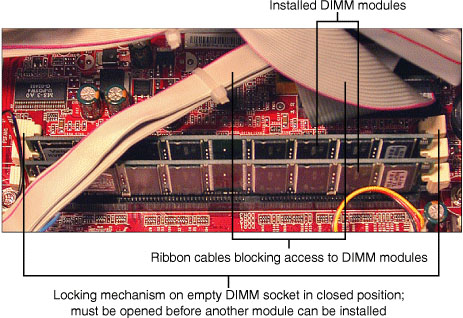
For clarity, the memory module installation pictured in Figure 6-3 was photographed with the motherboard out of the case. However, the tangle of cables around and over the DIMM sockets in Figure 6-4 provides a much more realistic view of the challenges you face when you install memory in a working system.
Figure 6-4 DDR DIMM sockets in a typical system are often surrounded and covered up by drive and power cables, making it difficult to properly install additional memory.
When you install memory on a motherboard inside a working system, use the following tips to help your upgrade go smoothly and the module to work properly:
• If the system is a tower system, consider placing the system on its side to make the upgrade easier. Doing this also helps to prevent tipping the system over by accident when you push on the memory to lock it into the socket.
• Move the locking mechanisms on the DIMM sockets to the open position before you try to insert the module. In Figure 6-4, the locks on the empty socket are in the closed position. Figure 6-3 shows open and closed locks for comparison.
• Move power and drive cables away from the memory sockets so you can access the sockets. Disconnect drive cables if necessary.
• Use a flashlight to shine light into the interior of the system so you can see the memory sockets and locking mechanisms clearly; this enables you to determine the proper orientation of the module and to make sure the sockets’ locking mechanisms are open.
• Use a flashlight to double-check your memory installation to make sure the module is completely inserted into the slot and locked into place.
• Replace any cables you moved or disconnected during the process before you close the case and restart the system.
Tip
Note the positions of any cables you need to remove before you remove them to perform an internal upgrade. I like to use self-stick colored dots on a drive and its matching data and power cables. You can purchase sheets of colored dots at most office-supply and discount stores.
Troubleshooting Memory
Because all information you create with a computer starts out in RAM, keeping RAM working properly is very important. This section describes troubleshooting problems that might affect memory.
Verifying RAM Compatibility
Because of the wide range of speeds, latencies (CL ratings), and other performance factors, it’s easier than ever before to install a memory module that will fit into a system but is not compatible with the system. Incompatible memory modules can cause system lockups or crashes or corrupted data.
To determine whether a particular module will work in a particular system or motherboard, check the module for brand and model number markings, then use a lookup or system analysis tool provided by the memory module vendor to determine which modules are recommended for a particular system or motherboard. Most memory vendors provide these tools on their websites. If the module is not recommended for the system or motherboard, don’t install it.
Overclocking Can Lead to System Instability
If you run the processor or memory at speeds faster than those recommended, a process called overclocking, you could cause components to overheat and the system to crash. If your system crashes after overclocking, return the settings to standard values and restart the system. If the system is now stable, don’t overclock it until you can add adequate cooling to the system. Overclocking is not recommended for business uses or for beginners.
Caution
Overclocking generates excess heat, which alone can cause damage to components. To make matters worse, one of the favorite ways that overclockers have to improve system stability is to slightly increase the voltage going to the processor core (Vcore) or to the memory modules, which further increases heat.
Don’t even think about overclocking unless you study overclocking-oriented websites such as www.overclockers.com or publications such as MaximumPC (www.maximumpc.com). A careful perusal of these and other resources will tell you that successful overclocking requires a lot of time, a fair amount of cash, a lot of tolerance for damaged components, frequent rebooting, crashes, voided warranties, and so on.
Avoid Mixing Metals in RAM and Sockets
Two types of metal are used for contacts on SIMMs: gold and tin. Putting gold-tipped SIMMs in tin sockets or tin-tipped SIMMs in gold sockets is asking for corrosion and eventual system lockups. Match the metal to avoid problems. If you have systems that have mixed metals and you can’t change them, periodically remove the memory modules, wipe off the contacts carefully, and reinstall them.
Use Caution When Mismatching RAM Speeds
Motherboards are designed to use particular speeds of memory modules, and all memory modules installed in a computer should meet or exceed the memory speed required by the system. Depending on the system, memory might be rated in nanoseconds (ns), by the bus speed of the CPU (such as PC-133), or by their throughput (such as DDR2-6400).
Newer systems are generally more tolerant of differences in memory timing. Some systems can access each module at its maximum speed, whereas others might slow down automatically to adjust to the slower access time. Some older systems might crash if additional memory is a different speed than the memory originally installed. Adjusting BIOS settings for memory timing might improve reliability in such cases.
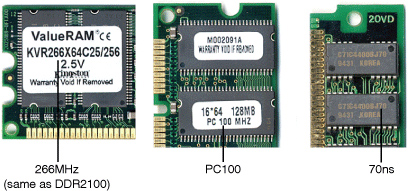
Memory speeds can be determined from the memory chips themselves on SIMMs or from the markings on DIMMs or Rambus RDRAM modules (see Figure 6-5).
Figure 6-5 Memory-speed markings on a DDR DIMM module (left), a standard SDRAM DIMM module (center), and a 72-pin SIMM (right).
![]()
As you can see from Figure 6-5, newer DIMM modules often have more informative markings than old modules. If you need to read the memory speed directly from the chips on the module, use these rules of thumb:
• Generally, the speed (in nanoseconds) is the last two numbers (often following a dash or alphanumerics) on the memory module: xxxxx - 15 (15ns) yyyyyyyy - 60 (60ns).
• Some memory chips use an abbreviated marking: xxxxx - 7 (70ns) yyyyy - 10 (100ns).
To verify speeds, you can use a standalone RAM tester, a small device that has connectors for different types of memory and a readout indicating actual speed, size, and other information.
For more information about testing RAM with both diagnostics software and hardware testing devices, see “Other Methods for RAM Testing,” later in this chapter.
EDO Compatibility with Other RAM Types
Although 168-pin DIMM modules are available in both SDRAM and EDO types (EDO is rare), and some older motherboards can use one or the other, don’t mix them. Their timings aren’t compatible; EDO RAM has an access speed of 60ns, whereas SDRAM has access speeds of 15ns or less, depending on whether it is PC-66, PC-100, or PC-133 compatible.
EDO memory can be used with FPM memory on systems using 72-pin SIMMs if the memory is in separate banks. EDO will be forced to slow down to match FPM’s slower access. Some systems require that you enable EDO support in the BIOS setup.
If you are adding memory to older systems that use SIMMs, don’t mix 60ns (EDO) with 70ns or slower FP memory unless the system can be configured to provide separate timing settings for each bank. Keep in mind that you must use two identical 72-pin SIMMs to provide a memory bank for a 64-bit system that uses SIMMs.
“Parity Error - System Halted” Message
Parity errors halt your system and require you to restart your computer. To use parity checking, you must be using parity-checked RAM (x9 or x36 module types) and your computer must support parity checking and have this feature enabled. Parity error can result from
• Mixing parity and non-parity RAM on parity-checked systems
• Mixing slow and fast RAM in the same bank or on the same motherboard
• Loose or corroded chip and module connectors
• Memory module/chip failure
If you enable parity checking in the BIOS setup and don’t have parity modules, you’ll have immediate errors. You can use parity memory along with non-parity memory by disabling parity checking in the system BIOS. Refer to Chapter 4 for more information about BIOS.
RAM-Sizing Errors at Bootup
Most systems test memory, and some will alert you to a change in the memory size detected compared to the BIOS value. This is normal if you have just added memory. In such cases, enter the system BIOS setup program, exit and save changes, and restart the computer. However, a memory size error that occurs later indicates a memory problem. To determine which module is affected, follow these steps:
Step 1. Note the memory count reached onscreen when the memory error is detected.
Step 2. Check the motherboard documentation to see which modules must be installed first.
Step 3. Change one module at a time, starting with the one you think is defective, until the error goes away.
Step 4. Disable cache RAM in the BIOS setup when testing memory.
A memory-sizing error that won’t go away after all memory is changed might indicate a defective motherboard or defective cache memory.
Determining Whether Cache RAM Is the Source of a Memory Problem
Because cache RAM holds a copy of the information in main memory, errors in cache RAM can appear to be errors in system RAM. Use the following procedure to determine whether cache RAM is the cause of a memory problem:
Step 1. Disable L2 cache first.
Step 2. If the memory problem goes away, determine where L2 cache is located (processor or motherboard). If the motherboard uses removable cache chips or a cache module, replace the cache memory. If the motherboard uses non-removable cache chips, replace the motherboard. If L2 cache is built into the processor, replace the processor.
Step 3. If the system runs normally, the replacement is successful. If the problem persists after replacing the component containing cache RAM, return the original component(s) to the system.
Step 4. Disable L1 cache.
Step 5. If the system runs normally, replace the CPU and retest.
Step 6. If the system runs normally after replacement, the CPU’s L1 cache is faulty.
Note
If the processor includes both L2 and L3 cache, disable both in Step 1. Check the system BIOS for an option such as CPU Internal cache.
Other Methods for RAM Testing
Many utility programs, including CheckIt, AMIDiag, RAMExam, and others feature powerful memory-testing programs that can run continuously and use many more testing options than the fast POST test performed by the computer at startup. Most of these programs are run from bootable floppy or CD media, so they bypass the normal operating system.
If you install or replace a large number of memory modules, a dedicated RAM tester provides the most accurate and complete method for finding RAM problems. RAM testers can be used to do the following:
• Determine memory type, size, and true speed
• Separate good RAM from bad RAM when all RAM is removed from a system
• Heat test and stress test RAM independently of the motherboard or operating system
Preventative Maintenance for Memory
The contents of memory are sensitive to overheating. To avoid overheated memory modules, perform the following tasks as needed.
• Keep the surfaces of the modules clean. You can use compressed air or a data-rated vacuum cleaner to remove dust.
• Make sure you are using the recommended voltage level for the memory installed if your system’s BIOS setup permits voltage adjustments.
• Install additional case fans over or behind the location of memory modules to pull hot air out of the system.
• Keep air intake vents in the front of the system clean.
• Replace any defective cooling fans.
To learn more about system cooling issues, see Chapter 5, “Power Supplies and System Cooling.” To learn more about BIOS configuration issues, see Chapter 4, “BIOS.”
Exam Preparation Tasks
Review All the Key Topics
Review the most important topics in the chapter, noted with the key topics icon in the outer margin of the page. Table 6-4 lists a reference of these key topics and the page numbers on which each is found.
Table 6-4 Key Topics for Chapter 6
Complete the Tables and Lists from Memory
Print a copy of Appendix B, “Memory Tables,” (found on the CD), or at least the section for this chapter, and complete the tables and lists from memory. Appendix C, “Memory Tables Answer Key,” also on the CD, includes completed tables and lists to check your work.
Definitions of Key Terms
Define the following key terms from this chapter, and check your answers in the glossary.
RAM,
Paging,
SRAM,
DRAM,
SIMM,
SIPP,
DIMM,
SIMM,
SIPP,
ECC,
Troubleshooting Scenario
You are asked to help someone overclock their system memory. What should you tell them?
Refer to Appendix A, “Answers to the ‘Do I Know This Already?’ Quizzes and Troubleshooting Scenarios,” for the answer.