
Chapter 11. Printers
This chapter covers a portion of the CompTIA A+ 220-701 objectives 1.11, 2.1, and 2.3, and CompTIA A+ 220-702 objective 1.5.
Printers are important output devices, second only to video displays. They output hard copy versions of files stored on the computer, such as documents, spreadsheets, and web pages. Printers can connect to a computer’s USB or parallel port, or they can connect directly to the network. Newer printers can interface with USB memory sticks, memory cards, and digital cameras. Some printers are known as multifunction devices because of their ability to print, fax, copy, and scan documents. This chapter focuses on laser, inkjet, thermal, and impact printers.
Generally, Windows Vista behaves the same as Windows XP when it comes to printers and scanners. So whenever Windows XP is mentioned in this chapter, the same will apply to Windows Vista unless otherwise stated.
“Do I Know This Already?” Quiz
The “Do I Know This Already?” quiz allows you to assess whether you should read this entire chapter or simply jump to the “Exam Preparation Tasks” section for review. If you are in doubt, read the entire chapter. Table 11-1 outlines the major headings in this chapter and the corresponding “Do I Know This Already?” quiz questions. You can find the answers in Appendix A, “Answers to the ‘Do I Know This Already?’ Quizzes and Troubleshooting Scenarios.”
Table 11-1 “Do I Know This Already?” Foundation Topics Section-to-Question Mapping
1. What is the major difference between a laser printer and an LED printer? (Choose all that apply.)
a. LED printers use an LED array to perform the transfer of images.
b. LED printers use an LED drum.
c. Laser printers are of better print quality.
d. Laser printers use a laser to transfer the image to the drum.
2. What happens if a page you print on a laser printer requires more memory than the printer has installed?
a. It will use hard drive space to print.
b. The printer will try to print the page but will stop before the job is finished.
c. The printer will continue to work but at a slower than normal pace.
d. The printer will notify you that you need to free some resources.
3. Which of the following will provide you with the most configuration options and utilities when installing a new printer?
a. A driver from Microsoft
b. A plug-and-play driver
c. A driver from the printer vendor
d. A driver from Automatic Updates
4. Which of the following must you do to determine what firmware version the printer is using?
a. Print a test page
b. Look on the back of the printer
c. Review the printer properties page
d. Review the firmware update page
5. Which of the following are true about the laser printing process? (Choose all that apply.)
a. A page does not start printing until the entire page is received.
b. The print is transferred to the paper.
c. The page is transferred to the print mechanism.
d. The page will start printing immediately after the print button is pushed.
6. Most inkjet, laser, and thermal printers use this interface to connect a printer to a computer. (Choose two.)
a. RJ-45
b. USB
c. Parallel
d. LED
7. You must provide which of the following in order to add a printer to a network?
a. A printer device
b. A print server
c. A printer NIC card
d. A Bluetooth adapter
8. When installing a printer, what is the easiest way to ensure compatibility to make sure that Windows recognizes the new hardware?
a. Windows Update
b. A search engine
c. Vendor’s website
d. Hardware compatibility list
9. Where would you find the setting for the print spooler on a Windows operating system?
a. Computer Management
b. The Printers folder
c. In Server Properties
d. User Manager
10. When upgrading a printer’s memory, you notice that the printer is using a DIMM memory module. Can you use the same type of memory as a laptop or desktop?
a. Yes, they use the same memory.
b. Yes, you can also use printer memory in a desktop.
c. No, they do not use the same type of memory.
d. Yes, but the printer will run more slowly.
11. Which of the following are considered troubleshooting tools and techniques for printers? (Choose all that apply.)
a. Increase memory
b. Print a test page
c. Identify symptoms
d. Review device error codes
12. What is the first process you must follow to print a page out of your printer?
a. Send it to the print queue.
b. An application must send a request that is relayed to the printer.
c. Insert the paper in the print feeder.
d. An application prints it out for you.
13. What will you need to connect a printer if you wish to use Bluetooth technology?
a. A USB key
b. A dongle key
c. A network interface card
d. A Bluetooth print adapter
14. When connecting a printer or scanner, which of the following should you use to install the correct driver for the device? (Choose all that apply.)
a. Vendor’s website
b. Windows Update
c. HCL
d. The CD
Foundation Topics
Printing Fundamentals
There are four types of printers covered by A+ Certification exams:
• Laser and LED
• Inkjet
• Thermal
• Impact
The following sections introduce you to the basic features of each printer type.
Tip
The key to mastering printer objectives on the A+ Certification exams is to pay careful attention to
• How printers create a page (note in particular the steps used by a laser printer to create a page)
• Major components of each printer type covered (thermal printers as well as impact, inkjet, and laser/LED)
• Typical printer operation and output problems and their solutions
• How printers are interfaced to the computer
Dot-matrix printers use a thermal or impact print head containing multiple pins that are used to form characters and graphics. Dot-matrix and other printers that print a line at a time are sometimes referred to as line printers. Typically, the term “page printers” refers to laser or LED array to change the electrostatic charge on a drum to attract toner, which is then transferred to paper to form the page.
Thermal printers can use a dot-matrix print mechanism or a dye-sublimation technology to transfer images. Some thermal printers use heat-sensitive paper, while others use an ink ribbon to create the image.
Laser and LED Printers
Laser printers are similar in many ways to photocopiers:
• Both use an electrostatically charged drum to receive the image to be transferred to paper.
• Both use a fine-grained powdered toner that is heated to adhere to the paper.
• Both must feed the paper through elaborate paper paths for printing.
However, significant differences exist between the photocopier and its computer-savvy sibling:
• Laser printers produce images digitally, turning individual dots on and off; most copiers, however, are still analog devices.
• Laser printers work under the control of a computer; copiers have a dedicated scanner as an image source.
• Laser printers use much higher temperatures than copiers to bond printing to the paper; using copier labels or transparency media in a laser printer can result in damage to the printer due to melted label adhesive, labels coming off in the printer, or melted transparency media.
The essential difference between a laser and an LED printer is in the imaging device. The laser printer uses a laser to transfer the image to the drum, whereas an LED printer uses an LED array to perform the same task. Otherwise, these technologies are practically identical. The laser printing process described in the following sections also applies to LED printers.
How Laser Printers Use Memory
Because a laser printer is a page printer and the graphics, text, and fonts on the page all use memory, the amount of memory in the laser printer determines the types of pages it can print successfully—and on some models, how quickly the pages are printed.
All laser printers are shipped with enough memory to print with built-in typefaces or with a typical mix of scalable OpenType or TrueType typefaces. However, graphics, especially photographs, require a great deal of printer memory.
If you send a page to a laser printer that requires more memory than the laser printer contains, the laser printer tries to print the page but stops after the printer’s memory is full. The printer displays an error message or blinks error status lights, at which point you must manually eject the page. Only a portion of the page is printed.
If the page requires an amount of memory close to the maximum in the laser printer, most recent laser printers have techniques for compressing the data going to the printer. Although this technique means that more pages can be printed successfully, compressing the data can slow down the print process.
Three options can be used if the pages you need to print require too much memory:
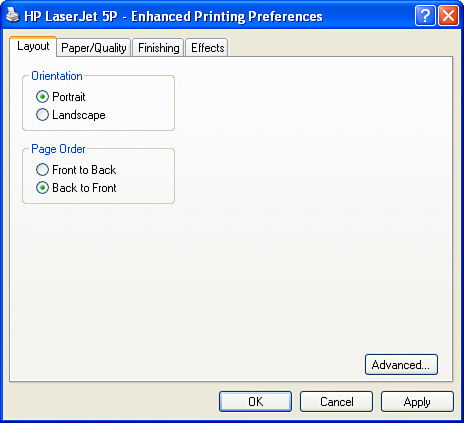
• Reduce the resolution of the print job. Most laser printers today have a standard resolution of 600dpi or 1,200dpi. Reducing the graphics resolution to the next lower figure (from 1,200 to 600dpi or from 600 to 300dpi) will reduce the memory requirement for printing the page by a factor of four. The laser printer’s Graphics or Advanced – Printing Defaults – Paper/Quality Properties sheet (see Figure 11-1) enables this factor to be adjusted as needed.
Figure 11-1 The Advanced – Printing Defaults – Paper/Quality Properties sheet in Windows XP for a typical laser printer enables you to adjust the graphics resolution from the default of 1200dpi to 600dpi or less; text quality is not affected by this option.

![]()
Note
If you reduce the graphics resolution, text resolution stays the same, so a document that is not designed for reproduction or mass distribution will still have acceptable quality.
However, graphics resolutions of 600 dots per inch (dpi) or less produce poor-quality photo output.
• Eliminate or reduce the size of graphics on the page.
• Convert color photos to black-and-white photos before placing in a desktop publishing document or printing them directly from the file. This can actually enhance the output quality from a monochrome laser printer as well as reduce the memory requirement for pages with photos.
These options are temporary workarounds that might be unsatisfactory for permanent use. The best solution to “out-of-memory” problems with a printer, as with the computer, is to add more RAM. To learn more about memory upgrades for laser and LED printers, see the section “Memory,” later in this chapter.
Toner Cartridges
Most monochrome laser printers use toner cartridges that combine the imaging drum and the developer with black toner. This provides you with an efficient and easy way to replace the laser printer items with the greatest potential to wear out.
Depending on the model, a new toner cartridge might also require that you change a wiper used to remove excess toner during the fusing cycle. This is normally packaged with the toner cartridge.
Note
Recycled toner cartridges are controversial in some circles, but I’ve used a mixture of new and rebuilt toner cartridges for several years without a problem. Major manufacturers, such as Apple, HP, and Canon, place a postage-paid return label in cartridge boxes to encourage you to recycle your toner cartridges.
Reputable toner cartridge rebuilders can save you as much as 30% off the price of a new toner cartridge.
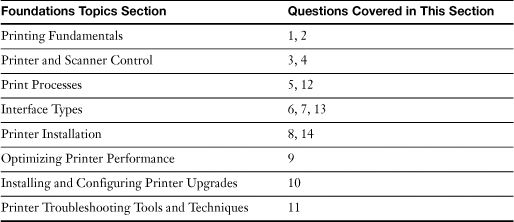
When you install the toner cartridge, be sure to follow the directions for cleaning areas near the toner cartridge. Depending on the make and model of the laser printer, this can involve cleaning the mirror that reflects the laser beam, cleaning up stray toner, or cleaning the charging corona wire or conditioning rollers inside the printer. If you need to clean the charging corona wire (also called the primary corona wire on some models), the laser printer will contain a special tool for this purpose. The printer instruction manual will show you how to clean the item.
Keep the cartridge closed; it is sensitive to light, and leaving it out of the printer in room light can damage the enclosed imaging drum’s surface. Figure 11-2 shows a typical laser printer toner cartridge and mirror cleaning tool. The tool above the toner cartridge is used to clean the printer’s mirror.
Figure 11-2 A typical laser printer toner cartridge. The inset shows the mirror cleaning tool in use after the old toner cartridge has been removed and before the new cartridge is put into position.
Caution
When you change a toner cartridge, take care to avoid getting toner on your face, hands, or clothing. It can leave a messy residue that’s hard to clean.
Color laser printers differ from monochrome laser printers in two important ways: They include four different colors of toner (cyan, magenta, yellow, and black); and the imaging drum is separate from the toner. Thus, instead of waste toner being reused as in a monochrome laser printer that has a toner cartridge with an integrated imaging drum, waste toner in a color printer is sent to a separate waste toner container.
Depending upon the toner transfer technology used, a color laser printer might require four passes to print a color page (one pass per color), or only one pass to print all four colors. For details, see the section “Color Laser Printing Differences,” in this chapter.
Laser Printer Paper and Media
For best results with laser printing, use these guidelines when selecting paper and media:
• Use paper made for laser or photocopier use. Extremely rough-surfaced specialty papers might not enable the toner to fuse correctly to the paper.
• Use envelopes made for laser printing, especially if the printer doesn’t offer a straight-through paper path option. Standard envelopes can lose some of their flap adhesive or have the flap stick to the back of the envelope when used in a laser printer.
• Use only labels made for laser printers; these labels have no exposed backing, requiring you to separate the labels from the backing after printing.
Caution
Labels made for copiers have exposed backing, and the labels can come off inside the printer, leading to expensive repairs.
• Use only laser-compatible transparency stock; it can resist the high heat of the fuser rollers better than other types, which can melt and damage the printer.
• Avoid using paper with damaged edges or damp paper; this can cause paper jams and lead to poor-quality printing.
• Load paper carefully into the paper tray; fan the paper and make sure the edges are aligned before inserting it.
Inkjet Printers
Inkjet printers (also known as ink dispersion printers) represent the most popular type of printer in small-office/home-office (SOHO) use today and are also popular in large offices. Their print quality can rival laser printers and virtually all inkjet printers in use today are able to print both color and black text and photographs.
From a tightly spaced group of nozzles, inkjet printers spray controlled dots of ink onto the paper to form characters and graphics. On a typical 5,760×1,440 dots per inch (dpi) printer, the number of nozzles can be as high as 180 for black ink and more than 50 per color (cyan, magenta, yellow). The tiny ink droplet size and high nozzle density enables inkjet printers to perform the seemingly impossible at resolutions as high as 1,200dpi or higher: fully formed characters from what is actually a high-resolution, non-impact, dot-matrix technology.
Inkjet printers are character/line printers. They print one line at a time of single characters or graphics up to the limit of the printhead matrix. Inkjet printers are functionally fully formed character printers because their inkjet matrix of small droplets forming the image is so carefully controlled that individual dots are not visible.
Larger characters are created by printing a portion of the characters across the page, advancing the page to allow the printhead to print another portion of the characters, and so on until the entire line of characters is printed. Thus, an inkjet printer is both a character and a line printer because it must connect lines of printing to build large characters. Some inkjet printers require realignment after each ink cartridge/printhead change to make sure that vertical lines formed by multiple printhead passes stay straight; with other models, alignment can be performed through a utility provided as part of the printer driver when print quality declines due to misalignment.
Ink Cartridges
Many inkjet printers, especially low-cost models, use a large tank of liquid ink for black and a separate tank with separate compartments for each color (typically cyan, magenta, and yellow; some models feature light versions of some of these colors for better photo-printing quality). However, the trend in most recent models has been to use a separate cartridge for each color. This improves print economy for the user because only one color at a time needs to be replaced. With a multicolor cartridge, the entire cartridge needs to be replaced, even when only one of the colors runs out.
Note
Inkjet printers are sometimes referred to as CMYK devices because of the four ink colors used on most models: cyan, magenta, yellow, and black.
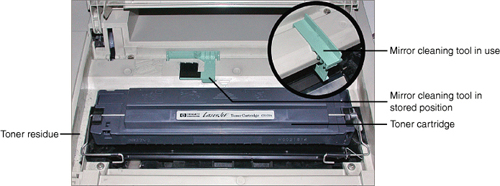
Figure 11-3 shows some of the typical components of an inkjet printer.
Figure 11-3 A typical inkjet printer with its cover open.
![]()
Depending on the printer, the printhead might be incorporated into the ink tank; be a separate, user-replaceable item; or be built into the printer.
Some inkjet printers feature an extra-wide (more nozzles) printhead or a dual printhead for very speedy black printing. Some models enable the user to replace either the ink cartridge only or an assembly comprising the printhead and a replaceable ink cartridge.
An inkjet printer is only as good as its printhead and ink cartridges. Clogged or damaged printheads or ink cartridges render the printer useless. If an inkjet printer fails after its warranty expires, you should check service costs carefully before repairing the unit. Failed inkjet printers are often “throwaway” models and can be replaced, rather than repaired, even during the warranty period.
Caution
Inkjet printers should never be turned off with a surge protector; doing so prevents the printer from self-capping its ink cartridges, which is a major cause of service calls and printer failures. Cleaning the printhead, either with the printer’s own cleaning feature, a cleaning utility built into the printer driver, or with a moistened cleaning sheet, will restore most printers to service.
Always use the printer’s own power switch, which enables the printer to protect the ink cartridges and perform other periodic tasks (such as self-cleaning) properly.
Inkjet Printer Paper and Media
Although papers made for copiers and laser printers provide adequate results, you must use inkjet-specific media of the following types to achieve best print quality:
• Glossy photos
• Transparencies
• Business cards
• Labels (especially clear labels)
It is also critical to use the correct print setting for the media type to avoid smudging, lines, and other print defects. For details, see “Configuring Options and Device Settings,” later in this chapter.
Thermal Printers
Thermal printers use heat transfer to create text and graphics on the paper. Thermal printers are used in point-of-sale and retail environments as well as for some types of portable printing.
Thermal printers are available using three different technologies:
• Thermal transfer
• Direct thermal
• Dye sublimation
Thermal Printer Ribbons
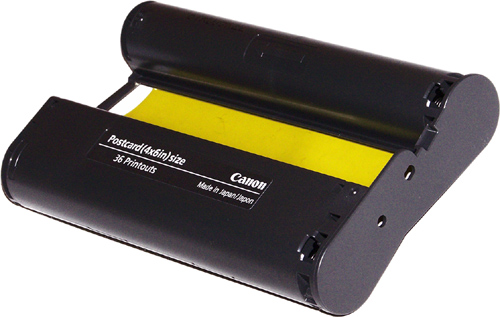
Thermal transfer printers use wax or resin-based ribbons, which are often bundled with paper made especially for the printer. The most common type of thermal transfer printer uses dye-sublimation (dye-sub) technology to print 4×6 continuous-tone photographs. Examples of dye-sublimation printers include Kodak printer docks and Canon’s Selphy CP series.
Figure 11-4 illustrates a typical dye-sublimation ribbon for a Canon Selphy CP printer.
Figure 11-4 A dye-sublimation ribbon for a 4×6-inch photo printer (Canon Selphy CP).
Thermal transfer printers used in point-of-sale or retail environments typically use non-impact dot-matrix printheads.
Thermal Printer Paper
Direct thermal printers use heat-sensitized paper, while thermal transfer printers might use either standard copy paper or glossy photo paper, depending upon their intended use.
If the printer uses direct thermal printing, heat-sensitive paper with characteristics matching the printer’s design specifications must be used. For portable printers using direct thermal printing such as the Pentax PocketJet series, the usual source for such paper is the printer vendor or its authorized resellers. If the direct thermal printer is used for bar codes or point-of-sale transactions, you can get suitable paper or label stock from bar code or POS equipment suppliers and resellers.
If the printer uses thermal transfer and is not designed for photo printing, most smooth paper and label stocks are satisfactory, including both natural and synthetic materials. However, dye-sublimation photo printers must use special media kits that include both a ribbon and suitable photo paper stocks.
Impact Printers
Impact printers are so named because they use a mechanical printhead that presses against an inked ribbon to print characters and graphics. Impact printers are the oldest printer technology, and are primarily used today in industrial and point-of-sale applications.
Note
Years ago, many impact printers used a daisy-wheel printhead similar to those used in electronic typewriters. This type of printhead created typewriter-style fully formed characters. However, virtually all recent impact printers use a dot-matrix printhead.
Dot-matrix printers, the most common form of impact printers, are so named because they create the appearance of fully formed characters from dots placed on the page.
The print mechanism of the dot-matrix printer is almost always an impact mechanism: A printhead containing various numbers of fine wires (called pins) arranged in one or more columns is used along with a fabric ribbon, similar to typewriter technology. The wires are moved by an electromagnet at high speed against the ribbon to form dot patterns that form words, special characters, or graphics. Figure 11-5 shows actual print samples from a typical 9-pin printer’s draft mode, a typical 24-pin printer’s draft mode, and the Near Letter Quality (NLQ) mode of the same 24-pin printer.
Figure 11-5 Actual print samples illustrating the differences in 24-pin and 9-pin impact dot-matrix printers. The narrower pins of the 24-pin printhead produce a reasonably good NLQ printout but hard-to-read results in draft mode.

![]()
Note
The print samples shown in Figure 11-5 are taken from printers that use 8.5″×11″-inch or wider paper sizes. The printhead design and print quality vary greatly on printers that use smaller paper sizes in point-of-sale applications.
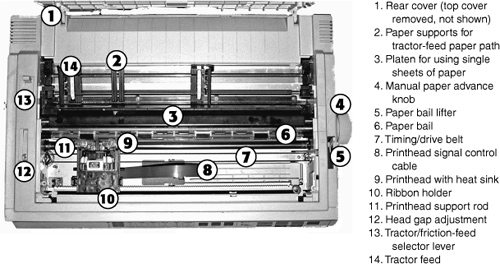
Figure 11-6 illustrates a typical impact dot-matrix printer.
Figure 11-6 Components of a typical impact dot-matrix printer. The model pictured is a wide-carriage version, but its features are typical of models using either standard or wide-carriage paper.
Impact Printer Ribbons
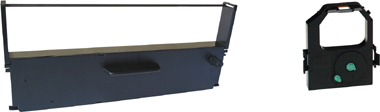
Printer ribbons for impact printers use various types of cartridge designs. Some span the entire width of the paper, and others snap over the printhead. Figure 11-7 compares various types of ribbons for impact printers.
Figure 11-7 Some typical ribbons for impact dot-matrix printers.
Impact Printer Paper and Media
Impact printers use plain uncoated paper or labels in various widths and sizes. Impact printers designed for point-of-sale receipt printing might use roll paper or larger sizes of paper. When larger sizes of paper are used, these printers typically use a tractor-feed mechanism to pull or push the paper past the printhead. Paper used with tractor-fed printers has fixed or removable sprocket holes on both sides of the paper.
Printer and Scanner Control
The behavior of a printer is controlled in large degree by two factors:
• Drivers
• Firmware
The following sections help you understand these features.
Drivers
Printer drivers are used to control and configure printers and the print features of multifunction devices.
Printer drivers might be supplied by Microsoft on the Windows distribution media or by the printer vendor itself. Generally, printer drivers provided by the printer vendor offer more configuration options and utilities for cleaning and maintenance than the drivers provided by Microsoft. Note that driver features might vary by Windows version, even if a single driver file supports more than one Windows version.
Note
It’s a good idea to check for updated versions of printer or multifunction device drivers before installing the device and periodically thereafter. Updated drivers might include bug fixes or enhanced features. Also, if a system is upgraded to a newer version of Windows or another operating system, you will need new drivers.
Firmware
Some printers, most often laser printers, might offer upgradeable firmware. Firmware, which is software on a chip, controls the basic operation of a printer.
To determine the firmware revision installed in a printer, use its self-test function to make a test printout. Firmware can be implemented in a flash-upgradeable chip built into the printer, or in a special memory module sometimes called a “personality” module.
Print Processes
Although all printers are designed to turn electronic documents into hard copy, the specifics of the printing process vary a great deal among printer types. In this section, you first learn the overall printing process, followed by specifics for each type of printer.
The printing process has the following steps:
Step 1. An application program in the computer sends a print request to the Windows operating system.
Step 2. Windows uses a print queue to manage print jobs, storing one or more print jobs in the default temporary directory until the printer is ready.
Step 3. After the printer is ready, it receives a stream of data from the computer through its interface. The data stream contains commands that begin the printing process, select a page orientation and margins, and select built-in fonts and typefaces, or it contains instructions to create fonts and typefaces especially for this print job, depending on the printer and the typefaces and fonts in the document.
If the data stream is appropriate for the printer, printing works correctly; if the data stream contains commands the printer doesn’t recognize, unrecognized characters (often referred to as “garbage printing”) will be printed, with much paper wasted. That’s why it’s important to use the correct printer driver for your printer.
Step 4. The printer feeds a page and prepares to print the document from the top of the page.
Step 5. When the page is complete, the paper is ejected and the process starts again with the next page of a multipage document or a new document.
Laser Print Process
A laser printer (and its close relative, an LED printer) is an example of a page printer. A page printer does not start printing until the entire page is received. At that point, the page is transferred to the print mechanism, which pulls the paper through the printer as the page is transferred from the printer to the paper.
Tip
To master this section, make sure you
• Memorize the six steps involved in laser printer imaging
• Master the details of each step and their sequence
• Be prepared to answer troubleshooting questions based on these steps
The laser printing process often is referred to as the electrophotographic (EP) process.
Before the six-step laser printing process can take place, the following events must occur:
• Laser printers are page based; they must receive the entire page before they can start printing.
• After the page has been received, the printer pulls a sheet of paper into the printer with its feed rollers.
After the paper has been fed into the print mechanism, a series of six steps takes place, which results in a printed page:
1. The excess toner is cleaned from the drum and the electrical charge discharged to prepare for the next page.
2. The image drum is conditioned.
3. The page is written to the drum.
4. The image is developed on the drum with the toner.
5. The toner image of the page is transferred to the paper.
6. The toner image of the page is fused permanently to the paper.
See Figure 11-8 to learn where each of these steps takes place in the printer. The following sections explain each step of the process in greater detail.
Figure 11-8 A typical monochrome laser printer’s components. The heavy line indicates the paper path; paper enters the printer at the right and is pulled through the printer to either the left output tray or the top output tray.

![]()
Step 1: Cleaning
To prepare the drum for a new page, the image of the preceding page placed on the drum by the laser or LED array (see Step 3) is removed by a discharge lamp. Toner that is not adhering to the surface of the drum is scraped from the drum’s surface for reuse.
Step 1 prepares the drum for the conditioning step (Step 2).
Step 2: Conditioning
The cylinder-shaped imaging drum receives an electrostatic charge of −600Vdc (DC voltage) from a primary corona wire or conditioning roller. The smooth surface of the drum retains this charge uniformly over its entire surface. The drum is photosensitive and will retain this charge only while kept in darkness.
Step 3: Writing
A moving mirror moves the laser beam across the surface of the drum. As it moves, the laser beam temporarily records the image of the page to be printed on the surface of the drum by reducing the voltage of the charge applied by the charger corona to −100Vdc. Instead of using a laser beam, an LED printer activates its LED array to record the image on the page.
Step 4: Developing
The drum has toner applied to it from the developer; because the toner is electrostatic and is also at −600Vdc, the toner stays on only the portions of the drum that have been reduced in voltage to create the image. It is not attracted to the rest of the drum because both the toner and the drum are at the same voltage, and like charges repel each other. This “like charges repel” phenomenon is the similar to two like poles of magnets that repel each other.
Step 5: Transferring
While the sheet is being fed into the printer, it receives an electrostatic charge of +600Vdc from a corona wire or roller; this enables it to attract toner from the drum, which is negatively charged (see Step 3). As the drum’s surface moves close to the charged paper, the toner adhering to the drum is attracted to the electrostatically charged paper to create the printed page.
As the paper continues to move through the printer, its charge is canceled by a static eliminator strip, so the paper itself isn’t attracted to the drum.
Step 6: Fusing
The printed sheet of paper is pulled through fuser rollers, using high temperatures (about 350F degrees) to heat the toner and press it into the paper. The printed image is slightly raised above the surface of the paper.
The paper is ejected into the paper tray, and the drum must be prepared for another page.
Color Laser Printing Differences
Color laser printers use the same basic process as monochrome lasers, but some use a transfer belt instead of an imaging drum. The use of a transfer belt enables all four colors (cyan, magenta, yellow, and black) to be placed on the paper at the same time, enabling color print speeds comparable to monochrome print speeds. When a transfer belt is used, the conditioning and transferring processes are performed on the transfer belt.
Inkjet Print Process
Two major methods are used by inkjet printers to create the ink dots that make up the page. Most inkjet printers heat the ink to boiling, creating a tiny bubble of ink that is allowed to escape through the printhead onto the paper. This is the origin of the name BubbleJet for the Canon line of inkjet printers.
Another popular method uses a piezo-electric crystal to distribute the ink through the printhead. This method makes achieving high resolutions easier; the Epson printers using this method were the first to achieve 5,760×1,440dpi resolutions. This method also provides a longer printhead life because the ink is not heated and cooled. Both types of inkjet printers are sometimes referred to as drop-on-demand printers.
During the print process:
1. The paper or media is pulled into position by a roller mechanism.
2. The printhead moves across the paper, placing black and color ink droplets as directed by the printer driver.
3. At the end of the line, the paper or media is advanced, and the printhead either reverses direction and continues to print (often referred to as Hi-Speed mode) or returns to the left margin before printing continues.
4. After the page is completed, the media is ejected.
Thermal Print Processes
Although thermal transfer, direct thermal printing, and dye-sublimation all involve heating the elements in a printhead to a particular temperature to transfer the image, there are some differences in operation. The basic process of thermal printing works like this:
1. The printhead has a matrix of dots that can be heated in various combinations to create text and graphics.
2. The printhead transfers text and graphics directly to heat-sensitive thermal paper in direct thermal printing, or to a ribbon that melts onto the paper in thermal transfer printing.
3. If a multicolor ribbon is used on a thermal transfer or dye-sublimation printer, each ribbon is moved past the printhead to print the appropriate color.
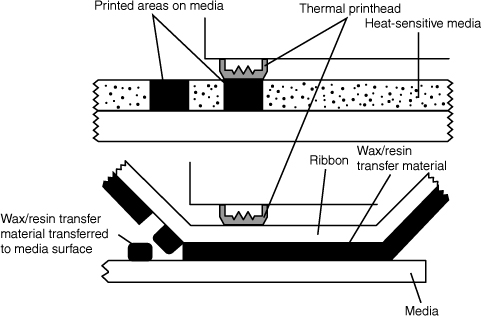
Figure 11-9 compares direct thermal and thermal transfer printing technologies.
Figure 11-9 Direct thermal (top) and thermal transfer (bottom) printing technologies.
![]()
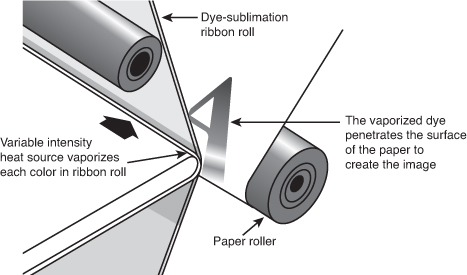
Dye-sublimation, like thermal transfer and direct thermal printing, also relies on heat to transfer the image to the media, but the process is very different than with traditional thermal printers:
1. During printing, the printhead heats up to transfer yellow, magenta, and cyan dyes from special dye-sublimation ribbons to the paper under computer control (some can print directly from flash or CD media). One pass is used for each color.
2. Unlike thermal transfer, which melts the wax or resin material to the surface of the paper, dye-sublimation dyes turn into a gas when heated and penetrate the surface of the paper. This creates a continuous-tone image. Thus, the relatively modest-sounding typical dye-sub resolutions of around 300–400dpi provide better real-world image quality than higher-resolution inkjet printers. Figure 11-10 illustrates this process.
Figure 11-10 Illustration of dye-sublimation printing process.
![]()
3. Many recent dye-sub printers apply a protective coating (overcoat) to the surface of the print before ejecting it.
Impact Print Process
Impact dot-matrix printers have the following parts moving in coordination with each other during the printing process:
Step 1. The paper is moved past the printhead vertically by pull or push tractors or by a platen.
Step 2. The printhead moves across the paper horizontally, propelled along the printhead carriage by a drive belt, printing as it moves from left to right. Bidirectional printing prints in both directions but is often disabled for high-quality printing because it can be difficult to align the printing precisely.
Step 3. As the printhead moves, the pins in the printhead are moving in and out against an inked ribbon as the printhead travels across the paper to form the text or create graphics.
Step 4. The ribbon is also moving to reduce wear during the printing process.
Steps 1–4 are repeated for each line until the page is printed.
Note
Impact dot-matrix printers have a lot of moving parts and traditionally high noise levels. This, along with their incapability to create truly high-quality, letter-quality text except at low speeds, has moved them out of most homes and offices. They are largely used for utility tasks (bank receipts, point-of-sale receipts, and warehouse reports) where their capability to print multipart forms is more important than print quality or noise level. Because impact dot-matrix printers use inexpensive ribbons designed to print millions of characters and can use fan-fold or single-sheet papers of all types, they have the lowest cost per page of all printers.
Interface Types
Interface types used by printers and scanners include the following:
• USB 2.0— Used by most inkjet, solid ink, dye-sublimation, thermal, and laser printers, either when connected directly to a PC or connected to a network via a print server. Also used by most multifunction (all-in-one) units.
• Parallel— Used by legacy impact printers as well as older inkjet and laser printers. Also used by some all-in-one units.
• RS-232 (serial)— Used by legacy impact and laser printers.
• SCSI— Used by high-end Postscript laser printers.
• Bluetooth— Used by some recent inkjet and laser printers.
• Infrared— Used by some legacy inkjet, impact, and laser printers.
• Ethernet— Used by inkjet and laser printers that are network-ready.
• IEEE 802.11 (wireless Ethernet)— Used by some recent inkjet and other types of printers.
• FireWire (IEEE 1394)— Used by some recent high-end inkjet printers used by graphic designers.
Many printers include more than one interface.
If you need to connect a printer using a different interface than its normal interface, you can sometimes use an adapter or print server device.
Adding Bluetooth Support
To add support for the Bluetooth short-range wireless network to a printer or scanner with a USB 2.0 port, connect a Bluetooth printer adapter. Note that the best results are usually obtained when the adapter is made especially for your printer.
Adding Ethernet Support
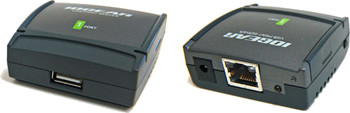
To add support for Ethernet local area networking to a printer that does not have a built-in Ethernet port, connect it to an Ethernet print server. Print servers are available in versions that support USB or parallel printers, and they enable the printer to be accessed via the print server’s IP address. Figure 11-11 illustrates a typical Ethernet print server for USB printers.
Figure 11-11 Front and rear views of an Ethernet print server that supports USB printers.
![]()
Note
Some laser printers can be upgraded with an internal Ethernet print server card.
When a printer includes its own Ethernet port, it is assigned an IP address on a TCP/IP network; similarly, a print server is also assigned an IP address on a TCP/IP network.
Adding 802.11Wireless Ethernet (WLAN) Support
To add support for 802.11 Wireless Ethernet (WLAN) local area networking to a printer, connect it to a Wireless Ethernet (Wi-Fi) print server. Print servers are available in versions that support USB or parallel printers, and enable the printer to be accessed via the print server’s IP address.
Note
Most Wireless Ethernet print servers also include Ethernet support.
Adding Infrared Support
To add support for infrared (IrDA) printing to a printer, connect it to an IrDA adapter. These are available for either USB printers or parallel printers. To learn more about Infrared (IrDA) ports for computers and other devices, see the section “Infrared,” in Chapter 16, “Networking.”
Printer Installation
There’s more to installing a printer than just plugging it in and hoping it works. The A+ Certification exams expect you to know the right way to “Git-R-Done,” so here’s how to do it.
Verifying Device Compatibility with Operating System and Applications
With Windows occupying the middle ground between printers and scanners on the one hand, and your PC on the other hand, the main concern is to make sure that Windows recognizes your printer or scanner. The easiest way to assure compatibility for a device is to visit the vendor’s website and look for the drivers for that device. Get the driver you need for your device and your operating system, and you’re ready to continue.
If you are unable to locate a driver made especially for a particular printer or scanner, you might be able to use a driver made for a similar printer or scanner. If the printer has an emulation mode, you can use it to make it emulate (act like) a different model so you can use a different driver.
Tip
In a pinch, you might be able to use printer drivers made for Windows 2000 with Windows XP, or printer drivers made for Windows XP with Windows Vista. However, you’re better off to use drivers made especially for your operating system.
You must use 64-bit drivers with a 64-bit version of Windows XP (or Windows Vista).
Connecting the Device
When should you connect the printer? It’s a common myth that you can plug in USB-based devices without installing drivers. This is true if, and only if, the computer already has a suitable driver installed. Although Windows includes drivers for many printers, it does not include drivers for most recent printers. Therefore, you should normally install the drivers provided by the vendor (either on the CD packaged with the device or by downloading updated versions) first.
Note
Many recent devices are now labeled to remind you to install the driver first; the labeling might be on the device itself or on the driver CD package. However, if you are reinstalling a device or moving an already-installed device to another system, this labeling has usually been removed and discarded. Check the documentation for the device to determine when to connect it during the installation process.
Devices using USB and FireWire (IEEE-1394) are hot-swappable; you can connect them without shutting down the computer. Devices using SCSI, parallel, and serial ports require that the device and the computer be shut down before the device is connected.
Installing Device Drivers
Device drivers for printers can be installed in one of the following ways:
• Using the Add Printer option in the Printers and Faxes folder in Control Panel
• Installing from a vendor-supplied driver disc
• Installing from a vendor-supplied downloadable file
Device drivers for all-in-one units are not supplied with Windows; you must use a vendor-supplied driver disc or downloadable file.
Using the Add Printer Wizard
The Add Printer option is suitable if Windows includes a suitable driver and the enhanced features that might be provided by a vendor-supplied driver are not necessary. To install a printer using the Add Printer Wizard, follow these steps:
Step 1. Open the Printers or Printer and Faxes folder. You can use the Control Panel or a shortcut located on the Start button such as Settings, Printer, or Printer and Faxes.
Step 2. Click the Add a Printer link in the Printer Tasks pane to open the Add Printer wizard.
Step 3. Specify whether the new printer is connected through a local port or through a network—Windows XP/Vista will automatically detect a Plug-and-Play (PnP) printer by default (assuming the printer is turned on and connected to your computer).
Step 4. Choose the port (for local printers) or network share (for network printers). If the printer is a network printer, specify whether you want to send MS-DOS print jobs to the printer.
Step 5. Select the port and then the brand and model of your printer.
If you have an installation disk or CD-ROM provided by the vendor, click Have Disk and browse to the installation disk or CD-ROM for the printer (see Figure 11-12).
Figure 11-12 Selecting a printer by brand and model; if the printer isn’t listed, or if you have a driver disk, click Have Disk.

![]()
Step 6. Specify whether the printer will be the default printer (if you are installing an additional printer).
Step 7. Specify whether you want to share the printer if prompted.
Step 8. Specify whether you want to print a test page. You should do this to make sure your new printer is working properly. This is the default.
Step 9. Windows XP displays the printer selections. Click Finish if you are done or click the Back button to make changes. Windows Vista does not let you go back at this point.
After you click Finish, the printer will be installed into the Printers folder, and it will be available to all Windows applications.
Installing a Printer or Multifunction Unit with a Vendor-Supplied Driver
Whether you use a vendor-supplied install disc or a downloaded file, the installation process is quite different from the Add Printer method:
Step 1. Insert the install disc into the computer’s CD or DVD drive. After a few moments, the install program might start automatically. If it doesn’t, open My Computer, right-click the CD or DVD drive, select Explore, and double-click the setup program’s icon.
Step 2. Navigate to the folder containing the downloaded install program. Double-click the .exe file to start the installation program.
Step 3. Connect your device to the USB or FireWire port, but do not turn it on (if the device uses a non-PnP port, you must connect it while the system is turned off).
Step 4. The install program starts. If prompted, select your device.
Step 5. When prompted, turn on your device. When the install program detects your device, it will complete the installation process.
Step 6. You might be prompted to restart your computer after the installation process is over. If that happens, remove the install disc and restart your system.
Calibrating the Device
Inkjet printers and multifunction units might require or recommend some type of calibration, most typically printhead alignment. This process involves printing one or more sheets of paper and selecting the print setting that produces straight lines. Some printers perform this step automatically, while others might require user intervention to determine the best setting.
Note
With some printers and multifunction units, it might be necessary to realign the printhead each time after changing ink cartridges. However, with others, it might be an optional utility that you can run on an as-needed basis.
Configuring Options and Device Settings
Printer options can be changed by the user before printing a document. However, if the printer will be used in the same way most of the time, it can be useful to configure the device with the most commonly-used settings.
Printer Options
Printer options are configured through the printer’s properties sheet. You can access printer properties sheets by doing one of the following:
• Right-clicking the printer’s icon in the Printers and Faxes folder in Control Panel and selecting Properties. Use this method to set defaults that will be used for all print jobs.
• Opening the Print dialog in an application and clicking the Properties button. Use this method to change settings for the current print job.
If the printer uses a Microsoft-supplied printer driver, the properties sheet will have some or all of the following tabs:
• General— Features the Print Test Page button, which prints a test page of graphics and text, listing the driver files, and the Printing Preferences button, which opens the Printer Preferences menu.
• Sharing— Enables or disables printer sharing over the network. In Windows 2000/XP this is available only if File and Print Sharing is enabled on the system. To enable Printer Sharing in Windows Vista go to Start, Control Panel, Network and Sharing Center, click on the down arrow for Printer Sharing, and select the radio button labeled Turn on Printer Sharing.
• The Sharing tab also features the Additional Drivers button. Once configured by the local user, this permits remote users to connect to the printer with other versions of Windows.
• Ports— Lists and configures printer ports and paths to network printers.
• Advanced— Schedules availability of printer, selects spooling methods, printer priority, print defaults (quality, paper type, orientation, and so forth), printer driver, print processor, and separator page.
• Security— Enables you to select which users can print and manage print jobs and documents; available only if user-level sharing is enabled, such as if the printer is connected to a computer that is part of a network being managed by a Windows or NetWare server or if Windows XP’s Simple File Sharing feature is disabled.
• Device Settings— Selects default paper tray, font substitutions, page protection, font cartridges, and printer memory.
• Color Management— Selects default color profile.
• About/Version Information— Lists driver version and/or driver files used by printer.
Tip
Some laser printers report the amount of memory installed to the operating system so that the properties sheet reflects this information. However, you should not assume that all laser printers do so. Be sure to verify that the memory size shown in the printer properties sheet is accurate. If not, change it to match the installed memory size.
To determine the installed memory size, use the printer’s own print test option.
The selections made on these tabs are automatically saved as the defaults when you click OK and close the dialog.
The Printer Preferences button on the General tab opens the preferences menu for the printer. The preferences menu can vary a great deal from printer to printer, but typically includes options such as these:
• Inkjet printers— Paper type, paper size, paper layout, print mode, utilities (head cleaning, alignment, ink levels), and watermarking.
• Laser printers— Layout, page order, resolution, font substitutions, printer features, pages per sheet, and watermarking.
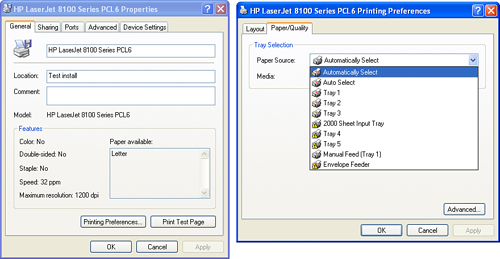
As you can see from Figures 11-14 and 11-15, these options can appear in various menus, depending upon the printer. Figure 11-13 shows General, Device Settings, and Advanced Print Properties for a laser printer, and Figure 11-14 shows the Advanced, Color Management, and Printing Preferences menu for an inkjet photo printer.
Figure 11-13 Windows XP General (a), Device Settings (b), and Advanced Print Properties (c) properties sheets for a typical departmental laser printer.

Figure 11-14 Windows XP Advanced (a), Color Management (b), and Printing Preferences (c) properties sheets for an inkjet photo printer.

![]()
To save changes to default settings, click Apply and then OK. Some printers offer the option to save settings under different names, so you can retrieve a particular setting before printing a particular type of document, such as a photo on glossy paper or a web page on plain paper.
Tip
Before configuring options and settings on a printer, consult with the user to find out how the printer will be used.
Printing a Test Page
If you use the Add Printer wizard to install a printer, you are prompted to print a test page at the end of the installation process. You can also print a test page by clicking the Print Test Page button from the General tab of Printer properties. A typical Windows XP test page resembles the one in Figure 11-15.
Figure 11-15 A Windows XP test print page.
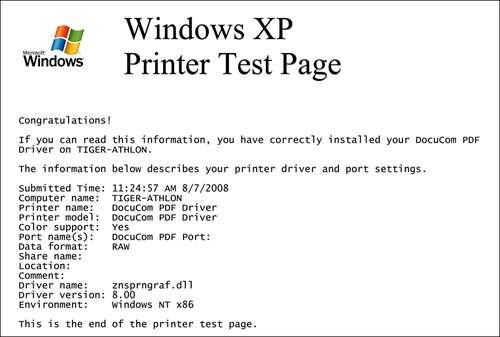
Note in particular whether the Windows logo looks correct: the upper-left quadrant is red; the upper-right quadrant is green; the lower-left quadrant is blue, and the lower-right quadrant is yellow. All quadrants feature shading. If you see streaks, lines or other print quality problems in either the logo or text printing, or if the printer doesn’t print, you need to troubleshoot your printer to solve the problem. See “Printer Troubleshooting Tools and Techniques,” in this chapter.
With most laser printers, you can also print a self-test page by pressing a button or combination of buttons on the printer. The self-test page lists the firmware revision used by the printer, the number of pages printed, and the amount of installed memory.
Educating the User About Basic Functionality
If possible, take a few minutes to acquaint the user(s) of the computer with the basic functionality of the new printer or multifunction unit. The demonstration should include
• How to use online or PDF-based documentation (if a printed manual is not provided)
• How to access the device’s properties sheet
• How to change settings for printing documents and photos
• How to print multiple-page documents
• How to use advanced features (printing multiple pages on a single sheet of paper, changing paper sizes, page orientation, and so on)
• How to open the print spooler to manage or delete print jobs
• How to perform routine maintenance (cleaning printheads, checking ink levels, and so on)
Optimizing Printer Performance
After a printer is installed, you can make it work even better by optimizing aspects of its performance, as discussed in the following sections.
Tray Switching
Most laser printers include two or more paper sources, such as internal paper trays, fold-down feeders for envelopes or card stock, and more. If a particular paper source is the primary or sole location for media, save time when printing by selecting the preferred source. On most printers, you’ll find the setting on the Paper/Quality tab in the Printing Preferences menu (see Figure 11-16).
Figure 11-16 Selecting the default tray on a laser printer.
If the user needs to switch sources, this menu is also used to specify alternatives.
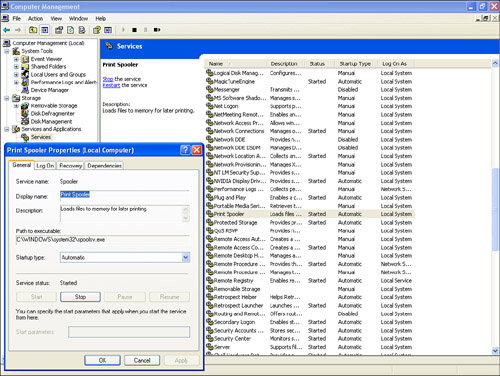
Print Spooler Settings
The print spooler service should be configured to start automatically (as of Windows XP Service Pack 2, this is the default setting). To verify that the spooler is properly configured, follow this procedure:
Step 1. Right-click Computer/My Computer and select Manage (this opens the Computer Management Console).
Step 2. Click Services and Applications in the right-hand pane.
Step 3. Click Services in the right-hand pane.
Step 4. Scroll down to Print Spooler and make sure the spooler status is listed as “Started” and the startup type is listed as “Automatic.” See Figure 11-17.
Figure 11-17 Viewing print spooler settings in Windows XP’s Microsoft Management Console.
![]()
Step 5. To make changes in the Print Spooler settings, double-click the Print Spooler listing. This opens the Print Spooler properties sheet. Make the changes desired, click Apply, and then OK.
Note
Some inkjet printers use their own print spooler or other printer utility service. These services should also be configured to start automatically. Check the printer’s documentation to determine the name of the service.
New XPS Feature in Windows Vista
Windows Vista incorporates the XML Paper Specification (XPS) print path. The XPS spooler is meant to replace the standard Enhanced Metafile print spooler that Windows has used for years. With XPS (part of the Windows Presentation Foundation) Vista provides improved color and graphics support, as well as support for the CMYK colorspace, and reduces the need for colorspace conversion.
This is implemented as the Microsoft XPS Document Writer that can be found in Start, Control Panel, Printers. A document created within any application in Windows can be saved as an .XPS file, to be viewed later on any computer that supports XPS. It can also be printed from any computer that supports XPS, but it will only print with proper fidelity if the computer has an XPS-compliant printer.
Device Calibration
Inkjet printers can use two printing methods: unidirectional, in which the printer prints only when the print head is moving from left to right, and bidirectional, in which the printer prints when the print head is moving in either direction (left to right or right to left). If the printhead is misaligned, bidirectional printing (sometimes referred to as high speed printing) will have much poorer print quality than unidirectional printing.
Be sure to align the print head as needed, using the alignment utility provided in the printer driver (Figure 11-18a), to permit successful use of bidirectional printing. To enable bidirectional printing, select this option (when it’s offered) in the Print Preferences menu (Figure 11-18b).
Figure 11-18 Aligning the printhead (a) helps produce better-quality high-speed (bidirectional) printing (b).

Media Types
As discussed elsewhere in this chapter, printer performance is heavily dependent upon using the right paper and media for the printer. In the case of inkjet printers, it is equally important to match the media type with the printer setting. Plain paper, glossy photo paper, matte photo paper, transparencies, and other types of media can be selected in the Printing Preferences menu (see Figure 11-19), and each selection configures the printer to place appropriate amounts of ink and adjusts the placement of ink droplets for best results.
Figure 11-19 Inkjet printers support a variety of media types.

Note
Some inkjet printer drivers offer brand-specific settings in the paper and media selection menu. For best results, use the recommended brands and types of paper.
Paper Orientation
Most printers (with the exception of a few large-format inkjet printers made for graphic arts) are designed to use paper in the portrait mode (long side to left and right; short side to top and bottom).
Some printers provide significantly better-quality and faster results when printing in portrait mode than in landscape mode, while other printers provide the same results in either portrait or landscape mode.
Some applications automatically switch the printer driver to the appropriate mode to match the layout of the document being printed, while others do not. If the document does not match the printer’s current mode, the printout might be cut off on one side, or it might be scaled to fit the dimensions of the paper.
If users will be printing in both portrait and landscape modes, they should be shown how to adjust the mode the printer uses. Users can change the layout through the Layout or Paper tab of the printer’s Printing Preferences menu (see Figure 11-20).
Figure 11-20 Selecting portrait or landscape print mode.
![]()
Print Order
In printers that deliver pages in face-down mode, as is typically the case with laser and solid-ink printers that use a curved paper path, multiple-page documents will be in the correct order when removed from the output tray.
However, if the printer uses a straight-through paper path, as is the case with inkjet and thermal printers (or with laser and solid-ink printers if the fold-down auxiliary paper tray is used), multi-page documents must be reordered, as the first page is on the bottom of the stack and the last page is on the top of the stack. To solve this problem, use an option such as Print Reverse Order in the Printing Preferences menu or Page Order: Back to Front in the Layout menu to print the document back to front (refer to Figure 11-20).
Installing and Configuring Printer Upgrades
Installing memory (RAM) and firmware upgrades can help printers provide better performance, handle more complex documents, support new types of memory cards and interfaces, and enhance other printer functions. The following sections help you understand these processes.
Memory
Laser and solid ink printers use memory modules to hold more page information, to reduce or eliminate the need to compress page information when printing, or to enable higher-resolution printing with complex pages.
Most recent printers with upgradeable memory use the DIMM memory module form factor, but printers do not use the same types of DIMMs as desktop or laptop computers. To order additional memory, you can
• Contact the printer vendor
• Contact a third-party memory vendor that offers compatible memory
To install a DIMM-based memory module, follow this basic procedure:
Step 1. Check the printer’s service manual to determine how to upgrade printer memory properly.
Step 2. Shut down the printer and disconnect it from AC power.
Step 3. Disconnect interface cables (USB, parallel, and so on) from the printer.
Step 4. Open the door covering the upgrade socket.
Step 5. Remove the DIMM from its antistatic packaging. Don’t touch the memory chips or connectors on the DIMM.
Step 6. Line up the module with the socket and make sure the label and contact side of the DIMM faces towards you.
Step 7. Insert the DIMM into the socket at a slight angle and lower it into place until the retaining clips on each side of the socket click (see Figure 11-21).
Figure 11-21 Inserting a DIMM into a printer and locking it into place.
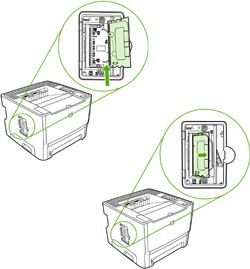
Step 8. Close the door over the upgrade socket.
Step 9. Reconnect power and data cables, and restart the printer.
Tip
After installing memory, make sure the printer properties sheet accurately reflects the installed amount of RAM.
For details, refer to the section “Printer Options,” earlier in this chapter.
Some printers might use other types of memory modules. For information on installation of other types of modules, see the documentation for the printer.
Firmware
Firmware (software on a chip) is used to change the personality of a printer or to add features. You can use firmware updates to add Postscript compatibility to a printer that supports PCL, add support for Bluetooth or other interface types, or to fix various bugs and problems.
You can perform firmware updates for printers in a variety of ways, including
• Update via the USB cable
• Update via connection of a flash memory card or USB flash memory drive
• Install a personality DIMM
• Update flash memory via sending the upgrade file via FTP to a networked printer (this method also works if a directly attached printer is connected via the USB port and is shared on the network)
• Update flash memory via sending the file via the parallel port to a directly attached printer
The exact method you should use depends upon the printer. Consult the support website for the printer to determine if a firmware update is available, what its benefits are, and how to install it.
Printer Troubleshooting Tools and Techniques
When printers and all-in-one units fail, many businesses are unable to function until the problem is solved. Use the techniques and tools discussed in the following sections to get these devices working properly again, applying the A+ Certification six-step troubleshooting process:
Step 1. Identify the problem
Step 2. Establish a theory of probable cause
Step 3. Test the theory to determine cause
Step 4. Establish a plan of action to solve the problem
Step 5. Verify full functionality and implement protective measures
Step 6. Document the problem, the actions you took to solve the problem, and the results
Identify the Problem
The first step in troubleshooting problems with these devices is to identify the problem.
Identifying Symptoms
Symptoms of print problems include
• An inability to print anything
• Slow print performance
• Poor print quality
To help determine more accurately why these events might be taking place, use the following methods.
Review Device Error Codes
Laser and solid ink printers can often display numeric or text error codes, sometimes with an LCD display or sometimes with specific patterns of flashing lights. Write down the message or code and check the documentation and vendor knowledge base to determine the problem.
Other types of printers might display a simple error indicator or simply not print. Consult printer documentation to determine the meaning of the signal and status displays on the printer.
Review Computer Error Messages and Logs
Virtually all printers in use today use bidirectional interfaces that can send messages back to the computer, such as
• Ink out
• Toner out
• Paper jam
• Printer offline
To view status messages like these, check the print spooler. Most printers use Windows’s own built-in print spooler, although some inkjet printers use their own spooler software instead. Normally, the print spooler is transparent to the user, sending print jobs to the printer as they are received and as the printer is available. However, special circumstances, such as a network printer going offline or the need to discard a print job, might require the user to open the print spooler.
To view the print spooler, you can
• Double-click the Printer icon shown in the Windows toolbar; this icon appears whenever one or more print jobs are waiting to print.
• Double-click the icon for your printer in the Printers or Printers and Faxes folder.
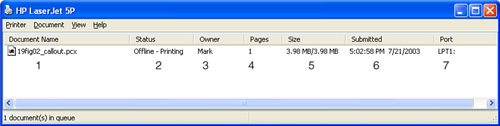
The spooler displays the following information:
• The name of the printer
• The print jobs waiting to print in order (newest at the top), with the following information, as shown in Figure 11-22:
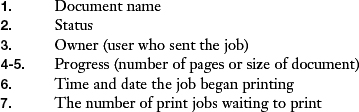
Figure 11-22 Windows XP print spooler in offline mode.
![]()
Using the Self-Test Feature
Printing a test page is a useful method for determining if the printer can print at all. If the printer has a built-in self test, use this function to determine if the printer is capable of printing. To print a test page from Windows, see “Printing a Test Page,” earlier in this chapter for details.
Impact Printers
Most impact dot-matrix printers have a self-test feature onboard. Use this to determine
• Which firmware the printer is using
• Which fonts and typefaces the printer includes
Normally, the self test is activated by holding down a button, usually the LF (line feed) button, while the printer is turned on. If the printer is wide-carriage, make sure the paper in place is also wide-carriage; if you don’t use wide-carriage paper, the printer will try to print on the platen, which could damage the printhead.
Inkjet Printers
Use the printer’s self test (activated by pressing a button or button combination on most printers when you turn it on; it varies by printer; see documentation or the printer vendor’s website for details) to see if the printer can
Note
Some recent printers don’t include a built-in self-test function, but the vendors might offer online diagnosis through your computer’s web browser. See the support website for your printer for details.
If the self test fails (you hear noise, but the printhead doesn’t move), check the drive belt; if it is broken or if the drive gears are jammed, the printer must be repaired or replaced. (Low-cost printers usually are not worth repairing.) Try using the paper advance button; if the paper won’t advance, check for obstructions, such as stuck labels or torn sheets, in the paper path.
If the self test works right, make sure the printer cable is attached correctly to the printer and computer, and retry the print job. If you get no results, make sure the proper port and driver are selected in Windows. If Windows sends print jobs to the wrong port, the printer won’t receive the data and can’t print. USB printers require a printer-specific driver as well as working USB ports
Using Diagnostic Tools
The Utility menu included in many inkjet printers provides a variety of diagnostic tools you can use to solve printing problems. These might include the following:
• Status or ink monitor— Use this to determine the ink level in each cartridge
• Nozzle check— Use to determine if any printheads are clogged
• Head cleaning— Use to clean heads (this option uses ink, so use only if you have clogged nozzles)
• Print head alignment— Use to correct misaligned vertical straight lines or large characters
Many laser printers include a special Diagnostics mode that you can use to test the printer’s cartridge check, paper path sensors, and components. To run built-in diagnostics, select this option from the printer’s control panel.
Establishing a Theory of Probable Cause
Depending upon the type of problem you encounter with a printer, the probable cause might be obvious (toner out, head clog, and so on) or it might be more difficult to determine. To help determine the most likely causes, perform the steps in the following sections.
Reviewing Service Documentation
Some simple service documentation (such as how to replace a toner or ink cartridge) is usually included with most printers. However, for more complex operations, such as removal or replacement of motors or other components, you will probably need to consult the service documentation for the printer.
Some vendors offer detailed service documentation on their websites at no charge, while others might require you to purchase a service manual for the printer to get detailed service information.
Tip
If you have a close relationship with a printer service shop, contact your representative to see if they can provide you with detailed information. Some companies that sell replacement and service parts for printers provide detailed procedure guides on their websites.
Reviewing Knowledge Base
If you are having a printer problem, be sure to consult the following knowledge bases for solutions:
• The device vendor’s knowledge base— Typically, you need to specify the name and model number of the printer or device to see a range of articles. Some provide a free-text search to help you find solutions.
• The knowledge base provided by the operating system vendor (Microsoft)— Searching the Microsoft Knowledge Base (http://support.microsoft.com) is helpful if the problem appears to be related to the operating system.
• The application vendor’s website— Although applications communicate with Windows via the printer or scanner driver to work with the hardware, you might find recommendations here as well.
Defining and Isolating the Problem
After reviewing the information provided by your own or customer tests, service information, and knowledge base searches, you are in a good position to define and isolate the problem. However, if you need more help in this process, determine the following:
• What other hardware or software was in use at the time the problem occurred?— The user probably will answer these types of questions in terms of open applications, but you will also want to look at the taskbar and system tray in Windows for other programs or routines that are running. Pressing Ctrl+Alt+Del will bring up a task list in Windows that has the most complete information about programs and subroutines in memory. To determine the exact version of a Windows-based program in use, click Help, About. View the System properties sheet to determine the version of Windows in use.
• What task was the user trying to perform at the time the problem occurred?— Ask the questions needed to find out the specific issues involved. For example, “Printing” isn’t a sufficient answer. “Printing a five-page brochure from PageMaker to a laser printer” is better, but you’ll probably want the user to re-create the situation in an attempt to get all the information you need. Don’t forget to check the Event Viewer in Windows XP or Vista for details about the software running at the time of the error.
• Is the hardware or software on the user’s machine or is it accessed over the network?— If the network is involved, check with the network administrator to see if the network is currently working properly, and check with other users to see if they can print to the network printer. If the hardware and software are not networked, your scope for troubleshooting is simpler.
• What were the specific symptoms of the problem?— Some users are very observant, but others might not be able to give you much help. Ask about the approximate time of the failure and about error messages, beeps, and unusual noises.
• Can the problem be reproduced?— Reproducible problems are easier to find than those that mysteriously “heal” themselves when you show up. Because power and environmental issues at the customer’s site can cause printer or scanner problems, try to reproduce the problem at the customer’s site before you move the device to your test bench, where conditions are different.
• Does the problem repeat itself with a different combination of hardware and software, or does the problem go away when another combination of hardware and software is used?— For example, if the user can print from Microsoft Word but not from PageMaker, this means that the printer is working, but there might be a problem with configuration or data types used by different applications. If the user can’t print anything, there might be a general problem with the printer hardware or drivers.
Use the information you have gathered to develop a theory of probable cause. Start with the most likely cause first.
Testing the Theory to Determine Cause
To test your theory, try to confirm it. Here are a couple of examples:
Problem: A complex document (one with many fonts or graphics) does not print
Research findings: The greater the number of fonts or graphics in a document, the larger the amount of printer memory needed to print the document.
Theory: Not enough memory in printer.
Test: Print a simple document (one or two fonts, no graphics).
Desired Result: If the simple document prints but the complex document does not, a printer memory upgrade is probably needed.
Dealing with Other Results: If neither document prints, check for other possible causes (driver problems, cabling, port problems, and so on) and construct a new theory.
Problem: Repetitive marks on laser-printed document
Research findings: The distance between the marks is consistent with a dirty fusing roller or damage to the toner cartridge.
Theory: The fusing roller needs to be cleaned.
Test: Clean the fusing roller and print a test page.
Desired Result: If test pages no longer show repetitive marks, the problem is solved.
Dealing with Other Results: If test prints continue to show repetitive marks, replace the toner cartridge and reprint the test page.
Establishing a Plan of Action to Resolve the Problem and Implement the Solution
The plan of action to resolve the problem and implement the solution needs at least three elements, in the following order:
Step 1. Determining the problem resolution—Examples include installing more memory, cleaning the fusing roller, changing the toner cartridge, changing inkjet cartridges, and so on.
Step 2. Developing a plan to implement the solution—Specifying where to obtain upgrades or replacement parts, how to install them, what schedule to follow, and so on.
Step 3. Implementing the solution—Applying the solution to all affected printers and multifunction devices using the procedure in Step 2.
Verifying Full System Functionality and Implementing Preventative Measures (if Applicable)
After implementing the solution, be sure to test the printer or device to determine that the device has full functionality. In some cases, you might need to update settings in the printer properties sheet (such as memory size or paper tray settings). In addition to performing self-tests and test prints, be sure to print the same documents that were being printed when the problem was first reported.
Documenting Findings, Actions, and Results
The final step recommended in CompTIA’s A+ Certification troubleshooting theory is the documentation of your findings, actions, and results. You can make notes of your process in any form, but if you want to research similar problems and possible solutions more quickly, consider developing a spreadsheet or database that can store this information in an easily searchable format.
If the problem and solution involve Windows error messages or dialogs, use screen capture or a digital camera (useful for recording STOP blue-screen errors) to save this information for future review.
Troubleshooting Print Failures
Print failures can be caused by a variety of issues, as described in the following sections. Use this information to prepare for troubleshooting questions on the A+ Certification exams and in real-world circumstances.
Paper Out
A paper-out error is one of the easiest problems to solve. Depending upon the printer and printer driver, you might see an on-screen error or a numeric error or error code on the printer’s control panel or signal lights.
To solve a paper out error, load additional paper and press the printer’s online button (or click the Continue or Retry button in an error dialog in Windows) to continue printing.
If a paper-out error is displayed when the printer has paper installed, remove the paper stack and reinstall it into the paper tray. If the problem persists, shut down the printer, wait a few seconds, and restart it. If the problem persists, have the printer serviced.
Clearing Print Queue
You might need to clear a print queue for a variety of reasons:
• The wrong options selected for the installed paper
• Gibberish printing because of a problem with the printer driver, cable, or port
• You decide not to print the queued documents
You can clear selected print jobs or all print jobs in a queue.
To access the print queue (also known as the print spooler), open the printer icon in the notification area, or open the Printers and Faxes folder in Control Panel and double-click the appropriate printer icon.
To discard a print job in the print queue, follow these steps:
Step 1. Open the print queue.
Step 2. Right-click the print job you want to discard.
Step 3. Select Cancel Print and the print job will be discarded.
To discard all print jobs in the queue, follow these steps:
Step 1. Open the print queue.
Step 2. Click Printer.
Step 3. Click Cancel All Documents (varies by Windows version) to discard all print jobs.
Restarting Print Queue
To release print jobs stored in the queue in offline mode after the network printer is available, use one of these methods:
Step 1. Open the print queue.
Step 2. Click Printer.
Step 3. Uncheck Use Printer Offline and the print jobs will go to the printer.
Alternatively:
Step 1. Right-click the printer icon in the Printers and Faxes folder.
Step 2. Click Use Printer Online.
Power Off, Power On Printer
Turning off and turning on the printer can sometimes solve print problems, but if the printer is accepting a large print job from a Windows print queue, it might also be necessary to clear the print queue to prevent continued printing of garbage pages.
The memory in laser printers is used to store multiple pages. Check the printer documentation to see how to clear out the printer’s page memory.
Paper Jams
Paper jams have a variety of causes, depending upon the printer type. Use the following sections to solve paper jams.
Note
Some printers require special tools to remove the plastic shell; contact the printer’s manufacturer for detailed disassembly instructions and recommended tools.
Other Types of Printers
The more turns the paper must pass through during the printing process, the greater the chances of paper jams.
Curved paper paths are typical of some inkjet and many laser printers as well as dot-matrix printers using push tractors: The paper is pulled from the front of the printer, pulled through and around a series of rollers inside the printer during the print process, and then ejected through the front or top of the printer onto a paper tray. Because the cross-section of this paper path resembles a C, this is sometimes referred to as a C-shaped paper path.
Some printers, especially those with bottom-mounted paper trays, have more complex paper paths that resemble an S.
A straight-through paper path is a typical option on laser printers with a curved paper path. Printers with this feature have a rear paper output tray that can be lowered for use, which overrides the normal top paper output tray. Some also have a front paper tray. Use both front and rear trays for a true straight-through path; this is recommended for printing on envelopes, labels, or card stock. Inkjet printers with input paper trays at the rear of the printer and an output tray at the front also use this method or a variation in which the paper path resembles a flattened V.
Paper jams can be caused by incorrect paper-loading procedures, overloading the input tray, or using paper or card stock that is thicker than the recommended types for the printer. If the printer jams, open the exit cover or front cover or remove the paper tray(s) as needed to clear the jam.
Tip
When you insert paper into any type of printer, be sure to fan the pages before you insert the paper into the tray to prevent sticking.
Print Quality Problems
Print quality problems have many causes, but the following sections will help you understand the leading causes and their solutions for each printer type covered by the A+ Certification exams.
Laser/LED Printers
Black marks on a page are usually caused by debris stuck to or surface damage to the imaging drum or dirty components in the printer (fuser, paper rollers, charging rollers, and so on). To determine which component is the cause, compare the distance between marks on the paper with the circumference of each component. The printer’s manual will provide this information. Replace the imaging drum (part of the toner cartridge on many printer models) if the drum is at fault. Clean other components if they’re at fault, and retest. If printing is uneven or there are blank spots on the page, the toner is running low. Remove the toner cartridge and gently shake it to redistribute the toner. Install a new toner cartridge as quickly as possible. If the printing is even, the printer might be set for Economode or a similar mode that uses less toner. Adjust the printer properties to use normal print modes for final drafts.
If the printer produces a blank page immediately after the toner cartridge has been changed, remove the toner cartridge and make sure the tape that holds the toner in place has been removed; without toner, the printer can’t print.
If the printer produces a blank page after printing thousands of pages, the toner probably is exhausted. Replace the toner cartridge.
If the printed output can be wiped or blown off the paper after the printout emerges from the laser printer, the fuser needs to be repaired or replaced. The fuser is supposed to heat the paper to fuse the toner to the paper; if it fails, the toner won’t stick to the paper.
Inkjet Printers
Smudged print output from an inkjet printer can be caused by dirty printheads, incorrect head gap settings, or paper rollers and by incorrect resolution and media settings. First, check the head gap setting; use the default setting for paper up to 24 lb. rating; the wider gap for labels, card stock, and envelopes. Clean the printhead by using the printer’s built-in nozzle cleaning routine. Typically, the cleaning routine can print a test sheet before and after cleaning. Repeat the cleaning process until all colors and black print properly. If the cleaning process doesn’t result in acceptable results, remove the printhead and clean it. If the printhead is built into the printer or if the paper-feed rollers or platen have ink smudges, use a cleaning sheet to clean the paper-feed rollers, platen, and printhead.
Check the Printer Properties setting in the operating system to ensure that the correct resolution and paper options are set for the paper in use. Incorrect settings can lead to excessive ink being used for a particular print job, leading to smudged output.
Unlike laser output—which can be handled as soon as the page is ejected—inkjet output, particularly from older printers or output on transparencies or glossy photo paper, often requires time to dry. For best results, use paper specially designed for inkjet printers. Paper should be stored in a cool, dry environment; damp paper also will result in smudged printing.
If uneven characters occur after the ink cartridge has been replaced, you might need to realign the printhead with the printer’s utility program or Printer Properties sheet. This process prints out a series of long bars, after which the user selects which bar is properly aligned.
Gaps in printed output usually indicate a partially clogged printhead. See “Inkjet Printers” (in the preceding section) for instructions. Replacing the ink cartridge replaces the printhead on some printers, but on other printers the printhead is a separate, removable device or is fixed in position.
Tip
Third-party and poorly refilled OEM inkjet cartridges are among the major causes for poor-quality prints, printhead clogs, and ink leakage in inkjet printers. For maximum print quality, you should use same-brand consumables when replacing ink in inkjet printers.
Impact Printers
If the print is evenly faded, the ribbon is dried out. Replace the ribbon to achieve better print quality and protect the printhead. If the print appears more faded on the top of each line than on the bottom, the head gap is set too wide for the paper type in use. Adjust the head gap to the correct width to improve printing and protect the printhead from damage.
If the printhead won’t move, check the drive belt and the gear mechanism. Jammed gears in the printer or a broken drive belt will prevent the drive belt from moving the printhead. Check the drive belt first to see if it is broken, and then check the gears that move the printhead. You might need to disassemble the printer to check the gears.
Thermal and Dye-Sublimation Printers
Poor print quality in thermal and dye-sublimation printers can have several causes, including
• Incorrect printhead temperature
• Wrong paper or media type for printer or print mode
• Dirty printer parts, paper, or media
• Incorrect printhead pressure or head-gap settings
• Defective ribbons
• Distorted colors
• Incorrect print density settings
If the printhead is too hot or too cold for the media in use, the printing will be of poor quality. Check the following:
• Environmental temperature— Move the printer to a warmer room if the area is much colder than normal room temperature, or to a cooler room if the room is much warmer than normal room temperature.
• Print mode setting— If the printer can be used in both direct thermal (ribbonless) or thermal transfer (uses ribbons) modes, make sure the correct mode is selected and that the printer is using a ribbon only when used in thermal transfer mode.
Thermal transfer printing can be performed on a wider range of media than direct thermal printing, but you should still use only recommended types of paper, labels, and other media. Because thermal transfer printing melts wax or resin to the paper, smooth paper and label stock works better than textured paper or label stock.
Direct thermal printing uses heat-sensitive paper, so don’t try using plain paper in a direct thermal printer. If the printer can be switched between direct thermal and thermal transfer modes, make sure to switch to the correct type of paper stock for the mode and insert or remove the ribbon as needed (the ribbon is used for thermal transfer, but not for direct thermal).
Printheads used for thermal transfer printing can become contaminated with wax or resin residue from the ribbon. Follow the printer vendor’s recommendations for cleaning the printhead.
On a direct thermal printer, check the rollers used to transport paper for dust and dirt. If they are dirty, clean them with a cleaning sheet, soft wipe, or compressed air according to the vendor’s recommendations.
Dust or dirt on any type of paper stock, especially that used for direct thermal printing, can cause dropouts in printed text or graphics. Store paper or media in a clean, dust-free location.
Thermal transfer printers rely on heat transfer from the printhead to the ribbon and from the ribbon to the paper or media to produce a printed image. If the head-gap or printhead pressure settings are incorrect, the print quality will be faded or uneven.
Use the color-matching features provided in the photo editor and with the printer to assure accurate colors. You might need to use a calibration sheet with your scanner and photo editor.
Be sure to replace ribbons on a thermal transfer printer when print quality declines. Although some thermal transfer printers work with multiuse ribbons, eventually these ribbons don’t have enough useful wax or resin left to produce a high-quality image.
Both types of thermal printing can use adjustments in print density. It might be done with an adjustment on the printer or through the Printer Properties sheet in Windows. Increase the density to achieve dark, well-formed letters, but reduce the density if closed letters such as a, e, or o start to fill in.
Error Messages and Codes
Printers use many different methods to provide error messages and codes, including
• On-printer error codes and messages— These can be provided by the printer’s LCD display or by signal lights flashing in different patterns.
• Windows printer driver error messages— These can be displayed within the print spooler window or by the print progress dialog used by many inkjet printers.
HP LaserJet printers use the following error codes to describe printing problems:
• 13 or 13.xx— Paper Jam (replace .xx with specific numeric values that indicate exactly where the paper jam has occurred)
• 20— Insufficient memory; press Go to print partial page
• 40— Bad transmission to EIO interface card
• 41.xx— Various printer errors involving media or other problems (replace .xx with value indicating specific error)
• 49.xx— Firmware error
• 50.4— Line voltage
• 50.x— Fuser error
• 51.x— Beam detect (.1) or laser error (.2)
• 52.x— Scanner speed errors; startup error (.1); rotation error (.2)
• 53.xy.zz— DIMM memory error in specified module (x= DIMM type; y=location; zz=error number)
• 54.1— Sealing tape not removed from toner cartridge
• 54.4— Line voltage error
• 55.xx— Internal communications error; can be caused by formatter, firmware DIMM, engine controller board, or fuser problems
• 56.x— Error in paper input or accessory (.1) or output bin (.2) connection
• 57.x— Printer fan (.4), duplex fan (.7), or main motor (older printer models in LaserJet 4, 5 series) failure
• 58.2— Environmental thermistor (TH3) failure
• 59.x— Main motor error (.0), startup error (.1), or rotation error (.2)
• 62.x— Printer memory error in internal memory (.0) or DIMM slots (.1–.4)
• 64— Scan buffer error
• 66.xx.yy— External paper-handling device error
• 68— NVRAM or permanent storage error
• 69.x— Temporary printing error
• 79— Printer detected error (can be caused by memory, firmware, EIO, formatter)
• 8x.yyyy— EIO device or slot error
A good resource for both numerical and text-based error codes for HP LaserJet printers is the HP Laserjet Error Codes page at PrinterTechs.com: http://www.printertechs.com/tech/error-codes/error-codes-index.php.
Performing Preventative Maintenance
A properly-maintained printer is capable of producing hundreds of thousands of pages—if it is properly maintained. The recommendations in this section are based on years of real-world experience as well as the A+ Certification exam objectives.
Installing Maintenance Kits
Many HP and other laser printers feature components that should be replaced at periodic intervals. These components often include fuser assemblies, air filters, transfer rollers, pickup rollers, other types of rollers, and separation pads. These components wear out over time, and can usually be purchased as a maintenance kit as well as separately.
A printer that uses a maintenance kit will display a message or an error code with a meaning such as “Perform printer maintenance” or “Perform user maintenance” when the printer reaches the recommended page count for maintenance kit replacement. Depending upon the printer model and whether it is used for color or monochrome printing, the recommended page count could be at as few as 50,000 pages or as much as 300,000 pages or more.
Note
See PrinterTechs.com, Inc. (http://www.printertechs.com/maintenance-kits.php) or DepotAmerica (http://www.depot-america.com/tr_mk.asp) to purchase maintenance kits for HP and Lexmark laser printers and for useful installation instructions.
Resetting Paper Counts
After a fuser assembly or full maintenance kit is installed in a laser printer, the page count must be reset; otherwise, you will not know when to perform recommended maintenance again. Typically, the page count is reset by pressing a specified combination of buttons on the printer’s control panel.
Note
If the printer is under service contract or being charged on a per page (or click) basis, it is not recommended to reset the paper count after servicing. However, most laser printers print the page count when you perform a self-test.
Cleaning Rollers, Printheads, and Other Components
Most types of printers need periodic cleaning of various components, including rollers, printheads, wiper and cleaning blades, and others. The following sections help you determine the components in each printer type that need to be cleaned, and how to clean them.
Laser Printers
Because laser printers use fine-grain powdered toner, keeping the inside of a laser printer clean is important in periodic maintenance. Turn off the laser printer before using a damp cloth to clean up any toner spills. To keep the paper path and rollers clean, use cleaning sheets made for laser printers, as follows:
Step 1. Insert the sheet into the manual feed tray on the laser printer.
Step 2. Create a short document with Notepad, WordPad, or some other text editor and print it on the sheet.
As the sheet passes through the printer, it cleans the rollers. If a specialized cleaning sheet is not available, you can also use transparency film designed for laser printers.
Caution
Never use transparency media not designed for laser printers in a laser printer. Copier or inkjet media isn’t designed to handle the high heat of a laser printer and can melt or warp and possibly damage the printer.
Inkjet Printers
Cleaning an inkjet printer’s printhead—either with the printer’s own cleaning feature, a cleaning utility built into the printer driver, or with a moistened cleaning sheet—will restore most printers to service. Most inkjet printers have built-in or software-controlled routines for cleaning the ink cartridges and checking the alignment of two-pass characters. Use these options when you notice poor-quality printouts.
Caution
Because both cleaning liquids and plain water can be used to clean up excess ink (unplug the printer first!), inkjet printers should not be used when water resistance is of paramount concern. Inkjet inks are more water resistant today than previously, but a careless spill can still destroy a digital masterpiece printed on an inkjet printer.
To learn more about inkjet printer cleaning kits, see “Cleaning Solutions,” later in this chapter
Thermal Transfer and Direct Thermal Printers
Printheads used for thermal transfer printing can become contaminated with wax or resin residue from the ribbon. Follow the printer vendor’s recommendations for cleaning the printhead. On a direct thermal printer, check the rollers used to transport paper for dust and dirt. If they are dirty, clean them with a cleaning sheet, soft wipe, or compressed air according to the vendor’s recommendations.
Checking for a Suitable Environment
Check the printer documentation to determine the vendor’s recommendation for a suitable environment for the printer. If the printer is located in a room with too high a relative humidity level (85% or higher), paper might swell or stick together, toner might not transfer or set up properly, and inkjet output might not stick to the paper. Too low a humidity level (15% or lower) can cause static electricity to build up.
Using Recommended Supplies
Printer manufacturers have two reasons for encouraging users to use same-brand ink, toner, and paper, and only one of them involves profitability. Yes, printer makers often make more money from inkjet printer cartridges than from the sale of the printer itself (so much so that I actually overheard a shopper at a discount store call home and say that he was buying a new printer rather than buying ink for the family’s old printer). However, the other reason to buy same-brand supplies is print quality, particularly with inkjet printers.
While third-party ink for inkjet printers is much less expensive per page than OEM ink, it also fades much more quickly in most cases but also produces poorer-quality output.
Note
The PC World June 2008 study, “Cheap Ink: Will It Cost You?” by Jeff Bertolucci (available at www.pcworld.com/article/147267/cheap_ink_will_it_cost_you.html), provides a recent demonstration of the poorer print quality and shorter image lifespan produced by third-party inks. The story also features side-by-side comparisons of photos printed with OEM and third-party inks.
Recommended Tools
The following sections discuss tools you can use to solve printer problems.
Multimeter
The multimeter can be used to check AC and DC voltage and to check cable continuity. If a printer is not receiving power, you can use the multimeter to determine if it is plugged into a working AC power source, or to verify that the DC power levels coming from an AC/DC converter are correct.
Be sure to select the appropriate AC or DC voltage range on manual-ranging meters, and if you use the meter to test voltages inside the printer, make sure the meter is designed to handle the voltage range(s) it will encounter.
Screwdrivers
At a minimum, you should have narrow and wide-blade screwdrivers and jewelers’ screwdrivers. Some printers might require specialty drivers such as hex or Torx drivers.
Cleaning Solutions
Cleaning sheets and solutions are available for most types of printers. Moistened cleaning sheets can be used to help clean clogged inkjet and solid-ink printheads or print rollers in a variety of printers.
Inkjet printer cleaning kits come in two forms:
• A special sheet and cleaning spray
• A cleaning pad and liquid cleaner
The sheet and spray is used to clean the paper paths in the printer and to remove ink buildup on the printheads. Spray the cleaner onto the sheet, insert it into the printer as directed, and print a few lines of text to clean the printer.
The cleaning pad is designed for models with removable printheads (which are part of the ink cartridge on thermal-inkjet printer models). Soak the pad with the supplied fluid and rub the printhead over it to remove built-up ink.
Be sure to use cleaning sheets or solutions designed for the particular printer or device you need to clean, and follow the vendor’s recommendations.
If you need to remove fingerprints and other markings from scanner cover glass, printer or scanner enclosures, or other computer components, Endust for Electronics is a good choice. Available in aerosol or pump spray or premoistened wipes, Endust for Electronics does not cause static buildup.
Extension Magnet
An extension magnet can help you retrieve dropped screws or other components from inside a printer, scanner, or all-in-one unit.
Exam Preparation Tasks
Review All the Key Topics
Review the most important topics in the chapter, noted with the key topics icon in the outer margin of the page. Table 11-2 lists a reference of these key topics and the page numbers on which each is found.
Table 11-2 Key Topics for Chapter 11

Definitions of Key Terms
Define the following key terms from this chapter, and check your answers in the glossary.
CMYK,
Troubleshooting Scenario
You have just purchased a new printer. You have set up the printer where it needs to be. Once you have completed the setup and try to print a test page, you notice that the page is unreadable. What process should you complete to correct the problem?
Refer to Appendix A, “Answers to the ‘Do I Know This Already?’ Quizzes and Troubleshooting Scenarios,” for the answer.