
Chapter 14. Installing and Upgrading Windows Operating Systems
This chapter covers a portion of the CompTIA A+ 220-701 objectives 3.1 and 3.3.
It’s hard to estimate how many operating system installations a PC technician will do over the course of a career, but you can be assured that it will be a lot of installations. Because there are so many different hardware configurations in PCs today, almost every computer will react differently to an installation or upgrade. In this chapter, you will gain a foundation of knowledge about the possible installations and upgrades of Windows. Later, after you have installed several operating systems yourself, this foundation will help you to build solid experience.
For the 2009 A+ exam you need to know how to
• Install Windows Vista
• Install Windows XP
• Upgrade to Windows Vista from Windows XP or Windows 2000
• Upgrade to Windows XP from Windows 2000
• Troubleshoot Windows Vista/XP installations and upgrades
For this chapter it is highly recommended that you try to get your hands on full version copies of Windows Vista and Windows XP. You should also have a test computer so that you can run clean installations of both operating systems, as well as running an upgrade from XP to Vista.
“Do I Know This Already?” Quiz
The “Do I Know This Already?” quiz allows you to assess whether you should read this entire chapter or simply jump to the “Exam Preparation Tasks” section for review. If you are in doubt, read the entire chapter. Table 14-1 outlines the major headings in this chapter and the corresponding “Do I Know This Already?” quiz questions. You can find the answers in Appendix A, “Answers to the ‘Do I Know This Already?’ Quizzes and Troubleshooting Scenarios.”
Table 14-1 “Do I Know This Already?” Foundation Topics Section-to-Question Mapping

1. You need to install the Windows Vista operating system on a client’s computer. Upon arrival you notice that the system is an older model. What should you do first before trying to install the operating system?
a. Format the hard drive
b. Verify the hard drive is large enough
c. Check the Windows Vista Logo’d Products List
d. Run Chkdsk
2. Which of the following are valid methods that can be used to install a Windows operating system? (Choose all that apply.)
a. Distribution CD/DVD
b. Network installation
c. Drive imaging
d. A recovery CD
3. You want to create an image for an unattended installation. Which of the following will you need to create this type of image for a Windows XP install? (Choose all that apply.)
a. Unattend.txt
b. Winnt.sif
c. Backup.exe
d. Sysprep.inf
4. Which of the following are the file systems supported by Windows XP and Windows Vista? (Choose all that apply.)
a. FAT16
b. FAT32
c. FAT64
d. NTFS
5. You are installing the Windows Vista operating system. You have a SCSI hard drive installed. Where does Vista allow you to install the device drivers?
a. By pressing F6 when the operating system starts loading
b. By clicking on the Load Driver button where partitioning is done
c. By pressing F8 during boot
d. By clicking on the Load Vista Drivers Only button
6. You have just installed the Windows XP operating system. You need to verify the installation succeeded by viewing the setup log files. Where would you go to find this information?
a. C:program fileslogs
b. C:windows
c. C:windowssystem32
d. C:system32
7. You have been asked to upgrade a Windows XP operating system to the new Windows Vista OS. You first need to verify if the system can run the new operating system. What is the minimum processor speed that will run Windows Vista?
a. 1000 MHz
b. 1.5 GHz
c. 800 MHz
d. 850 MHz
8. You need to upgrade a computer running Windows XP to Windows Vista. You need to verify that the upgrade will go smoothly. What should you do to determine if this computer can run the Vista operating system?
a. Run the Vista upgrade advisor
b. Check the HCL for computer specifications
c. Run the checkupgradeonly program
d. Run the Vista upgrade wizard
9. You are the technician for your company. You are about to upgrade a computer running the Windows XP operating system to Windows Vista. You need to prepare the computer for the upgrade. What should you do before attempting this upgrade? (Choose all that apply.)
a. Download any new device drivers
b. Back up all important files
c. Download any application updates
d. Back up Internet Explorer favorites
e. Download any new device drivers and download any application updates only
10. You have a computer running the Windows 2000 operating systems. You are in charge of the upgrade and notice that the file system is FAT32. You need to convert the files system to NTFS. At what point can you do this?
a. Once the install process is complete
b. During the upgrade process
c. You cannot convert FAT32 to NTFS
d. During the text portion of the install
11. You are in the process of doing an upgrade to Windows Vista. You start the process and then you cannot go any farther. Which of the following could be the problem?
a. You are using a full version disk instead of the upgrade disk.
b. Your installation key in incorrect.
c. You don’t have enough free disk space for the installation.
d. The file system is FAT32.
12. Which of the following will prevent you from starting the upgrade process from Windows XP to Windows Vista? (Choose all that apply.)
a. Not running the upgrade advisor
b. Hardware conflicts
c. Free disk space
d. Processor speed
e. Memory size
Foundation Topics
Installing Operating Systems
A computer without an operating system is useless. The process of preparing for an operating system installation includes
• Verifying that your system has sufficient resources and free disk space for the installation
• Verifying that you have drivers for the devices and peripherals you want to use with the operating system
• Preparing the appropriate startup disks (when required) to prepare the hard disk and start the installation
• Determining the location of the operating system if you are installing the new operating system as a dual-boot configuration that will enable you to run either the old or new operating systems
• Determining which edition of the operating system you wish to install
Verifying Hardware Compatibility and Minimum Requirements
Any system built in the last few years can easily achieve the hardware requirements needed for installing Windows Vista and will far surpass the requirements of Windows XP. However, in the real world, digital dinosaurs that might not be fast enough or have enough free disk space to support some versions of Windows still roam the earth.
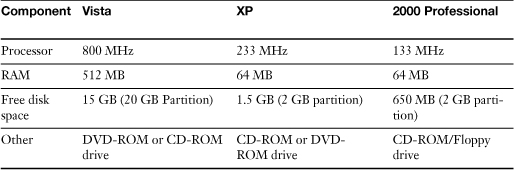
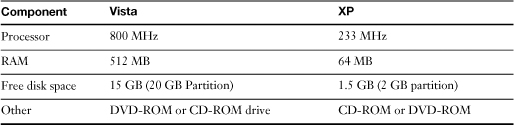
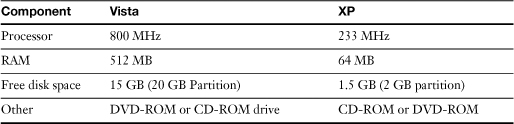
Table 14-2 lists the minimum requirements for Windows Vista, Windows XP, and Windows 2000 Professional.
Table 14-2 Minimum Hardware Requirements for Windows Vista/XP/2000
![]()
Note
The specs in Table 14-2 are the minimum requirements. Microsoft recommends a 1 GHz processor for all versions of Vista, and 1 GB of RAM plus a 40 GB HDD for Vista Home Premium/Business/Ultimate.
Note that Windows Vista has much higher requirements than XP, and XP has higher requirements than Windows 2000 Professional. As a consequence, a system that might run Windows XP acceptably well might be too slow to run Windows Vista.
Tip
You might like to recycle old computer parts, but if the processor, hard disk size, and memory size of your PC barely meet the Microsoft requirements, prepare to be annoyed at how slowly your computer runs and how limited its capabilities are. You’re much better off if your system greatly exceeds the minimums listed in Table 14-2.
You can use various types of system analysis programs and tools to verify that a system’s hardware will be compatible with Windows Vista or XP. If you are checking a computer that already has an operating system installed, use the following tools:
• For Windows Vista:
• Windows Vista Compatibility Center: http://www.microsoft.com/windows/compatibility/
• Windows Vista Logo’d Products List: http://winqual.microsoft.com/HCL/Default.aspx?m=v.
• For Windows XP:
• Windows XP Logo’d Products List (formerly the HCL): http://winqual.microsoft.com/HCL/Default.aspx?m=x.
• For both Windows Vista and Windows XP:
• System Information—The Windows System Information tool can be accessed by opening the Run prompt and typing msinfo32.exe. In Vista, this takes the place of winmsd, but winmsd can still be run on Window XP and 2000 in addition to msinfo32.exe.
• Belarc Advisor—Currently a free download, this program can be found at http://www.belarc.com/free_download.html. It’s extremely quick and painless; all you need to do is double-click it once the download is complete. It will automatically install, look for updates, and create a profile of your computer that runs in a browser window. Here you will find all of the hardware-related (and software-related) information on one screen. It also gives you system security status.
• SiSoftware Sandra Lite (available from http://www.sisoftware.co.uk/).
For computers without an installed operating system, use self-booting diagnostic programs such as
• #1-TuffTEST (available from http://www.tufftest.com/)
• PC Check (available from http://www.eurosoft-uk.com)
Note
The Windows Vista DVD has a “Check compatibility online” option, but this is meant for upgrades as opposed to clean installations. More on this in the section titled “Upgrading Operating Systems” later in this chapter.
Windows Vista Editions
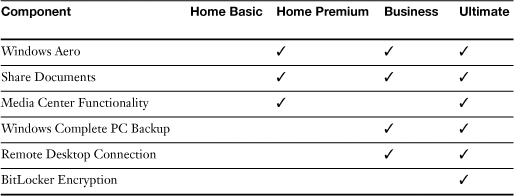
Windows Vista is an entire line of Microsoft operating systems designed for desktop PCs and laptops. Vista was released over a span of several months during the end of 2006 and beginning of 2007, culminating in a worldwide release on January 30th, 2007. Within the Windows Vista group are the versions Home Basic, Home Premium, Business, and Ultimate, available in 64-bit and 32-bit versions. In Table 14-3, the checkmarks indicate the components that are included in these various versions of Vista.
Table 14-3 Comparison of Windows Vista Versions
Note
As you can see, Home Basic is just that: basic, with none of the bells and whistles of the other versions. The A+ exams focus on the other three versions in Table 14-3: Vista Home Premium, Business, and Ultimate.
Note
There are two additional versions of Vista, including Vista Starter (sold in underdeveloped technology markets) and Vista Enterprise (not sold through retail or OEM channels), which are not covered on the exam.
Migrating User Data
If a user will be using a new operating system, either on the same computer or on a new computer, you might need to move his files and settings to the new system. When doing so, make sure that the destination computer has the latest service packs and updates and the same programs that are currently running on the original computer. There are a few options for migrating data:
• Windows Easy Transfer: This program enables you to copy files, photos, music, email, and settings to a Windows Vista computer; all this information is collectively referred to as user state. It is installed with Windows Vista and can be downloaded for Windows XP from www.microsoft.com; just search for Windows Easy Transfer for Windows XP. Either way, the program will be located in Start > All Programs > Accessories > System Tools. Files and settings can be migrated over the network or by USB cable. The data can also be stored on media like a CD, DVD, or USB flash drive until the destination Vista computer is ready. Normally you would start with the computer that has the files and settings that you want to transfer (the source computer). You can transfer the files and settings for one user account or all the accounts on the computer. All the files and settings will be saved as a single .MIG file (Migration Store). Then, you would move to the computer in which you want to transfer the files to (destination computer), and either load the .MIG file from CD, DVD, USB flash drive, or locate the file on the source computer through the use of a USB cable or network connection. For more information on how to migrate files with Windows Easy Transfer, see the following MSKB article: http://support.microsoft.com/kb/928634.
• User State Migration Tool (USMT): This is a command-line tool that can be used to migrate user files and settings for one or more computers. The program can be downloaded from www.microsoft.com. When installed, two different tools are used: Scanstate.exe saves all the files and settings of the user (or users) on a computer, known as the user state; and loadstate.exe transfers that data to the destination computer(s). There are many options when using the scanstate and loadstate commands, including the ability to select which users are migrated and whether the store of data is uncompressed, compressed, or compressed and encrypted. By utilizing scripting programs, the transfer of files to multiple computers can be automated over the network. For more information on how to transfer files and settings with USMT, see the following TechNet link:
http://technet.microsoft.com/en-us/library/cc722032(WS.10).aspx.
• Files and Settings Transfer (FAST) Wizard: This is the older version of Windows Easy Transfer and is installed by default on Windows XP. It is meant for transferring files and settings from a Windows XP, 2000, or 9x computer to a Windows XP computer but otherwise works in a similar fashion to Windows Easy Transfer. To transfer files from XP to Vista, download the Windows Easy Transfer program for XP.
Installation Methods
A variety of installation methods can be used to install Windows, including the following:
• Booting from the distribution DVD or CD— This method can be used to install Windows to an individual PC and to create a master PC from which disk images can be created.
• Installing from the network— Use this method to install Windows to one or more systems that have working network connections. To use this method, network adapters need to be configured to boot to a network location.
• Drive imaging— An existing Windows installation (with or without additional software and drivers) is cloned for use with other identical systems.
• Recovery CD or disk partition— Some vendors provide a special recovery CD or partition that contains an image of Windows. This image is used to restore a system to its original as-shipped configuration.
• Booting from downloaded floppy disk images— Use this method when a system cannot boot from a CD. Floppy disk boot images for Windows XP can be downloaded from the Microsoft website and are used when a system cannot boot directly to the CD-ROM. Note: There is no Microsoft supported floppy boot disk for Windows Vista.
Starting a Clean Installation of Windows Vista from the Distribution DVD
There are two ways to perform a clean install of Windows Vista from the distribution DVD:
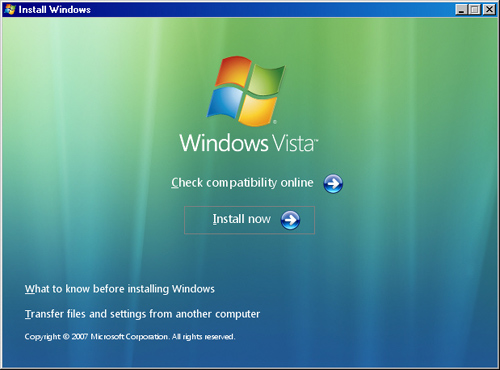
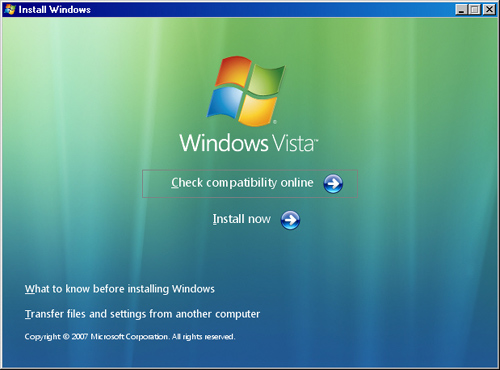
• Install Windows Vista by running the Setup program from within the current version of Windows. (This is the recommended method.) Insert the Windows Vista DVD. The disc will most likely autorun and you will see the setup screen shown in Figure 14-1. Otherwise, go to the DVD drive in Windows Explorer and double-click the setup.exe file to start the installation.
Figure 14-1 Windows Vista Installation Screen.
• Boot the computer from the Windows Vista DVD. This is necessary if no operating system exists on the computer. If you choose this option, follow these steps:
Step 1. Make sure the DVD drive is configured as the first boot device in the system BIOS.
Step 2. Insert the Windows Vista DVD into the system’s DVD drive. (If the drive won’t open while in the BIOS, insert the disc immediately after saving the BIOS.)
Step 3. Save the BIOS and restart the system.
Step 4. The DVD should boot automatically and start the installation, but if you are prompted to boot from the DVD, press any key.
Note
Microsoft recommends that the DVD-ROM be used for installations of Windows Vista; however, it is possible to order a CD-ROM version, if you can provide proof of purchase. To do so, visit this site: http://www.microsoft.com/windowsvista/1033/ordermedia/default.mspx.
Keep in mind that unattended installations of Vista from CD-ROM are not possible due to the fact that the Vista files span multiple CDs.
The Windows Vista installation is much easier and more simplified than earlier versions of Windows. After the installation has begun, you should see a GUI-based window like the one in Figure 14-2.
Figure 14-2 Windows Vista initial Install Windows screen.

When you run a default installation of Windows Vista from the distribution DVD, you are prompted to provide the following information during the process, in this order:
Step 1. Language to Install, Time and Currency Format, and Keyboard or Input Method. At this time there is also an option to learn more about the installation by clicking the What to Know Before Installing Windows link. Once you have input your settings for Step 1, you must click Next, and then on the next screen click Install Now.
Step 2. Product key and whether to automatically activate Windows (can be delayed up to 30 days).
Step 3. Accept the license terms.
Step 4. Select whether you are doing an Upgrade or a Custom install, which includes a clean installation. If you are installing to a computer with no operating system, the Upgrade option will be disabled.
Step 5. Where to install Windows Vista. From here you can select the drive, and administer partitions as you see fit. If necessary, you can also load third-party drivers for the media (hard drive) to be installed to.
The system automatically copies files from the DVD, expands those files, installs features and updates, and completes the installation. The system might have to restart several times during this installation process (for example, after it installs updates and after it completes the installation), but you can let the Vista installation work its magic until you get to the next step:
Step 6. Select a user name, password, and picture.
Step 7. Select a computer name and desktop background.
Step 8. Configure Windows Update to Use Recommended Settings, Install Important Updates Only, or Ask Me Later. (Use Recommended Settings will automatically enable Windows Updates, Windows Defender, updated drivers, and the phishing filter for Internet Explorer.)
Step 9. Set the time zone, time and date.
Step 10. Set the computer’s location: either home, work, or public location.
Now it’s time to start Windows. Vista will check the computer’s performance (which might take a while), and then ask you for your password (if you opted to use one), before you can access Vista. After you have logged on with the proper password the Welcome Center window should appear and you can continue with initial tasks such as connecting to the Internet or transferring files and settings.
Booting from the Windows XP Distribution CD
To start the install process from the Windows XP distribution CD, follow these steps:
Step 1. Make sure the CD or DVD drive is configured as the first boot device in the system BIOS.
Step 2. Insert the Windows XP CD into the system’s CD or DVD drive.
Step 3. Restart the system.
Step 4. When prompted to boot from CD, press any key.
When you install Windows XP from the distribution CD, you are prompted to provide the following information during the process, in this order:
Step 1. Drivers for mass storage devices
Step 2. Acceptance of the end-user license agreement
Step 3. If installing from an upgrade version, a CD from a previous version of Windows
Step 4. The location for the installation
Step 5. The file system (if installing to an unpartitioned location)
After the system reboots, the installer switches to graphics mode, and the process continues:
Step 6. Regional settings (languages, keyboard layout)
Step 7. User and company name
Step 8. Product key
Step 9. Computer name
Step 10. Administrator password
Step 11. Dialing information (if the computer has a modem installed)
Step 12. Date, time, time zone, daylight savings adjustments
Step 13. Network settings (if the computer has a network adapter installed)
Step 14. Workgroup or domain name
Step 15. Windows activation (can be delayed up to 30 days)
At the end of the process, the Windows desktop appears. Remove the Windows XP CD.
For more information about attended and unattended installations, dialing information, and network settings, see “Installation Method Options,” later in this chapter. For more information about drivers for mass storage devices, see “Providing Device Drivers During Installation,” later in this chapter. For more information about preparing the hard disk for installation and the file system to select, see “Preparing the Hard Disk for Installation,” in this chapter
Network Drive Installation
You can install Windows from a network drive by starting the computer with a network client and logging on to the server to start the process. If you want to automate the process, Windows Vista, XP, and 2000 can all be installed from a network drive automatically using either Windows Deployment Services (made specifically for deploying Windows Vista), which can be installed on Windows Server 2008/2003, or the Remote Installation Services (RIS) program, which can be installed on Windows Server 2003 and Windows 2000 Server.
These two server-based programs work along with the Windows System Image Manager program (for Vista), or the Setup Manager Wizard found on the Windows XP and 2000 CD-ROMs. These programs are used to create an answer file. The answer file provides the responses needed for the installation. In Windows Vista, there is a single answer file that is XML-based called Unattend.xml. In Windows XP/2000 the answer files are text-based—for example, Unattend.txt. For more information on how this works and the differences between Vista and XP, visit http://technet.microsoft.com/en-us/library/cc765993.aspx.
Note
The Windows System Image Manager (SIM) for Vista is part of the Windows Automated Installation Kit (AIK), which can be downloaded from Microsoft’s website—search for “Windows Automated Installation Kit (AIK).” For a free CBT tutorial on how to use WSIM, search the Microsoft TechNet for “Windows Vista Virtual Lab Express: Windows System Image Manager Overview.”
Disk Image
Windows can be installed from a disk image of another installation created with a program such as Acronis True Image or Norton Ghost. This process is called disk cloning.
For disk cloning to work, the systems must be identical in every major feature, including
• Same motherboard
• Same ATA/IDE or SCSI host adapter
At a Windows software level, the systems must use the same Hardware Abstraction Layer (HAL) and the same Ntoskrnl.exe (NT kernel) file.
The hard disk of the target for a cloned installation must be at least as large as the original system, if not larger.
Caution
Do not use disk cloning to make illegal copies of Windows. You can use disk-cloning software legally to make a backup copy of your installation, but if you want to duplicate the installation on another PC, make sure you are cloning a system created with a multiple-computer license for Windows and make sure that you do not exceed the number of systems covered by that license, or make sure you have the correct license number (Product key) for each duplicate system. You can clone standalone computers or those connected to a workgroup (but not those that are members of a domain).
A cloned system is identical in every way to the original, including having the same Security Identifier (SID). This can cause conflicts in a network. The SID and other differences in network configuration between the original and a cloned system can be automatically configured with the Sysprep utility from Microsoft. The Sysprep utility for Windows Vista is installed with the operating system and can be found by navigating to C:WindowsSystem32Sysprep. The Sysprep utility is available in separate versions for Windows XP and 2000. It is not provided on upgrade versions, but on full and OEM versions of the media, and is located on the CD-ROM at SUPPORTTOOLS in a cabinet file called DEPLOY.CAB. The most recent version of Sysprep for Windows XP can also be downloaded from the Microsoft website as part of the Windows XP Service Pack 2 Deployment Tools. See the following link for more information: http://support.microsoft.com/kb/838080.
Sysprep is installed on a system that will be used for cloning before it is cloned. A special mini-Setup Wizard starts on the cloned computer the first time it is run after cloning. Sysprep uses an answer file created with either the System Image Manager (SIM), or the Setup Manager (Setupmgr.exe) utility described earlier. When it runs on the cloned system, it creates a unique SID and makes other changes as needed to the network configuration of the system. If the answer file does not have the answer needed by the setup program, you will be prompted to provide this information, such as the Windows license number (Product key).
Installing Windows from a Recovery DVD/CD
Most vendors no longer provide a full installation DVD/CD of Windows for computers with preinstalled Windows installations. Instead, a recovery DVD/CD (or sometimes a hidden hard disk partition, or both) containing a special image of the Windows installation is provided. Systems that store the image on a hidden disk partition might offer the opportunity to create a restore image on a recordable DVD/CD.
Note
A recovery disc is also known as a system restoration disc. These special versions of Windows aren’t standalone copies of Windows, meaning you can’t use them to install Windows on another PC (unless the PC is identical to the one for which the disc was made).
Typically, you have limited choices when you want to restore a damaged installation with a recovery disc or recovery files on a disk partition. Typical options include
• Reformatting your hard disk and restoring it to just-shipped condition (causing the loss of all data and programs installed after the system was first used)
• Reinstalling Windows only
• Reinstalling support files or additional software
After you run the recovery disc to restore your system to its original factory condition, you will need to activate it again.
Caution
You might need the Windows Product key or your system’s serial number to run the recovery disc program. Keep this information handy. Note that most systems with preinstalled Windows have a sticker with the Windows license key (Product key) somewhere on the system case.
Using Boot Disks to Start the Installation (XP and 2000 only)
If you need to install Windows XP to a system that cannot be booted from the CD or DVD drive, you can download a file that can be used to make boot disks. Use these disks to start the installation process. The system will prompt you for each floppy disk, one by one, and after you have inserted the last one it should then be able to read off of the CD-ROM to complete the installation. Note that there are different sets of floppy disks for Windows XP Home, and XP Professional, and for the specific service pack that is packaged as part of the CD. Make sure to download the correct version. These disks are available from Microsoft at http://support.microsoft.com/kb/310994.
After downloading the appropriate file, you must provide six blank (or overwritable) floppy disks that will be used for the boot disk maker program. Start the program and provide each disk when prompted, followed by the Windows XP CD-ROM. At the end of the process, you will have six disks that are used to start the system.
To use the boot disks to start the install process:
Step 1. Make sure the floppy drive is configured as the first boot device in the system BIOS.
Step 2. Insert the Windows XP CD into the system’s CD or DVD drive.
Step 3. Insert the first boot disk into the floppy drive.
Step 4. Restart the system.
Step 5. Insert each additional boot disk as prompted.
The remainder of the process is as described in the section titled “Booting from the Windows XP Distribution CD” earlier in this chapter. Remove the last boot disk and Windows XP CD when finished.
Windows 2000 Professional comes with a CD and four boot disks in the case that the computer’s CD-ROM is not bootable. These disks can also be created by accessing the CD and going to the folder called bootdisk. From here, simply double-click makeboot.exe and the program will guide you through the process of making the disks. To create disks from the CD on an older version of Windows, use makebt32.exe.
Note
If you can’t find the boot disks that you need, you could search for them on the Internet. For example, www.bootdisk.com has an image file for just about every boot disk you can imagine!
Installation Method Options
There are several options to consider when installing Windows, including unattended versus attended installations, the type of file system to select, and the network configuration.
Attended Versus Unattended Installation
The processes outlined in the sections “Starting a Clean Installation of Windows Vista from the Distribution DVD” and “Booting from the Windows XP Distribution CD” are the default attended installation processes. In an attended installation, you must provide information at various points during the process.
To create an unattended installation, you must create the appropriate type of answer file for the installation type. Windows Vista uses the Windows System Image Manager, and both Windows XP Professional and Windows 2000 Professional include the Setupmgr.exe program to aid in the creation of an answer file.
In Windows Vista only the Unattend.xml file is created. This takes the place of all the previous files used by Windows XP/2000.
In Windows XP and Windows 2000 the following files are created:
• Unattend.txt— Provides answers when you start the installation from a network share or from a command line.
• Sysprep.inf— Provides answers when running the Sysprep mini-setup on a target machine after copying the image file prepared with Sysprep.
• Winnt.sif— Copy this to a floppy disk to use when booting the system from the Windows XP CD and starting the installation.
Network Configuration
Windows Vista will recognize and install most networking devices automatically. However, Windows XP recognizes dial-up modems, network adapters, and IEEE-1394 adapters as network devices, but during installation you might receive the following prompts:
• If you have a dial-up modem installed, Windows will ask you to provide dialing information, such as the area code for the telephone line used by the modem and whether you must dial 9 to get an outside line.
• If you have a network adapter installed, you are prompted to select either Typical or Custom as the network type (see Figure 14-3) and specify the network name and type (workgroup or domain name).
Figure 14-3 Use Typical network settings (default) if you don’t have an IEEE-1394 host adapter and don’t connect to older Windows systems. Otherwise, click Custom to fine-tune your network configuration.

![]()
You should select Custom to have the opportunity to fine-tune your network configuration:
• You can prevent your network from treating an IEEE-1394 adapter as a network device by clearing the network component checkboxes for the adapter.
• You can improve network performance between Windows XP and older Windows or non-Windows systems by clearing the QoS Packet Scheduler checkbox (refer to Figure 14-4).
Figure 14-4 Adjusting the default settings for this computer’s Fast Ethernet adapter.
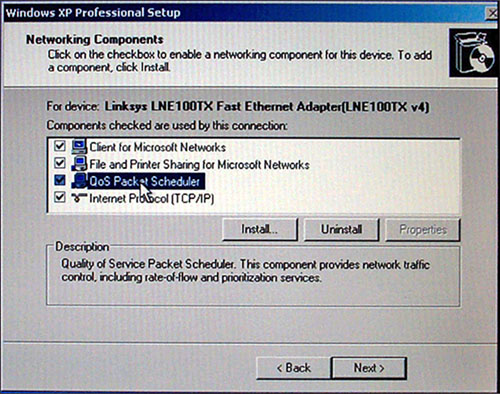
• You can install other network protocols, clients, or services with the Install button.
Preparing the Hard Disk for Installation
There are three different file systems supported by Windows Vista/XP:
• NTFS
• FAT32
• FAT16 (also known as FAT)
Which file system should you use for the operating system installation? Most of the time you will use NTFS, unless you want to install to a pre-existing FAT32 partition and do not want to lose data during the installation. The largest FAT32 partition that Windows can format during installation is 32GB; larger partitions must be formatted as NTFS. FAT16 is supported so that Windows can access other devices such as memory sticks or older hard drives, but chances are you won’t come across it very often.
Note
Keep in mind that much of the data security of Windows comes from the use of NTFS. If NTFS is not used to prepare a drive, encryption and compression are not available, nor is user-level or group-level access control. Windows Vista can be installed only or NTFS drives.
For more information about these file systems, see the section titled “File Systems” in Chapter 13, “Using and Managing Windows.”
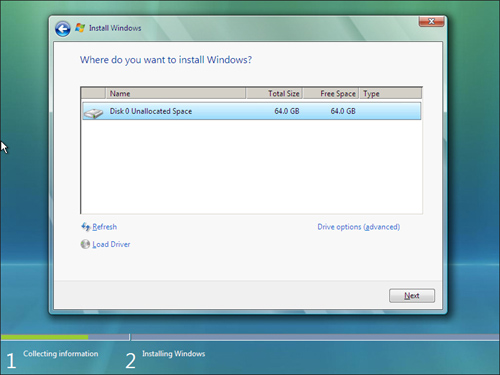
When prompted, you have the option to use all the unpartitioned space on an empty hard disk for Windows or to use only a part of the space.
In Windows Vista:
• To use all of the space in the disk, make sure that the disk and partition you want is highlighted and click Next (see Figure 14-5).
Figure 14-5 Example of using an entire disk as one partition for the Windows Vista Installation.
• To use only part of the space, click Drive Options (Advanced), click New, specify the partition size, and click Apply (See Figure 14-6 and Figure 14-7).
Figure 14-6 Specifying a partition size.
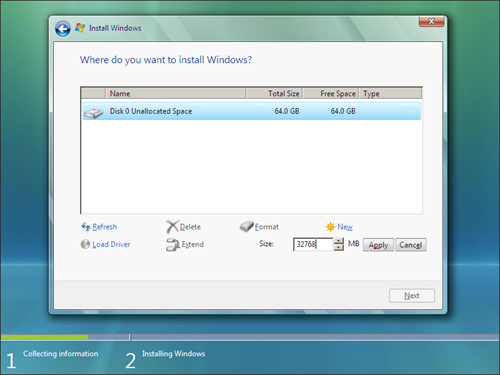
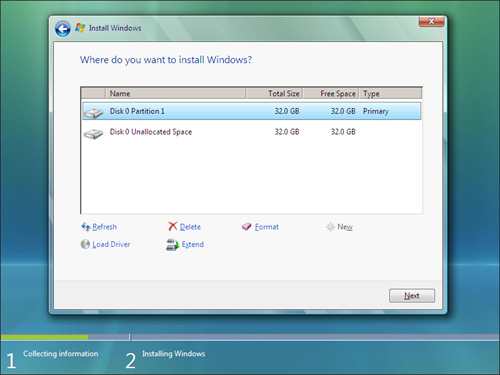
Figure 14-7 Partition table after creating a new partition.
![]()
• To use an existing partition, highlight the desired partition and click Next. Be careful; whatever partition you select for the installation will be formatted and all data on that partition will be erased.
You can also format partitions from here; they are automatically formatted as NTFS. In addition, you can extend pre-existing partitions to increase the size of the partition but without losing any data.
In Windows XP/2000:
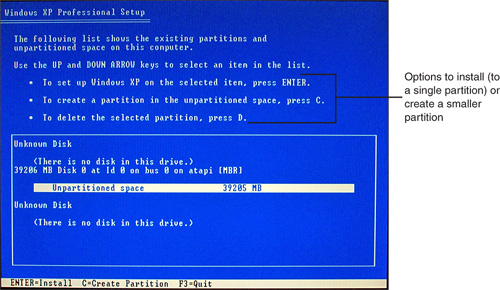
• To use all of the space in the disk, make sure that Unpartitioned Space is highlighted and press Enter (see Figure 14-8).
Figure 14-8 Partitioning options in the Windows XP program.
![]()
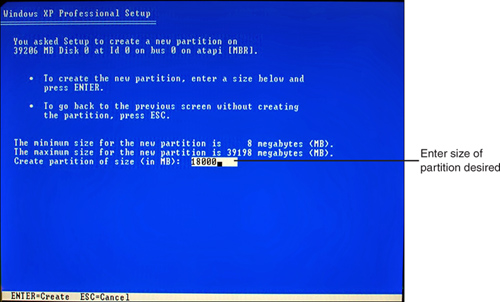
• To use only part of the space, press C to Create Partition, and specify the partition size on the next screen (See Figure 14-9). Press Enter after specifying the desired size.
Figure 14-9 Creating an 18GB partition with the Windows XP setup program. You can create an extended partition and logical drives with the setup program, or leave the rest of the disk empty until a later time.
• To use an existing partition, arrow to that partition so that it becomes highlighted and press Enter. Be careful, whatever partition you select for the installation will be formatted.
• To delete a pre-existing partition, press D, then press Enter at the next screen, and finally press L to confirm.
After partitioning is complete in Windows XP/2000, you need to format the partitions. Normally, you would select NTFS. Select FAT if the partition is under 32GB in size. If you specify FAT, the partition will be FAT16 if it is under 2GB in size and FAT32 if it is 2GB or larger. Windows XP offers the option to perform a quick format (saves time) or a regular format (takes longer but verifies the entire disk surface). Windows formats the partition with the file system you specify and continues the installation process.
Providing Device Drivers During Installation
In Windows Vista, device drivers are added within the same screen where partitioning was done by clicking Load Driver. These could be drivers for SATA or SCSI controllers, or other special hard disk controllers. These drivers can come from floppy disk, CD, DVD, or USB flash drive. Microsoft recommends that before you install, you check if the devices you wish to use are listed at the Windows Vista Compatibility Center (http://www.microsoft.com/windows/compatibility/) or at the Windows Logo’d Products List (http://winqual.microsoft.com/HCL/Default.aspx?m=v). If you click Load Driver and cannot supply a proper driver for Windows Vista, or if the computer cannot read the media where the driver is stored, you will have to exit the installation program.
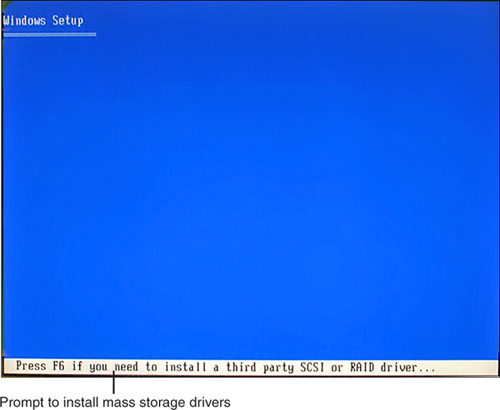
In Windows XP/2000, very early in the installation process, the status line at the bottom of the screen displays a prompt to press F6 if you need to provide drivers for the drive that will be used for the installation, such as an SATA or SCSI hard disk, a PATA hard disk connected to an adapter card, or a RAID array (see Figure 14-10).
Figure 14-10 As soon as the Windows XP or 2000 setup program starts, you have only a few moments to press F6 if you need to install a third-party SCSI or RAID driver (or Serial ATA driver).
If you don’t provide a driver when prompted and Windows cannot display your drive as an installation target, exit the installation program, restart it, and provide the driver when prompted. The driver must be provided on a floppy disk. Windows XP/2000 will not recognize a driver provided on a USB flash memory drive, CD, or DVD. Be sure to check for hardware compatibility with the Windows XP Logo’d list (formerly the HCL):
http://winqual.microsoft.com/HCL/Default.aspx?m=x.
Note
If the SATA host adapter used by your hard disk is incorporated into the system chipset on the motherboard, you might not need to provide a driver.
Verifying Installation
At the end of the installation process, you should test the system by running Windows Explorer, running built-in programs such as Paint and WordPad, and connecting to the Internet. Make sure you don’t see popup error messages or errors within the Event Viewer. If the installation process doesn’t complete properly, you should check the log files to determine the problem.
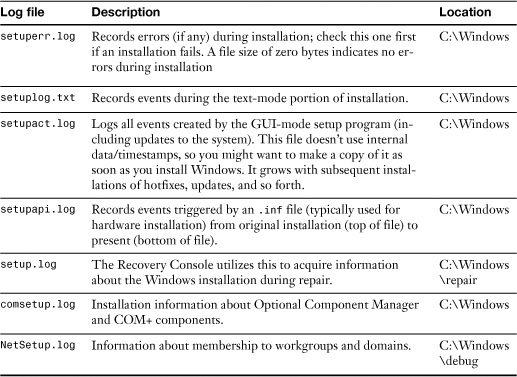
Let’s talk about Windows XP log files first. In Windows XP, most of these files are plain text, and are stored in the %systemroot% folder of the operating system. The %systemroot% folder is a variable that indicates the folder where the operating system was installed. In most cases this will be C:Windows, which we will assume for Table 14-4. This table describes the most important log files you need to know for the exam, and their location within the operating system.
Table 14-4 Windows XP Installation Log Files
![]()
For Windows Vista matters become more complicated when it comes to log files. The Vista installation is broken down into four phases:
• Downlevel phase— This is the phase that is run from within the previous operating system, meaning when you start the installation from the DVD, in Windows XP for example.
• Windows Preinstallation Environment phase— Also known as Windows PE, this phase occurs after the restart at the end of the downlevel phase. If installing to a new hard drive, this phase occurs when you first boot the computer to the Windows Vista DVD.
• Online configuration phase— The online configuration phase starts when a user receives the following message: “Please wait a moment while Windows prepares to start for the first time.” Hardware support is installed during this phase.
• Windows Welcome phase— During this phase, a computer name is selected for the computer, and the Windows System Assessment Tool (Winsat.exe) checks the performance of the computer. This is the final phase before the user first logs on.
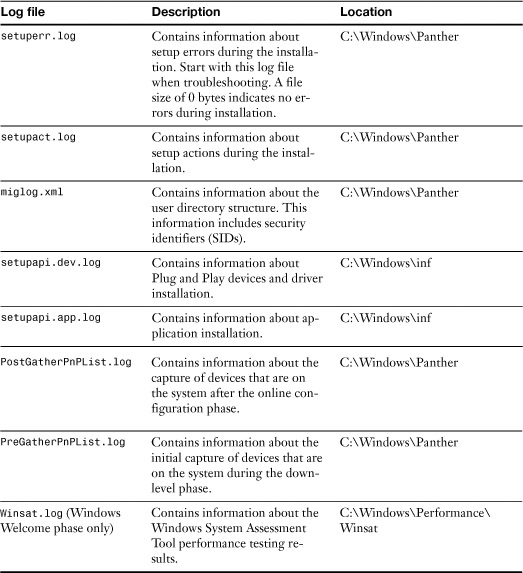
There are log files for each phase; they are pretty much the same log files but in different locations. However, we are most concerned with the last two phases. For the most part in these two phases, the log files are in the same location. Table 14-5 covers the important log files during these two phases.
Table 14-5 Windows Vista Installation Log Files
![]()
Note
For a list of all log files within all phases of the Windows Vista installation, visit http://support.microsoft.com/kb/927521.
You’ll notice that Vista doesn’t have a setuplog.txt file like XP does. This is because there is no text portion to the installation of Windows Vista.
How can you view these files if your system will not start? If Windows XP/2000 is installed on an NTFS drive, you can use the Windows boot disks or CD to start the system, launch the Recovery Console, and view the files with the More command. For example, use the command More setuplog.txt to display the contents of the Setuplog.txt file. Windows Vista does not use the Recovery Console any longer; instead you can boot to the DVD to the System Recovery Options menu and open a command prompt session. For more information about the Recovery Console and System Recovery Options, see Chapter 15, “Troubleshooting and Maintaining Windows.”
Upgrading Operating Systems
During the operational life of a computer, it might be necessary to upgrade the installed operating system to a newer version. The 2009 A+ Certification exam objectives include three such scenarios, known as upgrade paths:
• Upgrading Windows XP to Windows Vista
• Upgrading Windows 2000 to Windows Vista
• Upgrading Windows 2000 to Windows XP
Tip
If you’ve installed Windows XP on a system that is marginal (slow processor, small hard disk, and so forth), you can remove it if you find it’s not performing satisfactorily. Try it and see how you like it. If it’s not working for you, open Add/Remove Programs within the Control Panel to locate the uninstall program. If you want to install Windows XP on a system without hassles, don’t activate it until you’re sure you’re happy. Windows XP doesn’t need to be activated until 30 days have passed from the install date, so take your time and think it over.
Preparations to Make Before Upgrading to a Newer Version of Windows
To review, Windows Vista and XP raise the hardware ante compared to previous versions with these requirements:
Table 14-6 Hardware Requirements for Windows Vista and XP
Some older systems might require processor, memory, or hard disk upgrades to be qualified to run Windows Vista or XP. You should make sure your computer meets or exceeds these standards before you start the upgrade process.
Because upgrading to a newer version of Windows retains your existing application software and settings, you should also make sure that both your hardware and software are compatible with Windows Vista or XP.
• For Windows Vista:
• Windows Vista Upgrade Advisor— This is accessed by clicking the Check Compatibility Online button when you first insert the Windows Vista DVD as shown in Figure 14-11. Of course, the computer that you want to upgrade will need to have Internet access. The direct link for this site is http://www.microsoft.com/windows/windows-vista/get/upgrade-advisor.aspx.
Figure 14-11 The Windows Vista Check Compatibility Online option when first inserting the Vista DVD.
![]()
• Windows Vista Compatibility Center— http://www.microsoft.com/windows/compatibility/.
• Windows Vista Logo’d Products List— http://winqual.microsoft.com/HCL/Default.aspx?m=v.
• For Windows XP:
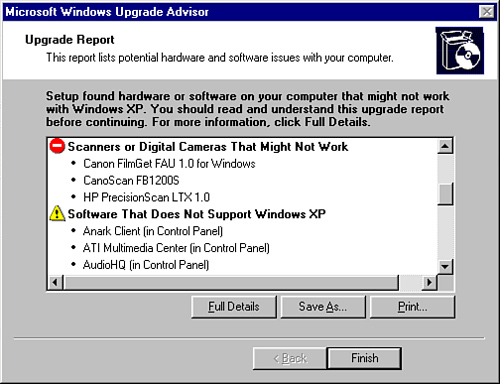
• Upgrade Advisor on Windows XP CD— You can run the Upgrade Advisor from the Windows XP CD. Click Check System Compatibility from the Welcome to Windows XP menu, and then click Check My System Automatically (note that this upgrade advisor is no longer available for download from the Microsoft website). After the analysis is complete, the Upgrade Analyzer displays any incompatible hardware or software it finds (see Figure 14-12).
Figure 14-12 The Windows XP Upgrade Advisor lists incompatible hardware and software products. Click the Full Details button to learn more.
![]()
• Windows XP Logo’d Products List (formerly the HCL)— http://winqual.microsoft.com/HCL/Default.aspx?m=x.
Before you upgrade to Windows Vista or XP, you should also download any new device drivers or new application updates that you need. Create a folder for your updates on your system and uncompress them if necessary so they can be used during the upgrade process. And of course, back up any important files, email, and settings: for example, Internet Explorer favorites, your email program’s blocked sender list, or use the Files and Settings Transfer Wizard for the bulk of the files and settings on your computer.
Upgrading to Windows Vista from XP or 2000
There are two installation options when attempting to upgrade to Windows Vista. The first is an “upgrade in-place” which means that you can install Windows Vista and retain your applications, files, and settings. This is usually how an upgrade is accomplished from Windows XP. The second is a clean install. This means that you should use Windows Easy Transfer to copy files and settings to an external source before starting the “upgrade.” This second option is necessary if you wish to upgrade from Windows 2000 Professional to Vista. Keep in mind that once a computer has been upgraded to Windows Vista, it cannot be “downgraded” back to XP or 2000, the way that older Microsoft operating systems could be; the only way to revert back to the older OS would be to reformat the hard drive and reinstall the older OS. For more information about the upgrade options, mapped to the various operating system editions, see the following link: http://www.microsoft.com/windows/windows-vista/get/upgrade-your-pc-options.aspx.
To start the Window Vista upgrade process from Windows XP or 2000, do the following:
Step 1. Insert your Windows Vista DVD into the DVD-ROM drive while your old version of Windows is running.
Step 2. Unless you’ve disabled Autorun, the Windows Vista splash screen is displayed (refer to Figure 14-11). If you do have autorun disabled, go to your DVD-ROM drive and double-click setup.exe. It is recommended that you choose Check Compatibility Online.
Step 3. After checking compatibility (if necessary), click Install Now.
Step 4. Next is the updates screen. It is recommended that you select the first option Go Online and Get the Latest Updates for Installation as shown in Figure 14-13. There is also an option to send anonymous information back to Microsoft during the install. If you do not want to do this, leave the I Want to Help Make Windows Installation Better checkbox blank.
Figure 14-13 The Windows Vista Update window.

Step 5. Type in the product key. This should have come with your upgrade disc.
Step 6. Next, accept the terms of the license (otherwise the installation will end).
Step 7. In the next window you have two options: upgrade or custom. Select the first option to upgrade the previous version of Windows to Windows Vista, as shown in Figure 14-14. If you receive any type of compatibility report window (like the one in Figure 14-15) that says you have potential issues, consider stopping the installation for now, and finding out what hardware or software needs to be replaced using the websites listed previously. Then start the upgrade again when you have fixed any issues. In some cases when you receive a compatibility report, the installation will not let you continue, and in other cases you can proceed at your own risk; but be warned, these devices or applications might not function when the upgrade completes.
Figure 14-14 Selecting Upgrade as the type of installation.
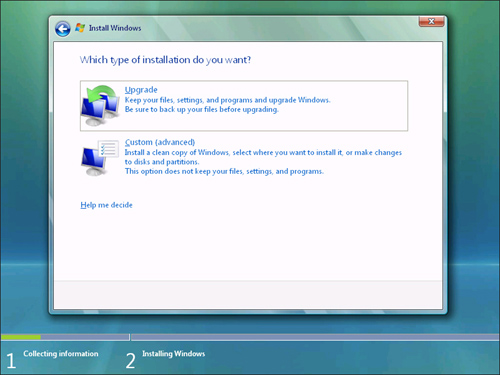
Figure 14-15 Compatibility Report Window.

Step 8. Next, Vista will copy files, gather files, expand files, install features and updates, and finally, complete the upgrade. This might require several restarts and will take at least several minutes to several hours to finish, depending on the computer’s resources. Let the upgrade continue unhindered until you get to Step 9.
Step 9. After the final restart you should see the Help Protect Windows Automatically screen.
Step 10. Then you will need to configure the time zone, time, and date.
Step 11. Finally, select the location for the computer, and click Start to begin using Windows Vista.
Tip
Another upgrade option for Windows Vista is called Windows Anytime Upgrade. This allows a user to upgrade from a lower edition of Vista to a higher edition, for example from Windows Vista Home Premium to Windows Vista Ultimate.
Upgrading to Windows XP from 2000
To start the Window XP upgrade process if you want to replace your old version of Windows, do the following:
Step 1. Insert your Windows XP CD into the CD-ROM drive while your old version is running.
Step 2. Unless you’ve disabled Autorun, the Windows XP splash screen is displayed. Choose Install Windows XP, Perform Additional Tasks, or Check System Compatibility.
Step 3. If you haven’t used the Windows Upgrade Advisor on this system, click Check System Compatibility as discussed earlier in this chapter.
Step 4. After completing the Upgrade Advisor check (if necessary), click Install Windows XP.
Step 5. Select Upgrade (the default setting) to change your installed version of Windows to Windows XP, which enables you to use your existing software and settings without reinstallation.
Note
During the upgrade process, you can convert the file system to NTFS. Do this to save space on your hard disk (NTFS is more efficient than FAT32) and if you want features such as encryption, file/folder compression, and better security. As an alternative to converting the file system during installation, use the command-line convert.exe program to perform this task after you verify that the Windows XP upgrade works properly.
Step 6. Read the license agreement, click I Accept, and click Next to continue.
Step 7. Enter the product key from the back of the CD package and click Next to continue.
Step 8. The installation process begins; a display on the left side gives an estimate of how long the process will take until completion. The computer restarts several times during the process.
Step 9. At the end of the process, the Welcome to Microsoft Windows dialog box is displayed. You can use it to activate your copy of Windows and set up users.
Step 10. After you complete the steps listed in the Welcome dialog box, the Windows XP desktop is displayed.
Troubleshooting the Windows Vista or Windows XP Upgrade
If a Windows XP upgrade from Windows 2000 goes badly, you can uninstall Windows XP and revert back to Windows 2000 by using the Uninstall Windows XP option in the Add or Remove Programs icon in the Control Panel (Classic mode). However, if after upgrading to Windows Vista you find that you want to go back to Windows XP, you will need to back up your data and re-install XP as a clean installation. There is currently no uninstall option in the Control Panel for Windows Vista.
In general, try the following tips to make the upgrade go smoothly.
If you are unable to start the upgrade, check the following:
• Free disk space— You need 15 GB free for Windows Vista, and 1.5GB free for Windows XP at the minimum; more is better.
• Hardware conflicts or problems— Use Windows Device Manager to ensure that all hardware is working correctly before you start the upgrade or dual-boot installation.
• Processor speed and memory size— If your system doesn’t meet the minimums, upgrade it according to the minimum requirements in Table 14-7. Remember that these are the bare minimums, again, more is better.
Table 14-7 Hardware Requirements for Windows Vista and XP
Tip
If you receive other types of errors during the upgrade, such as blue screen “STOP” errors, see http://support.microsoft.com and search for the specific error code.
For a list of specific errors concerning a Windows Vista upgrade, visit http://support.microsoft.com/kb/930743.
A useful resource for Windows XP installation/upgrade errors is http://labmice.techtarget.com/windowsxp/Install/installbugs.htm.
A list of Windows 2000 to Windows XP upgrade problems and solutions is available at http://labmice.techtarget.com/windowsxp/Install/win2kupgrade.htm.
Various problems can take place after you upgrade to Windows Vista or XP from older versions, including
• Can’t connect to network or Internet resources
• Can’t remove programs with Uninstall
• Certain systems and hardware don’t work properly
You should carefully study Microsoft Knowledge Base articles and any tips from your computer vendor to determine if your particular system might have problems with the upgrade to Windows Vista or XP.
Because some upgrade problems can prevent you from accessing the Internet for solutions, you should make sure you have performed the following before you start the upgrade process:
• Checked your hardware, applications, and utilities for compatibility using the proper compatibility tools mentioned earlier
• Downloaded updated drivers and application patches
• Removed or disabled applications and utilities that cannot be updated to Windows Vista or XP–compatible versions
• Updated the system BIOS to handle the full capacity of your hard disk and removed nonstandard drivers such as EZ-BIOS or Disk Manager Drive Overlay
Tip
EZ-BIOS and Disk Manager Drive Overlay have been provided as part of older versions of vendor-supplied disk setup programs from most major drive vendors (Western Digital, Seagate, Maxtor, and so forth). Contact the maker of your drive for details of how to remove the driver (which is no longer necessary after you update your system BIOS or add a helper card to handle the full capacity of your hard disk). Keep in mind that you should make a full backup of your hard disk in case something goes wrong.
One final point: Many users agree that upgraded computers just don’t seem to function as quickly as computers that had a fresh installation. If you can back up the data and settings and re-install applications, consider doing a fresh install whenever possible.
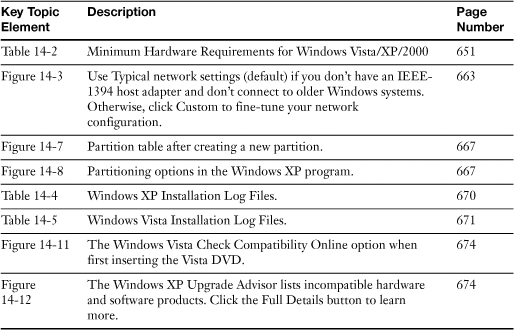
Review All the Key Topics
Review the most important topics in the chapter, noted with the key topics icon in the outer margin of the page. Table 14-8 lists a reference of these key topics and the page numbers on which each is found.
Table 14-8 Key Topics for Chapter 14
Complete the Tables and Lists from Memory
Print a copy of Appendix B, “Memory Tables,” (found on the CD), or at least the section for this chapter, and complete the tables and lists from memory. Appendix C, “Memory Tables Answer Key,” also on the CD, includes completed tables and lists to check your work.
Definitions of Key Terms
Define the following key terms from this chapter, and check your answers in the glossary.
Setup Manager Utility (Setupmgr.exe),
Remote Installation Services (RIS),
SID,
Troubleshooting Scenario
You are a technician for a company that is in the process of upgrading the operating systems from Windows XP to Windows Vista. You have a mixture of newer and older computers. To be more effective during this process you need to make sure that the Vista operating system will install without any problems. What should you do to minimize the time to determine if the upgrade will work or not?
Refer to Appendix A, “Answers to the ‘Do I Know This Already?’ Quizzes and Troubleshooting Scenarios,” for the answer.