
26. XML and LINQ to XML
Objectives
In this chapter you’ll learn:
• To specify and validate an XML document’s structure.
• To create and use simple XSL style sheets to render XML document data.
• To use the Document Object Model (DOM) to manipulate XML in C# programs.
• To use LINQ to XML to extract and manipulate data from XML documents.
• To create new XML documents using the classes provided by the .NET Framework.
• To work with XML namespaces in your C# code.
• To transform XML documents into XHTML using class XslCompiledTransform.
Like everything metaphysical, the harmony between thought and reality is to be found in the grammar of the language.
—Ludwig Wittgenstein
I played with an idea, and grew willful; tossed it into the air; transformed it; let it escape and recaptured it; made it iridescent with fancy, and winged it with paradox.
—Oscar Wilde
Outline
26.1 Introduction
26.2 Document Type Definitions (DTDs)
26.3 W3C XML Schema Documents
26.4 Extensible Stylesheet Language and XSL Transformations
26.5 LINQ to XML: Document Object Model (DOM)
26.6 LINQ to XML Class Hierarchy
26.7 LINQ to XML: Namespaces and Creating Documents
26.8 XSLT with Class XslCompiledTransform
26.9 Wrap-Up
26.10 Web Resources
26.1 Introduction
In Chapter 24, we began our introduction to XML to help explain the syntax of XAML (eXtensible Application Markup Language). You learned the syntax of XML, how to use XML namespaces and were introduced to the concept of DTDs and schemas. In this chapter, you learn how to create your own DTDs (Section 26.2) and schemas (Section 26.3) to validate your XML documents.
The .NET Framework uses XML extensively. Many of the configuration files that Visual Studio creates—such as those that represent project settings—use XML format. XML is also used heavily in serialization, as you’ll see in Chapter 28, Web Services. You’ve already used XAML—an XML vocabulary used for creating user interfaces—in Chapters 24–25. XAML is also used in Chapter 29, Silverlight and Rich Internet Applications.
Sections 26.4–26.8 demonstrate techniques for working with XML documents in C# applications. Visual C# provides language features and .NET Framework classes for working with XML. LINQ to XML provides a convenient way to manipulate data in XML documents using the same LINQ syntax you used on arrays and collections in Chapter 9. LINQ to XML also provides a set of classes for easily navigating and creating XML documents in your code.
26.2 Document Type Definitions (DTDs)
Document Type Definitions (DTDs) are one of two techniques you can use to specify XML document structure. Section 26.3 presents W3C XML Schema documents, which provide an improved method of specifying XML document structure.
Software Engineering Observation 26.1
![]()
XML documents can have many different structures, and for this reason an application cannot be certain whether a particular document it receives is complete, ordered properly, and not missing data. DTDs and schemas (Section 26.3) solve this problem by providing an extensible way to describe XML document structure. Applications should use DTDs or schemas to confirm whether XML documents are valid.
Software Engineering Observation 26.2
![]()
Many organizations and individuals are creating DTDs and schemas for a broad range of applications. These collections—called repositories—are available free for download from the web (e.g., www.xml.org, www.oasis-open.org).
Creating a Document Type Definition
Figure 24.4 presented a simple business letter marked up with XML. Recall that line 5 of letter.xml references a DTD—letter.dtd (Fig. 26.1). This DTD specifies the business letter’s element types and attributes and their relationships to one another.
Fig. 26.1. Document Type Definition (DTD) for a business letter.

A DTD describes the structure of an XML document and enables an XML parser to verify whether an XML document is valid (i.e., whether its elements contain the proper attributes and appear in the proper sequence). DTDs allow users to check document structure and to exchange data in a standardized format. A DTD expresses the set of rules for document structure by specifying what attributes and other elements may appear inside a given element.
Common Programming Error 26.1
![]()
For documents validated with DTDs, any document that uses elements, attributes or relationships not explicitly defined by a DTD is an invalid document.
Defining Elements in a DTD
The ELEMENT element type declaration in lines 4–5 defines the rules for element letter. In this case, letter contains one or more contact elements, one salutation element, one or more paragraph elements, one closing element and one signature element, in that sequence. The plus sign (+) occurrence indicator specifies that the DTD allows one or more occurrences of an element. Other occurrence indicators include the asterisk (*), which indicates an optional element that can occur zero or more times, and the question mark (?), which indicates an optional element that can occur at most once (i.e., zero or one occurrence). If an element does not have an occurrence indicator, the DTD allows exactly one occurrence.
The contact element type declaration (lines 7–8) specifies that a contact element contains child elements name, address1, address2, city, state, zip, phone and flag—in that order. The DTD requires exactly one occurrence of each of these elements.
Defining Attributes in a DTD
Line 9 uses the ATTLIST attribute-list declaration to define an attribute named type for the contact element. Keyword #IMPLIED specifies that the type attribute of the contact element is optional—a missing type attribute will not invalidate the document. Other keywords that can be used in place of #IMPLIED in an ATTLIST declaration include #REQUIRED and #FIXED. Keyword #REQUIRED specifies that the attribute must be present in the element, and keyword #FIXED specifies that the attribute (if present) must have the given fixed value. For example,
<!ATTLIST address zip CDATA #FIXED "01757">
indicates that attribute zip (if present in element address) must have the value 01757 for the document to be valid. If the attribute is not present, then the parser, by default, uses the fixed value that the ATTLIST declaration specifies. You can supply a default value instead of one of these keywords. Doing so makes the attribute optional, but the default value will be used if the attribute’s value is not specified.
Character Data vs. Parsed Character Data
Keyword CDATA (line 9) specifies that attribute type contains character data (i.e., a string). A parser will pass such data to an application without modification.
Software Engineering Observation 26.3
![]()
DTD syntax cannot describe an element’s (or attribute’s) type. For example, a DTD cannot specify that a particular element or attribute can contain only integer data.
Keyword #PCDATA (line 11) specifies that an element (e.g., name) may contain parsed character data (i.e., data that is processed by an XML parser). Elements with parsed character data cannot contain markup characters, such as less than (<), greater than (>) or ampersand (&). The document author should replace any markup character in a #PCDATA element with the character’s corresponding character entity reference. For example, the character entity reference < should be used in place of the less-than symbol (<), and the character entity reference > should be used in place of the greater-than symbol (>). A document author who wishes to use a literal ampersand should use the entity reference & instead—parsed character data can contain ampersands (&) only for inserting entities. The final two entities defined by XML are ' and ", representing the single (') and double (") quote characters, respectively.
Common Programming Error 26.2
![]()
Using markup characters (e.g., <, > and &) in parsed character data is an error. Use character entity references (e.g., <, > and & instead).
Defining Empty Elements in a DTD
Line 18 defines an empty element named flag. Keyword EMPTY specifies that the element does not contain any data between its start and end tags. Empty elements commonly describe data via attributes. For example, flag’s data appears in its gender attribute (line 19). Line 19 specifies that the gender attribute’s value must be one of the enumerated values (M or F) enclosed in parentheses and delimited by a vertical bar (|) meaning “or.” Line 19 also indicates that gender has a default value of M.
Well-Formed Documents vs. Valid Documents
Recall that a well-formed document is syntactically correct (i.e., each start tag has a corresponding end tag, the document contains only one root element, and so on), and a valid document contains the proper elements with the proper attributes in the proper sequence. An XML document cannot be valid unless it is well formed.
Visual Studio can validate XML documents against both DTDs and schemas. You do not have to create a project to use this facility—simply open the XML file in Visual Studio as in Fig. 26.2. If the DTD or schema referenced in the XML document can be retrieved, Visual Studio will automatically validate the XML. If the XML file does not validate, Visual Studio will display a warning just as it does with errors in your C# code. Visit www.w3.org/XML/Schema for a list of additional validation tools.
Fig. 26.2. An XML file open in the Visual C# IDE.


26.3 W3C XML Schema Documents
In this section, we introduce schemas for specifying XML document structure and validating XML documents. Many developers in the XML community believe that DTDs are not flexible enough to meet today’s programming needs. For example, DTDs lack a way of indicating what specific type of data (e.g., numeric, text) an element can contain, and DTDs are not themselves XML documents, making it difficult to manipulate them programmatically. These and other limitations have led to the development of schemas.
Unlike DTDs, schemas use XML syntax and are actually XML documents that programs can manipulate. Like DTDs, schemas are used by validating parsers to validate documents.
In this section, we focus on the W3C’s XML Schema vocabulary. For the latest information on XML Schema, visit www.w3.org/XML/Schema. For tutorials on XML Schema concepts beyond what we present here, visit www.w3schools.com/schema/default.asp.
A DTD describes an XML document’s structure, not the content of its elements. For example,
<quantity>5</quantity>
contains character data. If the document that contains element quantity references a DTD, an XML parser can validate the document to confirm that this element indeed does contain PCDATA content. However, the parser cannot validate that the content is numeric; DTDs do not provide this capability. So, unfortunately, the parser also considers
<quantity>hello</quantity>
to be valid. An application that uses the XML document containing this markup should test that the data in element quantity is numeric and take appropriate action if it is not.
XML Schema enables schema authors to specify that element quantity’s data must be numeric or, even more specifically, an integer. A parser validating the XML document against this schema can determine that 5 conforms and hello does not. An XML document that conforms to a schema document is schema valid, and one that does not conform is schema invalid. Schemas are XML documents and therefore must themselves be valid.
Validating Against an XML Schema Document
Figure 26.3 shows a schema-valid XML document named book.xml, and Fig. 26.4 shows the pertinent XML Schema document (book.xsd) that defines the structure for book.xml. By convention, schemas use the .xsd extension. Recall that Visual Studio can perform schema validation if it can locate the schema document. Visual Studio can locate a schema if it is specified in the XML document, is in the same solution or is simply open in Visual Studio at the same time as the XML document. To validate the schema document itself (i.e., book.xsd) and produce the output shown in Fig. 26.4, we used an online XSV (XML Schema Validator) provided by the W3C at
www.w3.org/2001/03/webdata/xsv
Fig. 26.3. Schema-valid XML document describing a list of books.

Fig. 26.4. XML Schema document for book.xml.

These tools enforce the W3C’s specifications regarding XML Schemas and schema validation. Figure 26.3 contains markup describing several books. The books element (line 5) has the namespace prefix deitel (declared in line 5), indicating that the books element is a part of the namespace http://www.deitel.com/booklist.
Creating an XML Schema Document
Figure 26.4 presents the XML Schema document that specifies the structure of book.xml (Fig. 26.3). This document defines an XML-based language (i.e., a vocabulary) for writing XML documents about collections of books. The schema defines the elements, attributes and parent-child relationships that such a document can (or must) include. The schema also specifies the type of data that these elements and attributes may contain.
Root element schema (Fig. 26.4, lines 5–23) contains elements that define the structure of an XML document such as book.xml. Line 5 specifies as the default namespace the standard W3C XML Schema namespace URI—http://www.w3.org/2001/XMLSchema. This namespace contains predefined elements (e.g., root element schema) that comprise the XML Schema vocabulary—the language used to write an XML Schema document.
Portability Tip 26.1

W3C XML Schema authors specify URI http://www.w3.org/2001/XMLSchema when referring to the XML Schema namespace. This namespace contains predefined elements that comprise the XML Schema vocabulary. Specifying this URI ensures that validation tools correctly identify XML Schema elements and do not confuse them with those defined by document authors.
Line 6 binds the URI http://www.deitel.com/booklist to namespace prefix deitel. As we discuss momentarily, the schema uses this namespace to differentiate names created by us from names that are part of the XML Schema namespace. Line 7 also specifies http://www.deitel.com/booklist as the targetNamespace of the schema. This attribute identifies the namespace of the XML vocabulary that this schema defines. The targetNamespace of book.xsd is the same as the namespace referenced in line 5 of book.xml (Fig. 26.3). This is what “connects” the XML document with the schema that defines its structure. When an XML schema validator examines book.xml and book.xsd, it will recognize that book.xml uses elements and attributes from the http://www.deitel.com/booklist namespace. The validator also will recognize that this namespace is the one defined in book.xsd (i.e., the schema’s targetNamespace). Thus the validator knows where to look for the structural rules for the elements and attributes used in book.xml.
Defining an Element in XML Schema
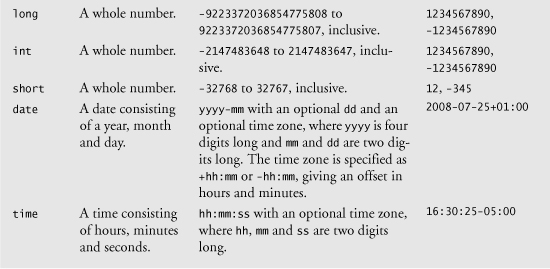
In XML Schema, the element tag (line 9) defines an element to be included in an XML document that conforms to the schema. In other words, element specifies the actual elements that can be used to mark up data. Line 9 defines the books element, which we use as the root element in book.xml (Fig. 26.3). Attributes name and type specify the element’s name and type, respectively. An element’s type attribute indicates the data type that the element may contain. Possible types include XML Schema–defined types (e.g., string, double) and user-defined types (e.g., BooksType, which is defined in lines 11–16). Figure 26.5 lists several of XML Schema’s many built-in types. For a complete list of builtin types, see Section 3 of the specification found at www.w3.org/TR/xmlschema-2.
Fig. 26.5. Some XML Schema types.

In this example, books is defined as an element of type deitel:BooksType (line 9). BooksType is a user-defined type (lines 11–16) in the http://www.deitel.com/booklist namespace and therefore must have the namespace prefix deitel. It is not an existing XML Schema type.
Two categories of types exist in XML Schema—simple types and complex types. They differ only in that simple types cannot contain attributes or child elements and complex types can.
A user-defined type that contains attributes or child elements must be defined as a complex type. Lines 11–16 use element complexType to define BooksType as a complex type that has a child element named book. The sequence element (lines 12–15) allows you to specify the sequential order in which child elements must appear. The element (lines 13–14) nested within the complexType element indicates that a BooksType element (e.g., books) can contain child elements named book of type deitel:SingleBookType (defined in lines 18–22). Attribute minOccurs (line 14), with value 1, specifies that elements of type BooksType must contain a minimum of one book element. Attribute maxOccurs (line 14), with value unbounded, specifies that elements of type BooksType may have any number of book child elements. Both of these attributes have default values of 1.
Lines 18–22 define the complex type SingleBookType. An element of this type contains a child element named title. Line 20 defines element title to be of simple type string. Recall that elements of a simple type cannot contain attributes or child elements. The schema end tag (</schema>, line 23) declares the end of the XML Schema document.
A Closer Look at Types in XML Schema
Every element in XML Schema has a type. Types include the built-in types provided by XML Schema (Fig. 26.5) or user-defined types (e.g., SingleBookType in Fig. 26.4).
Every simple type defines a restriction on an XML Schema-defined type or a restriction on a user-defined type. Restrictions limit the possible values that an element can hold.
Complex types are divided into two groups—those with simple content and those with complex content. Both can contain attributes, but only complex content can contain child elements. Complex types with simple content must extend or restrict some other existing type. Complex types with complex content do not have this limitation. We demonstrate complex types with each kind of content in the next example.
The schema in Fig. 26.6 creates simple types and complex types. The XML document in Fig. 26.7 (laptop.xml) follows the structure defined in Fig. 26.6 to describe parts of a laptop computer. A document such as laptop.xml that conforms to a schema is known as an XML instance document—the document is an instance (i.e., example) of the schema.
Fig. 26.6. XML Schema document defining simple and complex types.

Fig. 26.7. XML document using the laptop element defined in computer.xsd.
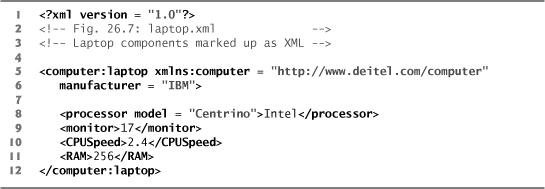
Line 5 (Fig. 26.6) declares the default namespace as the standard XML Schema namespace—any elements without a prefix are assumed to be in the XML Schema namespace. Line 6 binds the namespace prefix computer to the namespace http://www.deitel.com/computer. Line 7 identifies this namespace as the targetNamespace—the namespace being defined by the current XML Schema document.
To design the XML elements for describing laptop computers, we first create a simple type in lines 9–13 using the simpleType element. We name this simpleType gigahertz because it will be used to describe the clock speed of the processor in gigahertz. Simple types are restrictions of a type typically called a base type. For this simpleType, line 10 declares the base type as decimal, and we restrict the value to be at least 2.1 by using the minInclusive element in line 11.
Next, we declare a complexType named CPU that has simpleContent (lines 16–20). Remember that a complex type with simple content can have attributes but not child elements. Also recall that complex types with simple content must extend or restrict some XML Schema type or user-defined type. The extension element with attribute base (line 17) sets the base type to string. In this complexType, we extend the base type string with an attribute. The attribute element (line 18) gives the complexType an attribute of type string named model. Thus an element of type CPU must contain string text (because the base type is string) and may contain a model attribute that is also of type string.
Last, we define type portable, which is a complexType with complex content (lines 23–31). Such types are allowed to have child elements and attributes. The element all (lines 24–29) encloses elements that must each be included once in the corresponding XML instance document. These elements can be included in any order. This complex type holds four elements—processor, monitor, CPUSpeed and RAM. They’re given types CPU, int, gigahertz and int, respectively. When using types CPU and gigahertz, we must include the namespace prefix computer, because these user-defined types are part of the computer namespace (http://www.deitel.com/computer)—the namespace defined in the current document (line 7). Also, portable contains an attribute defined in line 30. The attribute element indicates that elements of type portable contain an attribute of type string named manufacturer.
Line 33 declares the actual element that uses the three types defined in the schema. The element is called laptop and is of type portable. We must use the namespace prefix computer in front of portable.
We have now created an element named laptop that contains child elements processor, monitor, CPUSpeed and RAM, and an attribute manufacturer. Figure 26.7 uses the laptop element defined in the computer.xsd schema. We used Visual Studio’s built-in schema validation to ensure that this XML instance document adheres to the schema’s structural rules.
Line 5 declares namespace prefix computer. The laptop element requires this prefix because it is part of the http://www.deitel.com/computer namespace. Line 6 sets the laptop’s manufacturer attribute, and lines 8–11 use the elements defined in the schema to describe the laptop’s characteristics.
Automatically Creating Schemas using Visual Studio
Visual Studio includes a tool that allows you to create a schema from an existing XML document, using the document as a template. With an XML document open, select XML > Create Schema to use this feature. A new schema file opens that conforms to the standards of the XML document. You can now save it and add it to the project.
Good Programming Practice 26.1
![]()
The schema generated by Visual Studio is a good starting point, but you should refine the restrictions and types it specifies so they’re appropriate for your XML documents.
26.4 Extensible Stylesheet Language and XSL Transformations
Extensible Stylesheet Language (XSL) documents specify how programs are to render XML document data. XSL is a group of three technologies—XSL-FO (XSL Formatting Objects), XPath (XML Path Language) and XSLT (XSL Transformations). XSL-FO is a vocabulary for specifying formatting, and XPath is a string-based language of expressions used by XML and many of its related technologies for effectively and efficiently locating structures and data (such as specific elements and attributes) in XML documents.
The third portion of XSL—XSL Transformations (XSLT)—is a technology for transforming XML documents into other documents—i.e., transforming the structure of the XML document data to another structure. XSLT provides elements that define rules for transforming one XML document to produce a different XML document. This is useful when you want to use data in multiple applications or on multiple platforms, each of which may be designed to work with documents written in a particular vocabulary. For example, XSLT allows you to convert a simple XML document to an XHTML (Extensible HyperText Markup Language) document that presents the XML document’s data (or a subset of the data) formatted for display in a web browser. (See Fig. 26.8 for a sample “before” and “after” view of such a transformation.) XHTML is the W3C technical recommendation that replaces HTML for marking up web content. For more information on XHTML, visit www.deitel.com/xhtml/.
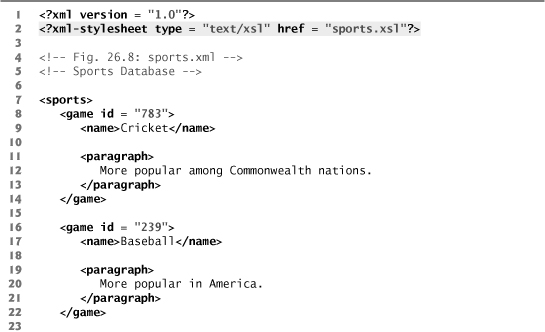
Fig. 26.8. XML document that describes various sports.

Transforming an XML document using XSLT involves two tree structures—the source tree (i.e., the XML document to be transformed) and the result tree (i.e., the XML document to be created). XPath is used to locate parts of the source-tree document that match templates defined in an XSL style sheet. When a match occurs (i.e., a node matches a template), the matching template executes and adds its result to the result tree. When there are no more matches, XSLT has transformed the source tree into the result tree. The XSLT does not analyze every node of the source tree; it selectively navigates the source tree using XSLT’s select and match attributes. For XSLT to function, the source tree must be properly structured. Schemas, DTDs and validating parsers can validate document structure before using XPath and XSLTs.
A Simple XSL Example
Figure 26.8 lists an XML document that describes various sports. The output shows the result of the transformation (specified in the XSLT template of Fig. 26.9) rendered by Internet Explorer 7. Right click with the page open in Internet Explorer and select View Source to view the generated XHTML.
Fig. 26.9. XSLT that creates elements and attributes in an XHTML document.


To perform transformations, an XSLT processor is required. Popular XSLT processors include Microsoft’s MSXML, the Apache Software Foundation’s Xalan (xalan.apache.org) and the XslCompiledTransform class from the .NET Framework that we use in Section 26.8. The XML document shown in Fig. 26.8 is transformed into an XHTML document by MSXML when the document is loaded in Internet Explorer. MSXML is both an XML parser and an XSLT processor.
Line 2 (Fig. 26.8) is a processing instruction (PI) that references the XSL style sheet sports.xsl (Fig. 26.9). A processing instruction is embedded in an XML document and provides application-specific information to whichever XML processor the application uses. In this particular case, the processing instruction specifies the location of an XSLT document with which to transform the XML document. The characters <? and ?> (line 2, Fig. 26.8) delimit a processing instruction, which consists of a PI target (e.g., xmlstylesheet) and a PI value (e.g., type = "text/xsl" href = "sports.xsl"). The PI value’s type attribute specifies that sports.xsl is a text/xsl file (i.e., a text file containing XSL content). The href attribute specifies the name and location of the style sheet to apply—in this case, sports.xsl in the current directory.
Software Engineering Observation 26.4
![]()
XSL enables document authors to separate data presentation (specified in XSL documents) from data description (specified in XML documents).
Figure 26.9 shows the XSL document for transforming the structured data of the XML document of Fig. 26.8 into an XHTML document for presentation. By convention, XSL documents have the file-name extension .xsl.
Lines 6–7 begin the XSL style sheet with the stylesheet start tag. Attribute version specifies the XSLT version to which this document conforms. Line 7 binds namespace prefix xsl to the W3C’s XSLT URI (i.e., http://www.w3.org/1999/XSL/Transform).
Lines 9–12 use element xsl:output to write an XHTML document type declaration (DOCTYPE) to the result tree (i.e., the XML document to be created). The DOCTYPE identifies XHTML as the type of the resulting document. Attribute method is assigned "xml", which indicates that XML is being output to the result tree. (Recall that XHTML is a type of XML.) Attribute omit-xml-declaration specifies whether the transformation should write the XML declaration to the result tree. In this case, we do not want to omit the XML declaration, so we assign to this attribute the value "no". Attributes doctype-system and doctype-public write the DOCTYPE DTD information to the result tree.
XSLT uses templates (i.e., xsl:template elements) to describe how to transform particular nodes from the source tree to the result tree. A template is applied to nodes that are specified in the match attribute. Line 14 uses the match attribute to select the document root (i.e., the conceptual part of the document that contains the root element and everything below it) of the XML source document (i.e., sports.xml). The XPath character / (a forward slash) is used as a separator between element names. Recall that XPath is a string-based language used to locate parts of an XML document easily. In XPath, a leading forward slash specifies that we are using absolute addressing (i.e., we are starting from the root and defining paths down the source tree). In the XML document of Fig. 26.8, the child nodes of the document root are the two processing-instruction nodes (lines 1–2), the two comment nodes (lines 4–5) and the sports element node (lines 7–31). The template in Fig. 26.9, line 14, matches a node (i.e., the document root), so the contents of the template are now added to the result tree.
The XSLT processor writes the XHTML in lines 16–29 (Fig. 26.9) to the result tree exactly as it appears in the XSL document. Now the result tree consists of the DOCTYPE definition and the XHTML code from lines 16–29. Lines 33–39 use element xsl:for-each to iterate through the source XML document, searching for game elements. The xsl:for-each element is similar to C#’s foreach statement. Attribute select is an XPath expression that specifies the nodes (called the node set) on which the xsl:for-each operates. Again, the first forward slash means that we are using absolute addressing. The forward slash between sports and game indicates that game is a child node of sports. Thus, the xsl:for-each finds game nodes that are children of the sports node. The XML document sports.xml contains only one sports node, which is also the document root element. After finding the elements that match the selection criteria, the xsl:for-each processes each element with the code in lines 34–38 (these lines produce one row in an XHTML table each time they execute) and places the result of lines 34–38 in the result tree.
Line 35 uses element value-of to retrieve attribute id’s value and place it in a td element in the result tree. The XPath symbol @ specifies that id is an attribute node of the game context node (i.e., the current node being processed). Lines 36–37 place the name and paragraph element values in td elements and insert them in the result tree. When an XPath expression has no beginning forward slash, the expression uses relative addressing. Omitting the beginning forward slash tells the xsl:value-of select statements to search for name and paragraph elements that are children of the context node, not the root node. Owing to the last XPath expression selection, the current context node is game, which indeed has an id attribute, a name child element and a paragraph child element.
Using XSLT to Sort and Format Data
Figure 26.10 presents an XML document (sorting.xml) that marks up information about a book. Several elements of the markup describing the book appear out of order (e.g., the element describing Chapter 3 appears before the element describing Chapter 2). We arranged them this way purposely to demonstrate that the XSL style sheet referenced in line 5 (sorting.xsl) can sort the XML file’s data for presentation purposes.
Fig. 26.10. XML document containing book information.

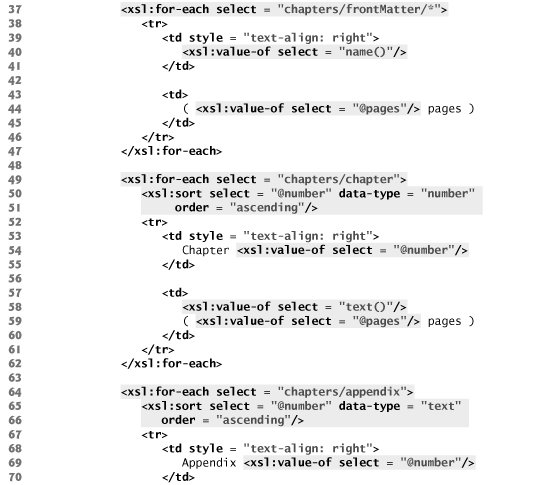
Figure 26.11 presents an XSL document (sorting.xsl) for transforming sorting.xml (Fig. 26.10) to XHTML. Recall that an XSL document navigates a source tree and builds a result tree. In this example, the source tree is XML, and the output tree is XHTML. Line 14 of Fig. 26.11 matches the root element of the document in Fig. 26.10. Line 15 outputs an html start tag to the result tree. The <xsl:apply-templates/> element (line 16) specifies that the XSLT processor is to apply the xsl:templates defined in this XSL document to the current node’s (i.e., the document root’s) children. The content from the applied templates is output in the html element that ends at line 17. Lines 21–86 specify a template that matches element book. The template indicates how to format the information contained in book elements of sorting.xml (Fig. 26.10) as XHTML.
Fig. 26.11. XSL document that transforms sorting.xml into XHTML.

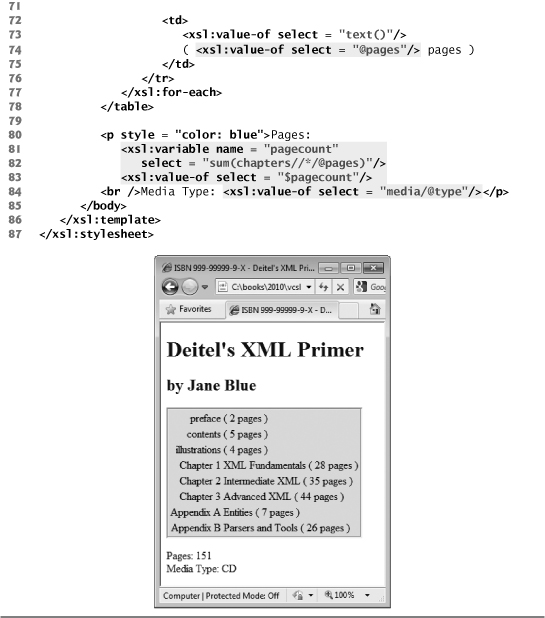
Lines 23–24 create the title for the XHTML document. We use the book’s ISBN (from attribute isbn) and the contents of element title to create the string that appears in the browser window’s title bar (ISBN 999-99999-9-X - Deitel’s XML Primer).
Line 28 creates a header element that contains the book’s title. Lines 29–33 create a header element that contains the book’s author. Because the context node (i.e., the current node being processed) is book, the XPath expression author/lastName selects the author’s last name, and the expression author/firstName selects the author’s first name. The xsl:text element (line 31) is used to insert literal text. Because XML (and therefore XSLT) ignores whitespace, the author’s name would appear as JaneBlue without inserting the explicit space.
Line 37 selects each element (indicated by an asterisk) that is a child of element frontMatter. Line 40 calls node-set function name to retrieve the current node’s element name (e.g., preface). The current node is the context node specified in the xsl:for-each (line 37). Line 44 retrieves the value of the pages attribute of the current node.
Line 49 selects each chapter element. Lines 50–51 use element xsl:sort to sort chapters by number in ascending order. Attribute select selects the value of attribute number in context node chapter. Attribute data-type, with value "number", specifies a numeric sort, and attribute order, with value "ascending", specifies ascending order. Attribute data-type also accepts the value "text" (line 65), and attribute order also accepts the value "descending". Line 58 uses node-set function text to obtain the text between the chapter start and end tags (i.e., the name of the chapter). Line 59 retrieves the value of the pages attribute of the current node. Lines 64–77 perform similar tasks for each appendix.
Lines 81–82 use an XSL variable to store the value of the book’s total page count and output the page count to the result tree. Such variables cannot be modified after they’re initialized. Attribute name specifies the variable’s name (i.e., pagecount), and attribute select assigns a value to the variable. Function sum (line 82) totals the values for all page attribute values. The two slashes between chapters and * indicate a recursive descent—the XSLT processor will search for elements that contain an attribute named pages in all descendant nodes of chapters. The XPath expression
//*
selects all the nodes in an XML document. Line 83 retrieves the value of the newly created XSL variable pagecount by placing a dollar sign in front of its name.
Performance Tip 26.1
![]()
Selecting all nodes in a document when it is not necessary slows XSLT processing.
Summary of XSL Style-Sheet Elements
This section’s examples used several predefined XSL elements to perform various operations. Figure 26.12 lists commonly used XSL elements. For more information on these elements and XSL in general, see www.w3.org/Style/XSL.
Fig. 26.12. XSL style-sheet elements.

This section introduced Extensible Stylesheet Language (XSL) and showed how to create XSL transformations to convert XML documents from one format to another. We showed how to transform XML documents to XHTML documents for display in a web browser. In most business applications, XML documents are transferred between business partners and are transformed to other XML vocabularies programmatically. In Section 26.8, we demonstrate how to perform XSL transformations using the XslCompiledTransform class provided by the .NET Framework.
26.5 LINQ to XML: Document Object Model (DOM)
Although an XML document is a text file, retrieving data from the document using traditional sequential file-processing techniques is not practical, especially for adding and removing elements dynamically.
On successfully parsing a document, some XML parsers store document data as trees in memory. Figure 26.13 illustrates the tree structure for the document article.xml discussed in Fig. 24.2. This hierarchical tree structure is called a Document Object Model (DOM) tree, and an XML parser that creates such a tree is known as a DOM parser. DOM gets its name from the conversion of an XML document’s tree structure into a tree of objects that are then manipulated using an object-oriented programming language such as C#. Each element name (e.g., article, date, firstName) is represented by a node. A node that contains other nodes (called child nodes or children) is called a parent node (e.g., author). A parent node can have many children, but a child node can have only one parent node. Nodes that are peers (e.g., firstName and lastName) are called sibling nodes. A node’s descendant nodes include its children, its children’s children and so on. A node’s ancestor nodes include its parent, its parent’s parent and so on.
Fig. 26.13. Tree structure for the document article.xml.

The DOM tree has a single root node, which contains all the other nodes in the document. For example, the root node of the DOM tree that represents article.xml (Fig. 24.2) contains a node for the XML declaration (line 1), two nodes for the comments (lines 2–3) and a node for the XML document’s root element article (line 5).
Classes for creating, reading and manipulating XML documents are located in the System.Xml namespace, which also contains additional namespaces that provide other XML-related operations.
Reading an XML Document with an XDocument
Namespace System.Xml.Linq contains the classes used to manipulate a DOM in .NET. Though LINQ query expressions are not required to use them, the technologies used are collectively referred to as LINQ to XML. Previous versions of the .NET Framework used a different DOM implementation in the System.Xml namespace. These classes (such as XmlDocument) should generally be avoided in favor of LINQ to XML. In LINQ to XML, the XElement class represents a DOM element node—an XML document is represented by a tree of XElement objects. The XDocument class represents an entire XML document. Unlike XElements, XDocuments cannot be nested. Figure 26.14 uses these classes to load the article.xml document (Fig. 24.2) and display its data in a TextBox. The program displays a formatted version of its input XML file. If article.xml were poorly formatted, such as being all on one line, this application would allow you to convert it into a form that is much easier to understand.
Fig. 26.14. Reading an XML document and displaying it in a TextBox.


To create an XDocument from an existing XML document, we use XDocument’s static Load method, giving the location of the document as an argument (line 20). The returned XDocument contains a tree representation of the loaded XML file, which is used to navigate the file’s contents. The XDocument’s Root property (line 24) returns an XElement representing the root element of the XML file.
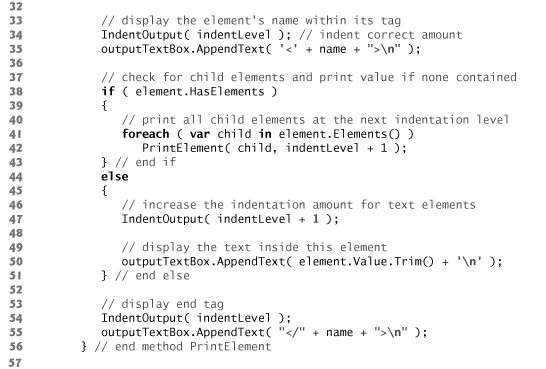
Method PrintElement (lines 28–56) displays an XElement in outputTextBox. Because nested elements should be at different indentation levels, PrintElement takes an int specifying the amount of indentation to use in addition to the XElement it is displaying. Variable indentLevel is passed as an argument to the IndentOutput method (lines 59–63) to add the correct amount of spacing before the begin (line 35) and end (line 55) tags are displayed.
As you’ve seen in previous sections, tag and attribute names often have a namespace prefix. Because the full names consist of two parts (the prefix and name), tag and attribute names are stored not simply as strings, but as objects of class XName. The Name property of an XElement (line 31) returns an XName object containing the tag name and namespace—we are not interested in the namespace for this example, so we retrieve the unqualified name using the XName’s LocalName property.
XElements with and without children are treated differently in the program—this test is performed using the HasElements property (line 38). For XElements with children, we use the Elements method (line 41) to obtain the children, then iterate through them and recursively print their children by calling PrintElement (line 42). For XElements that do not have children, the text they contain is displayed using the Value property (line 50). If used on an element with children, the Value property returns all of the text contained within its descendants, with the tags removed. For simplicity, elements with attributes and those with both elements and text as children are not handled. The indentation is increased by one in both cases to allow for proper formatting.
26.6 LINQ to XML Class Hierarchy
As you saw in the previous section, XElement objects provide several methods for quickly traversing the DOM tree they represent. LINQ to XML provides many other classes for representing different parts of the tree. Figure 26.15 demonstrates the use of these additional classes to navigate the structure of an XML document and display it in a TreeView control. It also shows how to use these classes to get functionality equivalent to the XPath strings introduced in Section 26.4. The file used as a data source (sports.xml) is shown in Fig. 26.8.
Fig. 26.15. Document navigation using XNode.


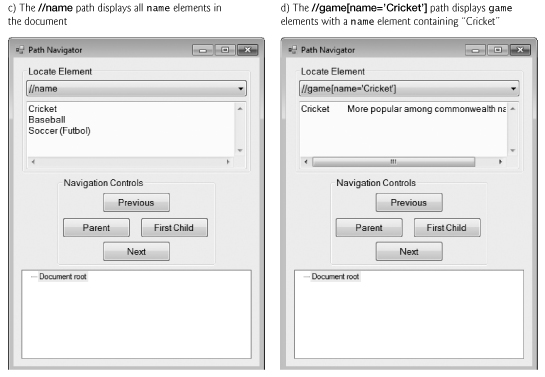

The interface for this example allows the user to display selected elements in the TextBox, or to navigate through the DOM tree in the lower TreeView. Initially, the TextBox is blank, and the TreeView is initialized to show the the root of the tree. The ComboBox at the top of the Form contains XPath expressions. These are not used directly—instead, the example uses the LINQ to XML DOM classes and a LINQ query to retrieve the same results. As in the previous example, the XDocument’s Load method (line 27) is used to load the contents of the XML file into memory. Instance variable current, which points to the current position in the DOM, is initialized to the document itself (line 30). Line 33 creates a TreeNode for the XElement with the correct text, which is then inserted into the TreeView (lines 34–35). The TreeRefresh method (lines 157–162) refreshes the pathTreeView control so that the user interface updates correctly.
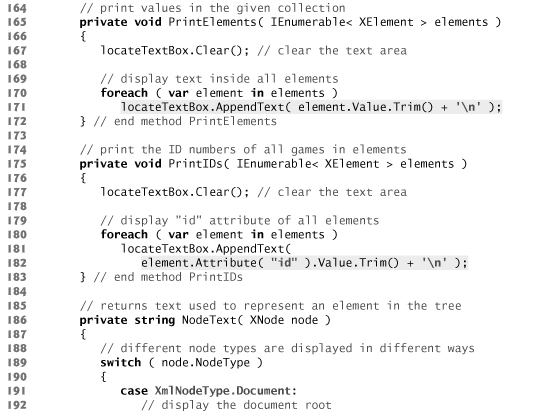
The SelectedIndexChanged event handler of locateComboBox (lines 39–70) fills the TextBox with the elements corresponding to the path the user selected. The first case (lines 45–47) uses the Elements method of the XDocument object document. The Elements method is overloaded—one version has no parameter and returns all child elements. The second version returns only elements with the given tag name. Recall from the previous example that XElement also has an Elements method. This is because the method is actually defined in the XContainer class, the base class of XDocument and XElement. XContainer represents nodes in the DOM tree that can contain other nodes. The results of the call to the method Elements are passed to the PrintElements method (lines 165–172). The PrintElements method uses the XElement’s Value property (line 171) introduced in the previous example. The Value property returns all text in the current node and its descendants. The text is displayed in locateTextBox.
The second case (lines 48–50) uses the Descendants method—another XContainer method common to XElement and XDocument—to get the same results as the XPath double slash (//) operator. In other words, the Descendants method returns all descendant elements with the given tag name, not just direct children. Like Elements, it is overloaded and has a version with no parameter that returns all descendants.
The third case (lines 51–53) uses extension method XPathSelectElements from namespace System.Xml.XPath (imported at line 8). This method allows you to use an XPath expression to navigate XDocument and XElement objects. It returns an IEnumerable<XElement>. There’s also an XPathSelectElement method that returns a single XElement.
The fourth case (lines 54–57) also uses the Descendants method to retrieve all game elements, but it then calls the Elements method to retrieve the child paragraph elements. Because the Descendants method returns an IEnumerable<XElement>, the Elements method is not being called on the XContainer class that we previously stated contains the Elements method. Calling the Elements method in this way is allowed because there’s an extension method in the System.Xml.Linq namespace that returns an IEnumerable<XElement> containing the children of all elements in the original collection. To match the interface of the XContainer class, there’s also a Descendants extension method, and both have versions that do not take an argument.
In a document where a specific element appears at multiple nesting levels, you may need to use chained calls of the Elements method explicitly to return only the elements in which you are interested. Using the Descendants method in these cases can be a source of subtle bugs—if the XML document’s structure changes, your code could silently accept input that the program should not treat as valid. The Descendants method is best used for tags that can appear at any nesting level within the document, such as formatting tags in XHTML, which can occur in many distinct parts of the text.
The fifth case (lines 58–65) retrieves only the game elements with a name element containing "Cricket". To do this, we use a LINQ query (lines 61–63). The Descendants and Elements methods return an IEnumerable<XElement>, so they can be used as the subject of a LINQ query. The where clause (line 62) uses the Element method to retrieve all name elements that are children of the game element the range variable represents. The Element method, a member of the XContainer class, returns the first child element with the given tag name or null if no such element exists. The where clause uses the Value property to retrieve the text contained in the element. We do not check for Element returning null because we know that all game elements in sports.xml contain name elements.
The PrintIDs method (lines 175–183) displays the id attributes of the XElement objects passed to it—specifically, the game elements in the document (line 67). To do this, it uses the Attribute method of the XElement class (line 182). The Attribute method returns an XAttribute object matching the given attribute name or null if no such object exists. The XAttribute class represents an XML attribute—it holds the attribute’s name and value. Here, we access its Value property to get a string that contains the attribute’s value—it can also be used as an lvalue to modify the value.
The Click event handlers for the Buttons in the example are used to update the data displayed in the TreeView. These methods introduce many other classes from the namespace System.Xml.Linq. The entire LINQ to XML class hierarchy is shown in the UML class diagram of Fig. 26.16. XNamespace will be covered in the next section, and XDocumentType holds a DTD, which may be defined directly in an XML file rather than externally referenced (as we did in Fig. 24.4, letter.xml).
Fig. 26.16. LINQ to XML class hierarchy diagram.

As you can see from the diagram, the XNode class is a common abstract base class of all the node types in an XML document—including elements, text and processing instructions. Because all DOM node classes inherit from XNode, an XNode object can be used to keep track of our current location as we navigate the DOM tree.
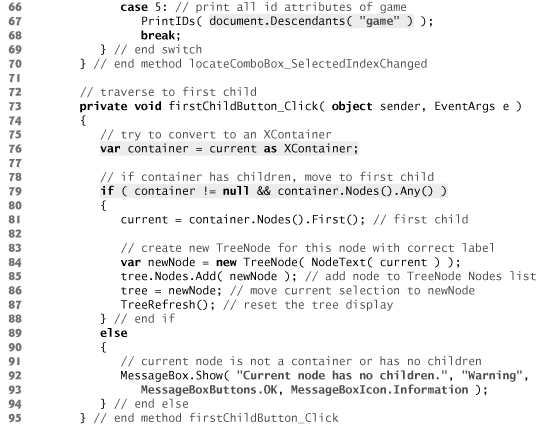
The firstChildButton_Click event handler (lines 73–95) uses the as operator to determine whether the current node is an XContainer (line 76). Recall that the as operator attempts to cast the reference to another type, and returns null if it cannot. If current is an XContainer and has children (line 79), we move current to its first child (line 81). These operations use the Nodes method of class XContainer, which returns a reference to an object of type IEnumerable<XNode> containing all children of the given XContainer. Line 79 uses the Any extension method introduced in Chapter 9—all of the standard LINQ to Objects methods may be used with the LINQ to XML classes. The event handler then inserts a TreeNode into the TreeView to display the child element that current now references (lines 84–87).
Line 84 uses the NodeText method (lines 186–211) to determine what text to display in the TreeNode. It uses the NodeType property, which returns a value of the XmlNodeType enumeration from the System.Xml namespace (imported at line 6) indicating the object’s node type. Although we call it on an XNode, the NodeType property is actually defined in the XObject class. XObject is an abstract base class for all nodes and attributes. The Node-Type property is overridden in the concrete subclasses to return the correct value.
After the node’s type has been determined, it is converted to the appropriate type using the as operator, then the correct text is retrieved. For the entire document, it returns the text Document root (line 193). For elements, NodeText returns the tag name enclosed in angle brackets (line 196). For text nodes, it uses the contained text. It retrieves this by converting the XNode to an XText object—the XText class holds the contents of a text node. XText’s Value property returns the contained text (line 199)—we could also have used its ToString method. Comments, represented by the XComment class, are displayed just as they’re written in the XML file using the ToString method of XComment (line 202). The ToString methods of all subclasses of XNode return the XML they and their children (if any) represent with proper indentation. The last type handled is processing instructions, stored in the XProcessingInstruction class (line 205)—in this example, the only processing instruction is the XML declaration at the beginning of the file. A default case returning the name of the node type is included for other node types that do not appear in sports.xml (line 209).
The event handlers for the other Buttons are structured similarly to firstChildButton_Click—each moves current and updates the TreeView accordingly. The parentButton_Click method (lines 98–113) ensures that the current node has a parent—that is, it is not at the root of the XDocument—before it tries to move current to the parent (line 102). It uses the Parent property of XObject, which returns the parent of the given XObject or null if the parent does not exist. For nodes at the root of the document, including the root element, XML declaration, header comments and the document itself, Parent with return null. We want to move up to the document root in this case, so we use the Document property (also defined in XObject) to retrieve the XDocument representing the document root (line 104). The Document property of an XDocument returns itself. This is consistent with most file systems—attempting to move up a directory from the root will succeed, but not move.
The event handlers for the Previous (lines 116–132) and Next (lines 135–154) Buttons use the PreviousNode (lines 119 and 121) and NextNode (lines 138 and 140) properties of XNode, respectively. As their names imply, they return the previous or next sibling node in the tree. If there’s no previous or next node, the properties return null.
26.7 LINQ to XML: Namespaces and Creating Documents
As you learned in Chapter 24, XML namespaces provide a technique for preventing collisions between tag names used for different purposes. LINQ to XML provides the XNamespace class to enable creation and manipulation of XML namespaces.
Using LINQ to XML to navigate data already stored in an XML document is a common operation, but sometimes it is necessary to create an XML document from scratch. Figure 26.17 uses these features to update an XML document to a new format and combine the data in it with data from a document already in the new format. Figures 26.18 and 26.19 contain the XML files in the old and new formats, respectively. Figure 26.20 displays the file output by the program.
Fig. 26.17. Transforming an XML document and splicing its contents with another.


Fig. 26.18. Sample old-format input for the XMLCombine application.

Fig. 26.19. Sample new-format input for the XMLCombine application.
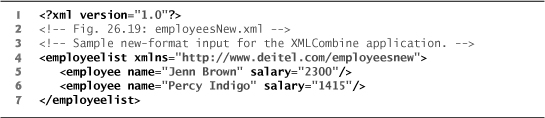
Fig. 26.20. XML file generated by XMLCombine

Lines 10–13 of Fig. 26.17 define XNamespace objects for the two namespaces used in the input XML documents. There’s an implicit conversion from string to XNamespace.
The TransformDocument method (lines 32–40) converts an XML document from the old format to the new format. It creates a new XElement newDocumentRoot, passing the desired name and child elements as arguments. It then creates and returns a new XDocument, with newDocumentRoot as its root element.
The first argument (line 35) creates an XName object for the tag name using the XNamespace’s overloaded + operator—the XName contains the XNamespace from the left operand and the local name given by the string in the right operand. Recall that you can use XName’s LocalName property to access the element’s unqualified name. The Namespace property gives you access to the contained XNamespace object. The second argument is the result of a LINQ query (lines 36–37), which uses the TransformEmployee method to transform each employeelisting entry in the old format (returned by calling the Elements method on the root of the old document) into an employee entry in the new format. When passed a collection of XElements, the XElement constructor adds all members of the collection as children.
The TransformEmployee method (lines 43–55) reformats the data for one employee. It does this by retrieving the text contained in the child elements of each of the employeelisting entries, then creating a new employee element and returning it. The expressions passed to the Element method use XNamespaces—this is necessary because the elements they’re retrieving are in the old namespace. Passing just the tag’s local name would cause the Element method to return null, creating a NullReferenceException when the Value property was accessed.
Once we’ve retrieved the values from the original XML document, we add them as attributes to an employee element. This is done by creating new XAttribute objects with the attribute’s name and value, and passing these to the XElement constructor (lines 52–54).
The SaveFinalDocument method (lines 59–70) merges the two documents and saves them to disk. It first creates a new root element in the correct namespace (line 63). Then it adds the employee elements from both documents as children using the Add method defined in the XContainer class (lines 66–67). The Add method, like XElement’s constructor, will add all elements if passed a collection. After creating and filling the new root, we save it to disk (line 69).
26.8 XSLT with Class XslCompiledTransform
Recall from Section 26.4 that XSL elements define rules for transforming one type of XML document to another type of XML document. We showed how to transform XML documents into XHTML documents and displayed the results in Internet Explorer. MSXML, the XSLT processor used by Internet Explorer, performed the transformations. We now perform a similar task in a C# program.
Performing an XSL Transformation in C# Using the .NET Framework
Figure 26.21 applies the style sheet sports.xsl (Fig. 26.9) to the XML document sports.xml (Fig. 26.8) programmatically. The result of the transformation is written to an XHTML file on disk and displayed in a text box. Figure 26.21(c) shows the resulting XHTML document (sports.html) when you view it in Internet Explorer.
Fig. 26.21. Applying an XSLT style sheet to an XML document.


Line 6 imports the System.Xml.Xsl namespace, which contains class XslCompiledTransform for applying XSL style sheets to XML documents. Line 18 declares XslCompiledTransform object transformer, which serves as an XSLT processor to transform XML data from one format to another.
In event handler TransformTestForm_Load (lines 21–27), line 23 creates and initializes transformer. Line 26 calls the XslCompiledTransform object’s Load method, which loads and parses the style sheet that this application uses. This method takes an argument specifying the name and location of the style sheet—sports.xsl (Fig. 26.9) located in the current directory.
The event handler transformButton_Click (lines 30–37) calls the Transform method of class XslCompiledTransform to apply the style sheet (sports.xsl) to sports.xml (line 33). This method takes two string arguments—the first specifies the XML file to which the style sheet should be applied, and the second specifies the file in which the result of the transformation should be stored on disk. Thus the Transform method call in line 33 transforms sports.xml to XHTML and writes the result to disk as the file sports.html. Figure 26.21(c) shows the new XHTML document rendered in Internet Explorer. The output is identical to that of Fig. 26.8—in the current example, though, the XHTML is stored on disk rather than generated dynamically by MSXML.
After applying the transformation, the program displays the content of the new file sports.html in consoleTextBox, as shown in Fig. 26.21(b). Line 36 obtains the text of the file by passing its name to method ReadAllText of the System.IO.File class, which simplifies file-processing tasks on the local system.
26.9 Wrap-Up
In this chapter, we continued our XML introduction from Chapter 24 by demonstrating several technologies related to XML. We discussed how to create DTDs and schemas for specifying and validating the structure of an XML document. We showed how to use various tools to confirm whether XML documents are valid (i.e., conform to a DTD or schema).
You learned how to create and use XSL documents to specify rules for converting XML documents between formats. Specifically, you learned how to format and sort XML data and output it as XHTML for display in a web browser.
The final sections of the chapter presented more advanced uses of XML in C# applications. We demonstrated how to retrieve and display data from an XML document using various .NET classes. We illustrated how a DOM tree represents each element of an XML document as a node in the tree. The chapter also demonstrated loading data from an XML document using the Load method of the XDocument class. We demonstrated the tools LINQ to XML provides for working with namespaces. Finally, we showed how to use the XslCompiledTransform class to perform XSL transformations.
26.10 Web Resources
www.deitel.com/XML/
The Deitel XML Resource Center focuses on the vast amount of free XML content available online, plus some for-sale items. Start your search here for tools, downloads, tutorials, podcasts, wikis, documentation, conferences, FAQs, books, e-books, sample chapters, articles, newsgroups, forums, downloads from CNET’s download.com, jobs and contract opportunities, and more that will help you develop XML applications.