10. Classes and Objects: A Deeper Look
Objectives
In this chapter you’ll learn:
• Encapsulation and data hiding.
• The concepts of data abstraction and abstract data types (ADTs).
• To use keyword this.
• To use indexers to access members of a class.
• To use static variables and methods.
• To use readonly fields.
• To take advantage of C#’s memory-management features.
• How to create a class library.
• When to use the internal access modifier.
• To use object initializers to set property values as you create a new object.
• To add functionality to existing classes with extension methods.
• To use delegates and lambda expressions to pass methods to other methods for execution at a later time.
• To create objects of anonymous types.
Instead of this absurd division into sexes, they ought to class people as static and dynamic.
—Evelyn Waugh
Is it a world to hide virtues in?
—William Shakespeare
But what, to serve our private ends, Forbids the cheating of our friends?
—Charles Churchill
This above all: to thine own self be true.
—William Shakespeare
Don’t be “consistent,” but be simply true.
—Oliver Wendell Holmes, Jr.
Outline
10.1 Introduction
10.2 Time Class Case Study
10.3 Controlling Access to Members
10.4 Referring to the Current Object’s Members with the this Reference
10.5 Indexers
10.6 Time Class Case Study: Overloaded Constructors
10.7 Default and Parameterless Constructors
10.8 Composition
10.9 Garbage Collection and Destructors
10.10 static Class Members
10.11 readonly Instance Variables
10.12 Data Abstraction and Encapsulation
10.13 Time Class Case Study: Creating Class Libraries
10.14 internal Access
10.15 Class View and Object Browser
10.16 Object Initializers
10.17 Time Class Case Study: Extension Methods
10.18 Delegates
10.19 Lambda Expressions
10.20 Anonymous Types
10.21 Wrap-Up
10.1 Introduction
In this chapter, we take a deeper look at building classes, controlling access to members of a class and creating constructors. We discuss composition—a capability that allows a class to have references to objects of other classes as members. We reexamine properties and explore indexers as an alternative notation for accessing the members of a class. The chapter also discusses static class members and readonly instance variables in detail. We investigate issues such as software reusability, data abstraction and encapsulation. Finally, we explain how to organize classes in assemblies to help manage large applications and promote reuse, then show a special relationship between classes in the same assembly.
10.2 Time Class Case Study
Time1 Class Declaration
Our first example consists of two classes—Time1 (Fig. 10.1) and Time1Test (Fig. 10.2). Class Time1 represents the time of day. Class Time1Test is a testing class in which the Main method creates an object of class Time1 and invokes its methods. The output of this application appears in Fig. 10.2.
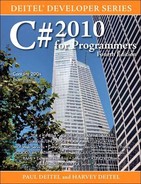
Fig. 10.1. Time1 class declaration maintains the time in 24-hour format.
Class Time1 contains three private instance variables of type int (Fig. 10.1, lines 5–7)—hour, minute and second—that represent the time in universal-time format (24-hour clock format, in which hours are in the range 0–23). Class Time1 contains public methods SetTime (lines 11–16), ToUniversalString (lines 19–23) and ToString (lines 26–31). These are the public services or the public interface that the class provides to its clients.
In this example, class Time1 does not declare a constructor, so the class has a default constructor that’s supplied by the compiler. Each instance variable implicitly receives the default value 0 for an int. When instance variables are declared in the class body, they can be initialized using the same initialization syntax as a local variable.
Method SetTime
Method SetTime (lines 11–16) is a public method that declares three int parameters and uses them to set the time. A conditional expression tests each argument to determine whether the value is in a specified range. For example, the hour value (line 13) must be greater than or equal to 0 and less than 24, because universal-time format represents hours as integers from 0 to 23 (e.g., 1 PM is hour 13 and 11 PM is hour 23; midnight is hour 0 and noon is hour 12). Similarly, both minute and second values (lines 14 and 15) must be greater than or equal to 0 and less than 60. Any out-of-range values are set to 0 to ensure that a Time1 object always contains consistent data—that is, the object’s data values are always kept in range, even if the values provided as arguments to method SetTime are incorrect. In this example, 0 is a consistent value for hour, minute and second.
A value passed to SetTime is a correct value if that value is in the allowed range for the member it’s initializing. So, any number in the range 0–23 would be a correct value for the hour. A correct value is always a consistent value. However, a consistent value is not necessarily a correct value. If SetTime sets hour to 0 because the argument received was out of range, then SetTime is taking an incorrect value and making it consistent, so the object remains in a consistent state at all times. In this case, the application might want to indicate that the object is incorrect. In Chapter 13, Exception Handling, you’ll learn techniques that enable your classes to indicate when incorrect values are received.
Software Engineering Observation 10.1
![]()
Methods and properties that modify the values of private variables should verify that the intended new values are valid. If they’re not, they should place the private variables in an appropriate consistent state.
Method ToUniversalString
Method ToUniversalString (lines 19–23) takes no arguments and returns a string in universal-time format, consisting of six digits—two for the hour, two for the minute and two for the second. For example, if the time were 1:30:07 PM, method ToUniversal-String would return 13:30:07. The return statement (lines 21–22) uses static method Format of class string to return a string containing the formatted hour, minute and second values, each with two digits and, where needed, a leading 0 (specified with the D2 format specifier—which pads the integer with 0s if it has less than two digits). Method Format is similar to the string formatting in method Console.Write, except that Format returns a formatted string rather than displaying it in a console window. The formatted string is returned by method ToUniversalString.
Method ToString
Method ToString (lines 26–31) takes no arguments and returns a string in standard-time format, consisting of the hour, minute and second values separated by colons and followed by an AM or PM indicator (e.g., 1:27:06 PM). Like method ToUniversalString, method ToString uses static string method Format to format the minute and second as two-digit values with leading 0s, if necessary. Line 29 uses a conditional operator (?:) to determine the value for hour in the string—if the hour is 0 or 12 (AM or PM), it appears as 12—otherwise, it appears as a value from 1 to 11. The conditional operator in line 30 determines whether AM or PM will be returned as part of the string.
Recall from Section 7.4 that all objects in C# have a ToString method that returns a string representation of the object. We chose to return a string containing the time in standard-time format. Method ToString is called implicitly when an object’s value is output with a format item in a call to Console.Write. Remember that to enable objects to be converted to their string representations, we need to declare method ToString with keyword override—the reason for this will become clear when we discuss inheritance in Chapter 11.
Using Class Time1
As you learned in Chapter 4, each class you declare represents a new type in C#. Therefore, after declaring class Time1, we can use it as a type in declarations such as
Time1 sunset; // sunset can hold a reference to a Time1 object
The Time1Test application class (Fig. 10.2) uses class Time1. Line 10 creates a Time1 object and assigns it to local variable time. Note that new invokes class Time1’s default constructor, since Time1 does not declare any constructors. Lines 13–17 output the time, first in universal-time format (by invoking time’s ToUniversalString method in line 14), then in standard-time format (by explicitly invoking time’s ToString method in line 16) to confirm that the Time1 object was initialized properly.
Line 20 invokes method SetTime of the time object to change the time. Then lines 21–25 output the time again in both formats to confirm that the time was set correctly.
Fig. 10.2. Time1 object used in an application.


To illustrate that method SetTime maintains the object in a consistent state, line 28 calls method SetTime with invalid arguments of 99 for the hour, minute and second. Lines 29–33 output the time again in both formats to confirm that SetTime maintains the object’s consistent state, then the application terminates. The last two lines of the application’s output show that the time is reset to midnight—the initial value of a Time1 object—after an attempt to set the time with three out-of-range values.
Notes on the Time1 Class Declaration
Consider several issues of class design with respect to class Time1. The instance variables hour, minute and second are each declared private. The actual data representation used within the class is of no concern to the class’s clients. For example, it would be perfectly reasonable for Time1 to represent the time internally as the number of seconds since midnight or the number of minutes and seconds since midnight. Clients could use the same public methods and properties to get the same results without being aware of this.
Software Engineering Observation 10.2
![]()
Classes simplify programming because the client can use only the public members exposed by the class. Such members are usually client oriented rather than implementation oriented. Clients are neither aware of, nor involved in, a class’s implementation. Clients generally care about what the class does but not how the class does it. (Clients do, of course, care that the class operates correctly and efficiently.)
Software Engineering Observation 10.3
![]()
Interfaces change less frequently than implementations. When an implementation changes, implementation-dependent code must change accordingly. Hiding the implementation reduces the possibility that other application parts become dependent on class-implementation details.
10.3 Controlling Access to Members
The access modifiers public and private control access to a class’s variables and methods. (In Section 10.14 and Chapter 11, we’ll introduce the additional access modifiers internal and protected, respectively.) As we stated in Section 10.2, the primary purpose of public methods is to present to the class’s clients a view of the services the class provides (that is, the class’s public interface). Clients of the class need not be concerned with how the class accomplishes its tasks. For this reason, a class’s private variables, properties and methods (i.e., the class’s implementation details) are not directly accessible to the class’s clients.
Figure 10.3 demonstrates that private class members are not directly accessible outside the class. Lines 9–11 attempt to directly access private instance variables hour, minute and second of Time1 object time. When this application is compiled, the compiler generates error messages stating that these private members are not accessible. [Note: This application uses the Time1 class from Fig. 10.1.]
Fig. 10.3. Private members of class Time1 are not accessible.

Notice that members of a class—for instance, properties, methods and instance variables—do not need to be explicitly declared private. If a class member is not declared with an access modifier, it has private access by default. For clarity, we always explicitly declare private members.
10.4 Referring to the Current Object’s Members with the this Reference
Every object can access a reference to itself with keyword this (also called the this reference). When a non-static method is called for a particular object, the method’s body implicitly uses keyword this to refer to the object’s instance variables and other methods. As you’ll see in Fig. 10.4, you can also use keyword this explicitly in a non-static method’s body. Section 10.5 and Section 10.6 shows a more interesting use of keyword this. Section 10.10 explains why keyword this cannot be used in a static method.
Fig. 10.4. this used implicitly and explicitly to refer to members of an object.


We now demonstrate implicit and explicit use of the this reference to enable class ThisTest’s Main method to display the private data of a class SimpleTime object (Fig. 10.4). For the sake of brevity, we declare two classes in one file—class ThisTest is declared in lines 5–12, and class SimpleTime is declared in lines 15–48.
Class SimpleTime (lines 15–48) declares three private instance variables—hour, minute and second (lines 17–19). The constructor (lines 24–29) receives three int arguments to initialize a SimpleTime object. For the constructor we used parameter names that are identical to the class’s instance-variable names (lines 17–19). We don’t recommend this practice, but we intentionally did it here to hide the corresponding instance variables so that we could illustrate explicit use of the this reference. Recall from Section 7.11 that if a method contains a local variable with the same name as a field, that method will refer to the local variable rather than the field. In this case, the parameter hides the field in the method’s scope. However, the method can use the this reference to refer to the hidden instance variable explicitly, as shown in lines 26–28 for SimpleTime’s hidden instance variables.
Method BuildString (lines 32–37) returns a string created by a statement that uses the this reference explicitly and implicitly. Line 35 uses the this reference explicitly to call ToUniversalString. Line 36 uses the this reference implicitly to call the same method. Programmers typically do not use the this reference explicitly to reference other methods in the current object. Also, line 46 in method ToUniversalString explicitly uses the this reference to access each instance variable. This is not necessary here, because the method does not have any local variables that hide the instance variables of the class.
Common Programming Error 10.1
![]()
It’s often a logic error when a method contains a parameter or local variable that has the same name as an instance variable of the class. In such a case, use reference this if you wish to access the instance variable of the class—otherwise, the method parameter or local variable will be referenced.
Error-Prevention Tip 10.1
![]()
Avoid method-parameter names or local-variable names that conflict with field names. This helps prevent subtle, hard-to-locate bugs.
Class ThisTest (Fig. 10.4, lines 5–12) demonstrates class SimpleTime. Line 9 creates an instance of class SimpleTime and invokes its constructor. Line 10 invokes the object’s BuildString method, then displays the results.
Performance Tip 10.1
![]()
C# conserves memory by maintaining only one copy of each method per class—this method is invoked by every object of the class. Each object, on the other hand, has its own copy of the class’s instance variables (i.e., non-static variables). Each method of the class implicitly uses the this reference to determine the specific object of the class to manipulate.
10.5 Indexers
Chapter 4 introduced properties as a way to access a class’s private data in a controlled manner via the properties’ get and set accessors. Sometimes a class encapsulates lists of data such as arrays. Such a class can use keyword this to define property-like class members called indexers that allow array-style indexed access to lists of elements. With “conventional” C# arrays, the index must be an integer value. A benefit of indexers is that you can define both integer indices and noninteger indices. For example, you could allow client code to manipulate data using strings as indices that represent the data items’ names or descriptions. When manipulating “conventional” C# array elements, the array element-access operator always returns a value of the same type—i.e., the type of the array’s elements. Indexers are more flexible—they can return any type, even one that’s different from the type of the underlying data.
Although an indexer’s element-access operator is used like an array element-access operator, indexers are defined like properties in a class. Unlike properties, for which you can choose an appropriate property name, indexers must be defined with keyword this. Indexers have the general form:

The IndexType parameters specified in the brackets ([]) are accessible to the get and set accessors. These accessors define how to use the index (or indices) to retrieve or modify the appropriate data member. As with properties, the indexer’s get accessor must return a value of type returnType, and the set accessor can use the implicit parameter value to reference the value that should be assigned to the element.
The application of Figs. 10.5 and 10.6 contains two classes—class Box represents a box with a length, a width and a height, and class BoxTest demonstrates class Box’s indexers.
Fig. 10.5. Box class definition represents a box with length, width and height dimensions with indexers.


The private data members of class Box are string array names (line 6), which contains the names (i.e., "length", "width" and "height") for the dimensions of a Box, and double array dimensions (line 7), which contains the size of each dimension. Each element in array names corresponds to an element in array dimensions (e.g., dimensions[ 2 ] contains the height of the Box).
Box defines two indexers (lines 18–33 and lines 36–59) that each return a double value representing the size of the dimension specified by the indexer’s parameter. Indexers can be overloaded like methods. The first indexer uses an int index to manipulate an element in the dimensions array. The second indexer uses a string index representing the name of the dimension to manipulate an element in the dimensions array. Each indexer returns -1 if its get accessor encounters an invalid index. Each indexer’s set accessor assigns value to the appropriate element of the array dimensions only if the index specified is valid. Normally, you would have an indexer throw an exception if it receives an invalid index. We discuss how to throw exceptions and process them in Chapter 13, Exception Handling.
The indexer that receives a string argument uses a while statement to search for a matching string in the names array (lines 42–44 and lines 52–54). If it finds a match, the indexer manipulates the corresponding element in array dimensions (lines 46 and 57).
Class BoxTest (Fig. 10.6) manipulates class Box’s private data members through Box’s indexers. Local variable box is declared at line 10 and initialized to a new instance of class Box. We use the Box class’s constructor to initialize box with dimensions of 30, 30, and 30. Lines 14–16 use the indexer declared with parameter int to obtain the three dimensions of box and display them with WriteLine. The expression box[0] (line 14) implicitly calls the indexer’s get accessor to obtain the value of box’s private instance variable dimensions[0]. Similarly, the assignment to box0] in line 20 implicitly calls the indexer’s set accessor in lines 28–32 of Fig. 10.5. The set accessor implicitly sets its value parameter to 10, then sets dimensions[0] to value (10). Lines 24 and 28–30 in Fig. 10.6 take similar actions, using the overloaded indexer with a string parameter to manipulate the Box’s properties.
Fig. 10.6. Indexers provide access to an object’s members.


10.6 Time Class Case Study: Overloaded Constructors
As you know, you can declare your own constructor to specify how objects of a class should be initialized. Next, we demonstrate a class with several overloaded constructors that enable objects of that class to be initialized in different ways. To overload constructors, simply provide multiple constructor declarations with different signatures.
Class Time2 with Overloaded Constructors
By default, instance variables hour, minute and second of class Time1 (Fig. 10.1) are initialized to their default values of 0—midnight in universal time. Class Time1 does not enable the class’s clients to initialize the time with specific nonzero values. Class Time2 (Fig. 10.7) contains overloaded constructors for conveniently initializing its objects in a variety of ways. The constructors ensure that each Time2 object begins in a consistent state. In this application, four of the constructors invoke a fifth constructor, which in turn calls method SetTime. Method SetTime invokes the set accessors of properties Hour, Minute and Second, which ensure that the value supplied for hour is in the range 0 to 23 and that the values for minute and second are each in the range 0 to 59. If a value is out of range, it’s set to 0 by the corresponding property (once again ensuring that each instance variable remains in a consistent state). The compiler invokes the appropriate constructor by matching the number and types of the arguments specified in the constructor call with the number and types of the parameters specified in each constructor declaration. We could have combined the constructors in lines 11–23 into a single constructor with optional parameters. Class Time2 also provides properties for each instance variable.
Fig. 10.7. Time2 class declaration with overloaded constructors.


Class Time2’s Constructors
Line 11 declares a parameterless constructor—a constructor invoked without arguments. This constructor has an empty body, as indicated by the empty set of curly braces after the constructor header. Instead, we introduce a use of the this reference that’s allowed only in the constructor’s header. In line 11, the usual constructor header is followed by a colon (:), then the keyword this. The this reference is used in method-call syntax (along with the three int arguments) to invoke the Time2 constructor that takes three int arguments (lines 20–23). The parameterless constructor passes values of 0 for the hour, minute and second to the constructor with three int parameters. The use of the this reference as shown here is called a constructor initializer. Constructor initializers are a popular way to reuse initialization code provided by one of the class’s constructors rather than defining similar code in another constructor’s body. We use this syntax in four of the five Time2 constructors to make the class easier to maintain. If we needed to change how objects of class Time2 are initialized, only the constructor that the class’s other constructors call would need to be modified. Even that constructor might not need modification—it simply calls the SetTime method to perform the actual initialization, so it’s possible that the changes the class might require would be localized to this method.
Line 14 declares a Time2 constructor with a single int parameter representing the hour, which is passed with 0 for the minute and second to the constructor at lines 20–23. Line 17 declares a Time2 constructor that receives two int parameters representing the hour and minute, which are passed with 0 for the second to the constructor at lines 20–23. Like the parameterless constructor, each of these constructors invokes the constructor at lines 20–23 to minimize code duplication. Lines 20–23 declare the Time2 constructor that receives three int parameters representing the hour, minute and second. This constructor calls SetTime to initialize the instance variables to consistent values. SetTime, in turn, invokes the set accessors of properties Hour, Minute and Second.
Common Programming Error 10.3
![]()
A constructor can call methods of the class. Be aware that the instance variables might not yet be in a consistent state, because the constructor is in the process of initializing the object. Using instance variables before they have been initialized properly is a logic error.
Lines 26–27 declare a Time2 constructor that receives a reference to another Time2 object. In this case, the values from the Time2 argument are passed to the three-parameter constructor at lines 20–23 to initialize the hour, minute and second. Line 27 could have directly accessed the hour, minute and second instance variables of the constructor’s time argument with the expressions time.hour, time.minute and time.second—even though hour, minute and second are declared as private variables of class Time2.
Software Engineering Observation 10.4
![]()
When one object of a class has a reference to another object of the same class, the first object can access all the second object’s data and methods (including those that are private).
Notes Regarding Class Time2’s Methods, Properties and Constructors
Time2’s properties are accessed throughout the body of the class. In particular, method SetTime assigns values to properties Hour, Minute and Second in lines 33–35, and methods ToUniversalString and ToString use properties Hour, Minute and Second in line 85 and lines 92–93, respectively. In each case, these methods could have accessed the class’s private data directly without using the properties. However, consider changing the representation of the time from three int values (requiring 12 bytes of memory) to a single int value representing the total number of seconds that have elapsed since midnight (requiring only 4 bytes of memory). If we make such a change, only the bodies of the methods that access the private data directly would need to change—in particular, the individual properties Hour, Minute and Second. There would be no need to modify the bodies of methods SetTime, ToUniversalString or ToString, because they do not access the private data directly. Designing the class in this manner reduces the likelihood of programming errors when altering the class’s implementation.
Similarly, each Time2 constructor could be written to include a copy of the appropriate statements from method SetTime. Doing so may be slightly more efficient, because the extra constructor call and the call to SetTime are eliminated. However, duplicating statements in multiple methods or constructors makes changing the class’s internal data representation more difficult and error-prone. Having the Time2 constructors call the three-parameter constructor (or even call SetTime directly) requires any changes to the implementation of SetTime to be made only once.
Software Engineering Observation 10.5
![]()
When implementing a method of a class, use the class’s properties to access the class’s private data. This simplifies code maintenance and reduces the likelihood of errors.
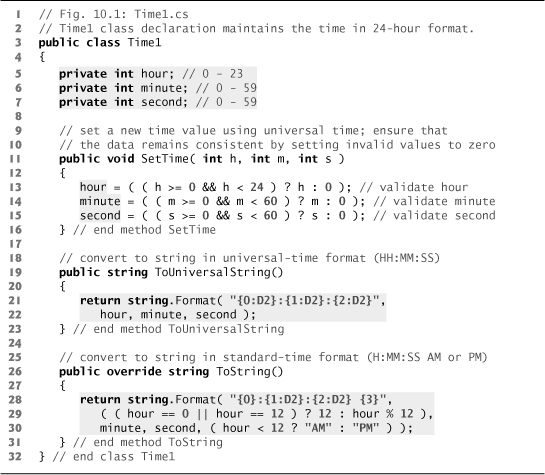
Also notice that class Time2 takes advantage of access modifiers to ensure that clients of the class must use the appropriate methods and properties to access private data. In particular, the properties Hour, Minute and Second declare private set accessors (lines 47, 61 and 75, respectively) to restrict the use of the set accessors to members of the class. We declare these private for the same reasons that we declare the instance variables private—to simplify code maintenance and ensure that the data remains in a consistent state. Although the methods in class Time2 still have all the advantages of using the set accessors to perform validation, clients of the class must use the SetTime method to modify this data. The get accessors of properties Hour, Minute and Second are implicitly declared public because their properties are declared public—when there is no access modifier before a get or set accessor, the accessor inherits the access modifier preceding the property name.
Using Class Time2’s Overloaded Constructors
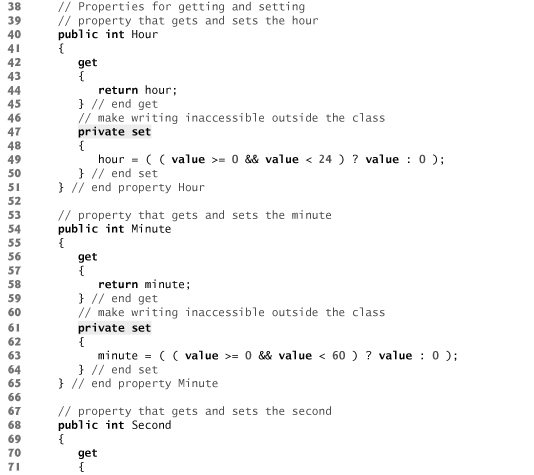
Class Time2Test (Fig. 10.8) creates six Time2 objects (lines 9–14) to invoke the overloaded Time2 constructors. Line 9 shows that the parameterless constructor (line 11 of Fig. 10.7) is invoked by placing an empty set of parentheses after the class name when allocating a Time2 object with new. Lines 10–14 of the application demonstrate passing arguments to the other Time2 constructors. C# invokes the appropriate overloaded constructor by matching the number and types of the arguments specified in the constructor call with the number and types of the parameters specified in each constructor declaration. Line 10 invokes the constructor at line 14 of Fig. 10.7. Line 11 invokes the constructor at line 17 of Fig. 10.7. Lines 12–13 invoke the constructor at lines 20–23 of Fig. 10.7. Line 14 invokes the constructor at lines 26–27 of Fig. 10.7. The application displays the string representation of each initialized Time2 object to confirm that each was initialized properly.
Fig. 10.8. Overloaded constructors used to initialize Time2 objects.

10.7 Default and Parameterless Constructors
Every class must have at least one constructor. Recall from Section 4.10 that if you do not provide any constructors in a class’s declaration, the compiler creates a default constructor that takes no arguments when it’s invoked. In Section 11.4.2, you’ll learn that the default constructor implicitly performs a special task.
The compiler will not create a default constructor for a class that explicitly declares at least one constructor. In this case, if you want to be able to invoke the constructor with no arguments, you must declare a parameterless constructor—as in line 11 of Fig. 10.7. Like a default constructor, a parameterless constructor is invoked with empty parentheses. The Time2 parameterless constructor explicitly initializes a Time2 object by passing to the three-parameter constructor 0 for each parameter. Since 0 is the default value for int instance variables, the parameterless constructor in this example could actually omit the constructor initializer. In this case, each instance variable would receive its default value when the object is created. If we omit the parameterless constructor, clients of this class would not be able to create a Time2 object with the expression new Time2().
Common Programming Error 10.4
![]()
If a class has constructors, but none of the public constructors are parameterless constructors, and an application attempts to call a parameterless constructor to initialize an object of the class, a compilation error occurs. A constructor can be called with no arguments only if the class does not have any constructors (in which case the default constructor is called) or if the class has a public parameterless constructor.
10.8 Composition
A class can have references to objects of other classes as members. This is called composition and is sometimes referred to as a has-a relationship. For example, an object of class AlarmClock needs to know the current time and the time when it’s supposed to sound its alarm, so it’s reasonable to include two references to Time objects in an AlarmClock object.
Software Engineering Observation 10.6
![]()
One form of software reuse is composition, in which a class has as members references to objects of other classes.
Our example of composition contains three classes—Date (Fig. 10.9), Employee (Fig. 10.10) and EmployeeTest (Fig. 10.11). Class Date (Fig. 10.9) declares instance variables month and day (lines 7–9) and auto-implemented property Year (line 11) to represent a date. The constructor receives three int parameters. Line 17 invokes the set accessor of property Month (lines 24–40) to validate the month—an out-of-range value is set to 1 to maintain a consistent state. Line 18 uses property Year to set the year. Since Year is an auto-implemented property, we’re assuming in this example that the value for Year is correct. Line 19 uses property Day (lines 43–67), which validates and assigns the value for day based on the current month and Year (by using properties Month and Year in turn to obtain the values of month and Year). The order of initialization is important, because the set accessor of property Day validates the value for day based on the assumption that month and Year are correct. Line 55 determines whether the day is correct based on the number of days in the particular Month. If the day is not correct, lines 58–59 determine whether the Month is February, the day is 29 and the Year is a leap year. Otherwise, if the parameter value does not contain a correct value for day, line 64 sets day to 1 to maintain the Date in a consistent state. Line 20 in the constructor outputs the this reference as a string. Since this is a reference to the current Date object, the object’s ToString method (lines 70–73) is called implicitly to obtain the object’s string representation.
Fig. 10.9. Date class declaration.


Class Employee (Fig. 10.10) has instance variables firstName, lastName, birthDate and hireDate. Members birthDate and hireDate (lines 7–8) are references to Date objects, demonstrating that a class can have as instance variables references to objects of other classes. The Employee constructor (lines 11–18) takes four parameters—first, last, dateOfBirth and dateOfHire. The objects referenced by parameters dateOfBirth and dateOfHire are assigned to the Employee object’s birthDate and hireDate instance variables, respectively. When class Employee’s ToString method is called, it returns a string containing the string representations of the two Date objects. Each of these strings is obtained with an implicit call to the Date class’s ToString method.
Fig. 10.10. Employee class with references to other objects.

Class EmployeeTest (Fig. 10.11) creates two Date objects (lines 9–10) to represent an Employee’s birthday and hire date, respectively. Line 11 creates an Employee and initializes its instance variables by passing to the constructor two strings (representing the Employee’s first and last names) and two Date objects (representing the birthday and hire date). Line 13 implicitly invokes the Employee’s ToString method to display the values of its instance variables and demonstrate that the object was initialized properly.
Fig. 10.11. Composition demonstration.

10.9 Garbage Collection and Destructors
Every object you create uses various system resources, such as memory. In many programming languages, these system resources are reserved for the object’s use until they’re explicitly released by the programmer. If all the references to the object that manages the resource are lost before the resource is explicitly released, the application can no longer access the resource to release it. This is known as a resource leak.
We need a disciplined way to give resources back to the system when they’re no longer needed, thus avoiding resource leaks. The Common Language Runtime (CLR) performs automatic memory management by using a garbage collector to reclaim the memory occupied by objects that are no longer in use, so the memory can be used for other objects. When there are no more references to an object, the object becomes eligible for destruction. Every object has a special member, called a destructor, that is invoked by the garbage collector to perform termination housekeeping on an object before the garbage collector reclaims the object’s memory. A destructor is declared like a parameterless constructor, except that its name is the class name, preceded by a tilde (~), and it has no access modifier in its header. After the garbage collector calls the object’s destructor, the object becomes eligible for garbage collection. The memory for such an object can be reclaimed by the garbage collector. With .NET 4, Microsoft has introduced a new background garbage collector that manages memory more efficiently than the garbage collectors in earlier .NET versions.
Memory leaks, which are common in other languages such as C and C++ (because memory is not automatically reclaimed in those languages), are less likely in C# (but some can still happen in subtle ways). Other types of resource leaks can occur. For example, an application could open a file on disk to modify its contents. If the application does not close the file, no other application can modify (or possibly even use) the file until the application that opened it terminates.
A problem with the garbage collector is that it doesn’t guarantee that it will perform its tasks at a specified time. Therefore, the garbage collector may call the destructor any time after the object becomes eligible for destruction, and may reclaim the memory any time after the destructor executes. In fact, it’s possible that neither will happen before the application terminates. Thus, it’s unclear whether, or when, the destructor will be called. For this reason, destructors are rarely used.
Software Engineering Observation 10.7
![]()
A class that uses system resources, such as files on disk, should provide a method to eventually release the resources. Many Framework Class Library classes provide Close or Dispose methods for this purpose. Section 13.5 introduces the Dispose method, which is then used in many later examples. Close methods are typically used with objects that are associated with files (Chapter 17) and other types of so-called streams of data.
10.10 static Class Members
Every object has its own copy of all the instance variables of the class. In certain cases, only one copy of a particular variable should be shared by all objects of a class. A static variable is used in such cases. A static variable represents classwide information—all objects of the class share the same piece of data. The declaration of a static variable begins with the keyword static.
Let’s motivate static data with an example. Suppose that we have a video game with Martians and other space creatures. Each Martian tends to be brave and willing to attack other space creatures when it’s aware that there are at least four other Martians present. If fewer than five Martians are present, each Martian becomes cowardly. Thus each Martian needs to know the martianCount. We could endow class Martian with martianCount as an instance variable. If we do this, every Martian will have a separate copy of the instance variable, and every time we create a new Martian, we’ll have to update the instance variable martianCount in every Martian. This wastes space on redundant copies, wastes time updating the separate copies and is error prone. Instead, we declare martianCount to be static, making martianCount classwide data. Every Martian can access the martianCount as if it were an instance variable of class Martian, but only one copy of the static martianCount is maintained. This saves space. We save time by having the Martian constructor increment the static martianCount—there is only one copy, so we do not have to increment separate copies of martianCount for each Martian object.
Software Engineering Observation 10.8
![]()
Use a static variable when all objects of a class must use the same copy of the variable.
The scope of a static variable is the body of its class. A class’s public static members can be accessed by qualifying the member name with the class name and the member access (.) operator, as in Math.PI. A class’s private static class members can be accessed only through the methods and properties of the class. Actually, static class members exist even when no objects of the class exist—they’re available as soon as the class is loaded into memory at execution time. To access a private static member from outside its class, a public static method or property can be provided.
Common Programming Error 10.5
![]()
It’s a compilation error to access or invoke a static member by referencing it through an instance of the class, like a non-static member.
Software Engineering Observation 10.9
![]()
Static variables and methods exist, and can be used, even if no objects of that class have been instantiated.
Our next application declares two classes—Employee (Fig. 10.12) and EmployeeTest (Fig. 10.13). Class Employee declares private static variable count (Fig. 10.12, line 8) and public static property Count (lines 38–44). We omit the set accessor of property Count to make the property read-only—we do not want clients of the class to be able to modify count. The static variable count is initialized to 0 in line 8. If a static variable is not initialized, the compiler assigns a default value to the variable—in this case 0, the default value for type int. Variable count maintains a count of the number of objects of class Employee that have been created.
Fig. 10.12. static variable used to maintain a count of the number of Employee objects in memory.

When Employee objects exist, member count can be used in any method of an Employee object—this example increments count in the constructor (line 22). When no objects of class Employee exist, member count can still be referenced, but only through a call to public static property Count (lines 28–34), as in Employee.Count, which evaluates to the number of Employee objects currently in memory.
EmployeeTest method Main (Fig. 10.13) instantiates two Employee objects (lines 14–15). When each Employee object’s constructor is invoked, lines 20–21 of Fig. 10.12 assign the Employee’s first name and last name to properties FirstName and LastName. These two statements do not make copies of the original string arguments. Actually, string objects in C# are immutable—they cannot be modified after they’re created. Therefore, it’s safe to have many references to one string object. This is not normally the case for objects of most other classes in C#. If string objects are immutable, you might wonder why we’re able to use operators + and += to concatenate string objects. String-concatenation operations actually result in a new string object containing the concatenated values. The original string objects are not modified.
Lines 18–19 display the updated Count. When Main has finished using the two Employee objects, references e1 and e2 are set to null at lines 29–30, so they no longer refer to the objects that were instantiated in lines 14–15. The objects become “eligible for destruction” because there are no more references to them in the application. After the objects’ destructors are called, the objects become “eligible for garbage collection.”
Fig. 10.13. static member demonstration.

Eventually, the garbage collector might reclaim the memory for these objects (or the operating system will reclaim the memory when the application terminates). C# does not guarantee when, or even whether, the garbage collector will execute. When the garbage collector does run, it’s possible that no objects or only a subset of the eligible objects will be collected.
A method declared static cannot access non-static class members directly, because a static method can be called even when no objects of the class exist. For the same reason, the this reference cannot be used in a static method—the this reference must refer to a specific object of the class, and when a static method is called, there might not be any objects of its class in memory.
10.11 readonly Instance Variables
The principle of least privilege is fundamental to good software engineering. In the context of an application, the principle states that code should be granted the amount of privilege and access needed to accomplish its designated task, but no more. Let’s see how this principle applies to instance variables.
Some instance variables need to be modifiable, and some do not. In Section 8.4, we used keyword const for declaring constants. These constants must be initialized to a constant value when they’re declared. Suppose, however, we want to initialize a constant belonging to an object in the object’s constructor. C# provides keyword readonly to specify that an instance variable of an object is not modifiable and that any attempt to modify it after the object is constructed is an error. For example,
private readonly int INCREMENT;
declares readonly instance variable INCREMENT of type int. Like constants, readonly variables are declared with all capital letters by convention. Although readonly instance variables can be initialized when they’re declared, this isn’t required. Readonly variables should be initialized by each of the class’s constructors. Each constructor can assign values to a readonly instance variable multiple times—the variable doesn’t become unmodifiable until after the constructor completes execution. A constructor does not initialize the readonly variable, the variable receives the same default value as any other instance variable (0 for numeric simple types, false for bool type and null for reference types), and the compiler generates a warning.
Software Engineering Observation 10.10
![]()
Declaring an instance variable as readonly helps enforce the principle of least privilege. If an instance variable should not be modified after the object is constructed, declare it to be readonly to prevent modification.
Members that are declared as const must be assigned values at compile time. Therefore, const members can be initialized only with other constant values, such as integers, string literals, characters and other const members. Constant members with values that cannot be determined at compile time must be declared with keyword readonly, so they can be initialized at execution time. Variables that are readonly can be initialized with more complex expressions, such as an array initializer or a method call that returns a value or a reference to an object.
Common Programming Error 10.6
![]()
Attempting to modify a readonly instance variable anywhere but in its declaration or the object’s constructors is a compilation error.
Error-Prevention Tip 10.2
![]()
Attempts to modify a readonly instance variable are caught at compilation time rather than causing execution-time errors. It’s always preferable to get bugs out at compile time, if possible, rather than allowing them to slip through to execution time (where studies have found that repairing bugs is often many times more costly).
Software Engineering Observation 10.11
![]()
If a readonly instance variable is initialized to a constant only in its declaration, it’s not necessary to have a separate copy of the instance variable for every object of the class. The variable should be declared const instead. Constants declared with const are implicitly static, so there will only be one copy for the entire class.
10.12 Data Abstraction and Encapsulation
Classes normally hide the details of their implementation from their clients. This is called information hiding. As an example, let’s consider the stack data structure introduced in Section 7.6. Recall that a stack is a last-in, first-out (LIFO) data structure—the last item pushed (inserted) on the stack is the first item popped (removed) off the stack.
Stacks can be implemented with arrays and with other data structures, such as linked lists. (We discuss stacks and linked lists in Chapters 21 and 23.) A client of a stack class need not be concerned with the stack’s implementation. The client knows only that when data items are placed in the stack, they’ll be recalled in last-in, first-out order. The client cares about what functionality a stack offers, not about how that functionality is implemented. This concept is referred to as data abstraction. Even if you know the details of a class’s implementation, you shouldn’t write code that depends on these details as they may later change. This enables a particular class (such as one that implements a stack and its push and pop operations) to be replaced with another version—perhaps one that runs faster or uses less memory—without affecting the rest of the system. As long as the public services of the class do not change (i.e., every original method still has the same name, return type and parameter list in the new class declaration), the rest of the system is not affected.
Earlier non-object-oriented programming languages like C emphasize actions. In these languages, data exists to support the actions that applications must take. Data is “less interesting” than actions. Data is “crude.” Only a few simple types exist, and it’s difficult for programmers to create their own types. C# and the object-oriented style of programming elevate the importance of data. The primary activities of object-oriented programming in C# are creating types (e.g., classes) and expressing the interactions among objects of those types. To create languages that emphasize data, the programming-languages community needed to formalize some notions about data. The formalization we consider here is the notion of abstract data types (ADTs), which improve the application-development process.
Consider the type int, which most people associate with an integer in mathematics. Actually, an int is an abstract representation of an integer. Unlike mathematical integers, computer ints are fixed in size. Type int in C# is limited to the range –2,147,483,648 to +2,147,483,647. If the result of a calculation falls outside this range, an error occurs, and the computer responds in some appropriate manner. It might “quietly” produce an incorrect result, such as a value too large to fit in an int variable—commonly called arithmetic overflow. It also might throw an exception, called an OverflowException. (We show how to deal with arithmetic overflow in Section 13.8.) Mathematical integers do not have this problem. Therefore, the computer int is only an approximation of the real-world integer. Simple types like int, double, and char are all examples of abstract data types—representations of real-world concepts to some satisfactory level of precision within a computer system.
An ADT actually captures two notions: a data representation and the operations that can be performed on that data. For example, in C#, an int contains an integer value (data) and provides addition, subtraction, multiplication, division and remainder operations—division by zero is undefined.
Software Engineering Observation 10.12
![]()
Programmers create types through the class mechanism. New types can be designed to be as convenient to use as the simple types. Although the language is easy to extend via new types, you cannot alter the base language itself.
Another ADT we discuss is a queue, which is similar to a “waiting line.” Computer systems use many queues internally. A queue offers well-understood behavior to its clients: Clients place items in a queue one at a time via an enqueue operation, then retrieve them one at a time via a dequeue operation. A queue returns items in first-in, first-out (FIFO) order—the first item inserted in a queue is the first removed. Conceptually, a queue can become infinitely long, but real queues are finite.
The queue hides an internal data representation that keeps track of the items currently waiting in line, and it offers enqueue and dequeue operations to its clients. The clients are not concerned about the implementation of the queue—they simply depend on the queue to operate “as advertised.” When a client enqueues an item, the queue should accept that item and place it in some kind of internal FIFO data structure. Similarly, when the client wants the next item from the front of the queue, the queue should remove the item from its internal representation and deliver it in FIFO order—the item that has been in the queue the longest should be returned by the next dequeue operation.
The queue ADT guarantees the integrity of its internal data structure. Clients cannot manipulate this data structure directly—only the queue ADT has access to its internal data. Clients are able to perform only allowable operations on the data representation—the ADT rejects operations that its public interface does not provide. We’ll discuss stacks and queues in greater depth in Chapter 21, Data Structures.
10.13 Time Class Case Study: Creating Class Libraries
In almost every example in the book, we have seen that classes from preexisting libraries, such as the .NET Framework Class Library, can be imported into a C# application. Each class belongs to a namespace that contains a group of related classes. As applications become more complex, namespaces help you manage the complexity of application components. Class libraries and namespaces also facilitate software reuse by enabling applications to add classes from other namespaces (as we have done in most examples). This section introduces how to create your own class libraries.
Steps for Declaring and Using a Reusable Class
Before a class can be used in multiple applications, it must be placed in a class library to make it reusable. Figure 10.14 shows how to specify the namespace in which a class should be placed in the library. Figure 10.17 shows how to use our class library in an application. The steps for creating a reusable class are:
- Declare a
publicclass. If the class is notpublic, it can be used only by other classes in the same assembly. - Choose a namespace name and add a
namespacedeclaration to the source-code file for the reusable class declaration. - Compile the class into a class library.
- Add a reference to the class library in an application.
- Specify a
usingdirective for the namespace of the reusable class and use the class.
Fig. 10.14. Time1 class declaration in a namespace.

Step 1: Creating a public Class
For Step 1 in this discussion, we use the public class Time1 declared in Fig. 10.1. No modifications have been made to the implementation of the class, so we’ll not discuss its implementation details again here.
Step 2: Adding the namespace Declaration
For Step 2, we add a namespace declaration to Fig. 10.1. The new version is shown in Fig. 10.14. Line 3 declares a namespace named Chapter10. Placing the Time1 class inside the namespace declaration indicates that the class is part of the specified namespace. The namespace name is part of the fully qualified class name, so the name of class Time1 is actually Chapter10.Time1. You can use this fully qualified name in your applications, or you can write a using directive (as we’ll see shortly) and use its simple name (the unqualified class name—Time1) in the application. If another namespace also contains a Time1 class, the fully qualified class names can be used to distinguish between the classes in the application and prevent a name conflict (also called a name collision).
Most language elements must appear inside the braces of a type declaration (e.g., classes and enumerations). Some exceptions are namespace declarations, using directives, comments and C# attributes (first used in Chapter 17). Only class declarations declared public will be reusable by clients of the class library. Non-public classes are typically placed in a library to support the public reusable classes in that library.
Step 3: Compiling the Class Library
Step 3 is to compile the class into a class library. To create a class library in Visual C# Express, we must create a new project by clicking the File menu, selecting New Project... and choosing Class Library from the list of templates, as shown in Fig. 10.15. Then add the code from Fig. 10.14 into the new project (either by copying our code from the book’s examples or by typing the code yourself). In the projects you’ve created so far, the C# compiler created an executable .exe containing the application. When you compile a Class Library project, the compiler creates a .dll file, known as a dynamically linked library—a type of assembly that you can reference from other applications.
Fig. 10.15. Creating a Class Library Project.

Step 4: Adding a Reference to the Class Library
Once the class is compiled and stored in the class library file, the library can be referenced from any application by indicating to the Visual C# Express IDE where to find the class library file. Create a new (empty) project and right-click the project name in the Solution Explorer window. Select Add Reference... from the pop-up menu that appears. The dialog box that appears will contain a list of class libraries from the .NET Framework. Some class libraries, like the one containing the System namespace, are so common that they’re added to your application by the IDE. The ones in this list are not.
In the Add Reference... dialog box, click the Browse tab. Recall from Section 3.3 that when you build an application, Visual C# 2010places the .exe file in the binRelease folder in the directory of your application. When you build a class library, Visual C# places the .dll file in the same place. In the Browse tab, you can navigate to the directory containing the class library file you created in Step 3, as shown in Fig. 10.16. Select the .dll file and click OK.
Fig. 10.16. Adding a Reference.

Step 5: Using the Class from an Application
Add a new code file to your application and enter the code for class Time1NamespaceTest (Fig. 10.17). Now that you’ve added a reference to your class library in this application, your Time1 class can be used by Time1NamespaceTest without adding the Time1.cs source-code file to the project.
Fig. 10.17. Time1 object used in an application.


In Fig. 10.17, the using directive in line 3 specifies that we’d like to use the class(es) of namespace Chapter10 in this file. Class Time1NamespaceTest is in the global namespace of this application, because the class’s file does not contain a namespace declaration. Since the two classes are in different namespaces, the using directive at line 3 allows class Time1NamespaceTest to use class Time1 as if it were in the same namespace.
Recall from Section 4.4 that we could omit the using directive in line 4 if we always referred to class Console by its fully qualified class name, System.Console. Similarly, we could omit the using directive in line 3 for namespace Chapter10 if we changed the Time1 declaration in line 11 of Fig. 10.17 to use class Time1’s fully qualified name, as in:
Chapter10.Time1 time = new Chapter10.Time1();
10.14 internal Access
Classes like the ones we’ve defined so far can be declared with only two access modifiers—public and internal. Such classes are sometimes called top-level classes. C# also supports nested classes—classes defined inside other classes. In addition to public and internal, such classes can be declared private or protected. If there is no access modifier in the class declaration, the class defaults to internal access. This allows the class to be used by all code in the same assembly as the class, but not by code in other assemblies. Within the same assembly as the class, this is equivalent to public access. However, if a class library is referenced from an application, the library’s internal classes will be inaccessible from the code of the application. Similarly, methods, instance variables and other members of a class declared internal are accessible to all code compiled in the same assembly, but not to code in other assemblies.
The application in Fig. 10.18 demonstrates internal access. The application contains two classes in one source-code file—the InternalAccessTest application class (lines 6–22) and the InternalData class (lines 25–43).
Fig. 10.18. Members declared internal in a class are accessible by other classes in the same assembly.


In the InternalData class declaration, lines 27–28 declare the instance variables number and message with the internal access modifier—class InternalData has access internal by default, so there is no need for an access modifier. The InternalAccessTest’s static Main method creates an instance of the InternalData class (line 10) to demonstrate modifying the InternalData instance variables directly (as shown in lines 16–17). Within the same assembly, internal access is equivalent to public access. The results can be seen in the output window. If we compile this class into a .dll class library file and reference it from a new application, that application will have access to public class InternalAccessTest, but not to internal class InternalData, or its internal members.
10.15 Class View and Object Browser
Now that we have introduced key concepts of object-oriented programming, we present two features that Visual Studio provides to facilitate the design of object-oriented applications—Class View and Object Browser.
Using the Class View Window
The Class View displays the fields, methods and properties for all classes in a project. To access this feature, you must first enable the IDE’s “expert features.” To do so, select Tools > Settings > Expert Settings. Next, select View > Class View. Figure 10.19 shows the Class View for the Time1 project of Fig. 10.1 (class Time1) and Fig. 10.2 (class Time1Test). The view follows a hierarchical structure, positioning the project name (Time1) as the root and including a series of nodes that represent the classes, variables, methods and properties in the project. If a ![]() appears to the left of a node, that node can be expanded to show other nodes. If a
appears to the left of a node, that node can be expanded to show other nodes. If a ![]() appears to the left of a node, that node can be collapsed. According to the Class View, project
appears to the left of a node, that node can be collapsed. According to the Class View, project Time1 contains class Time1 and class Time1Test as children. When class Time1 is selected, the class’s members appear in the lower half of the window. Class Time1 contains methods SetTime, ToString and ToUniversalString (indicated by purple boxes, ![]() ) and instance variables
) and instance variables hour, minute and second (indicated by blue boxes, ![]() ). The lock icons to the left of the blue box icons for the instance variables specify that the variables are
). The lock icons to the left of the blue box icons for the instance variables specify that the variables are private. Both class Time1 and class Time1Test contain the Base Types node. If you expand this node, you’ll see class Object in each case, because each class inherits from class System.Object (discussed in Chapter 11).
Fig. 10.19. Class View of class Time1 (Fig. 10.1) and class Time1Test (Fig. 10.2).

Using the Object Browser
Visual C# Express’s Object Browser lists all classes in the C# library. You can use the Object Browser to learn about the functionality provided by a specific class. To open the Object Browser, select Other Windows from the View menu and click Object Browser. Figure 10.20 depicts the Object Browser when the user navigates to the Math class in namespace System. To do this, we expanded the node for mscorlib (Microsoft Core Library) in the upper-left pane of the Object Browser, then expanded its subnode for System. [Note: The most common classes from the System namespace, such as System.Math, are in mscorlib.]
Fig. 10.20. Object Browser for class Math.

The Object Browser lists all methods provided by class Math in the upper-right frame—this offers you “instant access” to information regarding the functionality of various objects. If you click the name of a member in the upper-right frame, a description of that member appears in the lower-right frame. The Object Browser lists all the classes of the Framework Class Library. The Object Browser can be a quick mechanism to learn about a class or one of its methods. Remember that you can also view the complete description of a class or a method in the online documentation available through the Help menu in Visual C# Express.
10.16 Object Initializers
Object initializers allow you to create an object and initialize its properties in the same statement. This is useful when a class does not provide an appropriate constructor to meet your needs. For this example, we created a version of the Time class (Fig. 10.21) in which we did not define any constructors—so this class’s only constructor is the default one provided by the compiler, which does not allow client code to specify hour, minute and second values in the constructor call. Figure 10.22 demonstrates object initializers.
Fig. 10.21. Time class declaration maintains the time in 24-hour format.


Line 12 (Fig. 10.22) creates a Time object and initializes it with class Time’s parameterless constructor, then uses an object initializer to set its Hour, Minute and Second properties. Notice that new Time is immediately followed by an object-initializer list—a comma-separated list in curly braces ({}) of properties and their values. Each property name can appear only once in the object-initializer list.
Fig. 10.22. Demonstrate object initializers using class Time.

The object initializer executes the property initializers in the order in which they appear. Lines 15–17 display the Time object in standard and universal time formats. The Minute property’s value is 0. The value supplied for the Minute property in the object initializer (145) is invalid. The Minute property’s set accessor validates the supplied value, setting the Minute property to 0.
Line 22 uses an object initializer to create a new Time object (anotherTime) and set only its Minute property. Lines 25–27 display the Time object in both standard and universal time formats. The time is set to 12:45:00 AM. Recall that an object initializer first calls the class’s constructor. The Time constructor initializes the time to midnight (00:00:00). The object initializer then sets each specified property to the supplied value. In this case, the Minute property is set to 45. The Hour and Second properties retain their default values, because no values are specified for them in the object initializer.
10.17 Time Class Case Study: Extension Methods
Sometimes it’s useful to add new functionality to an existing class. However, you cannot modify code for classes in the .NET Framework Class Library or other class libraries that you did not create. In Visual C# 2010, you can use extension methods to add functionality to an existing class without modifying the class’s source code. Many LINQ capabilities are also available as extension methods.
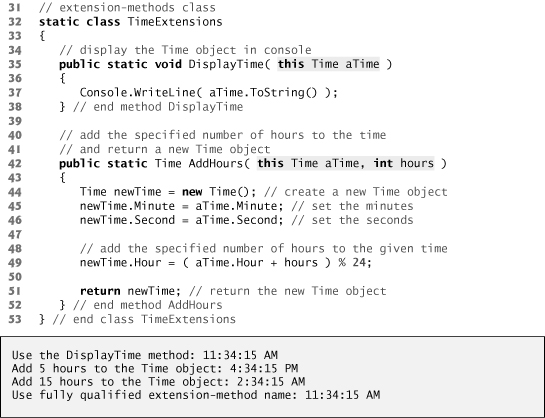
Figure 10.23 uses extension methods to add functionality to class Time (from Section 10.16). The extension method DisplayTime (lines 35–38) displays the time in the console window using the Time object’s ToString method. The key new feature of method DisplayTime is the this keyword that precedes the Time object parameter in the method header (line 35). The this keyword notifies the compiler that the DisplayTime method extends an existing class. The C# compiler uses this information to inject additional code into the compiled program that enables extension methods to work with existing types. The type of an extension method’s first parameter specifies the class that’s being extended—extension methods must define at least one parameter. Also, extension methods must be defined as static methods in a static top-level class such as TimeExtensions (lines 32–53). A static class can contain only static members and cannot be instantiated.
Fig. 10.23. Demonstrating extension methods.

The parameter list for the DisplayTime method (line 35) contains a single parameter of type Time, indicating that this method extends class Time. Line 14 of Fig. 10.23 uses Time object myTime to call the DisplayTime extension method. Line 14 does not provide an argument to the method call. The compiler implicitly passes the object that’s used to call the method (myTime in this case) as the extension method’s first argument. This allows you to call an extension method as if it were an instance method of the extended class. In fact, IntelliSense displays extension methods with the extended class’s instance methods and identifies them with a distinct icon (Fig. 10.24). Note the blue down-arrow in the icon to the left of the method name in the IntelliSense window—this denotes an extension method. The tool tip shown to the right of the IntelliSense window includes the text (extension) to indicate that DisplayTime is an extension method. Also note in the tool tip that the method’s signature shows an empty parameter list.
Fig. 10.24. IntelliSense support for extension methods.

Lines 42–52 of Fig. 10.23 define the AddHours extension method. Again, the method parameter contains the this keyword (line 42). The first parameter of AddHours is a Time object, indicating that the method extends class Time. The second parameter is an int value specifying the number of hours to add to the time. The AddHours method returns a new Time object with the specified number of hours added. Line 44 creates the new Time object. Lines 45–46 set the new Time’s Minute and Second properties using the values of the Time object received as an argument. Line 49 adds the specified number of hours to the value of the original Time object’s Hour property, then uses the % operator to ensure the value is in the range 0–23. This value is assigned to the new Time object’s Hour property. Line 51 returns the new Time object to the caller. Line 18 calls the AddHours extension method to add five hours to the myTime object’s hour value. The method call receives one argument—the number of hours to add. Again, the compiler implicitly passes the object that’s used to call the method (myTime) as the extension method’s first argument. The Time object returned by AddHours is assigned to a local variable (timeAdded) and displayed in the console using the DisplayTime extension method (line 19). Line 23 uses both extension methods (DisplayTime and AddHours) in a single statement to add 15 hours to myTime and display the result in the console. Extension methods, as well as instance methods, allow cascaded method calls—that is, invoking multiple methods in the same statement (line 23). The methods are called from left to right. In line 23, the DisplayTime method is called on the Time object returned by method AddHours.
Line 27 calls extension method DisplayTime using its fully qualified name—the name of the class in which the extension method is defined (TimeExtensions), followed by the method name (DisplayTime) and its argument list. Note in line 27 that the call to DisplayTime passes a Time object as an argument to the method. When using the fully qualified method name, you must specify an argument for extension method’s first parameter. This use of the extension method resembles a call to a static method.
Extension Method Notes
Be careful when using extension methods to add functionality to preexisting classes. If the type being extended defines an instance method with the same name as your extension method and a compatible signature, the instance method will shadow the extension method. If a predefined class is later updated to include an instance method that shadows an extension method, the compiler does not report any errors and the extension method does not appear in IntelliSense.
10.18 Delegates
A delegate is an object that holds a reference to a method. Delegates allow you to treat methods as data—via delegates, you can assign methods to variables, and pass methods to and from other methods. You can also call methods through variables of delegate types. Figure 10.25 uses delegates to customize the functionality of a method that filters an int array. Line 9 defines a delegate type named NumberPredicate. A variable of this type can store a reference to any method that takes an int argument and returns a bool. A delegate type is declared by preceeding a method header with keyword delegate (placed after any access specifiers, such as public or private). The delegate type declaration includes the method header only—the delegate type simply describes a set of methods with specific parameters and a specific return type.
Fig. 10.25. Using delegates to pass functions as arguments.


Line 16 declares evenPredicate as a variable of type NumberPredicate and assigns to it a reference to the IsEven method (defined in lines 61–64). Since method IsEven’s signature matches the NumberPredicate delegate’s signature, IsEven can be referenced by a variable of type NumberPredicate. Variable evenPredicate can now be used as an alias for method IsEven. A NumberPredicate variable can hold a reference to any method that receives an int and returns a bool. Lines 19–20 use variable evenPredicate to call method IsEven, then display the result. The method referenced by the delegate is called using the delegate variable’s name in place of the method’s name (i.e., evenPredicate(4)).
The real power of delegates is the ability to pass a method reference as an argument to another method, as shown by method FilterArray (lines 43–58). FilterArray takes as arguments an int array and a NumberPredicate that references a method used to filter the array elements. The foreach statement (lines 50–55) calls the method referenced by the NumberPredicate delegate (line 53) on each element of the array. If the method call returns true, the element is included in the result. The NumberPredicate is guaranteed to return either true or false, because any method referenced by a NumberPredicate must return a bool—as specified by the definition of the NumberPredicate delegate type. Line 23 passes FilterArray the int array (numbers) and the NumberPredicate that references the IsEven method (evenPredicate). FilterArray calls the NumberPredicate delegate on each array element. FilterArray returns a List of ints, because we don’t know in advance how many elements will be selected. Line 23 assigns the List returned by FilterArray to variable evenNumbers and line 26 calls method DisplayList to display the results.
Line 29 calls method FilterArray to select the odd numbers in the array. We reference method IsOdd (defined in lines 67–70) in FilterArray’s second argument, rather than creating a NumberPredicate variable. Line 32 displays the results. Line 35 calls method FilterArray to select the numbers greater than five in the array. Method IsOver5 is referenced by a NumberPredicate delegate and passed to method FilterArray (line 35). The filtered list is then displayed in lines 38–39.
10.19 Lambda Expressions
Lambda expressions (new in Visual C# 2010) allow you to define simple, anonymous functions. Figure 10.26 uses lambda expressions to reimplement the previous example that introduced delegates. A lambda expression (line 17) begins with a parameter list. The parameter list is followed by the => lambda operator (read as “goes to”) and an expression that represents the body of the function. The lambda expression in line 17 uses the % operator to determine whether the parameter’s number value is an even int. The value produced by the expression—true if the int is even, false otherwise—is implicitly returned by the lambda expression. We do not specify a return type for the lambda expression—the return type is inferred from the return value or, in some cases, from the delegate’s return type. The lambda expression in line 17 produces the same results as the IsEven method in Fig. 10.25. In fact, the expression used in the body of the IsEven method is the same one used in the lambda expression.
Fig. 10.26. Using lambda expressions.


In line 17, the lambda expression is assigned to a variable of type NumberPredicate (defined in line 9). Recall that NumberPredicate is the delegate type used in the previous example. A delegate can hold a reference to a lambda expression. As with traditional methods, a method defined by a lambda expression must have a signature that’s compatible with the delegate type. The NumberPredicate delegate can hold a reference to any method that takes an int as an argument and returns a bool. Based on this, the compiler is able to infer that the lambda expression in line 17 defines a method that implicitly takes an int as an argument and returns the bool result of the expression in its body. Lambda expressions are often used as arguments to methods with parameters of delegate types, rather than defining and referencing a separate method.
Lines 20–21 display the result of calling the lambda expression defined in line 17. The lambda expression is called via the variable that references it (evenPredicate). Line 24 passes evenPredicate to method FilterArray (lines 49–64), which is identical to the method used in Fig. 10.25—it uses the NumberPredicate delegate to determine whether an array element should be included in the result. Lines 27–28 display the filtered results.
Lines 32–33 select the odd array elements and store the results. The lambda expression’s input parameter number is explicitly typed as an int, rather than implicitly typed like the lambda expression in line 17. The lambda expressions in lines 17 and 33 are called expression lambdas because they have an expression to the right of the lambda operator. In this case, the lambda expression is passed directly to method FilterArray and is implicitly converted to a NumberPredicate delegate. The lambda expression in line 33 is equivalent to the IsOdd method defined in Fig. 10.25. Lines 36–37 display the filtered results.
Lines 40–41 filter ints greater than 5 from the array and store the results. The lambda expression in line 41 is equivalent to the IsOver5 method in Fig. 10.25. This lambda expression is called a statement lambda, because it contains a statement block—a set of statements enclosed in braces ({})—to the right of the lambda operator. The statement block of a statement lambda can contain multiple statements. The lambda expression’s signature is compatible with the NumberPredicate delegate, because the parameter’s type is inferred to be int and the statement in the lambda returns a bool.
Lambda expressions can help reduce the size of your code and the complexity of working with delegates—the program in Fig. 10.26 performs the same actions as the one in Fig. 10.25 but is 12 lines shorter. Lambda expressions are particularly powerful when combined with the where clause in LINQ queries.
10.20 Anonymous Types
Anonymous types (new in Visual C# 2010) allow you to create simple classes used to store data without writing a class definition. An anonymous type declaration (line 10 of Fig. 10.27)—known formally as an anonymous object-creation expression—is similar to an object initializer (discussed in Section 10.16). The anonymous type declaration begins with the keyword new followed by a member-initializer list in braces ({}). Notice that no class name is specified after the new keyword. The compiler generates a new class definition based on the anonymous object-creation expression. The new class contains the properties specified in the member-initializer list—Name and Age. All properties of an anonymous type are public and immutable. Anonymous type properties are read-only—you cannot modify a property’s value once the object is created. Each property’s type is inferred from the values assigned to it. The class definition is generated automatically by the compiler, so you don’t know the class’s type name (hence the term anonymous type). Thus, you must use implicitly typed local variables to store references to objects of anonymous types (e.g., line 10). Line 13 uses the anonymous type’s ToString method to display the object’s information on the console. The compiler defines the ToString method when creating the anonymous type’s class definition. The method returns a string in curly braces containing a comma-separated list of PropertyName = value pairs.
Fig. 10.27. Using anonymous types.


Line 16 creates another anonymous object and assigns it to variable steve. The anonymous object-creation expression uses the same property names (Name and Age) and types in the member-initializer list as the anonymous type defined in line 10. Two anonymous objects that specify the same property names and types, in the same order, use the same anonymous class definition and are considered to be of the same type.
Lines 22–23 determine if the two anonymous objects, bob and steve, are equal and display the results. When anonymous objects are compared for equality, all properties are considered. Line 23 uses the anonymous type’s Equals method (also defined by the compiler), which compares the properties of the anonymous object that calls the method and the anonymous object that it receives as an argument. Since bob’s Name and Age properties are not equal to steve’s Name and Age properties, the two objects are not equal.
Line 26 creates an object of the same anonymous type as bob and steve and assigns it to variable bob2. This object specifies the same property values as bob. Line 33 uses the anonymous type’s Equals method to determine that bob and bob2 are equal—both have the same Name and Age property values and the properties are declared in the same order.
Anonymous Types in LINQ
Anonymous types are frequently used in LINQ queries to select specific properties from the items being queried. Recall the Employee class used in Section 9.3. The class defines three properties—FirstName, LastName and MonthlySalary. The statement
var names =
from e in employees
select new { e.FirstName, Last = e.LastName };
from lines 64–66 of Fig. 9.4 uses a LINQ query to select properties FirstName and Last-Name of each Employee object (e) in an array of Employees (employees). The select clause creates an anonymous type with properties FirstName and Last to store the selected property values. The syntax used in the select clause to create the anonymous type is different than what you’ve seen in this section. The member-initializer list doesn’t specify a name for the FirstName property. As explained in Chapter 9, the compiler implicitly uses the name of the selected property unless you specify otherwise.
10.21 Wrap-Up
In this chapter, we discussed additional class concepts. The Time class case study presented a complete class declaration consisting of private data, overloaded public constructors for initialization flexibility, properties for manipulating the class’s data and methods that returned string representations of a Time object in two different formats. You learned that every class can declare a ToString method that returns a string representation of an object of the class and that this method is invoked implicitly when an object of a class is output as a string or concatenated with a string.
You learned that the this reference is used implicitly in a class’s non-static methods to access the class’s instance variables and other non-static methods. You saw explicit uses of the this reference to access the class’s members (including hidden fields) and learned how to use keyword this in a constructor to call another constructor of the class. You also learned how to declare indexers with the this keyword, allowing you to access the data of an object in much the same manner as you access the elements of an array.
You saw that composition enables a class to have references to objects of other classes as members. You learned about C#’s garbage-collection capability and how it reclaims the memory of objects that are no longer used. We explained the motivation for static variables in a class and demonstrated how to declare and use static variables and methods in your own classes. You also learned how to declare and initialize readonly variables.
We showed how to create a class library for reuse and how to use the classes of the library in an application. You learned that classes declared without an access modifier are given internal access by default. You saw that classes in an assembly can access the internal-access members of the other classes in the same assembly. We also showed how to use Visual Studio’s Class View and Object Browser windows to navigate the classes of the .NET Framework Class Library and your own applications to discover information about those classes.
You learned how to initialize an object’s properties as you create it with an object-initializer list. We used extension methods to add functionality to a class without modifying the class’s source code. You then learned that a delegate is an object that holds a method reference. We showed you how to use delegates to assign methods to variables and pass methods to other methods. Next we demonstrated lambda expressions for defining simple, anonymous methods that can also be used with delegates. Finally, you learned how to use anonymous types to create simple classes that store data without writing a class definition.
In the next chapter, you’ll learn about inheritance. You’ll see that all classes in C# are related directly or indirectly to the object class and begin to understand how inheritance enables you to build more powerful applications faster.