
30. ATM Case Study, Part 1: Object-Oriented Design with the UML
Objectives
In this chapter you’ll learn:
• A simple object-oriented design methodology.
• What a requirements document is.
• To identify classes and class attributes from a requirements document.
• To identify objects’ states, activities and operations from a requirements document.
• To determine the collaborations among objects in a system.
• To work with various UML diagrams to graphically model an object-oriented system.
Action speaks louder than words but not nearly as often.
—Mark Twain
Always design a thing by considering it in its next larger context.
—Eliel Saarinen
Oh, life is a glorious cycle of song.
—Dorothy Parker
The Wright brothers’ design ... allowed them to survive long enough to learn how to fly.
—Michael Potts
Outline
30.1 Introduction
30.2 Examining the ATM Requirements Document
30.3 Identifying the Classes in the ATM Requirements Document
30.4 Identifying Class Attributes
30.5 Identifying Objects’ States and Activities
30.6 Identifying Class Operations
30.7 Identifying Collaboration Among Objects
30.8 Wrap-Up
30.1 Introduction
Now we begin the optional portion of our object-oriented design and implementation case study. In this chapter and Chapter 31, you’ll design and implement an object-oriented automated teller machine (ATM) software system. The case study provides you with a concise, carefully paced, complete design and implementation experience. In Sections 30.2–30.7 and 31.2–31.3, you’ll perform the steps of an object-oriented design (OOD) process using the UML while relating these steps to the concepts discussed in Chapters 3–12. In this chapter, you’ll work with six popular types of UML diagrams to graphically represent the design. In Chapter 31, you’ll tune the design with inheritance, then fully implement the ATM in a C# console application (Section 31.4).
This is not an exercise; rather, it’s an end-to-end learning experience that concludes with a detailed walkthrough of the complete C# code that implements our design. It will acquaint you with the kinds of substantial problems encountered in industry. These chapters can be studied as a continuous unit after you’ve completed the introduction to object-oriented programming in Chapters 3 and 10–12.
30.2 Examining the ATM Requirements Document
We begin our design process by presenting a requirements document that specifies the overall purpose of the ATM system and what it must do. Throughout the case study, we refer to the requirements document to determine precisely what functionality the system must include.
Requirements Document
A small local bank intends to install a new automated teller machine (ATM) to allow users (i.e., bank customers) to perform basic financial transactions (Fig. 30.1). For simplicity, each user can have only one account at the bank. ATM users should be able to view their account balance, withdraw cash (i.e., take money out of an account) and deposit funds (i.e., place money into an account).
Fig. 30.1. Automated teller machine user interface.

The user interface of the automated teller machine contains the following hardware components:
• a screen that displays messages to the user
• a keypad that receives numeric input from the user
• a cash dispenser that dispenses cash to the user
• a deposit slot that receives deposit envelopes from the user
The cash dispenser begins each day loaded with 500 $20 bills. [Note: Owing to the limited scope of this case study, certain elements of the ATM described here simplify various aspects of a real ATM. For example, a real ATM typically contains a device that reads a user’s account number from an ATM card, whereas this ATM asks the user to type an account number on the keypad (which you’ll simulate with your personal computer’s keypad). Also, a real ATM usually prints a paper receipt at the end of a session, but all output from this ATM appears on the screen.]
The bank wants you to develop software to perform the financial transactions initiated by bank customers through the ATM. The bank will integrate the software with the ATM’s hardware at a later time. The software should simulate the functionality of the hardware devices (e.g., cash dispenser, deposit slot) in software components, but it need not concern itself with how these devices perform their duties. The ATM hardware has not been developed yet, so instead of writing your software to run on the ATM, you should develop a first version of the software to run on a personal computer. This version should use the computer’s monitor to simulate the ATM’s screen and the computer’s keyboard to simulate the ATM’s keypad.
An ATM session consists of authenticating a user (i.e., proving the user’s identity) based on an account number and personal identification number (PIN), followed by creating and executing financial transactions. To authenticate a user and perform transactions, the ATM must interact with the bank’s account information database. [Note: A database is an organized collection of data stored on a computer.] For each bank account, the database stores an account number, a PIN and a balance indicating the amount of money in the account. [Note: The bank plans to build only one ATM, so we do not need to worry about multiple ATMs accessing the database at the same time. Furthermore, we assume that the bank does not make any changes to the information in the database while a user is accessing the ATM. Also, any business system like an ATM faces reasonably complicated security issues that go well beyond the scope of a first- or second-semester programming course. We make the simplifying assumption, however, that the bank trusts the ATM to access and manipulate the information in the database without significant security measures.]
Upon approaching the ATM, the user should experience the following sequence of events (see Fig. 30.1):
- The screen displays a welcome message and prompts the user to enter an account number.
- The user enters a five-digit account number, using the keypad.
- For authentication purposes, the screen prompts the user to enter the PIN (personal identification number) associated with the specified account number.
- The user enters a five-digit PIN, using the keypad.
- If the user enters a valid account number and the correct PIN for that account, the screen displays the main menu (Fig. 30.2). If the user enters an invalid account number or an incorrect PIN, the screen displays an appropriate message, then the ATM returns to Step 1 to restart the authentication process.
Fig. 30.2. ATM main menu.
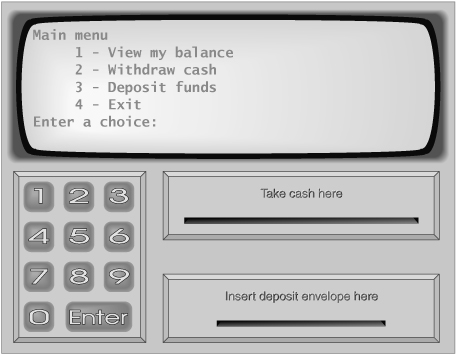
After the ATM authenticates the user, the main menu (Fig. 30.2) displays a numbered option for each of the three types of transactions: balance inquiry (option 1), withdrawal (option 2) and deposit (option 3). The main menu also displays an option that allows the user to exit the system (option 4). The user then chooses either to perform a transaction (by entering 1, 2 or 3) or to exit the system (by entering 4). If the user enters an invalid option, the screen displays an error message, then redisplays the main menu.
If the user enters 1 to make a balance inquiry, the screen displays the user’s account balance. To do so, the ATM must retrieve the balance from the bank’s database.
The following actions occur when the user enters 2 to make a withdrawal:
- The screen displays a menu (shown in Fig. 30.3) containing standard withdrawal amounts: $20 (option 1), $40 (option 2), $60 (option 3), $100 (option 4) and $200 (option 5). The menu also contains option 6, which allows the user to cancel the transaction.
Fig. 30.3. ATM withdrawal menu.

- The user enters a menu selection (1–6) using the keypad.
- If the withdrawal amount chosen is greater than the user’s account balance, the screen displays a message stating this and telling the user to choose a smaller amount. The ATM then returns to Step 1. If the withdrawal amount chosen is less than or equal to the user’s account balance (i.e., an acceptable withdrawal amount), the ATM proceeds to Step 4. If the user chooses to cancel the transaction (option 6), the ATM displays the main menu (Fig. 30.2) and waits for user input.
- If the cash dispenser contains enough cash to satisfy the request, the ATM proceeds to Step 5. Otherwise, the screen displays a message indicating the problem and telling the user to choose a smaller withdrawal amount. The ATM then returns to Step 1.
- The ATM debits (i.e., subtracts) the withdrawal amount from the user’s account balance in the bank’s database.
- The cash dispenser dispenses the desired amount of money to the user.
- The screen displays a message reminding the user to take the money.
The following actions occur when the user enters 3 (from the main menu) to make a deposit:
- The screen prompts the user to enter a deposit amount or to type 0 (zero) to cancel the transaction.
- The user enters a deposit amount or 0, using the keypad. [Note: The keypad does not contain a decimal point or a dollar sign, so the user cannot type a real dollar amount (e.g., $147.25). Instead, the user must enter a deposit amount as a number of cents (e.g., 14725). The ATM then divides this number by 100 to obtain a number representing a dollar amount (e.g., 14725 ÷ 100 = 147.25).]
- If the user specifies a deposit amount, the ATM proceeds to Step 4. If the user chooses to cancel the transaction (by entering 0), the ATM displays the main menu (Fig. 30.2) and waits for user input.
- The screen displays a message telling the user to insert a deposit envelope into the deposit slot.
- If the deposit slot receives a deposit envelope within two minutes, the ATM credits (i.e., adds) the deposit amount to the user’s account balance in the bank’s database. [Note: This money is not immediately available for withdrawal. The bank first must verify the amount of cash in the deposit envelope, and any checks in the envelope must clear (i.e., money must be transferred from the check writer’s account to the check recipient’s account). When either of these events occurs, the bank appropriately updates the user’s balance stored in its database. This occurs independently of the ATM system.] If the deposit slot does not receive a deposit envelope within two minutes, the screen displays a message that the system has canceled the transaction due to inactivity. The ATM then displays the main menu and waits for user input.
After the system successfully executes a transaction, the system should redisplay the main menu (Fig. 30.2) so that the user can perform additional transactions. If the user chooses to exit the system (by entering option 4), the screen should display a thank-you message, then display the welcome message for the next user.
Analyzing the ATM System
The preceding statement presented a simplified requirements document. Typically, such a document is the result of a detailed process of requirements gathering that might include interviews with potential users of the system and specialists in fields related to the system. For example, a systems analyst who is hired to prepare a requirements document for banking software (e.g., the ATM system described here) might interview financial experts and people who have used ATMs to gain a better understanding of what the software must do. The analyst would use the information gained to compile a list of system requirements to guide systems designers.
The process of requirements gathering is a key task of the first stage of the software life cycle. The software life cycle specifies the stages through which software evolves from the time it’s conceived to the time it’s retired from use. These stages typically include analysis, design, implementation, testing and debugging, deployment, maintenance and retirement. Several software life-cycle models exist, each with its own preferences and specifications for when and how often software engineers should perform the various stages. Waterfall models perform each stage once in succession, whereas iterative models may repeat one or more stages several times throughout a product’s life cycle.
The analysis stage of the software life cycle focuses on precisely defining the problem to be solved. When designing any system, one must certainly solve the problem right, but of equal importance, one must solve the right problem. Systems analysts collect the requirements that indicate the specific problem to solve. Our requirements document describes our simple ATM system in sufficient detail that you do not need to go through an extensive analysis stage—it has been done for you.
To capture what a proposed system should do, developers often employ a technique known as use case modeling. This process identifies the use cases of the system, each of which represents a different capability that the system provides to its clients. For example, ATMs typically have several use cases, such as “View Account Balance,” “Withdraw Cash,” “Deposit Funds,” “Transfer Funds Between Accounts” and “Buy Postage Stamps.” The simplified ATM system we build in this case study requires only the first three use cases (Fig. 30.4).
Fig. 30.4. Use case diagram for the ATM system from the user’s perspective.

Each use case describes a typical scenario in which the user uses the system. You have already read descriptions of the ATM system’s use cases in the requirements document; the lists of steps required to perform each type of transaction (i.e., balance inquiry, withdrawal and deposit) actually described the three use cases of our ATM—“View Account Balance,” “Withdraw Cash” and “Deposit Funds.”
Use Case Diagrams
We now introduce the first of several UML diagrams in our ATM case study. We create a use case diagram to model the interactions between a system’s clients (in this case study, bank customers) and the system. The goal is to show the kinds of interactions users have with a system without providing the details—these are shown in other UML diagrams (which we present throughout the case study). Use case diagrams are often accompanied by informal text that describes the use cases in more detail—like the text that appears in the requirements document. Use case diagrams are produced during the analysis stage of the software life cycle. In larger systems, use case diagrams are simple but indispensable tools that help system designers focus on satisfying the users’ needs.
Figure 30.4 shows the use case diagram for our ATM system. The stick figure represents an actor, which defines the roles that an external entity—such as a person or another system—plays when interacting with the system. For our automated teller machine, the actor is a User who can view an account balance, withdraw cash and deposit funds using the ATM. The User is not an actual person, but instead comprises the roles that a real person—when playing the part of a User—can play while interacting with the ATM. A use case diagram can include multiple actors. For example, the use case diagram for a real bank’s ATM system might also include an actor named Administrator who refills the cash dispenser each day.
We identify the actor in our system by examining the requirements document, which states, “ATM users should be able to view their account balance, withdraw cash and deposit funds.” The actor in each of the three use cases is simply the User who interacts with the ATM. An external entity—a real person—plays the part of the User to perform financial transactions. Figure 30.4 shows one actor, whose name, User, appears below the actor in the diagram. The UML models each use case as an oval connected to an actor with a solid line.
Software engineers (more precisely, systems designers) must analyze the requirements document, or a set of use cases, and design the system before programmers implement it in a particular programming language. During the analysis stage, systems designers focus on understanding the requirements document to produce a high-level specification that describes what the system is supposed to do. The output of the design stage—a design specification—should specify how the system should be constructed to satisfy these requirements. In the next several Software Engineering Case Study sections, we perform the steps of a simple OOD process on the ATM system to produce a design specification containing a collection of UML diagrams and supporting text. Recall that the UML is designed for use with any OOD process. Many such processes exist, the best known being the Rational Unified Process™ (RUP) developed by Rational Software Corporation (now a division of IBM). RUP is a rich process for designing “industrial-strength” applications. For this case study, we present a simplified design process.
Designing the ATM System
We now begin the design stage of our ATM system. A system is a set of components that interact to solve a problem. For example, to perform the ATM system’s designated tasks, our ATM system has a user interface (Fig. 30.1), contains software that executes financial transactions and interacts with a database of bank-account information. System structure describes the system’s objects and their interrelationships. System behavior describes how the system changes as its objects interact with one another. Every system has both structure and behavior—designers must specify both. There are several distinct types of system structures and behaviors. For example, the interactions among objects in the system differ from those between the user and the system, yet both constitute a portion of the system behavior.
The UML 2 specifies 13 diagram types for documenting system models. Each diagram type models a distinct characteristic of a system’s structure or behavior—six relate to system structure and seven to system behavior. We list here only the six types of diagrams used in our case study—of which one (the class diagram) models system structure and five model system behavior. We overview the remaining seven UML diagram types in Appendix E, UML 2: Additional Diagram Types.
- Use case diagrams, such as the one in Fig. 30.4, model the interactions between a system and its external entities (actors) in terms of use cases (system capabilities, such as “View Account Balance,” “Withdraw Cash” and “Deposit Funds”).
- Class diagrams, which you’ll study in Section 30.3, model the classes, or “building blocks,” used in a system. Each noun, or “thing,” described in the requirements document is a candidate to be a class in the system (e.g., “account,” “keypad”). Class diagrams help us specify the structural relationships between parts of the system. For example, the ATM system class diagram will, among other things, specify that the ATM is physically composed of a screen, a keypad, a cash dispenser and a deposit slot.
- State machine diagrams, which you’ll study in Section 30.5, model the ways in which an object changes state. An object’s state is indicated by the values of all its attributes at a given time. When an object changes state, it may subsequently behave differently in the system. For example, after validating a user’s PIN, the ATM transitions from the “user not authenticated” state to the “user authenticated” state, at which point the ATM allows the user to perform financial transactions (e.g., view account balance, withdraw cash, deposit funds).
- Activity diagrams, which you’ll also study in Section 30.5, model an object’s activity—the object’s workflow (sequence of events) during program execution. An activity diagram models the actions the object performs and specifies the order in which it performs them. For example, an activity diagram shows that the ATM must obtain the balance of the user’s account (from the bank’s account-information database) before the screen can display the balance to the user.
- Communication diagrams (called collaboration diagrams in earlier versions of the UML) model the interactions among objects in a system, with an emphasis on what interactions occur. You’ll learn in Section 30.7 that these diagrams show which objects must interact to perform an ATM transaction. For example, the ATM must communicate with the bank’s account-information database to retrieve an account balance.
- Sequence diagrams also model the interactions among the objects in a system, but unlike communication diagrams, they emphasize when interactions occur. You’ll learn in Section 30.7 that these diagrams help show the order in which interactions occur in executing a financial transaction. For example, the screen prompts the user to enter a withdrawal amount before cash is dispensed.
In Section 30.3, we continue designing our ATM system by identifying the classes from the requirements document. We accomplish this by extracting key nouns and noun phrases from the requirements document. Using these classes, we develop our first draft of the class diagram that models the structure of our ATM system.
Web Resources
We’ve created an extensive UML Resource Center that contains many links to additional information, including introductions, tutorials, blogs, books, certification, conferences, developer tools, documentation, e-books, FAQs, forums, groups, UML in Java, podcasts, security, tools, downloads, training courses, videos and more. We encourage you to browse our UML Resource Center at www.deitel.com/UML/ to learn more.
Self-Review Exercises
30.1 Suppose we enabled a user of our ATM system to transfer money between two bank accounts. Modify the use case diagram of Fig. 30.4 to reflect this change.
30.2 ___________ model the interactions among objects in a system with an emphasis on when these interactions occur.
a) Class diagrams
b) Sequence diagrams
c) Communication diagrams
d) Activity diagrams
30.3 Which of the following choices lists stages of a typical software life cycle in sequential order?
a) design, analysis, implementation, testing
b) design, analysis, testing, implementation
c) analysis, design, testing, implementation
d) analysis, design, implementation, testing
30.3 Identifying the Classes in the ATM Requirements Document
Now we begin designing the ATM system. In this section, we identify the classes that are needed to build the ATM system by analyzing the nouns and noun phrases that appear in the requirements document. We introduce UML class diagrams to model the relationships between these classes. This is an important first step in defining the structure of our system.
Identifying the Classes in a System
We begin our object-oriented design (OOD) process by identifying the classes required to build the ATM system. We’ll eventually describe these classes using UML class diagrams and implement these classes in C#. First, we review the requirements document of Section 30.2 and find key nouns and noun phrases to help us identify classes that comprise the ATM system. We may decide that some of these nouns and noun phrases are attributes of other classes in the system. We may also conclude that some of the nouns and noun phrases do not correspond to parts of the system and thus should not be modeled at all. Additional classes may become apparent to us as we proceed through the design process. Figure 30.5 lists the nouns and noun phrases in the requirements document.
Fig. 30.5. Nouns and noun phrases in the requirements document.

We create classes only for the nouns and noun phrases that have significance in the ATM system. We do not need to model “bank” as a class, because the bank is not a part of the ATM system—the bank simply wants us to build the ATM. “User” and “customer” also represent entities outside of the system—they’re important because they interact with our ATM system, but we do not need to model them as classes in the ATM system. Recall that we modeled an ATM user (i.e., a bank customer) as the actor in the use case diagram of Fig. 30.4.
We do not model “$20 bill” or “deposit envelope” as classes. These are physical objects in the real world, but they’re not part of what is being automated. We can adequately represent the presence of bills in the system using an attribute of the class that models the cash dispenser. (We assign attributes to classes in Section 30.4.) For example, the cash dispenser maintains a count of the number of bills it contains. The requirements document does not say anything about what the system should do with deposit envelopes after it receives them. We can assume that simply acknowledging the receipt of an envelope—an operation performed by the class that models the deposit slot—is sufficient to represent the presence of an envelope in the system. (We assign operations to classes in Section 30.6.)
In our simplified ATM system, representing various amounts of “money,” including the “balance” of an account, as attributes of other classes seems most appropriate. Likewise, the nouns “account number” and “PIN” represent significant pieces of information in the ATM system. They’re important attributes of a bank account. They do not, however, exhibit behaviors. Thus, we can most appropriately model them as attributes of an account class.
Though the requirements document frequently describes a “transaction” in a general sense, we do not model the broad notion of a financial transaction at this time. Instead, we model the three types of transactions (i.e., “balance inquiry,” “withdrawal” and “deposit”) as individual classes. These classes possess specific attributes needed to execute the transactions they represent. For example, a withdrawal needs to know the amount of money the user wants to withdraw. A balance inquiry, however, does not require any additional data if the user is authenticated. Furthermore, the three transaction classes exhibit unique behaviors. A withdrawal involves dispensing cash to the user, whereas a deposit involves receiving a deposit envelope from the user. [Note: In Section 31.3, we “factor out” common features of all transactions into a general “transaction” class using the object-oriented concepts of abstract classes and inheritance.]
We determine the classes for our system based on the remaining nouns and noun phrases from Fig. 30.5. Each of these refers to one or more of the following:
• ATM
• keypad
• cash dispenser
• deposit slot
• account
• bank database
• balance inquiry
• withdrawal
• deposit
The elements of this list are likely to be classes we’ll need to implement our system, although it’s too early in our design process to claim that this list is complete.
We can now model our system’s classes based on the list we’ve created. We capitalize class names in the design process—a UML convention—as we’ll do when we write the C# code that implements our design. If the name of a class contains more than one word, we run the words together and capitalize each word (e.g., MultipleWordName). Using these conventions, we create classes ATM, Screen, Keypad, CashDispenser, DepositSlot, Account, BankDatabase, BalanceInquiry, Withdrawal and Deposit. We construct our system using all of these classes as building blocks. Before we begin building the system, however, we must gain a better understanding of how the classes relate to one another.
Modeling Classes
The UML enables us to model, via class diagrams, the classes in the ATM system and their interrelationships. Figure 30.6 represents class ATM. In the UML, each class is modeled as a rectangle with three compartments. The top compartment contains the name of the class, centered horizontally and appearing in boldface. The middle compartment contains the class’s attributes. (We discuss attributes in Sections 30.4–30.5.) The bottom compartment contains the class’s operations (discussed in Section 30.6). In Fig. 30.6, the middle and bottom compartments are empty, because we’ve not yet determined this class’s attributes and operations.
Fig. 30.6. Representing a class in the UML using a class diagram.

Class diagrams also show the relationships between the classes of the system. Figure 30.7 shows how our classes ATM and Withdrawal relate to one another. For the moment, we choose to model only this subset of the ATM classes for simplicity. We present a more complete class diagram later in this section. Notice that the rectangles representing classes in this diagram are not subdivided into compartments. The UML allows the suppression of class attributes and operations in this manner, when appropriate, to create more readable diagrams. Such a diagram is said to be an elided diagram—one in which some information, such as the contents of the second and third compartments, is not modeled. We’ll place information in these compartments in Sections 30.4–30.6.
Fig. 30.7. Class diagram showing an association among classes.
![]()
In Fig. 30.7, the solid line that connects the two classes represents an association—a relationship between classes. The numbers near each end of the line are multiplicity values, which indicate how many objects of each class participate in the association. In this case, following the line from one end to the other reveals that, at any given moment, one ATM object participates in an association with either zero or one Withdrawal objects—zero if the current user is not performing a transaction or has requested a different type of transaction, and one if the user has requested a withdrawal. The UML can model many types of multiplicity. Figure 30.8 explains the multiplicity types.
Fig. 30.8. Multiplicity types.

An association can be named. For example, the word Executes above the line connecting classes ATM and Withdrawal in Fig. 30.7 indicates the name of that association. This part of the diagram reads “one object of class ATM executes zero or one objects of class Withdrawal.” association names are directional, as indicated by the filled arrowhead—so it would be improper, for example, to read the preceding association from right to left as “zero or one objects of class Withdrawal execute one object of class ATM.”
The word currentTransaction at the Withdrawal end of the association line in Fig. 30.7 is a role name, which identifies the role the Withdrawal object plays in its relationship with the ATM. A role name adds meaning to an association between classes by identifying the role a class plays in the context of an association. A class can play several roles in the same system. For example, in a college personnel system, a person may play the role of “professor” when relating to students. The same person may take on the role of “colleague” when participating in a relationship with another professor, and “coach” when coaching student athletes. In Fig. 30.7, the role name currentTransaction indicates that the Withdrawal object participating in the Executes association with an object of class ATM represents the transaction currently being processed by the ATM. In other contexts, a Withdrawal object may take on other roles (e.g., the previous transaction). Notice that we do not specify a role name for the ATM end of the Executes association. Role names are often omitted in class diagrams when the meaning of an association is clear without them.
In addition to indicating simple relationships, associations can specify more complex relationships, such as objects of one class being composed of objects of other classes. Consider a real-world automated teller machine. What “pieces” does a manufacturer put together to build a working ATM? Our requirements document tells us that the ATM is composed of a screen, a keypad, a cash dispenser and a deposit slot.
In Fig. 30.9, the solid diamonds attached to the association lines of class ATM indicate that class ATM has a composition relationship with classes Screen, Keypad, CashDispenser and DepositSlot. Composition implies a whole/part relationship. The class that has the composition symbol (the solid diamond) on its end of the association line is the whole (in this case, ATM), and the classes on the other end of the association lines are the parts—in this case, classes Screen, Keypad, CashDispenser and DepositSlot. The compositions in Fig. 30.9 indicate that an object of class ATM is formed from one object of class Screen, one object of class CashDispenser, one object of class Keypad and one object of class DepositSlot—the ATM “has a” screen, a keypad, a cash dispenser and a deposit slot. The has-a relationship defines composition. (We’ll see in the Software Engineering Case Study section in Section 31.3 that the is-a relationship defines inheritance.)
Fig. 30.9. Class diagram showing composition relationships.

According to the UML specification, composition relationships have the following properties:
- Only one class in the relationship can represent the whole (i.e., the diamond can be placed on only one end of the association line). For example, either the screen is part of the ATM or the ATM is part of the screen, but the screen and the ATM cannot both represent the whole in the relationship.
- The parts in the composition relationship exist only as long as the whole, and the whole is responsible for creating and destroying its parts. For example, the act of constructing an ATM includes manufacturing its parts. Furthermore, if the ATM is destroyed, its screen, keypad, cash dispenser and deposit slot are also destroyed.
- A part may belong to only one whole at a time, although the part may be removed and attached to another whole, which then assumes responsibility for the part.
The solid diamonds in our class diagrams indicate composition relationships that fulfill these three properties. If a has-a relationship does not satisfy one or more of these criteria, the UML specifies that hollow diamonds be attached to the ends of association lines to indicate aggregation—a weaker form of composition. For example, a personal computer and a computer monitor participate in an aggregation relationship—the computer “has a” monitor, but the two parts can exist independently, and the same monitor can be attached to multiple computers at once, thus violating the second and third properties of composition.
Figure 30.10 shows a class diagram for the ATM system. This diagram models most of the classes that we identified earlier in this section, as well as the associations between them that we can infer from the requirements document. [Note: Classes BalanceInquiry and Deposit participate in associations similar to those of class Withdrawal, so we’ve chosen to omit them from this diagram for simplicity. In Section 31.3, we expand our class diagram to include all the classes in the ATM system.]
Fig. 30.10. Class diagram for the ATM system model.

Figure 30.10 presents a graphical model of the structure of the ATM system. This class diagram includes classes BankDatabase and Account and several associations that were not present in either Fig. 30.7 or Fig. 30.9. The class diagram shows that class ATM has a one-to-one relationship with class BankDatabase—one ATM object authenticates users against one BankDatabase object. In Fig. 30.10, we also model the fact that the bank’s database contains information about many accounts—one object of class BankDatabase participates in a composition relationship with zero or more objects of class Account. Recall from Fig. 30.8 that the multiplicity value 0..* at the Account end of the association between class BankDatabase and class Account indicates that zero or more objects of class Account take part in the association. Class BankDatabase has a one-to-many relationship with class Account—the BankDatabase can contain many Accounts. Similarly, class Account has a many-to-one relationship with class BankDatabase—there can be many Accounts in the BankDatabase. Recall from Fig. 30.8 that the multiplicity value * is identical to 0.]
Figure 30.10 also indicates that if the user is performing a withdrawal, “one object of class Withdrawal accesses/modifies an account balance through one object of class Bank-Database.” We could have created an association directly between class Withdrawal and class Account. The requirements document, however, states that the “ATM must interact with the bank’s account-information database” to perform transactions. A bank account contains sensitive information, and systems engineers must always consider the security of personal data when designing a system. Thus, only the BankDatabase can access and manipulate an account directly. All other parts of the system must interact with the database to retrieve or update account information (e.g., an account balance).
The class diagram in Fig. 30.10 also models associations between class Withdrawal and classes Screen, CashDispenser and Keypad. A withdrawal transaction includes prompting the user to choose a withdrawal amount and receiving numeric input. These actions require the use of the screen and the keypad, respectively. Dispensing cash to the user requires access to the cash dispenser.
Classes BalanceInquiry and Deposit, though not shown in Fig. 30.10, take part in several associations with the other classes of the ATM system. Like class Withdrawal, each of these classes associates with classes ATM and BankDatabase. An object of class BalanceInquiry also associates with an object of class Screen to display the balance of an account to the user. Class Deposit associates with classes Screen, Keypad and Deposit-Slot. Like withdrawals, deposit transactions require use of the screen and the keypad to display prompts and receive inputs, respectively. To receive a deposit envelope, an object of class Deposit associates with an object of class DepositSlot.
We’ve identified our ATM system’s classes, although we may discover others as we proceed with the design and implementation. In Section 30.4, we determine each class’s attributes, and in Section 30.5, we use these attributes to examine how the system changes over time.
Self-Review Exercises
30.4 Suppose we have a class Car that represents a car. Think of some of the different pieces that a manufacturer would put together to produce a whole car. Create a class diagram (similar to Fig. 30.9) that models some of the composition relationships of class Car.
30.5 Suppose we have a class File that represents an electronic document in a stand-alone, non-networked computer represented by class Computer. What sort of association exists between class Computer and class File?
a) Class Computer has a one-to-one relationship with class File.
b) Class Computer has a many-to-one relationship with class File.
c) Class Computer has a one-to-many relationship with class File.
d) Class Computer has a many-to-many relationship with class File.
30.6 State whether the following statement is true or false. If false, explain why: A UML class diagram in which a class’s second and third compartments are not modeled is said to be an elided diagram.
30.7 Modify the class diagram of Fig. 30.10 to include class Deposit instead of class Withdrawal.
30.4 Identifying Class Attributes
In the previous section, we began the first stage of an object-oriented design (OOD) for our ATM system—analyzing the requirements document and identifying the classes needed to implement the system. We listed the nouns and noun phrases in the requirements document and identified a separate class for each one that plays a significant role in the ATM system. We then modeled the classes and their relationships in a UML class diagram (Fig. 30.10). Classes have attributes (data) and operations (behaviors). Class attributes are implemented in C# programs as instance variables and properties, and class operations are implemented as methods and properties. In this section, we determine many of the attributes needed in the ATM system. In Section 30.5, we examine how these attributes represent an object’s state. In Section 30.6, we determine the operations for our classes.
Identifying Attributes
Consider the attributes of some real-world objects: A person’s attributes include height, weight and whether the person is left-handed, right-handed or ambidextrous. A radio’s attributes include its station setting, its volume setting and its AM or FM setting. A car’s attributes include its speedometer and odometer readings, the amount of gas in its tank and what gear it is in. A personal computer’s attributes include its manufacturer (e.g., Dell, Gateway, Sun, Apple or IBM), type of screen (e.g., LCD or CRT), main memory size and hard-disk size.
We can identify many attributes of the classes in our system by looking for descriptive words and phrases in the requirements document. For each one we find that plays a significant role in the ATM system, we create an attribute and assign it to one or more of the classes identified in Section 30.3. We also create attributes to represent any additional data that a class may need, as such needs become clear throughout the design process.
Figure 30.11 lists the words or phrases from the requirements document that describe each class. For example, the requirements document describes the steps taken to obtain a “withdrawal amount,” so we list “amount” next to class Withdrawal.
Fig. 30.11. Descriptive words and phrases from the ATM requirements document.

Figure 30.11 leads us to create one attribute of class ATM. Class ATM maintains information about the state of the ATM. The phrase “user is authenticated” describes a state of the ATM (we discuss states in detail in Section 30.5), so we include userAuthenticated as a bool attribute (i.e., an attribute that has a value of either true or false). This attribute indicates whether the ATM has successfully authenticated the current user—user-Authenticated must be true for the system to allow the user to perform transactions and access account information. This attribute helps ensure the security of the data in the system.
Classes BalanceInquiry, Withdrawal and Deposit share one attribute. Each transaction involves an “account number” that corresponds to the account of the user making the transaction. We assign integer attribute accountNumber to each transaction class to identify the account to which an object of the class applies.
Descriptive words and phrases in the requirements document also suggest some differences in the attributes required by each transaction class. The requirements document indicates that to withdraw cash or deposit funds, users must enter a specific “amount” of money to be withdrawn or deposited, respectively. Thus, we assign to classes Withdrawal and Deposit an attribute amount to store the value supplied by the user. The amounts of money related to a withdrawal and a deposit are defining characteristics of these transactions that the system requires for them to take place. Recall that C# represents monetary amounts with type decimal. Class BalanceInquiry does not need additional data to perform its task—it requires only an account number to indicate the account whose balance should be retrieved.
Class Account has several attributes. The requirements document states that each bank account has an “account number” and a “PIN,” which the system uses for identifying accounts and authenticating users. We assign to class Account two integer attributes: accountNumber and pin. The requirements document also specifies that an account maintains a “balance” of the amount of money in the account, and that the money the user deposits does not become available for a withdrawal until the bank verifies the amount of cash in the deposit envelope and any checks in the envelope clear. An account must still record the amount of money that a user deposits, however. Therefore, we decide that an account should represent a balance using two decimal attributes—availableBalance and totalBalance. Attribute availableBalance tracks the amount of money that a user can withdraw from the account. Attribute totalBalance refers to the total amount of money that the user has “on deposit” (i.e., the amount of money available, plus the amount of cash deposits waiting to be verified or the amount of checks waiting to be cleared). For example, suppose an ATM user deposits $50.00 in cash into an empty account. The totalBalance attribute would increase to $50.00 to record the deposit, but the availableBalance would remain at $0 until a bank employee counts the amount of cash in the envelope and confirms the total. [Note: We assume that the bank updates the available-Balance attribute of an Account soon after the ATM transaction occurs, in response to confirming that $50 worth of cash was found in the deposit envelope. We assume that this update occurs through a transaction that a bank employee performs using a bank system other than the ATM. Thus, we do not discuss this transaction in our case study.]
Class CashDispenser has one attribute. The requirements document states that the cash dispenser “begins each day loaded with 500 $20 bills.” The cash dispenser must keep track of the number of bills it contains to determine whether enough cash is on hand to satisfy withdrawal requests. We assign to class CashDispenser integer attribute count, which is initially set to 500.
For real problems in industry, there is no guarantee that requirements documents will be rich enough and precise enough for the object-oriented systems designer to determine all the attributes, or even all the classes. The need for additional classes, attributes and behaviors may become clear as the design process proceeds. As we progress through this case study, we too will continue to add, modify and delete information about the classes in our system.
Modeling Attributes
The class diagram in Fig. 30.12 lists some of the attributes for the classes in our system—the descriptive words and phrases in Fig. 30.11 helped us identify these attributes. For simplicity, Fig. 30.12 does not show the associations among classes—we showed these in Fig. 30.10. Systems designers commonly do this. Recall that in the UML, a class’s attributes are placed in the middle compartment of the class’s rectangle. We list each attribute’s name and type separated by a colon (:), followed in some cases by an equal sign (=) and an initial value.
Fig. 30.12. Classes with attributes.

Consider the userAuthenticated attribute of class ATM:
userAuthenticated : bool = false
This attribute declaration contains three pieces of information about the attribute. The attribute name is userAuthenticated. The attribute type is bool. In C#, an attribute can be represented by a simple type, such as bool, int, double or decimal, or a class type. We have chosen to model only simple-type attributes in Fig. 30.12—we discuss the reasoning behind this decision shortly.
We can also indicate an initial value for an attribute. Attribute userAuthenticated in class ATM has an initial value of false. This indicates that the system initially does not consider the user to be authenticated. If an attribute has no initial value specified, only its name and type (separated by a colon) are shown. For example, the accountNumber attribute of class BalanceInquiry is an int. Here we show no initial value, because the value of this attribute is a number that we do not yet know. This number will be determined at execution time based on the account number entered by the current ATM user.
Figure 30.12 does not contain attributes for classes Screen, Keypad and DepositSlot. These are important components of our system for which our design process simply has not yet revealed any attributes. We may discover some, however, in the remaining phases of design or when we implement these classes in C#. This is perfectly normal.
Software Engineering Observation 30.1
![]()
Early in the design process, classes often lack attributes (and operations). Such classes should not be eliminated, however, because attributes (and operations) may become evident in the later phases of design and implementation.
Fig. 30.12 also does not include attributes for class BankDatabase. We have chosen to include only simple-type attributes in Fig. 30.12 (and in similar class diagrams throughout the case study). A class-type attribute is modeled more clearly as an association (in particular, a composition) between the class with the attribute and the attribute’s own class. For example, the class diagram in Fig. 30.10 indicates that class BankDatabase participates in a composition relationship with zero or more Account objects. From this composition, we can determine that when we implement the ATM system in C#, we’ll be required to create an attribute of class BankDatabase to hold zero or more Account objects. Similarly, we’ll assign attributes to class ATM that correspond to its composition relationships with classes Screen, Keypad, CashDispenser and DepositSlot. These composition-based attributes would be redundant if modeled in Fig. 30.12, because the compositions modeled in Fig. 30.10 already convey the fact that the database contains information about zero or more accounts and that an ATM is composed of a screen, keypad, cash dispenser and deposit slot. Software developers typically model these whole/part relationships as composition associations rather than as attributes required to implement the relationships.
The class diagram in Fig. 30.12 provides a solid basis for the structure of our model, but the diagram is not complete. In Section 30.5 we identify the states and activities of the objects in the model, and in Section 30.6 we identify the operations that the objects perform. As we present more of the UML and object-oriented design, we’ll continue to strengthen the structure of our model.
Self-Review Exercises
30.8 We typically identify the attributes of the classes in our system by analyzing the _____________ in the requirements document.
a) nouns and noun phrases
b) descriptive words and phrases
c) verbs and verb phrases
d) All of the above
30.9 Which of the following is not an attribute of an airplane?
a) length
b) wingspan
c) fly
d) number of seats
30.10 Describe the meaning of the following attribute declaration of class CashDispenser in the class diagram in Fig. 30.12:
count : int = 500
30.5 Identifying Objects’ States and Activities
In the previous section, we identified many of the class attributes needed to implement the ATM system and added them to the class diagram in Fig. 30.12. In this section, we show how these attributes represent an object’s state. We identify some key states that our objects may occupy and discuss how objects change state in response to various events occurring in the system. We also discuss the workflow, or activities, that various objects perform in the ATM system. We present the activities of BalanceInquiry and Withdrawal transaction objects in this section.
State Machine Diagrams
Each object in a system goes through a series of discrete states. An object’s state at a given point in time is indicated by the values of its attributes at that time. State machine diagrams model key states of an object and show under what circumstances the object changes state. Unlike the class diagrams presented in earlier case study sections, which focused primarily on the structure of the system, state machine diagrams model some of the behavior of the system.
Figure 30.13 is a simple state machine diagram that models two of the states of an object of class ATM. The UML represents each state in a state machine diagram as a rounded rectangle with the name of the state placed inside it. A solid circle with an attached stick arrowhead designates the initial state. Recall that we modeled this state information as the bool attribute userAuthenticated in the class diagram of Fig. 30.12. This attribute is initialized to false, or the “User not authenticated” state, according to the state machine diagram.
Fig. 30.13. State machine diagram for some of the states of the ATM object.

The arrows with stick arrowheads indicate transitions between states. An object can transition from one state to another in response to various events that occur in the system. The name or description of the event that causes a transition is written near the line that corresponds to the transition. For example, the ATM object changes from the “User not authenticated” state to the “User authenticated” state after the bank database authenticates the user. Recall from the requirements document that the database authenticates a user by comparing the account number and PIN entered by the user with those of the corresponding account in the database. If the database indicates that the user has entered a valid account number and the correct PIN, the ATM object transitions to the “User authenticated” state and changes its userAuthenticated attribute to the value true. When the user exits the system by choosing the “exit” option from the main menu, the ATM object returns to the “User not authenticated” state in preparation for the next ATM user.
Software Engineering Observation 30.2
![]()
Software designers do not generally create state machine diagrams showing every possible state and state transition for all attributes—there are simply too many of them. State machine diagrams typically show only the most important or complex states and state transitions.
Activity Diagrams
Like a state machine diagram, an activity diagram models aspects of system behavior. Unlike a state machine diagram, an activity diagram models an object’s workflow (sequence of tasks) during application execution. An activity diagram models the actions to perform and in what order the object will perform them. The activity diagram in Fig. 30.14 models the actions involved in executing a BalanceInquiry transaction. We assume that a BalanceInquiry object has already been initialized and assigned a valid account number (that of the current user), so the object knows which balance to retrieve. The diagram includes the actions that occur after the user selects a balance inquiry from the main menu and before the ATM returns the user to the main menu—a BalanceInquiry object does not perform or initiate these actions, so we do not model them here. The diagram begins with the retrieval of the available balance of the user’s account from the database. Next, the BalanceInquiry retrieves the total balance of the account. Finally, the transaction displays the balances on the screen.
Fig. 30.14. Activity diagram for a BalanceInquiry transaction.

The UML represents an action in an activity diagram as an action state, which is modeled by a rectangle with its left and right sides replaced by arcs curving outward. Each action state contains an action expression—for example, “get available balance of user’s account from database”—that specifies an action to perform. An arrow with a stick arrowhead connects two action states, indicating the order in which the actions represented by the action states occur. The solid circle (at the top of Fig. 30.14) represents the activity’s initial state—the beginning of the workflow before the object performs the modeled actions. In this case, the transaction first executes the “get available balance of user’s account from database” action expression. Second, the transaction retrieves the total balance. Finally, the transaction displays both balances on the screen. The solid circle enclosed in an open circle (at the bottom of Fig. 30.14) represents the final state—the end of the workflow after the object performs the modeled actions.
Figure 30.15 shows an activity diagram for a Withdrawal transaction. We assume that a Withdrawal object has been assigned a valid account number. We do not model the user selecting a withdrawal from the main menu or the ATM returning the user to the main menu, because these are not actions performed by a Withdrawal object. The transaction first displays a menu of standard withdrawal amounts (Fig. 30.3) and an option to cancel the transaction. The transaction then inputs a menu selection from the user. The activity flow now arrives at a decision symbol. This point determines the next action based on the associated guard conditions. If the user cancels the transaction, the system displays an appropriate message. Next, the cancellation flow reaches a merge symbol, where this activity flow joins the transaction’s other possible activity flows (which we discuss shortly). A merge can have any number of incoming transition arrows, but only one outgoing transition arrow. The decision at the bottom of the diagram determines whether the transaction should repeat from the beginning. When the user has canceled the transaction, the guard condition “cash dispensed or user canceled transaction” is true, so control transitions to the activity’s final state.
Fig. 30.15. Activity diagram for a Withdrawal transaction.

If the user selects a withdrawal amount from the menu, amount (an attribute of class Withdrawal originally modeled in Fig. 30.12) is set to the value chosen by the user. The transaction next gets the available balance of the user’s account (i.e., the availableBalance attribute of the user’s Account object) from the database. The activity flow then arrives at another decision. If the requested withdrawal amount exceeds the user’s available balance, the system displays an appropriate error message informing the user of the problem. Control then merges with the other activity flows before reaching the decision at the bottom of the diagram. The guard condition “cash not dispensed and user did not cancel” is true, so the activity flow returns to the top of the diagram, and the transaction prompts the user to input a new amount.
If the requested withdrawal amount is less than or equal to the user’s available balance, the transaction tests whether the cash dispenser has enough cash to satisfy the withdrawal request. If it does not, the transaction displays an appropriate error message and passes through the merge before reaching the final decision. Cash was not dispensed, so the activity flow returns to the beginning of the activity diagram, and the transaction prompts the user to choose a new amount. If sufficient cash is available, the transaction interacts with the database to debit the withdrawal amount from the user’s account (i.e., subtract the amount from both the availableBalance and totalBalance attributes of the user’s Account object). The transaction then dispenses the desired amount of cash and instructs the user to take the cash.
The main flow of activity next merges with the two error flows and the cancellation flow. In this case, cash was dispensed, so the activity flow reaches the final state.
We’ve taken the first steps in modeling the behavior of the ATM system and have shown how an object’s attributes affect the object’s activities. In Section 30.6, we investigate the operations of our classes to create a more complete model of the system’s behavior.
Self-Review Exercises
30.11 State whether the following statement is true or false, and if false, explain why: State machine diagrams model structural aspects of a system.
30.12 An activity diagram models the ___________ that an object performs and the order in which it performs them.
a) actions
b) attributes
c) states
d) state transitions
30.13 Based on the requirements document, create an activity diagram for a deposit transaction.
30.6 Identifying Class Operations
In the preceding sections, we performed the first few steps in the object-oriented design of our ATM system. In this section, we determine some of the class operations (or behaviors) needed to implement the ATM system.
Identifying Operations
An operation is a service that objects of a class provide to clients of the class. Consider the operations of some real-world objects. A radio’s operations include setting its station and volume (typically invoked by a person adjusting the radio’s controls). A car’s operations include accelerating (invoked by the driver pressing the accelerator pedal), decelerating (invoked by the driver pressing the brake pedal or releasing the gas pedal), turning, and shifting gears. Software objects can offer operations as well—for example, a software graphics object might offer operations for drawing a circle, drawing a line and drawing a square. A spreadsheet software object might offer operations like printing the spreadsheet, totaling the elements in a row or column and graphing information in the spreadsheet as a bar chart or pie chart.
We can derive many of the operations of the classes in our ATM system by examining the verbs and verb phrases in the requirements document. We then relate each of these to particular classes in our system. The verbs and verb phrases in Fig. 30.16 help us determine the operations of our classes.
Fig. 30.16. Verbs and verb phrases for each class in the ATM system.

Modeling Operations
To identify operations, we examine the verb phrases listed for each class in Fig. 30.16. The “executes financial transactions” phrase associated with class ATM implies that class ATM instructs transactions to execute. Therefore, classes BalanceInquiry, Withdrawal and Deposit each need an operation to provide this service to the ATM. We place this operation (which we have named Execute) in the third compartment of the three transaction classes in the updated class diagram of Fig. 30.17. During an ATM session, the ATM object will invoke the Execute operation of each transaction object to tell it to execute.
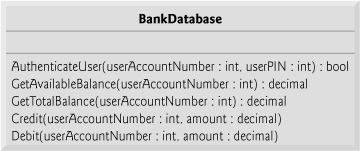
Fig. 30.17. Classes in the ATM system with attributes and operations.

The UML represents operations (which are implemented as methods in C#) by listing the operation name, followed by a comma-separated list of parameters in parentheses, a colon and the return type:
operationName( parameter1, parameter2, ..., parameterN ) : returnType
Each parameter in the comma-separated parameter list consists of a parameter name, followed by a colon and the parameter type:
parameterName : parameterType
For the moment, we do not list the parameters of our operations—we’ll identify and model the parameters of some of the operations shortly. For some of the operations, we do not yet know the return types, so we also omit them from the diagram. These omissions are perfectly normal at this point. As our design and implementation proceed, we’ll add the remaining return types.
Operations of Class BankDatabase and Class Account
Figure 30.16 lists the phrase “authenticates a user” next to class BankDatabase—the database is the object that contains the account information necessary to determine whether the account number and PIN entered by a user match those of an account at the bank. Therefore, class BankDatabase needs an operation that provides an authentication service to the ATM. We place the operation AuthenticateUser in the third compartment of class BankDatabase (Fig. 30.17). However, an object of class Account, not class BankDatabase, stores the account number and PIN that must be accessed to authenticate a user, so class Account must provide a service to validate a PIN obtained through user input against a PIN stored in an Account object. Therefore, we add a ValidatePIN operation to class Account. We specify a return type of bool for the AuthenticateUser and ValidatePIN operations. Each operation returns a value indicating either that the operation was successful in performing its task (i.e., a return value of true) or that it was not successful (i.e., a return value of false).
Figure 30.16 lists several additional verb phrases for class BankDatabase: “retrieves an account balance,” “credits an account” and “debits an account.” Like “authenticates a user,” these remaining phrases refer to services that the database must provide to the ATM, because the database holds all the account data used to authenticate a user and perform ATM transactions. However, objects of class Account actually perform the operations to which these phrases refer. Thus, class BankDatabase and class Account both need operations that correspond to each of these phrases. Recall from Section 30.3 that, because a bank account contains sensitive information, we do not allow the ATM to access accounts directly. The database acts as an intermediary between the ATM and the account data, preventing unauthorized access. As we’ll see in Section 30.7, class ATM invokes the operations of class BankDatabase, each of which in turn invokes corresponding operations (which are get accessors of read-only properties) in class Account.
The phrase “retrieves an account balance” suggests that classes BankDatabase and Account each need an operation that gets the balance. However, recall that we created two attributes in class Account to represent a balance—availableBalance and totalBalance. A balance inquiry requires access to both balance attributes so that it can display them to the user, but a withdrawal needs to check only the value of availableBalance. To allow objects in the system to obtain these balance attributes individually from a specific Account object in the BankDatabase, we add operations GetAvailableBalance and GetTotalBalance to the third compartment of class BankDatabase (Fig. 30.17). We specify a return type of decimal for each of these operations, because the balances that they retrieve are of type decimal.
Once the BankDatabase knows which Account to access, it must be able to obtain each balance attribute individually from that Account. For this purpose, we could add operations GetAvailableBalance and GetTotalBalance to the third compartment of class Account (Fig. 30.17). However, in C#, simple operations such as getting the value of an attribute are typically performed by a property’s get accessor (at least when that particular class “owns” the underlying attribute). This design is for a C# application, so, rather than modeling operations GetAvailableBalance and GetTotalBalance, we model decimal properties AvailableBalance and TotalBalance in class Account. Properties are placed in the second compartment of a class diagram. These properties replace the avail-ableBalance and totalBalance attributes that we modeled for class Account previously. Recall that a property’s accessors are implied—thus, they’re not modeled in a class diagram. Figure 30.16 does not mention the need to set the balances, so Fig. 30.17 shows properties AvailableBalance and TotalBalance as read-only properties (i.e., they have only get accessors). To indicate a read-only property in the UML, we follow the property’s type with “{readOnly}.”
You may be wondering why we modeled AvailableBalance and TotalBalance properties in class Account, but modeled GetAvailableBalance and GetTotalBalance operations in class BankDatabase. Since there can be many Account objects in the BankDatabase, the ATM must specify which Account to access when invoking BankData-base operations GetAvailableBalance and GetTotalBalance. The ATM does this by passing an account-number argument to each BankDatabase operation. The get accessors of the properties you’ve seen in C# code cannot receive arguments. Thus, we modeled GetAvailableBalance and GetTotalBalance as operations in class BankDatabase so that we could specify parameters to which the ATM can pass arguments. Also, the underlying balance attributes are not owned by the BankDatabase, so get accessors are not appropriate here. We discuss the parameters for the BankDatabase operations shortly.
The phrases “credits an account” and “debits from an account” indicate that classes BankDatabase and Account must perform operations to update an account during deposits and withdrawals, respectively. We therefore assign Credit and Debit operations to classes BankDatabase and Account. You may recall that crediting an account (as in a deposit) adds an amount only to the Account’s total balance. Debiting an account (as in a withdrawal), on the other hand, subtracts the amount from both the total and available balances. We hide these implementation details inside class Account. This is a good example of encapsulation and information hiding.
If this were a real ATM system, classes BankDatabase and Account would also provide a set of operations to allow another banking system to update a user’s account balance after either confirming or rejecting all or part of a deposit. Operation ConfirmDepositAmount, for example, would add an amount to the Account’s available balance, thus making deposited funds available for withdrawal. Operation RejectDepositAmount would subtract an amount from the Account’s total balance to indicate that a specified amount, which had recently been deposited through the ATM and added to the Account’s total balance, was invalidated (or checks may have “bounced”). The bank would invoke operation Reject-DepositAmount after determining either that the user failed to include the correct amount of cash or that any checks did not clear (i.e., they “bounced”). While adding these operations would make our system more complete, we do not include them in our class diagrams or implementation because they’re beyond the scope of the case study.
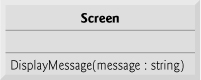
Operations of Class Screen
Class Screen “displays a message to the user” at various times in an ATM session. All visual output occurs through the screen of the ATM. The requirements document describes many types of messages (e.g., a welcome message, an error message, a thank-you message) that the screen displays to the user. The requirements document also indicates that the screen displays prompts and menus to the user. However, a prompt is really just a message describing what the user should input next, and a menu is essentially a type of prompt consisting of a series of messages (i.e., menu options) displayed consecutively. Therefore, rather than provide class Screen with an individual operation to display each type of message, prompt and menu, we simply create one operation that can display any message specified by a parameter. We place this operation (DisplayMessage) in the third compartment of class Screen in our class diagram (Fig. 30.17). We do not worry about the parameter of this operation at this time—we model the parameter momentarily.
Operations of Class Keypad
From the phrase “receives numeric input from the user” listed by class Keypad in Fig. 30.16, we conclude that class Keypad should perform a GetInput operation. Because the ATM’s keypad, unlike a computer keyboard, contains only the numbers 0–9, we specify that this operation returns an integer value. Recall from the requirements document that in different situations, the user may be required to enter a different type of number (e.g., an account number, a PIN, the number of a menu option, a deposit amount as a number of cents). Class Keypad simply obtains a numeric value for a client of the class—it does not determine whether the value meets any specific criteria. Any class that uses this operation must verify that the user entered appropriate numbers and, if not, display error messages via class Screen. [Note: When we implement the system, we simulate the ATM’s keypad with a computer keyboard, and for simplicity, we assume that the user does not enter nonnumeric input using keys on the computer keyboard that do not appear on the ATM’s keypad.]
Operations of Class CashDispenser and Class DepositSlot
Figure 30.16 lists “dispenses cash” for class CashDispenser. Therefore, we create operation DispenseCash and list it under class CashDispenser in Fig. 30.17. Class CashDispenser also “indicates whether it contains enough cash to satisfy a withdrawal request.” Thus, we include IsSufficientCashAvailable, an operation that returns a value of type bool, in class CashDispenser. Figure 30.16 also lists “receives a deposit envelope” for class DepositSlot. The deposit slot must indicate whether it received an envelope, so we place the operation IsDepositEnvelopeReceived, which returns a bool value, in the third compartment of class DepositSlot. [Note: A real hardware deposit slot would most likely send the ATM a signal to indicate that an envelope was received. We simulate this behavior, however, with an operation in class DepositSlot that class ATM can invoke to find out whether the deposit slot received an envelope.]
Operations of Class ATM
We do not list any operations for class ATM at this time. We’re not yet aware of any services that class ATM provides to other classes in the system. When we implement the system in C#, however, operations of this class, and additional operations of the other classes in the system, may become apparent.
Identifying and Modeling Operation Parameters
So far, we have not been concerned with the parameters of our operations—we have attempted to gain only a basic understanding of the operations of each class. Let’s now take a closer look at some operation parameters. We identify an operation’s parameters by examining what data the operation requires to perform its assigned task.
Consider the AuthenticateUser operation of class BankDatabase. To authenticate a user, this operation must know the account number and PIN supplied by the user. Thus we specify that operation AuthenticateUser takes int parameters userAccountNumber and userPIN, which the operation must compare to the account number and PIN of an Account object in the database. We prefix these parameter names with user to avoid confusion between the operation’s parameter names and the attribute names that belong to class Account. We list these parameters in the class diagram in Fig. 30.18, which models only class BankDatabase. [Note: It is perfectly normal to model only one class in a class diagram. In this case, we’re most concerned with examining the parameters of this particular class, so we omit the other classes. In class diagrams later in the case study, parameters are no longer the focus of our attention, so we omit the parameters to save space. Remember, however, that the operations listed in these diagrams still have parameters.]
Fig. 30.18. Class BankDatabase with operation parameters.
Recall that the UML models each parameter in an operation’s comma-separated parameter list by listing the parameter name, followed by a colon and the parameter type. Figure 30.18 thus specifies, for example, that operation AuthenticateUser takes two parameters—userAccountNumber and userPIN, both of type int.
Class BankDatabase operations GetAvailableBalance, GetTotalBalance, Credit and Debit also each require a userAccountNumber parameter to identify the account to which the database must apply the operations, so we include these parameters in the class diagram. In addition, operations Credit and Debit each require a decimal parameter amount to specify the amount of money to be credited or debited, respectively.
The class diagram in Fig. 30.19 models the parameters of class Account’s operations. Operation ValidatePIN requires only a userPIN parameter, which contains the user-specified PIN to be compared with the PIN associated with the account. Like their counterparts in class BankDatabase, operations Credit and Debit in class Account each require a decimal parameter amount that indicates the amount of money involved in the operation. Class Account’s operations do not require an account-number parameter—each can be invoked only on the Account object in which they’re executing, so including a parameter to specify an Account is unnecessary.
Fig. 30.19. Class Account with operation parameters.

Figure 30.20 models class Screen with a parameter for operation DisplayMessage. This operation requires only string parameter message, which is the text to be displayed.
Fig. 30.20. Class Screen with an operation parameter.
The class diagram in Fig. 30.21 specifies that operation DispenseCash of class Cash-Dispenser takes decimal parameter amount to indicate the amount of cash (in dollars) to be dispensed. Operation IsSufficientCashAvailable also takes decimal parameter amount to indicate the amount of cash in question.
Fig. 30.21. Class CashDispenser with operation parameters.

We don’t discuss parameters for operation Execute of classes BalanceInquiry, Withdrawal and Deposit, operation GetInput of class Keypad and operation IsDepositEnvelopeReceived of class DepositSlot. At this point in our design process, we cannot determine whether these operations require additional data to perform their tasks, so we leave their parameter lists empty. As we progress through the case study, we may decide to add parameters to these operations.
In this section, we have determined many of the operations performed by the classes in the ATM system. We have identified the parameters and return types of some of the operations. As we continue our design process, the number of operations belonging to each class may vary—we might find that new operations are needed or that some current operations are unnecessary—and we might determine that some of our class operations need additional parameters and different return types. Again, all of this is perfectly normal.
Self-Review Exercises
30.14 Which of the following is not a behavior?
a) reading data from a file
b) displaying output
c) text output
d) obtaining input from the user
30.15 If you were to add to the ATM system an operation that returns the amount attribute of class Withdrawal, how and where would you specify this operation in the class diagram of Fig. 30.17?
30.16 Describe the meaning of the following operation listing that might appear in a class diagram for an object-oriented design of a calculator:
Add( x : int, y : int ) : int
30.7 Identifying Collaboration Among Objects
When two objects communicate with each other to accomplish a task, they’re said to collaborate. A collaboration consists of an object of one class sending a message to an object of another class. Messages are sent in C# via method calls. In this section, we concentrate on the collaborations (interactions) among the objects in our ATM system.
In the previous section, we determined many of the operations of the classes in our system. In this section, we concentrate on the messages that invoke these operations. To identify the collaborations in the system, we return to the requirements document of Section 30.2. Recall that this document specifies the activities that occur during an ATM session (e.g., authenticating a user, performing transactions). The steps used to describe how the system must perform each of these tasks are our first indication of the collaborations in our system. As we proceed through this and the remaining Software Engineering Case Study sections, we may discover additional collaborations.
Identifying the Collaborations in a System
We begin to identify the collaborations in the system by carefully reading the sections of the requirements document that specify what the ATM should do to authenticate a user and to perform each transaction type. For each action or step described in the requirements document, we decide which objects in our system must interact to achieve the desired result. We identify one object as the sending object (i.e., the object that sends the message) and another as the receiving object (i.e., the object that offers that operation to clients of the class). We then select one of the receiving object’s operations (identified in Section 30.6) that must be invoked by the sending object to produce the proper behavior. For example, the ATM displays a welcome message when idle. We know that an object of class Screen displays a message to the user via its DisplayMessage operation. Thus, we decide that the system can display a welcome message by employing a collaboration between the ATM and the Screen in which the ATM sends a DisplayMessage message to the Screen by invoking the DisplayMessage operation of class Screen. [Note: To avoid repeating the phrase “an object of class...,” we refer to each object simply by using its class name preceded by an article (e.g., “a,” “an” or “the”)—for example, “the ATM” refers to an object of class ATM.]
Figure 30.22 lists the collaborations that can be derived from the requirements document. For each sending object, we list the collaborations in the order in which they’re discussed in the requirements document. We list each collaboration involving a unique sender, message and recipient only once, even though the collaboration may occur several times during an ATM session. For example, the first row in Fig. 30.22 indicates that the ATM collaborates with the Screen whenever the ATM needs to display a message to the user.
Fig. 30.22. Collaborations in the ATM system.
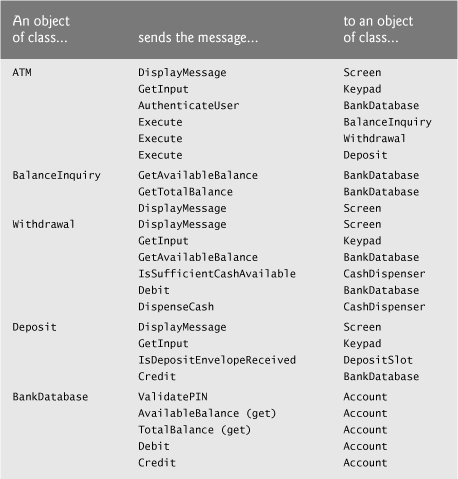
Let’s consider the collaborations in Fig. 30.22. Before allowing a user to perform any transactions, the ATM must prompt the user to enter an account number, then a PIN. It accomplishes each of these tasks by sending a DisplayMessage message to the Screen. Both of these actions refer to the same collaboration between the ATM and the Screen, which is already listed in Fig. 30.22. The ATM obtains input in response to a prompt by sending a GetInput message to the Keypad. Next the ATM must determine whether the user-specified account number and PIN match those of an account in the database. It does so by sending an AuthenticateUser message to the BankDatabase. Recall that the Bank-Database cannot authenticate a user directly—only the user’s Account (i.e., the Account that contains the account number specified by the user) can access the user’s PIN to authenticate the user. Figure 30.22 therefore lists a collaboration in which the Bank-Database sends a ValidatePIN message to an Account.
After the user is authenticated, the ATM displays the main menu by sending a series of DisplayMessage messages to the Screen and obtains input containing a menu selection by sending a GetInput message to the Keypad. We have already accounted for these collaborations. After the user chooses a type of transaction to perform, the ATM executes the transaction by sending an Execute message to an object of the appropriate transaction class (i.e., a BalanceInquiry, a Withdrawal or a Deposit). For example, if the user chooses to perform a balance inquiry, the ATM sends an Execute message to a BalanceInquiry.
Further examination of the requirements document reveals the collaborations involved in executing each transaction type. A BalanceInquiry retrieves the amount of money available in the user’s account by sending a GetAvailableBalance message to the BankDatabase, which sends a get message to an Account’s AvailableBalance property to access the available balance. Similarly, the BalanceInquiry retrieves the amount of money on deposit by sending a GetTotalBalance message to the BankDatabase, which sends a get message to an Account’s TotalBalance property to access the total balance on deposit. To display both measures of the user’s balance at the same time, the BalanceInquiry sends DisplayMessage messages to the Screen.
A Withdrawal sends DisplayMessage messages to the Screen to display a menu of standard withdrawal amounts (i.e., $20, $40, $60, $100, $200). The Withdrawal sends a GetInput message to the Keypad to obtain the user’s menu selection. Next, the Withdrawal determines whether the requested withdrawal amount is less than or equal to the user’s account balance. The Withdrawal obtains the amount of money available in the user’s account by sending a GetAvailableBalance message to the BankDatabase. The Withdrawal then tests whether the cash dispenser contains enough cash by sending an IsSufficientCashAvailable message to the CashDispenser. A Withdrawal sends a Debit message to the BankDatabase to decrease the user’s account balance. The Bank-Database in turn sends the same message to the appropriate Account. Recall that debiting an Account decreases both the total balance and the available balance. To dispense the requested amount of cash, the Withdrawal sends a DispenseCash message to the CashDispenser. Finally, the Withdrawal sends a DisplayMessage message to the Screen, instructing the user to take the cash.
A Deposit responds to an Execute message first by sending a DisplayMessage message to the Screen to prompt the user for a deposit amount. The Deposit sends a Get-Input message to the Keypad to obtain the user’s input. The Deposit then sends a DisplayMessage message to the Screen to tell the user to insert a deposit envelope. To determine whether the deposit slot received an incoming deposit envelope, the Deposit sends an IsDepositEnvelopeReceived message to the DepositSlot. The Deposit updates the user’s account by sending a Credit message to the BankDatabase, which subsequently sends a Credit message to the user’s Account. Recall that crediting an Account increases the total balance but not the available balance.
Interaction Diagrams
Now that we have identified a set of possible collaborations between the objects in our ATM system, let us graphically model these interactions. The UML provides several types of interaction diagrams that model the behavior of a system by modeling how objects interact with one another. The communication diagram emphasizes which objects participate in collaborations. [Note: Communication diagrams were called collaboration diagrams in earlier versions of the UML.] Like the communication diagram, the sequence diagram shows collaborations among objects, but it emphasizes when messages are sent between objects.
Communication Diagrams
Figure 30.23 shows a communication diagram that models the ATM executing a BalanceInquiry. Objects are modeled in the UML as rectangles containing names in the form objectName : ClassName. In this example, which involves only one object of each type, we disregard the object name and list only a colon followed by the class name. Specifying the name of each object in a communication diagram is recommended when modeling multiple objects of the same type. Communicating objects are connected with solid lines, and messages are passed between objects along these lines in the direction shown by arrows with filled arrowheads. The name of the message, which appears next to the arrow, is the name of an operation (i.e., a method) belonging to the receiving object—think of the name as a service that the receiving object provides to sending objects (its “clients”).
Fig. 30.23. Communication diagram of the ATM executing a balance inquiry.

The filled arrow in Fig. 30.23 represents a message—or synchronous call—in the UML and a method call in C#. This arrow indicates that the flow of control is from the sending object (the ATM) to the receiving object (a BalanceInquiry). Since this is a synchronous call, the sending object cannot send another message, or do anything at all, until the receiving object processes the message and returns control (and possibly a return value) to the sending object. The sender just waits. For example, in Fig. 30.23, the ATM calls method Execute of a BalanceInquiry and cannot send another message until Execute finishes and returns control to the ATM. [Note: If this were an asynchronous call, represented by a stick arrowhead, the sending object would not have to wait for the receiving object to return control—it would continue sending additional messages immediately following the asynchronous call. Such calls are beyond the scope of this book.]
Sequence of Messages in a Communication Diagram
Figure 30.24 shows a communication diagram that models the interactions among objects in the system when an object of class BalanceInquiry executes. We assume that the object’s accountNumber attribute contains the account number of the current user. The collaborations in Fig. 30.24 begin after the ATM sends an Execute message to a BalanceInquiry (i.e., the interaction modeled in Fig. 30.23). The number to the left of a message name indicates the order in which the message is passed. The sequence of messages in a communication diagram progresses in numerical order from least to greatest. In this diagram, the numbering starts with message 1 and ends with message 3. The Balance-Inquiry first sends a GetAvailableBalance message to the BankDatabase (message 1), then sends a GetTotalBalance message to the BankDatabase (message 2). Within the parentheses following a message name, we can specify a comma-separated list of the names of the arguments sent with the message (i.e., arguments in a C# method call)—the BalanceInquiry passes attribute accountNumber with its messages to the BankDatabase to indicate which Account’s balance information to retrieve. Recall from Fig. 30.18 that operations GetAvailableBalance and GetTotalBalance of class BankDatabase each require a parameter to identify an account. The BalanceInquiry next displays the available balance and the total balance to the user by passing a DisplayMessage message to the Screen (message 3) that includes a parameter indicating the message to be displayed.
Fig. 30.24. Communication diagram for executing a BalanceInquiry.

Figure 30.24 models two additional messages passing from the BankDatabase to an Account (message 1.1 and message 2.1). To provide the ATM with the two balances of the user’s Account (as requested by messages 1 and 2), the BankDatabase must send get messages to the Account’s AvailableBalance and TotalBalance properties. A message passed within the handling of another message is called a nested message. The UML recommends using a decimal numbering scheme to indicate nested messages. For example, message 1.1 is the first message nested in message 1—the BankDatabase sends the get message to the Account’s AvailableBalance property during BankDatabase’s processing of a GetAvailableBalance message. [Note: If the BankDatabase needed to pass a second nested message while processing message 1, it would be numbered 1.2.] A message may be passed only when all the nested messages from the previous message have been passed. For example, the BalanceInquiry passes message 3 to the Screen only after messages 2 and 2.1 have been passed, in that order.
The nested numbering scheme used in communication diagrams helps clarify precisely when and in what context each message is passed. For example, if we numbered the five messages in Fig. 30.24 using a flat numbering scheme (i.e., 1, 2, 3, 4, 5), someone looking at the diagram might not be able to determine that BankDatabase passes the get message to an Account’s AvailableBalance property (message 1.1) during the BankData-base’s processing of message 1, as opposed to after completing the processing of message 1. The nested decimal numbers make it clear that the get message (message 1.1) is passed to an Account’s AvailableBalance property within the handling of the GetAvailable-Balance message (message 1) by the BankDatabase.
Sequence Diagrams
Communication diagrams emphasize the participants in collaborations but model their timing a bit awkwardly. A sequence diagram helps model the timing of collaborations more clearly. Figure 30.25 shows a sequence diagram modeling the sequence of interactions that occur when a Withdrawal executes. The dotted line extending down from an object’s rectangle is that object’s lifeline, which represents the progression of time. Actions typically occur along an object’s lifeline in chronological order from top to bottom—an action near the top happens before one near the bottom.
Fig. 30.25. Sequence diagram that models a Withdrawal executing.

Message passing in sequence diagrams is similar to message passing in communication diagrams. An arrow with a filled arrowhead extending from the sending object to the receiving object represents a message between two objects. The arrowhead points to an activation on the receiving object’s lifeline. An activation, shown as a thin vertical rectangle, indicates that an object is executing. When an object returns control, a return message, represented as a dashed line with a stick arrowhead, extends from the activation of the object returning control to the activation of the object that initially sent the message. To eliminate clutter, we omit the return-message arrows—the UML allows this practice to make diagrams more readable. Like communication diagrams, sequence diagrams can indicate message parameters between the parentheses following a message name.
The sequence of messages in Fig. 30.25 begins when a Withdrawal prompts the user to choose a withdrawal amount by sending a DisplayMessage message to the Screen. The Withdrawal then sends a GetInput message to the Keypad, which obtains input from the user. We have already modeled the control logic involved in a Withdrawal in the activity diagram of Fig. 30.15, so we do not show this logic in the sequence diagram of Fig. 30.25. Instead, we model the best-case scenario, in which the balance of the user’s account is greater than or equal to the chosen withdrawal amount, and the cash dispenser contains a sufficient amount of cash to satisfy the request. You can model control logic in a sequence diagram with UML frames (which are not covered in this case study). For a quick overview of UML frames, visit www.agilemodeling.com/style/frame.htm.
After obtaining a withdrawal amount, the Withdrawal sends a GetAvailableBalance message to the BankDatabase, which in turn sends a get message to the Account’s Avail-ableBalance property. Assuming that the user’s account has enough money available to permit the transaction, the Withdrawal next sends an IsSufficientCashAvailable message to the CashDispenser. Assuming that there is enough cash available, the Withdrawal decreases the balance of the user’s account (both the total balance and the available balance) by sending a Debit message to the BankDatabase. The BankDatabase responds by sending a Debit message to the user’s Account. Finally, the Withdrawal sends a Dispense-Cash message to the CashDispenser and a DisplayMessage message to the Screen, telling the user to remove the cash from the machine.
We have identified collaborations among objects in the ATM system and modeled some of these collaborations using UML interaction diagrams—communication diagrams and sequence diagrams. In the next section, we enhance the structure of our model to complete a preliminary object-oriented design; then we begin implementing the ATM system in C#.
Self-Review Exercises
30.17 A(n) __________ consists of an object of one class sending a message to an object of another class.
a) association
b) aggregation
c) collaboration
d) composition
30.18 Which form of interaction diagram emphasizes what collaborations occur? Which form emphasizes when collaborations occur?
30.19 Create a sequence diagram that models the interactions among objects in the ATM system that occur when a Deposit executes successfully. Explain the sequence of messages modeled by the diagram.
30.8 Wrap-Up
In this chapter, you learned how to work from a detailed requirements document to develop an object-oriented design. You worked with six popular types of UML diagrams to graphically model an object-oriented automated teller machine software system. In Chapter 31, we tune the design using inheritance, then completely implement the design in a C# console application.
Answers to Self-Review Exercises
30.1 Figure 30.26 contains a use case diagram for a modified version of our ATM system that also allows users to transfer money between accounts.
Fig. 30.26. Use case diagram for a modified version of our ATM system that also allows users to transfer money between accounts.

30.4 Figure 30.27 presents a class diagram that shows some of the composition relationships of a class Car.
Fig. 30.27. Class diagram showing some composition relationships of a class Car.

30.5 c. In a computer network, this relationship could be many-to-many.
30.7 Figure 30.28 presents a class diagram for the ATM including class Deposit instead of class Withdrawal (as in Fig. 30.10). Class Deposit does not associate with class CashDispenser but does associate with class DepositSlot.
Fig. 30.28. Class diagram for the ATM system model including class Deposit.
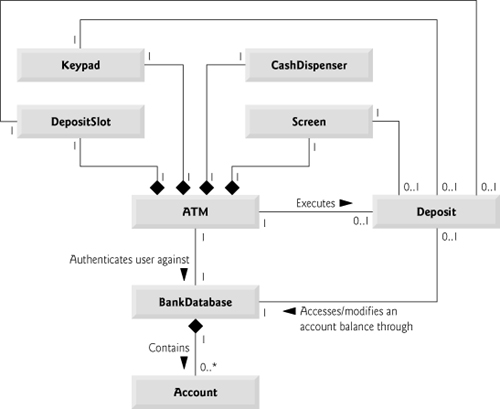
30.9 c. Fly is an operation or behavior of an airplane, not an attribute.
30.10 This declaration indicates that attribute count is an int with an initial value of 500; count keeps track of the number of bills available in the CashDispenser at any given time.
30.11 False. State machine diagrams model some of the behaviors of a system.
30.13 Figure 30.29 presents an activity diagram for a deposit transaction. The diagram models the actions that occur after the user chooses the deposit option from the main menu and before the ATM returns the user to the main menu. Recall that part of receiving a deposit amount from the user involves converting an integer number of cents to a dollar amount. Also recall that crediting a deposit amount to an account involves increasing only the totalBalance attribute of the user’s Account object. The bank updates the availableBalance attribute of the user’s Account object only after confirming the amount of cash in the deposit envelope and after the enclosed checks clear—this occurs independently of the ATM system.
Fig. 30.29. Activity diagram for a Deposit transaction.

30.15 An operation that retrieves the amount attribute of class Withdrawal would typically be implemented as a get accessor of a property of class Withdrawal. The following would replace attribute amount in the attribute (i.e., second) compartment of class Withdrawal:
«property» Amount : decimal {readOnly}
30.16 This is an operation named Add that takes int parameters x and y and returns an int value. This operation would most likely sum its parameters x and y and return the result.
30.18 Communication diagrams emphasize what collaborations occur. Sequence diagrams emphasize when collaborations occur.
30.19 Figure 30.30 presents a sequence diagram that models the interactions between objects in the ATM system that occur when a Deposit executes successfully. It indicates that a Deposit first sends a DisplayMessage message to the Screen (to ask the user to enter a deposit amount). Next, the Deposit sends a GetInput message to the Keypad to receive the amount the user will be depositing. The Deposit then prompts the user (to insert a deposit envelope) by sending a DisplayMessage message to the Screen. The Deposit next sends an IsDepositEnvelopeReceived message to the DepositSlot to confirm that the deposit envelope has been received by the ATM. Finally, the Deposit increases the total balance (but not the available balance) of the user’s Account by sending a Credit message to the BankDatabase. The BankDatabase responds by sending the same message to the user’s Account.
Fig. 30.30. Sequence diagram that models a Deposit executing.
