
28. Web Services
Objectives
In this chapter you’ll learn:
• How to create WCF web services.
• How XML, JSON, XML-Based Simple Object Access Protocol (SOAP) and Representational State Transfer Architecture (REST) enable WCF web services.
• The elements that comprise WCF web services, such as service references, service endpoints, service contracts and service bindings.
• How to create a client that consumes a WCF web service.
• How to use WCF web services with Windows and web applications.
• How to use session tracking in WCF web services to maintain state information for the client.
• How to pass user-defined types to a WCF web service.
A client is to me a mere unit, a factor in a problem.
—Sir Arthur Conan Doyle
...if the simplest things of nature have a message that you understand, rejoice, for your soul is alive.
—Eleonora Duse
Outline
28.1 Introduction
28.2 WCF Services Basics
28.3 Simple Object Access Protocol (SOAP)
28.4 Representational State Transfer (REST)
28.5 JavaScript Object Notation (JSON)
28.6 Publishing and Consuming SOAP-Based WCF Web Services
28.6.1 Creating a WCF Web Service
28.6.2 Code for the WelcomeSOAPXMLService
28.6.3 Building a SOAP WCF Web Service
28.6.4 Deploying the WelcomeSOAPXMLService
28.6.5 Creating a Client to Consume the WelcomeSOAPXMLService
28.6.6 Consuming the WelcomeSOAPXMLService
28.7 Publishing and Consuming REST-Based XML Web Services
28.7.1 HTTP get and post Requests
28.7.2 Creating a REST-Based XML WCF Web Service
28.7.3 Consuming a REST-Based XML WCF Web Service
28.8 Publishing and Consuming REST-Based JSON Web Services
28.8.1 Creating a REST-Based JSON WCF Web Service
28.8.2 Consuming a REST-Based JSON WCF Web Service
28.9 Blackjack Web Service: Using Session Tracking in a SOAP-Based WCF Web Service
28.9.1 Creating a Blackjack Web Service
28.9.2 Consuming the Blackjack Web Service
28.10 Airline Reservation Web Service: Database Access and Invoking a Service from ASP.NET
28.11 Equation Generator: Returning User-Defined Types
28.11.1 Creating the REST-Based XML EquationGenerator Web Service
28.11.2 Consuming the REST-Based XML EquationGenerator Web Service
28.11.3 Creating the REST-Based JSON WCF EquationGenerator Web Service
28.11.4 Consuming the REST-Based JSON WCF EquationGenerator Web Service
28.12 Wrap-Up
28.13 Deitel Web Services Resource Centers
28.1 Introduction
This chapter introduces Windows Communication Foundation (WCF) services. WCF is a set of technologies for building distributed systems in which system components communicate with one another over networks. In earlier versions of .NET, the various types of communication used different technologies and programming models. WCF uses a common framework for all communication between systems, so you need to learn only one programming model to use WCF.
This chapter focuses on WCF web services, which promote software reusability in distributed systems that typically execute across the Internet. A web service is a class that allows its methods to be called by methods on other machines via common data formats and protocols, such as XML (see Chapter 26), JSON (Section 28.5) and HTTP. In .NET, the over-the-network method calls are commonly implemented through Simple Object Access Protocol (SOAP) or the Representational State Transfer (REST) architecture. SOAP is an XML-based protocol describing how to mark up requests and responses so that they can be sent via protocols such as HTTP. SOAP uses a standardized XML-based format to enclose data in a message that can be sent between a client and a server. REST is a network architecture that uses the web’s traditional request/response mechanisms such as GET and POST requests. REST-based systems do not require data to be wrapped in a special message format.
We build the WCF web services presented in this chapter in Visual Web Developer 2010 Express, and we create client applications that invoke these services using both Visual C# 2010 Express and Visual Web Developer 2010 Express. Full versions of Visual Studio 2010 include the functionality of both Express editions.
Requests to and responses from web services created with Visual Web Developer are typically transmitted via SOAP or REST, so any client capable of generating and processing SOAP or REST messages can interact with a web service, regardless of the language in which the web service is written. We say more about SOAP and REST in Section 28.3 and Section 28.4, respectively.
28.2 WCF Services Basics
Microsoft’s Windows Communication Foundation (WCF) was created as a single platform to encompass many existing communication technologies. WCF increases productivity, because you learn only one straightforward programming model. Each WCF service has three key components—addresses, bindings and contracts (usually called the ABCs of a WCF service):
• An address represents the service’s location (also known as its endpoint), which includes the protocol (for example, HTTP) and network address (for example, www.deitel.com) used to access the service.
• A binding specifies how a client communicates with the service (for example, SOAP, REST, and so on). Bindings can also specify other options, such as security constraints.
• A contract is an interface representing the service’s methods and their return types. The service’s contract allows clients to interact with the service.
The machine on which the web service resides is referred to as a web service host. The client application that accesses the web service sends a method call over a network to the web service host, which processes the call and returns a response over the network to the application. This kind of distributed computing benefits systems in various ways. For example, an application without direct access to data on another system might be able to retrieve this data via a web service. Similarly, an application lacking the processing power necessary to perform specific computations could use a web service to take advantage of another system’s superior resources.
28.3 Simple Object Access Protocol (SOAP)
The Simple Object Access Protocol (SOAP) is a platform-independent protocol that uses XML to make remote procedure calls, typically over HTTP. Each request and response is packaged in a SOAP message—an XML message containing the information that a web service requires to process the message. SOAP messages are written in XML so that they’re computer readable, human readable and platform independent. Most firewalls—security barriers that restrict communication among networks—allow HTTP traffic to pass through, so that clients can browse the Internet by sending requests to and receiving responses from web servers. Thus, SOAP-based services can send and receive SOAP messages over HTTP connections with few limitations.
SOAP supports an extensive set of types. The wire format used to transmit requests and responses must support all types passed between the applications. SOAP types include the primitive types (for example, int), as well as DateTime, XmlNode and others. SOAP can also transmit arrays of these types. In Section 28.11, you’ll see that you can also transmit user-defined types in SOAP messages.
When a program invokes a method of a SOAP web service, the request and all relevant information are packaged in a SOAP message enclosed in a SOAP envelope and sent to the server on which the web service resides. When the web service receives this SOAP message, it parses the XML representing the message, then processes the message’s contents. The message specifies the method that the client wishes to execute and the arguments the client passed to that method. Next, the web service calls the method with the specified arguments (if any) and sends the response back to the client in another SOAP message. The client parses the response to retrieve the method’s result. In Section 28.6, you’ll build and consume a basic SOAP web service.
28.4 Representational State Transfer (REST)
Representational State Transfer (REST) refers to an architectural style for implementing web services. Such web services are often called RESTful web services. Though REST itself is not a standard, RESTful web services are implemented using web standards. Each operation in a RESTful web service is identified by a unique URL. Thus, when the server receives a request, it immediately knows what operation to perform. Such web services can be used in a program or directly from a web browser. The results of a particular operation may be cached locally by the browser when the service is invoked with a GET request. This can make subsequent requests for the same operation faster by loading the result directly from the browser’s cache. Amazon’s web services (aws.amazon.com) are RESTful, as are many others.
RESTful web services are alternatives to those implemented with SOAP. Unlike SOAP-based web services, the request and response of REST services are not wrapped in envelopes. REST is also not limited to returning data in XML format. It can use a variety of formats, such as XML, JSON, HTML, plain text and media files. In Sections 28.7–28.8, you’ll build and consume basic RESTful web services.
28.5 JavaScript Object Notation (JSON)
JavaScript Object Notation (JSON) is an alternative to XML for representing data. JSON is a text-based data-interchange format used to represent objects in JavaScript as collections of name/value pairs represented as Strings. It is commonly used in Ajax applications. JSON is a simple format that makes objects easy to read, create and parse, and allows programs to transmit data efficiently across the Internet because it is much less verbose than XML. Each JSON object is represented as a list of property names and values contained in curly braces, in the following format:
{ propertyName1 : value1, propertyName2 : value2 }
Arrays are represented in JSON with square brackets in the following format:
[ value1, value2, value3 ]
Each value in an array can be a string, a number, a JSON object, true, false or null. To appreciate the simplicity of JSON data, examine this representation of an array of address-book entries
[ { first: 'Cheryl', last: 'Black' },
{ first: 'James', last: 'Blue' },
{ first: 'Mike', last: 'Brown' },
{ first: 'Meg', last: 'Gold' } ]
Many programming languages now support the JSON data format.
28.6 Publishing and Consuming SOAP-Based WCF Web Services
This section presents our first example of publishing (enabling for client access) and consuming (using) a web service. We begin with a SOAP-based web service.
28.6.1 Creating a WCF Web Service
To build a SOAP-based WCF web service in Visual Web Developer, you first create a project of type WCF Service. SOAP is the default protocol for WCF web services, so no special configuration is required to create them. Visual Web Developer then generates files for the WCF service code, an SVC file (Service.svc, which provides access to the service), and a Web.config file (which specifies the service’s binding and behavior).
Visual Web Developer also generates code files for the WCF service class and any other code that is part of the WCF service implementation. In the service class, you define the methods that your WCF web service makes available to client applications.
28.6.2 Code for the WelcomeSOAPXMLService
Figures 28.1 and 28.2 present the code-behind files for the WelcomeSOAPXMLService WCF web service that you’ll build in Section 28.6.3. When creating services in Visual Web Developer, you work almost exclusively in the code-behind files. The service provides a method that takes a name (represented as a string) as an argument and appends it to the welcome message that is returned to the client. We use a parameter in the method definition to demonstrate that a client can send data to a web service.
Fig. 28.1. WCF web-service interface that returns a welcome message through SOAP protocol and XML format.

Fig. 28.2. WCF web service that returns a welcome message through the SOAP protocol and XML format.

Figure 28.1 is the service’s interface, which describes the service’s contract—the set of methods and properties the client uses to access the service. The ServiceContract attribute (line 6) exposes a class that implements this interface as a WCF web service. The OperationContract attribute (line 10) exposes the Welcome method to clients for remote calls. Optional parameters can be assigned to these contracts to change the data format and method behavior, as we’ll show in later examples.
Figure 28.2 defines the class that implements the interface declared as the Service-Contract. Lines 7–12 define the method Welcome, which returns a string welcoming you to WCF web services. Next, we build the web service from scratch.
28.6.3 Building a SOAP WCF Web Service
In the following steps, you create a WCF Service project for the WelcomeSOAPXMLService and test it using the built-in ASP.NET Development Server that comes with Visual Web Developer Express and Visual Studio.
Step 1: Creating the Project
To create a project of type WCF Service, select File > New Web Site... to display the New Web Site dialog (Fig. 28.3). Select the WCF Service template. Select File System from the Location drop-down list to indicate that the files should be placed on your local hard disk. By default, Visual Web Developer places files on the local machine in a directory named WCFService1. Rename this folder to WelcomeSOAPXMLService. We modified the default path as well. Click OK to create the project.
Fig. 28.3. Creating a WCF Service in Visual Web Developer.

Step 2: Examining the Newly Created Project
After you create the project, the code-behind file Service.cs, which contains code for a simple web service, is displayed by default. If the code-behind file is not open, open it by double clicking the file in the App_Code directory listed in the Solution Explorer. By default, a new code-behind file implements an interface named IService. This interface (in the file IService.cs) is marked with the ServiceContract and OperationContract attributes. In addition, the IService.cs file defines a class named CompositeType with a DataContract attribute (discussed in Section 28.8). The interface contains two sample service methods named GetData and GetDataUsingContract. The Service.cs contains the code that defines these methods.
Step 3: Modifying and Renaming the Code-Behind File
To create the WelcomeSOAPXMLService service developed in this section, modify IService.cs and Service.cs by replacing the sample code provided by Visual Web Developer with the code from the IWelcomeSOAPXMLService and WelcomeSOAPXMLService files (Figs. 28.1 and 28.2, respectively). Then rename the files to IWelcomeSOAPXMLService.cs and WelcomeSOAPXMLService.cs by right clicking each file in the Solution Explorer and choosing Rename.
Step 4: Examining the SVC File
The Service.svc file, when accessed through a web browser, provides information about the web service. However, if you open the SVC file on disk, it contains only
<%@ ServiceHost Language="C#" Debug="true" Service="Service"
CodeBehind="~/App_Code/Service.cs" %>
to indicate the programming language in which the web service’s code-behind file is written, the Debug attribute (enables a page to be compiled for debugging), the name of the service and the code-behind file’s location. When you request the SVC page in a web browser, WCF uses this information to dynamically generate the WSDL document.
Step 5: Modifying the SVC File
If you change the code-behind file name or the class name that defines the web service, you must modify the SVC file accordingly. Thus, after defining class WelcomeSOAPXMLService in the code-behind file WelcomeSOAPXMLService.cs, modify the SVC file as follows:
<%@ ServiceHost Language="C#" Debug="true"
Service="WelcomeSOAPXMLService"
CodeBehind="~/App_Code/WelcomeSOAPXMLService.cs" %>
28.6.4 Deploying the WelcomeSOAPXMLService
You can choose Build Web Site from the Build menu to ensure that the web service compiles without errors. You can also test the web service directly from Visual Web Developer by selecting Start Debugging from the Debug menu. The first time you do this, the Debugging Not Enabled dialog appears. Click OK if you want to enable debugging. Next, a browser window opens and displays information about the service. This information is generated dynamically when the SVC file is requested. Figure 28.4 shows a web browser displaying the Service.svc file for the WelcomeSOAPXMLService WCF web service.
Fig. 28.4. SVC file rendered in a web browser.
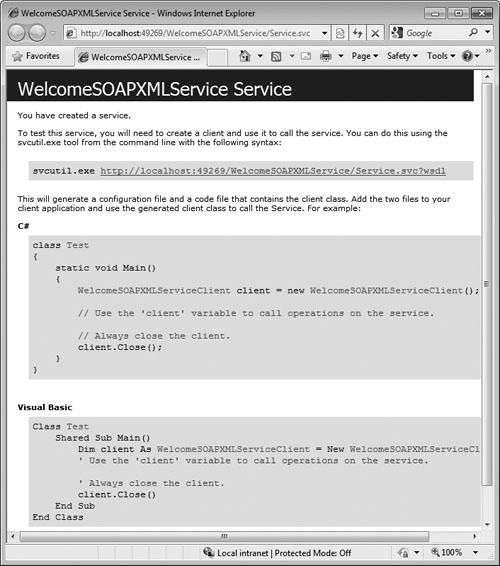
Once the service is running, you can also access the SVC page from your browser by typing a URL of the following form in a web browser:
http://localhost:portNumber/virtualPath/Service.svc
(See the actual URL in Fig. 28.4.) By default, the ASP.NET Development Server assigns a random port number to each website it hosts. You can change this behavior by going to the Solution Explorer and clicking on the project name to view the Properties window (Fig. 28.5). Set the Use dynamic ports property to False and set the Port number property to the port number that you want to use, which can be any unused TCP port. Generally, you don’t do this for web services that will be deployed to a real web server. You can also change the service’s virtual path, perhaps to make the path shorter or more readable.
Fig. 28.5. WCF web service Properties window.

Web Services Description Language
To consume a web service, a client must determine the service’s functionality and how to use it. For this purpose, web services normally contain a service description. This is an XML document that conforms to the Web Service Description Language (WSDL)—an XML vocabulary that defines the methods a web service makes available and how clients interact with them. The WSDL document also specifies lower-level information that clients might need, such as the required formats for requests and responses.
WSDL documents help applications determine how to interact with the web services described in the documents. When viewed in a web browser, an SVC file presents a link to the service’s WSDL document and information on using the utility svcutil.exe to generate test console applications. The svcutil.exe tool is included with Visual Studio 2010 and Visual Web Developer. We do not use svcutil.exe to test our services, opting instead to build our own test applications. When a client requests the SVC file’s URL followed by ?wsdl, the server autogenerates the WSDL that describes the web service and returns the WSDL document. Copy the SVC URL (which ends with .svc) from the browser’s address field in Fig. 28.4, as you’ll need it in the next section to build the client application. Also, leave the web service running so the client can interact with it.
28.6.5 Creating a Client to Consume the WelcomeSOAPXMLService
Now that you’ve defined and deployed the web service, let’s consume it from a client application. A .NET web-service client can be any type of .NET application, such as a Windows application, a console application or a web application. You can enable a client application to consume a web service by adding a service reference to the client. Figure 28.6 diagrams the parts of a client for a SOAP-based web service after a service reference has been added. [Note: This section discusses building a client application in Visual C# 2010 Express, but the discussion also applies to Visual Web Developer 2010 Express.]
Fig. 28.6. .NET WCF web-service client after a web-service reference has been added.

An application that consumes a SOAP-based web service actually consists of two parts—a proxy class representing the web service and a client application that accesses the web service via a proxy object (that is, an instance of the proxy class). A proxy class handles all the “plumbing” required for service method calls (that is, the networking details and the formation of SOAP messages). Whenever the client application calls a web service’s method, the application actually calls a corresponding method in the proxy class. This method has the same name and parameters as the web service’s method that is being called, but formats the call to be sent as a request in a SOAP message. The web service receives this request as a SOAP message, executes the method call and sends back the result as another SOAP message. When the client application receives the SOAP message containing the response, the proxy class deserializes it and returns the results as the return value of the web-service method that was called. Figure 28.7 depicts the interactions among the client code, proxy class and web service. The proxy class is not shown in the project unless you click the Show All Files button in the Solution Explorer.
Fig. 28.7. Interaction between a web-service client and a SOAP web service.

Many aspects of web-service creation and consumption—such as generating WSDL files and proxy classes—are handled by Visual Web Developer, Visual C# 2010 and WCF. Although developers are relieved of the tedious process of creating these files, they can still modify the files if necessary. This is required only when developing advanced web services—none of our examples require modifications to these files.
We now create a client and generate a proxy class that allows the client to access the WelcomeSOAPXMLService web service. First create a Windows application named WelcomeSOAPXMLClient in Visual C# 2010, then perform the following steps.
Step 1: Opening the Add Service Reference Dialog
Right click the project name in the Solution Explorer and select Add Service Reference... to display the Add Service Reference dialog.
Step 2: Specifying the Web Service’s Location
In the dialog, enter the URL of WelcomeSOAPXMLService’s .svc file (that is, the URL you copied from Fig. 28.4) in the Address field and click Go. When you specify the service you want to consume, the IDE accesses the web service’s WSDL information and copies it into a WSDL file that is stored in the client project’s Service References folder. This file is visible when you view all of your project’s files in the Solution Explorer. [Note: A copy of the WSDL file provides the client application with local access to the web service’s description. To ensure that the WSDL file is up to date, Visual C# 2010 provides an Update Service Reference option (available by right clicking the service reference in the Solution Explorer), which updates the files in the Service References folder.]
Many companies that provide web services simply distribute the exact URLs at which their web services can be accessed. The Add Service Reference dialog also allows you to search for services on your local machine or on the Internet.
Step 3: Renaming the Service Reference’s Namespace
In the Add Service Reference dialog, rename the service reference’s namespace by changing the Namespace field to ServiceReference.
Step 4: Adding the Service Reference
Click the Ok button to add the service reference.
Step 5: Viewing the Service Reference in the Solution Explorer
The Solution Explorer should now contain a Service References folder with a node showing the namespace you specified in Step 3.
28.6.6 Consuming the WelcomeSOAPXMLService
The application in Fig. 28.8 uses the WelcomeSOAPXMLService service to send a welcome message. You are already familiar with Visual C# applications that use Labels, TextBoxes and Buttons, so we focus our discussions on the web-services concepts in this chapter’s applications.
Fig. 28.8. Client that consumes the WelcomeSOAPXMLService.


Line 11 defines a new ServiceReference.WelcomeSOAPXMLServiceClient proxy object named client. The event handler uses this object to call methods of the Welcome-SOAPXMLService web service. Line 22 invokes the WelcomeSOAPXMLService web service’s Welcome method. The call is made via the local proxy object client, which then communicates with the web service on the client’s behalf. If you’re using the downloaded examples from this chapter, you may need to regenerate the proxy by removing the service reference, then adding it again, because ASP.NET Development Server may use a different port number on your computer. To do so, right click ServiceReference in the Service References folder in the Solution Explorer and select option Delete. Then follow the instructions in Section 28.6.5 to add the service reference to the project.
When the application runs, enter your name and click the Submit button. The application invokes the Welcome service method to perform the appropriate task and return the result, then displays the result in a MessageBox.
28.7 Publishing and Consuming REST-Based XML Web Services
In the previous section, we used a proxy object to pass data to and from a WCF web service using the SOAP protocol. In this section, we access a WCF web service using the REST architecture. We modify the IWelcomeSOAPXMLService example to return data in plain XML format. You can create a WCF Service project as you did in Section 28.6 to begin.
28.7.1 HTTP get and post Requests
The two most common HTTP request types (also known as request methods) are get and post. A get request typically gets (or retrieves) information from a server. Common uses of get requests are to retrieve a document or an image, or to fetch search results based on a user-submitted search term. A post request typically posts (or sends) data to a server. Common uses of post requests are to send form data or documents to a server.
An HTTP request often posts data to a server-side form handler that processes the data. For example, when a user performs a search or participates in a web-based survey, the web server receives the information specified in the XHTML form as part of the request. Both types of requests can be used to send form data to a web server, yet each request type sends the information differently.
A get request sends information to the server in the URL. For example, in the following URL
www.google.com/search?q=deitel
search is the name of Google’s server-side form handler, q is the name of a variable in Google’s search form and deitel is the search term. A ? separates the query string from the rest of the URL in a request. A name/value pair is passed to the server with the name and the value separated by an equals sign (=). If more than one name/value pair is submitted, each pair is separated by an ampersand (&). The server uses data passed in a query string to retrieve an appropriate resource from the server. The server then sends a response to the client. A get request may be initiated by submitting an XHTML form whose method attribute is set to "get", or by typing the URL (possibly containing a query string) directly into the browser’s address bar.
A post request sends form data as part of the HTTP message, not as part of the URL. A get request typically limits the query string (that is, everything to the right of the ?) to a specific number of characters. For example, Internet Explorer restricts the entire URL to no more than 2083 characters. Typically, large amounts of information should be sent using the post method. The post method is also sometimes preferred because it hides the submitted data from the user by embedding it in an HTTP message. If a form submits hidden input values along with user-submitted data, the post method might generate a URL like www.searchengine.com/search. The form data still reaches the server for processing, but the user does not see the exact information sent.
28.7.2 Creating a REST-Based XML WCF Web Service
Step 1: Adding the WebGet Attribute
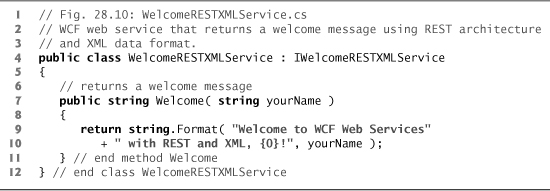
IWelcomeRESTXMLService interface (Fig. 28.9) is a modified version of the IWelcomeSOAPXMLService interface. The Welcome method’s WebGet attribute (line 12) maps a method to a unique URL that can be accessed via an HTTP get operation programmatically or in a web browser. To use the WebGet attribute, we import the System.ServiceModel.Web namespace (line 5). WebGet’s UriTemplate property (line 12) specifies the URI format that is used to invoke the method. You can access the Welcome method in a web browser by appending text that matches the UriTemplate definition to the end of the service’s location, as in http://localhost:portNumber/WelcomeRESTXMLService/Service.svc/welcome/ Paul. WelcomeRESTXMLService (Fig. 28.10) is the class that implements the IWelcomeRESTXMLService interface; it is similar to the WelcomeSOAPXMLService class (Fig. 28.2).
Fig. 28.9. WCF web-service interface. A class that implements this interface returns a welcome message through REST architecture and XML data format.

Fig. 28.10. WCF web service that returns a welcome message using REST architecture and XML data format.
Step 2: Modifying the Web.config File
Figure 28.11 shows part of the default Web.config file modified to use REST architecture. The endpointBehaviors element (lines 16–20) in the behaviors element indicates that this web service endpoint will be accessed using the web programming model (REST).
Fig. 28.11. WelcomeRESTXMLService Web.config file.

The nested webHttp element specifies that clients communicate with this service using the standard HTTP request/response mechanism. The protocolMapping element (lines 22–24) in the system.serviceModel element, changes the default protocol for communicating with this web service (normally SOAP) to webHttpBinding, which is used for REST-based HTTP requests.
Figure 28.12 tests the WelcomeRESTXMLService’s Welcome method in a web browser. The URL specifies the location of the Service.svc file and uses the URI template to invoke method Welcome with the argument Bruce. The browser displays the XML data response from WelcomeRESTXMLService. Next, you’ll learn how to consume this service.
Fig. 28.12. Response from WelcomeRESTXMLService in XML data format.

28.7.3 Consuming a REST-Based XML WCF Web Service
WelcomeRESTXMLFo(Fig. 28.13) uses the System.Net namespace’s WebClient class (line 13) to invoke the web service and receive its response. In lines 23–25, we register a handler for the WebClient’s DownloadStringCompleted event.
Fig. 28.13. Client that consumes the WelcomeRESTXMLService.


In this example, we process the WebClient’s DownloadStringCompleted event, which occurs when the client receives the completed response from the web service. Lines 32–34 call the client object’s DownloadStringAsync method to invoke the web service asynchronously. (There’s also a synchronous DownloadString method that does not return until it receives the response.) The method’s argument (i.e., the URL to invoke the web service) must be specified as an object of class Uri. Class Uri’s constructor receives a string representing a uniform resource identifier. [Note: The URL’s port number must match the one issued to the web service by the ASP.NET Development Server.] When the call to the web service completes, the WebClient object raises the DownloadStringCompleted event. Its event handler has a parameter e of type DownloadStringCompletedEventArgs which contains the information returned by the web service. We can use this variable’s properties to get the returned XML document (e.Result) and any errors that may have occurred during the process (e.Error). We then parse the XML response using XDocument method Parse (line 45). In lines 15–16, we specify the XML message’s namespace (seen in Fig. 28.12), and use it to parse the service’s XML response to display our welcome string in a MessageBox (lines 48–49).
28.8 Publishing and Consuming REST-Based JSON Web Services
We now build a RESTful web service that returns data in JSON format.
28.8.1 Creating a REST-Based JSON WCF Web Service
By default, a web-service method with the WebGet attribute returns data in XML format. In Fig. 28.14, we modify the WelcomeRESTXMLService to return data in JSON format by setting WebGet’s ResponseFormat property to WebMessageFormat.Json (line 13). (WebMessageFormat.XML is the default value.) For JSON serialization to work properly, the objects being converted to JSON must have Public properties. This enables the JSON serialization to create name/value pairs representing each Public property and its corresponding value. The previous examples return String objects containing the responses. Even though Strings are objects, Strings do not have any Public properties that represent their contents. So, lines 19–25 define a TextMessage class that encapsulates a String value and defines a Public property Message to access that value. The DataContract attribute (line 19) exposes the TextMessage class to the client access. Similarly, the DataMember attribute (line 23) exposes a property of this class to the client. This property will appear in the JSON object as a name/value pair. Only DataMembers of a DataContract are serialized.
Fig. 28.14. WCF web-service interface that returns a welcome message through REST architecture and JSON format.

Figure 28.15 shows the implementation of the interface of Fig. 28.14. The Welcome method (lines 7–15) returns a TextMessage object, reflecting the changes we made to the interface class. This object is automatically serialized in JSON format (as a result of line 13 in Fig. 28.14) and sent to the client.
Fig. 28.15. WCF web service that returns a welcome message through REST architecture and JSON format.

We can once again test the web service using a web browser, by accessing the Service.svc file (http://localhost:49745/WelcomeRESTJSONService/Service.svc) and appending the URI template (welcome/yourName) to the address. The response prompts you to download a file called yourName, which is a text file. If you save it to disk, the file will have the .json extension. This contains the JSON formatted data. By opening the file in a text editor such as Notepad (Fig. 28.16), you can see the service response as a JSON object. Notice that the property named Message has the welcome message as its value.
Fig. 28.16. Response from WelcomeRESTJSONService in JSON data format.

28.8.2 Consuming a REST-Based JSON WCF Web Service
We mentioned earlier that all types passed to and from web services can be supported by REST. Custom types that are sent to or from a REST web service are converted to XML or JSON data format. This process is referred to as XML serialization or JSON serialization, respectively. In Fig. 28.17, we consume the WelcomeRESTJSONService service using an object of the System.Runtime.Serialization.Json library’s DataContractJsonSerializer class (lines 44–45). The TextMessage class (lines 57–61) maps the JSON response’s fields for the DataContractJsonSerializer to deserialize. We add the Serializable attribute (line 57) to the TextMessage class to recognize it as a valid serializable object we can convert to and from JSON format. Also, this class on the client must have public data or properties that match the public data or properties in the corresponding class from the web service. Since we want to convert the JSON response into a Text-Message object, we set the DataContractJsonSerializer’s type parameter to TextMessage (line 45). In line 48, we use the System.Text namespace’s Encoding.Unicode.GetBytes method to convert the JSON response to a Unicode encoded byte array, and encapsulate the byte array in a MemoryStream object so we can read data from the array using stream semantics. The bytes in the MemoryStream object are read by the DataContractJsonSerializer and deserialized into a TextMessage object (lines 47–48).
Fig. 28.17. Client that consumes the WelcomeRESTJSONService.


28.9 Blackjack Web Service: Using Session Tracking in a SOAP-Based WCF Web Service
In Chapter 19, we described the advantages of maintaining information about users to personalize their experiences. In particular, we discussed session tracking using HttpSessionState objects. Next, we incorporate session tracking into a SOAP-based WCF web service.
Suppose a client application needs to call several methods from the same web service, possibly several times each. In such a case, it can be beneficial for the web service to maintain state information for the client. Session tracking eliminates the need for information about the client to be passed between the client and the web service multiple times. For example, a web service providing access to local restaurant reviews would benefit from storing the client user’s street address. Once the user’s address is stored in a session variable, web service methods can return personalized, localized results without requiring that the address be passed in each method call. This not only improves performance but also requires less effort on your part—less information is passed in each method call.
28.9.1 Creating a Blackjack Web Service
Web services store session information to provide more intuitive functionality. Our next example is a SOAP-based web service that assists programmers in developing a blackjack card game. The web service provides methods to deal a card and to evaluate a hand of cards. After presenting the web service, we use it to serve as the dealer for a game of blackjack. The blackjack web service creates a session variable to maintain a unique deck of cards for each client application. Several clients can use the service at the same time, but method calls made by a specific client use only the deck stored in that client’s session. Our example uses a simple subset of casino blackjack rules:
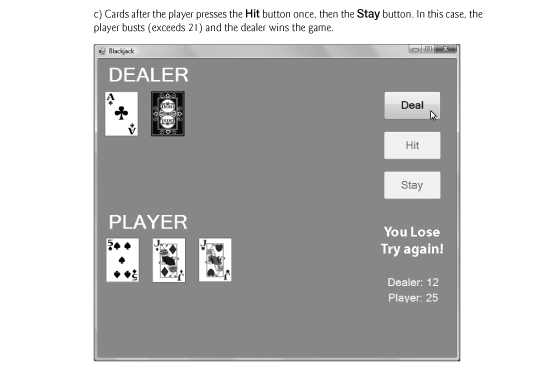
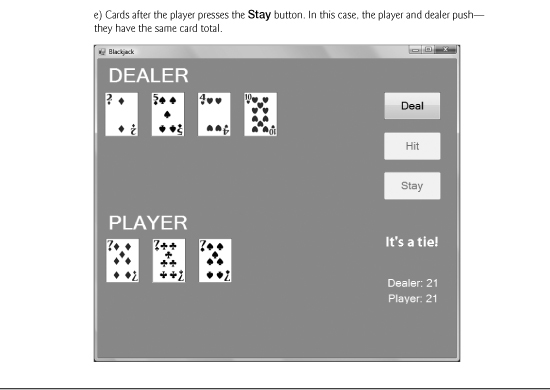
Two cards each are dealt to the dealer and the player. The player’s cards are dealt face up. Only the dealer’s first card is dealt face up. Each card has a value. A card numbered 2 through 10 is worth its face value. Jacks, queens and kings each count as 10. Aces can count as 1 or 11—whichever value is more beneficial to the player (as we’ll soon see). If the sum of the player’s two initial cards is 21 (that is, the player was dealt a card valued at 10 and an ace, which counts as 11 in this situation), the player has “blackjack” and immediately wins the game. Otherwise, the player can begin taking additional cards one at a time. These cards are dealt face up, and the player decides when to stop taking cards. If the player “busts” (that is, the sum of the player’s cards exceeds 21), the game is over, and the player loses. When the player is satisfied with the current set of cards, the player “stays” (that is, stops taking cards), and the dealer’s hidden card is revealed. If the dealer’s total is 16 or less, the dealer must take another card; otherwise, the dealer must stay. The dealer must continue to take cards until the sum of the dealer’s cards is greater than or equal to 17. If the dealer exceeds 21, the player wins. Otherwise, the hand with the higher point total wins. If the dealer and the player have the same point total, the game is a “push” (that is, a tie), and no one wins.
The Blackjack WCF web service’s interface (Fig. 28.18) uses a ServiceContract with the SessionMode property set to Required (line 5). This means the service requires sessions to execute correctly. By default, the SessionMode property is set to Allowed. It can also be set to NotAllowed to disable sessions.
Fig. 28.18. Blackjack game WCF web-service interface.

The web-service class (Fig. 28.19) provides methods to deal a card, shuffle the deck and determine the point value of a hand. For this example, we want a separate object of the BlackjackService class to handle each client session, so we can maintain a unique deck for each client. To do this, we must specify this behavior in the ServiceBehavior attribute (line 7). Setting the ServiceBehavior’s InstanceContextMode property to PerSession creates a new instance of the class for each session. The InstanceContextMode property can also be set to PerCall or Single. PerCall uses a new object of the web-service class to handle every method call to the service. Single uses the same object of the web-service class to handle all calls to the service.
Fig. 28.19. Blackjack game WCF web service.


We represent each card as a string consisting of a digit (that is, 1–13) representing the card’s face (for example, ace through king), followed by a space and a digit (that is, 0–3) representing the card’s suit (for example, clubs, diamonds, hearts or spades). For example, the jack of hearts is represented as "11 2", and the two of clubs as "2 0". After deploying the web service, we create a Windows Forms application that uses the Black-jackService’s methods to implement a blackjack game.
Method DealCard
Method DealCard (lines 14–19) removes a card from the deck and sends it to the client. Without using session tracking, the deck of cards would need to be passed back and forth with each method call. Using session state makes the method easy to call (it requires no arguments) and avoids the overhead of sending the deck over the network multiple times.
This method manipulates the current user’s deck (the List of strings defined at line 11). From the user’s deck, DealCard obtains the current top card (line 16), removes the top card from the deck (line 17) and returns the card’s value as a string (line 18).
Method Shuffle
Method Shuffle (lines 22–46) fills and shuffles the List representing a deck of cards. Lines 29–31 generate strings in the form "face suit" to represent each card in a deck. Lines 34–45 shuffle the deck by swapping each card with a randomly selected other card.
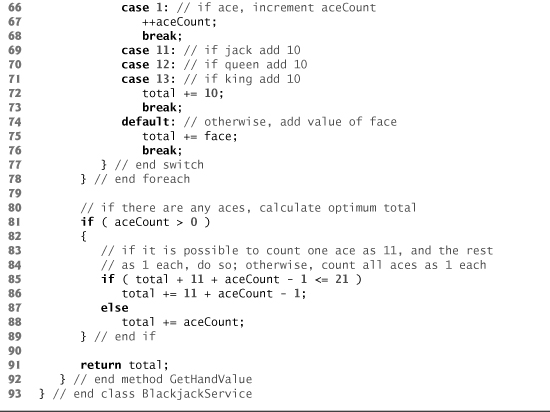
Method GetHandValue
Method GetHandValue (lines 49–92) determines the total value of cards in a hand by trying to attain the highest score possible without going over 21. Recall that an ace can be counted as either 1 or 11, and all face cards count as 10.
As you’ll see in Fig. 28.20, the client application maintains a hand of cards as a string in which each card is separated by a tab character. Line 52 of Fig. 28.19 tokenizes the hand of cards (represented by dealt) into individual cards by calling string method Split and passing to it the tab character. Split uses the delimiter characters to separate tokens in the string. Lines 58–78 count the value of each card. Lines 61–62 retrieve the first integer—the face—and use that value in the switch statement (lines 64–77). If the card is an ace, the method increments variable aceCount (line 67). We discuss how this variable is used shortly. If the card is an 11, 12 or 13 (jack, queen or king), the method adds 10 to the total value of the hand (line 72). If the card is anything else, the method increases the total by that value (line 75).
Fig. 28.20. Blackjack game that uses the BlackjackService web service.


Because an ace can represent 1 or 11, additional logic is required to process aces. Lines 81–89 process the aces after all the other cards. If a hand contains several aces, only one ace can be counted as 11 (if two aces each are counted as 11, the hand would have a losing value of at least 22). The condition in line 85 determines whether counting one ace as 11 and the rest as 1 results in a total that does not exceed 21. If this is possible, line 86 adjusts the total accordingly. Otherwise, line 88 adjusts the total, counting each ace as 1.
Method GetHandValue maximizes the value of the current cards without exceeding 21. Imagine, for example, that the dealer has a 7 and receives an ace. The new total could be either 8 or 18. However, GetHandValue always maximizes the value of the cards without going over 21, so the new total is 18.
Modifying the web.config File
To allow this web service to perform session tracking, you must modify the web.config file to include the following element in the system.serviceModel element:s
<protocolMapping>
<add scheme="http" binding="wsHttpBinding"/>
</protocolMapping>
28.9.2 Consuming the Blackjack Web Service
We use our blackjack web service in a Windows application (Fig. 28.20). This application uses an instance of BlackjackServiceClient (declared in line 14 and created in line 48) to represent the dealer. The web service keeps track of the cards dealt to the player and the dealer. As in Section 28.6.5, you must add a service reference to your project so it can access the service. The images for this example are provided with the chapter’s examples.
Each player has 11 PictureBoxes—the maximum number of cards that can be dealt without exceeding 21 (that is, four aces, four twos and three threes). These PictureBoxes are placed in a List (lines 51–73), so we can index the List during the game to determine which PictureBox should display a particular card image. The images are located in the blackjack_images directory with this chapter’s examples. Drag this directory from Windows Explorer into your project. In the Solution Explorer, select all the files in that folder and set their Copy to Output Directory property to Copy if newer.
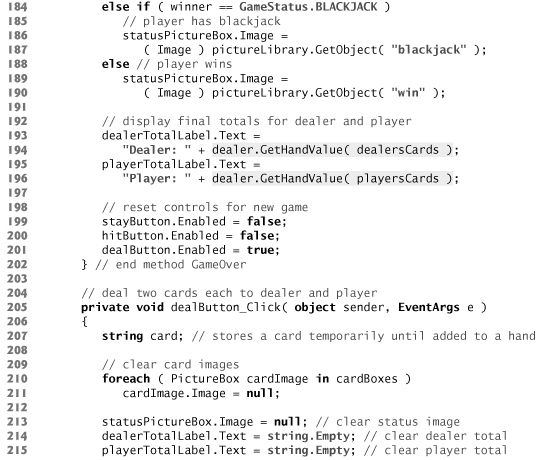
GameOver Method
Method GameOver (lines 169–202) shows an appropriate message in the status PictureBox and displays the final point totals of both the dealer and the player. These values are obtained by calling the web service’s GetHandValue method in lines 194 and 196. Method GameOver receives as an argument a member of the GameStatus enumeration (defined in lines 31–37). The enumeration represents whether the player tied, lost or won the game; its four members are PUSH, LOSE, WIN and BLACKJACK.
dealButton_Click Method
When the player clicks the Deal button, the event handler (lines 205–255) clears the PictureBoxes and the Labels displaying the final point totals. Line 218 shuffles the deck by calling the web service’s Shuffle method, then the player and dealer receive two cards each (returned by calls to the web service’s DealCard method in lines 221, 223, 228 and 230). Lines 239–240 evaluate both the dealer’s and player’s hands by calling the web service’s GetHandValue method. If the player and the dealer both obtain scores of 21, the program calls method GameOver, passing GameStatus.PUSH. If only the player has 21 after the first two cards are dealt, the program passes GameStatus.BLACKJACK to method GameOver. If only the dealer has 21, the program passes GameStatus.LOSE to method GameOver.
hitButton_Click Method
If dealButton_Click does not call GameOver, the player can take more cards by clicking the Hit button. The event handler for this button is in lines 258–277. Each time a player clicks Hit, the program deals the player one more card (line 260), displaying it in the GUI. Line 267 evaluates the player’s hand. If the player exceeds 21, the game is over, and the player loses. If the player has exactly 21, the player cannot take any more cards, and method DealerPlay (lines 78–118) is called, causing the dealer to keep taking cards until the dealer’s hand has a value of 17 or more (lines 88–97). If the dealer exceeds 21, the player wins (line 105); otherwise, the values of the hands are compared, and GameOver is called with the appropriate argument (lines 111–116).
hitButton_Click Method
Clicking the Stay button indicates that a player does not want to be dealt another card. The event handler for this button (lines 280–286) disables the Hit and Stay buttons, then calls method DealerPlay.
DisplayCard Method
Method DisplayCard (lines 121–165) updates the GUI to display a newly dealt card. The method takes as arguments an integer representing the index of the PictureBox in the List that must have its image set, and a string representing the card. An empty string indicates that we wish to display the card face down. If method DisplayCard receives a string that’s not empty, the program extracts the face and suit from the string and uses this information to find the correct image. The switch statement (lines 146–160) converts the number representing the suit to an int and assigns the appropriate character literal to suitLetter (c for clubs, d for diamonds, h for hearts and s for spades). The character in suitLetter is used to complete the image’s file name (lines 163–164).
28.10 Airline Reservation Web Service: Database Access and Invoking a Service from ASP.NET
Our prior examples accessed web services from Windows Forms applications. You can just as easily use web services in ASP.NET web applications. In fact, because web-based businesses are becoming increasingly prevalent, it is common for web applications to consume web services. Figures 28.21 and 28.22 present the interface and class, respectively, for an airline reservation service that receives information regarding the type of seat a customer wishes to reserve, checks a database to see if such a seat is available and, if so, makes a reservation. Later in this section, we present an ASP.NET web application that allows a customer to specify a reservation request, then uses the airline reservation web service to attempt to execute the request. The code and database used in this example are provided with the chapter’s examples.
Fig. 28.21. Airline reservation WCF web-service interface.

Fig. 28.22. Airline reservation WCF web service.

In Chapter 18, you learned how to use LINQ to SQL to extract data from a database. We added the Tickets.mdf database and corresponding LINQ to SQL classes to create a DataContext object (line 8) for our ticket reservation system. Tickets.mdf database contains the Seats table with four columns—the seat number (1–10), the seat type (Window, Middle or Aisle), the class (Economy or First) and a column containing either 1 (true) or 0 (false) to indicate whether the seat is taken.
This web service has a single method—Reserve (Fig. 28.22, lines 11–32)—which searches a seat database (Tickets.mdf) to locate a seat matching a user’s request. If it finds an appropriate seat, Reserve updates the database, makes the reservation and returns true; otherwise, no reservation is made, and the method returns false. The statements in lines 14–18 and lines 24–29, which query and update the database, use LINQ to SQL.
Reserve receives two parameters—a string representing the seat type (that is, Window, Middle or Aisle) and a string representing the class type (that is, Economy or First). Lines 15–18 retrieve the seat numbers of any available seats matching the requested seat and class type with the results of a query. Line 21 gets the first matching seat (or null if there is not one). If there is a matching seat (line 24), the web service reserves the that seat. Line 26 marks the seat as taken and line 27 submits the changes to the database. Method Reserve returns true (line 28) to indicate that the reservation was successful. If there are no matching seats, Reserve returns false (line 31) to indicate that no seats matched the user’s request.
Creating a Web Form to Interact with the Airline Reservation Web Service
Figure 28.23 shows an ASP.NET page through which users can select seat types. This page allows users to reserve a seat on the basis of its class (Economy or First) and location (Aisle, Middle or Window) in a row of seats. The page then uses the airline reservation web service to carry out user requests. If the database request is not successful, the user is instructed to modify the request and try again. When you create this ASP.NET application, remember to add a service reference to the ReservationService.
Fig. 28.23. ASPX file that takes reservation information.

This page defines two DropDownList objects and a Button. One DropDownList displays all the seat types from which users can select (Aisle, Middle, Window). The second provides choices for the class type. Users click the Button named reserveButton to submit requests after making selections from the DropDownLists. The page also defines an initially blank Label named errorLabel, which displays an appropriate message if no seat matching the user’s selection is available. The code-behind file is shown in Fig. 28.24.
Fig. 28.24. ReservationClient code-behind file.
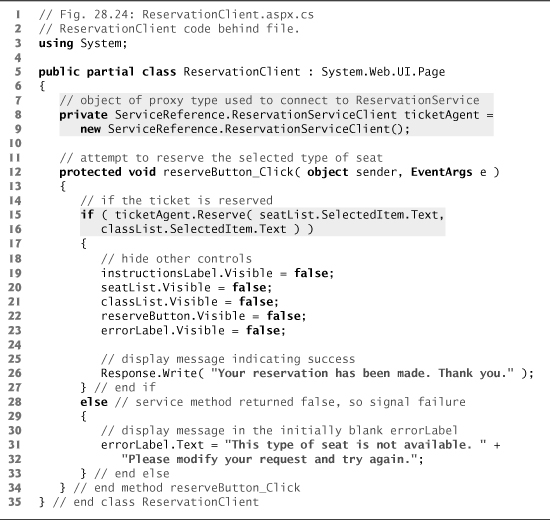
Lines 8–9 of Fig. 28.24 creates a ReservationServiceClient proxy object. When the user clicks Reserve (Fig. 28.25(a)), the reserveButton_Click event handler (lines 12–34 of Fig. 28.24) executes, and the page reloads. The event handler calls the web service’s Reserve method and passes to it the selected seat and class type as arguments (lines 15–16). If Reserve returns true, the application hides the GUI controls and displays a message thanking the user for making a reservation (line 26); otherwise, the application notifies the user that the type of seat requested is not available and instructs the user to try again (lines 31–32). You can use the techniques presented in Chapter 19 to build this ASP.NET Web Form. Figure 28.25 shows several user interactions with this web application.
Fig. 28.25. Ticket reservation web-application sample execution.
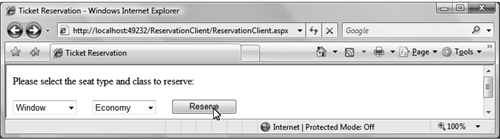
a) Selecting a seat

b) Seat is reserved successfully

c) Attempting to reserve another seat

d) No seats match the requested type and class
28.11 Equation Generator: Returning User-Defined Types
With the exception of the WelcomeRESTJSONService (Fig. 28.15), the web services we’ve demonstrated all received and returned primitive-type instances. It is also possible to process instances of complete user-defined types in a web service. These types can be passed to or returned from web-service methods.
This section presents an EquationGenerator web service that generates random arithmetic equations of type Equation. The client is a math-tutoring application that inputs information about the mathematical question that the user wishes to attempt (addition, subtraction or multiplication) and the skill level of the user (1 specifies equations using numbers from 1 to 10, 2 specifies equations involving numbers from 10 to 100, and 3 specifies equations containing numbers from 100 to 1000). The web service then generates an equation consisting of random numbers in the proper range. The client application receives the Equation and displays the sample question to the user.
Defining Class Equation
We define class Equation in Fig. 28.26. Lines 33–53 define a constructor that takes three arguments—two ints representing the left and right operands and a string that represents the arithmetic operation to perform. The constructor sets the Equation’s properties, then calculates the appropriate result. The parameterless constructor (lines 26–30) calls the three-argument constructor (lines 33–53) and passes default values.
Fig. 28.26. Class Equation that contains information about an equation.


Class Equation defines properties LeftHandSide (lines 64–74), RightHandSide (lines 78–88), Left (line 10), Right (line 14), Result (line 19) and Operation (line 23). The web service client does not need to modify the values of properties LeftHandSide and RightHandSide. However, a property can be serialized only if it has both a get and a set accessor—even if the set accessor has an empty body. Each property is preceded by the DataMember attribute to indicate that it should be serialized. LeftHandSide (lines 64–74) returns a string representing everything to the left of the equals (=) sign in the equation, and RightHandSide (lines 78–88) returns a string representing everything to the right of the equals (=) sign. Left (line 10) returns the int to the left of the operator (known as the left operand), and Right (lines 14) returns the int to the right of the operator (known as the right operand). Result (line 19) returns the solution to the equation, and Operation (line 23) returns the operator in the equation. The client in this case study does not use the RightHandSide property, but we included it in case future clients choose to use it. Method ToString (lines 56–60) returns a string representation of the equation.
28.11.1 Creating the REST-Based XML EquationGenerator Web Service
Figures 28.27 and 28.28 present the interface and class for the EquationGenerator-Service web service, which creates random, customized Equations. This web service contains only method GenerateEquation (lines 9–26 of Fig. 28.28), which takes two parameters—a string representing the mathematical operation ("add", "subtract" or "multiply") and a string representing the difficulty level. When line 25 of Fig. 28.28 returns the Equation, it is serialized as XML by default and sent to the client. We’ll do this with JSON as well in Section 28.11.3. Recall from Section 28.7.2 that you must modify the Web.config file to enable REST support as well.
Fig. 28.27. WCF REST service interface to create random equations based on a specified operation and difficulty level.

Fig. 28.28. WCF REST service to create random equations based on a specified operation and difficulty level.

28.11.2 Consuming the REST-Based XML EquationGenerator Web Service
The MathTutor application (Fig. 28.29) calls the EquationGenerator web service’s GenerateEquation method to create an Equation object. The tutor then displays the left-hand side of the Equation and waits for user input.
Fig. 28.29. Math tutor using EquationGeneratorServiceXML to create equations.
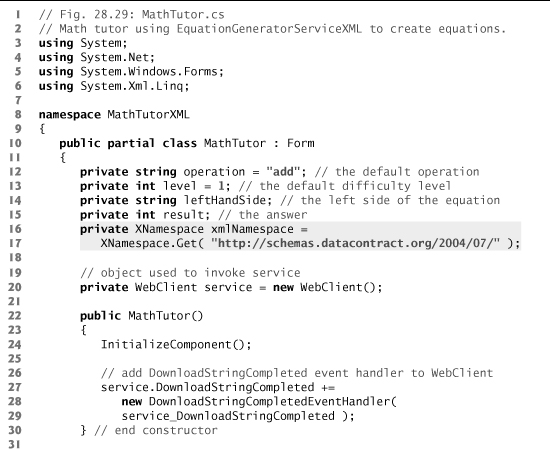


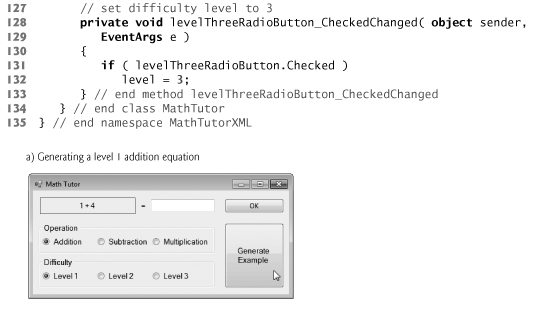

The default setting for the difficulty level is 1, but the user can change this by choosing a level from the RadioButtons in the GroupBox labeled Difficulty. Clicking any of the levels invokes the corresponding RadioButton’s CheckedChanged event handler (lines 112–133), which sets integer level to the level selected by the user. Although the default setting for the question type is Addition, the user also can change this by selecting one of the RadioButtons in the GroupBox labeled Operation. Doing so invokes the corresponding operation’s event handlers in lines 88–109, which assigns to string operation the string corresponding to the user’s selection.
Line 20 defines the WebClient that is used to invoke the web service. Event handler generateButton_Click (lines 33–39) invokes EquationGeneratorService method GenerateEquation (line 36–38) asynchronously using the web service’s UriTemplate specified at line 12 in Fig. 28.27. When the response arrives, the DownloadStringCompleted event handler (lines 42–62) parses the XML response (line 49), uses XDocument’s Element method to obtain the left side of the equation (lines 50–52) and stores the result (lines 53–55). We define the XML response’s namespace in lines 16–17 as an XNamespace to parse the XML response. Then, the handler displays the left-hand side of the equation in questionLabel (line 58) and enables okButton so that the user can enter an answer. When the user clicks OK, okButton_Click (lines 65–85) checks whether the user provided the correct answer.
28.11.3 Creating the REST-Based JSON WCF EquationGenerator Web Service
You can set the web service to return JSON data instead of XML. Figure 28.30 is a modified IEquationGeneratorService interface for a service that returns an Equation in JSON format. The ResponseFormat property (line 12) is added to the WebGet attribute and set to WebMessageFormat.Json. We don’t show the implementation of this interface here, because it is identical to that of Fig. 28.28. This shows how flexible WCF can be.
Fig. 28.30. WCF REST service interface to create random equations based on a specified operation and difficulty level.

28.11.4 Consuming the REST-Based JSON WCF EquationGenerator Web Service
A modified MathTutor application (Fig. 28.31) accesses the URI of the EquationGenerator web service to get the JSON object (lines 35–37). We define a JSON representation of an Equation object for the serializer in Fig. 28.32. The JSON object is deserialized using the System.Runtime.Serialization.Json namespace’s DataContractJsonSerializer (lines 48–49) and converted into an Equation object. We use the LeftHandSide field of the deserialized object (line 55) to display the left side of the equation and the Result field (line 67) to obtain the answer.
Fig. 28.31. Math tutor using EquationGeneratorServiceJSON


Fig. 28.32. Equation class representing a JSON object.

28.12 Wrap-Up
This chapter introduced WCF web services—a set of technologies for building distributed systems in which system components communicate with one another over networks. You learned that a web service is a class that allows client software to call the web service’s methods remotely via common data formats and protocols, such as XML, JSON, HTTP, SOAP and REST. We also discussed several benefits of distributed computing with web services.
We discussed how Visual C# 2010 Express, Visual Web Developer 2010 Express, and WCF facilitate publishing and consuming web services. You learned how to define web services and methods using both SOAP protocol and REST architecture, and how to return data in both XML and JSON formats. You consumed SOAP-based web services using proxy classes to call the web service’s methods. You also consumed REST-based web services using class WebClient. We built both Windows applications and ASP.NET web applications as web-service clients. After explaining the mechanics of web services through our Welcome examples, we demonstrated more sophisticated web services that use session tracking, database access and user-defined types.
28.13 Deitel Web Services Resource Centers
To learn more about web services, check out our web services Resource Centers at:
www.deitel.com/WebServices/
www.deitel.com/RESTWebServices/
You’ll find articles, samples chapters and tutorials that discuss XML, web-services specifications, SOAP, WSDL, UDDI, .NET web services, consuming XML web services and web-services architecture. You’ll learn how to build your own Yahoo! maps mashups and applications that work with the Yahoo! Music Engine. You’ll find information about Amazon’s web services including the Amazon E-Commerce Service (ECS), Amazon historical pricing, Amazon Mechanical Turk, Amazon S3 (Simple Storage Service) and the Scalable Simple Queue Service (SQS). You’ll learn how to use web services from several other companies including eBay, Google and Microsoft. You’ll find REST web services best practices and guidelines. You’ll also learn how to use REST web services with other technologies including SOAP, Rails, Windows Communication Foundation (WCF) and more. You can view the complete list of Deitel Resource Centers at www.deitel.com/ResourceCenters.html.