
19. Web App Development with ASP.NET
Objectives
In this chapter you’ll learn:
• Web application development using ASP.NET.
• To handle the events from a Web Form’s controls.
• To use validation controls to ensure that data is in the correct format before it’s sent from a client to the server.
• To maintain user-specific information.
• To create a data-driven web application using ASP.NET and LINQ to SQL.
... the challenges are for the designers of these applications: to forget what we think we know about the limitations of the Web, and begin to imagine a wider, richer range of possibilities. It’s going to be fun.
—Jesse James Garrett
If any man will draw up his case, and put his name at the foot of the first page, I will give him an immediate reply. Where he compels me to turn over the sheet, he must wait my leisure.
—Lord Sandwich
Outline
19.1 Introduction
19.2 Web Basics
19.3 Multitier Application Architecture
19.4 Your First Web Application
19.4.1 Building the WebTime Application
19.4.2 Examining WebTime.aspx’s Code-Behind File
19.5 Standard Web Controls: Designing a Form
19.6 Validation Controls
19.7 Session Tracking
19.7.1 Cookies
19.7.2 Session Tracking with HttpSessionState
19.7.3 Options.aspx: Selecting a Programming Language
19.7.4 Recommendations.aspx: Displaying Recommendations Based on Session Values
19.8 Case Study: Database-Driven ASP.NET Guestbook
19.8.1 Building a Web Form that Displays Data from a Database
19.8.2 Modifying the Code-Behind File for the Guestbook Application
19.9 Case Study: ASP.NET AJAX
19.10 Case Study: Password-Protected Books Database Application
19.11 Wrap-Up
19.1 Introduction
In this chapter, we introduce web-application development with Microsoft’s ASP.NET technology. Web-based applications create web content for web-browser clients.
We present several examples that demonstrate web-application development using Web Forms, web controls (also called ASP.NET server controls) and Visual C# programming. Web Form files have the file-name extension .aspx and contain the web page’s GUI. You customize Web Forms by adding web controls including labels, textboxes, images, buttons and other GUI components. The Web Form file represents the web page that is sent to the client browser. We often refer to Web Form files as ASPX files.
An ASPX file created in Visual Studio has a corresponding class written in a .NET language—we use Visual C# in this book. This class contains event handlers, initialization code, utility methods and other supporting code. The file that contains this class is called the code-behind file and provides the ASPX file’s programmatic implementation.
To develop the code and GUIs in this chapter, we used Microsoft’s Visual Web Developer 2010 Express—a free IDE designed for developing ASP.NET web applications. The full version of Visual Studio 2010 includes the functionality of Visual Web Developer, so the instructions we present for Visual Web Developer also apply to Visual Studio 2010. The database example (Section 19.8) also requires SQL Server 2008 Express. See the Before You Begin section of the book for additional information on this software.
In Chapter 27, we present several additional web-application development topics, including:
• master pages to maintain a uniform look-and-feel across the Web Forms in a web application
• creating password-protected websites with registration and login capabilities
• using the Web Site Administration Tool to specify which parts of a website are password protected
• using ASP.NET AJAX to quickly and easily improve the user experience for your web applications, giving them responsiveness comparable to that of desktop applications.
19.2 Web Basics
In this section, we discuss what occurs when a user requests a web page in a browser. In its simplest form, a web page is nothing more than an HTML (HyperText Markup Language) document (with the extension .html or .htm) that describes to a web browser the document’s content and how to format it.
HTML documents normally contain hyperlinks that link to different pages or to other parts of the same page. When the user clicks a hyperlink, a web server locates the requested web page and sends it to the user’s web browser. Similarly, the user can type the address of a web page into the browser’s address field and press Enter to view the specified page.
Web development tools like Visual Web Developer typically use a “stricter” version of HTML called XHTML (Extensible HyperText Markup Language), which is based on XML (Chapter 26). ASP.NET produces web pages as XHTML documents.
URIs and URLs
URIs (Uniform Resource Identifiers) identify resources on the Internet. URIs that start with http:// are called URLs (Uniform Resource Locators). Common URLs refer to files, directories or server-side code that performs tasks such as database lookups, Internet searches and business application processing. If you know the URL of a publicly available resource anywhere on the web, you can enter that URL into a web browser’s address field and the browser can access that resource.
Parts of a URL
A URL contains information that directs a browser to the resource that the user wishes to access. Web servers make such resources available to web clients. Popular web servers include Microsoft’s Internet Information Services (IIS) and Apache’s HTTP Server.
Let’s examine the components of the URL
http://www.deitel.com/books/downloads.html
The http:// indicates that the HyperText Transfer Protocol (HTTP) should be used to obtain the resource. HTTP is the web protocol that enables clients and servers to communicate. Next in the URL is the server’s fully qualified hostname (www.deitel.com)—the name of the web server computer on which the resource resides. This computer is referred to as the host, because it houses and maintains resources. The hostname www.deitel.com is translated into an IP (Internet Protocol) address—a numerical value that uniquely identifies the server on the Internet. A Domain Name System (DNS) server maintains a database of hostnames and their corresponding IP addresses, and performs the translations automatically.
The remainder of the URL (/books/downloads.html) specifies the resource’s location (/books) and name (downloads.html) on the web server. The location could represent an actual directory on the web server’s file system. For security reasons, however, the location is typically a virtual directory. The web server translates the virtual directory into a real location on the server, thus hiding the resource’s true location.
Making a Request and Receiving a Response
When given a URL, a web browser uses HTTP to retrieve the web page found at that address. Figure 19.1 shows a web browser sending a request to a web server. Figure 19.2 shows the web server responding to that request.
Fig. 19.1. Client requesting a resource from a web server.

Fig. 19.2. Client receiving a response from the web server.

19.3 Multitier Application Architecture
Web-based applications are multitier applications (sometimes referred to as n-tier applications). Multitier applications divide functionality into separate tiers (that is, logical groupings of functionality). Although tiers can be located on the same computer, the tiers of web-based applications commonly reside on separate computers for security and scalability. Figure 19.3 presents the basic architecture of a three-tier web-based application.
Fig. 19.3. Three-tier architecture.

Information Tier
The information tier (also called the bottom tier) maintains the application’s data. This tier typically stores data in a relational database management system. For example, a retail store might have a database for storing product information, such as descriptions, prices and quantities in stock. The same database also might contain customer information, such as user names, billing addresses and credit card numbers. This tier can contain multiple databases, which together comprise the data needed for an application.
Business Logic
The middle tier implements business logic, controller logic and presentation logic to control interactions between the application’s clients and its data. The middle tier acts as an intermediary between data in the information tier and the application’s clients. The middle-tier controller logic processes client requests (such as requests to view a product catalog) and retrieves data from the database. The middle-tier presentation logic then processes data from the information tier and presents the content to the client. Web applications typically present data to clients as web pages.
Business logic in the middle tier enforces business rules and ensures that data is reliable before the server application updates the database or presents the data to users. Business rules dictate how clients can and cannot access application data, and how applications process data. For example, a business rule in the middle tier of a retail store’s web-based application might ensure that all product quantities remain positive. A client request to set a negative quantity in the bottom tier’s product information database would be rejected by the middle tier’s business logic.
Client Tier
The client tier, or top tier, is the application’s user interface, which gathers input and displays output. Users interact directly with the application through the user interface (typically viewed in a web browser), keyboard and mouse. In response to user actions (for example, clicking a hyperlink), the client tier interacts with the middle tier to make requests and to retrieve data from the information tier. The client tier then displays to the user the data retrieved from the middle tier. The client tier never directly interacts with the information tier.
19.4 Your First Web Application
Our first example displays the web server’s time of day in a browser window (Fig. 19.4). When this application executes—that is, a web browser requests the application’s web page—the web server executes the application’s code, which gets the current time and displays it in a Label. The web server then returns the result to the web browser that made the request, and the web browser renders the web page containing the time. We executed this application in both the Internet Explorer and Firefox web browsers to show you that the web page renders identically in each.
Fig. 19.4. WebTime web application running in both Internet Explorer and Firefox.

Testing the Application in Your Default Web Browser
To test this application in your default web browser, perform the following steps:
- Open Visual Web Developer.
- Select Open Web Site... from the File menu.
- In the Open Web Site dialog (Fig. 19.5), ensure that File System is selected, then navigate to this chapter’s examples, select the
WebTimefolder and click the OpenButton.Fig. 19.5. Open Web Site dialog.

- Select
WebTime.aspxin the Solution Explorer, then type Ctrl + F5 to execute the web application.
Testing the Application in a Selected Web Browser
If you wish to execute the application in another web browser, you can copy the web page’s address from your default browser’s address field and paste it into another browser’s address field, or you can perform the following steps:
- In the Solution Explorer, right click
WebTime.aspxand select Browse With... to display the Browse With dialog (Fig. 19.6).Fig. 19.6. Selecting another web browser to execute the web application.

- From the Browsers list, select the browser in which you’d like to test the web application and click the Browse
Button.
If the browser you wish to use is not listed, you can use the Browse With dialog to add items to or remove items from the list of web browsers.
19.4.1 Building the WebTime Application
Now that you’ve tested the application, let’s create it in Visual Web Developer.
Step 1: Creating the Web Site Project
Select File > New Web Site... to display the New Web Site dialog (Fig. 19.7). In the left column of this dialog, ensure that Visual C# is selected, then select ASP.NET Empty Web Site in the middle column. At the bottom of the dialog you can specify the location and name of the web application.
Fig. 19.7. Creating an ASP.NET Web Site in Visual Web Developer.

The Web location: ComboBox provides the following options:
• File System:Creates a new website for testing on your local computer. Such web-sites execute in Visual Web Developer’s built-in ASP.NET Development Server and can be accessed only by web browsers running on the same computer. You can later “publish” your website to a production web server for access via a local network or the Internet. Each example in this chapter uses the File System option, so select it now.
• HTTP:Creates a new website on an IIS web server and uses HTTP to allow you to put your website’s files on the server. IIS is Microsoft’s software that is used to run production websites. If you own a website and have your own web server, you might use this to build a new website directly on that server computer. You must be an Administrator on the computer running IIS to use this option.
• FTP:Uses File Transfer Protocol (FTP) to allow you to put your website’s files on the server. The server administrator must first create the website on the server for you. FTP is commonly used by so-called “hosting providers” to allow website owners to share a server computer that runs many websites.
Change the name of the web application from WebSite1 to WebTime, then click OK to create the website.
Step 2: Adding a Web Form to the Website and Examining the Solution Explorer
A Web Form represents one page in a web application—we’ll often use the terms “page” and “Web Form” interchangeably. A Web Form contains a web application’s GUI. To create the WebTime.aspx Web Form:
- Right click the project name in the Solution Explorer and select Add New Item... to display the Add New Item dialog (Fig. 19.8).
Fig. 19.8. Adding a new Web Form to the website with the Add New Item dialog.

- In the left column, ensure that Visual C# is selected, then select Web Form in the middle column.
- In the Name:
TextBox, change the file name toWebTime.aspx, then click the AddButton.
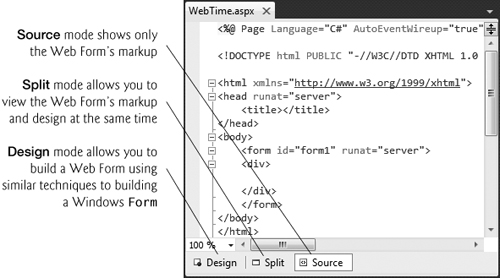
After you add the Web Form, the IDE opens it in Source view by default (Fig. 19.9). This view displays the markup for the Web Form. As you become more familiar with ASP.NET and building web sites in general, you might use Source view to perform high precision adjustments to your design or to program in the JavaScript language that executes in web browsers. For the purposes of this chapter, we’ll keep things simple by working exclusively in Design mode. To switch to Design mode, you can click the Design Button at the bottom of the code editor window.
Fig. 19.9. Web Form in Source view.
The Solution Explorer
The Solution Explorer (Fig. 19.10) shows the contents of the website. We expanded the node for WebTime.aspx to show you its code-behind file WebTime.aspx.cs. Visual Web Developer’s Solution Explorer contains several buttons that differ from Visual C# Express. The Copy Web Site button opens a dialog that allows you to move the files in this project to another location, such as a remote web server. This is useful if you’re developing the application on your local computer but want to make it available to the public from a different location. The ASP.NET Configuration button takes you to a web page called the Web Site Administration Tool, where you can manipulate various settings and security options for your application. The Nest Related Files button organizes each Web Form and its code-behind file.
Fig. 19.10. Solution Explorer window for an Empty Web Site project after adding the Web Form WebTime.aspx.

If the ASPX file is not open in the IDE, you can open it in Design mode three ways:
• double click it in the Solution Explorer then select the Design tab
• select it in the Solution Explorer and click the View Designer (![]() )
) Button
• right click it in the Solution Explorer and select View Designer
To open the code-behind file in the code editor, you can
• double click it in the Solution Explorer
• select the ASPX file in the Solution Explorer, then click the View Code (![]() )
) Button
• right click the code-behind file in the Solution Explorer and select Open
The Toolbox
Figure 19.11 shows the Toolbox displayed in the IDE when the project loads. Part (a) displays the beginning of the Standard list of web controls, and part (b) displays the remaining web controls and the list of other control groups. We discuss specific controls listed in Fig. 19.11 as they’re used throughout the chapter. Many of the controls have similar or identical names to Windows Forms controls presented earlier in the book.
Fig. 19.11. Toolbox in Visual Web Developer.

a)

b)
The Web Forms Designer
Figure 19.12 shows the initial Web Form in Design mode. You can drag and drop controls from the Toolbox onto the Web Form. You can also type at the current cursor location to add so-called static text to the web page. In response to such actions, the IDE generates the appropriate markup in the ASPX file.
Fig. 19.12. Design mode of the Web Forms Designer.

Step 3: Changing the Title of the Page
Before designing the Web Form’s content, you’ll change its title to A Simple Web Form Example. This title will be displayed in the web browser’s title bar (see Fig. 19.4). It’s typically also used by search engines like Google and Bing when they index real websites for searching. Every page should have a title. To change the title:
- Ensure that the ASPX file is open in Design view.
- View the Web Form’s properties by selecting
DOCUMENT, which represents the Web Form, from the drop-down list in the Properties window. - Modify the
Titleproperty in the Properties window by setting it toA Simple Web Form Example.
Designing a Page
Designing a Web Form is similar to designing a Windows Form. To add controls to the page, drag-and-drop them from the Toolbox onto the Web Form in Design view. The Web Form and each control are objects that have properties, methods and events. You can set these properties visually using the Properties window or programmatically in the code-behind file. You can also type text directly on a Web Form at the cursor location.
Controls and other elements are placed sequentially on a Web Form one after another in the order in which you drag-and-drop them onto the Web Form. The cursor indicates the insertion point in the page. If you want to position a control between existing text or controls, you can drop the control at a specific position between existing page elements. You can also rearrange controls with drag-and-drop actions in Design view. The positions of controls and other elements are relative to the Web Form’s upper-left corner. This type of layout is known as relative positioning and it allows the browser to move elements and resize them based on the size of the browser window. Relative positioning is the default, and we’ll use it throughout this chapter.
For precise control over the location and size of elements, you can use absolute positioning in which controls are located exactly where you drop them on the Web Form. If you wish to use absolute positioning:
- Select Tools > Options...., to display the Options dialog.
- If it isn’t checked already, check the Show all settings checkbox.
- Next, expand the HTML Designer > CSS Styling node and ensure that the check-box labeled Change positioning to absolute for controls added using Toolbox, paste or drag and drop is selected.
Step 4: Adding Text and a Label
You’ll now add some text and a Label to the Web Form. Perform the following steps to add the text:
- Ensure that the Web Form is open in Design mode.
- Type the following text at the current cursor location:
Current time on the Web server:
- Select the text you just typed, then select Heading 2 from the Block Format
ComboBox(Fig. 19.13) to format this text as a heading that will appear in a larger bold font. In more complex pages, headings help you specify the relative importance of parts of that content—like sections in a book chapter.Fig. 19.13. Changing the text to Heading 2 heading.

- Click to the right of the text you just typed and press the Enter key to start a new paragraph in the page. The Web Form should now appear as in Fig. 19.14.
Fig. 19.14.
WebTime.aspxafter inserting text and a new paragraph.
- Next, drag a
Labelcontrol from the Toolbox into the new paragraph or double click theLabelcontrol in the Toolbox to insert theLabelat the current cursor position. - Using the Properties window, set the
Label’s(ID)property totimeLabel. This specifies the variable name that will be used to programmatically change theLabel’sText. - Because, the
Label’sTextwill be set programmatically, delete the current value of theLabel’sTextproperty. When aLabeldoes not contain text, its name is displayed in square brackets in Design view (Fig. 19.15) as a placeholder for design and layout purposes. This text is not displayed at execution time.Fig. 19.15.
WebTime.aspxafter adding aLabel.
Step 5: Formatting the Label
Formatting in a web page is performed with CSS (Cascading Style Sheets). The details of CSS are beyond the scope of this book. However, it’s easy to use CSS to format text and elements in a Web Form via the tools built into Visual Web Developer. In this example, we’d like to change the Label’s background color to black, its foreground color yellow and make its text size larger. To format the Label, perform the following steps:
- Click the
Labelin Design view to ensure that it’s selected. - Select View > Other Windows > CSS Properties to display the CSS Properties window at the left side of the IDE (Fig. 19.16).
Fig. 19.16. CSS Properties window.

- Right click in the Applied Rules box and select New Style... to display the New Style dialog (Fig. 19.17).
Fig. 19.17. New Style dialog.

- Type the new style’s name—
.timeStyle—in the Selector:ComboBox. Styles that apply to specific elements must be named with a dot (.) preceding the name. Such a style is called a CSS class. - Each item you can set in the New Style dialog is known as a CSS attribute. To change
timeLabel’s foreground color, select the Font category from the Category list, then select the yellow color swatch for the color attribute. - Next, change the font-size attribute to
xx-large. - To change
timeLabel’s background color, select the Background category, then select the black color swatch for the background-color attribute.
The New Style dialog should now appear as shown in (Fig. 19.18). Click the OK Button to apply the style to the timeLabel so that it appears as shown in Fig. 19.19. Also, notice that the Label’s CssClass property is now set to timeStyle in the Properties window.
Fig. 19.18. New Style dialog after changing the Label’s style.

Fig. 19.19. Design view after changing the Label’s style.

Step 6: Adding Page Logic
Now that you’ve designed the GUI, you’ll write code in the code-behind file to obtain the server’s time and display it on the Label. Open WebTime.aspx.cs by double clicking it in the Solution Explorer. In this example, you’ll add an event handler to the code-behind file to handle the Web Form’s Init event, which occurs when the page is requested by a web browser. The event handler for this event—named Page_Init—initialize the page. The only initialization required for this example is to set the timeLabel’s Text property to the time on the web server computer. The code-behind file initally contains a Page_Load event handler. To create the Page_Init event handler, simply rename Page_Load as Page_Init. Then complete the event handler by inserting the following code in its body:
// display the server's current time in timeLabel
timeLabel.Text = DateTime.Now.ToString("hh:mm:ss");
Step 7: Setting the Start Page and Running the Program
To ensure that WebTime.aspx loads when you execute this application, right click it in the Solution Explorer and select Set As Start Page. You can now run the program in one of several ways. At the beginning of Fig. 19.4, you learned how to view the Web Form by typing Ctrl + F5. You can also right click an ASPX file in the Solution Explorer and select View in Browser. Both of these techniques execute the ASP.NET Development Server, open your default web browser and load the page into the browser, thus running the web application. The development server stops when you exit Visual Web Developer.
If problems occur when running your application, you can run it in debug mode by selecting Debug > Start Debugging, by clicking the Start Debugging Button (![]() ) or by typing F5 to view the web page in a web browser with debugging enabled. You cannot debug a web application unless debugging is explicitly enabled in the application’s
) or by typing F5 to view the web page in a web browser with debugging enabled. You cannot debug a web application unless debugging is explicitly enabled in the application’s Web.config file—a file that is generated when you create an ASP.NET web application. This file stores the application’s configuration settings. You’ll rarely need to manually modify Web.config. The first time you select Debug > Start Debugging in a project, a dialog appears and asks whether you want the IDE to modify the Web.config file to enable debugging. After you click OK, the IDE executes the application. You can stop debugging by selecting Debug > Stop Debugging.
Regardless of how you execute the web application, the IDE will compile the project before it executes. In fact, ASP.NET compiles your web page whenever it changes between HTTP requests. For example, suppose you browse the page, then modify the ASPX file or add code to the code-behind file. When you reload the page, ASP.NET recompiles the page on the server before returning the response to the browser. This important behavior ensures that clients always see the latest version of the page. You can manually compile an entire website by selecting Build Web Site from the Debug menu in Visual Web Developer.
19.4.2 Examining WebTime.aspx’s Code-Behind File
Figure 19.20 presents the code-behind file WebTime.aspx.cs. Line 5 begins the declaration of class WebTime. In Visual C#, a class declaration can span multiple source-code files—the separate portions of the class declaration in each file are known as partial classes. The partial modifier indicates that the code-behind file is part of a larger class. Like Windows Forms applications, the rest of the class’s code is generated for you based on your visual interactions to create the application’s GUI in Design mode. That code is stored in other source code files as partial classes with the same name. The compiler assembles all the partial classes that have the same into a single class declaration.
Fig. 19.20. Code-behind file for a page that displays the web server’s time.

Line 5 indicates that WebTime inherits from class Page in namespace System.Web.UI. This namespace contains classes and controls for building web-based applications. Class Page represents the default capabilities of each page in a web application—all pages inherit directly or indirectly from this class.
Lines 8–12 define the Page_Init event handler, which initializes the page in response to the page’s Init event. The only initialization required for this page is to set the time-Label’s Text property to the time on the web server computer. The statement in line 11 retrieves the current time (DateTime.Now) and formats it as hh:mm:ss. For example, 9 AM is formatted as 09:00:00, and 2:30 PM is formatted as 02:30:00. As you’ll see, variable timeLabel represents an ASP.NET Label control. The ASP.NET controls are defined in namespace System.Web.UI.WebControls.
19.5 Standard Web Controls: Designing a Form
This section introduces some of the web controls located in the Standard section of the Toolbox (Fig. 19.11). Figure 19.21 summarizes the controls used in the next example.
Fig. 19.21. Commonly used web controls.

A Form Gathering User Input
Figure 19.22 depicts a form for gathering user input. This example does not perform any tasks—that is, no action occurs when the user clicks Register. As an exercise, you could provide the functionality. Here we focus on the steps for adding these controls to a Web Form and for setting their properties. Subsequent examples demonstrate how to handle the events of many of these controls. To execute this application:
Fig. 19.22. Web Form that demonstrates web controls.

- Select Open Web Site... from the File menu.
- In the Open Web Site dialog, ensure that File System is selected, then navigate to this chapter’s examples, select the
WebControlsfolder and click the OpenButton. - Select
WebControls.aspxin the Solution Explorer, then type Ctrl + F5 to execute the web application in your default web browser.
Creating the Web Site
To begin, follow the steps in Section 19.4.1 to create an Empty Web Site named WebControls, then add a Web Form named WebControls.aspx to the project. Set the document’s Title property to "Web Controls Demonstration". To ensure that WebControls.aspx loads when you execute this application, right click it in the Solution Explorer and select Set As Start Page.
Adding the Images to the Project
The images used in this example are located in the images folder with this chapter’s examples. Before you can display images in the Web Form, they must be added to your project. To add the images folder to your project:
- Open Windows Explorer.
- Locate and open this chapter’s examples folder (
ch22). - Drag the
imagesfolder from Windows Explorer into Visual Web Developer’s Solution Explorer window and drop the folder on the name of your project.
The IDE will automatically copy the folder and its contents into your project.
Adding Text and an Image to the Form
Next, you’ll begin creating the page. Perform the following steps:
- First create the page’s heading. At the current cursor position on the page, type the text
"Registration Form", then use the Block FormatComboBoxin the IDE’s toolbar to change the text to Heading 3 format. - Press Enter to start a new paragraph, then type the text
"Please fill in all fields and click the Register button". - Press Enter to start a new paragraph, then double click the
Imagecontrol in theToolbox. This control inserts an image into a web page, at the current cursor position. Set theImage’s(ID)property touserInformationImage. TheImageUrlproperty specifies the location of the image to display. In the Properties window, click the ellipsis for theImageUrlproperty to display the Select Image dialog. Select theimagesfolder under Project folders: to display the list of images. Then select the imageuser.png. - Click OK to display the image in Design view, then click to the right of the
Imageand press Enter to start a new paragraph.
Adding a Table to the Form
Form elements are often placed in tables for layout purposes—like the elements that represent the first name, last name, e-mail and phone information in Fig. 19.22. Next, you’ll create a table with two rows and two columns in Design mode.
- Select Table > Insert Table to display the Insert Table dialog (Fig. 19.23). This dialog allows you to configure the table’s options.
Fig. 19.23. Insert Table dialog.

- Under Size, ensure that the values of Rows and Columns are both
2—these are the default values. - Click OK to close the Insert Table dialog and create the table.
By default, the contents of a table cell are aligned vertically in the middle of the cell. We changed the vertical alignment of all cells in the table by setting the valign property to top in the Properties window. This causes the content in each table cell to align with the top of the cell. You can set the valign property for each table cell individually or by selecting all the cells in the table at once, then changing the valign property’s value.
After creating the table, controls and text can be added to particular cells to create a neatly organized layout. Next, add Image and TextBox controls to each the four table cells as follows:
- Click the table cell in the first row and first column of the table, then double click the
Imagecontrol in the Toolbox. Set its(ID)property tofirstNameImageand set itsImageUrlproperty to the imagefname.png. - Next, double click the
TextBoxcontrol in the Toolbox. Set its(ID)property tofirstNameTextBox. As in Windows Forms, aTextBoxcontrol allows you to obtain text from the user and display text to the user - Repeat this process in the first row and second column, but set the
Image’s(ID)property tolastNameImageand itsImageUrlproperty to the imagelname.png, and set theTextBox’s(ID)property tolastNameTextBox. - Repeat Steps 1 and 2 in the second row and first column, but set the
Image’s(ID)property toemailImageand itsImageUrlproperty to the imageemail.png, and set theTextBox’s(ID)property toemailTextBox. - Repeat Steps 1 and 2 in the second row and second column, but set the
Image’s(ID)property tophoneImageand itsImageUrlproperty to the imagephone.png, and set theTextBox’s(ID)property tophoneTextBox.
Creating the Publications Section of the Page
This section contains an Image, some text, a DropDownList control and a HyperLink control. Perform the following steps to create this section:
- Click below the table, then use the techniques you’ve already learned in this section to add an
ImagenamedpublicationsImagethat displays thepublications.pngimage. - Click to the right of the
Image, then press Enter and type the text"Which book would you like information about?"in the new paragraph. - Hold the Shift key and press Enter to create a new line in the current paragraph, then double click the
DropDownListcontrol in the Toolbox. Set its(ID)property tobooksDropDownList. This control is similar to the WindowsFormsComboBoxcontrol, but doesn’t allow users to type text. When a user clicks the drop-down list, it expands and displays a list from which the user can make a selection. - You can add items to the
DropDownListusing the ListItem Collection Editor, which you can access by clicking the ellipsis next to theDropDownList’sItemsproperty in the Properties window, or by using the DropDownList Tasks smarttag menu. To open this menu, click the small arrowhead that appears in the upper-right corner of the control in Design mode (Fig. 19.24). Visual Web Developer displays smart-tag menus for many ASP.NET controls to facilitate common tasks. Clicking Edit Items... in the DropDownList Tasks menu opens the ListItem Collection Editor, which allows you to addListItemelements to theDropDown-List. Add items for"Visual Basic 2010 How to Program","Visual C# 2010 How to Program","Java How to Program"and"C++ How to Program"by clicking the AddButtonfour times. For each item, select it, then set itsTextproperty to one of the four book titles.Fig. 19.24. DropDownList Tasks smart-tag menu.

- Click to the right of the
DropDownListand press Enter to start a new paragraph, then double click theHyperLinkcontrol in the Toolbox to add a hyperlink to the web page. Set its(ID)property tobooksHyperLinkand itsTextproperty to"Click here to view more information about our books". Set theNavigateUrlproperty tohttp://www.deitel.com. This specifies the resource or web page that will be requested when the user clicks theHyperLink. Setting theTargetproperty to_blankspecifies that the requested web page should open in a new browser window. By default,HyperLinkcontrols cause pages to open in the same browser window.
Completing the Page
Next you’ll create the Operating System section of the page and the Register Button. This section contains a RadioButtonList control, which provides a series of radio buttons from which the user can select only one. The RadioButtonList Tasks smart-tag menu provides an Edit Items... link to open the ListItem Collection Editor so that you can create the items in the list. Perform the following steps:
- Click to the right of the
HyperLinkcontrol and press Enter to create a new paragraph, then add anImagenamedosImagethat displays theos.pngimage. - Click to the right of the
Imageand press Enter to create a new paragraph, then add aRadioButtonList. Set its(ID)property toosRadioButtonList. Use the ListItem Collection Editor to add the items shown in Fig. 19.22. - Finally, click to the right of the
RadioButtonListand press Enter to create a new paragraph, then add aButton. AButtonweb control represents a button that triggers an action when clicked. Set its(ID)property toregisterButtonand itsTextproperty toRegister. As stated earlier, clicking the Register button in this example does not do anything.
You can now execute the application (Ctrl + F5) to see the Web Form in your browser.
19.6 Validation Controls
This section introduces a different type of web control, called a validation control or validator, which determines whether the data in another web control is in the proper format. For example, validators can determine whether a user has provided information in a required field or whether a zip-code field contains exactly five digits. Validators provide a mechanism for validating user input on the client. When the page is sent to the client, the validator is converted into JavaScript that performs the validation in the client web browser. JavaScript is a scripting language that enhances the functionality of web pages and is typically executed on the client. Unfortunately, some client browsers might not support scripting or the user might disable it. For this reason, you should always perform validation on the server. ASP.NET validation controls can function on the client, on the server or both.
Validating Input in a Web Form
The Web Form in Fig. 19.25 prompts the user to enter a name, e-mail address and phone number. A website could use a form like this to collect contact information from visitors. After the user enters any data, but before the data is sent to the web server, validators ensure that the user entered a value in each field and that the e-mail address and phone-number values are in an acceptable format. In this example, (555) 123-4567, 555-123-4567 and 123-4567 are all considered valid phone numbers. Once the data is submitted, the web server responds by displaying a message that repeats the submitted information. A real business application would typically store the submitted data in a database or in a file on the server. We simply send the data back to the client to demonstrate that the server received the data. To execute this application:
Fig. 19.25. Validators in a Web Form that retrieves user contact information.

a) Initial Web Form

b) Web Form after the user presses the Submit Button without having entered any data in the TextBoxes; each TextBox is followed by an error message that was displayed by a validation control

c) Web Form after the user enters a name, an invalid e-mail address and an invalid phone number in the TextBoxes, then presses the Submit Button; the validation controls display error messages in response to the invalid e-mail and phone number values

d) The Web Form after the user enters valid values for all three TextBoxes and presses the Submit Button
- Select Open Web Site... from the File menu.
In the Open Web Site dialog, ensure that File System is selected, then navigate to this cha pter’s examples, select the
Validationfolder and click the OpenButton.- Select
Validation.aspxin the Solution Explorer, then type Ctrl + F5 to execute the web application in your default web browser.
In the sample output:
• Fig. 19.25(a) shows the initial Web Form
• Fig. 19.25(b) shows the result of submitting the form before typing any data in the TextBoxes
• Fig. 19.25(c) shows the results after entering data in each TextBox, but specifying an invalid e-mail address and invalid phone number
• Fig. 19.25(d) shows the results after entering valid values for all three TextBoxes and submitting the form.
Creating the Web Site
To begin, follow the steps in Section 19.4.1 to create an Empty Web Site named Validation, then add a Web Form named Validation.aspx to the project. Set the document’s Title property to "Demonstrating Validation Controls". To ensure that Validation.aspx loads when you execute this application, right click it in the Solution Explorer and select Set As Start Page.
Creating the GUI
To create the page, perform the following steps:
- Type
"Please fill out all the fields in the following form:", then use the Block FormatComboBoxin the IDE’s toolbar to change the text to Heading 3 format and press Enter to create a new paragraph. - Insert a three row and two column table. You’ll add elements to the table momentarily.
- Click below the table and add a
Button. Set its(ID)property tosubmitButtonand itsTextproperty toSubmit. Press Enter to create a new paragraph. By default, aButtoncontrol in a Web Form sends the contents of the form back to the server for processing. - Add a
Label. Set its(ID)property tooutputLabeland clear itsTextproperty—you’ll set it programmatically when the user clicks thesubmitButton. Set theoutputLabel’sVisibleproperty tofalse, so theLabeldoes not appear in the client’s browser when the page loads for the first time. You’ll programmatically display thisLabelafter the user submits valid data.
Next you’ll add text and controls to the table you created in Step 2 above. Perform the following steps:
- In the left column, type the text
"Name:"in the first row,"E-mail:"in the second row and"Phone:"in the third row. - In the right column of the first row, add a
TextBoxand set its(ID)property tonameTextBox. - In the right column of the second row, add a
TextBoxand set its(ID)property toemailTextBox. Then type the text"e.g., [email protected]"to the right of theTextBox. - In the right column of the third row, add a
TextBoxand set its(ID)property tophoneTextBox. Then type the text"e.g., (555) 555-1234"to the right of theTextBox.
Using RequiredFieldValidator Controls
We use three RequiredFieldValidator controls (found in the Validation section of the Toolbox) to ensure that the name, e-mail address and phone number TextBoxes are not empty when the form is submitted. A RequiredFieldValidator makes an input control a required field. If such a field is empty, validation fails. Add a RequiredFieldValidator as follows:
- Click to the right of the
nameTextBoxin the table and press Enter to move to the next line. - Add a
RequiredFieldValidator, set its(ID)tonameRequiredFieldValidatorand set theForeColorproperty toRed. - Set the validator’s
ControlToValidateproperty tonameTextBoxto indicate that this validator verifies thenameTextBox’s contents. - Set the validator’s
ErrorMessageproperty to"Please enter your name". This is displayed on the Web Form only if the validation fails. - Set the validator’s
Displayproperty toDynamic, so the validator occupies space on the Web Form only when validation fails. When this occurs, space is allocated dynamically, causing the controls below the validator to shift downward to accommodate theErrorMessage, as seen in Fig. 19.25(a)–(c).
Repeat these steps to add two more RequiredFieldValidators in the second and third rows of the table. Set their (ID) properties to emailRequiredFieldValidator and phone-RequiredFieldValidator, respectively, and set their ErrorMessage properties to "Please enter your email address" and "Please enter your phone number", respectively.
Using RegularExpressionValidator Controls
This example also uses two RegularExpressionValidator controls to ensure that the e-mail address and phone number entered by the user are in a valid format. Visual Web Developer provides several predefined regular expressions that you can simply select to take advantage of this powerful validation control. Add a RegularExpressionValidator as follows:
- Click to the right of the
emailRequiredFieldValidatorin the second row of the table and add aRegularExpressionValidator, then set its(ID)toemailRegularExpressionValidatorand itsForeColorproperty toRed. - Set the
ControlToValidateproperty toemailTextBoxto indicate that this validator verifies theemailTextBox’s contents. - Set the validator’s
ErrorMessageproperty to"Please enter an e-mail address in a valid format". - Set the validator’s
Displayproperty toDynamic, so the validator occupies space on the Web Form only when validation fails.
Repeat the preceding steps to add another RegularExpressionValidator in the third row of the table. Set its (ID) property to phoneRegularExpressionValidator and its ErrorMessage property to "Please enter a phone number in a valid format", respectively.
A RegularExpressionValidator’s ValidationExpression property specifies the regular expression that validates the ControlToValidate’s contents. Clicking the ellipsis next to property ValidationExpression in the Properties window displays the Regular Expression Editor dialog, which contains a list of Standard expressions for phone numbers, zip codes and other formatted information. For the emailRegularExpressionValidator, we selected the standard expression Internet e-mail address. If the user enters text in the emailTextBox that does not have the correct format and either clicks in a different text box or attempts to submit the form, the ErrorMessage text is displayed in red.
For the phoneRegularExpressionValidator, we selected U.S. phone number to ensure that a phone number contains an optional three-digit area code either in parentheses and followed by an optional space or without parentheses and followed by a required hyphen. After an optional area code, a phone number must contain three digits, a hyphen and another four digits. For example, (555) 123-4567, 555-123-4567 and 123-4567 are all valid phone numbers.
Submitting the Web Form’s Contents to the Server
If all five validators are successful (that is, each TextBox is filled in, and the e-mail address and phone number provided are valid), clicking the Submit button sends the form’s data to the server. As shown in Fig. 19.25(d), the server then responds by displaying the submitted data in the outputLabel.
Examining the Code-Behind File for a Web Form That Receives User Input
Figure 19.26 shows the code-behind file for this application. Notice that this code-behind file does not contain any implementation related to the validators. We say more about this soon. In this example, we respond to the page’s Load event to process the data submitted by the user. Like the Init event, the Load event occurs each time the page loads into a web browser—the difference is that on a postback, you cannot access the posted data in the controls. The event handler for this event is Page_Load (lines 8–33). The event handler for the Load event is created for you when you add a new Web Form. To complete the event handler, insert the code from Fig. 19.26.
Fig. 19.26. Code-behind file for the form demonstrating validation controls.

Differentiating Between the First Request to a Page and a Postback
Web programmers using ASP.NET often design their web pages so that the current page reloads when the user submits the form; this enables the program to receive input, process it as necessary and display the results in the same page when it’s loaded the second time. These pages usually contain a form that, when submitted, sends the values of all the controls to the server and causes the current page to be requested again. This event is known as a postback. Line 12 uses the IsPostBack property of class Page to determine whether the page is being loaded due to a postback. The first time that the web page is requested, IsPostBack is false, and the page displays only the form for user input. When the post-back occurs (from the user clicking Submit), IsPostBack is true.
Server-Side Web Form Validation
Server-side Web Form validation must be implemented programmatically. Line 14 calls the current Page’s Validate method to validate the information in the request. This validates the information as specified by the validation controls in the Web Form. Line 17 uses the IsValid property of class Page to check whether the validation succeeded. If this property is set to true (that is, validation succeeded and the Web Form is valid), then we display the Web Form’s information. Otherwise, the web page loads without any changes, except any validator that failed now displays its ErrorMessage.
Processing the Data Entered by the User
Lines 20–22 retrieve the values of nameTextBox, emailTextBox and phoneTextBox. When data is posted to the web server, the data that the user entered is accessible to the web application through the web controls’ properties. Next, lines 25–29 set outputLabel’s Text to display a message that includes the name, e-mail and phone information that was submitted to the server. In lines 25, 26 and 29, notice the use of <br/> rather than
to start new lines in the outputLabel—<br/> is the markup for a line break in a web page. Line 30 sets the outputLabel’s Visible property to true, so the user can see the thank-you message and submitted data when the page reloads in the client web browser.
19.7 Session Tracking
Originally, critics accused the Internet and e-business of failing to provide the customized service typically experienced in “brick-and-mortar” stores. To address this problem, businesses established mechanisms by which they could personalize users’ browsing experiences, tailoring content to individual users. Businesses achieve this level of service by tracking each customer’s movement through the Internet and combining the collected data with information provided by the consumer, including billing information, personal preferences, interests and hobbies.
Personalization
Personalization makes it possible for businesses to communicate effectively with their customers and also improves users’ ability to locate desired products and services. Companies that provide content of particular interest to users can establish relationships with customers and build on those relationships over time. Furthermore, by targeting consumers with personal offers, recommendations, advertisements, promotions and services, businesses create customer loyalty. Websites can use sophisticated technology to allow visitors to customize home pages to suit their individual needs and preferences. Similarly, online shopping sites often store personal information for customers, tailoring notifications and special offers to their interests. Such services encourage customers to visit sites more frequently and make purchases more regularly.
Privacy
A trade-off exists between personalized business service and protection of privacy. Some consumers embrace tailored content, but others fear the possible adverse consequences if the info they provide to businesses is released or collected by tracking technologies. Consumers and privacy advocates ask: What if the business to which we give personal data sells or gives that information to another organization without our knowledge? What if we do not want our actions on the Internet—a supposedly anonymous medium—to be tracked and recorded by unknown parties? What if unauthorized parties gain access to sensitive private data, such as credit-card numbers or medical history? These are questions that must be addressed by programmers, consumers, businesses and lawmakers alike.
Recognizing Clients
To provide personalized services to consumers, businesses must be able to recognize clients when they request information from a site. As we have discussed, the request/response system on which the web operates is facilitated by HTTP. Unfortunately, HTTP is a stateless protocol—it does not provide information that would enable web servers to maintain state information regarding particular clients. This means that web servers cannot determine whether a request comes from a particular client or whether the same or different clients generate a series of requests.
To circumvent this problem, sites can provide mechanisms by which they identify individual clients. A session represents a unique client on a website. If the client leaves a site and then returns later, the client will still be recognized as the same user. When the user closes the browser, the session typically ends. To help the server distinguish among clients, each client must identify itself to the server. Tracking individual clients is known as session tracking. One popular session-tracking technique uses cookies (discussed in Section 19.7.1); another uses ASP.NET’s HttpSessionState object (used in Section 19.7.2). Additional session-tracking techniques are beyond this book’s scope.
19.7.1 Cookies
Cookies provide you with a tool for personalizing web pages. A cookie is a piece of data stored by web browsers in a small text file on the user’s computer. A cookie maintains information about the client during and between browser sessions. The first time a user visits the website, the user’s computer might receive a cookie from the server; this cookie is then reactivated each time the user revisits that site. The collected information is intended to be an anonymous record containing data that is used to personalize the user’s future visits to the site. For example, cookies in a shopping application might store unique identifiers for users. When a user adds items to an online shopping cart or performs another task resulting in a request to the web server, the server receives a cookie containing the user’s unique identifier. The server then uses the unique identifier to locate the shopping cart and perform any necessary processing.
In addition to identifying users, cookies also can indicate users’ shopping preferences. When a Web Form receives a request from a client, the Web Form can examine the cookie(s) it sent to the client during previous communications, identify the user’s preferences and immediately display products of interest to the client.
Every HTTP-based interaction between a client and a server includes a header containing information either about the request (when the communication is from the client to the server) or about the response (when the communication is from the server to the client). When a Web Form receives a request, the header includes information such as the request type and any cookies that have been sent previously from the server to be stored on the client machine. When the server formulates its response, the header information contains any cookies the server wants to store on the client computer and other information, such as the MIME type of the response.
The expiration date of a cookie determines how long the cookie remains on the client’s computer. If you do not set an expiration date for a cookie, the web browser maintains the cookie for the duration of the browsing session. Otherwise, the web browser maintains the cookie until the expiration date occurs. Cookies are deleted when they expire.
Portability Tip 19.1

Users may disable cookies in their web browsers to help ensure their privacy. Such users will experience difficulty using web applications that depend on cookies to maintain state information.
19.7.2 Session Tracking with HttpSessionState
The next web application demonstrates session tracking using the .NET class HttpSessionState. When you execute this application, the Options.aspx page (Fig. 19.27(a)), which is the application’s Start Page, allows the user to select a programming language from a group of radio buttons. [Note: You might need to right click Options.aspx in the Solution Explorer and select Set As Start Page before running this application.] When the user clicks Submit, the selection is sent to the web server for processing. The web server uses an HttpSessionState object to store the chosen language and the ISBN number for one of our books on that topic. Each user that visits the site has a unique HttpSessionState object, so the selections made by one user are maintained separately from all other users. After storing the selection, the server returns the page to the browser (Fig. 19.27(b)) and displays the user’s selection and some information about the user’s unique session (which we show just for demonstration purposes). The page also includes links that allow the user to choose between selecting another programming language or viewing the Recommendations.aspx page (Fig. 19.27(e)), which lists recommended books pertaining to the programming language(s) that the user selected previously. If the user clicks the link for book recommendations, the information stored in the user’s unique HttpSessionState object is read and used to form the list of recommendations. To test this application:
Fig. 19.27. ASPX file that presents a list of programming languages.

a) User selects a language from the Options.aspx page, then presses Submit to send the selection to the server

b) Options.aspx page is updated to hide the controls for selecting a language and to display the user’s selection; the user clicks the hyperlink to return to the list of languages and make another selection

c) User selects another language from the Options.aspx page, then presses Submit to send the selection to the server

d) Options.aspx page is updated to hide the controls for selecting a language and to display the user’s selection; the user clicks the hyperlink to get a list of book recommendations
e) Recommendations.aspx displays the list of recommended books based on the user’s selections
- Select Open Web Site... from the File menu.
- In the Open Web Site dialog, ensure that File System is selected, then navigate to this chapter’s examples, select the
Sessionsfolder and click the OpenButton. - Select
Options.aspxin the Solution Explorer, then type Ctrl + F5 to execute the web application in your default web browser.
Creating the Web Site
To begin, follow the steps in Section 19.4.1 to create an Empty Web Site named Sessions, then add two Web Forms named Options.aspx and Recommendations.aspx to the project. Set the Options.aspx document’s Title property to "Sessions" and the Recommendations.aspx document’s Title property to "Book Recommendations". To ensure that Options.aspx is the first page to load for this application, right click it in the Solution Explorer and select Set As Start Page.
19.7.3 Options.aspx: Selecting a Programming Language
The Options.aspx page Fig. 19.27(a) contains the following controls arranged vertically:
- A
Labelwith its(ID)property set topromptLabeland itsTextproperty set to"Select a programming language:". We used the techniques shown in Step 5 of Section 19.4.1 to create a CSS style for this label named.labelStyle, and set the style’sfont-sizeattribute tolargeand thefont-weightattribute tobold. - The user selects a programming language by clicking one of the radio buttons in a
RadioButtonList. Each radio button has aTextproperty and aValueproperty. TheTextproperty is displayed next to the radio button and theValueproperty represents a value that is sent to the server when the user selects that radio button and submits the form. In this example, we’ll use theValueproperty to represent the ISBN for the recommended book. Create aRadioButtonListwith its(ID)property set tolanguageList. Use the ListItem Collection Editor to add five radio buttons with theirTextproperties set toVisual Basic,Visual C#,C,C++andJava, and theirValueproperties set to0-13-215213-4,0-13-605322-X,0-13-512356-2,0-13-611726-0and0-13-605306-8, respectively - A
Buttonwith its(ID)property set tosubmitButtonand itsTextproperty set toSubmit. In this example, we’ll handle thisButton’sClickevent. You can create its event handler by double clicking theButtonin Design view. - A
Labelwith its(ID)property set toresponseLabeland itsTextproperty set to"Welcome to Sessions!". ThisLabelshould be placed immediately to the right of theButtonso that theLabelappears at the top of the page when we hide the preceding controls on the page. Reuse the CSS style you created in Step 1 by setting thisLabel’sCssClassproperty tolabelStyle. - Two more
Labels with their(ID)properties set toidLabelandtimeoutLabel, respectively. Clear the text in eachLabel’sTextproperty—you’ll set these programmatically with information about the current user’s session. - A
HyperLinkwith its(ID)property set tolanguageLinkand itsTextproperty set to"Click here to choose another language". Set itsNavigateUrlproperty by clicking the ellipsis next to the property in the Properties window and selectingOptions.aspxfrom the Select URL dialog. - A
HyperLinkwith its(ID)property set torecommendationsLinkand itsTextproperty set to"Click here to get book recommendations". Set itsNavigateUrlproperty by clicking the ellipsis next to the property in the Properties window and selectingRecommendations.aspxfrom the Select URL dialog. - Initially, the controls in Steps 4–7 will not be displayed, so set each control’s
Visibleproperty tofalse.
Session Property of a Page
Every Web Form includes a user-specific HttpSessionState object, which is accessible through property Session of class Page. Throughout this section, we use this property to manipulate the current user’s HttpSessionState object. When a page is first requested, a unique HttpSessionState object is created by ASP.NET and assigned to the Page’s Session property.
Code-Behind File for Options.aspx
Fig. 19.28 presents the code-behind file for the Options.aspx page. When this page is requested, the Page_Load event handler (lines 10–40) executes before the response is sent to the client. Since the first request to a page is not a postback, the code in lines 16–39 does not execute the first time the page loads.
Fig. 19.28. Process user’s selection of a programming language by displaying links and writing information in an HttpSessionState object.


Postback Processing
When the user presses Submit, a postback occurs. The form is submitted to the server and Page_Load executes. Lines 16–20 display the controls shown in Fig. 19.27(b) and lines 23–25 hide the controls shown in Fig. 19.27(a). Next, lines 28–32 ensure that the user selected a language and, if so, display a message in the responseLabel indicating the selection. Otherwise, the message "You did not select a language" is displayed.
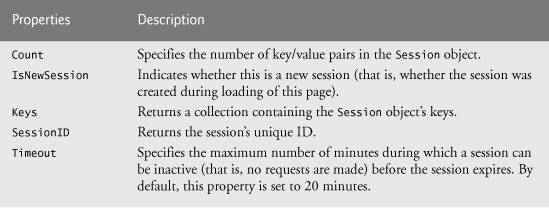
The ASP.NET application contains information about the HttpSessionState object (property Session of the Page object) for the current client. The object’s SessionID property (displayed in line 35) contains the unique session ID—a sequence of random letters and numbers. The first time a client connects to the web server, a unique session ID is created for that client and a temporary cookie is written to the client so the server can identify the client on subsequent requests. When the client makes additional requests, the client’s session ID from that temporary cookie is compared with the session IDs stored in the web server’s memory to retrieve the client’s HttpSessionState object. HttpSessionState property Timeout (displayed in line 38) specifies the maximum amount of time that an HttpSessionState object can be inactive before it’s discarded. By default, if the user does not interact with this web application for 20 minutes, the HttpSessionState object is discarded by the server and a new one will be created if the user interacts with the application again. Figure 19.29 lists some common HttpSessionState properties.
Fig. 19.29. HttpSessionState properties.
Method submitButton_Click
In this example, we wish to store the user’s selection in an HttpSessionState object when the user clicks the Submit Button. The submitButton_Click event handler (lines 43–50) adds a key/value pair to the HttpSessionState object for the current user, specifying the language chosen and the ISBN number for a book on that language. The HttpSession-State object is a dictionary—a data structure that stores key/value pairs. A program uses the key to store and retrieve the associated value in the dictionary. We cover dictionaries in more depth in Chapter 23.
The key/value pairs in an HttpSessionState object are often referred to as session items. They’re placed in an HttpSessionState object by calling its Add method. If the user made a selection (line 46), lines 48–49 get the selection and its corresponding value from the languageList by accessing its SelectedItem’s Text and Value properties, respectively, then call HttpSessionState method Add to add this name/value pair as a session item in the HttpSessionState object (Session).
If the application adds a session item that has the same name as an item previously stored in the HttpSessionState object, the session item is replaced—session item names must be unique. Another common syntax for placing a session item in the HttpSessionState object is Session[Name] = Value. For example, we could have replaced lines 48–49 with
Session[ languageList.SelectedItem.Text ] =
languageList.SelectedItem.Value
Software Engineering Observation 19.1
![]()
A Web Form should not use instance variables to maintain client state information, because each new request or postback is handled by a new instance of the page. Instead, maintain client state information in HttpSessionState objects, because such objects are specific to each client.
Software Engineering Observation 19.2
![]()
A benefit of using HttpSessionState objects (rather than cookies) is that they can store any type of object (not just Strings) as attribute values. This provides you with increased flexibility in determining the type of state information to maintain for clients.
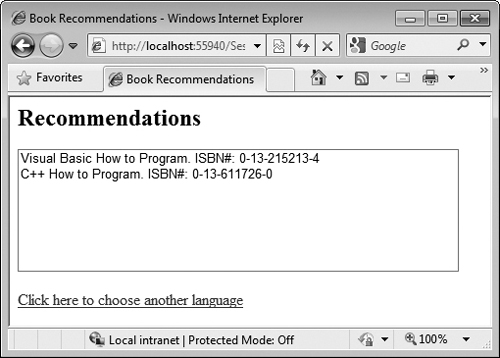
19.7.4 Recommendations.aspx: Displaying Recommendations Based on Session Values
After the postback of Options.aspx, the user may request book recommendations. The book-recommendations hyperlink forwards the user to the page Recommendations.aspx (Fig. 19.27(e)) to display the recommendations based on the user’s language selections. The page contains the following controls arranged vertically:
- A
Labelwith its(ID)property set torecommendationsLabeland itsTextproperty set to"Recommendations". We created a CSS style for this label named.label-Style, and set thefont-sizeattribute tox-largeand thefont-weightattribute tobold. (See Step 5 in Section 19.4.1 for information on creating a CSS style.) - A
ListBoxwith its(ID)property set tobooksListBox. We created a CSS style for this label named.listBoxStyle. In the Position category, we set thewidthattribute to450pxand theheightattribute to125px. Thepxindicates that the measurement is in pixels. - A
HyperLinkwith its(ID)property set tolanguageLinkand itsTextproperty set to"Click here to choose another language". Set itsNavigateUrlproperty by clicking the ellipsis next to the property in the Properties window and selectingOptions.aspxfrom the Select URL dialog. When the user clicks this link, theOptions.aspxpage will be reloaded. Requesting the page in this manner is not considered a postback, so the original form in Fig. 19.27(a) will be displayed.
Code-Behind File for Recommendations.aspx
Figure 19.30 presents the code-behind file for Recommendations.aspx. Event handler Page_Init (lines 8–29) retrieves the session information. If a user has not selected a language in the Options.aspx page, the HttpSessionState object’s Count property will be 0 (line 11). This property provides the number of session items contained in a HttpSessionState object. If the Count is 0, then we display the text No Recommendations (line 22), clear the ListBox and hide it (lines 23–24), and update the Text of the HyperLink back to Options.aspx (line 27).
Fig. 19.30. Session data used to provide book recommendations to the user.

If the user chose at least one language, the loop in lines 14–16 iterates through the HttpSessionState object’s keys (line 14) by accessing the HttpSessionState’s Keys property, which returns a collection containing all the keys in the session. Lines 15–16 concatenate the keyName, the String " How to Program. ISBN#: " and the key’s corresponding value, which is returned by Session(keyName). This String is the recommendation that is added to the ListBox.
19.8 Case Study: Database-Driven ASP.NET Guestbook
Many websites allow users to provide feedback about the website in a guestbook. Typically, users click a link on the website’s home page to request the guestbook page. This page usually consists of a form that contains fields for the user’s name, e-mail address, message/ feedback and so on. Data submitted on the guestbook form is then stored in a database located on the server.
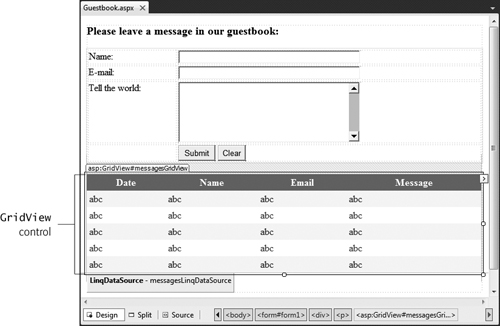
In this section, we create a guestbook Web Form application. The GUI (Fig. 19.31) contains a GridView data control, which displays all the entries in the guestbook in tabular format. This control is located in the Toolbox’s Data section. We explain how to create and configure this data control shortly. The GridView displays abc in Design mode to indicate data that will be retrieved from a data source at runtime. You’ll learn how to create and configure the GridView shortly.
Fig. 19.31. Guestbook application GUI in Design mode.
The Guestbook Database
The application stores the guestbook information in a SQL Server database called Guest-book.mdf located on the web server. (We provide this database in the databases folder with this chapter’s examples.) The database contains a single table named Messages.
Testing the Application
To test this application:
- Select Open Web Site... from the File menu.
- In the Open Web Site dialog, ensure that File System is selected, then navigate to this chapter’s examples, select the
Guestbookfolder and click the OpenButton. - Select
Guestbook.aspxin the Solution Explorer, then type Ctrl + F5 to execute the web application in your default web browser.
Figure 19.32(a) shows the user submitting a new entry. Figure 19.32(b) shows the new entry as the last row in the GridView.
Fig. 19.32. Sample execution of the Guestbook application.

a) User enters data for the name, e-mail and message, then presses Submit to send the data to the server

b) Server stores the data in the database, then refreshes the GridView with the updated data
19.8.1 Building a Web Form that Displays Data from a Database
You’ll now build this GUI and set up the data binding between the GridView control and the database. Many of these steps are similar to those performed in Chapter 18 to access and interact with a database in a Windows application. We discuss the code-behind file in Section 19.8.2. To build the guestbook application, perform the following steps:
Step 1: Creating the Web Site
To begin, follow the steps in Section 19.4.1 to create an Empty Web Site named Guestbook then add a Web Form named Guestbook.aspx to the project. Set the document’s Title property to "Guestbook". To ensure that Guestobook.aspx loads when you execute this application, right click it in the Solution Explorer and select Set As Start Page.
Step 2: Creating the Form for User Input
In Design mode, add the text Please leave a message in our guestbook:, then use the Block Format ComboBox in the IDE’s toolbar to change the text to Heading 3 format. Insert a table with four rows and two columns, configured so that the text in each cell aligns with the top of the cell. Place the appropriate text (see Fig. 19.31) in the top three cells in the table’s left column. Then place TextBoxes named nameTextBox, emailTextBox and messageTextBox in the top three table cells in the right column. Configure the TextBoxes as follows:
• Set the nameTextBox’s width to 300px.
• Set the emailTextBox’s width to 300px.
• Set the messageTextBox’s width to 300px and height to 100px. Also set this control’s TextMode property to MultiLine so the user can type a message containing multiple lines of text.
Finally, add Buttons named submitButton and clearButton to the bottom-right table cell. Set the buttons’ Text properties to Submit and Clear, respectively. We discuss the buttons’ event handlers when we present the code-behind file. You can create these event handlers now by double clicking each Button in Design view.
Step 3: Adding a GridView Control to the Web Form
Add a GridView named messagesGridView that will display the guestbook entries. This control appears in the Data section of the Toolbox. The colors for the GridView are specified through the Auto Format... link in the GridView Tasks smart-tag menu that opens when you place the GridView on the page. Clicking this link displays an AutoFormat dialog with several choices. In this example, we chose Professional. We show how to set the GridView’s data source (that is, where it gets the data to display in its rows and columns) shortly.
Step 4: Adding a Database to an ASP.NET Web Application
To use a SQL Server Express database file in an ASP.NET web application, you must first add the file to the project’s App_Data folder. For security reasons, this folder can be accessed only by the web application on the server—clients cannot access this folder over a network. The web application interacts with the database on behalf of the client.
The Empty Web Site template does not create the App_Data folder. To create it, right click the project’s name in the Solution Explorer, then select Add ASP.NET Folder > App_Data. Next, add the Guestbook.mdf file to the App_Data folder. You can do this in one of two ways:
• Drag the file from Windows Explorer and drop it on the App_Data folder.
• Right click the App_Data folder in the Solution Explorer and select Add Existing Item... to display the Add Existing Item dialog, then navigate to the databases folder with this chapter’s examples, select the Guestbook.mdf file and click Add. [Note: Ensure that Data Files is selected in the ComboBox above or next to the Add Button in the dialog; otherwise, the database file will not be displayed in the list of files.]
Step 5: Creating the LINQ to SQL Classes
As in Chapter 18, you’ll use LINQ to interact with the database. To create the LINQ to SQL classes for the Guestbook database:
- Right click the project in the Solution Explorer and select Add New Item... to display the Add New Item dialog.
- In the dialog, select LINQ to SQL Classes, enter
Guestbook.dbmlas the Name, and click Add. A dialog appears asking if you would like to put your new LINQ to SQL classes in theApp_Codefolder; click Yes. The IDE will create anApp_Codefolder and place the LINQ to SQL classes information in that folder. - In the Database Explorer window, drag the
Guestbookdatabase’sMessagestable from the Database Explorer onto the Object Relational Designer. Finally, save your project by selecting File > Save All.
Step 6: Binding the GridView to the Messages Table of the Guestbook Database
You can now configure the GridView to display the database’s data.
- In the GridView Tasks smart-tag menu, select <New data source...> from the Choose Data Source
ComboBoxto display the Data Source Configuration Wizard dialog. - In this example, we use a
LinqDataSourcecontrol that allows the application to interact with theGuestbook.mdfdatabase through LINQ. Select LINQ, then set theIDof the data source tomessagesLinqDataSourceand click OK to begin the Configure Data Source wizard. - In the Choose a Context Object screen, ensure that
GuestbookDataContext is selected in theComboBox, then click Next >. - The Configure Data Selection screen (Fig. 19.33) allows you to specify which data the
LinqDataSourceshould retrieve from the data context. Your choices on this page design aSelectLINQ query. The Table drop-down list identifies a table in the data context. TheGuestbookdata context contains one table namedMessages, which is selected by default. If you haven’t saved your project since creating your LINQ to SQL classes (Step 5), the list of tables will not appear. In the Select pane, ensure that the checkbox marked with an asterisk (*) is selected to indicate that you want to retrieve all the columns in theMessagestable.Fig. 19.33. Configuring the query used by the
LinqDataSourceto retrieve data.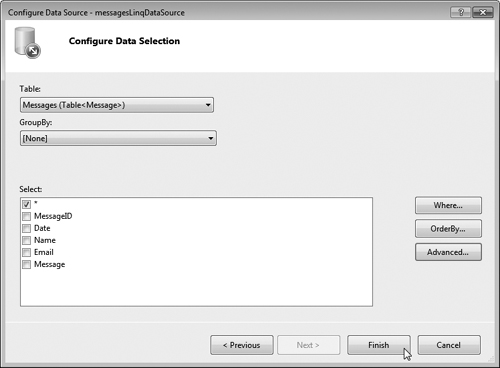
- Click the Advanced... button, then select the Enable the LinqDataSource to perform automatic inserts
CheckBoxand click OK. This configures theLinqData-Sourcecontrol to automatically insert new data into the database when new data is inserted in the data context. We discuss inserting new guestbook entries based on users’ form submissions shortly. - Click Finish to complete the wizard.
A control named messagesLinqDataSource now appears on the Web Form directly below the GridView (Fig. 19.34). It’s represented in Design mode as a gray box containing its type and name. It will not appear on the web page—the gray box simply provides a way to manipulate the control visually through Design mode—similar to how the objects in the component tray are used in Design mode for a Windows Forms application.
Fig. 19.34. Design mode displaying LinqDataSource control for a GridView.

The GridView now has column headers that correspond to the columns in the Messages table. The rows each contain either a number (which signifies an autoincremented column) or abc (which indicates string data). The actual data from the Guestbook.mdf database file will appear in these rows when you view the ASPX file in a web browser.
Step 7: Modifying the Columns of the Data Source Displayed in the GridView
It’s not necessary for site visitors to see the MessageID column when viewing past guest-book entries—this column is merely a unique primary key required by the Messages table within the database. So, let’s modify the GridView to prevent this column from displaying on the Web Form. We’ll also modify the column Message1 to read Message.
- In the GridView Tasks smart tag menu, click Edit Columns to display the Fields dialog (Fig. 19.35).
Fig. 19.35. Removing the
MessageIDcolumn from theGridView.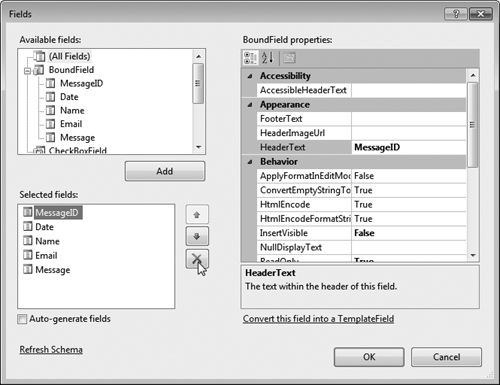
- Select MessageID in the Selected fields pane, then click the

Button. This removes theMessageIDcolumn from theGridView. - Next select Message1 in the Selected fields pane and change its
HeaderTextproperty toMessage. The IDE renamed this field to prevent a naming conflict in the LINQ to SQL classes. - Click OK to return to the main IDE window, then set the
Widthproperty of theGridViewto650px.
The GridView should now appear as shown in Fig. 19.31.
19.8.2 Modifying the Code-Behind File for the Guestbook Application
After building the Web Form and configuring the data controls used in this example, double click the Submit and Clear buttons in Design view to create their corresponding Click event handlers in the code-behind file (Fig. 19.36). The IDE generates empty event handlers, so we must add the appropriate code to make these buttons work properly. The event handler for clearButton (lines 37–42) clears each TextBox by setting its Text property to an empty string. This resets the form for a new guestbook submission.
Fig. 19.36. Code-behind file for the guestbook application.

Lines 10–34 contain submitButton’s event-handling code, which adds the user’s information to the Guestbook database’s Messages table. To use the values of the Text-Boxes on the Web Form as the parameter values inserted into the database, we must create a ListDictionary of insert parameters that are key/value pairs.
Line 13 creates a ListDictionary object—a set of key/value pairs that is implemented as a linked list and is intended for dictionaries that store 10 or fewer keys. Lines 17–20 use the ListDictionary’s Add method to store key/value pairs that represent each of the four insert parameters—the current date and the user’s name, e-mail address, and message. The keys must match the names of the columns of the Messages table in the .dbml file. Invoking the LinqDataSource method Insert (line 25) inserts the data in the data context, adding a row to the Messages table and automatically updating the database. We pass the ListDictionary object as an argument to the Insert method to specify the insert parameters. After the data is inserted into the database, lines 28–30 clear the Text-Boxes, and line 33 invokes messagesGridView’s DataBind method to refresh the data that the GridView displays. This causes messagesLinqDataSource (the GridView’s source) to execute its Select command to obtain the Messages table’s newly updated data.
19.9 Case Study: ASP.NET AJAX
In Chapter 27, Web App Development with ASP.NET: A Deeper Look, you learn the difference between a traditional web application and an Ajax (Asynchronous JavaScript and XML) web application. You also learn how to use ASP.NET AJAX to quickly and easily improve the user experience for your web applications, giving them responsiveness comparable to that of desktop applications. To demonstrate ASP.NET AJAX capabilities, you enhance the validation example by displaying the submitted form information without reloading the entire page. The only modifications to this web application appear in Validation.aspx file. You use Ajax-enabled controls to add this feature.
19.10 Case Study: Password-Protected Books Database Application
In Chapter 27, we also include a web application case study in which a user logs into a password-protected website to view a list of publications by a selected author. The application consists of several pages and provides website registration and login capabilities. You’ll learn about ASP.NET master pages, which allow you to specify a common look-and-feel for all the pages in your app. We also introduce the Web Site Administration Tool and use it to configure the portions of the application that can be accessed only by users who are logged into the website.
19.11 Wrap-Up
In this chapter, we introduced web-application development using ASP.NET and Visual Web Developer 2010 Express. We began by discussing the simple HTTP transactions that take place when you request and receive a web page through a web browser. You then learned about the three tiers (that is, the client or top tier, the business logic or middle tier and the information or bottom tier) that comprise most web applications.
Next, we explained the role of ASPX files (that is, Web Form files) and code-behind files, and the relationship between them. We discussed how ASP.NET compiles and executes web applications so that they can be displayed in a web browser. You also learned how to build an ASP.NET web application using Visual Web Developer.
The chapter demonstrated several common ASP.NET web controls used for displaying text and images on a Web Form. We also discussed validation controls, which allow you to ensure that user input on a web page satisfies certain requirements.
We discussed the benefits of maintaining a user’s state information across multiple pages of a website. We then demonstrated how you can include such functionality in a web application by using session tracking with HttpSessionState objects.
Finally, we built a guestbook application that allows users to submit comments about a website. You learned how to save the user input in a SQL Server database and how to display past submissions on the web page. In Chapter 20, we discuss how to create methods that can order array elements in ascending or descending order, and that can search for values in arrays.