
In this recipe we will create a bronze shader similar to a ruined antique statue:

- Start Blender and load the file
1301OS_04_start.blend. - With Suzanne selected, click on the Mode button in the Camera view header and choose Vertex Paint; Suzanne turns a shadeless white color.
- Place the mouse cursor on the Paint item at the left of the Mode button, click and select Dirty Vertex Colors, then press T and in the bottom window of the Object Tools panel set Blur Strength to
0.01, Dirt Angle to90, and check the Dirt Only option.
- Go to the Object Data window under the Properties panel. In the Name slot under the Vertex Colors subpanel, rename the vertex color layer as
V_col. - Return to Object Mode and press T to get rid of the Object Tools panel.
And now we are going to create the material:
- Click on New in the Material window under the Properties panel or in the Node Editor header. Rename the material as
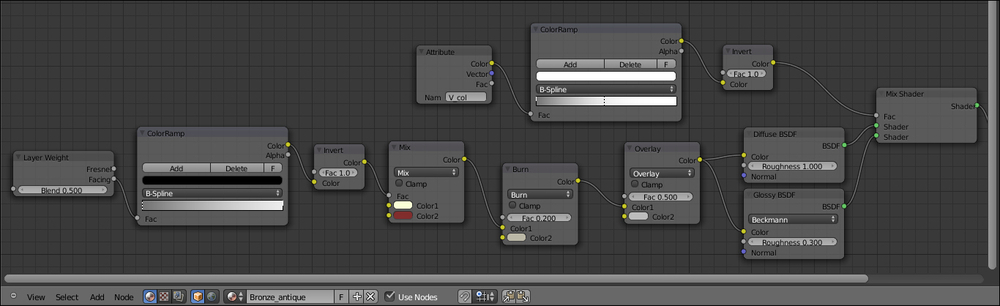
Bronze_antique. - Switch the Diffuse shader with a Mix Shader node. In the first Shader slot select a Diffuse BSDF shader, in the second Shader slot select a Glossy BSDF. Set the Diffuse shader Roughness to
1.000and the Glossy shader Roughness value to0.300. - Now add a Layer Weight node (press Shift + A and go to Input | Layer Weight), a ColorRamp node (press Shift + A and go to Convertor | ColorRamp), and a Mix node (press Shift + A and go to Color | Mix). Connect the Facing output of the Layer Weight node to the Fac input of the ColorRamp and its Color output to the Fac input socket of the Mix node.
- Add an Invert node (press Shift + A and go to Color | Invert) and paste it between the ColorRamp node and the Mix node. Set the ColorRamp interpolation mode to B-Spline and the Color1 value of the Mix node to
R 0.187,G 0.319, andB 1.000; set the Color2 value toR 0.000,G 0.880, andB 0.222. - Press Shift + D to duplicate the Mix node and set the Blend Type to Burn; set the Fac value to
0.200and connect the Mix node color output to the Color1 input socket. - Press Shift + D to duplicate the Mix node again and set the Blend Type to Overlay, then connect its Color output to both the Color input sockets of the Diffuse node and of the Glossy shaders. Now connect the Color output of the Burn node to the Color1 input socket of the Overlay node.

- Add an Attribute node (press Shift + A and go to Input | Attribute); select and press Shift + D to duplicate the ColorRamp and the Invert nodes, move them closer to the Attribute node. Write the name of the vertex color layer (
V_col) in the Name slot of the Attribute node, then connect the Color output to the Fac input of the ColorRamp node. Move the white color marker of this ColorRamp node to the middle of the slider. - Connect the Color output of the second Invert node to the Fac input socket of the Mix Shader node.
- Add a Texture Coordinate node (press Shift + A and go to Input | Texture Coordinate), a Mapping node (press Shift + A and go to Vector | Mapping), two Noise Texture nodes (press Shift + A and go to Textures | Noise Texture), and two Musgrave Textures (press Shift + A and go to Textures | Musgrave Texture).
- Connect the Object output of the Texture Coordinate node to the Vector input of the Mapping node, then connect the Vector output of this one to the Vector inputs of all four texture nodes.
- For the first Noise node, set Scale to
22.100, Detail to12.000, and Distortion to3.000; for the second Noise, set Scale to3.500and Detail to 5.800. - For the first Musgrave, just set the Scale value to
8.500. For the second one change the type to Multifractal and set Scale to8.500, Detail to2.600, Dimension to0.800, and Lacunarity to0.400. - Add a Mix node (press Shift + A and go to Color | Mix); set the Blend Type to Difference and the Color2 value to pure white. Connect the Color output of the first Musgrave node to the Color1 input socket, and the Fac output of the second Noise Texture node to the Fac input socket of the same Mix node.
- Press Shift + D to duplicate the Mix node, set the Blend Type to Subtract and connect the color output of the Difference node to the Color2 input of the Subtract node, and the Color output of the first Noise Texture to its Color1 input socket.
- Connect the Color output of the first Noise Texture node to the Color2 input socket of the Burn node that we made in step 5.
- Add a Math node (Shift + A and go to Convertor | Math) and set the operation to Multiply. Connect the Subtract node output to the first Value input of the Math node, then connect the Math node output to the Displacement input socket of the Material Output node. Set the second Value to
0.200. - Add a ColorRamp node (Shift + A and go to Convertor | ColorRamp) and paste it between the Subtract node and the Math node. Set the interpolation to Ease and move the color white marker three-fourths to the left of the slider.
- Add a Mix node (Shift + A and go to Color | Mix) and paste it just after this last ColorRamp node. Connect the first Noise Texture node's Color output to the Color2 input socket of the Mix node, and the ColorRamp node's Color output also to the Color2 input socket of the Overlay node we made in step 6.
- Add a last ColorRamp (Shift + A and go to Convertor | ColorRamp); set its interpolation to Ease, move the black color marker one-third to the right and the white color marker one-third to the left. Connect the Fac output of the fourth Musgrave Texture node to the Fac input of this last ColorRamp node.
- Add a Math node (Shift + A and go to Convertor | Math) and paste it between the Mix node and the last Math node (the one set to Multiply).
- Connect the ColorRamp node's Color output to the second Value input of the just added Math node.

We are using the vertex color layer set in the Getting ready section as a stencil map to distribute both the colored Diffuse and the Glossy shaders, driven also by the Facing option of the Layer Weight input node.
For the rest, the bulk of the effect is in the bump obtained by the Noise and Musgrave textures mixed and clamped in several ways by the ColorRamp nodes.
As usual, the last Math node set to Multiply establishes the strength of the bump.
..................Content has been hidden....................
You can't read the all page of ebook, please click here login for view all page.