
In this recipe we will create a generic cloth material like the one shown in the following image:

- Start Blender and load the file
1301OS_cloth_start.blend; in the scene there is an already set cloth simulation. - Press the play button on the timeline bar to see the simulation working and being cached in real-time: a plane (our tissue) draped on a sphere leaning on a bigger plane (the floor).
- After the simulation has been totally cached (it's a total of 100 frames), in the Physics window on the right, under the Cloth Cache tab, click on the Current Cache to Bake button to save the simulation; the 100 frames simulation is now cached and saved inside a folder, named as the
blend fileand located in the same directory of theblend file.
From now on there is no need to calculate the simulation anymore, Blender will read the simulation data from that folder and so it will be possible to quickly scroll the timeline bar to immediately reach any frame inside the cached range.

Now we are going to create the material:
- Go to the frame 100.
- Be sure to have the cloth plane selected and click on New in the Material window under the Properties panel or in the Node Editor header; rename the new material
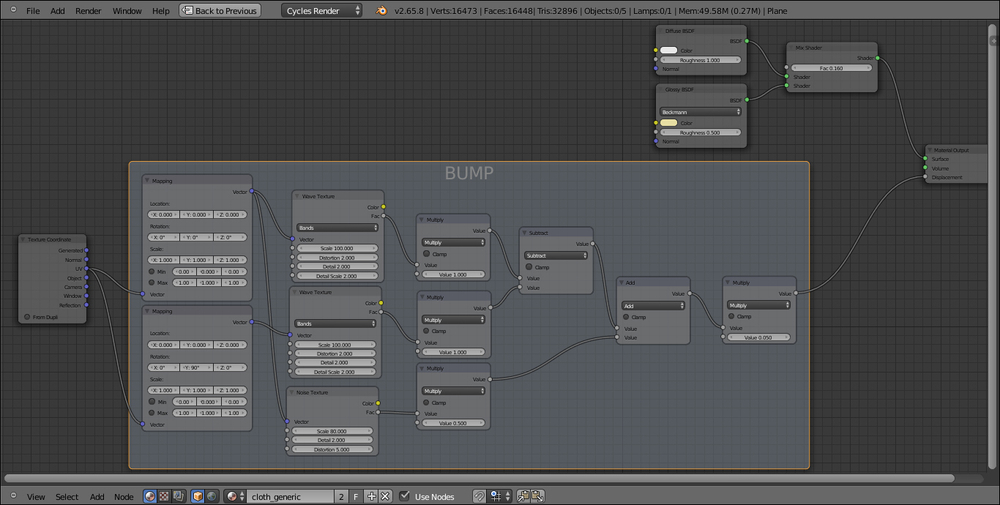
cloth_generic. - In the Material window switch the Diffuse BSDF node with a Mix Shader node; in the first Shader slot select a Diffuse BSDF node and in the second one a Glossy BSDF shader node.
- Set the Diffuse roughness to 1.000; set the Glossy roughness to 0.500. Change the Glossy color to R 0.800, G 0.730, B 0.369 and the Fac value of the Mix Shader node to 0.160.
- Add a Texture Coordinate node (Shift + A | Input | Texture Coordinate) and two Mapping nodes (Shift + A | Vector | Mapping); connect the UV output of the Texture Coordinate node to the Vector input sockets of the two Mapping nodes.
- Now add two Wave Texture nodes (Shift + A | Texture | Wave Texture) and a Noise Texture node (Shift + A | Texture | Noise Texture). Connect the output of the first Mapping node to the Vector input sockets of the first Wave Texture node and of the Noise Texture node; connect the output of the second Mapping node to the Vector input of the second Wave Texture node.
- Add three Math nodes (Shift + A | Convertor | Math), each one for each texture node; set their operation mode to Multiply and connect the Fac output of each texture node to the first Value input socket of the respective Math node. Set the second Value of the first two Math nodes to 1.000.
- Go to the second Mapping node and set the Rotation Y to 90°. Go to the Wave Texture nodes and for both of them set the Scale to 100.000, Distortion to 2.000, and Detail Scale to 2.000. For the Noise Texture set the Scale to 80.000 and the Distortion to 5.000.
- Add a new Math node (Shift + A | Convertor | Math), set the operation to Subtract, and connect the outputs of the first two Multiply nodes to the first and to the second Value input sockets.
- Press Shift + D to duplicate the last Math node, set the operation mode to Add, and connect the output of the Subtract node to its first Value socket, and the output of the third Multiply node, which is connected to the Noise Texture node, to the second Value input socket.
- Press Shift + D to duplicate a Multiply node and connect the output of the Add node to the first Value input socket; set the second Value to 0.050. Connect the last Multiply node output to the Displacement input socket of the Material Output node.
- Add a frame (Shift + A | Layout | Frame), select the Mapping nodes, the Textures, and all the Math nodes, and then the frame and then press Ctrl + P to parent them. Rename the frame to BUMP.
- Add two new Mapping nodes (Shift + A | Vector | Mapping) and two Wave Texture nodes (Shift + A | Texture | Wave Texture). As before, connect the UV output of the Texture Coordinate node to the Vector inputs of each of the Mapping nodes, and these latter to the Wave Texture nodes.
- Go to the first Mapping node and set the Rotation Z value to -45° and the Scale Y to 2.000. Go to the respective Wave Texture and set the Scale to 10.900 and the Detail to 0.000. Copy the same exact values in the second Wave Texture node and in the second Mapping node set the Rotation Z value to 45°, and the Scale X to 2.000.
- Add two ColorRamp nodes (Shift + A | Convertor | ColorRamp) and connect the Fac output of the two Wave Texture nodes to the Fac input sockets of the two ColorRamp nodes.
- Add a Mix node (Shift + A | Color | Mix) and connect the Color outputs of the two ColorRamp nodes to the Color1 and Color2 input sockets of the Mix node. Set its Blend Type to Multiply and the Fac value to 1.000.
- Connect the Color output of the Mix node to the Color input socket of the Diffuse BSDF node.
- Add a frame (Shift + A | Layout | Frame), select the new nodes and then the frame, and press Ctrl + P to parent them; rename the frame to COLOR.

- At this point we can change the colors inside the two ColorRamp gradients to obtain colored patterns; in my example, I set the first ColorRamp colors as a pure white going to a light blue, and to a violet for the second one.
From step 1 to step 3 we just made the simple basic shader.
From step 4 to step 10 we built the bump texture of the tissue, by mixing with different orientations two wave textures, and by adding a little bit of noise.
From step 11 to step 18 we built a simple cross color pattern.
A lot of variations can be obtained by setting different values for the bump but especially using different texture nodes and combinations for the color pattern:
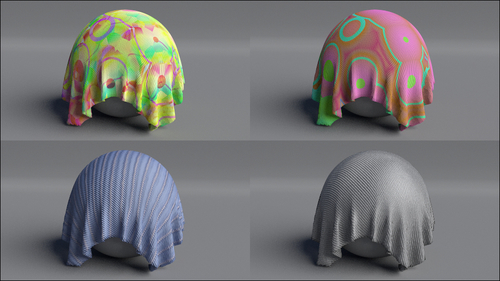
All these examples are included in the file 1301OS_06_cloth.blend.
To know more about Blender cloth simulation you can have a look at the following link: http://wiki.blender.org/index.php/Doc:2.6/Manual/Physics/Cloth