
In this recipe we will create a material similar to a beetle's iridescent chitin, as shown here:

Start Blender and open the 1301OS_07_start.blend file, where there is an already set scene with an unwrapped Suzanne primitive object.
Let's start with the creation of the chitin material by assigning a second default material to the eyes of the Suzanne mesh (which, although not connected to the face vertexes, are part of the same object):
- Click on New in the Node Editor window's header or in the Material window on the right and rename the new material as
chitin_beetle. - Press Tab to go in the edit mode and select the eyes' vertexes (put the mouse pointer on the part and press the L key to select all the connected vertexes). Click on the + icon in the top-left corner of the Material window to add a new material. Click on New, rename the material as
eyes, and click on the Assign button. Press Tab to come out of the edit mode. - Now, in the Material window, select the chitin_beetle material. Switch the Diffuse shader with a Mix Shader node. In the first Shader slot select a new Mix Shader node and in the second one, a Glossy BSDF shader node. Set the Glossy shader's Roughness value to
0.100and its Color value to R 0.800, G 0.574, B 0.233. - Go to the second Mix Shader node and in the first Shader slot, select a Diffuse BSDF shader and in the second one, a new Glossy BSDF shader node. Set the Glossy shader's Color value to R 1.000, G 0.000, B 0.562.
- Add a Layer Weight node (press Shift + A and go to Input | Layer Weight) and connect its Facing output to the Fac input socket of the first Mix Shader node. Set the Blend value to
0.500. - Add a new Layer Weight node (press Shift + A and go to Input | Layer Weight) and connect its Facing output to the Fac input socket of the second Mix Shader node. Set the Blend value to
0.800. - Add a Texture Coordinate node (press Shift + A and go to Input | Texture Coordinate) and a Mapping node (press Shift + A and go to Vector | Mapping). Connect the UV output of the Texture Coordinate node to the Vector input of the Mapping node.
- Add a Voronoi Texture node (press Shift + A and go to Texture | Voronoi Texture) and a Noise Texture node (press Shift + A and go to Texture | Noise Texture). To their Vector input sockets, connect the Mapping output. Set the Voronoi texture's Scale value to
300.000and the Noise texture's Scale to300.000as well. - Add a Bump node (press Shift + A and go to Vector | Bump) and connect the Color output of the Voronoi Texture node to the the Height input socket of the Bump node. Connect the Normal output of the Bump node to the Normal input sockets of the Diffuse and both the two Glossy shader nodes. Set the Bump node's Strength value to
0.025. - Add a ColorRamp (press Shift + A and go to Convertor | ColorRamp) and paste it between the Voronoi Texture node and the Bump node. Set the interpolation to Ease and move the white colored marker to the left (right under the E letter of the word Ease).
- Add a Math node (press Shift + A and go to Convertor | Math), set the operation to Multiply, and connect the Fac output of the Noise Texture node to the first Value input socket of the Math node. Set the second Value to
0.050and connect the Value output to the Displacement input socket of the Material Output node.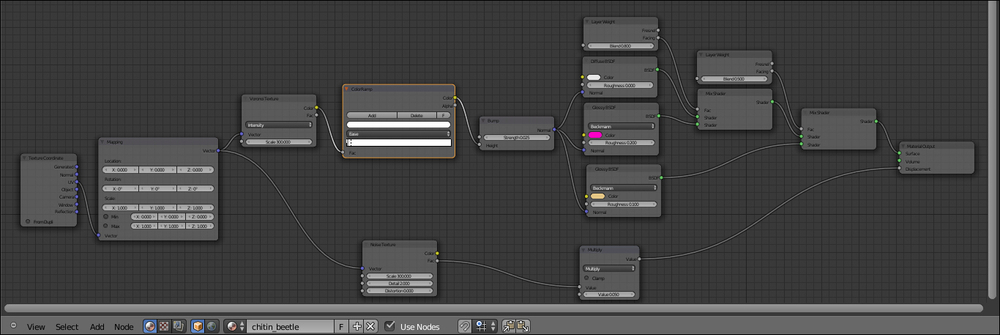
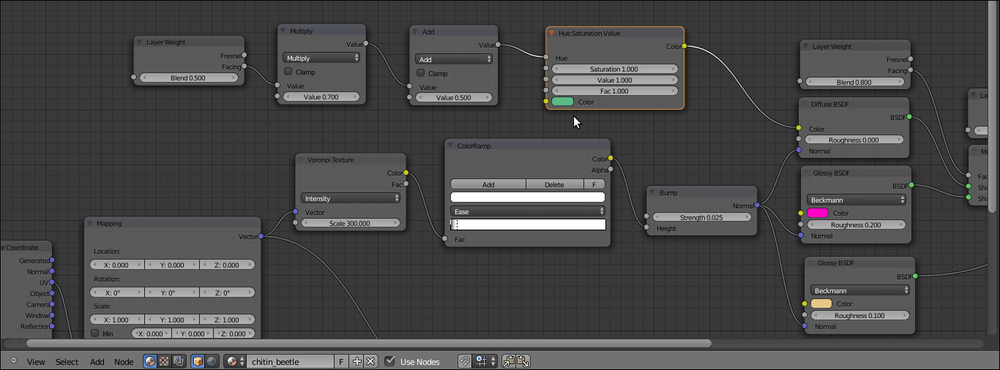
- Add a Layer Weight node (press Shift + A and go to Input | Layer Weight), two Math nodes (press Shift + A and go to Convertor | Math) and a Hue Saturation Value node (press Shift + A and go to Color | Hue Saturation Value).
- Connect the Facing output of the Layer Weight node to the first Value input socket of the first Math node. Set the operation to Multiply and the second Value to
0.700. - Connect the Multiply node's output to the first Value input socket of the second Math node and the output of the latter to the Hue input socket of the Hue Saturation Value node. Connect the output of the Hue Saturation Value node to the Color input socket of the Diffuse shader node.
- Change the Hue Saturation Value node's Color value to R 0.103, G 0.500, B 0.229 and, just for this example, let the other values be as they are.
This is how the preceding steps work to create a beetle-like chitin material:
- The first parts of this shader work almost the same as that of the chitin_wasp material, that is the basic shader from step 3 to step 6 and the chitin bump from step 7 to step 11.
- From step 12 to step 15, we built the color component coming from the Hue Saturation Value node and that, thanks to the combination of the Layer Weight and of the Math nodes, shows mainly in the mesh faces perpendicular to the point of view, and is moreover sliding in the other spectrum colors on the facing-away mesh sides. The adding of the Hue Saturation Value node is also for further color tweaking. Especially, the Fac value is useful to set the intensity of the mixture of the iridescent colors with the green base color.
..................Content has been hidden....................
You can't read the all page of ebook, please click here login for view all page.