
In this recipe we will create a wall made of bricks and concrete, like this one:

- Start Blender and switch to the Cycles Render engine.
- Select the default cube and, by typing the values in the Dimensions tab under the Transform panel located to the right of the 3D view (press N to make it appear if not visible), scale it like this: X 10.000, Y 1.000, and Z 6.000. Press Ctrl + A to apply the size.
- Split the bottom row in two parts, change the left one to a UV/Image Editor window. Go in Edit Mode (Tab) and select the edges as indicated in the figure (the red edges in the image to the right):
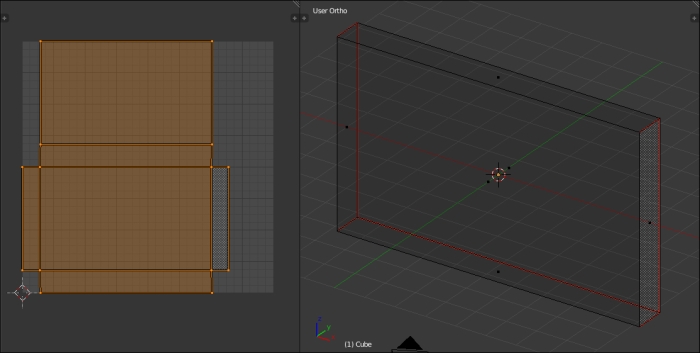
- Press Ctrl + E | Mark Seams to seam the selected edges, then press U, and in the UV Mapping pop-up panel select Unwrap. Go out of Edit Mode.
- Add a plane to the scene (mouse in the 3D view, Shift + A | Mesh | Plane) and still in Edit Mode scale it is 10 times bigger (press A to select all the vertexes, then S | 10 | Enter). Press U | UV Mapping | Unwrap. Go out of Edit Mode and move it three units down (G | Z | -3 | Enter).
- Join the bottom two windows in a single 3D view again to get rid of the UV/Image Editor window.
- Select the Lamp and delete it. Add a new Plane to the scene (Shift + A | Mesh | Plane), go out of Edit Mode and scale it six times bigger (S | 6 | Enter). Rename it Emitter. In the Transform panel set these values: Location X 87.00000, Y -39.70000, Z 58.00000 and Rotation X 22°, Y 60°, Z 0°.
- Select the Camera and in the Transform panel set these values: Location X 11.00000, Y -21.00000, Z 6.20000 and Rotation X 74.7°, Y 0°, Z 26.5°. Go to the Object Data window and set the Focal Length to 60.000.
- Go to the World window and click on the Use Nodes button under the Surface tab; click on the little square with a dot on the right side of the color slot: from the menu select Sky Texture. Set the Strength to 0.500.
- Go to the Render window and under the Sampling tab set the Clamp value to 1.00 and the Samples for Render and Preview to 25. Under the Performance tab set the Acceleration structure to Static BVH and check both the Use Spatial Splits and Cache BVH options.
- Press N to get rid of the Transform panel in the 3D view and split it in two rows: change the upper one to a Node Editor window.
Now we are going to create the material:
- In the Outliner select the Emitter plane and click on New in the Material window under the Properties panel or in the Node Editor header; rename the new material Emitter and in the Material window switch the Diffuse BSDF node with an Emission node; set the Strength to 500.000.
- Select the floor plane and click on New in the Material window under the Properties panel or in the Node Editor header; rename the new material Brickwall. Select the cube and press Shift to select the floor plane, then press Ctrl + L | Materials to assign the same material to both the objects.
- In the Material window switch the Diffuse BSDF node with a Mix Shader node; in the first Shader slot select a Diffuse BSDF node and in the second one a Glossy BSDF shader node.
- Set the Diffuse roughness to 0.200 and the Glossy roughness to 0.800. Add a Layer Weight node (Shift + A | Input | Layer Weight) and connect the Fresnel output to the Fac input socket of the Mix Shader node. Set the Blend to 0.200.
- Add two Voronoi Texture nodes (Shift + A | Texture | Voronoi Texture), a Noise Texture node (Shift + A | Texture | Noise Texture), and a Musgrave Texture (Shift + A | Texture | Musgrave Texture); place them vertically in a column in this order from the top: Voronoi, Noise, Musgrave, and Voronoi.
- Add a Texture Coordinate node (Shift + A | Input | Texture Coordinate) and a Mapping node (Shift + A | Vector | Mapping); connect the UV output of the Texture Coordinate node to the Vector input of the Mapping node and the Vector output of this latter to the Vector input sockets of the four texture nodes.
- Add four ColorRamp nodes (Shift + A | Convertor | ColorRamp) and place each one of them close to each one of the texture nodes; connect the Color output of each texture to the Fac input socket of the respective ColorRamp.
- Go to the first Voronoi Texture node: set the Coloring to Cells and the Scale to 100.000; set the Interpolation of its ColorRamp to B-Spline and move the black color marker to the middle of the slider, and the white color marker to the full left. Add a Math node (Shift + A | Convertor | Math) and connect the color ColorRamp output to the first Value input socket of the Math node; set the operation to Multiply and the second Value to 0.005.
- Go to the Noise Texture node and set the Scale to 80.000. Set the respective ColorRamp interpolation to Ease, move the black color marker to the middle of the slider, and the white color marker 1/4 to the left. Add a Math node (Shift + A | Convertor | Math) and connect the color ColorRamp output to the first Value input socket of the Math node; set the operation to Multiply and the second Value to 0.050.
- Add a Mix node (Shift + A | Color | Mix), set the Blend Type to Difference, the Fac value to 1.000 and connect the outputs of the two Multiply math nodes to the Color1 and Color2 input sockets of the Difference node.
- Go to the Musgrave Texture node and set the Scale to 96.900, Lacunarity to 2.000, and Offset to 1.000. Set the respective ColorRamp interpolation to B-Spline and move the black color marker 1/4 to the right. Add a Math node (Shift + A | Convertor | Math) and connect the color ColorRamp output to the first Value input socket of the Math node; set the operation to Multiply and the second Value to -3.000.
- Add a Mix node (Shift + A | Color | Mix), set the Blend Type to Multiply, the Fac value to 0.700, and connect the output of the Difference node to the Color1 and the output of the last Multiply math node to the Color2 input socket.
- Go to the second Voronoi Texture node and set the Scale to 600.000. Set the respective ColorRamp interpolation to Ease and move the black color marker a little bit to the right (right under the E of the Easy word, to be clear) and the white color marker to the full left. Add a Math node (Shift + A | Convertor | Math) and connect the color ColorRamp output to the first Value input socket of the Math node; set the operation to Multiply and the second Value to 0.050.
- Add a Mix node (Shift + A | Color | Mix), set the Blend Type to Divide, the Fac value to 0.005, and connect the output of the multiply Mix node to the Color1 and the output of the last multiply Math node to the Color2 input socket.
- Add a Bump node (Shift + A | Vector | Bump) and connect the Divide node output to its Height input socket, then connect its Normal output to the Normal input sockets of the Diffuse and of the Glossy shaders. Set the Strength to 1.000.
- Add a Brick Texture node (Shift + A | Texture | Brick Texture) and connect the Mapping node output to the Vector input socket. Set these values: Scale 5.500, Mortar Size 0.005, Row Height 0.150; set the Color1 as R 1.000, G 0.227, B 0.051, the Color2 as R 0.462, G 0.051, B 0.012, and the Mortar color as RGB 0.555.
- Add a Mix node (Shift + A | Color | Mix) and connect the color output of the Brick Texture to the Color1 input socket; set the Color2 to R 0.658, G 0.095, B 0.020, the Blend Type to Color, and the Fac value to 0.550.
- Add a new Mix node (Shift + A | Color | Mix) and connect the Color output of the color Mix node to the Color1 input socket; set the Color2 to R 0.597, G 0.056, B 0.012. Connect the color output of the ColorRamp of the last Voronoi Texture to the Fac input socket of the Mix node and the output of this latter to the Color input sockets of both the Diffuse and the Glossy shader nodes.

- Add a Frame (Shift + A | Layout | Frame), select all the nodes except of the Texture Coordinate, the Mapping, and the Material Output nodes, then press Shift to select the Frame and Ctrl + P to parent them. Rename the frame BRICKS.
- Now add a Diffuse BSDF shader, a Glossy BSDF shader, and a Mix Shader and connect them as usual; connect the Mix Shader output to the Surface input socket of the Material Output node (that is, to temporarily replace the connection of the brick material and see the result in the Rendered camera view).
- Set the Diffuse roughness to 0.850. Add a Layer Weight node (Shift + A | Input | Layer Weight) and connect the Fresnel output to the Fac input socket of the Mix Shader node; set the Blend factor to 0.150.
- Add a Voronoi Texture node (Shift + A | Texture | Voronoi Texture), a Noise Texture node (Shift + A | Texture | Noise Texture), and two Musgrave Texture (Shift + A | Texture | Musgrave Texture) nodes; place them vertically in a column in this order from the top: Voronoi, Noise, Musgrave, and Musgrave.
- Add four ColorRamp nodes (Shift + A | Convertor | ColorRamp) and place each one of them close to each one of the texture nodes; connect the Color output of each texture to the Fac input socket of the respective ColorRamp.
- Connect the Vector output of the Mapping node to the Vector input sockets of the four new texture nodes.
- Go to the Voronoi Texture node and set the Scale to 200.000. Set the Interpolation of its ColorRamp to Ease, move the black color marker a bit to the right (right under the middle of the Ease word, between the letters a and s, to be clear), and the white color marker to the full left.
- Go to the Noise Texture node and set the Scale to 800.000. Set the Interpolation of its ColorRamp to Ease, move the black color marker to the middle of the slider, and the white color marker 1/4 to the left.
- Add a Math node (Shift + A | Convertor | Math) and connect the output of the first two ColorRamp nodes to the first and to the second Value input sockets. Press Shift + D to duplicate the Math node, change the operation to Multiply, and connect the output of the first math node to the first Value input socket; set the second Value to 0.100; rename the node Multiply1.
- Go to the first Musgrave Texture node and set the Type to Multifractal, the Scale to 800.000, Lacunarity to 2.000, and Offset to 1.000. Set the Interpolation of its ColorRamp to Ease, move the black color marker to the middle of the slider and the white color marker 1/4 to the left. Add a Math node (Shift + A | Convertor | Math) and connect the Color output of ColorRamp to the first Value input socket of the Math node; set the operation to Multiply and the second Value to 1.000; rename the node Multiply2.
- Go to the second Musgrave Texture node and set the Type to Multifractal, the Scale to 193.800, Lacunarity to 2.000, and Offset to 1.000. Set the Interpolation of its ColorRamp to Ease, move the black color marker 1/4 to the right and the white color marker to the middle of the slider; click on the Add button and move the new middle gray marker to the right for 3/4 of the total length of the slider. Add a Math node (Shift + A | Convertor | Math) and connect the color ColorRamp output to the first Value input socket of the Math node; set the operation to Multiply and the second Value to -0.400; rename the node Multiply3.
- Add a Mix node (Shift + A | Color | Mix), set the Blend Type to Divide and the Fac value to 1.000; connect the output of the Multiply1 node to the Color1 input socket and the output of the Multiply2 math node to the Color2 input socket; rename the node Divide1.
- Press Shift + D to duplicate the Divide1 node and rename it Divide2. Connect the output of the Divide1 node to the Color1 input socket of the Divide2 node, and the output of the Multiply3 node to the Color2 input socket.
- Add a Bump node (Shift + A | Vector | Bump), connect the output of the Divide2 node to the Height input socket of the Bump node, and its Normal output to the Normal input sockets of both the Diffuse and the Glossy shaders.
- Add a Mix node (Shift + A | Color | Mix) and connect the output to the Color input sockets of both the Diffuse and the Glossy shaders; set the Blend Type to Add.
- Press Shift + D to duplicate the Add node, change the Blend Type to Mix and connect its output to the Color1 input socket of the add Mix node; set the Color1 to RGB 0.103 and the Color2 to R 0.546, G 0.571, B 0.565. Set the Fac value to 0.200.
- Connect the Color output of the ColorRamp of the Voronoi Texture node to the Color2 input socket of the add Mix node.

- Add a Frame (Shift + A | Layout | Frame), select the nodes and then the frame, press Ctrl + P to parent them, and rename the frame CONCRETE.
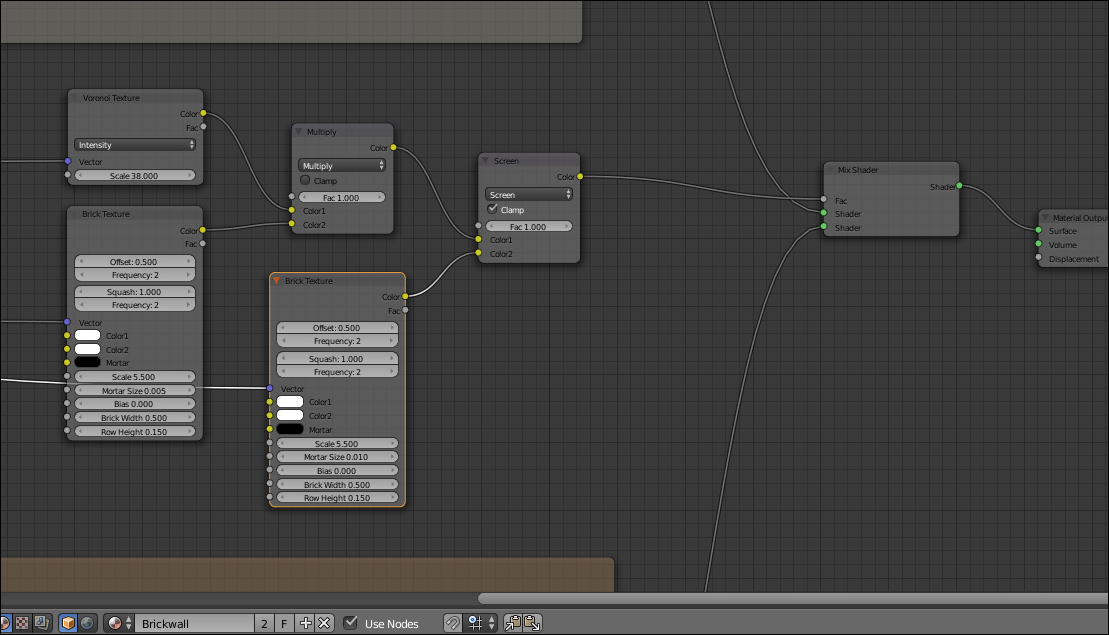
- Add a new Brick Texture node (Shift + A | Texture | Brick Texture) and connect the Mapping node output to its Vector input socket. Set these values: Scale 5.500, Mortar Size 0.005, Row Height 0.150 (the same as in the first Brick Texture node we added). Set the Color1 and Color2 as pure white.
- Add a Voronoi Texture node (Shift + A | Texture | Voronoi Texture), connect the Mapping node output to the Vector input socket, and set the Scale to 38.000; add a Mix node (Shift + A | Color | Mix), set the Blend Type to Multiply, and the Fac value to 1.000. Connect the Voronoi Color output to the Color1 input socket and the Brick Texture Color output to the Color2 input socket.
- Now add a Mix Shader node (Shift + A | Shader | Mix Shader) and connect it to the Surface input socket of the Material Output node; connect the output of the CONCRETE frame to the first Shader input socket and the output of the BRICKS frame to the second one.
- Connect the Multiply node output to the Fac input socket of the Mix Shader node.
- Press Shift + D duplicate the Brick Texture node, connect the Mapping node output and change the Mortar Size value to 0.010; add a Mix node (Shift + A |Color | Mix), paste it between the Multiply node and the Material Output node; set the Blend Type to Screen, the Fac value to 1.000, click on the Clamp option, and connect the color output of the second Brick Texture node to the Color2 input socket.
- Add a Frame (Shift + A | Layout | Frame) and parent to it the last nodes; rename the frame MASK_BRICKS.
- Go to the BRICKS frame and add a Math node (Shift + A | Convertor | Math); paste it between the Bump and the Divide nodes; add a new Math node (Shift + A | Convertor | Math) and connect its output to the first Value input socket of the former one (this way the connection of the Divide node is automatically moved to the second Value input socket). Set the operation to Multiply and connect the output of the Screen node inside the MASK_BRICKS frame to the first Value input socket. Set the second Value to 2.000.

- Add a Voronoi Texture (Shift + A | Texture | Voronoi Texture) and a Musgrave Texture (Shift + A | Texture | Musgrave Texture) and connect them as usual to the Mapping node output. Set the Voronoi Scale to 200.000 and the Musgrave scale to 154.200.
- Add a Mix node (Shift + A | Color | Mix), set the Blend Type to Difference and connect the Voronoi color output to the Color1 input socket, and the Musgrave color output to the Color2 input socket.
- Go to the BRICKS frame and add a Mix node (Shift + A | Color | Mix); rename it Mix1 and paste it between the Diffuse shader and the Mix node; move the connection of the Mix node from the Color1 to the Color2 input socket and set the Color1 Color to RGB 0.019.
- Press Shift + D to duplicate the Mix1 node, rename it Mix2 and paste it between the Mix1 node and the Diffuse shader. Move the connection of the Mix1 node from the Color1 to the Color2 input socket and set the Color1 Color to pure white.
- Connect the output of the Difference node to the Fac input sockets of the Mix1 and Mix2 nodes: add two Bright/Contrast nodes (Shift + A | Color Bright/Contrast) and paste them respectively between the Difference node and the Mix1 and Mix2 nodes.
- For the Bright/Contrast node go to the Mix1 node set the Bright to 1.300 and the Contrast to 1.550; for the Bright/Contrast node go to the Mix2 node set the Bright to 1.500 and the Contrast to 1.350.

- Add a Frame (Shift + A | Layout | Frame), select the Voronoi, the Musgrave, the Difference, and the two Bright/Contrast nodes and then the frame, and press Ctrl + P to parent them. Rename the frame DIRT.
Even if this material can look quite complex, the concept behind is really simple: we built two separate materials, the brick and the concrete (mortar), and then we mixed them by a combination of Brick Texture nodes, arranged in such a way as to give a less regular and perfect result.
First, we started with the Brick material:
From step 1 to step 4 we built the basic shader, from step 5 to step 15 we built the bump component of the brick material, and from step 16 to step 18 we added the basic coloration of the bricks.
After this we built the Concrete material: from step 20 to step 21 again the basic shader combination, from step 22 to step 32 we built the bump for the concrete, and from step 33 to step 35 the color for the concrete.
Then it was the time of the brick masking, from step 37 to step 41; the second Brick Texture is combined with the first one so as to leave a distorted border only on the mortar space, to give an irregular shape to the bricks. At step 43 we added the black and white values of the brick masking to the overall bump effect.
As the last thing we added a slight dirty effect on the bricks, from step 44 to step 49.