
The simpler way to make a water shader is by using a glass node and setting the IOR value (Index Of Refraction, a number specifying the capacity of a medium to refract the light passing through it) to 1.33, and actually, this should be enough; by the way, although physically correct, this does not work well in every light condition or particular situation. A better approach is to use the glass shader mixed with another "specularity" node and, in some cases, also with the aid of a texture.

- Start Blender and switch to the Cycles rendering engine. Select the cube and scale it at least six units on the z axis (press S followed by Z, digit 3, and hit Enter; the default cube is already of 2 units, so 2 X 3 = 6). Then scale down to the half its width (press S followed by Shift + Z, digit 0.500, and hit Enter).
- Go in edit mode, and press Crtl + R and scroll the middle mouse wheel to add four horizontal cuts to the cube.
- Select the upper and the bottom faces and delete them (press X and go to Faces). Go out of edit mode and set the cube smooth (press T to bring up the Object Tools panel on the left and press the Smooth button under Shading).
- Press Crtl + A and select Scale to apply the new size of the cube as original.
- Go to the Object Modifiers window and assign a Subdivision Surface modifier, set the Subdivision levels to
6. - Add a Displace modifier. Click on the Show textures in texture tab button, the last to the right of the Texture slot; this switches to the Textures window. Click on New and then change the Size value of the default Clouds texture to
0.50. Back to the Object Modifiers window, set the displacement strength to0.500. - Go to the World window, click on Use Nodes and change the color to R 0.118, G 0.129, B 0.142.
- Go in the Render window and, under Sampling, change the samples to
100both for Render and Preview. Also, increase the Clamp value to1.00. - Split the 3D window to two horizontal windows and change the upper one to a Node Editor window.
- Set the 3D window as a Camera view and in Rendered mode.
- In the Outliner, select the lamp, click on Use Nodes and set the Strength value to
1000.000.
And now, let's jump straight to the material creation:
- Select the cube and click on Use Nodes in the Material window, under Surface in the Properties panel, or in the Node Editor window's header. Rename the material as
Running_water. - In the Material window on the right, under Surface, switch the Diffuse shader with a Mix Shader node. In the first Shader slot, select a Glass BSDF shader and in the second slot a Glossy BSDF shader.
- Set the Glass shader's IOR value to
1.330and the color of both the Glass and Glossy shaders to pure white. Set the Roughness value of the Glossy shader to0.010. - Add a Fresnel node (press Shift + A and go to Input | Fresnel) and connect its output to the Fac socket of the Mix Shader node; set the IOR value to
1.330. - Add a Musgrave Texture node (press Shift + A and go to Texture | Musgrave Texture) and a Bump node (press Shift + A and go to Vector | Bump). Connect the Musgrave node's Fac output to the Height input of the Bump node, then its Normal output to the Normal sockets of the Glass and Glossy shaders.
- Add a Texture Coordinate node (press Shift + A and go to Input | Texture Coordinate) and a Mapping (press Shift + A and go to Vector | Mapping) node. Connect the Object output of the first to the Vector input of the second one, and then connect the Vector output of the Mapping node to the Vector input socket of the Musgrave Texture node.
- In the Mapping node, set the Scale value for the z axes to 0.200, as shown here:
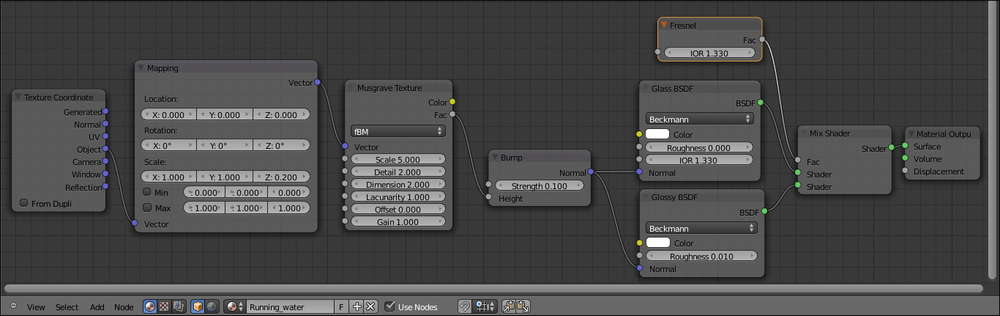
The water material is very simple: it is a Glass BSDF shader mixed with a Glossy BSDF to provide a better reflection of the environment. Note that the Roughness value of the Glossy shader is set really low, at 0.010, to provide almost the most of reflection, and that the index of refraction for both the Glass shader and the Fresnel node is 1.330.
The Musgrave texture is there just to add "pattern" to the Running_water shader. The only difference between the Running_water shader and the Water_calm shader in the containers lies in the Musgrave texture and, of course, the displacement, replaced in the Water_calm case by a Wave modifier to provide some "life".
Both the displacement and the Musgrave texture assigned to our running water are, at the moment, static. Of course, it's possible to animate them; just follow these steps:
- Add an Empty (press Shift + A and go to Empty with the mouse in the 3D window) to the scene, possibly at the origin pivot point of the cube. Reselect the cube and go to the Object Modifiers window. Now, in the Displace modifier, under Texture Coordinates, switch from Local to Object; in the just appeared Object new slot, click to select the name of the Empty. Now the displacement is mapped on the position of this Empty.
- Looking in the Timeline at the bottom of the screen, be sure to be at frame 1. Select the Empty and press I and go to Location. This sets a position key for the Empty at frame 1.
- Now, in the Timeline, go at frame 25; move the Empty 10 units down on the z axis and again press I and go to Location, to set a second position key for the Empty.
- In the Screen lay-out button at the top, switch from Default to Animation. In the Graph Editor window, press T and go to Linear and press Shift + E and go to Linear Extrapolation to make the twenty-fifth frame's Empty animation constant and continuous.
- Switch back to the Default screen, go at frame 1, and select the cube. In the Node Editor window, zoom on the Mapping node. Put the mouse on the Location values and press I; the values turn yellow, to show that a key has been assigned.
- Go to frame 25, change the Z Location value to
-10.000and press I again. - Switch to the Animation screen, again press T and go to Linear and press Shift + E and go to Linear Extrapolation in the Graph Editor window.
