
In this recipe, we will create a sand material, good for close objects as for distant ones:

To get ready, start Blender and switch to Cycles. Delete the default cube and add a plane. In the edit mode, scale it nine times bigger (18 units per side).
- Go to the World window and click on Use Nodes, then click on the little square with a dot on the right-hand side of the color slot. From the menu, select Sky Texture. Set the Strength value to
0.300. - Select the lamp and go to the lamp's Object Data window and click on Use Nodes. Then change the Lamp type to Sun and set the Size value to
0.100and the Strength value to2.000. Change the light's color to R 1.000, G 0.782, B 0.310. In an orthogonal top view, rotate the Sun lamp to 45°. - Place the camera to have a nice angle on the plane and switch the 3D view to a Camera view (press 0 from numpad).
- Add a cube and a UV Sphere to the scene and place them leaning on the plane.
- Select the cube and in the Object Modifiers window add a Bevel modifier. Set the Width value to
0.0600. Assign a Subdivision Surface modifier and set both the levels to 2. Assign a Smooth modifier and set the Factor value to1.000and Repeat to25. Press T to call the Object Tools panel on the left, and under Shading select Smooth. - Split the 3D window to two horizontal rows and change the upper one to a Node Editor window and set the Camera view mode to Rendered.
We are now ready to go and make this:

After you have prepared the scene, let's start with creation of the material:
- Select the plane and click on New in the Material window under the Properties panel, or in the Node Editor window's header. Rename the material as
Sand_01. - Press Shift and select the UV Sphere, the cube, and the plane (because it's the active object of the multiselection). Press Crtl + L and from the Make Links pop-up menu, select Material to assign the same material to the other two objects. The
Sand_01material is now assigned to all three objects. - In the Material window under the Properties panel on the right, switch the Diffuse shader with a Mix Shader node. In both the two Shader slots, assign a Diffuse BSDF shader.
- Change the color of the first Diffuse shader to R 0.800, G 0.659, B 0.504. Change the color of the second Diffuse shader to R 0.521, G 0.513, B 0.335.
- Add a Noise Texture node (press Shift + A and go to Texture | Noise Texture), add a Texture Coordinate node (press Shift + A and go to Input | Texture Coordinate), and a Mapping node (press Shift + A and go to Vector | Mapping).
- Connect the Object output of the Texture Coordinate node to the Vector input of the Mapping node, and then the Vector output to the Vector input of the Noise texture.
- Connect the Fac output of the Noise texture to the Fac input of the Mix Shader node. Increase the Detail value of the Noise texture to 5.000, as shown here:

- Add a Frame (press Shift + A and go to Layout | Frame). Press Shift to multi-select the Noise texture, the two Diffuse shaders, the Mix Shader node, and the Frame. Press Crtl + P to parent them. In the Active Node panel (Press N in the Node Editor window), rename the Frame as Sand Color.
- Add a new Noise texture and a Wave Texture node (press Shift + A and go to Texture | Wave Texture). Select both these textures and press Shift + D to duplicate them. Adjust them in a column in this order: Wave, Noise, Noise, and Wave. Connect the Mapping output to their corresponding Vector inputs.
- Set the first Wave texture's Scale value to
3.000, Distortion to25.000, and Detail to10.000. Set the first Noise texture's Detail value to10.000and Distortion to0.500. Set the second Noise texture's Detail value to10.000. Set the last Wave node's Scale value to25.000, Distortion to15.000, and Detail Scale to5.000. - Add a Mix node (press Shift + A and go to Color | Mix) and connect the first Wave color output to the Color1 input, and the second Noise texture color output to the Color2 input.
- Select the Mix node and press Shift + D to duplicate it. Connect the color output of the first Mix node to the Color1 input of the second Mix node, and the last Wave texture color output to its Color2 input.
- Connect the color output of the third Noise texture to the Fac input socket of the second Mix node.
- Select a Mix node and press Shift + D to duplicate it. Change the Blend Type to Multiply. Connect the output of the second Mix node to the Color1 input socket of the Multiply node. Set its Fac value to
0.300and connect its output to the Displacement input socket of the Material Output node. - Add a Hue Saturation Value node (press Shift + A and go to Color | Hue Saturation Value) and drag it to the link connecting the second Noise texture to the first Mix node to paste it in between. Set Value to
10.000. - Press Shift + D to duplicate it and drag it to the link connecting the last Wave texture to the second Mix node. Set Value to
0.100. - Press Shift + D to duplicate it again and drag it between the second Mix node and the Multiply node. Set Value to
0.350. - Add a Bright/Contrast node (press Shift + A and go to Color | Bright/Contrast) and drag it to be pasted between the second Noise texture and the second Mix factor input. Set the Bright value to -0.250 and the Contrast value to 1.000, as shown in the following screenshot:

- Add a Frame, select these last 11 nodes and the Frame, and then press Crtl + P to parent them. Rename the Frame as Sand Bump.
- Select the last Wave texture and press Shift + D to duplicate it twice (press Alt + P unparent it, if after the duplication, the node is still parented to the Frame). Do the same with the Bright/Contrast node. Connect the Mapping output to their Vector input. Select a Mix node and press Shift + D to duplicate it. Set the Blend Type to Divide and the factor to
1.000. - Connect each Color output of the two textures to the respective Color input of the Bright/Contrast nodes. Then, connect their color outputs to the Color1 and Color2 inputs of the Divide node.
- In the first Wave texture, set the Scale value to
0.500, Distortion to25.000, Detail to10.000, and Detail Scale to1.000. In the Bright/Contrast node, set the Bright value to0.000and the Contrast value to-0.800. In the second Wave texture, set the Scale value to1.000, Distortion to10.000, Detail to5.000, and Detail Scale to1.000. In the respective Bright/Contrast node again set the Bright value to0.000and the Contrast value to-0.800. - Add a Math node (press Shift + A and go to Convertor | Math). Set the operation to Multiply and the first Value the same as the Scale value of the first Wave texture (
0.500). Set the second Value to1.000. Connect the Value output to the Scale input of the first Wave texture node. - Press Shift + D to duplicate the Math node, move it on the side of the second Wave texture, and set the first Value the same as the Scale value of the second Wave texture (
1.000). Connect the Value output to the Scale input. - Add a Value node (press Shift and go to Input | Value) and connect the output to both the second Value input sockets of the Math nodes, as shown here:

- Add a Frame, parent and rename the Frame as Big Waves.
- Duplicate a Multiply node and drag it to the link between the Sand Bump frame's Multiply node output and the Material Output node. Connect the Divide node output of Big Waves to the Color2 input of this last Multiply node.
- Duplicate a Noise texture, a Bright/Contrast node, and a Multiply node. Connect the Mapping output to the Vector input of the texture node, then connect the Noise color output to the Bright/Color color input and its output to the Color1 input of the Multiply node.
- Set the Noise texture's Scale value to
200.000, Detail to1.000, and Distortion to0.000. Set the Bright/Contrast node's Bright value to0.000and the Contrast value to0.200. Set the Multiply factor value to0.050. - Duplicate a Multiply node and paste it between the Multiply node and the Material Output node. Connect the Multiply output of the Granularity to its Color2 input and set the Fac value to 1.000:

- Add a Math node (press Shift + A and go to Convertor | Math) and a RGB to BW node (press Shift + A and go to Convertor | RGB to BW). Paste the Math node between the last Multiply node and the Material Output node, then paste the RGB to BW node just before the Math node.
- Set the Math node's operation to Multiply and the second Value to 1.500, as shown in the following screenshot:
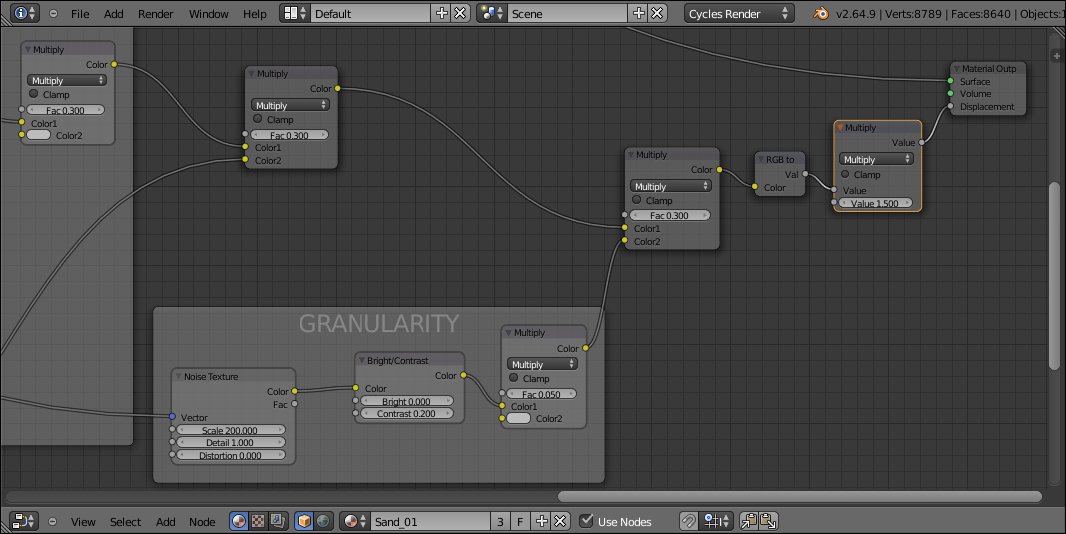
- Add a Frame and parent the RGB to BW node and the last Math nodes. Rename the frame as Total Bump Strength. For better visibility, give different colors to the frames, as shown here:

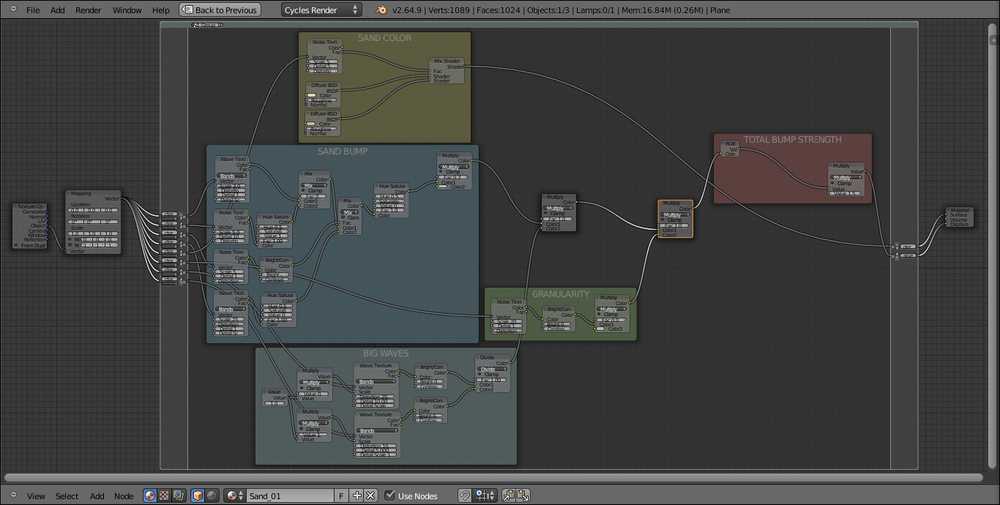
The concept behind the structure of this material is basically the same as for the procedural rock and can be subdivided in stages as well:
- From step 1 to step 7, we built the color part of the shader, blending two differently colored Diffuse shaders on the ground of a Noise texture factor.
- From step 9 to step 18, we built the main bump effect, this time piped directly as a whole in the Displacement input of the Material Output node rather than to the per shader Normal inputs.
- From step 20 to step 25, we built a supplementary bump effect, this time to simulate the big waves you can usually see on the desert sand dunes. This effect is left apart from the main bump to be easily reduced or eliminated if the case, and we added two Math nodes set to Multiply and driven by a Value node to automatically set the size of the sand big waves (actually, this is more of a "repeating" effect, that is, the bigger the value, the smaller and closer the waves).
- In steps 28 and 29, we built a last bump effect to add, if necessary, the sand grain, for example, for objects very close to the camera. From step 31 to step 33, we summed all the bump effects as a whole, to be driven by the Math node value.
Every stage has been "framed" and labeled to make it more easily readable in the Node Editor window.
One more thing we can do to improve this material is to combine everything in a "group" node, leaving, at the same time, the fundamental values exposed to be tweaked from the interface.
- Put the mouse cursor in the Node Editor window and press B. Horizontal and vertical lines now appear at the mouse cursor's location, left-click and drag the mouse to encompass the framed nodes, leaving outside only the Texture Coordinate, the Mapping, and the Material Output nodes. After the mouse button is released, everything you encompassed is now selected.
- Press Crtl + G and confirm by clicking on the Make Group | New pop-up and create the group:
- As you can see, all the links to the external nodes have been created on the left and right sides of the group interface. Rename the group (in the little window on the top-left of the interface) as Sand_group.
- All the mapping coordinates for the texture nodes are Object, so one Vector input is enough. Replace all the connections to the texture nodes with the first input and then delete the unnecessary empty sockets, as shown here:

- Now we need to expose the values to modify the material from the interface. From the Fac input of the first Multiply node, click and drag a link to the left border of the group. In the newly appeared input socket name, enter
Big waves strength. This value actually drives the strength (the multiplication value) of the Big Waves bump summed to the main Sand Bump. - Do the same with the second Multiply node and rename the input as Granularity. Again, this value will drive the amount of multiplication of the sand grain to the rest of the bump effect.
- Now click on the Value node inside the Big Waves frame and press X to delete it. Click and drag to the border around the second Value socket of the first Wave node and rename the exposed new socket as Big waves repeat. Also, Click and drag a link also from the second Value socket of the second Wave node and connect it to the Big waves repeat socket. By clicking on the upper little arrow on the socket side, move it up just before the Granularity frame.
- We also need to expose the Multiply node inside the Total Bump Strength frame, by dragging the second Value socket. Rename the new socket on the interface as Bump strength. This is, in fact, the value for the overall bump of the material.

- Press Tab to close the group. On the interface we have the controls to increase or decrease the overall bump effect, the sand grain, and the waves' strength and scale/repetition. We can have exposed even more values, for example, also the first bump amount for more finer tweaking, and the two color inputs in the Sand Color frame.

The group is now available under the Add menu by using a shortcut (press Shift + A and go to Group | Sand_group), and can be easily re-used for other materials in the same scene and also with different interface values; or linked/appended from a library in other blend files.