C H A P T E R 11
Writing Advanced Queries
In Chapter 10, you learned about some useful data types in SQL Server 2012. In this chapter, you will learn about some of the functions and advanced queries available with these most recent releases. For example, you will learn more about common table expressions (CTEs), how to write a pivot query, how to use the new ranking functions, and more. As a beginning T-SQL developer, you may or may not need this information right away. This chapter doesn’t contain any exercises, but I encourage you to experiment and come up with your own examples for any of the features that you are interested in. Consider the information in this chapter as a head start in becoming an expert T-SQL developer.
Advanced CTE Queries
In Chapter 4, you learned to use common table expressions as one of the ways to combine the data from more than one table into one query. In Chapters 5 and 6, you learned how CTEs can simplify many statements. CTEs allow you to isolate part of the query logic or do things you could not ordinarily do, such as use an aggregate expression in an update. In these cases, you could use derived tables (see the “Derived Tables” section in Chapter 4), but now you will learn that CTEs are much more versatile. You can do several things with CTEs that are not possible with derived tables, such as write a recursive query. This section covers these advanced CTE features.
![]() Caution The keyword
Caution The keyword WITH appears in many other statement types. Because of this, a statement containing a CTE must be the first statement in the batch, or the previous statement must end with a semicolon. At this point, Microsoft recommends using semicolons to end T-SQL statements, but it is not required. Some developers start all CTE definitions with a semicolon to avoid errors.
Using Multiple CTEs
You can use CTEs to organize and isolate query logic in order to write complicated queries efficiently. You can’t nest CTEs; that is, one CTE can’t contain another CTE. You can, however, add multiple CTEs to one query. You might want to do this just to make your query more readable or possibly because writing the query this way will let you avoid creating temp tables or views. Here is the syntax:
WITH <cteName1> AS (SELECT <col1> FROM <table1>),

    <cteName2> AS (SELECT <col2> FROM <table2>),

    <cteName3> AS (SELECT <col3> FROM <table3>)
SELECT <col1>, <col2>, <col3>
FROM <cteName1> INNER JOIN <cteName2> ON <join condition1>
INNER JOIN <cteName3> ON <join condition2>
Of course, your CTE definitions can contain just about any valid SELECT statement, and your outer query can use the CTEs in any way you need to use them. Type in and execute Listing 11-1 to learn more.
![]() Note The CTE examples in this chapter create objects in tempdb. Keep in mind that tempdb is recreated each time the SQL service restarts, so if you restart SQL Server, you will need to run the CREATE TABLE statements again.
Note The CTE examples in this chapter create objects in tempdb. Keep in mind that tempdb is recreated each time the SQL service restarts, so if you restart SQL Server, you will need to run the CREATE TABLE statements again.
Listing 11-1. A Query with Multiple Queries in a CTE
--1 First, populate the tempdb tables


USE [tempdb];

GO


CREATE TABLE [Employee](

        [EmployeeID] [int] NOT NULL,

        [ContactID] [int] NOT NULL,

        [ManagerID] [int] NULL,

        [Title] [nvarchar](50) NOT NULL);


CREATE TABLE [Contact] (

        [ContactID] [int] NOT NULL,

        [FirstName] [nvarchar](50) NOT NULL,

        [MiddleName] [nvarchar](50) NULL,

        [LastName] [nvarchar](50) NOT NULL);


INSERT INTO tempdb.dbo.Contact (ContactID, FirstName, MiddleName, LastName) VALUES

        (1030,'Kevin','F','Brown'),

        (1009,'Thierry','B','DHers'),

        (1028,'David','M','Bradley'),

        (1070,'JoLynn','M','Dobney'),

        (1071,'Ruth','Ann','Ellerbrock'),

        (1005,'Gail','A','Erickson'),

        (1076,'Barry','K','Johnson'),

        (1006,'Jossef','H','Goldberg'),

        (1001,'Terri','Lee','Duffy'),

        (1072,'Sidney','M','Higa'),

        (1067,'Taylor','R','Maxwell'),

        (1073,'Jeffrey','L','Ford'),

        (1068,'Jo','A','Brown'),

        (1074,'Doris','M','Hartwig'),

        (1069,'John','T','Campbell'),

        (1075,'Diane','R','Glimp'),

        (1129,'Steven','T','Selikoff'),

        (1231,'Peter','J','Krebs'),
(1172,'Stuart','V','Munson'),
(1173,'Greg','F','Alderson'),
(1113,'David','N','Johnson'),
(1054,'Zheng','W','Mu'),
(1007, 'Ovidiu', 'V', 'Cracium'),
(1052, 'James', 'R', 'Hamilton'),
(1053, 'Andrew', 'R', 'Hill'),
(1056, 'Jack', 'S', 'Richins'),
(1058, 'Michael', 'Sean', 'Ray'),
(1064, 'Lori', 'A', 'Kane'),
(1287, 'Ken', 'J', 'Sanchez'),
INSERT INTO tempdb.dbo.Employee (EmployeeID, ContactID, ManagerID, Title) VALUES
(1, 1209, 16,'Production Technician - WC60'),
(2, 1030, 6,'Marketing Assistant'),
(3, 1002, 12,'Engineering Manager'),
(4, 1290, 3,'Senior Tool Designer'),
(5, 1009, 263,'Tool Designer'),
(6, 1028, 109,'Marketing Manager'),
(7, 1070, 21,'Production Supervisor - WC60'),
(8, 1071, 185,'Production Technician - WC10'),
(9, 1005, 3,'Design Engineer'),
(10, 1076, 185,'Production Technician - WC10'),
(11, 1006, 3,'Design Engineer'),
(12, 1001, 109,'Vice President of Engineering'),
(13, 1072, 185,'Production Technician - WC10'),
(14, 1067, 21,'Production Supervisor - WC50'),
(15, 1073, 185,'Production Technician - WC10'),
(16, 1068, 21,'Production Supervisor - WC60'),
(17, 1074, 185,'Production Technician - WC10'),
(18, 1069, 21,'Production Supervisor - WC60'),
(19, 1075, 185,'Production Technician - WC10'),
(20, 1129, 173,'Production Technician - WC30'),
(21, 1231, 148,'Production Control Manager'),
(22, 1172, 197,'Production Technician - WC45'),
(23, 1173, 197,'Production Technician - WC45'),
(24, 1113, 184,'Production Technician - WC30'),
(25, 1054, 21,'Production Supervisor - WC10'),
(109, 1287, NULL, 'Chief Executive Officer'),
(148, 1052, 109, 'Vice President of Production'),
(173, 1058, 21, 'Production Supervisor - WC30'),
(184, 1056, 21, 'Production Supervisor - WC30'),
(185, 1053, 21, 'Production Supervisor - WC10'),
(197, 1064, 21, 'Production Supervisor - WC45'),
(263, 1007, 3, 'Senior Tool Designer'),
--2 Now run the CTE query
USE tempdb;
WITH
Emp AS(
SELECT e.EmployeeID, e.ManagerID,e.Title AS EmpTitle, c.FirstName + ISNULL(' ' + c.MiddleName,'') + ' ' + c.LastName AS EmpName
FROM Employee AS e
INNER JOIN Contact AS c
ON e.ContactID = c.ContactID
),
Mgr AS(
SELECT e.EmployeeID AS ManagerID,e.Title AS MgrTitle,
c.FirstName + ISNULL(' ' + c.MiddleName,'') + ' ' + c.LastName AS MgrName
FROM Employee AS e
INNER JOIN Contact AS c
ON e.ContactID = c.ContactID
)
SELECT EmployeeID, Emp.ManagerID, EmpName, EmpTitle, MgrName, MgrTitle
FROM Emp INNER JOIN Mgr ON Emp.ManagerID = Mgr.ManagerID
ORDER BY EmployeeID;
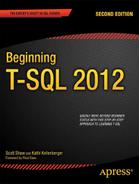
Figure 11-1 shows the partial results. Each CTE must have a name, followed by the keyword AS and the definition in parentheses. Separate the CTE definitions with a comma. This query, from the tempdbdatabase, contains a CTE for the employees, Emp, and a CTE for the managers, Mgr. Within each CTE, the Employee table joins the Contact table. By writing the query using CTEs, the outer query is very simple. You just join the Mgr CTE to the Emp CTE just as if they were regular tables or views.

Figure 11-1. The partial results of multiple CTEs in one statement
Calling a CTE Multiple Times
Just as you can have multiple CTE definitions within one statement, you can call a CTE multiple times within one statement. This is not possible with a derived table, which can be used only once within a statement. (See Chapter 4 for more information about derived tables.) A CTE could be used in a self-join, in a subquery, or in any valid way of using a table within a statement. Here are two syntax examples:
--self-join

WITH <cteName> AS (SELECT <col1>, <col2> FROM <table1>)

SELECT a.<col1>, b.<col1>

FROM <cteName> AS a

INNER JOIN <cteName> AS b ON <join condition>


--subquery

WITH <cteName> AS (SELECT <col1>, <col2> FROM <table1>)

SELECT <col1>

FROM <cteName>

WHERE <col2> IN (SELECT <col2>

    FROM <cteName> INNER JOIN <table1> ON <join condition>)
Type in and execute Listing 11-2 to see some examples. The self-join produces the same results as those in the previous section.
Listing 11-2. Calling a CTE Multiple Times Within a Statement
USE tempdb;


WITH

Employees AS(

    SELECT e.EmployeeID, e.ManagerID,e.Title,

        c.FirstName + ISNULL(' ' + c.MiddleName,'') + ' ' +  c.LastName AS EmpName

    FROM Employee AS e
INNER JOIN Contact AS c
ON e.ContactID = c.ContactID
)
SELECT emp.EmployeeID, emp.ManagerID, emp.EmpName, emp.Title AS EmpTitle,
mgr.EmpName as MgrName, mgr.Title as MgrTitle
FROM Employees AS Emp INNER JOIN Employees AS Mgr
ON Emp.ManagerID = Mgr.EmployeeID;
--2
WITH Employees AS (
SELECT e.EmployeeID, e.ManagerID,e.Title,
c.FirstName + ISNULL(' ' + c.MiddleName,'') + ' ' + c.LastName AS EmpName
FROM Employee AS e
INNER JOIN Contact AS c
ON e.ContactID = c.ContactID)
SELECT EmployeeID, ManagerID, EmpName, Title
FROM Employees
WHERE EmployeeID IN (SELECT EmployeeID
FROM Employees AS e
INNER JOIN AdventureWorks2012.HumanResources.Employee AS er2 ON e.ManagerID = er2.BusinessEntityID
WHERE er2.MaritalStatus = 'M'),
Figure 11-2 shows the partial results. Statement 1 defines just one CTE, joining Employee to Contact. The outer query calls the CTE twice, once with the alias Emp and once with the alias Mgr. Statement 2 defines the same CTE. In this case, however, the outer query uses the CTE as the main table and also within a subquery.
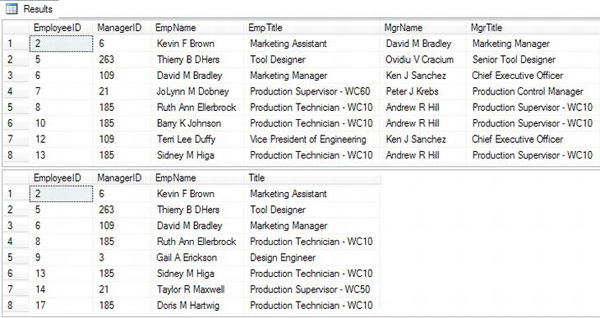
Figure 11-2. The partial results of using a CTE twice in one statement
Joining a CTE to Another CTE
Another very interesting feature of CTEs is the ability to call one CTE from another CTE definition. This is not recursion, which you will learn about in the “Writing a Recursive Query” section. Calling one CTE from within another CTE definition allows you to base one query on a previous query. Here is a syntax example:
WITH <cteName1> AS (SELECT <col1>, <col2> FROM <table1>),

    <cteName2> AS (SELECT <col1>, <col2>, <col3>

        FROM <table3> INNER JOIN <cteName1> ON <join condition>)

SELECT <col1>, <col2>, <col3> FROM <cteName2>
The order in which the CTE definitions appear is very important. You can’t call a CTE before it is defined. Type in and execute the code in Listing 11-3 to learn more.
Listing 11-3. Joining a CTE to Another CTE
USE tempdb;


--1

IF OBJECT_ID('dbo.JobHistory') IS NOT NULL BEGIN

    DROP TABLE dbo.JobHistory;

END;


--2

CREATE TABLE JobHistory(

    EmployeeID INT NOT NULL,

    EffDate DATE NOT NULL,

    EffSeq INT NOT NULL,

    EmploymentStatus CHAR(1) NOT NULL,

    JobTitle VARCHAR(50) NOT NULL,

    Salary MONEY NOT NULL,

    ActionDesc VARCHAR(20)

 CONSTRAINT PK_JobHistory PRIMARY KEY CLUSTERED

(

    EmployeeID, EffDate, EffSeq

));


GO


--3

INSERT INTO JobHistory(EmployeeID, EffDate, EffSeq, EmploymentStatus,

    JobTitle, Salary, ActionDesc)

VALUES

    (1000,'07-31-2008',1,'A','Intern',2000,'New Hire'),

    (1000,'05-31-2009',1,'A','Production Technician',2000,'Title Change'),

    (1000,'05-31-2009',2,'A','Production Technician',2500,'Salary Change'),

    (1000,'11-01-2009',1,'A','Production Technician',3000,'Salary Change'),

    (1200,'01-10-2009',1,'A','Design Engineer',5000,'New Hire'),

    (1200,'05-01-2009',1,'T','Design Engineer',5000,'Termination'),

    (1100,'08-01-2008',1,'A','Accounts Payable Specialist I',2500,'New Hire'),

    (1100,'05-01-2009',1,'A','Accounts Payable Specialist II',2500,'Title Change'),

    (1100,'05-01-2009',2,'A','Accounts Payable Specialist II',3000,'Salary Change'),


--4

DECLARE @Date DATE = '05-02-2009';


--5

WITH EffectiveDate AS (

        SELECT MAX(EffDate) AS MaxDate, EmployeeID

        FROM JobHistory

        WHERE EffDate <= @Date

        GROUP BY EmployeeID

    ),

    EffectiveSeq AS (
SELECT MAX(EffSeq) AS MaxSeq, j.EmployeeID, MaxDate
FROM JobHistory AS j
INNER JOIN EffectiveDate AS d
ON j.EffDate = d.MaxDate AND j.EmployeeID = d.EmployeeID
GROUP BY j.EmployeeID, MaxDate)
SELECT j.EmployeeID, EmploymentStatus, JobTitle, Salary
FROM JobHistory AS j
INNER JOIN EffectiveSeq AS e ON j.EmployeeID = e.EmployeeID
AND j.EffDate = e.MaxDate AND j.EffSeq = e.MaxSeq;
Figure 11-3 shows the results. I based this example on a system that I have worked with for several years. Many of the tables in this system contain history information with an effective date and an effective sequence. The system adds one row to these tables for each change to the employee’s data. For a particular effective date, the system can add more than one row along with an incrementing effective sequence. To display information valid on a particular date, you first have to figure out the latest effective date before the date in mind and then figure out the effective sequence for that date. At first glance, you might think that just determining the maximum date and maximum sequence in one aggregate query should work. This doesn’t work because the maximum sequence in the table for an employee may not be valid for a particular date. For example, the employee may have four changes and, therefore, four rows for an earlier date and only one row for the latest date.
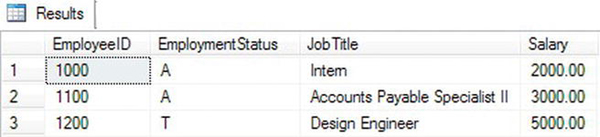
Figure 11-3. The results of calling one CTE from another CTE definition
Code section 1 drops the JobHistory table if it already exists. Statement 2 creates the JobHistory table including a primary key composed of EmployeeID, EffDate, and EffSeq. Statement 3 inserts several rows into the table. Notice that the statement inserts one row for each change even if the changes happen on the same date. Statement 4 declares and initializes a variable, @Date, which will be used in the WHERE clause in Statement 5. You can change the value of this variable to validate the results for different dates.
Statement 5 contains the SELECT statement. The first CTE, EffectiveDate, just determines the maximum EffDate from the JobHistory table for each employee that is valid for the @Date value. The second CTE, EffectiveSeq, joins the JobHistory table to the EffectiveDate CTE to find the maximum EffSeq for each employee for the date determined in the previous CTE, EffectiveDate. Finally, the outer query joins the JobHistory table on the EffectiveSeq CTE to display the valid data for each employee on the date stored in @Date.
Using the Alternate CTE Syntax
I prefer naming all the columns within the CTE definition, but you can also specify the column names outside the definition. There is no advantage to either syntax, but you should be familiar with both. Here is the syntax:
WITH <cteName> (<col1>, <col2>) AS (

    SELECT <col3>,<col4> FROM <table1>)

SELECT <col1>,<col2> FROM <cteName>
When using this technique, the column names defined outside the definition must be used in the outer query. If you have an expression within the definition, you don’t have to give the expression an alias. Type in and execute the code in Listing 11-4 to practice this technique.
Listing 11-4. Writing a Query with the Alternate CTE Syntax
USE tempdb;


WITH Emp (EmployeeID, ManagerID, JobTitle,EmpName) AS

    (SELECT e.EmployeeID, e.ManagerID,e.Title,

        c.FirstName + ISNULL(' ' + c.MiddleName,'') + ' ' +  c.LastName

    FROM Employee AS e

    INNER JOIN Contact AS c

    ON e.ContactID = c.ContactID)

SELECT Emp.EmployeeID, ManagerID, JobTitle, EmpName

FROM Emp;
Figure 11-4 shows the partial results. All the columns must be listed in parentheses between the CTE name and the definition. Only the columns listed are valid. Either syntax will work; it is just a matter of preference.

Figure 11-4. The partial results of using the named column CTE syntax
Writing a Recursive Query
Recursive code, in any programming language, is code that calls itself. Programmers use this technique to follow paths in tree or directory structures. When following the paths in these structures, the code must start at the root, follow each path to the end, and back up again to the next path repeatedly. In T-SQL, you can use the same technique in a CTE. Let’s use the same Employee table created in tempdb at the beginning of the chapter to demonstrate how to use a recursive CTE. The self-join found in that table represents a hierarchical structure. To view the entire hierarchy, you must start at the root, the CEO of the company, and follow every possible manager-employee path down to the lowest person. Here is the syntax for writing a recursive CTE:
WITH <cteName> (<col1>, <col2>, <col3>, level)

AS

(

    --Anchor member

    SELECT <primaryKey>,<foreignKey>,<col3>, 0 AS level

    FROM <table1>

    WHERE <foreignKey> = <startingValue>

    UNION ALL

    --Recursive member

    SELECT a.<primaryKey>,a.<foreignKey>,a.<col3>, b.level + 1

    FROM <table1> AS a

    INNER JOIN <cteName> AS b

        ON a.<foreignKey>  = b.<primaryKey>

)

SELECT <col1>,<col2>,<col3>,level

FROM <cteName> [OPTION (MAXRECURSION <number>)]
To write the recursive CTE, you must have an anchor member, which is a statement that returns the top of your intended results. This is like the root of the directory. Following the anchor member, you will write the recursive member. The recursive member actually joins the CTE that contains it to the same table used in the anchor member. The results of the anchor member and the recursive member join in a UNION ALL query. Type in and execute the code in Listing 11-5 to see how this works.
Listing 11-5. A Recursive CTE
USE tempdb;


WITH OrgChart (EmployeeID, ManagerID, Title, Level,Node)

    AS (SELECT EmployeeID, ManagerID, Title, 0,

            CONVERT(VARCHAR(30),'/') AS Node

        FROM Employee

        WHERE ManagerID IS NULL

        UNION ALL

        SELECT a.EmployeeID, a.ManagerID,a.Title, b.Level + 1,

          CONVERT(VARCHAR(30),b.Node +

              CONVERT(VARCHAR,a.ManagerID) + '/')

        FROM Employee AS a

        INNER JOIN OrgChart AS b ON a.ManagerID = b.EmployeeID

    )

SELECT EmployeeID, ManagerID, SPACE(Level * 3) + Title AS Title, Level, Node

FROM OrgChart
ORDER BY Node;
Figure 11-5 shows the results. The anchor member selects the EmployeeID, ManagerID, and Title from the Employee table for the CEO. The CEO is the only employee with a NULL ManagerID. The level is zero. The node column, added to help sorting, is just a slash. To get this to work, the query uses the CONVERT function to change the data type of the slash to a VARCHAR(30) because the data types in the columns of the anchor member and recursive member must match exactly. The recursive member joins Employee to the CTE, OrgChart. The query is recursive because the CTE is used inside its own definition. The regular columns in the recursive member come from the table, and the level is one plus the value of the level returned from the CTE. To sort in a meaningful way, the node shows the ManagerID values used to get to the current employee surrounded with slashes. This looks very similar to the node used in the HierarchyID example in Chapter 10.

Figure 11-5. The partial results of a recursive query
The query runs the recursive member repeatedly until all possible paths are selected; that is, until the recursive member no longer returns results. In case of an incorrectly written recursive query that will run forever, the recursive member will run only 100 times by default unless you specify the MAXRECURSION option to limit how many times the query will run. To alter the query in Listing 11-5 to a potential unending loop, change a.ManagerID = b.EmployeeID to a.EmployeeID = b.EmployeeID.
Just because the default MAXRECURSION value is 100 doesn’t mean that a recursive query will return only 100 rows. In this example, the anchor returns the CEO, EmployeeID 109. The first time the recursive member runs, the results include all employees who report to 109. The next call returns the employees reporting to the employees returned in the last call, and so on. The values from one call feed the next call. This process will quickly exceed the MAXRECURSION value and the query will generate an error. If you want to see what an unending recursive query loop looks like, change the MAXRECURSION value to 0. Keep in mind that you will need to manually terminate the query since it will never actually complete.
Instead of filtering the anchor to find the CEO, you can supply any ManagerID value. If you specify a particular manager, instead of starting at the CEO, the results will start at the subordinates of the ManagerID supplied. On your own, change the criteria in the anchor member, and rerun the query to see what happens.
Writing recursive queries is an advanced skill you may or may not need right away. Luckily, if you do need to write a recursive query, you will know where to find a simple example.
The OUTPUT Clause
You learned how to manipulate data in Chapter 6. The OUTPUT clause allows you to see or even save the modified values when you perform a data manipulation statement. The interesting thing about OUTPUT is that data manipulation statements don’t normally return data except for the number of rows affected. By using OUTPUT, you can retrieve a result set of the data in the same statement that updates the data. You can see the result set in the query window results or return the result set to a client application.
Using OUTPUT to View Data
When using OUTPUT, you can view the data using the special tables DELETED and INSERTED. You may wonder why there is not an UPDATED table. Instead of an UPDATED table, you will find the old values in the DELETED table and the new values in the INSERTED table. Here are the syntax examples for using the OUTPUT clause for viewing changes when running data manipulation statements:
--Update style 1

UPDATE a SET <col1> = <value>

OUTPUT deleted.<col1>,inserted.<col1>

FROM <table1> AS a


--Update style 2

UPDATE <table1> SET <col1> = <value>

OUTPUT deleted.<col1>, inserted.<col1>

WHERE <criteria>


--Insert style 1

INSERT [INTO] <table1> (<col1>,<col2>)

OUTPUT inserted.<col1>, inserted.<col2>

SELECT <col1>, <col2>

FROM <table2>


--Insert style 2

INSERT [INTO] <table1> (<col1>,<col2>)

OUTPUT inserted.<col1>, inserted.<col2>

VALUES (<value1>,<value2>)


--Delete style 1

DELETE [FROM] <table1>

OUTPUT deleted.<col1>, deleted.<col2>

WHERE <criteria>
--DELETE style 2
DELETE [FROM] a
OUTPUT deleted.<col1>, deleted.<col2>
FROM <table1> AS a
Probably the trickiest thing about using OUTPUT is figuring out where in the statement to include it. Type in and execute the code in Listing 11-6 to learn more about OUTPUT.
Listing 11-6. Viewing the Manipulated Data with OUTPUT
USE AdventureWorks2012;

GO


--1

IF OBJECT_ID('dbo.Customers') IS NOT NULL BEGIN

    DROP TABLE dbo.Customers;

END;


--2

CREATE TABLE dbo.Customers (CustomerID INT NOT NULL PRIMARY KEY,

    Name VARCHAR(150),PersonID INT NOT NULL)

GO


--3

INSERT INTO dbo.Customers(CustomerID,Name,PersonID)

OUTPUT inserted.CustomerID,inserted.Name

SELECT c.CustomerID, p.FirstName + ' ' + p.LastName,PersonID

FROM Sales.Customer AS c

INNER JOIN Person.Person AS p

ON c.PersonID = p.BusinessEntityID;


--4

UPDATE c SET Name = p.FirstName +

    ISNULL(' ' + p.MiddleName,'') + ' ' + p.LastName

OUTPUT deleted.CustomerID,deleted.Name AS OldName, inserted.Name AS NewName

FROM dbo.Customers AS c

INNER JOIN Person.Person AS p on c.PersonID = p.BusinessEntityID;


--5

DELETE FROM dbo.Customers

OUTPUT deleted.CustomerID, deleted.Name, deleted.PersonID

WHERE CustomerID = 11000;
Figure 11-6 shows the partial results. Unfortunately, you can’t add an ORDER BY clause to OUTPUT, and the INSERT statement returns the rows in a different order than the UPDATE statement. Code section 1 drops the dbo.Customers table if it already exists. Statement 2 creates the dbo.Customers table. Statement 3 inserts all the rows when joining the Sales.Customer table to the Person.Person table. The OUTPUT clause, located right after the INSERT clause, returns the CustomerID and Name. Statement 4 modifies the Name column by including the MiddleName in the expression. The DELETED table displays the Name column data before the update. The INSERTED table displays the Name column after the update. The UPDATE clause includes aliases to differentiate the values. Statement 5 deletes one row from the table. The OUTPUT clause displays the deleted data.

Figure 11-6. The partial results of viewing the manipulated data with OUTPUT
Saving OUTPUT Data to a Table
Instead of displaying or returning the rows from the OUTPUT clause, you might need to save the information in another table. For example, you may need to populate a history table or save the changes for further processing. Here is a syntax example showing how to use INTO along with OUTPUT:
INSERT [INTO] <table1> (<col1>, <col2>)

OUTPUT inserted.<col1>, inserted.<col2>

INTO <table2>

SELECT <col3>,<col4>

FROM <table3>
Type in and execute the code in Listing 11-7 to learn more.
Listing 11-7. Saving the Results of OUTPUT
USE AdventureWorks2012;


--1

IF OBJECT_ID('dbo.Customers') IS NOT NULL BEGIN

    DROP TABLE dbo.Customers;

END;


IF OBJECT_ID('dbo.CustomerHistory') IS NOT NULL BEGIN

    DROP TABLE dbo.CustomerHistory;

END;


--2

CREATE TABLE dbo.Customers (CustomerID INT NOT NULL PRIMARY KEY,

    Name VARCHAR(150),PersonID INT NOT NULL)


CREATE TABLE dbo.CustomerHistory(CustomerID INT NOT NULL PRIMARY KEY,

    OldName VARCHAR(150), NewName VARCHAR(150),

    ChangeDate DATETIME);

GO


--3

INSERT INTO dbo.Customers(CustomerID, Name, PersonID)

SELECT c.CustomerID, p.FirstName + ' ' + p.LastName,PersonID

FROM Sales.Customer AS c

INNER JOIN Person.Person AS p

ON c.PersonID = p.BusinessEntityID;


--4

UPDATE c SET Name = p.FirstName +

    ISNULL(' ' + p.MiddleName,'') + ' ' + p.LastName

OUTPUT deleted.CustomerID,deleted.Name, inserted.Name, GETDATE()

INTO dbo.CustomerHistory

FROM dbo.Customers AS c

INNER JOIN Person.Person AS p on c.PersonID = p.BusinessEntityID;


--5

SELECT CustomerID, OldName, NewName,ChangeDate

FROM dbo.CustomerHistory;
Figure 11-7 shows the partial results. Code section 1 drops the dbo.Customers and dbo.CustomerHistory tables if they already exist. Code section 2 creates the two tables. Statement 3 populates the dbo.Customers table. Statement 4 updates the Name column for all of the rows. By including OUTPUT INTO, the CustomerID along with the previous and current Name values are saved into the table. The statement also populates the ChangeDate column by using the GETDATE function.
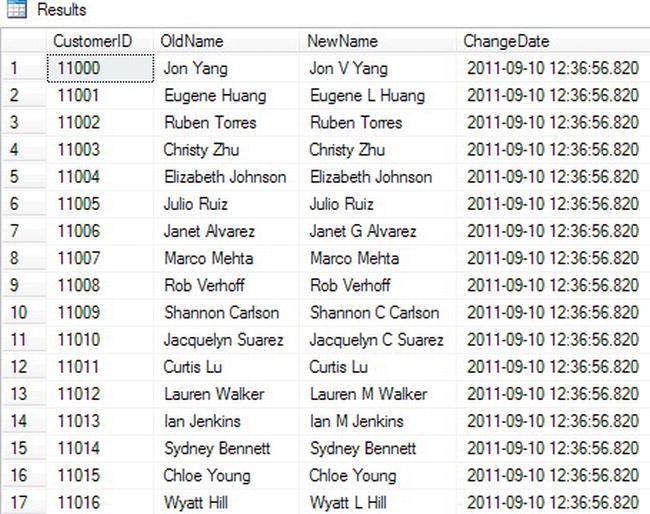
Figure 11-7. The partial results of saving the OUTPUT data into a table
The MERGE Statement
The MERGE statement, also known as upsert, allows you to synchronize two tables with one statement. For example, you would normally need to perform at least one UPDATE, one INSERT, and one DELETE statement to keep the data in one table up-to-date with the data from another table. By using MERGE, you can perform the same work more efficiently (assuming that the tables have the proper indexes in place) with just one statement. The drawback is that MERGE is more difficult to understand and write than the three individual statements. One potential use for MERGE—where taking the time to write the MERGE statements really pays off—is loading data warehouses and data marts. Here is the syntax for a simple MERGE statement:
MERGE <target table>

USING <source table name>|(or query>) AS alias [(column names)]

ON (<join criteria>)

WHEN MATCHED [AND <other critera>]

THEN UPDATE SET <col> = alias.<value>

WHEN NOT MATCHED BY TARGET [AND <other criteria>]

THEN INSERT (<column list>) VALUES (<values>) –- row is inserted into target

WHEN NOT MATCHED BY SOURCE [AND <other criteria>]

THEN DELETE –- row is deleted from target

[OUTPUT $action, DELETED.*, INSERTED.*];
At first glance, the syntax may seem overwhelming. Basically, it defines an action to perform if a row from the source table matches the target table (WHEN MATCHED), an action to perform if a row is missing in the target table (WHEN NOT MATCHED BY TARGET), and an action to perform if an extra row is in the target table (WHEN NOT MATCHED BY SOURCE). The actions to perform on the target table can be anything you need to do. For example, if the source table is missing a row that appears in the target table (WHEN NOT MATCHED BY SOURCE), you don’t have to delete the target row. You could, in fact, leave out that part of the statement or perform another action. In addition to the join criteria, you can also specify any other criteria in each match specification. You can include an optional OUTPUT clause along with the $action option. The $action option shows you which action is performed on each row. Include the DELETED and INSERTED tables in the OUTPUT clause to see the before and after values. The MERGE statement must end with a semicolon. Type in and execute the code in Listing 11-8 to learn how to use MERGE.
Listing 11-8. Using the MERGE Statement
USE AdventureWorks2012;


--1

IF OBJECT_ID('dbo.CustomerSource') IS NOT NULL BEGIN

    DROP TABLE dbo.CustomerSource;

END;

IF OBJECT_ID('dbo.CustomerTarget') IS NOT NULL BEGIN

    DROP TABLE dbo.CustomerTarget;

END;


--2

CREATE TABLE dbo.CustomerSource (CustomerID INT NOT NULL PRIMARY KEY,

    Name VARCHAR(150), PersonID INT NOT NULL);

CREATE TABLE dbo.CustomerTarget (CustomerID INT NOT NULL PRIMARY KEY,

    Name VARCHAR(150), PersonID INT NOT NULL);


--3

INSERT INTO dbo.CustomerSource(CustomerID,Name,PersonID)

SELECT CustomerID,

    p.FirstName + ISNULL(' ' + p.MiddleName,'') + ' ' + p.LastName,

    PersonID

FROM Sales.Customer AS c

INNER JOIN Person.Person AS p ON c.PersonID = p.BusinessEntityID

WHERE c.CustomerID IN (29485,29486,29487,10299);


--4

INSERT INTO dbo.CustomerTarget(CustomerID,Name,PersonID)

SELECT CustomerID, p.FirstName  + ' ' + p.LastName, PersonID

FROM Sales.Customer AS c

INNER JOIN Person.Person AS p ON c.PersonID = p.BusinessEntityID

WHERE c.CustomerID IN (29485,29486,21139);


--5

SELECT CustomerID, Name, PersonID

FROM dbo.CustomerSource

ORDER BY CustomerID;
--6
SELECT CustomerID, Name, PersonID
FROM dbo.CustomerTarget
ORDER BY CustomerID;
--7
MERGE dbo.CustomerTarget AS t
USING dbo.CustomerSource AS s
ON (s.CustomerID = t.CustomerID)
WHEN MATCHED AND s.Name <> t.Name
THEN UPDATE SET Name = s.Name
WHEN NOT MATCHED BY TARGET
THEN INSERT (CustomerID, Name, PersonID) VALUES (CustomerID, Name, PersonID)
WHEN NOT MATCHED BY SOURCE
THEN DELETE
OUTPUT $action, DELETED.*, INSERTED.*;--semi-colon is required
--8
SELECT CustomerID, Name, PersonID
FROM dbo.CustomerTarget
ORDER BY CustomerID;
Figure 11-8 shows the results. Code section 1 drops the tables dbo.CustomerSource and dbo.CustomerTarget. Code section 2 creates the two tables. They have the same column names, but this is not a requirement. Statement 3 populates the dbo.CustomerSource table with four rows. It creates the Name column using the FirstName, MiddleName, and LastName columns. Statement 4 populates the dbo.CustomerTarget table with three rows. Two of the rows contain the same customers as the dbo.CustomerSource table. Query 5 displays the data from dbo.CustomerSource, and query 6 displays the data from dbo.CustomerTarget. Statement 7 synchronizes dbo.CustomerTarget with dbo.CustomerSource, correcting the Name column, inserting missing rows, and deleting extra rows by using the MERGE command. Because the query includes the OUTPUT clause, you can see the action performed on each row. Query 8 displays the dbo.CustomerTarget with the changes. The target table now matches the source table.

Figure 11-8. The results of using MERGE
GROUPING SETS
You learned all about aggregate queries in Chapter 5. Another option, GROUPING SETS, when added to an aggregate query, allows you to combine different grouping levels within one statement. This is equivalent to combining multiple aggregate queries with UNION. For example, suppose you want the data summarized by one column combined with the data summarized by a different column. Just like MERGE, this feature is very valuable for loading data warehouses and data marts. When using GROUPING SETS instead of UNION, you can see increased performance, especially when the query includes a WHERE clause and the number of columns specified in the GROUPING SETS clause increases. Here is the syntax:
SELECT <col1>,<col2>,<aggregate function>(<col3>)

FROM <table1>

WHERE <criteria>

GROUP BY GROUPING SETS (<col1>,<col2>)
Listing 11-9 compares the equivalent UNION query to a query using GROUPING SETS. Type in and execute the code to learn more.
Listing 11-9. Using GROUPING SETS
USE AdventureWorks2012;


--1

SELECT NULL AS SalesOrderID,SUM(UnitPrice)AS SumOfPrice,ProductID

FROM Sales.SalesOrderDetail

WHERE SalesOrderID BETWEEN 44175 AND 44180

GROUP BY ProductID

UNION

SELECT SalesOrderID,SUM(UnitPrice), NULL

FROM Sales.SalesOrderDetail

WHERE SalesOrderID BETWEEN 44175 AND 44180

GROUP BY SalesOrderID;


--2

SELECT SalesOrderID,SUM(UnitPrice) AS SumOfPrice,ProductID

FROM Sales.SalesOrderDetail

WHERE SalesOrderID BETWEEN 44175 AND 44180

GROUP BY GROUPING SETS(SalesOrderID,ProductID);
Figure 11-9 shows the partial results. Query 1 is a UNION query that calculates the sum of the UnitPrice. The first part of the query supplies a NULL value for SalesOrderID. That is because SalesOrderID is just a placeholder. The query groups by ProductID, and SalesOrderID is not needed. The second part of the query supplies a NULL value for ProductID. In this case, the query groups by SalesOrderID, and ProductID is not needed. The UNION query combines the results. Query 2 demonstrates how to write the equivalent query using GROUPING SETS.

Figure 11-9. The partial results of comparing UNION to GROUPING SETS
Pivoted Queries
Normally a query displays the data in a way that is similar to how it looks in a table, often with the column headers being the actual names of the columns within the table. A pivoted query displays the values of one column as column headers instead. For example, you could display the sum of the sales by month so that the month names are column headers. Each row would then contain the data by year with the sum for each month displayed from left to right. This section shows how to write pivoted queries with two techniques: CASE and PIVOT.
Pivoting Data with CASE
Many developers still use the CASE function to create pivoted results. (See “The Case Function” section in Chapter 3 to learn more about CASE.) Essentially, you use several CASE expressions in the query, one for each pivoted column header. For example, the query will have a CASE expression checking to see whether the month of the order date is January. If the order does occur in January, supply the total sales value. If not, supply a zero. For each row, the data ends up in the correct column where it can be aggregated. Here is the syntax for using CASE to pivot data:
CASE <col1>,SUM(CASE <col3> WHEN <value1> THEN <col2> ELSE 0 END) AS <alias1>,

    SUM(CASE <col3> WHEN <value2> THEN <col2> ELSE 0 END) AS <alias2>,

    SUM(CASE <col3> WHEN <value3> THEN <col2> ELSE 0 END) AS <alias3>

FROM <table1>

GROUP BY <col1>
Type in and execute Listing 11-10 to learn how to pivot data using CASE.
Listing 11-10. Using CASE to Pivot Data
USE AdventureWorks2012;


SELECT YEAR(OrderDate) AS OrderYear,

ROUND(SUM(CASE MONTH(OrderDate) WHEN 1 THEN TotalDue ELSE 0 END),0)

    AS Jan,

ROUND(SUM(CASE MONTH(OrderDate) WHEN 2 THEN TotalDue ELSE 0 END),0)

    AS Feb,

ROUND(SUM(CASE MONTH(OrderDate) WHEN 3 THEN TotalDue ELSE 0 END),0)

    AS Mar,

ROUND(SUM(CASE MONTH(OrderDate) WHEN 4 THEN TotalDue ELSE 0 END),0)

    AS Apr,

ROUND(SUM(CASE MONTH(OrderDate) WHEN 5 THEN TotalDue ELSE 0 END),0)

    AS May,

ROUND(SUM(CASE MONTH(OrderDate) WHEN 6 THEN TotalDue ELSE 0 END),0)

    AS Jun

FROM Sales.SalesOrderHeader

GROUP BY YEAR(OrderDate)

ORDER BY OrderYear;
Figure 11-10 shows the results. To save space in the results, the statement calculates the totals only for the months January through June and uses the ROUND function. The GROUP BY clause contains just the YEAR(OrderDate) expression. You might think that you need to group by month as well, but this query doesn’t group by month. It just includes each TotalDue value in a different column depending on the month.

Figure 11-10. The results of using CASE to create a pivot query
Using the PIVOT Function
Microsoft introduced the PIVOT function with SQL Server 2005. In my opinion, the PIVOT function is more difficult to understand than using CASE to produce the same results. Just like CASE, you have to hardcode the column names. This works fine when the pivoted column names will never change, such as the months of the year. When the query bases the pivoted column on data that changes over time, such as employee or department names, the query must be modified each time that data changes. Here is the syntax for PIVOT:
SELECT <groupingCol>, <pivotedValue1> [AS <alias1>], <pivotedValue2> [AS <alias2>]

FROM (SELECT <groupingCol>, <value column>, <pivoted column>) AS <queryAlias>

PIVOT

( <aggregate function>(<value column>)

FOR <pivoted column> IN (<pivotedValue1>,<pivotedValue2>)

) AS <pivotAlias>

[ORDER BY <groupingCol>]
The SELECT part of the query lists any nonpivoted columns along with the values from the pivoted column. These values from the pivoted column will become the column names in your query. You can use aliases if you want to use a different column name than the actual value. For example, if the column names will be the month numbers, you can alias with the month names.
This syntax uses a derived table, listed after the word FROM, as the basis of the query. See the “Derived Tables” section in Chapter 4 to review derived tables. Make sure that you only list columns that you want as grouping levels, the pivoted column, and the column that will be summarized in this derived table. Adding other columns to this query will cause extra grouping levels and unexpected results. The derived table must be aliased, so don’t forget this small detail.
![]() Tip It is possible to use a CTE to write this query instead of a derived table. See the article “Create Pivoted Tables in 3 Steps” in SQL Server Magazine’s July 2009 issue to learn this alternate method.
Tip It is possible to use a CTE to write this query instead of a derived table. See the article “Create Pivoted Tables in 3 Steps” in SQL Server Magazine’s July 2009 issue to learn this alternate method.
Follow the derived table with the PIVOT function. The argument to the PIVOT function includes the aggregate expression followed by the word FOR and the pivoted column name. Right after the pivoted column name, include an IN expression. Inside the IN expression, list the pivoted column values. These will match up with the pivoted column values in the SELECT list. The PIVOT function must also have an alias. Finally, you can order the results if you want. Usually this will be by the grouping level column, but you can also sort by any of the pivoted column names. Type in and execute Listing 11-11 to learn how to use PIVOT.
Listing 11-11. Pivoting Results with PIVOT
USE AdventureWorks2012;


--1

SELECT OrderYear, [1] AS Jan, [2] AS Feb, [3] AS Mar,

    [4] AS Apr, [5] AS May, [6] AS Jun

FROM (SELECT YEAR(OrderDate) AS OrderYear, TotalDue,

    MONTH(OrderDate) AS OrderMonth

    FROM Sales.SalesOrderHeader) AS MonthData

PIVOT (

    SUM(TotalDue)

    FOR OrderMonth IN ([1],[2],[3],[4],[5],[6])

    ) AS PivotData

ORDER BY OrderYear;


--2

SELECT OrderYear, ROUND(ISNULL([1],0),0) AS Jan,

    ROUND(ISNULL([2],0),0) AS Feb, ROUND(ISNULL([3],0),0) AS Mar,

    ROUND(ISNULL([4],0),0) AS Apr, ROUND(ISNULL([5],0),0) AS May,

    ROUND(ISNULL([6],0),0) AS Jun

FROM (SELECT YEAR(OrderDate) AS OrderYear, TotalDue,

    MONTH(OrderDate) AS OrderMonth

    FROM Sales.SalesOrderHeader) AS MonthData

PIVOT (

    SUM(TotalDue)

    FOR OrderMonth IN ([1],[2],[3],[4],[5],[6])

    ) AS PivotData

ORDER BY OrderYear;
Figure 11-11 shows the results. First take a look at the derived table aliased as MonthData in query 1. The SELECT statement in the derived table contains an expression that returns the year of the OrderDate, the OrderYear, and an expression that returns the month of the OrderDate, OrderMonth. It also contains the TotalDue column. The query will group the results by OrderYear. The OrderMonth column is the pivoted column. The query will sum up the TotalDue values. The derived table contains only the columns and expressions needed by the pivoted query.
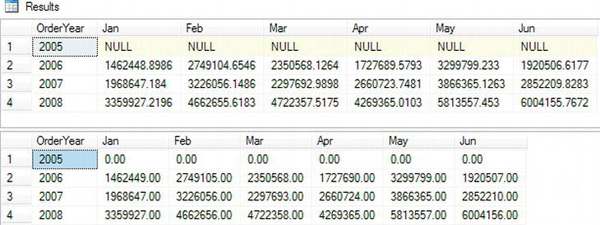
Figure 11-11. The results of using PIVOT
The PIVOT function specifies the aggregate expression SUM(TotalDue). The pivoted column is OrderMonth. The IN expression contains the numbers 1–6, each surrounded by brackets. The IN expression lists the values for OrderMonth that you want to show up in the final results. These values are also the column names. Since columns starting with numbers are not valid column names, the brackets surround the numbers. You could also quote these numbers. The IN expression has two purposes: to provide the column names and to filter the results.
The outer SELECT list contains OrderYear and the numbers 1–6 surrounded with brackets. These must be the same values found in the IN expression. Because you want the month abbreviations instead of numbers as the column names, the query uses aliases. Notice that the SELECT list does not contain the TotalDue column. Finally, the ORDER BY clause specifies that the results will sort by OrderYear.
The results of query 2 are identical to the results from the pivoted results using the CASE technique in the previous section. This query uses the ROUND and ISNULL functions to replace NULL with zero and round the results.
Numbers Table
Many T-SQL developers and some DBAs use what is a called a numbers table to help with some advanced queries involving ranges of data. A numbers table is simply a table containing a sequential list of numbers. The amount of numbers you put in the table is dependent on how many numbers you may need and how large you want the table. As an example, let’s create a numbers table with 500,000 rows; this should be enough for almost any task. First, you create the table. The table contains only one column with a clustered index on the column. Listing 11-12 shows the script for creating the table.
Listing 11-12. Creating a Numbers Table
USE tempdb;


CREATE TABLE tblNumbers

    (num    INT NOT NULL

    ,CONSTRAINT pk_tblNumbers PRIMARY KEY CLUSTERED(num) WITH FILLFACTOR = 100

    );
In this case, you created the table in tempdb. Normally, depending on your use of the table, you will want to either create it in model database or in any user database needing a numbers table. The preferred method is to create a new database used exclusively to store DBA objects or custom T-SQL code. You would then script out this utility database and create on every new server. Put a primary key constraint on the column to avoid any chance of duplicate rows. You also create a fillfactor equal to 100 since you won’t be inserting or deleting rows into the table.
The second step now is to populate the table with sequential numbers. Listing 11-13 populates the tblNumbers with values 1-500,000. Although there are many ways to do this, you’ll generate the values by using the recursive CTE technique discussed earlier in the chapter.
Listing 11-13. Populating a Numbers Table
WITH  cte0 AS (SELECT 1 AS c UNION ALL SELECT 1),

      cte1 AS (SELECT 1 AS c FROM cte0 a, cte0 b),

      cte2 AS (SELECT 1 AS c FROM cte1 a, cte1 b),

      cte3 AS (SELECT 1 AS c FROM cte2 a, cte2 b),

      cte4 AS (SELECT 1 AS c FROM cte3 a, cte3 b),

      cte5 AS (SELECT 1 AS c FROM cte4 a, cte4 b),

      nums AS (SELECT row_number() OVER (ORDER BY c) AS n FROM cte5)
INSERT INTO tblNumbers(num)
SELECT n FROM nums
WHERE n <= 500000
So now that you have a table with sequential numbers from 1 to 500,000, what are some things you can do with it? You can use it as a method to create a calendar table for the current year. Listing 11-14 shows the code to create the table. Figure 11-12 shows the partial output.
Listing 11-14. Creating a Calendar Table
USE tempdb;

GO


    SELECT dt, DATENAME( dw, dt )

      FROM ( SELECT DATEADD( d, num - 1, CAST( CAST( YEAR( CURRENT_TIMESTAMP )

                            * 10000 + 101 AS  VARCHAR(8) ) AS DATETIME ) )

              FROM tblNumbers ) D ( dt )

    WHERE YEAR( dt ) = 2011 ;

Figure 11-12. Partial output of the calendar table
Another use for numbers table is to parse an array of string values separated by commas. These are common in CSV files sometimes used in data imports. In this example, you will define in a variable a short list of string values separated by commas. The code in Listing 11-15 will take this variable and use the value from the numbers table in the SUBSTRING() function. The output is shown in Figure 11-13.
Listing 11-15. Parsing a Comma-Delimited List
USE tempdb;

GO


DECLARE @p VARCHAR(50)

SET @p = 'ABCDE,FG,HIJ,KLMNO,PQR,STUV,WX,YZ'


SELECT SUBSTRING( ',' + @p + ',', num + 1,

                CHARINDEX( ',', ',' + @p + ',', num + 1 ) - num - 1 ) AS "value"

      FROM tblNumbers

    WHERE SUBSTRING( ',' + @p + ',', num, 1 ) = ','

      AND num < LEN( ',' + @p + ',' ) ;
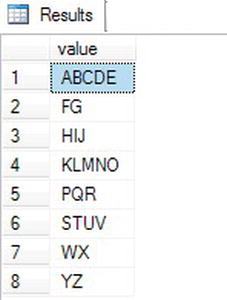
Figure 11-13. Results of parsing a comma-delimited list
A numbers table is invaluable for any serious T-SQL programmer. The table helps to simplify many complex problems while also increasing performance by avoiding cursors. I recommend creating a numbers table either in a database specifically used for data management or in each user database. If you create the table in the model database, the table will be created each time you create a user database. Still, keep in mind the size of the table and only populate it with the amount of values you think you will ever need.
![]() Note There are more uses for a numbers table than can be discussed here. For more details see Brandon Galderisi’s article at
Note There are more uses for a numbers table than can be discussed here. For more details see Brandon Galderisi’s article at www.sqlservercentral.com/articles/T-SQL+Aids/64696/. Jeff Moden and Itzic Ben Gan also have some excellent discussions concerning the implementations of numbers tables for everyday use.
Database Cleanup
Run the script in Listing 11-16 to clean up the tables used in this chapter. You can download the script from this book’s page at www.apress.com. Alternately, you can reinstall the sample databases by following the instructions in the “Installing the Sample Databases” section in Chapter 1. There is no need to clean up databases created in tempdb. These will be removed once you restart SQL Server.
Listing 11-16. Demo Table Cleanup
USE AdventureWorks2012;

GO


IF OBJECT_ID('dbo.Customers') IS NOT NULL BEGIN

    DROP TABLE dbo.Customers;

END;

IF OBJECT_ID('dbo.CustomerHistory') IS NOT NULL BEGIN

    DROP TABLE dbo.CustomerHistory;

END;

IF OBJECT_ID('dbo.CustomerSource') IS NOT NULL BEGIN

    DROP TABLE dbo.CustomerSource;

END;

IF OBJECT_ID('dbo.CustomerTarget') IS NOT NULL BEGIN

    DROP TABLE dbo.CustomerTarget;

END;

IF OBJECT_ID('dbo.Sales') IS NOT NULL BEGIN

    DROP TABLE dbo.Sales;

END;
Summary
This chapter covered how to write advanced queries using some T-SQL features supported in SQL Server 2012. Starting with Chapter 4, you saw how CTEs, or common table expressions, can help you solve query problems without resorting to temporary tables or views. In this chapter, you learned several other ways to use CTEs, including how to display hierarchical data with a recursive CTE. With the OUTPUT clause, you can return or store the data involved in data manipulation statements. If you will be involved with loading data warehouses, you can use the MERGE and GROUPING SET features to improve performance. You learned two ways to write pivot queries, using CASE and using the new PIVOT function. Finally, you learned how to use a numbers table to simply complex queries and increase performance by avoiding the use of cursors.
Although the material in this chapter is not required knowledge for beginning T-SQL developers, it will be very beneficial to you to keep these techniques in mind. As you gain more experience, you will often find ways to take advantage of these features.