C H A P T E R 1
Getting Started
If you are reading this book, you probably know about T-SQL. T-SQL, also known as Transact-SQL, is Microsoft’s implementation of the Structured Query Language (SQL) for SQL Server. T-SQL is the language that is most often used to extract or modify data stored in a SQL Server database, regardless of which application or tool you use. SQL Server 2012 T-SQL is based on standards created by the American National Standards Institute (ANSI), but Microsoft has added several functionality enhancements. You will find that T-SQL is a very versatile and powerful programming language.
T-SQL consists of Data Definition Language (DDL) and Data Manipulation Language (DML) statements. This book focuses primarily on the DML statements, which you will use to retrieve and manipulate data. The book also covers DDL statements, which you will use to create and manage objects. You will learn about table creation, for example, in Chapter 9.
In this chapter, you will learn how to install a free edition of SQL Server and get it ready for running the example code and performing the exercises in the rest of the book. This chapter also gives you a quick tour of SQL Server Management Studio (SSMS) and introduces a few concepts to help you become a proficient T-SQL programmer.
Installing SQL Server Express Edition
Microsoft makes SQL Server 2012 available in six different editions, including two that can be installed on a desktop computer or laptop. If you don’t have access to SQL Server, you can download and install the SQL Server Express edition from Microsoft’s web site at www.microsoft.com/express/sql/download/default.aspx. To fully take advantage of all the concepts covered in this book, download SQL Server 2012 Express with Tools. You may notice a new LocalDB option for SQL Server Express; LocalDB is an extremely lightweight version of SQL Server that doesn’t include any configuration options or tools. Since you will need the tools for this book you don’t want to download the LocalDB version. Be sure to choose either the 64-bit or 32-bit download according to the operating system that you are running. The Express edition will run on the following operating systems available at the time of this writing: Windows Server 2008 SP2, Windows Server 2008 R2 SP1, Windows 7 SP1, Windows Vista SP2. Note that SQL Server 2012 is not compatible with Windows XP.
![]() Note SP is shorthand for Service Pack, so SP2 refers to Service Pack 2. A service pack is an update to the operating system or to other software that fixes bugs and security issues.
Note SP is shorthand for Service Pack, so SP2 refers to Service Pack 2. A service pack is an update to the operating system or to other software that fixes bugs and security issues.
Here are the steps to follow to install SQL Server Express:
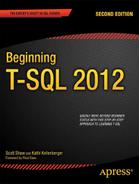
- Once you have downloaded the SQL Server 2012 Express edition installation file from Microsoft’s site, double-click the file to extract and start up the SQL Server Installation Center. Figure 1-1 shows the Planning pane of the SQL Server Installation Center once the extraction has completed. You may need to click on Planning in the left-hand side to see these options.
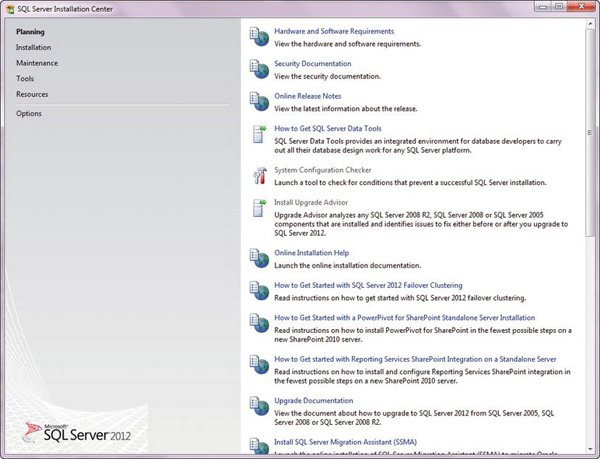
Figure 1-1. SQL Server Installation Center’s Planning pane
- To make sure that your system meets all the requirements to install SQL Server Express, click the System Configuration Checker link, which opens the Setup Support Rules screen (see Figure 1-2). Click “Show details” or “View detailed report” to see more information. Click OK to dismiss the screen when you are done.

- If your system doesn’t meet the requirements, click the Hardware and Software Requirements link on the Planning pane of the SQL Server Installation Center, which will take you to a web page on Microsoft’s site. Be sure to scroll down the web page to find the information for the Express edition. The hardware requirements are not difficult to meet with today’s PCs.
- Once you are certain that your computer meets all the requirements, switch to the Installation pane, shown in Figure 1-3, and click “New SQL Server stand-alone installation or add features to an existing installation.” The Setup Support Rules screen you saw in step 2 will display again, but the behavior will be different this time. Click OK to dismiss the Setup Support Rules screen, and an installation wizard will begin.

- You may or may not see a Setup Support Files screen at this point. If you do see it, click Install.
- Select Express from the drop-down and click Next on the Product Key screen when installing SQL Server Express edition. No need to have a key since this is a free edition! Accept the license terms and click Next.
- Some more checking of your system will take place. You may get a warning about your firewall (Figure 1-4), especially if you are installing on a workstation. The warning will say to open ports required for other systems to access your SQL Server. You can ignore that warning unless you do really want to open up your system. Click Next to continue.
- If you have a previously installed instance of SQL Server on your computer, the installation will prompt you to either update an existing instance or install a new instance on the Installation Type screen. Select to install a new instance and click Next. If you don’t have a previous install, select the option “SQL Server Feature Installation” and click Next.
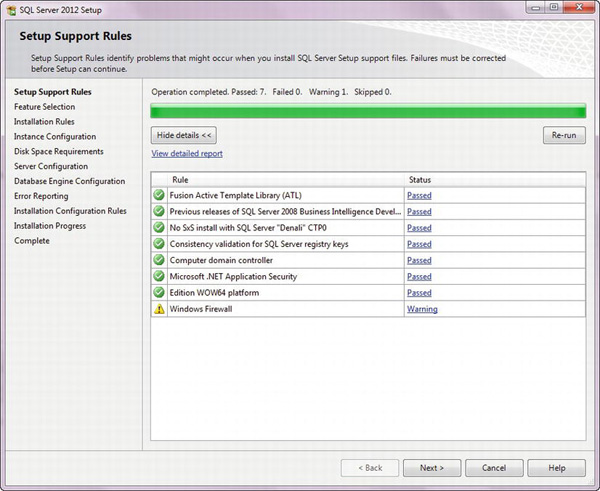
- On the Feature Selection screen (Figure 1-5), make sure that “Database Engine Services,” “Full-Text and Semantic Extractions for Search,” and “Management Tools – Basic” are selected before clicking Next. If a previous SQL Server 2012 R2 installation is in place, the Management Tools check box might be grayed out since you need to install it only once per computer.
- Figure 1-6 shows the Instance Configuration screen, and it is very important. Here you can choose to install a default instance or a named instance. If you have any SQL Server instances already installed, possibly an earlier version such as 2008 R2, they will show up in the list on this screen. Each instance must have a unique name, so you must avoid using any existing instance names. See the sidebar “Named Instances” for more information about naming SQL Server instances. The Express edition installation installs the named instance MSSQLSERVER by default. Use the name MSSQLSERVER if you can; otherwise, type in a unique name. Figure 1-6 shows the instance configuration screen. Click Next.
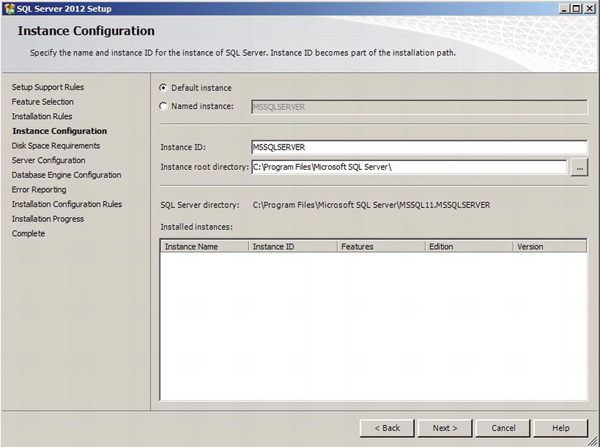
Figure 1-6. The Instance Configuration screen
NAMED INSTANCES
- The Disk Space Requirements screen (Figure 1-7) will ensure that you have enough disk space for the install. However, “space for the install” refers to having space for the executable and other files such as the system databases. The system databases start out small but can grow quite large in a production system. The space requirements don’t include any user databases, which are the databases that will store your data, so make sure you also have room for them before clicking Next.
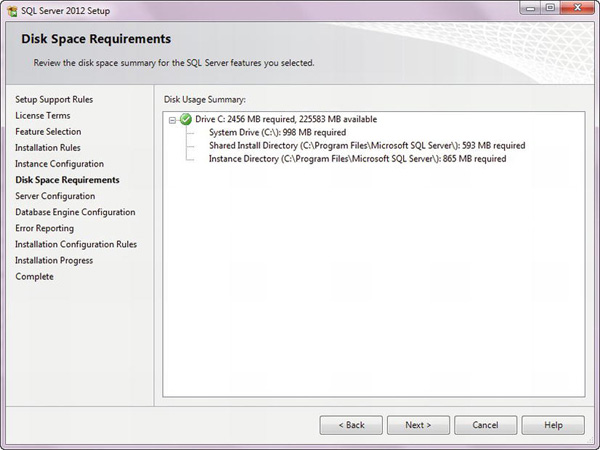
Figure 1-7. The Disk Space Requirements screen
- On the Service Configuration screen, shown in Figure 1-8, you must specify accounts under which SQL Server will run. If you are setting up SQL Server for a production environment, you probably have a special service account to use. Since you are just installing the Express edition for learning purposes here, choose the default for all the services.

- On the Database Engine Configuration screen’s Account Provisioning tab (Figure 1-9), you will either select the “Windows authentication mode” option or the “Mixed Mode” option. If you select “Windows authentication mode,” SQL Server can accept connections only from Windows-authenticated accounts; if you selected “Mixed Mode,” it can additionally allow accounts set up within SQL Server. For the purposes of the book, you can leave the authentication mode as “Windows authentication mode.” Click the Add Current User button near the bottom of the page to make sure that the account you are using is added as an administrator.
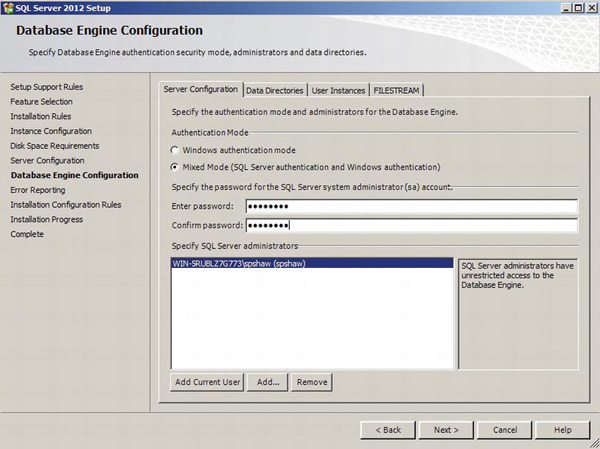
- On the Data Directories tab, you can specify directories for database and log files as well as all the other directories needed for your SQL Server instance. In a learning environment, the defaults are fine. On a production system, the database administrator will strategically place files for best performance.
- Click the FILESTREAM tab on the current screen to enable
FILESTREAMfunctionality, as in Figure 1-10.FILESTREAMwas introduced in SQL Server 2008 and we will look more closely at it in Chapter 10.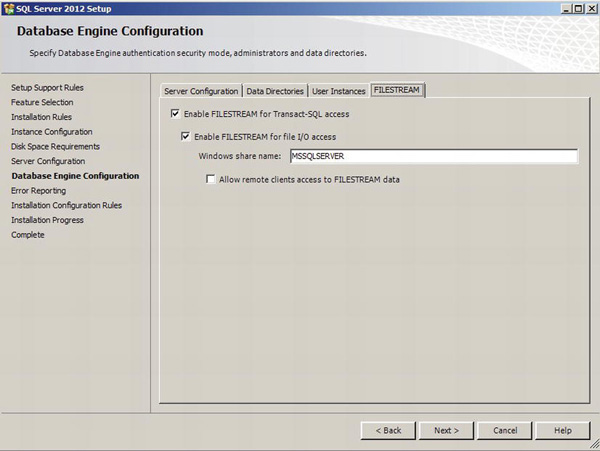
- Click Next after configuring
FILESTREAM. You’ll see an Error and Usage Reporting screen. Check the buttons on that screen to send reports to Microsoft if you choose to do that, and click Next again.- The installation performs more checks from the Installation Rules page that appears next, such as making sure that the settings you have selected will work. Click Next to continue.
- A summary screen of what will be installed displays. Click Install, and the installation begins.
- Once the install is complete, you can view a report to help you solve any issues with the installation. Figure 1-11 shows the report from a successful installation.
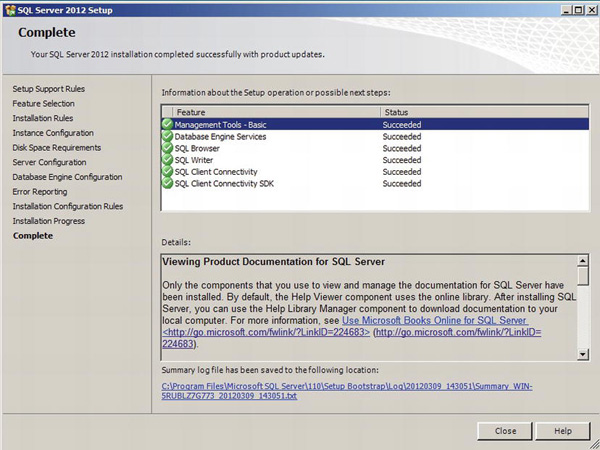
- Click the Close button. Congratulations! You have just installed SQL Server Express.
After the installation completes, the SQL Server Installation Center displays once more. You may be interested in viewing some of the resources available in this application at a later time. Luckily, you don’t have to start the install again. You can run the Installation Center by selecting Start ![]() All Programs
All Programs ![]() Microsoft SQL Server 2012
Microsoft SQL Server 2012 ![]() Configuration Tools
Configuration Tools ![]() SQL Server Installation Center at any time.
SQL Server Installation Center at any time.
Installing the Sample Databases
Sample databases are very useful to help beginners practice writing code. Several databases, such as Pubs, Northwind, and AdventureWorks, have been available for this purpose over the many releases of SQL Server. You can download the sample databases from the CodePlex samples web site at www.codeplex.com. Because the link will change frequently as updated samples become available, search for SQL Server 2012 sample databases. Make sure you are downloading the latest version of the sample databases. Figure 1-12 shows a portion of the download page that was current the day that this section was written.

Figure 1-12. The source for the AdventureWorks databases
The following steps will guide you through installing the sample databases.
- After clicking the appropriate link for your processor type and operating system, click the I Agree button to accept the license agreement.
- Click Save to download the files.
- Navigate to a location that you will remember, and click Save.
- Once the download completes, open SQL Server Management Studio and start a new query. You can skip ahead in this chapter to see how this is done. In the query windows, execute the command shown in Listing 1-1. You will need to change the path to match the location where you downloaded the AdventureWorks2012 data file. Figure 1-13 shows how your screen should look.
Listing 1-1. Script to Create the AdventureWorks2012 Database
CREATE DATABASE AdventureWorks2012 ON (FILENAME = '<drive>:<file

path>AdventureWorks2012_Data.mdf') FOR ATTACH_REBUILD_LOG ;
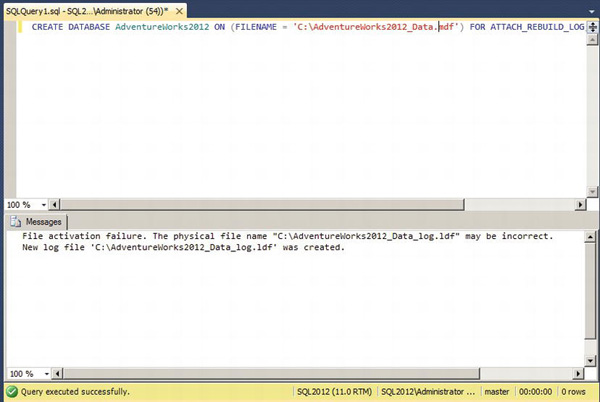
Figure 1-13. The sample database install
You should now have AdventureWorks database installed on your SQL Server instance. Your next step is to install SQL Server’s help system, Books Online. Then I’ll show you how to look at the AdventureWorks database in the “Using SQL Server Management Studio” section.
Installing Books Online
In SQL Server 2012 you have the choice of accessing Books Online via the Internet or locally. When you first install SQL Server you have the option to install the Books Online components. These components allow for better integration with the web-based documentation. The online components allow for updates to Books Online on the Internet to be applied to your local installation. Follow these steps to install Books Online locally.
- Open up Management Studio and select Help from the menu. Under Help, select Manage Help Settings.
- A window will pop up with a list of items. Select “Install Content from Online.”
- Scroll down until you find the entry for SQL Server and click Add, as shown in Figure 1-14, and then click Update.

Figure 1-14. Installing Books Online
Using Books Online
Once SQL Server Books Online is installed, you can launch it by opening Management Studio and selecting Help from the top menu. Under the Help menu, select View Help. A new browser window will open up to the first page of MSDN.
Books Online is now part of the standardized Help Viewer. The screen for Microsoft Help Viewer is divided into two sections, as shown in Figure 1-15. The contents are displayed in the left pane. You can expand each entry to see the sections and click a topic to view each article on the right.

Figure 1-15. The two panes of Microsoft Help Viewer
In the top right corner there is a search bar. Type in a term, such as query, to see the results found in the local help system and any articles posted online. On the right you’ll see advanced search options (Figure 1-16) and in the main window you’ll see the results listed by topic and by location.
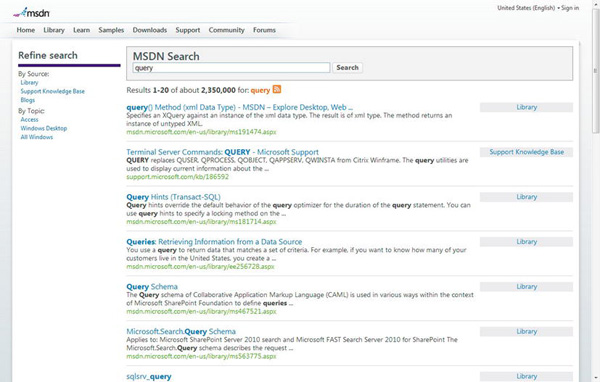
Figure 1-16. Search results in Microsoft Help Viewer
Once you find an article or help topic you think you will want to view periodically, you can click the “Add to Favorites” button as you would for any other web site.
You will learn how to write T-SQL from reading this book, but I recommend that you check Books Online frequently to learn even more!
Using SQL Server Management Studio
Now that you have SQL Server, SQL Server Books Online, and the sample database installed, it’s time to get acquainted with SQL Server Management Studio (SSMS). SSMS is the tool that ships with most editions of SQL Server, and you can use it to manage SQL Server and the databases as well as write T-SQL code. If you have installed SQL Server Express with Tools as outlined earlier, you should be able to find SSMS by selecting Start ![]() All Programs
All Programs ![]() Microsoft SQL Server 2012
Microsoft SQL Server 2012 ![]() SQL Server Management Studio. SSMS is your window into SQL Server. You can manage your database, create scripts, and—most importantly—execute T-SQL code and see the results.
SQL Server Management Studio. SSMS is your window into SQL Server. You can manage your database, create scripts, and—most importantly—execute T-SQL code and see the results.
Launching SQL Server Management Studio
Launch SSMS by selecting Start ![]() All Programs
All Programs ![]() Microsoft SQL Server 20012
Microsoft SQL Server 20012 ![]() SQL Server Management Studio. After the splash screen displays, you will be prompted to connect to an instance of SQL Server, as shown in Figure 1-17.
SQL Server Management Studio. After the splash screen displays, you will be prompted to connect to an instance of SQL Server, as shown in Figure 1-17.

Figure 1-17. Connect to Server dialog box
Notice in this example that the computer name is SQL2012 and we are using the default instance. If you installed a named instance, you will see the computer name followed by a “” and then the instance name. For the default instance you can also use (local), Localhost, or a period in place of the computer name as long as you are logged on locally and not trying to connect to a remote SQL Server. Make sure that the appropriate server name is filled in, and click Connect.
Once connected to an instance of SQL Server, you can view the databases and all the objects in the Object Explorer. The Object Explorer is located the left side of the screen by default. You can expand each item to see other items underneath. For example, once you expand the Databases folder, you can expand one of the databases. Then you can expand the Tables folder for that database. You can expand a table name and drill down to see the columns, indexes, and other properties. In the right pane, you can see details about the selected item. If you don’t see the details, press the F7 key. Figure 1-18 shows the Object Explorer window and details.

Figure 1-18. The Object Explorer
Running Queries
One SSMS feature that you will use extensively during this book is the Query Editor. In this window you will type and run queries as you learn about T-SQL. The following steps will guide you through writing your first query in the Query Editor.
- Make sure your SQL Server instance is selected in the Object Explorer, and click New Query, which is located right above the Object Explorer, to open the Query Editor window.
- Select the AdventureWorks2012 database from the drop-down list on the left if it is not already selected, as in Figure 1-19.

- Type the following code in the Query Editor window on the right. It’s a query to display all the data in the Employee table.
SELECT * FROM HumanResources.Employee;- You will notice as you type that IntelliSense (Figure 1-20) is available in the Query Editor window. IntelliSense helps you by eliminating keystrokes to save you time. It also validates the code before the code is compiled. It doesn’t work when connecting to versions earlier than SQL Server 2008.

Figure 1-20. IntelliSense
- Click Execute or press the F5 key to see the results, as in Figure 1-21.
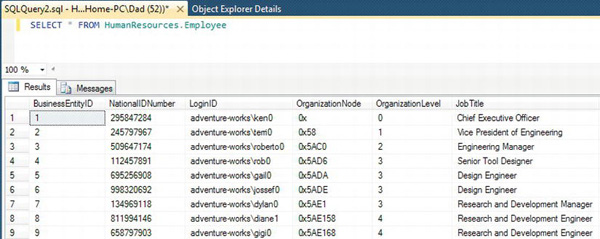
Figure 1-21. Results of running your first T-SQL query
SSMS has several scripting features to help you write code. Follow these steps to learn how to create a query without typing.
- Make sure that the Tables folder is expanded, and select the HumanResources.Employee table, as in Figure 1-22.
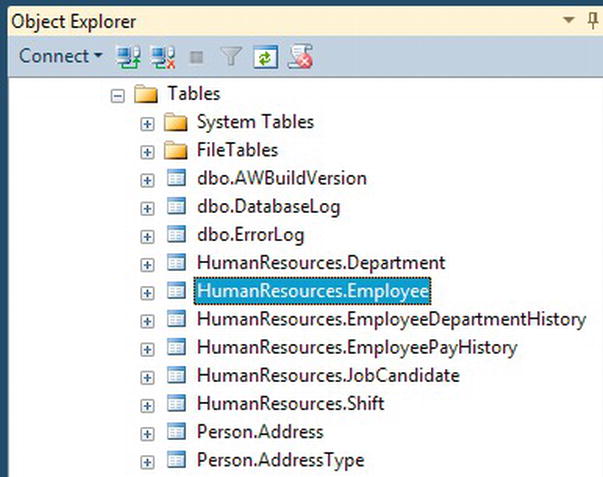
Figure 1-22. The HumanResources.Employee table
- Right-click the HumanResources.Employee table, and select Script Table as
Select To
- A new window will automatically open with some code (Figure 1-23). Click Execute.
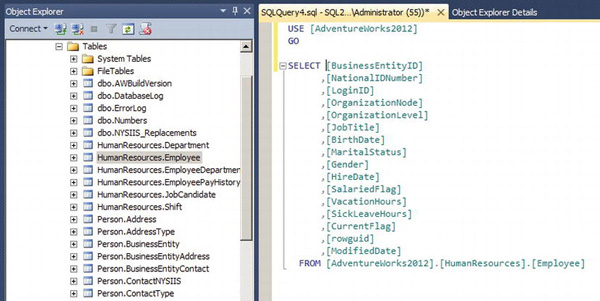
Figure 1-23. Automatically generated code
Sometimes you will end up with multiple statements in one Query Editor window. To run only some of the statements in the window, select what you want to run, and click Execute or press F5. Figure 1-24 shows an example. When you execute, only the first query will run.

Figure 1-24. Selected code
Sections of code can be collapsed to get them out of your way by clicking the minus sign to the left of the code. You can search and replace just like a regular text editor, and, of course, you have IntelliSense to help you write the code.
Results can be saved to text files by clicking the Results to File icon shown in Figure 1-25 before you execute the code. You can also select and copy the results for pasting into Excel or Notepad.

Figure 1-25. Results to File icon
You can add documentation to your code or just keep code from running by adding comments. To comment a section of code, begin the section with /* and end the section with */. You can comment out a line of code or the end of a line of code with two hyphens (--). To automatically comment out code, select the lines you want to comment, and click the Comment button shown in Figure 1-26. Uncomment code by selecting commented lines and clicking the Uncomment button next to the Comment button.
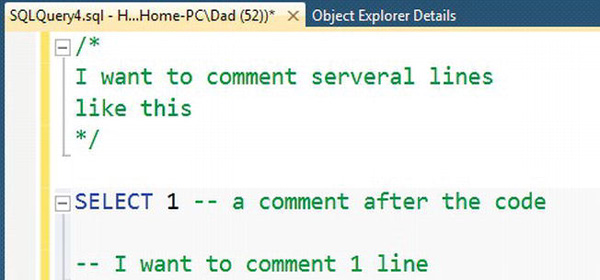
Figure 1-26. Commented code
The Object Explorer allows you to manage the databases, security, maintenance jobs, and other aspects of SQL Server. Most of the tasks that can be performed are in the realm of database administrators, so we will not explore them in this book.
Exploring Database Concepts
In this section, you will learn just what SQL Server is and about the databases and objects that make up databases. You will learn how data is stored in a database, and you’ll learn about objects, called indexes, that help SQL Server return the results of your queries quickly.
What Is SQL Server?
SQL Server is Microsoft’s relational database management system (RDBMS). A relational database management system stores data in tables according to the relational model. The relational model is beyond the scope of this book, but you can learn more by reading Beginning Relational Data Modeling, Second Edition, by Sharon Allen and Evan Terry (Apress, 2005).
Editions
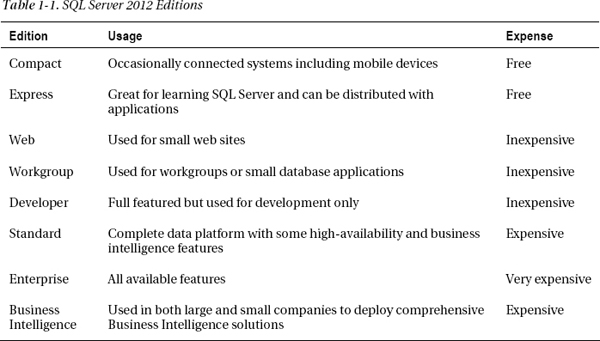
Microsoft makes SQL Server available in many editions, including a free edition called Express that can be distributed with applications or used to learn about SQL Server and several expensive, full-featured editions (Standard, Business Intelligence, and Enterprise) that are used to store terabytes of data in the most demanding enterprises. There is even a version that can be installed on smart phones (Compact edition). Search for the article “Features Supported by the Editions of SQL Server 20012” in SQL Server Books Online for more information about the editions and features of each. Table 1-1 gives an overview of the editions available.
Many well-known companies trust SQL Server with their data. To read case studies about how some of these companies use SQL Server 20012, visit www.microsoft.com/sqlserver/2008/en/in/case-studies.aspx.
Service vs. Application
SQL Server is a service, not just an application. Even though you can install some of the editions on a regular workstation, it generally runs on a dedicated server and will run when the server starts; in other words, usually no one needs to manually start SQL Server. To minimize or practically eliminate downtime for critical systems, SQL Server boasts high-availability features such as clustering, log shipping, database mirroring, and AlwaysOn. Think about your favorite shopping web site. You expect it to be available any time day or night and every day. Behind the scenes, a database server, possibly a SQL Server instance, must be running and performing well at all times. Even during necessary maintenance—when applying security patches, for example—administrators must keep downtime to a minimum.
SQL Server is feature rich, providing a complete business intelligence suite, impressive management tools, sophisticated data replication features, and much, much more. These features are well beyond the scope of this book, but I invite you to visit www.apress.com to find books to help you learn about these other topics if you are interested.
SQL Server doesn’t come with a data-entry interface for regular users or even a way to create a web site or a Windows application. To do that, you will most likely use a programming language such as Visual Basic .NET or C#. Calls to SQL Server via T-SQL can be made within your application code or through a middle tier such as a web service. Regardless of your application architecture, at some point you’ll use T-SQL. SQL Server does have a very nice reporting tool called Reporting Services that is part of the business intelligence suite. Otherwise, you will have to use another programming language to create your user interface.
Figure 1-27 shows the architecture of a typical web application. The web server requests data from the database server. The clients communicate with the web server.

Figure 1-27. The architecture of a typical web application
Database As Container
A database in SQL Server is basically a container that holds several types of objects and data in an organized fashion. Generally, one database is used for a particular application or purpose, though this is not a hard and fast rule. For example, some systems have one database for all the enterprise applications required to run a business. On the other hand, one application could access more than one database.
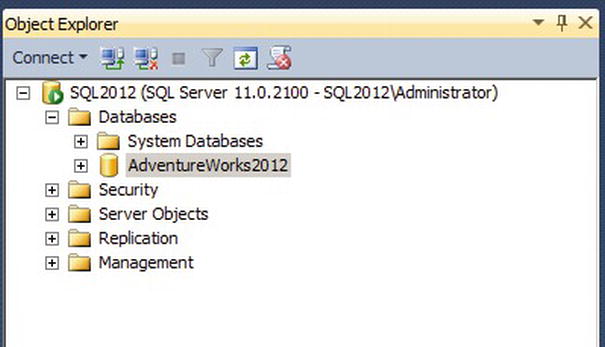
Start SQL Server Management Studio if it is not already running, and connect to the SQL Server instance you installed in the “Installing SQL Server Express Edition” section. Expand the Databases folder to see the databases installed on the SQL Server. You should be able to see the AdventureWorks2012 database, as in Figure 1-28.
Within a database, you will find several objects, but only one type of object, the table, holds the data that we usually think about. In addition to tables, a database can contain indexes, views, stored procedures, user-defined functions, and user-defined types among other objects. Later chapters in this book will cover most of the other objects that are used to make up a database. You’ll find an introduction to indexes later in this chapter.
SQL SERVER FILES
Data Is Stored in Tables
The most important objects in a database are tables because the tables are the objects that store the data and allow you to retrieve the data in an organized fashion. You can represent a table as a grid with columns and rows. The terminology used to describe the data in a database varies depending on the system, but in this book, I will stick with the terms table, row, and column. The following is an example of a table created to hold data about store owners:
CustomerID  Title  FirstName  MiddleName  LastName  Suffix  CompanyName

1           Mr.    Orlando    N.          Gee       NULL    A Bike Store

2           Mr.    Keith      NULL        Harris    NULL    Progressive Sports

3           Ms.    Donna      F.          Carreras  NULL    Advanced Bike Components

4           Ms.    Janet      M.          Gates     NULL    Modular Cycle Systems
In a normalized database, each table holds information about one type of entity. An entity type might be a student, customer, or vehicle, for example. Each row in a table contains the information about one instance of the entity represented by that table. For example, a row will represent one student, one customer, or one vehicle. Each column in the table will contain one piece of information about the entity. In the vehicle table, there might be a VIN column, a make column, a model column, a color column, and a year column, among others.
Each column within a table has a definition specifying a data type along with rules, called constraints, that enforce the values that can be stored. Constraints include whether a column can be left blank, whether it must be unique, whether it is limited to a certain range of values, and so on. You will learn more about constraints in Chapter 9.
In a normalized database, each table will have a primary key that is used to uniquely identify each row. In the previous example, the primary key is CustomerID.
![]() Note You will learn what
Note You will learn what NULL means in Chapter 2.
Data Types
SQL Server has a rich assortment of data types for storing strings, numbers, money, XML, binary, and temporal data. Start SQL Server Management Studio if it is not running already, and connect to the SQL Server you installed in the “Installing SQL Server Express Edition” section. Expand the Databases section. Expand the AdventureWorks2012 database and the Tables section. Locate the HumanResources.Employee table, and right-click it. Select the Design option to view the properties (see Figure 1-29).
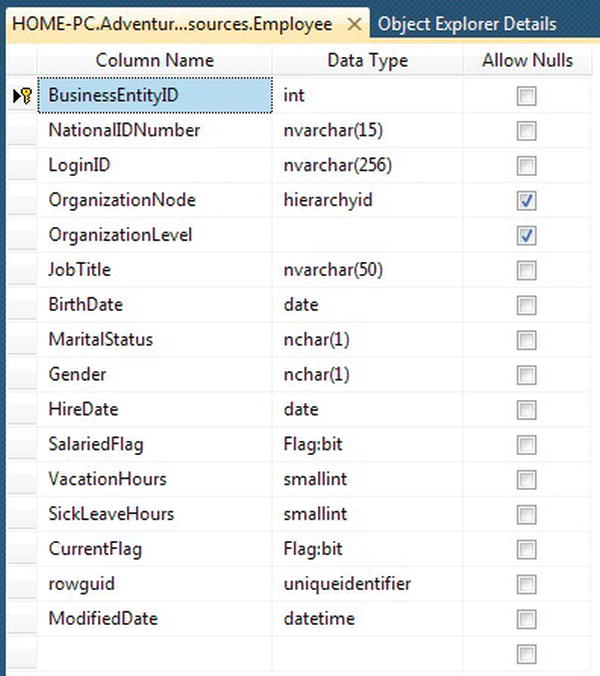
Figure 1-29. The properties of the HumanResources.Employee table
The HumanResources.Employee table contains a variety of data types and one column, OrganizationalLevel, with no data type defined. The OrganizationalLevel column is a computed column consisting of a formula.
SalariedFlag and CurrentFlag have the Flag user-defined data type, which is defined within the database. Developers can create user-defined data types to simplify table creation and to ensure consistency. For example, the AdventureWorks2012 database has a Phone data type used whenever a column contains phone numbers. To see the Phone data type definition, expand the Programmability section, the Type section, and the User Defined Data Types section. Locate and double-click the Phone data type to see the properties (see Figure 1-30).
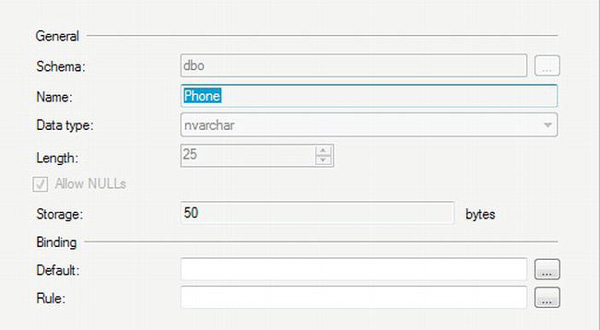
Figure 1-30. The properties of the Phone user-defined data type
Developers can create custom data types, called CLR data types, with multiple properties and methods using a .NET language such as C#. Chapter 9 shows how to create a helpful CLR for generating passwords and Chapter 10 covers three built-in CLR data types: HIERARCHYID, GEOMETRY, and GEOGRAPHY. The OrganizationNode column is a HIERARCHYID. You will find a wealth of information about data types in SQL Server Books Online by searching on the data type that interests you.
Normalization
Normalization is the process of designing database tables in a way that makes for efficient use of disk space and that allows the efficient manipulation and updating of the data. Normalization is especially important in online transaction processing (OLTP) databases, such as those used in e-commerce. Database architects usually design reporting-only databases to be denormalized to speed up data retrieval since they don’t have to worry about frequent data updates.
The process of normalization is beyond the scope of this book, but it is helpful to understand why databases are normalized. To learn more about normalization, see Pro SQL Server 2012 Relational Database Design and Implementation by Louis Davidson and Jessica Moss (Apress, 2012).
Figure 1-31 shows how a database design might look before it is normalized. The example is of an order-entry database. There is one table, and that table consists of data about both customers and orders. One problem that you can probably see straightaway is that there is room only for three items per order and only three orders per customer.
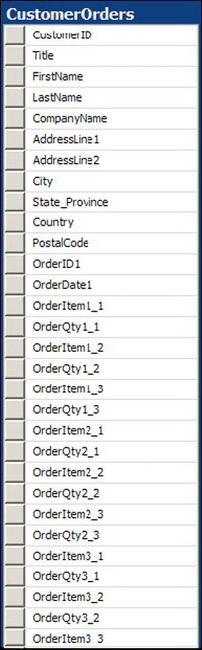
Figure 1-31. The denormalized database
Figure 1-32 shows how the database might look once it is normalized. In this case, the database contains a table to hold information about the customer and a table to contain information about the order, such as the order date. The database contains a separate table to hold the items ordered. The order table contains a CustomerID that determines the customer instead of containing all the customer information. The OrderDetail table allows as many items as needed per order. The OrderDetail table contains the OrderID column to specify the correct order.
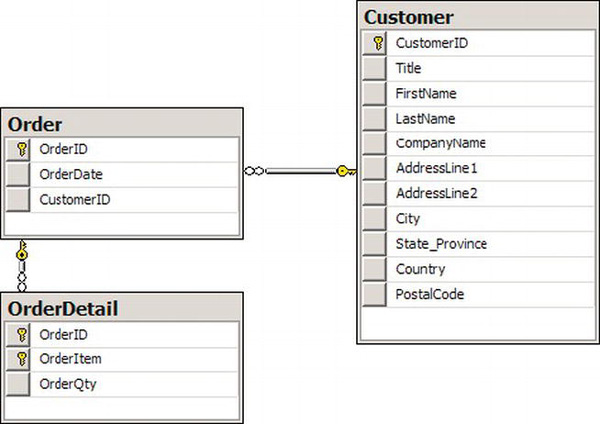
Figure 1-32. The normalized database
It may seem like a lot of trouble to properly define a database up front. However, it is well worth the effort to do so. I was called in once to help create reports on one of the most poorly designed databases I have ever seen. This was a small Microsoft Access database that was used to record information from interviewing users at a medium-sized company about the applications that the employees used. Each time a new application was entered into the database, a new Yes/No column for that application was created, and the data-entry form had to be modified. The developer, who should have known better, told me that she just didn’t have time to create a properly normalized database. Much more time was spent fighting with this poor design than would have been spent properly designing the database.
Understanding Indexes
When a user runs a query to retrieve a portion of the rows from a table, how does the database engine determine which rows to return? If the table has indexes defined on it, SQL Server may use the indexes to find the appropriate rows.
There are several types of indexes, but this section covers two types: clustered and nonclustered. A clustered index stores and organizes the table. A nonclustered index is defined on one or more columns of the table, but it is a separate structure that points to the actual table. Both types of indexes are optional, but they can greatly improve the performance of queries when properly designed and maintained. A couple of analogies will help explain how indexes work.
A printed phone directory is a great example of a clustered index. Each entry in the directory represents one row of the table. A table can have only one clustered index. That is because a clustered index is the actual table organized in order of the cluster key. At first glance, you might think that inserting a new row into the table would require all the rows after the inserted row to be moved on the disk. Luckily, this is not the case. The row will have to be inserted into the correct data page. A list of pointers maintains the order between the pages, so the rows in other pages will not have to actually move.
The primary key of the phone directory is the phone number. Usually the primary key is used as the clustering key as well, but this is not the case in our example. The cluster key in the phone directory is a combination of the last name and first name. How would you find a friend’s phone number if you knew the last and first name? Easy—you would open the book approximately to the section of the book that contains the entry. If your friend’s last name starts with an F, you search near the beginning of the book; if it starts with an S, you search toward the back. You can use the names printed at the top of the page to quickly locate the page with the listing. You then drill down to the section of the correct page until you find the last name of your friend. Now you can use the first name to choose the correct listing. The phone number is right there next to the name. It probably takes more time to describe the process than to actually do it. Using the last name plus the first name to find the number is called a clustered index seek.
The index in the back of a book is an example of a nonclustered index. A nonclustered index has the indexed columns and a pointer or bookmark pointing to the actual row. In the case of our example, it contains a page number. Another example could be a search done on Google, Bing, or another search engine. The results on the page contain links to the original web pages. The thing to remember about nonclustered indexes is that you may have to retrieve part of the required information from the rows in the table. When using a book index, you will probably have to turn to the page of the book. When searching on Google, you will probably have to click the link to view the original page. If all the information you need is included in the index, you have no need to visit the actual data.
Although you can have only one clustered index per table, you can have up to 999 nonclustered indexes per table. If you ever need that many, you might have a design problem! An important thing to keep in mind is that although indexes can improve the performance of queries, indexes take up disk space and require resources to maintain. If a table has four nonclustered indexes, every write to that table may require four additional writes to keep the indexes up-to-date.
I just mentioned that 999 nonclustered indexes is too many. When talking about databases, an answer I hear all the time is “It depends.” The number of indexes allowed per table increased with the release of SQL Server 2008 to take advantage of a couple of new features: sparse columns and filtered indexes. You will learn more about sparse columns in Chapter 10.
Database Schemas
A schema is a container that you can use to organize database objects. A schema is a way to organize the tables and object within the database. For example, the AdventureWorks2012 database contains several schemas based on the purpose: HumanResources, Person, Production, Purchasing, and Sales. Each table or other object belongs to one of the schemas.
![]() Note Objects in earlier versions of SQL Server were owned by database users. In SQL Server 2005 and later, a user can own a schema, but not individual objects.
Note Objects in earlier versions of SQL Server were owned by database users. In SQL Server 2005 and later, a user can own a schema, but not individual objects.
A user can have a default schema. When accessing an object in the default schema, the user doesn’t have to specify the schema name; however, it’s a good practice to do so. If the user has permission to create new objects, the objects will belong to the user’s default schema unless specified otherwise. To access objects outside the default schema, the schema name must be used. Table 1-2 shows several objects along with the schema.

Summary
This chapter provided a quick tour of SQL Server. You learned how databases are structured and designed; you also learned how SQL Server uses indexes to efficiently return data. If you followed the instructions in this chapter, you now have an instance of SQL Server running on your workstation or laptop so that you have a place to practice the queries you are about to learn.
In Chapter 2, you will get a chance to write your own queries. You’ll learn the SELECT statement, the next step in your journey to T-SQL mastery.