C H A P T E R 2
Writing Simple SELECT Queries
Chapter 1 had you preparing your computer by installing SQL Server 2012 and the AdventureWorks2012 sample database. You learned how to get around in SQL Server Management Studio and a few tips to help make writing queries easier.
Now that you’re ready, it’s time to learn how to retrieve data from a SQL Server database. You will retrieve data from SQL Server using the SELECT statement, starting with the simplest syntax. This chapter will cover the different parts, called clauses, of the SELECT statement so that you will be able to not only retrieve data but also filter and order it. The ultimate goal is to get exactly the data you need from your database—no more, no less.
Beginning in this chapter, you will find many code examples. Even though all the code is available from this book’s catalog pages at http://www.apress.com, you will probably find that by typing the examples yourself you will learn more quickly. As they say, practice makes perfect! In addition, exercises follow many of the sections so that you can practice using what you have just learned. You can find the answers for each set of exercises in the appendix.
![]() Note If you take a look at SQL Server Books Online, you will find the syntax displayed for each kind of statement. Books Online displays every possible parameter and option, which is not always helpful when learning about a new concept for the first time. In this book, you will find only the syntax that applies to the topic being discussed at the time.
Note If you take a look at SQL Server Books Online, you will find the syntax displayed for each kind of statement. Books Online displays every possible parameter and option, which is not always helpful when learning about a new concept for the first time. In this book, you will find only the syntax that applies to the topic being discussed at the time.
Using the SELECT Statement
You use the SELECT statement to retrieve data from SQL Server. T-SQL requires only the word SELECT followed by at least one item in what is called a select-list.
If SQL Server Management Studio is not running, go ahead and start it. When prompted to connect to SQL Server, enter the name of the SQL Server instance you installed while reading Chapter 1 or the name of your development SQL Server. You will need the AdventureWorks2012 sample databases installed to follow along with the examples and to complete the exercises. You will find instructions for installing the sample databases in Chapter 1.
Selecting a Literal Value
Perhaps the simplest form of a SELECT statement is that used to return a literal value that you specify. Begin by clicking New Query to open a new query window. Listing 2-1 shows two SELECT statements that both return a literal value. Notice the single quote mark that is used to designate the string value. Type each line of the code from Listing 2-1 into your query window.
Listing 2-1. Statements Returning Literal Values
SELECT 1

SELECT 'ABC'
After typing the code in the query window, press F5 or click Execute to run the code. You will see the results displayed in two windows at the bottom of the screen, as shown in Figure 2-1. Because you just ran two statements, two sets of results are displayed.
![]() Tip By highlighting one or more statements in the query window, you can run just a portion of the code. For example, you may want to run one statement at a time. Use the mouse to select the statements you want to run, and press F5.
Tip By highlighting one or more statements in the query window, you can run just a portion of the code. For example, you may want to run one statement at a time. Use the mouse to select the statements you want to run, and press F5.

Figure 2-1. The results of running your first T-SQL statements
Notice the Messages tab next to the Results tab. Click Messages, and you will see the number of rows affected by the statements, as well as any error or informational messages. If an error occurs, you will see the Messages tab selected by default instead of the Results tab when the statement execution completes. You can then find the results, if any, by clicking the Results tab.
Retrieving from a Table
You will usually want to retrieve data from a table instead of literal values. After all, if you already know what value you want, you probably don’t need to execute a query to get that value.
In preparation for retrieving data from a table, either delete the current code or open a new query window. Change to the example database by typing Use AdventureWorks2012 or by selecting the AdventureWorks2012 database from the drop-down list, as shown in Figure 2-2.

Figure 2-2. Choosing the AdventureWorks2012 database
You use the FROM clause to specify a table name in a SELECT statement. The FROM clause is the first part of the statement that the database engine evaluates and processes. Here is the syntax for the SELECT statement with a FROM clause:
SELECT <column1>, <column2> FROM <schema>.<table>;
Type in and execute the code in Listing 2-2 to learn how to retrieve data from a table.
Listing 2-2. Writing a Query with a FROM Clause
USE AdventureWorks2012;

GO

SELECT BusinessEntityID, JobTitle

FROM HumanResources.Employee;
The first statement in Listing 2-2 switches the connection to the AdventureWorks2012 database if it‘s not already connected to it. The word GO doesn’t really do anything except divide the code up into separate distinct code batches.
When retrieving from a table, you still have a select-list as in Listing 2-1; however, your select-list typically contains column names from a table. The select-list in Listing 2-2 requests data from the BusinessEntityID and JobTitle columns, which are both found in the Employee table. The Employee table is in turn found in the HumanResources schema.
Figure 2-3 shows the output from executing the code in Listing 2-2. There is only one set of results, because there is only one SELECT statement.

Figure 2-3. The partial results of running a query with a FROM clause
Notice that the FROM clause in Listing 2-2 specifies the table name in two parts: HumanResources.Employee. The first part—HumanResources—is a schema name. In SQL Server 2012, groups of related tables can be organized together as schemas. You don’t always need to provide those schema names, but it’s a best practice to do so. Two schemas can potentially each contain a table named Employee, and those would be different tables with different data. Specifying the schema name as part of your table reference eliminates a source of potential confusion and error.
To retrieve all the columns from a table, you can use the * symbol, also known as asterisk, star, or splat. Run the following statement to try this shortcut: SELECT * FROM HumanResources.Employee. You will see that all the columns from the table are returned.
The asterisk technique is useful for performing a quick query, but you should avoid it in a production application or process. Retrieving more data than you really need may have a negative impact on performance. Why retrieve all the columns from a table and pull more data across the network when you need only a few columns? Using SELECT * also comprises performance by ignoring any indexes created on table columns. This is because indexes are normally based off a WHERE clause filter (see the section call “Filtering Data” later in this chapter). If the SQL Server query optimizer doesn’t have a filter, it will default to a full table scan to find the data. Besides performance, application code may break if an additional column is added to or removed from the table. Additionally, there might be security reasons for returning only some of the columns. Best practice is to write select-lists specifying exactly the columns that you need and return only the rows you need.
Generating a Select-List
You might think that typing all the required columns for a select-list is tedious work. Luckily, SQL Server Management Studio provides a shortcut for writing good SELECT statements. Follow these instructions to learn the shortcut:
You now have a properly formed SELECT statement, as shown in Listing 2-3, that retrieves all the columns from the HumanResources.Employee table. You can easily remove any unneeded columns from the query.
Listing 2-3. A Scripted SELECT Statement
SELECT [BusinessEntityID]

      ,[NationalIDNumber]

      ,[LoginID]

      ,[OrganizationNode]

      ,[OrganizationLevel]

      ,[JobTitle]

      ,[BirthDate]

      ,[MaritalStatus]

      ,[Gender]

      ,[HireDate]

      ,[SalariedFlag]

      ,[VacationHours]

      ,[SickLeaveHours]

      ,[CurrentFlag]

      ,[rowguid]

      ,[ModifiedDate]

  FROM [AdventureWorks2012].[HumanResources].[Employee]

GO
Notice the brackets around the names in Listing 2-3. Column and table names need to follow specific naming rules so that SQL Server’s parser can recognize them. When a table, column, or database has a name that doesn’t follow those rules, you can still use that name, but you must enclose it within square brackets ([]). Automated tools often enclose all names within square brackets as a “just-in-case” measure.
Also notice that the FROM clause in Listing 2-3 mentions the database name: [AdventureWorks2012]. You need to specify a database name only when accessing a database other than the one to which you are currently connected. For example, if you are currently connected to the master database, you can access data from AdventureWorks2012 by specifying the database name. Again, though, automated tools often specify the database name regardless.
![]() Note Another shortcut to typing all the column names is to click and drag the column(s) from the left side of Management Studio into the query window. For example, if you click on the Columns folder and drag it to the query window, SQL Server will list all the columns.
Note Another shortcut to typing all the column names is to click and drag the column(s) from the left side of Management Studio into the query window. For example, if you click on the Columns folder and drag it to the query window, SQL Server will list all the columns.
Mixing Literals and Column Names
You can mix literal values and column names in one statement. Listing 2-4 shows an example. SQL Server allows you to create or rename a column within a query by using what is known as an alias. You use the keyword AS to specify an alias for the column. This is especially useful when using literal values where you create a column name in the T-SQL statement that doesn’t exist in the table.
Listing 2-4. Mixing Literal Values and Column Names
USE AdventureWorks2012;

GO

SELECT 'A Literal Value' AS "Literal Value",

    BusinessEntityID AS EmployeeID,

    LoginID JobTitle

FROM HumanResources.Employee;
Go ahead and execute the query in Listing 2-4. You should see results similar to those in Figure 2-4. Notice the column names in your results. The column names are the aliases that you specified in your query. You can alias any column, giving you complete control over the headers for your result sets.

Figure 2-4. The results of using aliases
The keyword AS is optional. You can specify an alias name immediately following a column name. If an alias contains a space or is a reserved word, you can surround the alias with square brackets, single quotes, or double quotes. If the alias follows the rules for naming objects, the quotes or square brackets are not required.
Be aware that any word listed immediately after a column within the SELECT list is treated as an alias. If you forget to add the comma between two column names, the second column name will be used as the alias for the first. Omitting this comma is a common error. Look carefully at the query in Listing 2-4, and you’ll see that the intent is to display the LoginID and JobTitle columns. Because the comma was left out between those two column names, the name of the LoginID column was changed to JobTitle. JobTitle was treated as an alias rather than as an additional column. Watch for and avoid this common mistake.
Reading about T-SQL and typing in code examples are wonderful ways to learn. The best way to learn, however, is to figure out the code for yourself. Imagine learning how to swim by reading about it instead of jumping into the water. Practice now with what you have learned so far. Follow the instructions in Exercise 2-1, and write a few queries to test what you know.
Filtering Data
Usually an application requires only a fraction of the rows from a table at any given time. For example, an order-entry application that shows the order history will need to display the orders for only one customer at a time. There might be millions of orders in the database, but the operator of the software will view only a handful of rows instead of the entire table. Filtering data is a very important part of T-SQL.
Adding a WHERE Clause
To filter the rows returned from a query, you will add a WHERE clause to your SELECT statement. The database engine processes the WHERE clause second, right after the FROM clause. The WHERE clause will contain expressions, called predicates, that can be evaluated to TRUE, FALSE, or UNKNOWN. You will learn more about UNKNOWN in the “Working with Nothing” section later in the chapter. The WHERE clause syntax is as follows:
SELECT <column1>,<column2>

FROM <schema>.<table>

WHERE <column> = <value>;
Listing 2-5 shows the syntax and some examples demonstrating how to compare a column to a literal value. The following examples are from the AdventureWorks2012 database unless specified otherwise. Be sure to type each query into the query window and execute the statement to see how it works. Make sure you understand how the expression in the WHERE clause affects the results returned by each query. Notice that tick marks, or single quotes, have been used around literal strings and dates.
Listing 2-5. How to Use the WHERE Clause
USE AdventureWorks2012;

GO

--1


SELECT CustomerID, SalesOrderID

FROM Sales.SalesOrderHeader

WHERE CustomerID = 11000;


--2

SELECT CustomerID, SalesOrderID

FROM Sales.SalesOrderHeader

WHERE SalesOrderID = 43793;


--3

SELECT CustomerID, SalesOrderID, OrderDate

FROM Sales.SalesOrderHeader

WHERE OrderDate = '2005-07-02';


--4

SELECT BusinessEntityID, LoginID, JobTitle

FROM HumanResources.Employee

WHERE JobTitle = 'Chief Executive Officer';
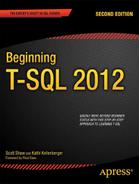
Each query in Listing 2-5 returns rows that are filtered by the expression in the WHERE clause. Be sure to check the results of each query to make sure that the expected rows are returned (see Figure 2-5). Each query returns only the information specified in that query’s WHERE clause.
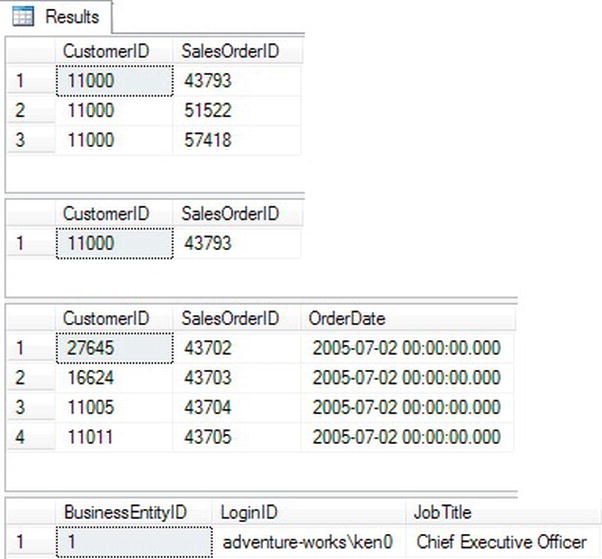
Figure 2-5. The results of using the WHERE clause
Using WHERE Clauses with Alternate Operators
Within WHERE clause expressions, you can use many comparison operators, not just the equal sign. Books Online lists the following operators:
>(greater than)
<(less than)
=(equals)
<=(less than or equal to)
>=(greater than or equal to)
!=(not equal to)
<>(not equal to)
!<(not less than)
!>(not greater than)
Type in and execute the queries in Listing 2-6 to practice using these additional operators in the WHERE clause.
Listing 2-6. Using Operators with the WHERE Clause
USE AdventureWorks2012;

GO

--Using a DateTime column

--1

SELECT CustomerID, SalesOrderID, OrderDate

FROM Sales.SalesOrderHeader

WHERE OrderDate > '2005-07-05';


--2

SELECT CustomerID, SalesOrderID, OrderDate

FROM Sales.SalesOrderHeader

WHERE OrderDate < '2005-07-05';


--3

SELECT CustomerID, SalesOrderID, OrderDate

FROM Sales.SalesOrderHeader

WHERE OrderDate >= '2005-07-05';


--4

SELECT CustomerID, SalesOrderID, OrderDate

FROM Sales.SalesOrderHeader

WHERE OrderDate <> '2005-07-05';


--5

SELECT CustomerID, SalesOrderID, OrderDate

FROM Sales.SalesOrderHeader

WHERE OrderDate != '2005-07-05';


--Using a numeric column

--6

SELECT SalesOrderID, SalesOrderDetailID, OrderQty

FROM Sales.SalesOrderDetail

WHERE OrderQty > 10;


--7

SELECT SalesOrderID, SalesOrderDetailID, OrderQty

FROM Sales.SalesOrderDetail

WHERE OrderQty <= 10;


--8

SELECT SalesOrderID, SalesOrderDetailID, OrderQty

FROM Sales.SalesOrderDetail

WHERE OrderQty <> 10;


--9

SELECT SalesOrderID, SalesOrderDetailID, OrderQty

FROM Sales.SalesOrderDetail

WHERE OrderQty != 10;
--Using a string column

--10

SELECT BusinessEntityID, FirstName

FROM Person.Person

WHERE FirstName <> 'Catherine';


--11

SELECT BusinessEntityID, FirstName

FROM Person.Person

WHERE FirstName != 'Catherine';


--12

SELECT BusinessEntityID, FirstName

FROM Person.Person

WHERE FirstName > 'M';


--13

SELECT BusinessEntityID, FirstName

FROM Person.Person

WHERE FirstName !> 'M';
Take a look at the results of each query to make sure that the results make sense and that you understand why you are getting them. Remember that both != and <> mean “not equal to” and are interchangeable. Using either operator should return the same results if all other aspects of a query are the same.
You may find the results of query 12 interesting. At first glance, you may think that only rows with the first name beginning with the letter N or later in the alphabet should be returned. However, if any FirstName value begins with M followed by at least one additional character, the value is greater than M, so the row will be returned. For example, Ma is greater than M.
Using BETWEEN
BETWEEN is another useful operator to be used in the WHERE clause. You can use it to specify an inclusive range of values. It is frequently used with dates but can be used with string and numeric data as well. Here is the syntax for BETWEEN:
SELECT <column1>,<column2>

FROM <schema>.<table>

WHERE <column> BETWEEN <value1> AND <value2>;
Type in and execute the code in Listing 2-7 to learn how to use BETWEEN.
Listing 2-7. Using BETWEEN
USE AdventureWorks2012

GO

--1

SELECT CustomerID, SalesOrderID, OrderDate

FROM Sales.SalesOrderHeader

WHERE OrderDate BETWEEN '2005-07-02' AND '2005-07-04';
--2

SELECT CustomerID, SalesOrderID, OrderDate

FROM Sales.SalesOrderHeader

WHERE CustomerID BETWEEN 25000 AND 25005;


--3

SELECT BusinessEntityID, JobTitle

FROM HumanResources.Employee

WHERE JobTitle BETWEEN 'C' and 'E';


--An invalid BETWEEN expression

--4

SELECT CustomerID, SalesOrderID, OrderDate

FROM Sales.SalesOrderHeader

WHERE CustomerID BETWEEN 25005 AND 25000;
Pay close attention to the results of Listing 2-7 shown in Figure 2-6. Query 1 returns all orders placed on the two dates specified in the query as well as the orders placed between the dates. You will see the same behavior from the second query—all orders placed by customers with customer IDs within the range specified. What can you expect from query 3? You will see all job titles that start with C or D. You will not see the job titles beginning with E, however. A job title composed of only the letter E would be returned in the results. Any job title beginning with E and at least one other character is greater than E and therefore not within the range. For example, the Ex in Executive is greater than just E, so any job titles beginning with Executive get eliminated.

Figure 2-6. The partial results of queries with BETWEEN
Query 4 returns no rows at all because the values listed in the BETWEEN expression are switched. No values meet the qualification of being greater than or equal to 25,005 and also less than or equal to 25,000. Make sure you always list the lower value first and the higher value second when using BETWEEN.
Using NOT BETWEEN
To find values outside a particular range of values, you write the WHERE clause expression using BETWEEN along with the NOT keyword. In this case, the query returns any rows outside the range. Try the examples in Listing 2-8, and compare them to the results from Listing 2-7.
Listing 2-8. Using NOT BETWEEN
Use AdventureWorks2012

GO

--1

SELECT CustomerID, SalesOrderID, OrderDate

FROM Sales.SalesOrderHeader

WHERE OrderDate NOT BETWEEN '2005-07-02' AND '2005-07-04';


--2

SELECT CustomerID, SalesOrderID, OrderDate

FROM Sales.SalesOrderHeader

WHERE CustomerID NOT BETWEEN 25000 AND 25005;


--3

SELECT BusinessEntityID, JobTitle

FROM HumanResources.Employee

WHERE JobTitle NOT BETWEEN 'C' and 'E';


--An invalid BETWEEN expression

--4

SELECT CustomerID, SalesOrderID, OrderDate

FROM Sales.SalesOrderHeader

WHERE CustomerID NOT BETWEEN 25005 AND 25000;
Query 1 displays all orders placed before July 2, 2001 (2001-07-02) or after July 4, 2001 (2001-07-04)—in other words, any orders placed outside the range specified (see Figure 2-7). Query 2 displays the orders placed by customers with customer IDs less than 25,000 or greater than 25,005. When using the NOT operator with BETWEEN, the values specified in the expression don’t show up in the results. Query 3 returns all job titles beginning with A and B. It also displays any job titles beginning with E and at least one more character, as well as any job titles starting with a letter greater than E. If a title consists of just the letter E, it will not show up in the results. This is just the opposite of what you saw in Listing 2-7.

Figure 2-7. The partial results of queries with NOT BETWEEN
Query 4 with the incorrect BETWEEN expression returns all the rows in the table. Since no customer ID values can be less than or equal to 25,005 and also be greater than or equal to 25,000, no rows meet the criteria in the BETWEEN expression. By adding the NOT operator, every row ends up in the results, which is probably not the original intent.
Filtering On Date and Time
Some temporal data columns store the time as well as the date. If you attempt to filter on such a column specifying only the date, you may retrieve incomplete results. Type in and run the code in Listing 2-9 to create and populate a temporary table that will be used to illustrate this issue. Don’t worry about trying to understand the table creation code at this point.
Listing 2-9. Table Setup for Date/Time Example
CREATE TABLE #DateTimeExample(

    ID INT NOT NULL IDENTITY PRIMARY KEY,

    MyDate DATETIME2(0) NOT NULL,

    MyValue VARCHAR(25) NOT NULL

);

GO

INSERT INTO #DateTimeExample

    (MyDate,MyValue)

VALUES ('1/2/2009 10:30','Bike'),

    ('1/3/2009 13:00','Trike'),

    ('1/3/2009 13:10','Bell'),

    ('1/3/2009 17:35','Seat'),
Now that the table is in place, type in and execute the code in Listing 2-10 to see what happens when filtering on the MyDate column.
Listing 2-10. Filtering On Date and Time Columns
--1

SELECT ID, MyDate, MyValue

FROM #DateTimeExample

WHERE MyDate = '2009-01-03';


--2

SELECT ID, MyDate, MyValue

FROM #DateTimeExample

WHERE MyDate BETWEEN '2009-01-03 00:00:00' AND '2009-01-03 23:59:59';
Figure 2-8 shows the results of the two queries. Suppose you want to retrieve a list of entries from January 3, 2009 (2009-01-03). Query 1 tries to do that but returns no results. Results will be returned only for entries where the MyDate value is precisely 2009-01-03 00:00:00, and there are no such entries. The second query returns the expected results—all values where the date is 2009-01-03. It does that by taking the time of day into account. To be even more accurate, the query could be written using two expressions: one filtering for dates greater than or equal to 2009-01-03 and another filtering for dates less than 2009-01-04. You will learn how to write WHERE clauses with multiple expressions in the “Using WHERE Clauses with Two Predicates” section later in this chapter.

Figure 2-8. Results of filtering on a date and time column
So what would happen if you formatted the date differently? Will you get the same results if slashes (/)(/)are used or if the month is spelled out (in other words, as January 3, 2009)? SQL Server does not store the date using any particular character-based format but rather as an integer representing the number of days between 1901-01-01 and the date specified. If the data type holds the time, the time is stored as the number of clock ticks past midnight. As long as you pass a date in an appropriate format, the value will be recognized as a date.
Writing a WHERE clause is as much an art as a skill. Take the time to practice what you have learned so far by completing Exercise 2-2.
Pattern Matching with LIKE
Sometimes you know only part of the value that will match the data stored in the table. For example, you may need to search for one word within a description. You can perform searches with pattern matching using wildcards to find one value within another value.
Pattern matching is possible by using the keyword LIKE in the expression instead of equal to or one of the other operators. Most of the time, the percent (%) character is used as a wildcard along with LIKE to represent any number of characters. You will also see the underscore (_) used as a wildcard to replace just one character, but it’s not used as often. Type in and run the code from Listing 2-11 to learn how to use LIKE.
Listing 2-11. Using LIKE with %
USE AdventureWorks2012;

GO

--1

SELECT DISTINCT LastName

FROM Person.Person

WHERE LastName LIKE 'Sand%';


--2

SELECT DISTINCT LastName

FROM Person.Person

WHERE LastName NOT LIKE 'Sand%';


--3

SELECT DISTINCT LastName

FROM Person.Person

WHERE LastName LIKE '%Z%';


--4

SELECT DISTINCT LastName

FROM Person.Person

WHERE LastName LIKE 'Bec_';
The queries in Listing 2-11 contain the keyword DISTINCT to eliminate duplicates in the results shown in Figure 2-9. Query 1 returns all rows where the last name starts with Sand. Query 2 returns the opposite—it returns all the rows not returned by query 1, which are those rows where the last name does not start with Sand. Query 3 returns all rows that contain a Z anywhere in the last name. Query 4 will return only the last name Beck or any last name starting with Bec and one more character, but not the last name Becker since the underscore can replace only one character.

Figure 2-9. The partial results of queries with LIKE
Restricting the Characters in Pattern Matches
The value replacing a wildcard may be restricted to a list or range of characters. To do this, surround the possible values or range by square brackets ([]). Alternately, include the ^ symbol to list characters or the range of characters that you don’t want to use as replacements. Here is the syntax for using brackets as the wildcard:
SELECT <column1>,<column2>

FROM <schema>.<table>

WERE <column> LIKE 'value[a-c]';


SELECT <column1>,<column2>

FROM <schema>.<table>

WERE <column> LIKE 'value[a,b,c]';


SELECT <column1>,<column2>

FROM <schema>.<table>

WERE <column> LIKE 'value[^d]';
Type in and execute the code from Listing 2-12, which shows some examples. You will probably not encounter the square bracket technique very often, but you should be familiar with the syntax in case you run into it.
Listing 2-12. Using Square Brackets with LIKE
USE AdventureWorks2012;

GO


--1

SELECT DISTINCT LastName

FROM Person.Person

WHERE LastName LIKE 'Cho[i-k]';


--2

SELECT DISTINCT LastName

FROM Person.Person

WHERE LastName LIKE 'Cho[i,j,k]';


--3

SELECT DISTINCT LastName

FROM Person.Person

WHERE LastName LIKE 'Cho[^i]';
Figure 2-10 displays the results of Listing 2-12. Queries 1 and 2 returns unique rows with a last name of Choi, Choj, or Chok because the pattern specifies the range i to k. Query 1 specifies the range of values, while query 2 explicitly lists the allowable values that may be replaced. Query 3 returns unique rows that have a last name beginning with Cho and ending with any character except for i.

Figure 2-10. The results of queries restricting characters in matches
Combining Wildcards
You may combine wildcards to create even more elaborate patterns. Remember that the percent sign (%) replaces any number of characters, the underscore (_) replaces one character, and the square brackets ([]) replace one character based on the values within the brackets. Listing 2-13 demonstrates some examples. Type in and execute the code to see how this works.
Listing 2-13. Combining Wildcards in One Pattern
USE AdventureWorks2012;

GO

--1

SELECT LastName

FROM Person.Person

WHERE LastName LIKE 'Ber[r,g]%';


--2

SELECT LastName

FROM Person.Person

WHERE LastName LIKE 'Ber[^r]%';


--3

SELECT LastName

FROM Person.Person

WHERE LastName LIKE 'Be%n_';
View Figure 2-11 to see the results. Query 1 returns all rows with a last name beginning with Ber followed by either r or g (which is signified by the characters within the brackets) and then by any number of characters. Query 2 returns all rows with a last name beginning with Ber followed by any letter except for r and then by any number of characters. Query 3 returns all rows with a last name beginning with Be followed by any number of characters, except that the next-to-last character must be an n.

Figure 2-11. The results of queries with multiple wildcards
You will probably find LIKE used frequently in queries, so it’s important to understand how it works. Practice the skills you have just learned by completing Exercise 2-3.
Using WHERE Clauses with Two Predicates
So far, the examples have shown only one condition or predicate in the WHERE clause, but the WHERE clause can be much more complex. They can have multiple predicates by using the logical operators OR. Type in and execute the code in Listing 2-14 that demonstrates how to use AND and OR to combine two predicates.
Listing 2-14. How to Use AND and OR
USE AdventureWorks2012;

GO


--1

SELECT BusinessEntityID,FirstName,MiddleName,LastName

FROM Person.Person

WHERE FirstName = 'Ken' AND LastName = 'Myer';


--2

SELECT BusinessEntityID,FirstName,MiddleName,LastName

FROM Person.Person

WHERE LastName = 'Myer' OR LastName = 'Meyer';
Figure 2-12 shows the results. Query 1 returns any rows with the first name Ken and the last name Myer because both expressions must evaluate to true. Query 2 returns any rows with either the last name Myer or the last name Meyer because only one of the expressions must evaluate to true.
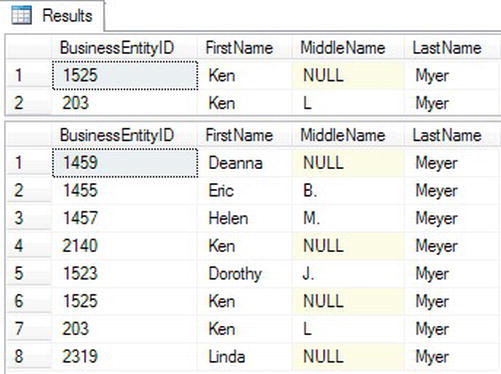
Figure 2-12. The results of queries with two predicates in the WHERE clause
Using WHERE Clauses with Three or More Predicates
A WHERE clause can contain more than two predicates combined by the logical operators AND and OR. If a WHERE clause contains more than two predicates using both AND and OR, you must be careful to ensure that the query returns the expected results. Type in and execute the code in Listing 2-15 to see how the order of the predicates affects the results and how to use parentheses to enforce the correct logic.
Listing 2-15. WHERE Clauses with Three Predicates
USE AdventureWorks2012;

GO


--1

SELECT BusinessEntityID,FirstName,MiddleName,LastName

FROM Person.Person

WHERE FirstName = 'Ken' AND LastName = 'Myer'

    OR LastName = 'Meyer';


--2

SELECT BusinessEntityID,FirstName,MiddleName,LastName

FROM Person.Person

WHERE LastName = 'Myer' OR LastName = 'Meyer'

    AND FirstName = 'Ken';


--3

SELECT BusinessEntityID,FirstName,MiddleName,LastName

FROM Person.Person

WHERE LastName = 'Meyer'

    AND FirstName = 'Ken' OR LastName = 'Myer';
--4

SELECT BusinessEntityID,FirstName,MiddleName,LastName

FROM Person.Person

WHERE FirstName = 'Ken' AND (LastName = 'Myer'

    OR LastName = 'Meyer'),
You can see the results of Listing 2-15 in Figure 2-13. Once both logical operators AND and OR are used in the WHERE clause, things can get complicated. The logical operator AND takes precedence over OR; therefore, the database engine evaluates AND first. For example, suppose you want to find a name in the Person.Person table, Ken Meyer, but you can’t remember the spelling of the last name. It could be Myer. Listing 2-15 shows four attempts to solve this problem, but only the last one is correct.

Figure 2-13. The results of queries that force precedence to ensure the correct results
Query 1 returns the rows with the name Ken Myer but also returns any row with the last name Meyer. Queries 2 and 3 return identical results—the row with Ken Meyer and any rows with the last name Myer. Finally, by using the parentheses, query 4 returns the correct results.
When using multiple conditions, you must be very careful about the precedence, or order, that the expressions are evaluated. The database engine evaluates the conditions in the WHERE clause from left to right, but AND takes precedence over OR. Rearranging the terms can produce different but possibly still invalid results as in the previous example. To guarantee that the query is correct, always use parentheses to enforce the logic once the logical operator OR is added to the WHERE clause.
Using NOT with Parentheses
Another interesting twist when using parentheses is that you can negate the meaning of the expression within them by specifying the keyword NOT. For example, you could try to find the rows where the first name is Ken and the last name can’t be Myer or Meyer. Type in and execute Listing 2-16 to see two ways to write the query.
Listing 2-16. Using NOT with Parentheses
USE AdventureWorks2012;

GO

--1

SELECT BusinessEntityID,FirstName,MiddleName,LastName

FROM Person.Person

WHERE FirstName='Ken' AND LastName <> 'Myer'

    AND LastName <> 'Meyer';


--2

SELECT BusinessEntityID,FirstName,MiddleName,LastName

FROM Person.Person

WHERE FirstName='Ken'

    AND NOT (LastName = 'Myer' OR LastName = 'Meyer'),
Often multiple ways exist to solve the same problem, as in this case. Query 1 contains three expressions. One expression restricts the rows to those where FirstName is Ken. The other two expressions compare LastName to a value using not equal to (<>). In query 2, the expressions within the parentheses are evaluated first. Next, that result is negated by the NOT operator to find all last names that are not Myer or Meyer. Finally, only the rows that also have the first name Ken are returned. You can see the results in Figure 2-14.
As a best practice, always employ parentheses to enforce precedence when the WHERE clause includes the logical operator OR. Not only will this decrease the possibility of an incorrect WHERE clause, but it will increase the readability of the query.

Figure 2-14. The identical results of two queries with different techniques
Using the IN Operator
The IN operator is very useful when multiple values must be compared to the same column. Query 4 in Listing 2-15 could have been written in a more straightforward way using the IN operator. Follow the IN operator with a list of possible values for a column within parentheses. Here is the syntax:
SELECT <column1>,<column2>

FROM <schema>.<table>

WHERE <column> IN (<value1>,<value2>);
Type in and execute the code from Listing 2-17. The queries in this listing demonstrate how to use the IN operator. Review the results to be sure that you understand them.
Listing 2-17. Using the IN Operator
USE AdventureWorks2012

GO


--1

SELECT BusinessEntityID,FirstName,MiddleName,LastName

FROM Person.Person

WHERE FirstName = 'Ken' AND

    LastName IN ('Myer','Meyer'),


--2

SELECT TerritoryID, Name

FROM Sales.SalesTerritory

WHERE TerritoryID IN (2,1,4,5);


--3

SELECT TerritoryID, Name

FROM Sales.SalesTerritory

WHERE TerritoryID NOT IN (2,1,4,5);
You will probably find that the operator IN can simplify many queries. Query 1 solves the same problem as in Listing 2-15. The original query used two expressions to compare two values to the same column within parentheses: (LastName = 'Myer' OR LastName = 'Meyer'). By using the IN operator, you were able to eliminate one expression by including both values in the IN list. You can also use IN with numbers and dates. Query 2 returns all rows with TerritoryID 2, 1, 4, or 5. By using NOT, query 3 returns the opposite results. Figure 2-15 shows the results of the three queries from Listing 2-17.

Figure 2-15. The results of queries using the IN operator
As the WHERE clause becomes more complicated, it becomes very easy to make a mistake. Complete Exercise 2-4 to practice writing multiple predicates, WHERE clauses with multiple predicates, and the IN operator.
Working with Nothing
Probably nothing causes more aggravation to T-SQL developers than NULL values. NULL means that a value has not been entered for a particular column in a row. Suppose you have an e-commerce application that requires the customer to fill in information such as name and address. In this example, the phone number is optional. What does it mean if the customer does not enter a phone number and the table ends up with NULL in the PhoneNumber column of the Customer table? Does it mean that the customer does not have a phone? That’s one possibility. Another is that the customer has at least one phone number but chose not to supply it since it was not required. Either way, the end result is that you have =.
Think now about what would happen if you had a list of 1,000,000 phone numbers and tried to figure out whether any of the phone numbers belonged to the customer. Even if you compared each phone number to the customer’s row, one by one, you would never know whether any of the phone numbers were the right one. You would never know because you would be comparing 1,000,000 values to nothing. Conversely, can you guarantee that every one of your 1,000,000 phone numbers is not the missing phone number? No, you can’t do that either, since the customer’s phone number is unknown.
This example should give you an idea about the challenges of working with NULL values. Type in and execute the code in Listing 2-18 to work on some examples using real data.
Listing 2-18. An Example Illustrating NULL
USE AdventureWorks2012;

GO


--1) Returns 19,972 rows

SELECT MiddleName

FROM Person.Person;


--2) Returns 291 rows

SELECT MiddleName

FROM Person.Person

WHERE MiddleName = 'B';


--3) Returns 11,182 but 19,681 were expected

SELECT MiddleName

FROM Person.Person

WHERE MiddleName != 'B';


--4) Returns 19,681

SELECT MiddleName

FROM Person.Person

WHERE MiddleName IS NULL

    OR MiddleName !='B';
Query 1 with no WHERE clause returns 19,972 rows, the total number of rows in the table. Query 2 returns 291 rows with the middle name B. Logic follows that query 3 will return the difference of the two numbers: 19,681 rows. When you check the results of query 3, you will find that more than 8,000 rows are not accounted for. That is because the rows with NULL values can’t be found by the expression containing not equal. Comparing NULL to B returns UNKNOWN, so the rows are not returned. You must specifically check for NULL values by using the IS NULL operator, as shown in query 4, which returns the correct number of rows.
Usually comparing the data in a column to a value or comparing the values from two columns returns either TRUE or FALSE. If the expression evaluates to TRUE, then the row is returned. If the expression evaluates to FALSE, then the row is not returned. If a value in the expression contains NULL, then the expression is resolved to UNKNOWN. In some ways, the behavior is like FALSE. When an expression resolves to UNKNOWN, the row is not returned. The problems begin when using any operator except for equal to (=). The opposite of FALSE is TRUE, but the opposite of UNKNOWN is still UNKNOWN.
![]() Note Be aware that NULL is not a numeric value so it can’t equal itself or any other value. T-SQL instead provides specific expressions and functions to test for
Note Be aware that NULL is not a numeric value so it can’t equal itself or any other value. T-SQL instead provides specific expressions and functions to test for NULL values. To test for a NULL value you will want to use the IS [NOT] NULL expression (http://msdn.microsoft.com/en-us/library/ms188795(v=SQL.110).aspx). The function ISNULL will replace a NULL value with a value specified in the query (see Chapter 3).
Neglecting to take possible NULL values into consideration can often cause incorrect results. Always remember to think about NULL values, especially when writing any expression containing NOT. Do the NULL values belong in the results? If so, you will have to check for NULL. You will also need to keep NULL values in mind when using the less than operator. NULL values will be left out of those results as well. Chapter 3 will show you some other options for working with NULL.
Understanding how NULL values can affect the results of your queries is one of the most important skills you will learn. Even experienced T-SQL developers struggle from time to time when working with NULL values. Be sure to complete Exercise 2-5 to practice what you have just learned.
Performing a Full-Text Search
You have learned how to use LIKE to find a character match in data. Full-text search provides the ability to search for words or phrases within string or binary data columns similar to a web search such as Google or Bing. You can use LIKE for pattern matching only and not for searching binary data. Full-text search has support for multiple languages and other features such as synonym searches. Full-text search is especially beneficial for documents stored as binary data in the database.
Full-text search must be installed during the SQL Server setup, and a special full-text index needs to be created on the table. This book doesn’t intend to teach you how to set up and manage full-text search, but it will show you how to write some of the basic queries. For more information about full-text search, see the book Pro Full-Text Search in SQL Server 2008 by Hillary Cotter and Michael Coles (Apress, 2008). The AdventureWorks2012 database ships with three full-text indexes already in place. Table 2-1 lists the columns with full-text indexes included by default in AdventureWorks2012.

Using CONTAINS
CONTAINS is one of the functions used to search full-text indexes. You will learn more about functions in Chapter 3. The simplest way to use CONTAINS is to search a column for a particular word or phrase. Here is the syntax for CONTAINS:
SELECT <column1>,<column2>

FROM <schema>.<tablename>

WHERE CONTAINS(<indexed column>,<searchterm>);
Listing 2-19 shows how to use CONTAINS. Notice that the second query has a regular predicate in the WHERE clause as well. Be sure to type in and execute the code to learn how to use CONTAINS.
Listing 2-19. Using CONTAINS
USE AdventureWorks2012;

GO


--1

SELECT FileName

FROM Production.Document

WHERE Contains(Document,'important'),


--2

SELECT FileName

FROM Production.Document

WHERE Contains(Document,' "service guidelines " ')

    AND DocumentLevel = 2;
Figure 2-16 displays the results. Notice how double quotes are used within single quotes to designate a phrase in query 2. Query 2 also demonstrates that both a full-text predicate and a regular predicate can be used in the same query. You may be wondering why the Document column is not part of the results since that is the search term. The document is actually a binary file, such as a Microsoft Word document, that must be opened by the appropriate application.

Figure 2-16. The results of a full-text search operation
Using Multiple Terms with CONTAINS
You can use CONTAINS to find words in data that are not even next to each other by using AND, OR, and NEAR. You can use the operator AND NOT to find results with one term and not another. This syntax is similar to searches with Google or other search engines. Listing 2-20 demonstrates this technique.
Listing 2-20. Multiple Terms in CONTAINS
USE AdventureWorks2012;

GO


--1

SELECT FileName, DocumentSummary

FROM Production.Document

WHERE Contains(DocumentSummary,'bicycle AND reflectors'),


--2

SELECT FileName, DocumentSummary

FROM Production.Document

WHERE CONTAINS(DocumentSummary,'bicycle AND NOT reflectors'),


--3

SELECT FileName, DocumentSummary

FROM Production.Document

WHERE CONTAINS(DocumentSummary,'maintain NEAR bicycle AND NOT reflectors'),
Figure 2-17 shows the results. In this case, a regular string data column, DocumentSummary, is searched so that you can verify the results.

Figure 2-17. The results from using multiple search terms
Searching Multiple Columns
You can search multiple columns or all full-text indexed columns at once without multiple CONTAINS predicates in the WHERE clause. Use the asterisk to specify that all possible columns are searched, or use a comma-delimited list in parentheses to specify a list of columns. Type in and execute the code in Listing 2-21, which demonstrates these techniques.
Listing 2-21. Using Multiple Columns
USE AdventureWorks2012;

GO


--1

SELECT FileName, DocumentSummary

FROM Production.Document

WHERE CONTAINS((DocumentSummary,Document),'maintain'),


--2

SELECT FileName, DocumentSummary

FROM Production.Document

WHERE CONTAINS((DocumentSummary),'maintain')

        OR CONTAINS((Document),'maintain')


--3

SELECT FileName, DocumentSummary

FROM Production.Document

WHERE CONTAINS(*,'maintain'),
The list of columns to be searched in query 1 is explicitly listed and contained within an inner set of parentheses. Query 2 is equivalent to query 1 by using two CONTAINS expressions, each searching a different column for the same term. By using the asterisk in query 3 within the CONTAINS expression, all columns with a full-text index are searched.
Using FREETEXT
FREETEXT is similar to CONTAINS except that it returns rows that don’t exactly match. It will return rows that have terms with similar meanings to your search terms by using a thesaurus. FREETEXT is less precise than CONTAINS, and it is less flexible. The keywords AND, OR, and NEAR can’t be used with CONTAINS. Avoid using double quotes that specify an exact phrase with FREETEXT, because then SQL Server won’t use the thesaurus and will search only for the exact phrase. The same rules about multiple columns apply. Type in and execute the code in Listing 2-22, which compares FREETEXT to LIKE.
Listing 2-22. Using FREETEXT
USE AdventureWorks2012

GO


--1

SELECT FileName, DocumentSummary

FROM Production.Document

WHERE FREETEXT((DocumentSummary),'provides'),


--2

SELECT FileName, DocumentSummary

FROM Production.Document

WHERE DocumentSummary LIKE '%provides%'
Figure 2-18 displays the results from Listing 2-22. The DocumentSummary value in the rows returned from query 1 do not contain the word provides. Query 1 returns the rows anyway because FREETEXT will find similar words as well as exact matches.
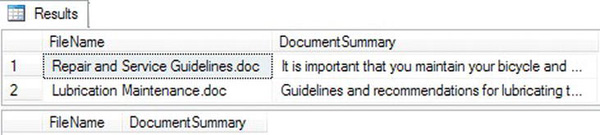
Figure 2-18. The results from using FREETEXT
Full-text search operations can get much more complicated than the information provided here. This was meant to be an overview of the basic syntax. Be sure to see the book Pro Full-Text Search in SQL Server 2008 by Hillary Cotter and Michael Coles (Apress, 2008) to learn more about full-text search. Practice what you have just learned about full-text search by completing Exercise 2-6.
Sorting Data
So far, you have learned how to retrieve a list of columns from a table and filter the results. This section covers how to sort the data that is retrieved using the ORDER BY clause. The ORDER BY clause is the last part of the SELECT statement that the database engine will process.
You can specify one or more columns in the ORDER BY clause separated by commas. The sort order is ascending by default, but you can specify descending order by using the keyword DESCENDING or DESC after the column name. Here is the syntax for ORDER BY:
SELECT <column1>,<column2>

FROM <schema>.<tablename>

ORDER BY <column1>[<sort direction>],<column2> [<sort direction>]
Type in and execute the code in Listing 2-23 to learn how to use the ORDER BY clause.
Listing 2-23. How to Use ORDER BY
USE AdventureWorks2012;

GO


--1

SELECT ProductID, LocationID

FROM Production.ProductInventory

ORDER BY LocationID;


--2

SELECT ProductID, LocationID

FROM Production.ProductInventory

ORDER BY ProductID, LocationID DESC
Figure 2-19 shows the partial results. The rows from query 1 display in order of LocationID. Query 2 returns the results ordered first by ProductID, and then the results are further sorted by LocationID in descending order.
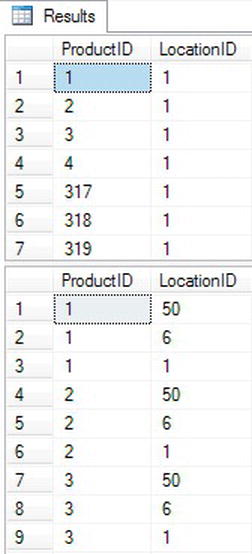
Figure 2-19. The results when using the ORDER BY clause
You can also use the ORDER BY clause to reduce the dataset returned by the query. This is helpful when you have a large table but only need a subset of the rows or your application only requires a small portion of a given dataset. There are two key words used to return only a subset of the selected rows. The first is OFFSET and it determines at what row count to start returning data. Type in the code in Listing 2-24 and execute in the query window.
Listing 2-24. How to Use ORDER BY OFFSET
SELECT ProductID, LocationID

FROM Production.ProductInventory

ORDER BY LocationID

OFFSET 10 ROWS;
Figure 2-20 shows the partial results of using the OFFSET command. If you compare the results of ProductID with the similar query from 2-23 you will notice the result skips the first 10 rows and begins showing data starting at row 11.

Figure 2-20. Results when using the OFFSET clause
An additional feature allows you to also limit the total rows returned. To do this you use the FETCH NEXT…ONLY command. To use the command, type the keywords and specify the amount of rows you want to return. In Listing 2-25, you will run the same query as before but this time it will only return 10 rows.
Listing 2-25. How to Use ORDER BY FETCH NEXT…ONLY
SELECT ProductID, LocationID

FROM Production.ProductInventory

ORDER BY LocationID

OFFSET 10 ROWS

FETCH NEXT 10 ROWS ONLY;
The results in Figure 2-21 are the same as in Figure 2-20 but you restricted the dataset to only 10 rows.

Figure 2-21. Results when using the FETCH NEXT…ONLY clause
![]() Note Although you used the words NEXT and ROWS in the OFFSET and the FETCH NEXT clause, you can replace these with the words FIRST and ROW and still maintain the same results. Those key words are interchangeable and do not affect the resultset.
Note Although you used the words NEXT and ROWS in the OFFSET and the FETCH NEXT clause, you can replace these with the words FIRST and ROW and still maintain the same results. Those key words are interchangeable and do not affect the resultset.
You may find the ORDER BY clause easy to use, but you should still practice what you have learned about sorting the results of your queries by completing Exercise 2-7.
Thinking About Performance
Reading this book and performing the exercises found in each chapter will enable you to become a proficient T-SQL programmer. You will learn how to write the queries, often in more than one way, to get results. Often T-SQL developers don’t learn the best way to write a query, and the performance of their applications and reports suffer. As a result, several chapters of this book, beginning with this chapter, feature a section on performance to get you thinking about how the statements you write can affect performance.
Taking Advantage of Indexes
Indexes help the database engine locate the rows that must be returned by a query. In fact, the database engine will retrieve all the required columns from the index instead of accessing the table if possible. I am not advocating creating an index on every column, but strategically designed indexes immensely improve the performance of queries.
When a table contains an index on a column, the database engine will usually use that index to find the rows for the results if the column appears in the WHERE clause. For example, the Person.Person table contains an index called IX_Person_LastName_FirstName_MiddleName, which consists of the LastName, FirstName, and MiddleName columns. To see the index properties, follow these steps:
- Using SQL Server Management Studio, connect to your SQL Server instance if you aren’t connected already.
- Expand Databases.
- Expand AdventureWorks2012.
- Expand Tables.
- Expand Person.Person.
- Expand Indexes.
- Locate the IX_Person_LastName_FirstName_MiddleName index, and double-click it to view the properties.
View the index properties in Figure 2-22. Notice that the LastName column appears first in the list. To take full advantage of this index, the WHERE clause must filter on LastName. Imagine searching a phone book by first name when you don’t know the last name! SQL Server must do the same thing, looking at each entry in the index, when the query filters on FirstName but not LastName.
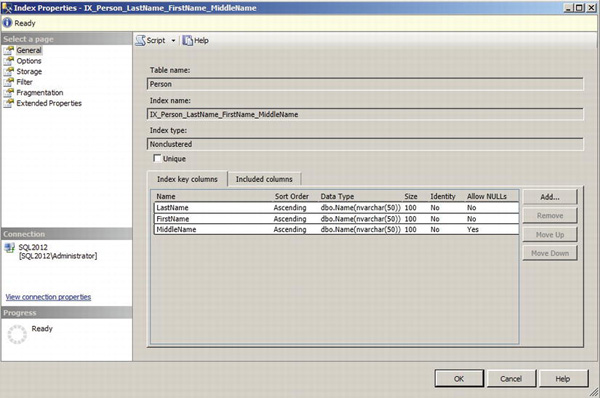
Figure 2-22. The properties of an index
What happens when you filter on only a nonindexed column? The database engine must check the value of the column in each row of the table to find the rows meeting the criteria. Again, I’m not advocating creating an index on every column, and index creation and tuning are both well beyond the scope of this book. I just want to make you aware that the indexes defined on the table will affect the performance of your queries.
Viewing Execution Plans
By using execution plans, you can determine whether the database engine utilizes an index to return the rows in the query. You can also compare the performance of two or more queries to see which one performs the best. Again, this book doesn’t intend to make you an expert on execution plans but instead just gets you started using them to help you understand how your query performs.
![]() Note To learn more about execution plans, see the book SQL Server 2008 Query Performance Tuning Distilled by Grant Fritchey and Sajal Dam (Apress, 2009).
Note To learn more about execution plans, see the book SQL Server 2008 Query Performance Tuning Distilled by Grant Fritchey and Sajal Dam (Apress, 2009).
While you have a query window open, click the Include Actual Execution Plan icon (see Figure 2-23) to turn on this feature for the current session. The setting must be toggled on for each query window; it is not a permanent setting.
Figure 2-23. Clicking the Include Actual Execution Plan icon
Listing 2-26 contains three queries to demonstrate the differences in performance found depending on whether SQL Server can take advantage of an index to return the results. Type in and execute the code in Listing 2-26.
Listing 2-26. Learning How to View Execution Plans
USE AdventureWorks2012;

GO


--1

SELECT LastName, FirstName

FROM Person.Person

WHERE LastName = 'Smith';


--2

SELECT LastName, FirstName

FROM Person.Person

WHERE FirstName = 'Ken';


--3

SELECT ModifiedDate

FROM Person.Person

WHERE ModifiedDate BETWEEN '2005-01-01' and '2005-01-31';
Once the query execution completes, click the Execution Plan tab. Figure 2-24 shows the graphical execution plans for the three queries. First, take a look at the query cost for each query shown at the top of each section. The query cost gives you an estimated weight of each query compared to the total. The numbers should add up to 100 percent.
Query 1, which has a relative query cost of 0 percent, filters the results on the LastName column. Recall that an index comprised of the LastName, FirstName, and MiddleName columns exists on the Person.Person table. Because the query filters on the first column in the index, the database engine can take full advantage of the index; it performs an index seek without scanning the entire index. This is similar to looking at the phone book when you know the last name; you don’t need to look at every page or every entry to find the name you are looking for. Query 2, which has a relative query cost of 3 percent, filters the results on the FirstName column. The table has an index that contains the FirstName column, but since it appears second in the index, SQL Server must perform an index scan. This means that the database engine must compare the string Ken to every FirstName value in the index. The database was able to take advantage of the index but not to the fullest extent. Because the index contains both columns found in the results, the database engine didn’t have to touch the actual table, pulling all the needed data from the index. The execution plan also suggests a new index that will make this query perform better.
Query 3, which has a relative query cost of 96 percent, filters the results on the ModifiedDate column. The table doesn’t have an index containing this column. To filter the rows, the database engine must perform a clustered index scan. The clustered index is the actual table. In this case, the database engine had to look at each row of the table to retrieve the results, which causes the worst possible performance. Review the “Understanding Indexes” section in Chapter 1 to learn more about clustered indexes and indexes in general.
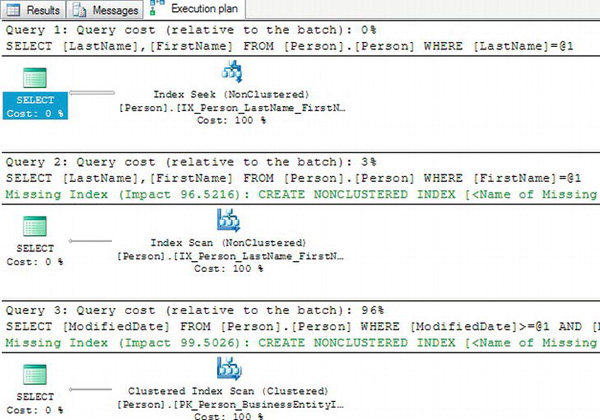
Figure 2-24. The actual execution plans generated from Listing 2-26
Viewing and understanding execution plans will help you learn how writing queries will affect the performance of your applications and reports. Don’t rush to your database administrator demanding changes to the database indexes in your production database; this section doesn’t intend to teach index tuning. Think of execution plans as another tool you can use to write better code. To learn more about how execution plans affect performance, complete Exercise 2-8.
Summary
The SELECT statement is used to retrieve data from tables stored in SQL Server databases. The statement can be broken down into several parts called clauses. The FROM clause specifies the table where the data is stored. The SELECT clause contains a list of columns to be retrieved. To filter the data, use the WHERE clause. To sort the data, use the ORDER BY clause.
This chapter covered a lot of ground, especially all the nuances of the WHERE clause. Make sure you really understand the material covered in the chapter before continuing. Everything you learn throughout the rest of the book will depend on a thorough knowledge of the basics. The next chapter explores many of the built-in functions you can use to make data retrieval even more interesting.