C H A P T E R 4
Querying Multiple Tables
Now that you know how to write simple queries using one table and how to use functions and expressions in queries, it is time to learn how to write queries involving two or more tables. In a properly designed relational database, a table contains data about one thing or entity. For example, an order-entry application will have a table storing customer information, a table containing data about orders, and a table containing detail information about each item ordered. The order table has a column, called a foreign key, that points to a row in the customer table. The detail table has a foreign key column that points to the order table. By using joins, you can link these tables together so that you can display columns from each table in the same result set.
You can also use multiple tables with subqueries and union queries. You might use a subquery in place of an IN list in the WHERE clause, for example. A union query allows you to combine the result of two or more queries into one result set. For example, a database may contain archive tables with old sales data. By using a UNION query, you can combine the data from both the production tables and the archived tables so that it looks like the results are from the same table.
Finally, this chapter demonstrates two useful techniques: derived tables and common table expressions. These techniques allow you to isolate the logic used to query one table from the rest of the main query.
Learning how to join tables is a critical skill for T-SQL developers because it allows you to combine the relational data stored in multiple tables and present it as a single result set. Make sure you understand all the example code and complete the exercises in this chapter before moving on to the next chapter.
Writing INNER JOINS
Most of the time, to join tables together, you will use INNER JOIN. When connecting two tables with INNER JOIN, only the rows from the tables that match on the joining columns will show up in the results. If you join the customer and order tables, the query will return only the customers who have placed orders, along with the orders that have been placed. Only the rows where the customer ID is common in both tables will show up in the results.
Joining Two Tables
To join tables together, you might think that another clause will be added to the SELECT statement. This is not the case. Instead, the FROM clause contains information about how the tables join together. Here is the syntax for joining two tables (the keyword INNER is optional):
Figure 4-1 shows how the Sales.SalesOrderHeader and Sales.SalesOrderDetail tables connect and shows some of the columns in the tables. You will see these tables joined in the first example query, so make sure you understand how they connect before typing Listing 4-1.

Figure 4-1. The Sales.SalesOrderHeader and Sales.SalesOrderDetail tables
The Sales.SalesOrderHeader table has a primary key called SalesOrderID. The Sales.SalesOrderDetail table has a composite primary key, one that is made up of more than one column, consisting of SalesOrderDetailID and SalesOrderID. The SalesOrderID column in the Sales.SalesOrderDetail table is also a foreign key pointing back to the Sales.SalesOrderHeader table. The arrow points from the foreign key in the Sales.SalesOrderDetail table to the primary key in the Sales.SalesOrderHeader table.
Take a look at the code in Listing 4-1. Type in and execute the code to learn how to join the two tables.
Listing 4-1. Joining Two Tables
USE AdventureWorks2012;

GO

SELECT s.SalesOrderID, s.OrderDate, s.TotalDue, d.SalesOrderDetailID,

    d.ProductID, d.OrderQty

FROM Sales.SalesOrderHeader AS s

INNER JOIN Sales.SalesOrderDetail AS d ON s.SalesOrderID = d.SalesOrderID;
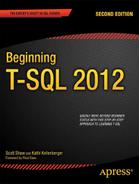
Figure 4-2 displays the results. The SELECT list may contain columns from either of the tables. In the FROM clause, you list one of the tables followed by the words INNER JOIN and the second table name. To define how the two tables join together, use the keyword ON and an equality expression. Each Sales.OrderHeader row contains a unique SalesOrderID. Each Sales.SalesOrderDetail row contains a SalesOrderID column that determines to which order the detail belongs. When you join these two tables together, the query displays every row from the Sales.SalesOrderHeader table that matches a row in the Sales.SalesOrderDetail table.
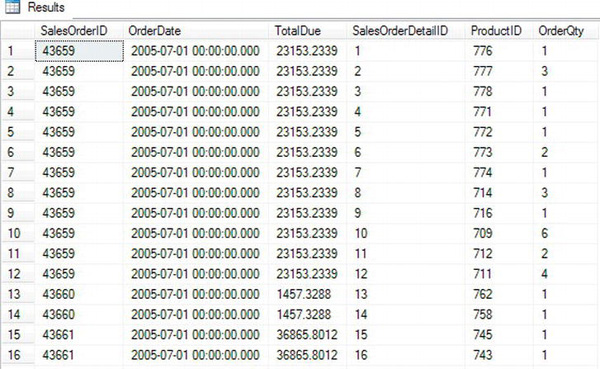
Figure 4-2. The partial results of joining two tables
Take a look at the data from the Sales.SalesOrderHeader columns in the query results. The information from the Sales.SalesOrderHeader table repeats for each matching row in the Sales.SalesOrderDetail table. If a row exists in the Sales.SalesOrderHeader table with no matches in the Sales.SalesOrderDetail table, the Sales.SalesOrderHeader row will not show up in the results.
Because the column name, SalesOrderID, is the same in both tables, it must be fully qualified with the table name anywhere it is used in the query. To save typing, use an alias for each table. Notice that the query uses the table alias for all the columns in the SELECT list. Fully qualifying the column name is not required except for the columns with the same name; however, fully qualifying all of the column names will make the query more readable. Six months after you write a query, you can immediately see which table each column comes from without spending a lot of time figuring it out.
Avoiding an Incorrect Join Condition
Although you must specify join criteria with ON in the FROM clause when using INNER JOIN, nothing keeps you from writing the join incorrectly. Take a look at Listing 4-2. If you decide to run the code, you may have to click the red, square Cancel Executing Query icon to the right of the Execute icon to stop query execution, or the query will run for several minutes.
Listing 4-2. Writing an Incorrect Query
USE AdventureWorks2012;

GO

SELECT s.SalesOrderID, OrderDate, TotalDue, SalesOrderDetailID,

    d.ProductID, d.OrderQty

FROM Sales.SalesOrderHeader AS s

INNER JOIN Sales.SalesOrderDetail d ON 1 = 1;
Figure 4-3 displays a portion of the results after scrolling down more than 3,000 rows. When comparing the results to those in Figure 4-2, you will see that the rows from Sales.SalesOrderHeader join inappropriate rows from Sales.SalesOrderDetail. Both sets of results show SalesOrderID 43659, but the results are correct only in Figure 4-2. Because 1=1 is always true, every row from the first table joins every row from the second table to produce these incorrect results, which is also called a Cartesian product.

Figure 4-3. The partial results of an incorrect join
Whenever you write a query with INNER JOIN, make sure you understand the relationship between the two tables. For example, you could join the OrderQty column from the Sales.SalesOrderDetail table to the SalesOrderID column in the Sales.SalesOrderHeader table. The query would run, but the results would not make any sense at all.
Joining on a Different Column Name
In the previous two examples, the key column names happen to be the same, but this is not a requirement. The Person.Person table contains information about people from several tables in the AdventureWorks2012 database. Figure 4-4 shows how the Person.Person and the Sales.Customer table connect. The PersonID from the Sales.Customer table joins to the BusinessEntityID in the Person.Person table. The PersonID column in the Sales.Customer table is the foreign key.
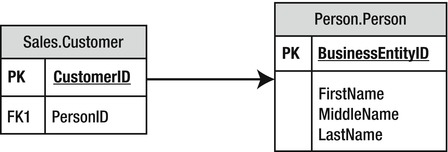
Figure 4-4. How to connect the Sales.Customer and Person.Person tables
Listing 4-3 shows an example that joins these two tables.
Listing 4-3. Joining Two Tables with Different Column Names
USE AdventureWorks2012;

GO

SELECT c.CustomerID, c.PersonID, p.BusinessEntityID, p.LastName

FROM Sales.Customer AS c

INNER JOIN Person.Person AS p ON c.PersonID = p.BusinessEntityID;
Figure 4-5 shows the partial results. The Person.Person table contains information about people from several tables in the database. In this case, the columns joining the two tables have different names. The PersonID from the Sales.Customer table joins to the BusinessEntityID in the Person.Person table. This works even though the columns have different names.

Figure 4-5. The partial results of joining tables with different key column names
Joining on More Than One Column
Although a JOIN frequently involves joining a column from one table to a column from another table, sometimes you must join multiple columns. The AdventureWorks2012 database contains only one example in which multiple columns must be used in a single JOIN: Sales.SalesOrderDetail to Sales.SpecialOfferProduct. Figure 4-6 shows how these two tables connect.
Figure 4-6. How to connect the Sales.SalesOrderDetail table to the Sales.SpecialOfferProduct table
The Sales.SalesSpecialOfferProduct table has a composite primary key composed of SpecialOfferID plus ProductID. To identify a row in this table, you must use both columns. When joining Sales.SalesOrderDetail to the Sales.SpecialOfferProduct table, you specify both columns in the join. Here is the syntax for joining on more than one column:
SELECT <SELECT list>

FROM <table1>

[INNER] JOIN <table2> ON <table1>.<col1> = <table2><col2>

    AND <table1>.<col3> = <table2>.<col4>
Type in and execute the code in Listing 4-4 to learn how to join on two columns.
Listing 4-4. Joining on Two Columns
USE AdventureWorks2012;

GO


SELECT sod.SalesOrderID, sod.SalesOrderDetailID,

    so.ProductID, so.SpecialOfferID, so.ModifiedDate

FROM Sales.SalesOrderDetail AS sod

INNER JOIN Sales.SpecialOfferProduct AS so

    ON so.ProductID = sod.ProductID AND

    so.SpecialOfferID = sod.SpecialOfferID

WHERE sod.SalesOrderID IN (51116,51112);
Take a look at the results (see Figure 4-7). Two columns, ProductID and SpecialOfferID, comprise the join condition. To determine which row matches the rows from Sales.SalesOrderDetail, both columns are used in the join condition. If the join contained only one of the columns, the results would be similar to the incorrect results in the section “Avoiding an Incorrect Join.” If the join contained only the ProductID, the results would show every possible SpecialOfferID row for each ProductID, not just the correct rows. Try modifying the join yourself by leaving out one of the conditions to see what happens.
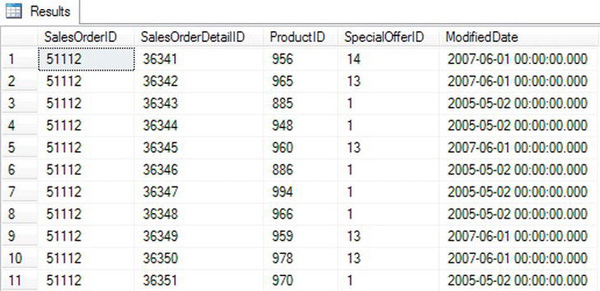
Figure 4-7. The partial results of joining on two columns
Joining Three or More Tables
Sometimes you will need to join only two tables together in a query, but more frequently, you will need to join three or more tables. You will often join three tables when there is a many-to-many relationship between two of the tables. For example, suppose you have a table listing college courses and a table listing students. You would need a third table that records which students take which courses. To join courses to students, your query will join all three tables.
In the AdventureWorks2012 database, you will find many reasons to join more than two tables in one query. For example, suppose you want to see a list of the product names for each order, along with the OrderDate column. This query requires the Sales.SalesOrderHeader, Sales.SalesOrderDetail, and Production.Product tables. Figure 4-8 shows how to connect these three tables.
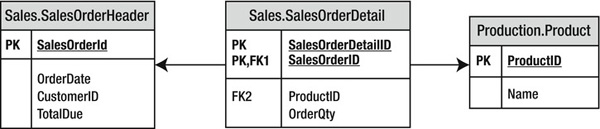
Figure 4-8. How to join Sales.SalesOrderHeader to Production.Product
To add a third or more tables, just continue the FROM clause. Take a look at the syntax.
SELECT <SELECT list> FROM <table1>

[INNER] JOIN <table2> ON <table1>.<col1> = <table2>.<col2>

[INNER] JOIN <table3> ON <table2>.<col2> = <table3>.<col3>
Type in and execute the query in Listing 4-5 to learn how to join more than two tables in one query.
Listing 4-5. Joining Three Tables
USE AdventureWorks2012;

GO


SELECT soh.SalesOrderID, soh.OrderDate, p.ProductID, p.Name

FROM Sales.SalesOrderHeader as soh

INNER JOIN Sales.SalesOrderDetail AS sod ON soh.SalesOrderID = sod.SalesOrderID

INNER JOIN Production.Product AS p ON sod.ProductID = p.ProductID

ORDER BY soh.SalesOrderID;
Figure 4-9 shows the results. Notice that even though the query joins three tables, the query displays columns from only two of the tables. To get from Sales.SalesOrderHeader to the names of the products ordered in the Production.Product table, the query must include the Sales.SalesOrderDetail table to connect the other two tables. Depending on the goal of the query, you may want to include columns from all tables involved in the query.

Figure 4-9. The partial results of joining three tables
Take another look at the FROM clause. The Sales.SalesOrderHeader table joins to the Sales.SalesOrderDetail table on the SalesOrderID column. Then the Sales.SalesOrderDetail table joins the Production.Product table on the ProductID column. If you have trouble figuring out how to join the tables, take it a step at a time. Join two tables first, and then add the third table.
Joining tables is a very important skill for T-SQL developers. Before you move on to the next section, make sure you are comfortable with what the chapter has covered so far by completing Exercise 4-1.
Writing Outer Joins
When joining two tables with INNER JOIN, there must be an exact match between the two tables for a row to show up in the results. Occasionally, you’ll need to retrieve all the rows from one of the tables even if the other table doesn’t contain a match for every row. For example, you may want to display all the customers along with their orders, including the customers who have not placed orders yet. By using OUTER JOIN, you can retrieve all the rows from one table along with any rows that match from the other table.
Using LEFT OUTER JOIN
When writing OUTER JOIN, you must specify either LEFT or RIGHT. If the main table, the table that you want to see all the rows even if there is not a match, is on the left side of the join, you will specify LEFT. Figure 4-10 shows how the Sales.Customer and Sales.SalesOrderHeader tables connect when using LEFT OUTER JOIN so that all customers show up in the results even if they have not placed any orders. The gray area of the Venn diagram illustrates how all the CustomerID values in the Sales.Customer table will be returned whether or not there is a matching CustomerID value in the Sales.SalesOrderHeader table. Additionally, all matching CustomerID values (this is where the circles intersect in the diagram) will also be returned.

Figure 4-10. How to perform LEFT JOIN
Here is the syntax for LEFT OUTER JOIN:
SELECT <SELECT list>

FROM <table1>

LEFT [OUTER] JOIN <table2> ON <table1>.<col1> = <table2>.<col2>
Type in and execute the code in Listing 4-6 to learn how to write a LEFT OUTER JOIN query. Note that the word OUTER is optional.
Listing 4-6. Using LEFT OUTER JOIN
USE AdventureWorks2012;

GO

SELECT c.CustomerID, s.SalesOrderID, s.OrderDate

FROM Sales.Customer AS c

LEFT OUTER JOIN Sales.SalesOrderHeader AS s ON c.CustomerID = s.CustomerID

WHERE c.CustomerID IN (11028,11029,1,2,3,4);
Figure 4-11 displays the results. Just like INNER JOIN, you must determine which column or columns from one table join the column or columns from the other table. All the rows from the table on the left side of the join, the Sales.Customer table, that meet the criteria in the WHERE clause, show up in the results. The query returns rows from the right side of the join, the Sales.SalesOrderHeader table, only if they match on CustomerID. All of the columns from the Sales.SalesOrderHeader rows that don’t match return NULL values. The query returns the customers along with the orders even for customers with no orders, customers 1–4.

Figure 4-11. The results of using LEFT OUTER JOIN
Using OUTER JOIN is not difficult, but it seems to be confusing to people when they first try to use it. If the tables have the primary and foreign keys defined, the table joining with the primary key will usually be the table on the left side in a LEFT OUTER JOIN. Figure out which table must have rows returned even if there is not a match. That table must show up on the left side of a LEFT OUTER JOIN.
Using RIGHT OUTER JOIN
RIGHT OUTER JOIN differs from LEFT OUTER JOIN in just the location of the tables. If the main table, the table in which you want to see all the rows even if there is not a match, is on the right side of the join, you will specify RIGHT. Here is the syntax:
SELECT <SELECT list>

FROM <table2>

RIGHT [OUTER] JOIN <table1> ON <table1>.<col1> = <table2>.<col2>
Type in and execute the code in Listing 4-7 to learn how to write a query using RIGHT OUTER JOIN.
Listing 4-7. Using RIGHT OUTER JOIN
USE AdventureWorks2012;

GO

SELECT c.CustomerID, s.SalesOrderID, s.OrderDate

FROM Sales.SalesOrderHeader AS s

RIGHT OUTER JOIN Sales.Customer AS c ON c.CustomerID = s.CustomerID

WHERE c.CustomerID IN (11028,11029,1,2,3,4);
Figure 4-12 shows the results; they are identical to the results in Figure 4-11. The only difference between this query and the one from Listing 4-6 is the order of the tables within the FROM clause and the direction keyword. Again, all of the customers who meet the criteria display along with any orders that were placed. For customers with no orders, NULL values are returned in the Sales.SalesOrderHeader columns.

Figure 4-12. Result of using RIGHT OUTER JOIN
Using OUTER JOIN to Find Rows with No Match
Sometimes it’s useful to find all the rows in one table that don’t have corresponding rows in another table. For example, you may want to find all the customers who have never placed an order. Since the columns from the nonmatching rows contain NULL values, you can use OUTER JOIN to find rows with no match by checking for NULL. The syntax is as follows:
SELECT <SELECT list>

FROM <table1>

LEFT [OUTER] JOIN <table2> ON <table1>.<col1> = <table2>.<col2>

WHERE <col2> IS NULL
Type in and execute the code in Listing 4-8 to see how this works.
Listing 4-8. Using LEFT OUTER JOIN to Find the Rows with No Matches
USE AdventureWorks2012;

GO


SELECT c.CustomerID, s.SalesOrderID, s.OrderDate

FROM Sales.Customer AS c

LEFT OUTER JOIN Sales.SalesOrderHeader AS s ON c.CustomerID = s.CustomerID

WHERE s.SalesOrderID IS NULL;
Figure 4-13 shows the partial results. The query in Listing 4-8 returns a list of all customers who have not placed an order. After you run the query, scroll down to see that every row in the results contains NULL in the SalesOrderID column.
The LEFT JOIN returns all rows from Sales.Customer even if the customer has no orders. The customer rows with no orders contain NULL in the Sales.SalesOrderHeader columns. By checking for NULL, the customers with no orders show up in the results. Again, this might be complicated to understand at first. Just take it a step at a time when writing your own queries.
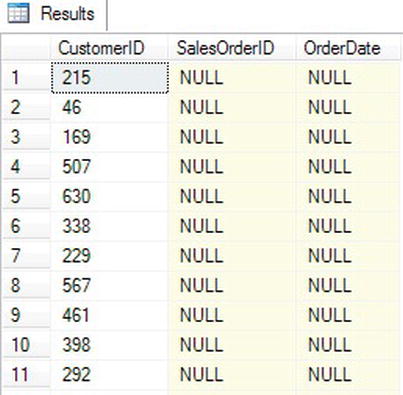
Figure 4-13. The partial results of finding rows with no match
Adding a Table to the Right Side of a Left Join
The next step is to understand what to do when additional tables are added to the query. For example, you might want to display all the customers and their orders even if an order has not been placed, along with the ProductID from those orders that were placed. To keep the customers with no orders from dropping out of the results, you must continue to use LEFT JOIN. Figure 4-14 shows how these three tables can be joined to produce the correct results. Notice the Venn diagram shows the SalesOrderHeader and the SalesOrderDetail tables joining on the SalesOrderID. Those results are matched with the CustomerID to get a resultset that includes all of the customers in the Customer table including those without orders. The diagram in Figure 4-14 shows the SalesOrderHeader as the circle linking the Customer and SalesOrderDetail together because it is the only table containing both the CustomerID and the SalesOrderID. These types of linking tables are normally referred to as junction tables. The junction table allows you to combine in a single query output SalesOrderDetail and Customer data.

Figure 4-14. How to connect the tables with two LEFT OUTER JOINs
Take a look at the syntax.
SELECT <SELECT list>

FROM <table1> LEFT [OUTER]JOIN <table2> ON <table1>.<col1> = <table2>.<col2>

LEFT [OUTER] JOIN <table3> ON <table2>.<col3> = <table3>.<col4>
Listing 4-9 contains an example query. Type in and execute the code to learn how to write this type of join.
Listing 4-9. Joining Three Tables with LEFT JOIN
USE AdventureWorks2012;

GO


SELECT C.CustomerID, SOH.SalesOrderID, SOD.SalesOrderDetailID, SOD.ProductID

FROM Sales.Customer AS C

LEFT OUTER JOIN Sales.SalesOrderHeader AS SOH ON C.CustomerID = SOH.CustomerID

LEFT OUTER JOIN Sales.SalesOrderDetail AS SOD ON SOH.SalesOrderID = SOD.SalesOrderID

WHERE C.CustomerID IN (11028,11029,1,2,3,4);
Figure 4-15 shows the results. Because the columns from the nonmatching rows from Sales.SalesOrderHeader contain NULL, they can’t join to the Sales.SalesOrderDetail table. If you must join another table to the Sales.SalesOrderHeader table, you must use LEFT OUTER JOIN because you can’t join on the NULL values. On your own, change the query by removing the words LEFT OUTER in the join between Sales.SalesOrderHeader and Sales.SalesOrderDetail. The customers with no orders will drop out of the results.
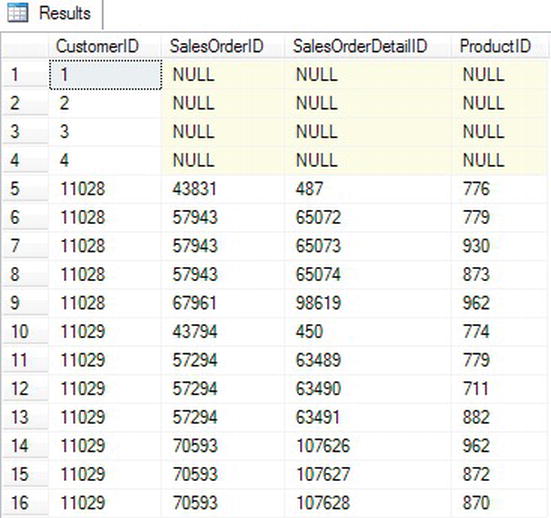
Figure 4-15. The results of a querying multiple tables with LEFT JOIN
I prefer listing the main table first and using left joins over right joins. If you list the main table first and you start down the LEFT OUTER JOIN path, you can continue to use LEFT. If you start out with RIGHT, you may have to switch to LEFT when you add more tables, which can be confusing.
Adding a Table to the Left Side of a Left Join
You may be wondering what kind of join you must use if you join another table to the left side of the join, in other words, to your main table. To be on the safe side, use LEFT OUTER JOIN to ensure that you will not lose any rows from the main table.
Figure 4-16 shows how to add the Sales.Territory table to the example started in the previous section. The Sales.Territory table joins to the main table, the Sales.Customer table. Since you want to make sure that all customers show up in the results, use LEFT OUTER JOIN to join this new table.
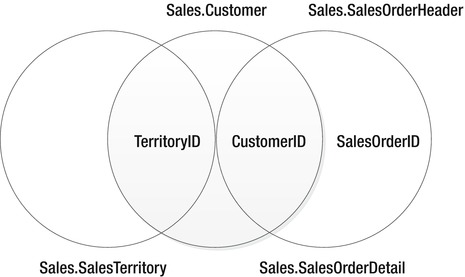
Figure 4-16. How to add another table to the left side of the join
Listing 4-10 shows two example queries that add another table to the main table. Type in and execute the code.
Listing 4-10. Adding Another Table to the Left Side of the Join
USE AdventureWorks2012;

GO


SELECT C.CustomerID, SOH.SalesOrderID, SOD.SalesOrderDetailID,

    SOD.ProductID, T.Name

FROM Sales.Customer AS C

LEFT OUTER JOIN Sales.SalesOrderHeader AS SOH ON C.CustomerID = SOH.CustomerID

LEFT OUTER JOIN Sales.SalesOrderDetail AS SOD ON SOH.SalesOrderID = SOD.SalesOrderID

LEFT OUTER JOIN Sales.SalesTerritory AS T ON C.TerritoryID = T.TerritoryID

WHERE C.CustomerID IN (11028,11029,1,2,3,4);
Figure 4-17 shows the results. The Sales.SalesTerritory table joins the Sales.Customer table on TerritoryID. Because you don’t want to lose any rows from the Sales.Customer table, use LEFT OUTER JOIN.
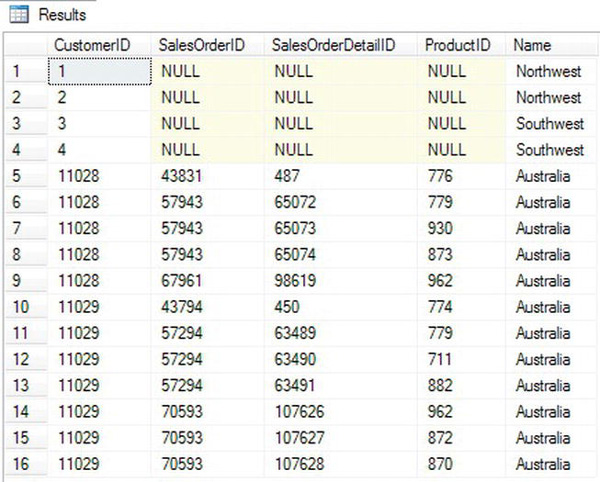
Figure 4-17. The results of joining to the left side of LEFT OUTER JOIN
FULL OUTER JOIN
FULL OUTER JOIN is similar to LEFT OUTER JOIN and RIGHT OUTER JOIN, but in this case, all the rows from each side of the join are returned. In other words, all rows from the left side of the join, even if there is not a match, and all rows from the right side, even if there is not a match, show up in the results. This type of join is rare and could indicate some problems with the database design or the data. For example, this type of join might be necessary if the Sales.SalesOrderHeader table contains orders with invalid CustomerID values. Here is the syntax:
SELECT <column list>

FROM <table1>

FULL [OUTER] JOIN <table2> ON <table1>.<col1>  = <table2>.<col2>
Because no good example exists in the AdventureWorks2012 database, Listing 4-11 includes a script that creates and populates a table of colors that can be used in the Production.Product table. After populating the table, it contains colors that don’t appear in the Production.Product table, and it is missing a color that should be there. Don’t worry about understanding the table creation and population part of the script at this point.
Listing 4-11. FULL OUTER JOIN Demonstration
USE AdventureWorks2012;

GO

IF OBJECT_ID('Production.ProductColor') IS NOT NULL BEGIN

    DROP TABLE Production.ProductColor;

END

CREATE table Production.ProductColor

    (Color nvarchar(15) NOT NULL PRIMARY KEY)

GO

--Insert most of the existing colors

INSERT INTO Production.ProductColor

SELECT DISTINCT Color

FROM Production.Product

WHERE Color IS NOT NULL and Color <> 'Silver'

--Insert some additional colors

INSERT INTO Production.ProductColor

VALUES ('Green'),('Orange'),('Purple'),


--Here is the query:

SELECT c.Color AS "Color from list", p.Color, p.ProductID

FROM Production.Product AS p

FULL OUTER JOIN Production.ProductColor AS c ON p.Color = c.Color

ORDER BY p.ProductID;
Figure 4-18 displays the results. When colors from the Production.ProductColor table have no matches in the Production.Product table, the query returns NULL values in the second and third columns, which are from Production.Product (rows 1–3). When colors from the Production.Product table don’t match the Production.ProductColor table (in this case, silver) or no color for a product is specified, the query returns NULL values in the first column, which is from Production.ProductColor (rows 12–13). Finally, when a product has a color that matches one found in the Production.ProductColor table, the query returns all non-NULL values (rows 9–11). A query like this might be used to find problems in data so that it can be cleaned up before loading it into a production system or data warehouse.
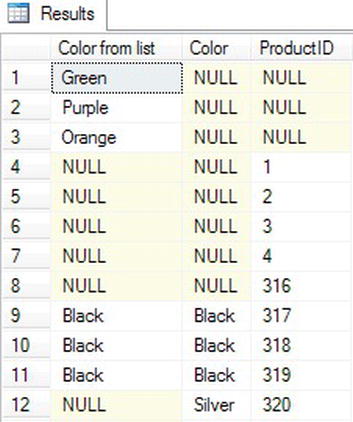
Figure 4-18. The partial results of using FULL OUTER JOIN
CROSS JOIN
Another type of rarely used join is CROSS JOIN. This is actually the same as the Cartesian product mentioned in the “Avoiding an Incorrect Join Condition” section. In this case, use CROSS JOIN when you intend to multiply two tables together—every row from one table matched to every row from another table. You might write a CROSS JOIN query to populate a table for a special purpose such as an inventory. You may need a list of every product in every possible location to create forms for the inventory crew. Here is the syntax:
SELECT <SELECT list> FROM <table1> CROSS JOIN <table2>
Notice that the FROM clause doesn’t contain a join condition. Every possible row from one table joins every possible row from another table, so you don’t have to specify a join condition. Listing 4-12 demonstrates how to write this type of query. Type in and execute the code.
Listing 4-12. A CROSS JOIN
USE AdventureWorks2012;

GO

--1

SELECT p.ProductID, l.LocationID

FROM Production.Product AS p

CROSS JOIN Production.Location AS l

ORDER BY ProductID;

--2

SELECT p.ProductID, l.LocationID

FROM Production.Product AS p

CROSS JOIN Production.Location AS l

ORDER BY LocationID;
Figure 4-19 shows the partial results. These queries, just sorted differently, each produce a row for every possible product and every possible location. Query 1 shows that product 1 displays along with every location. Query 2 shows that location 1 displays along with every product.
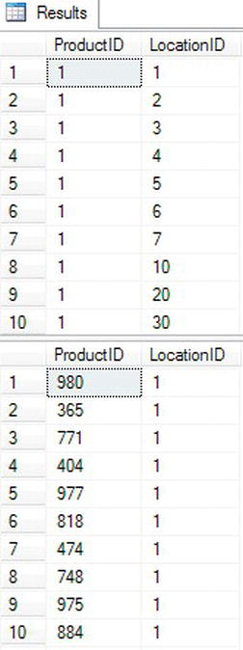
Figure 4-19. The partial results of a CROSS JOIN
Self-Joins
A self-join is a special type of query that joins a table back to itself. In this example, you will first create a temporary table named #Employee. Normally the EmployeeID would be a primary key column and the ManagerID would be a foreign key pointing back to the same table. This would ensure that only an existing EmployeeID could be added to the ManagerID column. Every employee, except for one, has a manager—another employee appearing in the same table. The one employee with no manager is the CEO of Adventure Works. The SQL Server team chose to eliminate the self-join when creating AdventureWorks2012 in favor of a new feature first introduced with SQL Server 2008, the HIERARCHYID data type. You will learn about HIERARCHYID in Chapter 10.
You can actually join any table to itself even if it doesn’t have a foreign key pointing back to the primary key. This relationship is called a unary relationship. Here is the syntax for a self-join:
SELECT <a.col1>, <b.col1>

FROM <table1> AS a

LEFT [OUTER] JOIN <table1> AS b ON a.<col1> = b.<col2>
Listing 4-13 demonstrates how to write a self-join. Be sure to type in and execute the code.
Listing 4-13. Using Self-Join
USE AdventureWorks2012;

GO


CREATE TABLE #Employee (

EmployeeID  int,

ManagerID int,

Title nvarchar(50));


INSERT INTO #Employee

VALUES (1, NULL, 'Chief Executive Officer')

INSERT INTO #Employee

VALUES (2, 1, 'Engineering Manager')

INSERT INTO #Employee

VALUES (3, 2, 'Senior Tool Designer')

INSERT INTO #Employee

VALUES (4, 2, 'Design Engineer')

INSERT INTO #Employee

VALUES (5, 2, 'Research and Development')

INSERT INTO #Employee

VALUES (6, 1, 'Marketing Manager')

INSERT INTO #Employee

VALUES (7, 6, 'Marketing Specialist'),


SELECT a.EmployeeID AS Employee,

    a.Title AS EmployeeTitle,

    b.EmployeeID AS ManagerID,

    b.Title AS ManagerTitle

FROM #Employee AS a

LEFT OUTER JOIN #Employee AS b ON a.ManagerID = b.EmployeeID;


DROP TABLE #Employee;
Take a look at the results shown in Figure 4-20. Each employee, except for one, has a manager who is also an employee in the same table. The table has ManagerID, which points back to the EmployeeID. Since employee 1 doesn’t have a manager, the query uses LEFT OUTER JOIN. Be sure to keep track of which table each column is supposed to come from. Even though the query uses the same table twice, it has two separate roles.

Figure 4-20. The results of using a self-join
The important thing to remember is that one table is used twice in the query. At least one of the table names must be aliased; it is not an option because you can’t have two tables with the same name in the query. You will have to qualify all the column names, so you may want to alias both table names to save typing.
This section covered several advanced joining techniques. Understanding how the techniques work and when to use them are very important skills. Practice what you have learned by completing Exercise 4-2.
Writing Subqueries
The previous examples in this chapter demonstrated how to write queries using JOIN. This section demonstrates using subqueries in the WHERE clause. A subquery is a nested query—a query within a query. One reason to use a subquery is to find the rows in one table that match another table without actually joining the second table. For example, without actually joining the order table, you could use a subquery to display a list of the customers who have placed an order. Another technique, correlated subqueries, will be shown in Chapter 5.
Using a Subquery in an IN List
Using a subquery in an IN list is similar to the hard-coded IN list you learned to use in a WHERE clause in Chapter 2. Here is the syntax:
SELECT <select list> FROM <table1>

WHERE <col1> IN (SELECT <col2> FROM <table2>)
Listing 4-14 demonstrates this technique. Type in and execute the code.
Listing 4-14. Using a Subquery in the IN List
USE AdventureWorks2012;

GO

SELECT CustomerID, AccountNumber

FROM Sales.Customer

WHERE CustomerID IN (SELECT CustomerID FROM Sales.SalesOrderHeader);
This query returns a list of the customers who have placed an order (see Figure 4-21). The difference between this example and other examples in this chapter that join these tables is that the columns from the Sales.SalesOrderHeader table don’t show up in the results. Each customer displays only once in the results, not once for each order placed. The subquery produces a list of possible values from one, and only one, column. The outer query compares a column to that list.
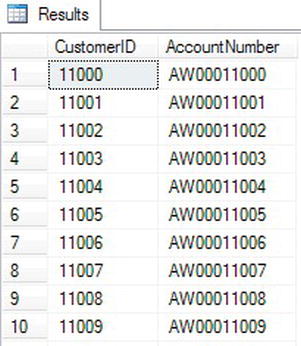
Figure 4-21. The results of using a subquery in an IN list
Using a Subquery and NOT IN
A subquery in the WHERE clause can also be used to find rows that don’t match the values from another table by adding the NOT operator. You can find the customers who have not placed an order by adding the word NOT to the previous query. Type in and execute the code in Listing 4-15, which demonstrates using NOT IN.
Listing 4-15. A Subquery with NOT IN
USE AdventureWorks2012;

GO


SELECT CustomerID, AccountNumber

FROM Sales.Customer

WHERE CustomerID NOT IN

    (SELECT CustomerID FROM Sales.SalesOrderHeader);
This query returns the opposite results of Listing 4-14 (see Figure 4-22). The subquery returns a list of all the CustomerID values found in Sales.SalesOrderHeader. By using NOT IN, the query returns all the rows from Sales.Customer that don’t match.

Figure 4-22. The partial results of using a subquery with NOT IN
Using a Subquery Containing NULL with NOT IN
Recall that you will often get incorrect results if you don’t take NULL values into account. If the subquery contains any NULL values, using NOT IN will incorrectly produce no rows. For example, the values returned by a subquery are NULL, 1, 2, and 3. The values from the outer query (1, 2, and 10) must each be compared to that list. The database engine can tell that 10 is not 1, 2, or 3, but it can’t tell whether it is the same as NULL. The intended result is 10 since it doesn’t match any of the values from the subquery, but because of the NULL, the comparison returns no results at all. Type in and execute the code in Listing 4-16, which shows incorrect results and how to correct the problem.
Listing 4-16. A Subquery with NOT IN
USE AdventureWorks2012;

GO


--1

SELECT CurrencyRateID, FromCurrencyCode, ToCurrencyCode

FROM Sales.CurrencyRate

WHERE CurrencyRateID NOT IN

    (SELECT CurrencyRateID

     FROM Sales.SalesOrderHeader);


--2

SELECT CurrencyRateID, FromCurrencyCode, ToCurrencyCode

FROM Sales.CurrencyRate

WHERE CurrencyRateID NOT IN

    (SELECT CurrencyRateID

     FROM Sales.SalesOrderHeader

     WHERE CurrencyRateID IS NOT NULL);
Figure 4-23 shows the results. Query 1 does not return any results because NULL values exist in the values returned by the subquery. Since any value from CurrencyRateID compared to NULL returns UNKNOWN, it is impossible to know whether any of the values meet the criteria. Query 2 corrects the problem by adding a WHERE clause to the subquery that eliminates NULL values.
Using a subquery in the WHERE clause is a very popular technique. Just make sure that you always eliminate the possibility of NULL values in the subquery.

Figure 4-23. The results of code that corrects the NULL problem with NOT IN
Writing UNION Queries
A UNION query is not really a join, but it is a way to merge the results of two or more queries together. I like to think of it as “folding” one table into another table. One reason for using a UNION query is to view data with one query that combines data from a production table along with data that has been archived into another table. A UNION query combines two or more queries, and the results are returned in one result set. Here is the syntax:
SELECT <col1>, <col2>,<col3>

FROM <table1>

UNION [ALL]

SELECT <col4>,<col5>,<col6>FROM <table2>
Figure 4-24 shows a diagram of how a UNION query might look. Each individual query must contain the same number of columns and be of compatible data types. For example, you could have an INT column and a VARCHAR column line up as long as the VARCHAR column contains only numbers.
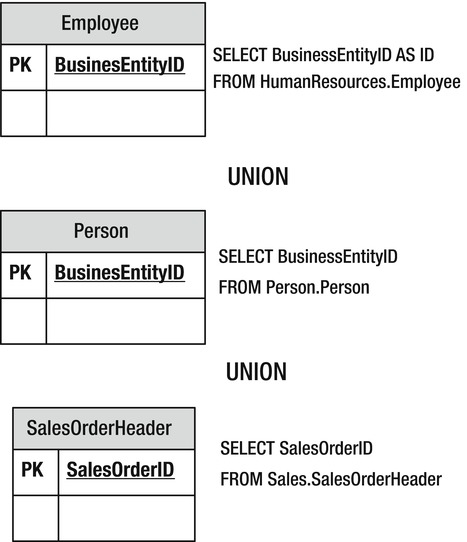
Figure 4-24. The diagram of a UNION query
Type in and execute the code in Listing 4-17 to learn how to use UNION.
Listing 4-17. Using UNION
USE AdventureWorks2012;

GO


--1

SELECT BusinessEntityID AS ID

FROM HumanResources.Employee

UNION

SELECT BusinessEntityID

FROM Person.Person

UNION

SELECT SalesOrderID

FROM Sales.SalesOrderHeader

ORDER BY ID;


--2

SELECT BusinessEntityID AS ID

FROM HumanResources.Employee

UNION ALL

SELECT BusinessEntityID
FROM Person.Person

UNION ALL

SELECT SalesOrderID

FROM Sales.SalesOrderHeader

ORDER BY ID;
Notice the difference in the two queries in Listing 4-17. Figure 4-25 shows the results. Query 2 uses UNION ALL, which returns all rows, even if they are duplicates. Leaving out the keyword ALL eliminates the duplicates. The first query in the UNION query determines the number of columns and the name of each column. When using a UNION query, only one ORDER BY clause can be used, and it will be located at the end of the statement.

Figure 4-25. The results of UNION queries
A UNION query is often used to combine the results of two tables so that they look the same. For example, a database has separate customer tables for each division of the company. By using a UNION query, the customers can be displayed together as if they were in the same table. It is also possible to write UNION queries using the same table.
When writing a UNION query, you must make sure that both queries contain the same number of columns in the results and that the data types are compatible. The first query sets the number of columns and the name of each column. The second and later queries must match up to the first query. The data type of each column follows precedence rules, so you can’t allow one query to return an integer where the other query returns a string. Run these practice queries to see what happens when a UNION query doesn’t follow these rules:
--Incompatible types

SELECT 1

UNION ALL

SELECT 'a'

--Number of columns don't match up

SELECT 1

UNION ALL

SELECT 1,2
This section covered some alternate ways to utilize more than one table within a query. Practice these techniques by completing Exercise 4-3.
Exploring Derived Tables and Common Table Expressions
Using derived tables and common table expressions allows T-SQL developers to solve some complicated query problems. You will find these techniques useful as you learn about aggregate queries (Chapter 5) and updating data (Chapter 6). With only the skills you have learned so far, using these techniques does not actually make writing queries any easier, but you will appreciate learning about them before you progress to more advanced skills.
Using Derived Tables
If you still work with some SQL Server 2000 systems, you may work with derived tables. A derived table is a subquery that appears in the FROM clause. Actually, you may see derived tables with SQL Server 2005 and 2008 code, but starting with 2005, another option, common table expressions, is available. You will learn about common table expressions in the next section.
Derived tables allow developers to join to queries instead of tables so that the logic of the query is isolated. At this point, I just want you to learn how to write a query using a derived table. This technique will be very useful as you learn to write more advanced queries. Here is the syntax:
SELECT <select list> FROM <table1>

[INNER] JOIN (SELECT <select list>

              FROM <table2>) AS B ON <table1>.<col1> = B.<col2>
The syntax shows INNER JOIN, but this could also be done with OUTER JOIN as well. Figure 4-26 shows a diagram representing a LEFT OUTER JOIN query joining the Sales.Customer table to a query of the Sales.SalesOrderHeader table as a derived table.
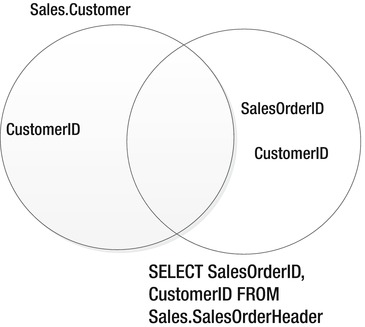
Figure 4-26. The diagram of a derived query
Listing 4-18 demonstrates how to use a derived table. Type in and execute the code. Make sure you take the time to understand how this works with these simple examples even though a regular join makes more sense at this point.
Listing 4-18. Using a Derived Table
USE AdventureWorks2012;

GO


SELECT c.CustomerID, s.SalesOrderID

FROM Sales.Customer AS c

INNER JOIN (SELECT SalesOrderID, CustomerID

            FROM Sales.SalesOrderHeader) AS s ON c.CustomerID = s.CustomerID;
Obviously, you could write this query using a regular INNER JOIN. Figure 4-27 shows the results. Keep in mind three rules when using derived tables. First, any columns that will be needed outside the derived table must be included in its SELECT list. Even though only SalesOrderID appears in the main SELECT list, CustomerID is required for joining. Second, the derived table requires an alias. Use the alias to refer to columns from the derived table in the outer query. Finally, the derived table may contain multiple tables, a WHERE clause, and even another derived table.

Figure 4-27. The results of a query with a virtual table
Using Common Table Expressions
Microsoft introduced the common table expression (CTE) feature with SQL Server 2005. This gives developers another way to separate out the logic of one part of the query. When writing a CTE, you define one or more queries up front, which you can then immediately use. This technique will come in handy when learning more advanced skills. For simple problems, there is no advantage over derived tables, but CTEs have several advanced features covered in Chapter 11 that are not available with derived tables. Here is the simplest syntax:
WITH <CTE Name> AS (SELECT <select list> FROM <table1>)

SELECT <select list> FROM <table2>

[INNER] JOIN <CTE Name> ON <table2>.<col1> = <CTE Name>.<col2>
Type in and execute the code in Listing 4-19. Again, the example is very simple but should help you learn the technique.
Listing 4-19. Using a Common Table Expression
USE AdventureWorks2012;

GO


WITH orders AS (

    SELECT SalesOrderID, CustomerID

    FROM Sales.SalesOrderHeader

    )

SELECT c.CustomerID, orders.SalesOrderID

FROM Sales.Customer AS c

INNER JOIN orders ON c.CustomerID = orders.CustomerID;
You can see the results in Figure 4-28. The CTE begins with the word WITH. Because WITH is a keyword in several T-SQL commands, it must be either the first word in the batch, as in this example, or proceeded by a semicolon. The word GO begins a new batch. Supply the CTE name followed by the definition. The main query immediately follows the CTE definition. Treat the CTE as a regular table in the main query. Once the query completes executing, the CTE goes out of scope and can no longer be used.

Figure 4-28. The results of a query using a CTE
Using a CTE to Solve a Complicated Join Problem
The examples in the previous sections on joining tables demonstrated very simple join conditions, one or two columns from one table equal to the same number of columns in another table. Join conditions may be much more complicated. For example, suppose you wanted to produce a list of all customers along with the orders, if any, placed on a certain date. Figure 4-29 shows a diagram of this query. The left-hand circle represents the Customer table in the AdventureWorks2012 database while the right-hand circle represents the CTE. The Customer table is then joined to the results of the CTE query.
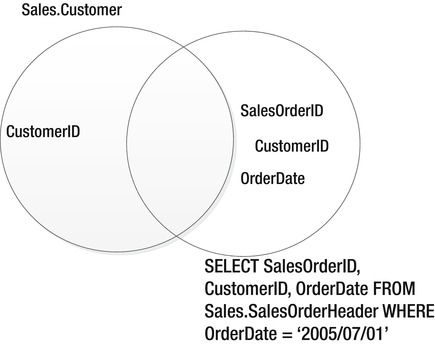
Figure 4-29. A diagram of a CTE query
Listing 4-20 demonstrates the problem and how to solve it with a CTE.
Listing 4-20. Using a CTE to Solve a Problem
USE AdventureWorks2012;

GO


--1

SELECT c.CustomerID, s.SalesOrderID, s.OrderDate

FROM Sales.Customer AS c

LEFT OUTER JOIN Sales.SalesOrderHeader AS s ON c.CustomerID = s.CustomerID

WHERE s.OrderDate = '2005/07/01';


--2

WITH orders AS (

    SELECT SalesOrderID, CustomerID, OrderDate

    FROM Sales.SalesOrderHeader

    WHERE OrderDate = '2005/07/01'

    )

SELECT c.CustomerID, orders.SalesOrderID, orders.OrderDate

FROM Sales.Customer AS c

LEFT OUTER JOIN orders ON c.CustomerID = orders.CustomerID

ORDER BY orders.OrderDate DESC;
Take a look at the results in Figure 4-30. Query 1 returns only the 43 rows with the specified order date. The nonmatching rows dropped out of the query because of the NULLs and values other than 2005/07/01 in the OrderDate column. If you want to show all customers even if there is not an order placed on the specified date, then by adding the WHERE clause to the CTE instead, the NULL values and other OrderDate values do not cause any problems, and the correct results are returned.

Figure 4-30. The results of using a CTE to solve a tricky query
This section demonstrated how to use derived tables and common table expressions. The examples, except for the last one, covered queries that you could have easily written using joins. In Chapter 5, you will learn more examples of how to use these techniques when regular joins will not work. Practice writing queries with derived tables and common table expressions by completing Exercise 4-4.
Thinking About Performance
Often, using different query techniques can produce the same execution plan, or at least similar performance. To see an example of this, toggle on the Include Actual Execution Plan setting, and run Listing 4-21, which shows two techniques to get the same results.
Listing 4-21. Comparing the Performance of Two Techniques
USE AdventureWorks2012;

GO


--1

SELECT DISTINCT c.CustomerID

FROM Sales.Customer AS c

INNER JOIN Sales.SalesOrderHeader AS o ON c.CustomerID = o.CustomerID;


--2

SELECT CustomerID

FROM Sales.Customer

WHERE CustomerID IN (SELECT CustomerID FROM Sales.SalesOrderHeader);
Figure 4-31 shows the identical execution plans. These queries produce identical results but with very different techniques.

Figure 4-31. The identical execution plans
As you learn to write more complicated queries, especially using aggregate functions in Chapter 5, you will learn that how you join the tables can make a big difference in performance. To experiment a bit more with performance, complete Exercise 4-5.
Summary
For the data to make sense in reports and applications, tables must be joined together. As you can see from the number of topics in this chapter, there are many ways to do it. Most queries will use the INNER JOIN syntax, but for returning all the rows even if there is not a match, use an OUTER JOIN. After learning about joins, you learned about subqueries in the WHERE clause using IN and UNION queries. Finally, the chapter covered derived tables and common table expressions, which will help you solve more intriguing query puzzles as you learn more advanced techniques.