C H A P T E R 9
Moving Logic to the Database
So far, you have worked exclusively with tables by using Data Manipulation Language (DML) statements. You have learned to manipulate data by inserting new rows and updating or deleting existing rows. You can use many other objects in a SQL Server database to make your database applications more efficient and secure. This chapter teaches you how to add restrictions to tables and to create other objects that help to enforce key business rules. In this chapter, you will learn about Data Definition Language (DDL) statements and learn about constraints on tables, views, stored procedures, user-defined functions, and user-defined types. You will also learn about triggers, special objects that fire when data is modified. Because SQL Server provides so many choices for creating these objects, this chapter doesn’t attempt to explore every possible option. The chapter does, however, provide enough detail to teach you most of what you will encounter on your journey to becoming an expert T-SQL developer.
Tables
SQL Server and other database systems store data in tables. You have learned how to retrieve data from tables as well as how to insert, update, and delete data. Specifically, you learned how to create temporary tables in Chapter 7 and how to create tables using the SELECT INTO and CREATE TABLE syntax in Chapter 6. You might think of a table as just a way to store data, but you can also enforce some business rules based on constraints built into the table definition.
As a beginning T-SQL developer, you will most likely write T-SQL code against a database already in place, possibly from a software vendor or one created by a design team using data-modelling software to create the tables. Although your job description may not include writing scripts to create tables, you do need to understand how the table definition controls what data you can insert into a table and how you can update the data. This section covers many options available when creating or altering tables such as computed columns, primary keys, foreign keys, and other constraints. The point of this section is not to get you to memorize how to add keys and constraints but to understand the implications of having them in place.
![]() Tip By using SQL Server Management Studio, you can script the commands to create existing tables and other objects in the database. This is a great way to learn how to write scripts and learn the syntax. To script the definition, right-click the object and select the “Script table as” menu.
Tip By using SQL Server Management Studio, you can script the commands to create existing tables and other objects in the database. This is a great way to learn how to write scripts and learn the syntax. To script the definition, right-click the object and select the “Script table as” menu.
Adding Check Constraints to a Table
As you know, each column in a table must have a specific data type and usually a maximum size that controls what data can be inserted or updated and whether a column may contain NULL values. For example, you can’t add a non-numeric string to an INT column. It is also possible to further control what data you can add by defining check constraints. For example, you may want to restrict the values of a column to a particular range of values.
![]() Note The
Note The NULL and NOT NULL options are also called constraints.
Here is the syntax to add a check constraint to a table when creating the table and later with an ALTER TABLE command:
--Adding during CREATE TABLE

CREATE TABLE <table name> (<col1> <data type>,<col2> <data type>,

    CONSTRAINT <constraint name> CHECK (<condition>))


--Adding during ALTER TABLE

CREATE TABLE <table name> (<col1> <data type>, <col2> <data type>)

ALTER TABLE <table name> ADD CONSTRAINT <constraint name> CHECK (<condition>)
The condition looks much like the criteria in a WHERE clause. Type in and execute the code in Listing 9-1 to learn how to add a constraint.
Listing 9-1. Adding a Check Constraint
USE tempdb;

GO

--1

IF OBJECT_ID('table1') IS NOT NULL BEGIN

    DROP TABLE table1;

END;


--2

CREATE TABLE table1 (col1 SMALLINT, col2 VARCHAR(20),

    CONSTRAINT ch_table1_col2_months

    CHECK (col2 IN ('January','February','March','April','May',

        'June','July','August','September','October',

        'November','December')

    )

 );


--3

ALTER TABLE table1 ADD CONSTRAINT ch_table1_col1

    CHECK (col1 BETWEEN 1 and 12);
PRINT 'January';
--4
INSERT INTO table1 (col1,col2)
VALUES (1,'January'),
PRINT 'February';
--5
INSERT INTO table1 (col1,col2)
VALUES (2,'February'),
PRINT 'March';
--6
INSERT INTO table1 (col1,col2)
VALUES (13,'March'),
PRINT 'Change 2 to 20';
--7
UPDATE table1 SET col1 = 20;
Figure 9-1 shows the results. Code section 1 drops the table in case it already exists. Statement 2 creates table1 along with a constraint specifying that the exact months of the year may be entered into col2. Statement 3 adds another constraint to the table, specifying values for col1. Statements 4 to 6 insert new rows into table1. Only statement 5 succeeds because the values in 4 and 6 each violate one of the constraints. If the constraints had not been added to the table, these inserts would have worked. Statement 7 attempts to update the one successful row with an invalid col1. You can see all the error messages in Figure 9-1.

Figure 9-1. The results of attempting to violate check constraints
Adding UNIQUE Constraints
You can specify that a column or columns in a table contain unique values. Unlike primary keys, which you will learn more about in the next section, unique columns may contain one NULL value. In the case of multiple columns, you must decide whether to have a constraint on each column or a constraint that covers several columns. In the first case, each column value must be unique; in the second case, the combination of the column values must be unique. You can add UNIQUE constraints to tables when you create them or later with an ALTER TABLE statement. Here is the syntax:
--Adding individual constraints

CREATE TABLE <table name> (<col1> <data type> UNIQUE, <col2> <data type> UNIQUE)


--Adding a combination constraint

CREATE TABLE <table name> (<col1> <data type>, <col2> <data type>,

    CONSTRAINT <constraint name> UNIQUE (<col1>,<col2))


--Add a constraint with ALTER TABLE

CREATE TABLE <table name> (<col1> <data type>, <col2> <data type>)

ALTER TABLE ADD CONSTRAINT <constraint name> UNIQUE (<col1>,<col2)
The first syntax example creates a separate constraint on each column within the CREATE TABLE statement. The other two examples each create one constraint on a combination of the columns. If you don’t specify a constraint name as in the first syntax example, SQL Server will come up with a name for you. Listing 9-2 contains example code showing how to create UNIQUE constraints. Type in and execute the code to learn more.
Listing 9-2. Creating Tables with UNIQUE Constraints
USE tempdb;

GO

--1

IF OBJECT_ID('table1') IS NOT NULL BEGIN

    DROP TABLE table1;

END;


--2

CREATE TABLE table1 (col1 INT UNIQUE,

    col2 VARCHAR(20), col3 DATETIME);

GO


--3

ALTER TABLE table1 ADD CONSTRAINT

    unq_table1_col2_col3 UNIQUE (col2,col3);


--4

PRINT 'Statement 4'

INSERT INTO table1(col1,col2,col3)

VALUES (1,2,'1/1/2009'),(2,2,'1/2/2009'),


--5

PRINT 'Statement 5'

INSERT INTO table1(col1,col2,col3)

VALUES (3,2,'1/1/2009'),


--6

PRINT 'Statement 6'

INSERT INTO table1(col1,col2,col3)

VALUES (1,2,'1/2/2009'),
--7
PRINT 'Statement 7'
UPDATE table1 SET col3 = '1/2/2009'
WHERE col1 = 1;
Figure 9-2 shows the results. Code section 1 drops the table in case it already exists. Statement 2 creates table1 with three columns. It creates a UNIQUE constraint on col1. Statement 3 adds another UNIQUE constraint on the combination of columns col2 and col3. Statement 4 adds two rows to the table successfully. Statement 5 violates the constraint on col2 and col3. Statement 6 violates the constraint on col1. Statement 7 violates the constraint on col2 and col3 with an UPDATE to the table.

Figure 9-2. The results of adding UNIQUE constraints
Another interesting thing about UNIQUE constraints is that you will not see them in the Constraints section in SQL Server Management Studio. Instead, you will find them in the Indexes section. When creating a unique constraint, you are actually creating a unique index. Figure 9-3 shows the constraints, as indexes, added to table1.

Figure 9-3. The unique constraints defined on table1 are indexes.
Adding a Primary Key to a Table
Throughout this book, you have read about primary keys. You can use a primary key to uniquely define a row in a table. A primary key must have the following characteristics:
- A primary key may be made of one column or multiple columns, called a composite key.
- A table can have only one primary key.
- The values of a primary key must be unique.
- If the primary key is a composite key, the combination of the values must be unique.
- None of the columns making up a primary key can contain
NULLvalues.
I once received a call from a developer asking me to remove the primary key from a table because it was preventing him from inserting rows into a table in one of our enterprise systems. He insisted that the table definition must be wrong. I spent ten minutes explaining that the primary key was preventing him from making a mistake and helped him figure out the correct statements. After this developer moved on to another company, I received almost the identical phone call from his replacement. Primary keys and other constraints are there to ensure data consistency, not to make your job harder.
You can add a primary key to a table when you create the table using the CREATE TABLE statement or later by using the ALTER TABLE statement. Here is the syntax:
--Single column key

CREATE TABLE <table name> (<column1> <data type> NOT NULL PRIMARY KEY

    [CLUSTERED|NONCLUSTERED] <column2> <data type>)


--Composite key

CREATE TABLE <table name>(<column1> <data type> NOT NULL,

    <column2> <data type> NOT NULL, <column3> <data type>,

    CONSTRAINT <constraint name> PRIMARY KEY [CLUSTERED|NONCLUSTERED]

    (<column1>,<column2>)

)


--Using ALTER TABLE

CREATE TABLE <table name>(<column1> <data type> NOT NULL,

    <column2> <data type>)


ALTER TABLE <table name> ADD CONSTRAINT <primary key name>

    PRIMARY KEY [CLUSTERED|NONCLUSTERED] (<column1>)
Take a look at the keys and indexes of the HumanResources.Department table in the AdventureWorks2012 database (see Figure 9-4). When you create a primary key, the database engine automatically creates an index composed of that key. One of the indexes, PK_Department_DepartmentID, is also the primary key composed of the DepartmentID column.

Figure 9-4. The indexes of the HumanResources.Department table
Listing 9-3 contains some examples that create tables with primary keys, either during the CREATE command or later with the ALTER command. Type in and execute the code to learn more.
Listing 9-3. Creating Primary Keys
USE tempdb;

GO


--1

IF OBJECT_ID('table1') IS NOT NULL BEGIN

    DROP TABLE table1;

END;


IF OBJECT_ID('table2') IS NOT NULL BEGIN

    DROP TABLE table2;

END;


IF OBJECT_ID('table3') IS NOT NULL BEGIN

    DROP TABLE table3;

END;


--2

CREATE TABLE table1 (col1 INT NOT NULL PRIMARY KEY,

    col2 VARCHAR(10));


--3

CREATE TABLE table2 (col1 INT NOT NULL,

    col2 VARCHAR(10) NOT NULL, col3 INT NULL,

    CONSTRAINT PK_table2_col1col2 PRIMARY KEY

    (col1, col2)

);


--4

CREATE TABLE table3 (col1 INT NOT NULL,

    col2 VARCHAR(10) NOT NULL, col3 INT NULL);


--5

ALTER TABLE table3 ADD CONSTRAINT PK_table3_col1col2

    PRIMARY KEY NONCLUSTERED (col1,col2);
Figure 9-5 shows the resulting tables. Code section 1 drops the tables if they already exist in the database. Statement 2 creates table1 with a primary key made of col1. The code doesn’t contain the optional keyword CLUSTERED. The keyword CLUSTERED specifies that the primary key is also a clustered index. (See Chapter 1 for more information about clustered and nonclustered indexes.) By default, if no clustered index already exists on the table, as in this case, the primary key will become a clustered index. Because the code in statement 2 didn’t specify the primary key constraint name, the database engine named the primary key for you.
Statement 3 creates a composite primary key composed of col1 and col2. You actually don’t have to specify NOT NULL when defining the primary key, because SQL Server will change the primary key columns to NOT NULL for you. I prefer to specify the NOT NULL constraint in the CREATE TABLE statement for clarity, especially if I am saving the script. Again, since there is no other clustered index, the primary key will also be a clustered index on table2.
Statement 4 creates table3 without specifying a primary key. Statement 5, an ALTER TABLE statement, adds the primary key, in this case a nonclustered index. The primary key is often a clustered index, but that is not a requirement. You will often see the clustered index composed of a smaller column, such as an INT column, if the primary key contains several large columns. The reason is that the clustered index is automatically part of every other index, so having a “narrow” clustered index saves space in the database, but keep in mind the wider the index the more reads SQL Server will need to perform to retrieve the data and this can have a negative impact on performance.

Figure 9-5. The tables created with primary keys
Creating Foreign Keys
You have seen how to join tables on the primary key of one table to the foreign key of another table beginning with Chapter 4. Having foreign keys defined on tables is not a requirement to join tables together but, in addition to performance implications, explicitly defined foreign keys can help enforce what is called referential integrity. Referential integrity means that data consistency between tables is maintained. For example, no orders may exist without a valid customer for that order.
Just like primary keys, you can define a foreign key within the CREATE TABLE command or later in an ALTER TABLE statement. Here is the syntax for creating simple foreign keys:
--On one column in the CREATE TABLE

CREATE TABLE <table1> (<col1> <data type> FOREIGN KEY REFERENCES <table2> (<col3>))
--On two columns in the CREATE TABLE
CREATE TABLE <table1> (<col1> <data type>, <col2> <data type>,
CONSTRAINT <foreign key name> FOREIGN KEY (<col1>,<col2>)
REFERENCES <table2> (<col3>,<col4>))
--Adding with ALTER table
CREATE TABLE <table1> (<col1> <data type>, <col2> <data type>)
ALTER TABLE <table1> ADD CONSTRAINT <foreign key name> FOREIGN KEY (<col1>)
REFERENCES <table2> (<col3>))
The foreign key refers to the table specified before the keyword REFERENCES. For example, if you were defining the foreign key on the orders table, table2 would be the customers table. The column or columns specified after the REFERENCES keyword generally will be the primary key of that table. If the column or columns referred to are not the primary key, they at least have to be defined as UNIQUE. Type in and execute Listing 9-4, which shows a simple example.
Listing 9-4. Adding a Foreign Key
USE tempdb;

GO

--1

IF OBJECT_ID('table2') IS NOT NULL BEGIN

    DROP TABLE table2;

END;


IF OBJECT_ID('table1') IS NOT NULL BEGIN

    DROP TABLE table1;

END;


--2

CREATE TABLE table1 (col1 INT NOT NULL PRIMARY KEY,

    col2 VARCHAR(20), col3 DATETIME);


--3

CREATE TABLE table2 (col4 INT NULL,

    col5 VARCHAR(20) NOT NULL,

    CONSTRAINT pk_table2 PRIMARY KEY (col5),

    CONSTRAINT fk_table2_table1 FOREIGN KEY (col4) REFERENCES table1(col1)

    );

GO


--4

PRINT 'Adding to table1';

INSERT INTO table1(col1,col2,col3)

VALUES(1,'a','1/1/2009'),(2,'b','1/2/2009'),(3,'c','1/3/2009'),


--5

PRINT 'Adding to table2';

INSERT INTO table2(col4,col5)

VALUES(1,'abc'),(2,'def'),
--6
PRINT 'Violating foreign key with insert';
INSERT INTO table2(col4,col5)
VALUES (7,'abc'),
--7
PRINT 'Violating foreign key with update';
UPDATE table2 SET col4 = 6
WHERE col4 = 1;
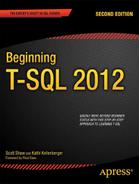
Figure 9-6 shows the results of adding the foreign key and then violating it. Code section 1 drops table1 and table2 if they exist. Notice that the code drops table2 first. If the drop statements are reversed and you run the code multiple times, it will fail. Note that table1 may not be dropped while the foreign key pointing to it exists. To eliminate this problem, drop table2 first.
Statement 2 creates table1. Statement 3 creates table2 with the foreign key. Statement 4 adds three rows to table1. Statement 5 inserts two valid rows to table2. Any value for col4 must already exist in col1 of table1. Statement 6 attempts to insert a row with the value 7. Since the value 7 doesn’t exist in col1 of table1, the statement fails. Statement 7 attempts to update an existing row with an invalid value. The statement fails because the value, 6, doesn’t exist in col1 of table1.
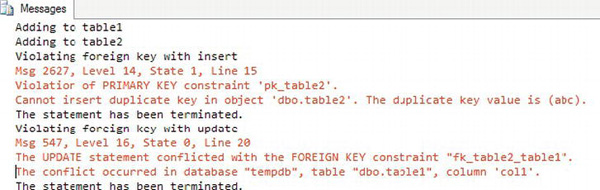
Figure 9-6. The results of adding a foreign key
Creating Foreign Keys with Delete and Update Rules
You saw in the previous section that foreign keys ensure that only valid values from the referenced table are used. For example, if you have an order table, only valid CustomerID values from the customer table may be used. You can also define what should happen if a customer with orders is deleted from the database. Will all orders also be deleted at the same time? Should SQL Server prevent the customer from being deleted? What about changing the CustomerID in the customer table? Will that change also change the CustomerID in the order table or prevent the change? You can define all that behavior within the foreign key definition. A rule may be set up for deletions and for updates. Here are the possible values:
CASCADE: Applies the same action to the foreign key table.NO ACTION: Prevents the deletion or update and rolls back the transaction.SET NULL: Sets the value of the foreign key columns toNULL.SET DEFAULT: Sets the value of the foreign key columns to the default values.
Here is the syntax for creating foreign keys with update and delete rules:
CREATE TABLE <table1> (<col1> <data type>,<col2> <data type>,

    CONSTRAINT <foreign key name> FOREIGN KEY (<col1>) REFERENCES <table2> (<col3>)

    [ON DELETE [NO ACTION|CASCADE|SET NULL|SET DEFAULT]]

    [ON UPDATE [NO ACTION|CASCADE|SET NULL|SET DEFAULT]])
By default, the NO ACTION option applies if no rule is defined. In this case, if you attempt to delete a customer who has placed one or more orders, SQL Server will return an error message and roll back the transaction. To use SET NULL, the columns making up the foreign key must allow NULL values. To use SET DEFAULT, the columns making up the foreign key must have defaults defined. The other requirement is that the default values must be a valid value that satisfies the foreign key. Type in and execute the code in Listing 9-5 to learn how these rules work.
Listing 9-5. Using Update and Delete Rules
USE tempdb;

GO

--1

IF OBJECT_ID('table2') IS NOT NULL BEGIN

    DROP TABLE table2;

END;


IF OBJECT_ID('table1') IS NOT NULL BEGIN

    DROP TABLE table1;

END;


--2

CREATE TABLE table1 (col1 INT NOT NULL PRIMARY KEY,

    col2 VARCHAR(20), col3 DATETIME);


--3 default rules

PRINT 'No action by default';

CREATE TABLE table2 (col4 INT NULL DEFAULT 7,

    col5 VARCHAR(20) NOT NULL,

    CONSTRAINT pk_table2 PRIMARY KEY (col5),

    CONSTRAINT fk_table2_table1 FOREIGN KEY (col4) REFERENCES table1(col1)

    );


--4

PRINT 'Adding to table1';

INSERT INTO table1(col1,col2,col3)

VALUES(1,'a','1/1/2009'),(2,'b','1/2/2009'),(3,'c','1/3/2009'),

    (4,'d','1/4/2009'),(5,'e','1/6/2009'),(6,'g','1/7/2009'),

    (7,'g','1/8/2009'),


--5

PRINT 'Adding to table2';

INSERT INTO table2(col4,col5)

VALUES(1,'abc'),(2,'def'),(3,'ghi'),

    (4,'jkl'),
--6
SELECT col4, col5 FROM table2;
--7
PRINT 'Delete from table1'
DELETE FROM table1 WHERE col1 = 1;
--8
ALTER TABLE table2 DROP CONSTRAINT fk_table2_table1;
--9
PRINT 'Add CASCADE';
ALTER TABLE table2 ADD CONSTRAINT fk_table2_table1
FOREIGN KEY (col4) REFERENCES table1(col1)
ON DELETE CASCADE
ON UPDATE CASCADE;
--10
PRINT 'Delete from table1';
DELETE FROM table1 WHERE col1 = 1;
--11
PRINT 'Update table1';
UPDATE table1 SET col1 = 10 WHERE col1 = 4;
--12
ALTER TABLE table2 DROP CONSTRAINT fk_table2_table1;
--13
PRINT 'Add SET NULL';
ALTER TABLE table2 ADD CONSTRAINT fk_table2_table1
FOREIGN KEY (col4) REFERENCES table1(col1)
ON DELETE SET NULL
ON UPDATE SET NULL;
--14
DELETE FROM table1 WHERE col1 = 2;
--15
ALTER TABLE table2 DROP CONSTRAINT fk_table2_table1;
--16
PRINT 'Add SET DEFAULT';
ALTER TABLE table2 ADD CONSTRAINT fk_table2_table1
FOREIGN KEY (col4) REFERENCES table1(col1)
ON DELETE SET DEFAULT
ON UPDATE SET DEFAULT;
--17
PRINT 'Delete from table1';
DELETE FROM table1 WHERE col1 = 3;--18
SELECT col4, col5 FROM table2;
Figure 9-7 shows the information and error messages that result from running the script. Code section 1 drops table1 and table2 if they exist. Statement 2 creates table1. Statement 3 creates table2 with a foreign key referencing table1 with the default NO ACTION rules. In my experience, most of the time the default NO ACTION is in effect preventing updates and deletions from the referenced table, as in statement 3. Statements 4 and 5 add a few rows to the tables. Statement 7 deletes a row from table1. Since that deletion violates the foreign key rules, the statement rolls back and produces an error.

Figure 9-7. The results of applying foreign key rules
Statement 8 drops the foreign key constraint so that statement 9 can re-create the foreign key with the CASCADE options. Statement 10, which deletes the row from table1 with col1 equal to 1, succeeds. The CASCADE rule also automatically deletes the matching row from table2. (Figure 9-8 shows how table2 looks after population and at the end of the script.) Statement 11 changes the value of col1 in table1 to 10 where the value is equal to 4. The CASCADE rule automatically updates the matching row in table2.
Statement 12 drops the foreign key constraint so that statement 13 can re-create the foreign key with the SET NULL option. Statement 14 deletes a row from table1. The SET NULL rule automatically changes the matching value in table2 to NULL.
Statement 15 drops the foreign key constraint so that statement 16 can re-create the foreign key with the SET DEFAULT option. Statement 17 deletes a row from table1. The SET DEFAULT rule automatically changes the matching value in table2 to the default value 7. Finally, statement 18 displays the rows after all the automatic changes. Review the script again. Except for the INSERT statement, the script contains no other explicit changes to the data in table2. The rule in effect at the time of each data change to table1 automatically made changes to the data in table2.

Figure 9-8. The results of changes based on foreign key options
Defining Automatically Populated Columns
You have seen automatically populated columns used in the “Inserting Rows into Tables with Automatically Populating Columns” section in Chapter 6. This section will show you how to define IDENTITY columns, ROWVERSION columns, COMPUTED columns, and columns with DEFAULT values. Here are the syntax examples:
--IDENTITY

CREATE TABLE <table name> (<col1> INT NOT NULL IDENTITY[(<seed>,<increment>)],

    <col1> <data type>)


--ROWVERSION

CREATE TABLE <table name> (<col1> <data type>,<col2> ROWVERSION)


--COMPUTED column

CREATE TABLE <table name> (<col1> <data type>,<col2> AS <computed column definition>

    [PERSISTED])


--DEFAULT column

CREATE TABLE <table name> (<col1> <data type> DEFAULT <default value or function>)
Several rules apply to using these column types:
- A table may contain only one
IDENTITYcolumn - By default,
IDENTITYcolumns begin with the value 1 and increment by 1. You can specify different values by specifying seed and increment values. - You may not insert values into
IDENTITYcolumns unless theIDENTITY_INSERTsetting is turned on for the table and session. - A table may contain only one
ROWVERSIONcolumn. - The
ROWVERSIONvalue will be unique within the database. - You may not insert values into
ROWVERSIONcolumns. - Each time you update the row, the
ROWVERSIONvalue changes. - A table may contain multiple
COMPUTEDcolumns. - Do not specify a data type for
COMPUTEDcolumns. - You may not insert values into
COMPUTEDcolumns. - By specifying the option
PERSISTED, the database engine stores the value in the table. - You can define indexes on
PERSISTED COMPUTEDcolumns. - You can specify other non-
COMPUTEDcolumns, literal values, and scalar functions in theCOMPUTEDcolumn definition. - You do not need to specify a value for a column with a
DEFAULTvalue defined. - You can use expressions with literal values and scalar functions, but not other column names with
DEFAULTvalue columns. - If a value is specified for a column with a
DEFAULT, the specified value applies. - If a column with a
DEFAULTvalue specified allowsNULLvalues, you can still specifyNULLfor the column.
![]() Note While a sequence does enable you to autopopulate values in a table, it is a database object and is not dependent upon the table. You create SEQUENCES apart from tables and reference them in your INSERT statements.
Note While a sequence does enable you to autopopulate values in a table, it is a database object and is not dependent upon the table. You create SEQUENCES apart from tables and reference them in your INSERT statements.
Listing 9-6 demonstrates creating and populating tables with these automatically populating columns. Type in and execute the code to learn more.
Listing 9-6. Defining Tables with Automatically Populating Columns
USE tempdb;

GO


--1

IF OBJECT_ID('table3') IS NOT NULL BEGIN

    DROP TABLE table3;

END;


--2

CREATE TABLE table3 (col1 VARCHAR(10),

    idCol INT NOT NULL IDENTITY,

    rvCol ROWVERSION,

    defCol DATETIME2 DEFAULT GETDATE(),

    calcCol1 AS DATEADD(m,1,defCol),
calcCol2 AS col1 + ':' + col1 PERSISTED);
GO
--3
INSERT INTO table3 (col1)
VALUES ('a'), ('b'), ('c'), ('d'), ('e'), ('g'),
--4
INSERT INTO table3 (col1, defCol)
VALUES ('h', NULL),('i','1/1/2009'),
--5
SELECT col1, idCol, rvCol, defCol, calcCol1, calcCol2
FROM table3;
Figure 9-9 shows the results. Statement 1 drops table3 if it exists. Statement 2 creates table3 with one regular column, col1, and several other columns that may be automatically populated. Statement 3 inserts several rows into table3, specifying values only for col1. Statement 4 inserts two more rows, specifying values for col1 and the column with a DEFAULT value, defCol. Notice that the first row inserted in statement 4 specifies NULL for defCol. Statement 5 just returns the results.
If you run the script more than once, you will see that the ROWVERSION column, rvCol, contains different values each time. Notice, also, that in the row where col1 equals h, both devCol and calcCol1 also contain NULL. That is because statement 4 explicitly inserted a NULL value into defCol. Since the value for calcCol1 is based on defCol and any operation on NULL returns NULL, calcCol1 also contains a NULL in that row. Statement 4 inserts a row with another explicit value for defCol, and calcCol1 reflects that as well.

Figure 9-9. The results of populating a table with automatically populating columns
Even though the main purpose of database tables is to store data, you can enforce many business rules by the table definition. Practice what you have learned by completing Exercise 9-1.
Views
SQL Server stores data in tables, but you can create objects, called views, that you query just like tables. Views don’t store data; they are just saved query definitions. Developers can use views to simplify coding. For example, in the AdventureWorks2012 database, the Person.Person table contains name columns for several other tables, such as the HumanResources.Employee table. You could create views to join the Person.Person table to the other tables so that you would always have the name columns available, therefore simplifying queries for reports.
You can also simplify security by using views. You can give a user permission to select data from a view when the user doesn’t have permission to select data from the tables comprising the view. This keeps users from seeing or modifying data that they should not access.
![]() Note An indexed view, also known as a materialized view, actually does contain data. SQL Server Express doesn’t support indexed views, so this section doesn’t cover them. See Books Online for more information about creating and using indexed views.
Note An indexed view, also known as a materialized view, actually does contain data. SQL Server Express doesn’t support indexed views, so this section doesn’t cover them. See Books Online for more information about creating and using indexed views.
Creating Views
Creating views is easy. You can create views using most SELECT statements, including those made with common table expressions. For example, you might want to create a view that lists all the customers in the Sales.Customer table from the AdventureWorks2012 database along with their names from the Person.Person table. You could use that view instead of the Sales.Customer table in other queries. Here is the syntax to create, alter, and drop views:
CREATE VIEW <view name> AS SELECT <col1>, <col2> FROM <table>

ALTER VIEW <view name> AS SELECT <col1>, <col2> FROM <table>

DROP VIEW <view name>
Type in and execute the code in Listing 9-7 to learn how to create and use views.
Listing 9-7. Creating and Using a View
USE AdventureWorks2012;

GO


--1

IF OBJECT_ID('dbo.vw_Customer') IS NOT NULL BEGIN

    DROP VIEW dbo.vw_Customer;

END;

GO


--2

CREATE VIEW dbo.vw_Customer AS

    SELECT c.CustomerID, c.AccountNumber, c.StoreID,

        c.TerritoryID, p.FirstName, p.MiddleName,

        p.LastName

    FROM Sales.Customer AS c

    INNER JOIN Person.Person AS p ON c.PersonID = p.BusinessEntityID

GO


--3

SELECT CustomerID,AccountNumber,FirstName,

    MiddleName, LastName

FROM dbo.vw_Customer;


GO


--4

ALTER VIEW dbo.vw_Customer AS

    SELECT c.CustomerID,c.AccountNumber,c.StoreID,

        c.TerritoryID, p.FirstName,p.MiddleName,

        p.LastName, p.Title

    FROM Sales.Customer AS c

    INNER JOIN Person.Person AS p ON c.PersonID = p.BusinessEntityID


GO
--5
SELECT CustomerID,AccountNumber,FirstName,
MiddleName, LastName, Title
FROM dbo.vw_Customer
ORDER BY CustomerID;
Figure 9-10 shows the results. Code section 1 drops the view if it already exists. Code section 2 creates the view. Notice that the GO statements surround the CREATE VIEW code so that it has its own batch. Any time you create or alter a view, the code must be contained within a batch that has no other code except for comments. Notice that the view begins with the characters vw_, designating that it is a view, not a table. Often companies will have naming conventions such as this; be sure to find out whether your shop requires special naming for views. Statement 3 selects several of the columns from the view. At this point, you could include a WHERE clause, include an ORDER BY clause, or involve the view in an aggregate query if you wanted. Basically, you can treat the view like a table in a SELECT statement. Statement 4 alters the view by adding a column. Statement 5 is another SELECT statement, which includes the new column and an ORDER BY clause.
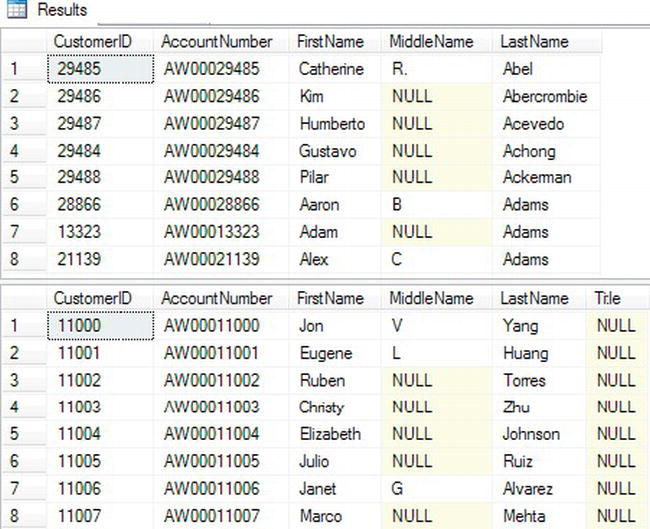
Figure 9-10. The results of creating and using a view
To see the view in SQL Server Management Studio, navigate to the Views section of the AdventureWorks2012 database. You will see the newly created view along with several views that ship with the database. Notice that each of the pre-existing views belongs to one of the schemas in the database. Just like tables, you can script out the definition or bring up a graphical designer. Figure 9-11 shows the graphical designer for the view.

Figure 9-11. The graphical designer for views
Avoiding Common Problems with Views
You may decide that you should set up views joining all the tables in the database and just write queries against those views, but there are often problems associated with using views as the main strategy for database development. One problem is the confusion that can result from views created on top of other views. Tracking down logic errors becomes difficult when they are buried in layers of views. If the underlying table structure changes, the view may produce strange results, as shown in Listing 9-8. Make sure that you don’t use views in a way that will negatively impact performance. For example, suppose you created a view containing the customers, customer addresses, sales, and sales details tables. If you just wanted a list of customers, you could query the view but you would be also accessing tables you didn’t need to view at that time.
Developers often want to add an ORDER BY clause to a view definition. This is actually disallowed except under specific conditions and doesn’t make sense because you can always add the ORDER BY clause to the outer query. (To add an ORDER BY to a view definition, you must add the TOP specifier to the view. You will learn about TOP in Chapter 10.) In fact, the database engine doesn’t guarantee that the data will be returned in the order specified in the view definition according to the CREATE VIEW topic in SQL Server Books Online. Type in and execute the code in Listing 9-8 to learn more about two common problems with views.
Listing 9-8. Common Problems Using Views
USE AdventureWorks2012;

GO


--1

IF OBJECT_ID('vw_Dept') IS NOT NULL BEGIN

    DROP VIEW dbo.vw_Dept;

END;

IF OBJECT_ID('demoDept') IS NOT NULL BEGIN

    DROP TABLE dbo.demoDept;

END;


--2

SELECT DepartmentID,Name,GroupName,ModifiedDate

INTO dbo.demoDept

FROM HumanResources.Department;


GO

--3

CREATE VIEW dbo.vw_Dept AS

    SELECT *

    FROM dbo.demoDept;

GO


--4

SELECT DepartmentID, Name, GroupName, ModifiedDate

FROM dbo.vw_Dept;


--5

DROP TABLE dbo.demoDept;

GO


--6

SELECT DepartmentID, GroupName, Name, ModifiedDate

INTO dbo.demoDept

FROM HumanResources.Department;

GO


--7

SELECT DepartmentID, Name, GroupName, ModifiedDate

FROM dbo.vw_Dept;

GO


--8

DROP VIEW dbo.vw_Dept;

GO
--9
CREATE VIEW dbo.vw_Dept AS
SELECT TOP(100) PERCENT DepartmentID,
Name, GroupName, ModifiedDate
FROM dbo.demoDept
ORDER BY Name;
GO
--10
SELECT DepartmentID, Name, GroupName, ModifiedDate
FROM dbo.vw_Dept;
Figure 9-12 shows the results. Code section 1 drops the view and a work table in case they already exist. Statement 2 creates the table dbo.demoDept from the HumanResources.Department table. Statement 3 creates a view, dbo.vw_Dept, using the asterisk (*) syntax against the dbo.demoDept table. Statement 4 selects all the rows from the view, and the results look as expected in the first result set.
Statement 5 drops the dbo.demoDept table, and Statement 6 creates and populates the table again but with the columns in a different order. Statement 7 selects the rows from the view, but this time with surprising results. Because the table was dropped and re-created differently, the columns in the view are now mismatched, as shown in the second result set. The Name and GroupName columns are reversed.
Statement 8 drops the view, and statement 9 creates it while attempting to enforce a specific order in the view definition. Statement 10 shows within the final set of results that the ORDER BY clause within the view definition didn’t make any difference.

Figure 9-12. The results of demonstrating some common problems with views
Manipulating Data with Views
So far, you have seen how you can use views to select data. You can also modify the data of a table by updating a view as long as the view meets several requirements:
- Modifying the data of a view by inserting or updating may affect only one base table.
- You may not delete data from a view that consists of more than one table.
- The columns updated must be directly linked to updateable table columns; in other words, you can’t update a view column based on an expression or an otherwise non-updatable column.
- Inserts into views are possible only if all columns that require a value are exposed through the view.
As you can see, modifying data through views can be much more complicated than through tables, especially if the view is made of more than one table. Type in and execute the code in Listing 9-9 to learn how to update data using views.
Listing 9-9. Modifying Data Through Views
USE AdventureWorks2012;

GO


--1

IF OBJECT_ID('dbo.demoCustomer') IS NOT NULL BEGIN

    DROP TABLE dbo.demoCustomer;

END;

IF OBJECT_ID('dbo.demoPerson') IS NOT NULL BEGIN

    DROP TABLE dbo.demoPerson;

END;

IF OBJECT_ID('dbo.vw_Customer') IS NOT NULL BEGIN

    DROP VIEW dbo.vw_Customer;

END;


--2

SELECT CustomerID, TerritoryID, StoreID, PersonID

INTO dbo.demoCustomer

FROM Sales.Customer;


SELECT BusinessEntityID, Title, FirstName, MiddleName, LastName

INTO dbo.demoPerson

From Person.Person;

GO


--3

CREATE VIEW vw_Customer AS

    SELECT CustomerID, TerritoryID, PersonID, StoreID,

        Title, FirstName, MiddleName, LastName

    FROM dbo.demoCustomer

    INNER JOIN dbo.demoPerson ON PersonID = BusinessEntityID;
GO
--4
SELECT CustomerID, FirstName, MiddleName, LastName
FROM dbo.vw_Customer
WHERE CustomerID IN (29484,29486,29489,100000);
--5
PRINT 'Update one row';
UPDATE dbo.vw_Customer SET FirstName = 'Kathi'
WHERE CustomerID = 29486;
--6
GO
PRINT 'Attempt to update both sides of the join'
GO
UPDATE dbo.vw_Customer SET FirstName = 'Franie',TerritoryID = 5
WHERE CustomerID = 29489;
--7
GO
PRINT 'Attempt to delete a row';
GO
DELETE FROM dbo.vw_Customer
WHERE CustomerID = 29484;
--8
GO
PRINT 'Insert into dbo.demoCustomer';
INSERT INTO dbo.vw_Customer(TerritoryID,
StoreID, PersonID)
VALUES (5,5,100000);
--9
GO
PRINT 'Attempt to insert a row into demoPerson';
GO
INSERT INTO dbo.vw_Customer(Title, FirstName, LastName)
VALUES ('Mrs.','Lady','Samoyed'),
--10
SELECT CustomerID, FirstName, MiddleName, LastName
FROM dbo.vw_Customer
WHERE CustomerID IN (29484,29486,29489,100000);
--11
SELECT CustomerID, TerritoryID, StoreID, PersonID
FROM dbo.demoCustomer
WHERE PersonID = 100000;
Since this code will produce some errors, view the error messages and then click the Results tab (see Figure 9-13). Code section 1 drops the two tables and the view involved in this script if they exist. Code section 2 creates the two tables, dbo.demoPerson and dbo.demoCustomer, using SELECT INTO statements. Since the two tables must be in place before the view is created, the code to create dbo.vw_Customer is in a separate batch. Statement 4 shows how three of the rows look before the data is manipulated and is the first result set in Figure 9-13. Statement 5 changes the first name of one row from Kim to Kathi. This statement succeeds because the update affects only one of the tables.
Statement 6 attempts to update two of the columns. Because the FirstName column is from one base table and TerritoryID is from a different base table, the update fails. Statement 7 attempts to delete a row from the view but fails. Deletions will work only if the view consists of one base table.
Statement 8 successfully inserts one row into the dbo.demoCustomer table through the view. Statement 9 attempts to insert a row into dbo.demoPerson but fails because the view does not expose the non-NULL column, BusinessEntityID, and there is no way to add a valid value. Statements 10 and 11 show the results of the script. The script updated only one row and added one row to dbo.demoCustomer through the view.

Figure 9-13. The results of manipulating data through a view
Developers can use views to simplify database programming, but care must be taken to avoid performance and logic problems. Practice what you have learned by completing Exercise 9-2.
User-Defined Functions
You learned about the built-in functions available in SQL Server in Chapter 3. You can also create your own T-SQL user-defined functions (UDFs) that you can use in the same ways as the built-in functions. You will learn about two types of user-defined functions in this chapter: scalar valued, which return one value, and table-valued, which return record sets. By using UDFs, you can reuse code to simplify development and hide complex logic.
Creating User-Defined Scalar Functions
A scalar function returns one value and may take one or more parameters. You can create your own scalar functions to simplify your code. For example, your application may have a complex calculation that appears in many queries. Instead of including the formula in every query, you can create and include the function in your queries instead. Keep these facts about scalar UDFs in mind:
- UDFs can be used almost anywhere in a T-SQL statement.
- UDFs can accept one or more parameters.
- UDFs return one value.
- UDFs can use logic such as
IFblocks andWHILEloops. - UDFs can access data, though this is not a good idea.
- UDFs can’t update data.
- UDFs can call other functions.
- The UDF definition must include a return value.
You may have noticed that scalar-valued UDFs can access data, but this is not a good use of UDFs. UDFs should generally not be dependent on the tables in a particular database. They should be reusable as possible. Another problem with UDFs that access data is that the performance can be very poor, especially when used inline in a T-SQL query. The queries within the function run for each row in the outer query. Here is the syntax for creating, altering, and deleting user-defined scalar functions:
CREATE FUNCTION <scalar function Name> (<@param1> <data type1>,

    <@param2> <data type2>)

RETURNS <data type> AS

BEGIN

    <statements>

    RETURN <value>

END


ALTER FUNCTION <scalar function Name> ([<@param1> <data type>,

    <@param2> <data type>])

RETURNS <data type> AS

BEGIN

    <statements>

    RETURN <value>

END


DROP FUNCTION <scalar function name>
Listing 9-10 demonstrates how to create and use user-defined functions. Type in and execute the code to learn more.
Listing 9-10. Creating and Using User-Defined Scalar Functions
USE AdventureWorks2012;

GO


--1

IF OBJECT_ID('dbo.udf_Product') IS NOT NULL BEGIN

    DROP FUNCTION dbo.udf_Product;

END;

IF OBJECT_ID('dbo.udf_Delim') IS NOT NULL BEGIN

    DROP FUNCTION dbo.udf_Delim;

END;

GO


--2

CREATE FUNCTION dbo.udf_Product(@num1 INT, @num2 INT) RETURNS INT AS

BEGIN


    DECLARE @Product INT;

    SET @Product = ISNULL(@num1,0) * ISNULL(@num2,0);

    RETURN @Product;


END;

GO


--3

CREATE FUNCTION dbo.udf_Delim(@String VARCHAR(100),@Delimiter CHAR(1))

    RETURNS VARCHAR(200) AS

BEGIN

    DECLARE @NewString VARCHAR(200) = '';

    DECLARE @Count INT = 1;


    WHILE @Count <= LEN(@String) BEGIN

        SET @NewString += SUBSTRING(@String,@Count,1) + @Delimiter;

        SET @Count += 1;

    END


    RETURN @NewString;

END

GO


--3

SELECT StoreID, TerritoryID,

    dbo.udf_Product(StoreID, TerritoryID) AS TheProduct,

    dbo.udf_Delim(FirstName,',') AS FirstNameWithCommas

FROM Sales.Customer AS c

INNER JOIN Person.Person AS p ON c.PersonID= p.BusinessEntityID ;
Figure 9-14 shows the results. Code section 1 drops the UDFs in case they already exist. Code section 2 creates the UDFs dbo.udf_Product and dbo.udf_Delim. The dbo.udf_Product UDF takes two INT parameters. Inside the UDF, the two parameters are multiplied together after correcting for NULL values. The code saves the product in a variable, @Product, which is returned.
The second UDF, dbo.udf_Delim, takes two parameters: @String, which is a VARCHAR(100), and @Delimiter, which is a one-character string. Inside the definition, a loop builds a new string inserting the delimiter after each character in the original string. The function returns the new string. Query 3 uses the new functions in the SELECT list, multiplying the StoreID by the TerritoryID and adding commas to the FirstName column. Each of these function are database agnostic; you could add them to any database.
Figure 9-14. The results of using two user-defined scalar functions
Using Table-Valued User-Defined Functions
The second type of UDF returns a record set instead of one value. You can’t use this type of UDF inline within a query, but you can use it in place of a table or save the results into a temp table or table variable for use later in your script.
The AdventureWorks2012 database contains one example of a table-valued UDF. This function accepts a @PersonID value and returns information about the contact. Using SSMS, navigate to the AdventureWorks2012 database, and drill down to the dbo.ufnGetContactInformation function via Programmability ![]() Functions
Functions ![]() Table-valued Functions. Once you reach the function, right-click and choose Script Function as
Table-valued Functions. Once you reach the function, right-click and choose Script Function as ![]() Create to
Create to ![]() New Query Editor Window. You will see why this is a function instead of a view. Because the Person.Person table contains information about contacts from many different tables, the function uses logic to figure out which query to run to pull the information. You can’t define logic like that in a view, so that is why the AdventureWorks2012 developers chose to create the table-valued UDF.
New Query Editor Window. You will see why this is a function instead of a view. Because the Person.Person table contains information about contacts from many different tables, the function uses logic to figure out which query to run to pull the information. You can’t define logic like that in a view, so that is why the AdventureWorks2012 developers chose to create the table-valued UDF.
To work with a table-valued UDF, you can select from it like a table or use the CROSS APPLY operator to join the function to another table. Here is the syntax:
SELECT <col1>,<col2> FROM <schema>.<udf name>(<@param>)

SELECT <col1>,<col2> FROM <table1> CROSS APPLY <udf name>(<table1>.<col3>)
Listing 9-11 demonstrates using the dbo.ufnGetContactInformation function. Type in and execute to learn more.
Listing 9-11. Using a Table-Valued UDF
USE AdventureWorks2012;

GO


--1

SELECT PersonID,FirstName,LastName,JobTitle,BusinessEntityType

FROM dbo.ufnGetContactInformation(1);


--2

SELECT PersonID,FirstName,LastName,JobTitle,BusinessEntityType

FROM dbo.ufnGetContactInformation(7822);


--3

SELECT e.BirthDate, e.Gender, c.FirstName,c.LastName,c.JobTitle

FROM HumanResources.Employee as e

CROSS APPLY dbo.ufnGetContactInformation(e.BusinessEntityID ) AS c;


--4

SELECT sc.CustomerID,sc.TerritoryID,c.FirstName,c.LastName

FROM Sales.Customer AS sc

CROSS APPLY dbo.ufnGetContactInformation(sc.PersonID) AS c;
Figure 9-15 shows the partial results. Query 1 calls the UDF with the parameter 1. The logic inside the UDF determines that BusinessEntityID 1 belongs to an employee and returns that information. Query 2 calls the UDF with parameter 7822. The logic inside the UDF determines that this BusinessEntityID belongs to a customer and returns the appropriate information. Query 3 uses the CROSS APPLY operator to join the HumanResources.Employee table to the UDF. Instead of supplying an individual value to find one name, the query supplies the BusinessEntityID column of the HumanResources.Employee table to the function. Columns from the UDF and the table appear in the SELECT list. Query 4 uses CROSS APPLY to join the UDF on the Sales.Customer table. Another option, OUTER APPLY, returns rows even if a NULL value is passed to the UDF, similar to an OUTER JOIN.
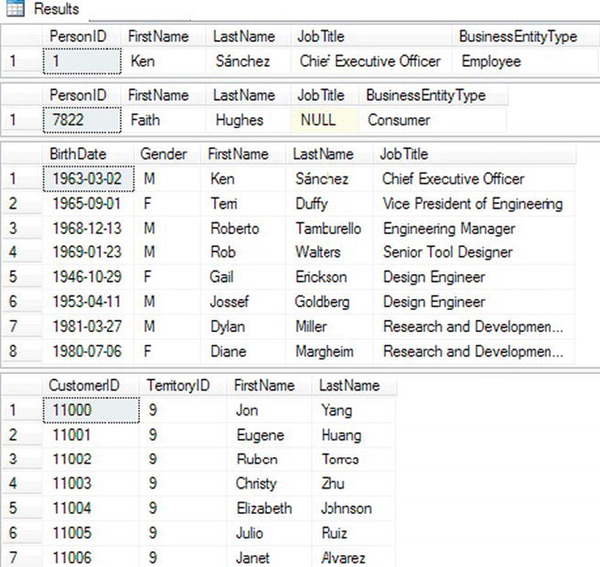
Figure 9-15. The partial results of using a table-valued UDF
You will probably find many reasons to write scalar-valued user-defined functions. Table-valued UDFs are not as common. You can also create user-defined functions with a .NET language. Creating functions with a .NET language is beyond the scope of this book. Practice what you have learned about UDFs by completing Exercise 9-3.
Stored Procedures
Stored procedures (sometimes shortened to “procs”) are the workhorses of T-SQL. Developers and database administrators use them to increase security as well as encapsulate logic. Stored procedures can contain programming logic, update data, create other objects, and more. Essentially, stored procedures are just saved scripts, and they can do anything that the stored procedure owner can do. Like views, the user of the stored procedure doesn’t usually need to have permissions on the tables used within the stored procedure.
![]() Tip Stored procedures are often used to prevent SQL injection attacks. Hackers employing SQL injection techniques insert SQL commands into web forms that build SQL statements dynamically. Eventually the hacker takes over databases, servers, and networks. This problem is not unique to SQL Server; other database systems have been attacked as well.
Tip Stored procedures are often used to prevent SQL injection attacks. Hackers employing SQL injection techniques insert SQL commands into web forms that build SQL statements dynamically. Eventually the hacker takes over databases, servers, and networks. This problem is not unique to SQL Server; other database systems have been attacked as well.
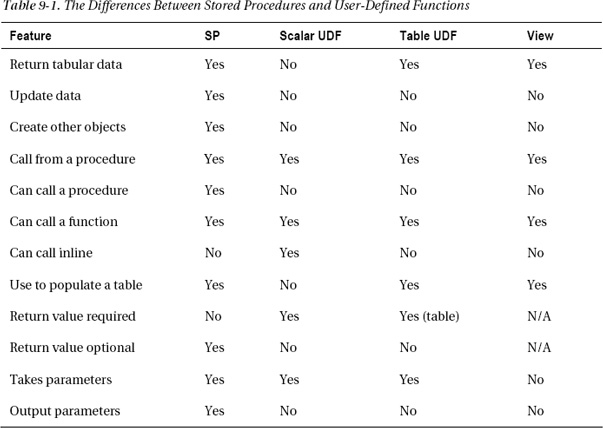
Stored procedures and UDFs have many similarities but have some distinct differences. One interesting difference is that they both take parameters, but stored procedures can accept special parameters called OUTPUT parameters. These parameters can be used to get modified values from the stored procedures. UDFs can accept parameters but can return only a single return value. A stored procedure can also return an integer value, usually reporting the success of the stored procedure or some other informational code. Table 9-1 shows some of the differences between stored procedures and UDFs as well as views.
You will find that creating stored procedures is easy. Here’s the syntax to create, alter, drop, and execute a stored procedure:
CREATE PROC[EDURE] <proc name> [<@param1> <data type>,<@param2> <data type>] AS

    <statements>

    [RETURN <INT>]


ALTER PROC[EDURE] <proc name> [<@param1> <data type>,<@param2> <data type>] AS

    <statements>

    [RETURN <INT>]


EXEC <proc name> <param values>


DROP PROC[EDURE] <proc name>
Some shops require that developers use stored procedures for all database calls from their applications. I have also heard of shops that don’t allow stored procedures at all. Chances are you will work with stored procedures at some point in your career. Listing 9-12 shows how to create a stored proc. Type in and execute the code to learn more.
Listing 9-12. Creating and Using a Stored Procedure
USE AdventureWorks2012;

GO


--1

IF OBJECT_ID('dbo.usp_CustomerName') IS NOT NULL BEGIN

    DROP PROC dbo.usp_CustomerName;

END;

GO


--2

CREATE PROC dbo.usp_CustomerName AS

    SELECT c.CustomerID,p.FirstName,p.MiddleName,p.LastName

    FROM Sales.Customer AS c

    INNER JOIN Person.Person AS p on c.PersonID = p.BusinessEntityID

    ORDER BY p.LastName, p.FirstName,p.MiddleName ;


    RETURN 0;

GO


--3

EXEC dbo.usp_CustomerName

GO


--4

ALTER PROC dbo.usp_CustomerName @CustomerID INT AS

    SELECT c.CustomerID,p.FirstName,p.MiddleName,p.LastName

    FROM Sales.Customer AS c

    INNER JOIN Person.Person AS p on c.PersonID = p.BusinessEntityID

    WHERE c.CustomerID = @CustomerID;


    RETURN 0;

GO


--5

EXEC dbo.usp_CustomerName @CustomerID = 15128;
Figure 9-16 shows the results. Code section 1 drops the stored procedure if it already exists. Code section 2 creates the stored procedure, dbo.usp_CustomerName. The proc simply joins the Sales.Customer table to the Person.Person table and returns several columns from those tables. Notice that the query includes the ORDER BY clause. Unlike views, the ORDER BY clause will actually return the rows in the order specified. Statement 3 calls the proc with the EXEC command. Code section 4 changes the stored proc by adding a parameter and using that parameter in a WHERE clause. Statement 5 calls the modified proc supplying a value for the @CustomerID parameter. You could have left out the name of the parameter when you called the stored procedure in this case. Supplying the name of the parameter makes the code easier to read and understand.

Figure 9-16. The partial results of using a stored procedure
Using Default Values with Parameters
SQL Server requires that you supply a value for each parameter unless you define a default value for the parameter. When a parameter has a default value, you can skip the parameter when you call the stored procedure. In that case, you will have to name the other parameters, not just rely on the position in the list. Once you use a named parameter when calling the stored procedure, you must continue naming parameters. You may want to get in the habit of naming the parameters anyway because it makes your code easier to understand. Here is the syntax for creating a stored procedure with default value parameters:
CREATE PROC[EDURE] <proc name> <@param1> <data type> = <default value> AS

    <statements>

    [return <value>]
Listing 9-13 shows how to use default value parameters. Type in and execute the code to learn more.
Listing 9-13. Using Default Value Parameters
USE AdventureWorks2012;

GO


--1

IF OBJECT_ID('dbo.usp_CustomerName') IS NOT NULL BEGIN

    DROP PROC dbo.usp_CustomerName;

END;

GO


--2

CREATE PROC dbo.usp_CustomerName @CustomerID INT = -1 AS

    SELECT c.CustomerID,p.FirstName,p.MiddleName,p.LastName

    FROM Sales.Customer AS c

    INNER JOIN Person.Person AS p on c.PersonID = p.BusinessEntityID

    WHERE @CustomerID = CASE @CustomerID WHEN -1 THEN -1 ELSE c.CustomerID END;


    RETURN 0;

GO
--3

EXEC dbo.usp_CustomerName 15128;


--4

EXEC dbo.usp_CustomerName ;
Figure 9-17 shows the results. Code section 1 drops the stored proc if it exists. Code section 2 creates the stored proc along with the parameter @CustomerID and the default value –1. In this case, if the user calls the stored proc without a value for @CustomerID, the stored proc will return all the rows. Statement 3 calls the stored proc with a value, and the stored proc returns the one matching row. Statement 4 calls the stored proc without the parameter value, and the stored proc returns all the rows.

Figure 9-17. The partial results of using a default value parameter
Using the OUTPUT Parameter
You can use an OUTPUT parameter to get back a value from a stored proc. This is one of those gray areas where you may decide to use a scalar-value UDF with a return value instead. In my opinion, if the logic is not portable to any database, use a stored procedure. Save scalar-valued UDFs for truly database-agnostic uses. Here is the syntax for creating and using an OUTPUT parameter with a stored proc:
CREATE PROC[EDURE] <proc name> <@param> <data type> OUTPUT AS

    <statements>

    [return <value>]

GO


DECLARE <@variable> <data type>

EXEC <proc name> [<@param> =] <@variable> OUTPUT

PRINT <@variable>
You can include as many parameters as you need, and your OUTPUT parameter can pass a value to the stored proc as well as return a value. Type in and execute Listing 9-14 to learn how to use an OUTPUT parameter.
Listing 9-14. Using an OUTPUT Parameter
USE AdventureWorks2012;

GO


--1

IF OBJECT_ID('dbo.usp_OrderDetailCount') IS NOT NULL BEGIN

    DROP PROC dbo.usp_OrderDetailCount;

END;

GO

--2

CREATE PROC dbo.usp_OrderDetailCount @OrderID INT,

    @Count INT OUTPUT AS


    SELECT @Count = COUNT(*)

    FROM Sales.SalesOrderDetail

    WHERE SalesOrderID = @OrderID;


    RETURN 0;

GO


--3

DECLARE @OrderCount INT;

--4

EXEC usp_OrderDetailCount 71774, @OrderCount OUTPUT;

--5

PRINT @OrderCount;
Code section 1 drops the stored proc if it exists. Code section 2 creates the stored proc, dbo.usp_OrderDetailCount, along with two parameters, @OrderID and @Count. The first parameter accepts a SalesOrderID value. The second parameter is the OUTPUT parameter, which returns the count of the orders for that SalesOrderID. Statement 3 creates a variable, @OrderCount, to be used as the OUTPUT parameter. Statement 4 calls the stored proc with the value for @OrderID and the variable for the @Count parameter. In statement 5, the final value of @Count from inside the stored procedure saved to the variable @OrderCount prints in the Message window. The call to the stored proc could also have looked like this:
EXEC dbo.usp_OrderDetailCount @OrderID = 71774, @Count = @OrderCount OUTPUT.
One mistake that developers often make is to forget to use the OUTPUT keyword when calling the stored proc. To get the modified parameter value back, you must use OUTPUT.
Saving the Results of a Stored Proc in a Table
One very popular use of a stored procedure is to save the results in a temp or work table for later processing. When saving the results of a stored proc in a table, define the table define ahead of time. All the columns must be in place and of compatible data types. Here is the syntax for inserting the rows returned from a stored procedure into a table:
INSERT [INTO] <table name> EXEC <stored proc> [<@param value>]
Listing 9-15 shows how to save the results of a proc into a table. Type in and execute the code to learn more.
Listing 9-15. Inserting the Rows from a Stored Proc into a Table
USE AdventureWorks2012;

GO


--1

IF OBJECT_ID('dbo.tempCustomer') IS NOT NULL BEGIN

    DROP TABLE dbo.tempCustomer;

END

IF OBJECT_ID('dbo.usp_CustomerName') IS NOT NULL BEGIN

    DROP PROC dbo.usp_CustomerName;

END;

GO


--2

CREATE TABLE dbo.tempCustomer(CustomerID INT, FirstName NVARCHAR(50),

    MiddleName NVARCHAR(50), LastName NVARCHAR(50))

GO


--3

CREATE PROC dbo.usp_CustomerName @CustomerID INT = -1 AS

    SELECT c.CustomerID,p.FirstName,p.MiddleName,p.LastName

    FROM Sales.Customer AS c

    INNER JOIN Person.Person AS p on c.PersonID = p.BusinessEntityID

    WHERE @CustomerID = CASE @CustomerID WHEN -1 THEN -1 ELSE c.CustomerID END;


    RETURN 0;

GO


--4

INSERT INTO dbo.tempCustomer EXEC dbo.usp_CustomerName;


--5

SELECT CustomerID, FirstName, MiddleName, LastName

FROM dbo.tempCustomer;
Figure 9-18 shows the results. Code section 1 drops the table and stored proc if they exist. Statement 2 creates the table dbo.tempCustomer, matching up columns and data types. They don’t need to have the same names as the stored proc, but they should have the same number of columns, in the same order, and of compatible data types. Code section 3 creates the stored procedure. Statement 4 calls the stored proc while at the same time storing the results in dbo.tempCustomer. Query 5 returns the results.

Figure 9-18. The results of saving the results of a stored proc into a table
Using a Logic in Stored Procedures
So far, you have seen stored procs that don’t do much more than run queries, but stored procedures are capable of so much more. You can include conditional code, loops, error trapping, object creation statements, and more within stored procedures. Listing 9-16 shows an example. Type in and execute the code to learn more.
Listing 9-16. Using Logic in a Stored Procedure
USE tempdb;

GO


--1

IF OBJECT_ID('usp_ProgrammingLogic') IS NOT NULL BEGIN

    DROP PROC usp_ProgrammingLogic;

END;

GO


--2

CREATE PROC usp_ProgrammingLogic AS

    --2.1

    CREATE TABLE #Numbers(number INT NOT NULL);

    --2.2

    DECLARE @count INT;

    SET @count = ASCII('!'),


    --2.3

    WHILE @count < 200 BEGIN

        INSERT INTO #Numbers(number) VALUES (@count);

        SET @count = @count + 1;

    END;
--2.4
ALTER TABLE #Numbers ADD symbol NCHAR(1);
--2.5
UPDATE #Numbers SET symbol = CHAR(number);
--2.6
SELECT number, symbol FROM #Numbers
GO
--3
EXEC usp_ProgrammingLogic;
Figure 9-19 shows the results. This stored proc creates a table of numbers and the ASCII symbol for each number. This is a simple example just to give you an idea of what you can do. Anything you have learned in this book can be encapsulated within a stored procedure.
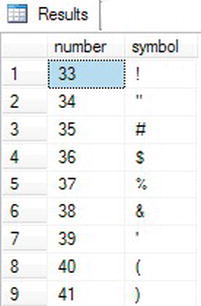
Figure 9-19. The partial results of using a stored procedure with programming logic
CLR Integration
T-SQL is a powerful tool for handling relational data. It is the primary tool for talking to a SQL Server database, but even a tool as powerful and flexible as T-SQL has limitations. For example, if you want to run large aggregate computations on relational data, T-SQL may not be the best tool. CLR (Common Language Runtime) allows for executing .NET languages such as Visual C++, Visual C#, and Visual Basic .NET in procedures, functions, or triggers. In fact, CLR is used by some SQL Server spatial data types (GEOMETRY and GEOGRAPHY) and complex functions (encryption). Without the use of .NET code these data types and functions could not exist using standard T-SQL.
So when should you use CLR and when should you use T-SQL? Though a simplified answer, CLR is best used when you need to perform difficult procedural logic on data. T-SQL is great at selecting, deleting, and updating data but what happens to that data in between is where CLR comes into play. For example, CLR is especially suited for functions. Functions accept data as input but once a function has the data, computations are performed on the data to produce an output. During the computation process there is no need to access the database.
Creating a CLR object in SQL Server is a basically a three-step process. The first step is to create a DLL based on the developed code. You do this in a tool like Visual Studio. To build the application you can download a copy of Visual Studio Express for C# from Microsoft at www.microsoft.com/visualstudio/en-us/products/2010-editions/visual-csharp-express. Once the application is built you then create an assembly. Much like an extended stored procedure, CLR uses application DLLs but instead of the DLL residing on the server outside of SQL Server, the DLL is embedded into an assembly that becomes a SQL Server object. The third step is to create the SQL Server object (stored procedure, function, UDF) by referencing the assembly.
Let’s look at a useful example that walks through these steps. The example in Listing 9-17 will create a CLR stored procedure used to create a strong, eight-character password based off of two hash keys selected from a table. Although the procedure for building an application DLL is beyond the scope of this chapter, I am including the C# code. Following it is the C# code used to build the application DLL.
Listing 9-17. C# Code for Generating Passwords
using System;

using System.Collections.Generic;

using System.ComponentModel;

using System.Data;

using System.Linq;

using System.Text;

using System.IO;

using System.Data.SqlClient;

using System.Data.SqlTypes;


public partial class pwdGen

{

    // private DataSet myDataset;

    private string cString;

    //private int myRow;

    private string key1;

    private string key2;

    //private string mySeed = "HashKeyMe";

    private SqlConnection mySqlConnection;

    private SqlDataAdapter myAdapter;

    string txtUser = "";

    string txtServer = "";

    string password;

    //string letters =

       "abcdefghijkmnopqrstuvwxyzABCDEFGHIJKLMNOPQRSTUVWXYZ23456789!@#$%^&*():;?<>";

    string lcase = "abcdefghijkmnopqrstuvwxyz";

    string ucase = "ABCDEFGHJKLMNOPQRSTUVWXYZ";

    string ncase = "23456789";

    string scase = "!@#[$%]^{&}*(<)?>";

    bool OLD = true;

    bool NEW = false;


    private void LoadData()

    {

        mySqlConnection =

          new SqlConnection(

          "server=HOME-PC" +

          ";database=TEST" +
";Integrated Security=SSPI");
mySqlConnection.Open();
// build the sql select string
cString = "SELECT Key1, Key2 FROM tblHashCode";
//myDataset = ConnectToData(cString, "KeyCodes");
DataSet dataset;
myAdapter = new SqlDataAdapter();
myAdapter.TableMappings.Add("Table", "KeyCodes");
SqlCommand myCommand = new SqlCommand(cString, mySqlConnection);
myAdapter.SelectCommand = myCommand;
dataset = new DataSet("KeyCodes");
myAdapter.Fill(dataset);
}
private void generate()
{
string buffer;
string buffer2;
string tempbuffer;
char[] seed = new char[1];
char[] tempchar = new char[1];
char[] myTemp = new char[1];
int i = 0;
int m = 0;
int c = 0;
int temp = 0;
int bufferval = 0;
int systemsval = 0;
bool direction;
buffer = key1 + txtUser.ToLower();
buffer2 = key2 + txtServer.ToLower();
m = txtServer.Length % 2;
if (m == 0)
{
direction = true;
}
else
{
direction = false;
}
// semi random seed
tempchar[0] = buffer[0];
for (int x = 1; x < buffer.Length; x++)
{
tempchar[0] = (char)(tempchar[0] ^ buffer[x]);
} for (int x = 1; x < buffer2.Length; x++)
{
tempchar[0] = (char)(tempchar[0] ^ buffer2[x]);
}
seed = tempchar;
// pre-process buffers to make 8 character password
i = 0;
tempbuffer = "";
for (int x = 0; x < buffer.Length; x++)
{
if (i == 8) i = 0;
//if (tempbuffer[i] == buffer[x]) tempbuffer[i]++;
if (x >= 8)
{
myTemp[0] = (char)(myTemp[0] ^ buffer[x]);
}
else
{
myTemp[0] = (char)(seed[0] ^ buffer[x]);
}
tempbuffer = tempbuffer + myTemp[0];
i++;
}
buffer = tempbuffer;
i = 0;
tempbuffer = "";
for (int x = 0; x < buffer2.Length; x++)
{
if (i == 8) i = 0;
if (x >= 8)
{
myTemp[0] = (char)(myTemp[0] ^ buffer2[x]);
}
else
{
myTemp[0] = (char)(seed[0] ^ buffer2[x]);
}
i++;
tempbuffer = tempbuffer + myTemp[0];
}
buffer2 = tempbuffer;
// cycle the buffers against each other and generate modulii
c = 0;
m = 0;
password = "";
for (int x = 0; x < 2; x++) {
if (OLD)
{
if (c >= buffer2.Length) c = 0;
if (m >= buffer.Length) m = 0;
bufferval = buffer[m];
systemsval = buffer2[c];
}
if (direction)
{
// Lowercase letter
if (NEW)
{
c++;
m++;
if (c >= buffer2.Length) c = 0;
if (m >= buffer.Length) m = 0;
bufferval = buffer[m];
systemsval = buffer2[c];
}
temp = (bufferval * systemsval) % 25;
myTemp[0] = lcase[Math.Abs(temp)];
password = password + myTemp[0];
// Uppercase letter
if (NEW)
{
c++;
m++;
if (c >= buffer2.Length) c = 0;
if (m >= buffer.Length) m = 0;
bufferval = buffer[m];
systemsval = buffer2[c];
}
temp = (bufferval * systemsval) % 25;
myTemp[0] = ucase[Math.Abs(temp)];
password = password + myTemp[0];
// Number character
if (NEW)
{
c++;
m++;
if (c >= buffer2.Length) c = 0;
if (m >= buffer.Length) m = 0;
bufferval = buffer[m];
systemsval = buffer2[c];
}
temp = (bufferval * systemsval) % 8;
myTemp[0] = ncase[Math.Abs(temp)];
password = password + myTemp[0]; // Special letter
if (NEW)
{
c++;
m++;
if (c >= buffer2.Length) c = 0;
if (m >= buffer.Length) m = 0;
bufferval = buffer[m]; systemsval = buffer2[c];
}
temp = (bufferval * systemsval) % 17;
myTemp[0] = scase[Math.Abs(temp)];
password = password + myTemp[0];
}
else
{
// Uppercase letter
if (NEW)
{
c++;
m++;
if (c >= buffer2.Length) c = 0;
if (m >= buffer.Length) m = 0;
bufferval = buffer[m];
systemsval = buffer2[c];
}
temp = (bufferval * systemsval) % 25;
myTemp[0] = ucase[Math.Abs(temp)];
password = password + myTemp[0];
                // Special letter

                if (NEW)

                {

                    c++;

                    m++;

                    if (c >= buffer2.Length) c = 0;

                    if (m >= buffer.Length) m = 0;

                    bufferval = buffer[m];
systemsval = buffer2[c];
}
temp = (bufferval * systemsval) % 17;
myTemp[0] = scase[Math.Abs(temp)];
password = password + myTemp[0];
// Number character
if (NEW)
{
c++;
m++;
if (c >= buffer2.Length) c = 0;
if (m >= buffer.Length) m = 0;
bufferval = buffer[m];
systemsval = buffer2[c];
}
temp = (bufferval * systemsval) % 8;
myTemp[0] = ncase[Math.Abs(temp)];
password = password + myTemp[0];
// Lowercase letter
if (NEW)
{
c++;
m++;
if (c >= buffer2.Length) c = 0;
if (m >= buffer.Length) m = 0;
bufferval = buffer[m];
systemsval = buffer2[c];
}
temp = (bufferval * systemsval) % 25;
myTemp[0] = lcase[Math.Abs(temp)];
password = password + myTemp[0];
}
if (OLD)
{
c++;
m++;
}
}
}
// below is the sp
[Microsoft.SqlServer.Server.SqlProcedure]
public static void generatePassword(string user, string svr, out string pwd)
{
pwdGen objpwd = new pwdGen();
objpwd.txtUser = user;
objpwd.txtServer = svr;
objpwd.password = "";
objpwd.loadData();
objpwd.generate();
pwd = objpwd.password;
}
}
Understanding the C# code to the nth degree is not important, but there are two things to notice. Firstly, the only T-SQL being executed is the T-SQL used to select from the table in the LoadData() function, as highlighted in Listing 9-18. Once the data is pulled from SQL Server, the C# logic takes over.
Listing 9-18. LoadData() Function
    private void LoadData()

    {

        mySqlConnection =

          new SqlConnection(

          "server=HOME-PC" +

          ";database=TEST" +

          ";Integrated Security=SSPI");

        mySqlConnection.Open();

        // build the sql select string

        cString = "SELECT Key1, Key2 FROM tblHashCode";

        //myDataset = ConnectToData(cString, "KeyCodes");

        DataSet dataset;

        myAdapter = new SqlDataAdapter();

        myAdapter.TableMappings.Add("Table", "KeyCodes");

        SqlCommand myCommand = new SqlCommand(cString, mySqlConnection);

        myAdapter.SelectCommand = myCommand;

        dataset = new DataSet("KeyCodes");

        myAdapter.Fill(dataset);


    }
This LoadData() function creates a connection to my server named HOME-PC and database named TEST. If you want to run this code, you will need to modify these values to reflect your specific configuration. The T-SQL performs a SELECT on the tblHashCode. The script for creating this table is in Listing 9-20.
The other item of note is the declaration of the stored procedure at the end of code. This declaration is important because you will need to refer to it later when creating the assembly in SQL Server. Listing 9-19 shows how the stored procedure declaration is created.
Listing 9-19. SqlProcedure Call in C#
[Microsoft.SqlServer.Server.SqlProcedure]

    public static void generatePassword(string user, string svr, out string pwd)

    {

        pwdGen objpwd = new pwdGen();

        objpwd.txtUser = user;

        objpwd.txtServer = svr;

        objpwd.password = "";

        objpwd.loadData();

        objpwd.generate();

        pwd = objpwd.password;
Once you build the DLL in Visual Studio, you can focus on preparing the SQL Server environment. As mentioned, the C# code references a server, database, and table. You’ll need to configure these based on how you modified the original code. In my case, the server is called HOME-PC, the database is called TEST, and the table is called tblHashCode. The table has two columns: key1 and key2. Listing 9-20 creates the table.
Listing 9-20. Create tblHashCode
USE test;


CREATE TABLE [dbo].[tblKeyCode](

      [Key1] [varchar](100) NOT NULL,

      [Key2] [varchar](100) NOT NULL

) ON [PRIMARY];


INSERT INTO tblHashCode

VALUES('ApressPublishing', 'ScottShaw'),
Listing 9-20 creates a table called tblHashCode and inserts two values into the table. These two values can be anything you want and will be used by the code to generate the password. If you change either one of the values, the application will generate a different password. Next, you will create the assembly and the stored procedure. Listing 9-21 takes care of those two tasks.
Listing 9-21. Create Assembly and Storted Procedure
ALTER DATABASE test SET TRUSTWORTHY ON;


USE test;

GO


CREATE ASSEMBLY [PasswordGenerator]

AUTHORIZATION [sys]

FROM N'C:ProjectsPasswordGeneratorinReleasePasswordGenerator.dll'

WITH PERMISSION_SET = EXTERNAL_ACCESS;


CREATE PROC sp_passwordgenerator(@uname NVARCHAR(50),@srv NVARCHAR(50),@pwd1 NVARCHAR(50) OUTPUT)

AS EXTERNAL name PasswordGenerator.pwdGen.generatePassword;
You first set the database to trustworthy mode since you are creating an assembly with the EXTERNAL ACCESS permission. You will need to change the directory path for the DLL to wherever it is stored on your own system. The CREATE PROCEDURE command specifies all the necessary input and output variables and references the name and methods for the application. Once the stored procedure is successfully created, you can execute it like any other stored procedure. Listing 9-22 shows an example execution. Figure 9-20 shows the results.
Listing 9-22. Executing a CLR Stored Procedure
DECLARE @return_status sysname;

DECLARE @pwd1 nvarchar(50);

DECLARE @srv nvarchar(50);

DECLARE @user nvarchar(50);

SET  @srv='HOME-PC';

SET @user ='scott';

EXEC sp_passwordgenerator @user,@srv,@pwd1 output;

SELECT @pwd1;

Figure 9-20. Results of sp_passwordgenerator
Developers can use stored procedures for all database calls. Database administrators can set up stored procedures as scheduled jobs for batch processing or for reports. CLR is now used in SQL Server as a replacement for extended stored procedures. Developers can use CLR to embed .NET languages in usable SQL Server objects like stored procedures, functions, and data types. Now that you have seen many of the possibilities of using stored procedures, complete Exercise 9-4 to practice what you have learned.
User-Defined Data Types
Within a database, you can create user-defined data types. User-defined data types (UDTs) are nothing more than native data types that you have given a specific name. This enables you to make sure that a particular type of column is consistently defined throughout the database. For example, databases often contain ZIP code and phone number columns as UDTs.
Take a look at the UDTs defined for the AdventureWorks2012 database by navigating to Programmability ![]() Types
Types ![]() User-Defined Data Types. If you double-click the
User-Defined Data Types. If you double-click the Phone data type, you can see the graphical editor for the type (see Figure 9-21).

Figure 9-21. The properties of the
The Phone data type is an NVARCHAR(25) that allows NULL values. The Binding section for Default and Rule are blank. In previous versions of SQL Server, you could create defaults and rules that were then applied to columns or UDTs, but the binding features have been deprecated and should not be used. Once you have the data type defined, you can use it when defining columns in tables as any other data type. Here is the syntax for creating a UDT:
CREATE TYPE <type name> FROM <native type and size> [NULL|NOT NULL]
Listing 9-23 shows how to create a UDT. Type in and execute the code to learn more.
Listing 9-23. Creating a User-Defined Type
USE AdventureWorks2012;

GO

IF  EXISTS (

    SELECT * FROM sys.types st

    JOIN sys.schemas ss ON st.schema_id = ss.schema_id

    WHERE st.name = N'CustomerID' AND ss.name = N'dbo') BEGIN


    DROP TYPE dbo.CustomerID;

END;

GO


CREATE TYPE dbo.CustomerID FROM INT NOT NULL;
Now that the new UDT exists, you can use it when defining new tables. Another type of object is called a user-defined type. This type must be created with a .NET language called a CLR data type. CLR types can contain multiple properties and can contain methods.
Triggers
Triggers are a very powerful feature of SQL Server. As with most powerful things, they can also cause many problems. Triggers are like a special type of stored procedure that runs whenever data is modified. You can define triggers on tables that fire when new rows are inserted or when existing rows are updated or deleted. Triggers can insert data into auditing tables, roll back the current update, or even modify the row that caused the trigger to fire in the first place. Obviously, they can have an impact on performance, and care must be taken so that triggers are not used in a way that causes them to fire repeatedly because of one update.
Any code within a trigger must be very efficient. The transaction that caused the trigger to fire can’t complete until the trigger is successfully completed. One common use of triggers is to enforce referential integrity, or the primary key/foreign key relationships between tables. For example, a trigger that fires when a customer is deleted from the customer table might delete all the orders for that customer. In actuality, this use of triggers is not necessary. Database designers can use foreign key constraints to take care of situations like this.
Traditionally, triggers were defined only on tables. Triggers defined on a database or on a server are called DDL triggers. These fire when operations such as creating a table or adding a login are performed. They can be used to prevent these operations or log them, for example.
Since this is a beginning book, it doesn’t cover creating triggers. Just be aware that triggers often exist in databases and are frequently the cause of performance or logic problems that are difficult to track down.
Thinking About Performance
This chapter covers many ways that you can add logic to the database to enforce business rules or make development easier. One common problem is using UDFs that access data inline in a query. The database engine will have to execute the function for each row of the query. Listing 9-24 illustrates this point. Run the first part of the code to create the objects. Then run query 3 and see how long it takes. Run query 4 and see how long that query takes.
Listing 9-24. Performance Issues with UDFs
--RUN THIS FIRST

USE AdventureWorks2012;

GO


IF OBJECT_ID('dbo.udf_ProductTotal') IS NOT NULL BEGIN

    DROP FUNCTION dbo.udf_ProductTotal;

END;

GO


CREATE FUNCTION dbo.udf_ProductTotal(@ProductID INT,@Year INT) RETURNS MONEY AS

BEGIN


    DECLARE @Sum MONEY;


    SELECT @Sum = SUM(LineTotal)

    FROM Sales.SalesOrderDetail AS sod

    INNER JOIN Sales.SalesOrderHeader AS soh

            ON sod.SalesOrderID = soh.SalesOrderID
WHERE ProductID = @ProductID AND YEAR(OrderDate) = @Year;
RETURN ISNULL(@Sum,0);
END;
GO
--TO HERE
--3 Run this by itself to see how long it takes
SELECT ProductID, dbo.udf_ProductTotal(ProductID, 2004) AS SumOfSales
FROM Production.Product
ORDER BY SumOfSales DESC;
--4 Run this by itself to see how long it takes
WITH Sales AS (
SELECT SUM(LineTotal) AS SumOfSales, ProductID,
YEAR(OrderDate) AS OrderYear
FROM Sales.SalesOrderDetail AS sod
INNER JOIN Sales.SalesOrderHeader AS soh
ON sod.SalesOrderID = soh.SalesOrderID
GROUP BY ProductID, YEAR(OrderDate)
)
SELECT p.ProductID, ISNULL(SumOfSales,0) AS SumOfSales
FROM Production.Product AS p
LEFT OUTER JOIN Sales ON p.ProductID = Sales.ProductID
AND OrderYear = 2004
ORDER BY SumOfSales DESC;
On my laptop, query 3 takes 6 or 7 seconds to run, and query 4 takes 1 second. Since the user-defined function must access the Sales.SalesOrderDetail table once for every product, it takes a lot of resources. Unfortunately, the execution plans, if you choose to compare them, don’t accurately reflect the difference. On my computer, query 4 takes 100 percent of the resources in the execution plans, but I know that is not true since query 4 runs so much faster.
Database Cleanup
You have created quite a few objects during this chapter. You can either run the script in Listing 9-25 (also available on the catalogue page for this book at www.apress.com) to clean up the objects from the examples or reinstall the sample databases according to the instructions in the “Installing the Sample Databases” section in Chapter 1.
Listing 9-25. Database Cleanup
USE AdventureWorks2012;

GO


IF OBJECT_ID('vwCustomer') IS NOT NULL BEGIN

    DROP VIEW vwCustomer;

END;
IF OBJECT_ID('vw_Dept') IS NOT NULL BEGIN
DROP VIEW dbo.vw_Dept;
END;
IF OBJECT_ID('demoDept') IS NOT NULL BEGIN
DROP TABLE dbo.demoDept;
END;
IF OBJECT_ID('dbo.demoCustomer') IS NOT NULL BEGIN
DROP TABLE dbo.demoCustomer;
END;
IF OBJECT_ID('dbo.demoPerson') IS NOT NULL BEGIN
DROP TABLE dbo.demoPerson;
END;
IF OBJECT_ID('dbo.vw_Customer') IS NOT NULL BEGIN
DROP VIEW dbo.vw_Customer;
END;
IF OBJECT_ID('dbo.udf_Product') IS NOT NULL BEGIN
DROP FUNCTION dbo.udf_Product;
END;
IF OBJECT_ID('dbo.udf_Delim') IS NOT NULL BEGIN
DROP FUNCTION dbo.udf_Delim;
END;
IF OBJECT_ID('dbo.usp_CustomerName') IS NOT NULL BEGIN
DROP PROC dbo.usp_CustomerName;
END;
IF OBJECT_ID('dbo.usp_OrderDetailCount') IS NOT NULL BEGIN
DROP PROC dbo.usp_OrderDetailCount;
END;
IF OBJECT_ID('dbo.tempCustomer') IS NOT NULL BEGIN
DROP TABLE dbo.tempCustomer;
END
IF OBJECT_ID('dbo.usp_CustomerName') IS NOT NULL BEGIN
DROP PROC dbo.usp_CustomerName;
END;
IF OBJECT_ID('usp_ProgrammingLogic') IS NOT NULL BEGIN
DROP PROC usp_ProgrammingLogic
END;
IF OBJECT_ID('dbo.CustomerID') IS NOT NULL BEGIN
DROP TYPE dbo.CustomerID
END;
IF OBJECT_ID('dbo.udf_ProductTotal') IS NOT NULL BEGIN
DROP FUNCTION dbo.udf_ProductTotal;END;
IF OBJECT_ID ('dbo.testCustomer') IS NOT NULL BEGIN
DROP TABLE dbo.testCustomer;
END;
IF OBJECT_ID('dbo.testOrder') IS NOT NULL BEGIN
DROP TABLE dbo.testOrder;
END;
IF OBJECT_ID('dbo.testOrderDetail') IS NOT NULL BEGIN
DROP TABLE dbo.testOrderDetail;
END;
IF OBJECT_ID('dbo.vw_Products') IS NOT NULL BEGIN
DROP VIEW dbo.vw_Products;
END;
IF OBJECT_ID('dbo.vw_CustomerTotals') IS NOT NULL BEGIN
DROP VIEW dbo.vw_CustomerTotals;
END;
IF OBJECT_ID('dbo.fn_AddTwoNumbers') IS NOT NULL BEGIN
DROP FUNCTION dbo.fn_AddTwoNumbers;
END;
IF OBJECT_ID('dbo.Trim') IS NOT NULL BEGIN
DROP FUNCTION dbo.Trim;
END
IF OBJECT_ID('dbo.fn_RemoveNumbers') IS NOT NULL BEGIN
DROP FUNCTION dbo.fn_RemoveNumbers;
END;
IF OBJECT_ID('dbo.fn_FormatPhone') IS NOT NULL BEGIN
DROP FUNCTION dbo.fn_FormatPhone;
END;
IF OBJECT_ID('dbo.usp_CustomerTotals') IS NOT NULL BEGIN
DROP PROCEDURE dbo.usp_CustomerTotals;
END;
IF OBJECT_ID('dbo.usp_ProductSales') IS NOT NULL BEGIN
DROP PROCEDURE dbo.usp_ProductSales;
END;
IF EXISTS (
SELECT * FROM sys.types st
JOIN sys.schemas ss ON st.schema_id = ss.schema_id
WHERE st.name = N'CustomerID' AND ss.name = N'dbo') BEGIN
DROP TYPE [dbo].[CustomerID];
END;DROP DATABASE [TEST];
Summary
SQL Server contains many ways to enforce business rules and ensure data integrity. You can set up primary and foreign keys, constraints, and defaults in table definitions. You can create user-defined functions, stored procedures, views, and user-defined data types to add other ways to enforce business rules. You have many options that you can use to make development simpler and encapsulate logic. Each new version of SQL Server adds new data types and functions. Chapter 10 covers some of the new data types added with SQL Server 2012. The new updates to data types related to geography and geometry are especially interesting.