
Appendix C. Libraries
In chapter 4 we covered software libraries and how they’re used to extend the basic functionality of the Arduino. Other chapters have provided examples of how using libraries in your own projects can easily extend their functionality.
When you’ve gained some experience in writing your own sketches there will come a time when you develop a sketch that you could reuse in future projects or that may be useful to the Arduino community. You can either keep the developed code in a sketch or split it out into a library. Splitting the sketch out into a library will probably make it more useful to other users.
This appendix will guide you through the anatomy of a library so that you can see what’s involved in writing your own.
C.1. Anatomy of a library
Arduino sketches are coded using C++ (see appendix B for more detail), and much of the complexity and functionality of Arduino programming is hidden from users by the extensive use of software libraries.
A software library is made up of at least one C++ class and maybe many more. A class consists of two files: a header file with a .h extension and a file with a .cpp extension.
The .h (header) file acts as a blueprint for the library, describing the functions of the library and what the class does. The .cpp file contains the fine detail of the library, detailing the functions and variables declared by the header.
Let’s start by looking at the makeup of a header file.
C.1.1. The .h (header) file
The header is the blueprint for a library of classes. Imagine that we have a sensor called a Sabre that detects the presence of fossils in a patch of ground and counts them. You need to think what functions the library is going to provide. In this example we have two public functions available: one will set up the Sabre and the other will update readings from the Sabre.
We’ll define the header in the next listing.
Listing C.1. Sabre.h

The start of the file is the #ifndef include guard directive. This prevents the code being included multiple times ![]() . Including the Arduino library is optional
. Including the Arduino library is optional ![]() ; include it if your code makes use of elements from the Arduino library, such as digitalWrite, delay, pinMode, and so on.
; include it if your code makes use of elements from the Arduino library, such as digitalWrite, delay, pinMode, and so on.
After the public keyword, the library’s public functions are included; then the constructor, which is required to set up the library, is included
![]() .
.
After the private keyword are the private functions; these are only accessible to the library. The end of the class is designated with the
end of the #ifndef directive ![]() .
.
Having completed the header file, we can now create the .cpp file, which will be the file that carries out the actions identified by the header file.
C.1.2. The .cpp file
The .cpp file contains the meat of the library. It includes the .h (header) file and fleshes out the functions declared in that file. The next listing shows the outline for our .cpp file.
Listing C.2. Sabre.cpp

The class declaration is included at the head of the file ![]() before constructing the class
before constructing the class ![]() . The public and private functions of the class then complete the library.
. The public and private functions of the class then complete the library.
Note
The double colon (::) is the scope resolution operator, and it tells the compiler that this function is inside the class.
Once you’ve finished writing your library you’ll want to make it available to your sketches. To do so you need to copy the .h (header) and .cpp files into a subfolder of the Arduino libraries folder with the same name as your library, like this:
libraries/Sabre/Sabre.h
libraries/Sabre/Sabre.cpp
Let’s finish off this section by looking at how to use this library.
C.2. Using a library
Once you’ve created a library you can use it in your own sketches, and you can also distribute it so others can use it in their sketches. You might consider sharing your code on the Arduino playground, which can be found at http://playground.arduino.cc. The playground is also a good place to find other people’s libraries and code examples.
C.2.1. Using a library in a sketch
The following listing shows how the Sabre library would be used in an example sketch, where the Arduino is connected to a Sabre sensor.
Listing C.3. Sabre.ino
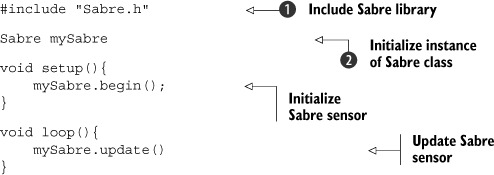
You need to include the Sabre library in the sketch ![]() before initializing an instance of the Sabre class
before initializing an instance of the Sabre class ![]() . The Sabre sensor is initialized during setup and updated in the main sketch loop.
. The Sabre sensor is initialized during setup and updated in the main sketch loop.
That’s all there is to using a library in a sketch.
C.2.2. Distributing a library
You should consider distributing libraries that you write to the wider Arduino community. By distributing your libraries you give others the benefit of your experience and also invite other people to take what you have written and suggest ideas for future improvements. This sharing of libraries and willingness to help others is what makes the Arduino community so great.
When distributing a library to others, which is normally done as a zip file, you should include one or more example sketches showing how the library should be used. The examples should be placed in their own examples subfolder:
Libraries/Sabre/Examples/sabre.ino