
Appendix B. Coding primer
This coding primer is a basic guide to the Arduino language and how it’s used to create sketches that can be run on an Arduino. We’ll cover the following topics:
- History of the Arduino language
- Using variables
- Using control statements
- Using loops
- Using functions
B.1. The Arduino language
The Arduino language is based on C/C++, and anyone who has previously studied C or C++ will readily be able to read the written code. If you haven’t studied C or C++ before, don’t worry. The Arduino language was designed to make coding as painless as possible, allowing you to concentrate on what can be done rather than how it’s done.
Students at the Interactive Design Institute, Ivrea, the original home of Arduino, were taught to program using a language called Processing. The Processing design philosophy is to teach the fundamentals of programming within a visual context, and the Arduino team, realizing they needed to develop a language that made the prototyping of ideas as simple as possible, adopted a similar philosophy.
The decision was made to use the Processing IDE as the model for the Arduino IDE, because the original Arduino system was aimed at art and design students who were already familiar with Processing. The close links to Processing are still evident today, and any improvements made to the Processing IDE can be directly imported into the Arduino system.
Arduino makes extensive use of libraries to provide common functions. Figure B.1 shows some of these libraries. The libraries help the language hide much of its complexity and simplify many common tasks, such as setting digital pins as input or output, reading in analog values, controlling servomotors, or switching DC motors on and off. Many of the core libraries used are based on a library called Wiring, which was developed by Hernando Barragan.
Figure B.1. Additional functionality is added to the language by using libraries.

Shields that add functionality also often require specialized libraries, and these are normally provided and maintained by the shield developers.
It’s now time to move on and investigate the Arduino language in more detail by looking first at variables and their types. Then we’ll move on to how code is controlled within a sketch.
B.2. Variables
One way to think of variables is to consider them as being like buckets, each containing something. Your code can look in individual buckets and see or change their contents. A variable is the name, or identifier, given to a container holding a piece of data that can be inspected and changed. Figure B.2 shows some typical variables.
The advantages of using variables are twofold: they make code easier to understand, and they also make it easier to maintain. If you had a variable called pinLED that denotes pin 13 as a digital output, and at a later stage you decide to use pin 12 instead, you would only need to make one change in your code. The following listing shows this in action.
Figure B.2. Typical variables, considered as though they are held in named buckets

Listing B.1. Value of the variable pinLED

The code has four instances of the variable pinLED, but it’s simple to change them all by changing the value of pinLED when it is first declared, from 13 to 12. From then on all instances of pinLED will have the value 12.
When naming a variable in your code give it a meaningful, descriptive name that makes your code both easier to read and understand. A variable can be given any name you want, as long as it isn’t one of the Arduino keywords. The following are all valid variable names:
- outputPin
- inputPin
- leftMotor
- rightMotor
- pinLED
You’ve seen how useful variables can be and how they make code easier to understand and maintain. Now let’s have a look at some variable types.
B.2.1 Variable types
There are a number of types of variables. The variable type and the variable itself must be declared before you can use them in your code.
Variables don’t have to be initialized—given a value—when declared. As a result, the following two statements are both correct:
int startIndex;
int startIndex = 0;
Nevertheless, it’s considered good programming practice to initialize a variable when you declare it as this can aid in debugging—locating code errors.
When declaring numeric variables think carefully about the range of numbers your sketch will need and whether they or the result of a calculation will be whole or decimal numbers, as each is declared differently. Table B.1 outlines the range of variable types.
Table B.1. Variable types
|
Description |
Code example |
|
|---|---|---|
| byte | An 8-bit whole number with a range of 0 to 255. | byte myVariable = 215; |
| int | Short for integer; a 16-bit whole number with a range of 32,767 to –32,768. | int myVariable = 32000; |
| long | A long integer stored as a 32-bit value with a range of 2,147,483,647 to –2,147,483,648. | long myVariable = 320000; |
| float | A number that has a decimal point, stored as a 32-bit value with a range of 3.4028325E+38 to –3.4028235E+38. | float myVariable = 3.14; |
| unsigned int | An integer without any negative values, stored as a 16-bit value with a range of 0 to 65,545. | unsigned int myVariable = 45000; |
| unsigned long | A long integer without any negative values, stored as a 32-bit value with a range of 0 to 4,294,967,296. | unsigned long myVariable = 569124; |
| word | An unsigned number, stored as a 16-bit value with a range of 0 to 65,545 (the same as an unsigned int). | word myVariable = 53000; |
| boolean | A Boolean variable that holds one of two values: true or false. | boolean myVariable = true; |
| char | A single ASCII character, stored as an 8-bit, or byte, number. This allows characters to have arithmetic functions performed on them. The character 'c' is stored as number 99, so you could add 2 to this and get 'e'. | Char myVariable = 'c'; Char myVariable = 99; |
Note
With the whole number types you can get a situation called roll over, where a value that has increased or decreased past the end of the range for that variable type rolls over to the other end of the range. For example, if 1 is added to an int that has a value of 32,767, the value will become –32,768 and not 32,768 as you might think. This is true for all the whole number types.
B.2.2 Arrays
Arrays are a collection of variables that are indexed with a number. The array has to be declared before it can be used.
You can declare an initialized array like this:
int myVariable[4];
Or you can initialize an array like this:
int myVariable[4] = {1,2,3,4};
The index for an array starts from 0. Using the array name and an index accesses a value in an array.
Note
Be careful that you don’t access data from beyond the end of an array, as it will return meaningless data from memory.
int myVariable[4] = {1,2,3,4};
newVariable = myVariable[3];
myVariable[0] = 2;
newVariable = myVariable[0];
The preceding code snippet initializes an array with four values: 1, 2, 3, and 4. Then it accesses the fourth value with index 3, which is the end of the array. It then changes the value at the beginning of the array with index 0 and accesses that value by calling it with its index number.
Arrays are commonly used to manipulate values within a for loop, where the increment counter is used as the index for an array. We’ll look at for loops in section B.4.
B.2.3 Strings
Text strings can be used in two ways: they can be declared as an array of type char, or you can use the String class. The String class offers a wide range of text manipulation functions that can be performed on text strings; these are discussed in some detail in chapter 7, where we work with LCD displays. Here we’ll only consider the simpler array type, char.
When strings are used as an array of char they normally terminate with a null character, ASCII 0. This allows other functions to recognize when they have come to the end of the string, so when calculating the size of an array remember to add 1 to allow for the extra character.
A char array can be declared in a number of ways. All of the following are valid:
char myVariable[10];
char myVariable[6] = {'H', 'e', 'l', 'l', 'o'};
char myVariable[6] = {'H', 'e', 'l', 'l', 'o', '�'};
char myVariable[] = "Hello";
char myVariable[6] = "Hello";
char myVariable[10] = "Hello";
The first of the preceding lines of code sets up an uninitialized array, the second line automatically appends '�' to the end, and the third line includes it. The fourth line automatically splits the characters and auto-sizes the array, the fifth line auto-splits the array, and the sixth line leaves space in the array for a larger string.
B.2.4 Constants
Some variables don’t change the values assigned to them at initialization, and in these cases the keyword const can be added to the start of the variable. Typical examples would be assigning PIN numbers or constant values like the value of pi:
const int pinLed = 13;
const float pi = 3.142;
If you try to assign a value to a constant after it has been initialized the compiler will throw an error.
The Arduino has some reserved words that are constants:
- true, false—true is any value that is not 0; false is the value 0.
- INPUT, OUTPUT—Digital pins can be set as either an INPUT or an OUTPUT using the pinMode() function: pinMode(13, OUTPUT)
- HIGH, LOW—You can set the value of a pin to either LOW (logic level 0, 0 volts) or HIGH (logic level 1, 5 volts).
B.2.5 Variable scope
Variables in Arduino also have what is called scope; the value of a variable can be referenced from some places within a sketch depending on where it’s declared. Variables declared outside the main setup and loop functions are termed global variables, because their value is available from anywhere in the sketch. Variables declared within a function are termed local variables and they have local scope; their values are only available to the function in which they’re declared.
The following listing shows global and local variables in action: pinLedGlobal is available to any function.
Listing B.2. Global and local variables within a sketch

As your code gets longer and becomes more complex, using local variables can prevent you from inadvertently changing the value of same-named variables that are used in other functions. Figure B.3 shows the scope of variables.
Figure B.3. The scope of variables varA, varB, and varC
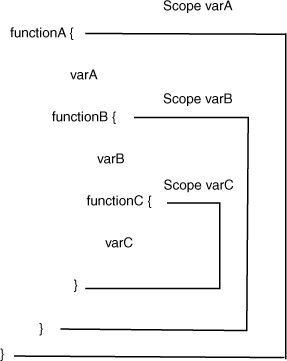
The value of varA is available to functions functionA, functionB, and functionC and in this context has global scope. Both variables varB and varC have local scope: variable varB has its value available to both functionB and functionC, whereas varC has its value only available to functionC.
In this section we’ve looked at variables and their types, learned about arrays, and investigated a method of dealing with text strings. We’ve looked at constants, including those already included by Arduino, and we’ve looked at variable scope. In the next section we’ll take a look at some Arduino control structures.
B.3. Taking control
Program code, like real life, is based on making decisions, albeit in a simpler sense. Your sketch code makes decisions based on what are called Boolean tests. The results are either true or false.
Here are a few real-world examples:
- I am tired; true
- It is dark; false
- Carrots are orange; true
In your code, the Boolean test is performed using relational operators:
- 15 < 30; true
- 15 > 6; true
- 17 <= 16; false
- 17 == 16; false
The standard numerical relational operators are shown in table B.2.
Table B.2. Relational operators
|
Operator |
Description |
Operator |
Description |
|---|---|---|---|
| > | Greater than | < | Less than |
| >= | Greater than or equal to | <= | Less than or equal to |
| == | Equality | != | Inequality |
Note
== is not the same as =. == tests for equality and returns true or false.
Control statements control the flow of your code. The statements can perform a number of tasks, and typical examples are reading a value from a sensor, turning an LED on or off, controlling the motors or servos on a robot, or measuring the distance from an object. The results from some tasks can determine what the next action will be.
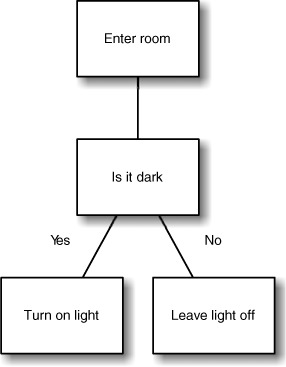
For example, in the real world, if you went into a room and it was dark you would switch on a light. This sequence of events can be broken down into tasks as represented in figure B.4.
Figure B.4. A simple task: upon entering a room, if it is dark, turn on the light.
True or false is how computers evaluate an expression.
In the next section we’ll look at how the different control structures behave in what are called conditional operators.
B.3.1 If, else, else if
The first of the conditional operators we’re going to look at is the if statement. In the real world the if statement would be akin to asking a question with a straight yes (true) or no (false) answer:
- Am I tired of walking? Yes, then I’ll stop.
- Am I hungry? Yes, then I’ll eat.
In the real-world examples we’re saying that if something is true, we’ll perform the action. In code we ask the same questions, and if the statement is true we perform the action:
if (Boolean expression) {
   // do Action if Boolean expression is true
}
The statement preceding the { is evaluated as a Boolean expression. If it’s true the code between the curly braces is run:
if (indexA < indexB) {
    digitalWrite(pinLed, HIGH);
{
In the preceding code, if the value of indexA is less than the value of indexB, the code statement is run and the pin is switched to HIGH.
Now that you understand the if statement we can introduce else:
- If I am tired, then stop; else carry on.
- If you are hungry, then eat; else pack up.
Here we’re saying that if the answer to the question is yes (true) we’ll perform the first action. Otherwise (else), if the answer is no (false) we’ll perform the second action.
In Boolean expression terms we can think of this as follows:
if (Boolean expression) {
       // run this code if Boolean expression is true
{
else {
       // run this code if Boolean expression is false
}
If the Boolean expression is true the first statement block is run; otherwise the second block is run:
if (indexA < indexB) {
     digitalWrite(pinLed, HIGH);
}

else {
     digitalWrite(pinLed, LOW);
}
In the preceding code, if the value of indexA is less than the value of indexB the first statement block is run, switching the pin to HIGH; otherwise the second code block is run, switching the pin to LOW.
We’ll now add the last part of the puzzle, else if, where we can ask one or more questions:
- If I am tired, then stop; else, if you are tired, then stop; else let’s carry on.
- If you are hungry, then eat; else, if you are thirsty, then drink; else pack up.
In Boolean expression terms, it looks like this:
if (Boolean expression A) {
// run this code if Boolean expression A is true
{
else if (Boolean expression B) {
     // run this code if Boolean expression B is true
}
else {
    // run this code if both Boolean expressions are false
Here’s a code example:
if (indexA < indexB) {
     digitalWrite(pinLedA, HIGH);
}
else if (indexA == index B) {
     digitalWrite(pinLedB, High);
}
else {
     digitalWrite(pinLedA, High);
}

}
In this case, if the value of indexA is less than the value of indexB the first code block is run; otherwise, if the value of indexA is equivalent to the value indexB the second code block is run; otherwise, if none of the preceding are true the third block is run.
We’ve now covered the if, else, and else if conditional operators, but if you find you’re using a series of else if statements in your code it’s worth considering the switch-case statement. We’ll look at this next.
B.3.2 Switch case
Switch-case statements are a great way of simplifying complicated if, else if statements, and we find them much easier to understand and read. The following listing shows the typical layout for a switch-case statement.
Listing B.3. The switch-case statement
switch (value){
        case 1:
            // code statements when value == 1
            break;
        case 2:
            // code statements when value == 2
            break;
        case 3:
            //code statements value == 3
            break;
        case 4:
        case 5:
        case 6:
            // code statement when value == 4 or 5 or 6
            break;
        default:
            // code statements run for any other value
            break;
}
The switch-case statement computes a series of comparisons and the computed value is compared with each case. If it’s found equivalent the statements are run for that case.
The break; statement shown in the listing is optional, but if it’s included it ceases further comparisons, which is generally more efficient.
The default statement is also optional, but it can be used like the final else in a complicated if, else if series of statements.
This completes our look at switch-case statements. We’re now going to move on and look at logical operators. These will give us more tools for comparing expressions and will expand our coding abilities.
B.3.3 Logical operators
The conditional operator examples we’ve looked at so far have just considered simple expressions like “if I am tired, then stop.” Adding the logical operators AND, OR, and NOT gives us more scope to ask slightly more developed questions:
- If I am tired AND you are tried, then we will stop.
- If I am tired OR you are tired, then we will stop.
- If you are NOT tired, we will carry on.
In code, we don’t use the words AND, OR, and NOT but instead represent them in the following manner:
- AND becomes &&
- OR becomes ||
- NOT becomes !
Let’s look at each in turn.
AND
if (indexA > indexB && indexC > indexD) {
     digitalWrite(pinLedA, HIGH);
}
If the value of indexA is greater than the value of indexB AND the value of indexC is greater than the value of indexD, then run the code block and switch the pin to HIGH.
OR
if (indexA > indexB || indexC > indexD) {
       digitalWrite(pinLedB, HIGH);
}
If the value of indexA is greater than the value of indexB OR the value of indexC is greater than the value of indexD, then run the code block and switch the pin to HIGH.
NOT
if (!buttonPressed) {
     digitalWrite(pinLedA, HIGH);
}
If NOT variable buttonPressed, run the code block and switch the pin to HIGH.
B.4. Going loopy
As we’ve already discussed, the main part of a sketch typically takes part in the control loop which continues to loop until the Arduino is powered off. But there are other types of loops that can occur within the main loop, designed to be used with repetitive code. These are set so that they loop until a certain condition is met, and if that condition isn’t met the loop will continue indefinitely.
We’re going to look at three types of loops: for, while, and do while.
B.4.1. The for loop
For loops are used to loop through a block of code a certain number of times. They’re normally used with some form of incremental counter that increments until a certain value is reached, which terminates the loop.
The following listing shows a typical for loop that prints the value of i, from 0 to 99, repeatedly until the Arduino is powered off.
Listing B.4. A for loop printing the value of i, from 0 to 99
void setup()
{
  Serial.begin(9600);
}
void loop {
 for (int i = 0; i < 100; i++){
     Serial.println(i);
 }
}
The variable i is initialized with the value 0. This is incremented by one with the code i++, which is a shorthand way of saying
i = i + 1
The code loops, printing out the value of i until i equals 100. At that point the loop terminates that run and starts again from 0.
The top line or header of a for loop consists of three parts, as shown in figure B.5: initialization, test, and the increment or decrement counter.
Figure B.5. A for loop header showing initialization, test, and increment or decrement

The initialization only occurs once, at the start of the routine. The second part, the test, is performed each time the loop runs. If the test is true the code block is executed and the counter value is incremented (++) or decremented (--) as specified in the third part of the header. The routine will continue to loop until the test is false, which in this case is when the counter reaches 100.
The next type of loop we’ll consider is the while loop.
B.4.2. The while loop
The while loop tests an expression contained within parentheses and will continue to loop through a block of code between curly braces until the expression tests false:
while (expression) {
// do statements
}
The previous code for the for loop can be written using a while loop, as shown in the following listing.
Listing B.5. A while loop that prints out the value of i from 0 to 99
void setup() {
    Serial.begin(9600);
}
void loop(){
 int i = 0;
 while (i < 100){
   Serial.println(i);
   i++;
 }
}
You can consider a for loop as a special case of a while loop; the while loop is used when you are unsure how many times the code will loop. Typical uses for the while loop include testing the input from sensors or buttons.
The following snippet tests the value of a sensor:
int sensorValue = 0;
while (sensorValue < 2000 {
    sensorValue = analogRead(analogPin);
}
This code will continue to loop while the value of sensorValue is less than 2000.
Note
Make sure the code does change the value of the variable being tested in the expression, or the code will loop indefinitely.
The third and last type of loop is the do while loop, and we’ll look at that next.
B.4.3. The do while loop
The do while loop is not used as often as the while loop. The difference between it and the while loop is that it tests the expression at the end of the code block, so the code block will always run at least once. The do while loop is typically used for reading data from files:
do {
    // code block
} while (expression);
Like a while loop, this code block will continue to run until the expression tests false.
B.5. Functions
We’ve already looked at the two main functions or routines that are needed in a sketch: setup() and loop(). Both are declared as type void, which means they don’t return a value. Arduino simplifies many tasks by using readily accessible functions to control digital and analog input and output of data, as well as mathematics, trigonometry, and time functions, but we discuss these in the chapters as we come across them.
You can also write your own functions. They are normally used to help with repetitive tasks or calculations. You first need to declare the function type, as you do with a variable, and give it a name—something memorable that indicates what the function does. In parentheses, you place any parameters that you want to pass to the function. Code statements are then contained within curly braces:
type functionName(parameters){
// code statements here
}
Remember, if the function doesn’t return a value you should give it a type of void. Functions of type void can use a return; statement to exit or return from the function; functions that return a value use the keyword return followed by the return value and then a semicolon (;). The following code snippet shows a function that converts a temperature in Fahrenheit to Celsius and returns the Celsius value:
float calcTemp(float fahrenheit){
      float celcius;
      celcius = (fahrenheit – 32)/ 1.8;
      return celcius;
}
The function is declared as type float and it’s passed a value for fahrenheit. Subtracting 32 from fahrenheit and then dividing by 1.8 produces the celsius value. The return statement returns the value of celsius. This function could be used as part of a system for logging temperature data.
As you can see, functions are an ideal way to simplify code and take care of repetitive tasks.
B.6. Summary
In this appendix we looked at some parts of the Arduino language. Variables are a good way to help with our code, and choosing good names for them helps indicate how a code sketch works. We started to come to grips with language constructs such as if, else, and else if, and the switch-case statement. We also looked at the logical operators AND, OR and NOT. Finally, we ran through the different loop types, concluding with a look at functions. As you’ve seen, even if you’re completely new to coding these techniques are quick to pick up and master.