Deploying Your App to the App Store
Once you’ve built your app, you will probably want other people to use it. There are two ways of distributing your app. The first was outlined in Chapter 3, where you saw how you could deploy to a device. The process required you to have the device on hand so that you could add provisioning profiles to it. You were also limited to 100 devices for your entire developer account, so that option was somewhat limited. The second, and more typical, approach is to deploy your app to Apple’s app store. It doesn’t cost anything to do this, other than the developer account subscription of $99 per year.
If you haven’t worked through Chapter 3 yet, you really need to do so before continuing with this chapter. The processes of signing up for a developer account and deploying to a physical device need to be completed before you can submit to the app store. You can’t compile an app for the simulator and then deploy it to the store. It must have been built for a physical device first.
In this chapter, you’ll see how to prepare your app for app store submission, including the attributes that you’ll need to add to it. You’ll also see how to use the iTunes Connect portal to define the app, before finally using Xcode to deploy the app to the app store.
Preparing Your App for Store Deployment
There are a number of steps that you have to go through to prepare your app for store deployment. In this section, you’ll go through what needs to be done for the typical iPhone app. This involves setting the application graphics for icons and for the launch screen, as well as signing the application with your deployment certificates.
Setting the General Settings
The first step in preparing your app for store deployment is in the “General Settings” tab. To access this, ensure that your project is selected in the project navigator. See Figure 13-1, where we’re working with the “Magic 8 Ball” app from Chapter 6.
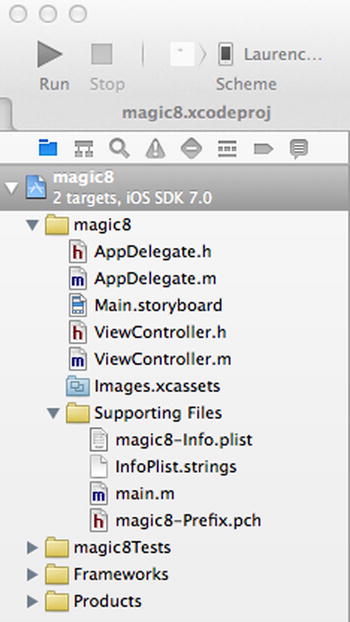
Figure 13-1. Selecting your project
Once it’s selected, you need to select the target compilation for your app. This is sometimes hard to find, because it’s very discreet. Immediately to the right of the project navigator, you’ll see the settings and a number of tabs, such as “General,” “Capabilities,” “Info,” etc., as in Figure 13-2.

Figure 13-2. Settings for your project
You’ll notice, to the left of where it says “magic8,” there is a little right-pointing triangle. If you have this, click it, and a sidebar will appear with the target settings. See Figure 13-3. If you already have this sidebar, you’re in good shape!
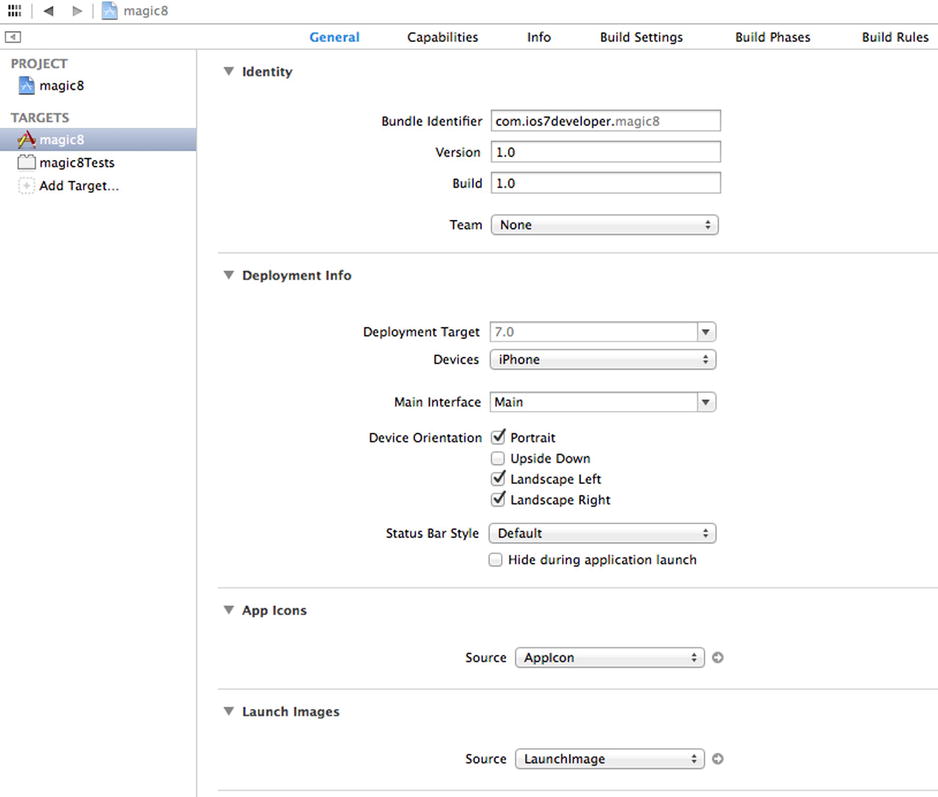
Figure 13-3. Project settings with sidebar
You’ll likely see two targets, as in Figure 13-3. One will be the name of your project, and one will be the name of your project postfixed with “Tests.” If you don’t see the latter, don’t worry. You just need the main one, as shown in Figure 13-3.
Editing App Identity
The “Identity” section has four main settings.
The “Bundle Identifier” is the name that you gave the app when you created it. If you want to change it, you can do so here, but it isn’t necessary to do so at this point. You can see the “Version” and “Build” items are defaulting to 1.0. As you create updates to your application, you can change them here. For your first deployment, it’s good to keep them at 1.0.
It’s important to set the “Team” setting in order to be able to deploy to the app store. Here is where you specify who you are—and your certificate is used to sign the application. If you are a solo developer (like this example), Apple treats you as a team of one.
Select this setting and you should see your identifier with your account details for the iOS developer portal, as set up in Figure 13-4.

Figure 13.4. Setting the “Team” settings
If you don’t see anything here, you should work through Chapter 3. If you see an entry, such as the “[email protected]” one above, use it.
Editing App Icons
Your app needs a number of icons for use by the app store, and for your end-users’ iPhone home screens from which they will launch your app. You can set these up through the “app icons” section of the “General Settings” tab. See Figure 13-5.

Figure 13-5. The app icons settings
You’ll see the setting reads “AppIcon” and has a right-pointing arrow beside it. Click this arrow, and you’ll be taken to the icon editor.

Figure 13-6. The app icon settings
Here you’ll see that there are three types of icon you need to set. The dialog isn’t very clear on what size it wants them to be, so the best approach is to create three icons: one at 58x58, one at 80x80, and one at 120x120. They should all be in the PNG format.
Tip If you need a graphics application to create the required graphics, you don’t need to buy an expensive one. There’s a terrific, simple, lightweight app called Paintbrush that is open sourced and available for download from http://paintbrush.sourceforge.net/. This is what we have used throughout this book.
Once you have these images, you can drag and drop them onto the dotted boxes on the right-hand side of the screen. You can see what this would look like in Figure 13-7.

Figure 13-7. App icons with icons set
Once you’ve dropped your icons into the boxes, you’ll see a preview of them in place of the dotted boxes. So, for example, in Figure 13-7, my 58x58 image has the number 58 in it, and so forth.
You also need to set the LaunchImage, so on the left side of the screen (see Figure 13-6 for an example), immediately below AppIcon, you’ll see LaunchImage. Select it and you’ll see the LaunchImage settings. See Figure 13-8.
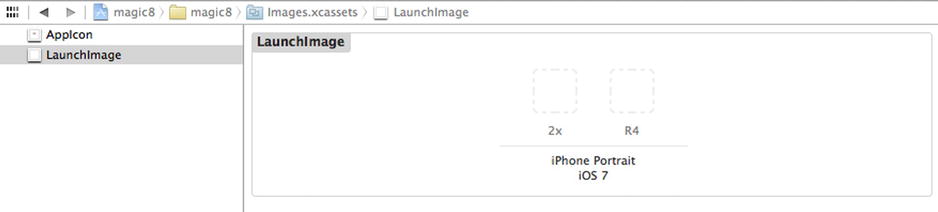
Figure 13-8. The LaunchImage settings
You’ll see that there are two settings—one for 2x and one for R4. Again, it’s not very clear, but what Xcode is expecting here is a 640x960 image for 2x and a 640x1136 image for R4. Create these images and drop them onto the dotted boxes. When you’re done, your screen should look something like Figure 13-9, with previews of your images replacing the dotted boxes.

Figure 13-9. LaunchImage with images set
You should now compile your app and run it on either the simulator or your device. You should see one of your configured icons for the app on the iPhone’s home screen. See Figure 13-10. You’ll also see your launch screen graphics when the app launches.
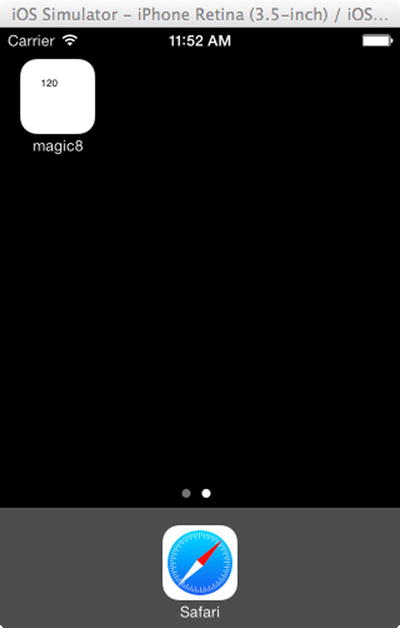
Figure 13-10. Your app on the home screen
You’ve now finished the first set of steps that you need to follow to get your app ready for the app store. In the next section, you’ll take a look at what you need to do to get the app store ready for your app!
Creating Settings for Your App on iTunes Connect
iTunes Connect is the portal that you use to configure your apps in the app store marketplace, as well as to manage their availability, banking details (so that you can get paid), and all legal documents that you need to agree to in order to sell in different countries.
Note To use iTunes Connect and the iOS developer center, you need to be a registered iOS developer. The process for signing up for this is documented in Chapter 3. You won’t be able to access most of the functionality in this section until you do so.
iTunes Connect is integrated with the developer portal that you sign into as a registered user. You can find this portal at: https://developer.apple.com/devcenter/ios/index.action. When you sign in to this site, you’ll see a sidebar for the iOS Developer Program on the right-hand side. See Figure 13-11.
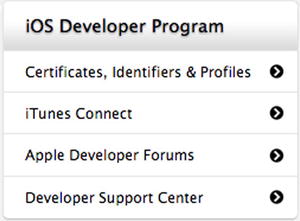
Figure 13-11. Finding iTunes Connect on the developer portal
Select the iTunes Connect link and you’ll be taken to the iTunes Connect portal. You can also link directly there by visiting https://itunesconnect.apple.com/WebObjects/iTunesConnect.woa. Sign in with the same Apple ID and password that you use to sign into the iOS developer center.
When you’re signed in, you’ll see the iTunes Connect portal. It should look like Figure 13-12.
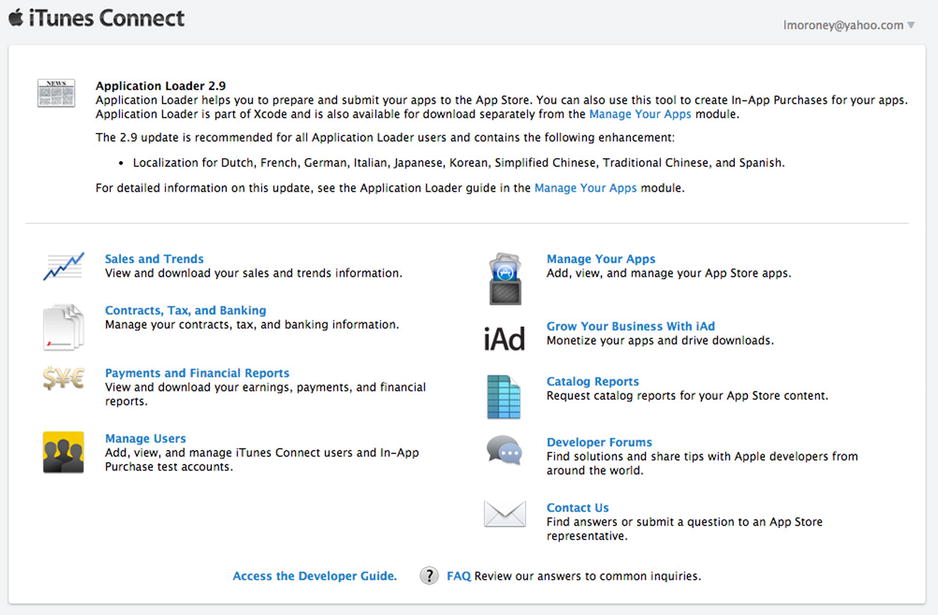
Figure 13-12. The iTunes Connect portal
There’s lots to do in here, including monitoring your sales and trends, handling taxes and banking, and so forth. There’s a lot that goes beyond the scope of this book, so to focus on app deployment, you’re going to select the “Manage Your Apps” option.
This will take you to a site that lists your recent iOS app activity, which shows, for example, which of your apps have recently gone on sale or have been removed from sale. At the top of the screen, you’ll see a blue “Add New App” button. See Figure 13-13.

Figure 13-13. Managing your apps in the iTunes Connect portal
To add a new app, click the button, and if, like me, you subscribe to both iOS and Mac OS development, you’ll be asked to select the app type. If you don’t see this step, don’t worry—it just means that you subscribe to one or the other, and the portal has taken you directly to the right place.
You can see this choice in Figure 13-14.
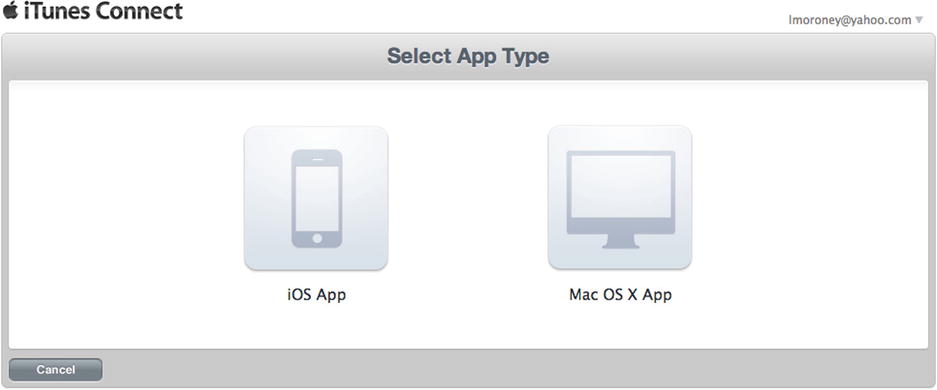
Figure 13-14. Selecting the app type
Select “iOS App” and you’ll be taken to the App Information screen. See Figure 13-15.
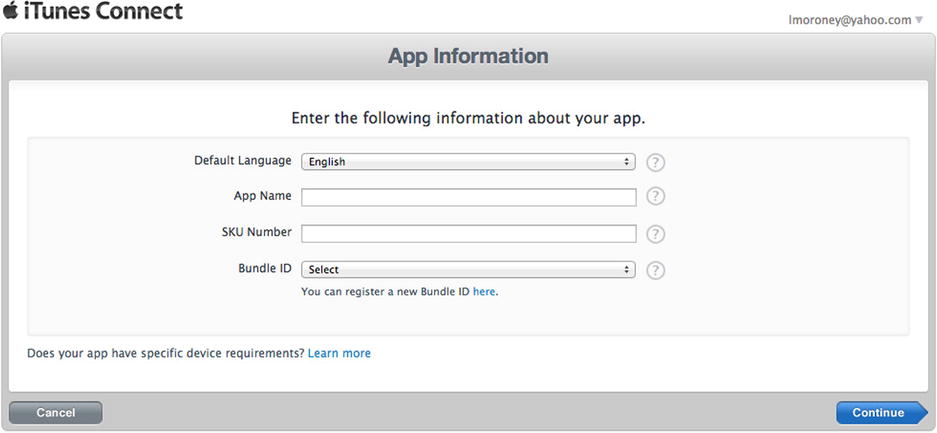
Figure 13-15. App Information screen
You need to specify the default language, app name, SKU number, and bundle ID in this section.
The default language should be, as expected, the language that your app is built for. In this case, we’re leaving it as English.
The app name is the name that you want to give your app in the app store. So, for example, we’re using “My Excellent Magic8Ball” as the app name.
The SKU is a code that you enter that helps you track your app amongst others if you deploy a lot of apps. You can just use “1234” or something similar here.
Finally, you need a bundle ID. This is a setting that the app store uses to identify your app and any future updates. At this point you probably haven’t developed one, so click on the link where it says “You can register a new Bundle ID here.”
You’ll be taken to a site that allows you to register an iOS App ID. The address of this site is: https://developer.apple.com/account/ios/identifiers/bundle/bundleCreate.action. You can see this in Figure 13-16.
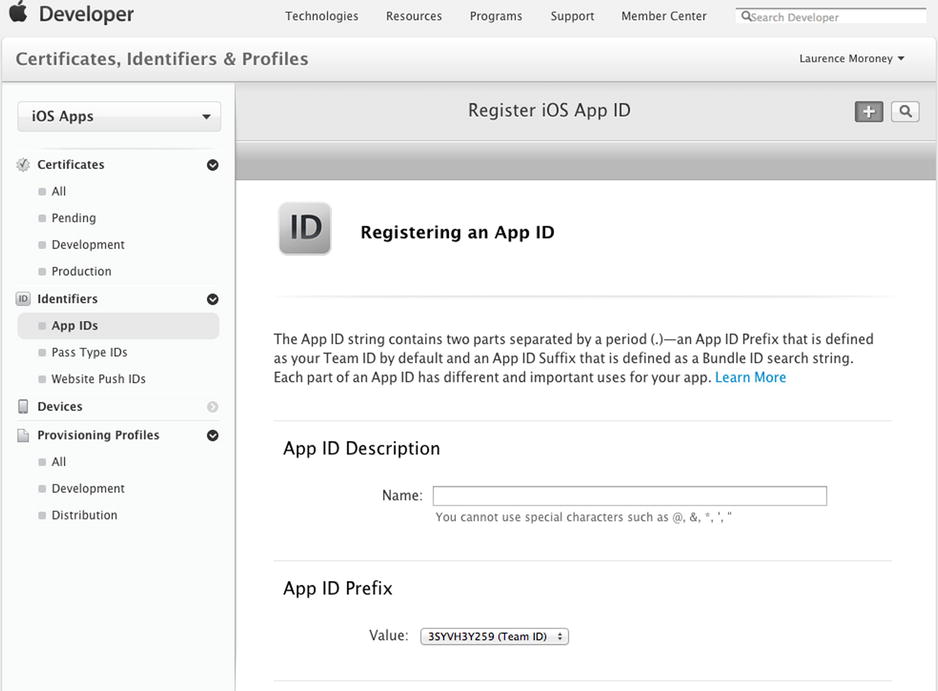
Figure 13-16. Registering an App ID
You’ll need to give the app a name. We’d recommend using the same name as you’re using in the app name section. Apple also gave you a team ID when you set up your developer account. This will be the default setting in the “App ID Prefix” field. You can keep this setting.
As you scroll down, you see settings to use an explicit App ID or a wildcard App ID. As the site explains (see Figure 13-17), explicit App IDs are good if you want to specifically identify a particular app with an App ID. If you don’t mind bundling a bunch of apps with an App ID, you can use a wildcard.
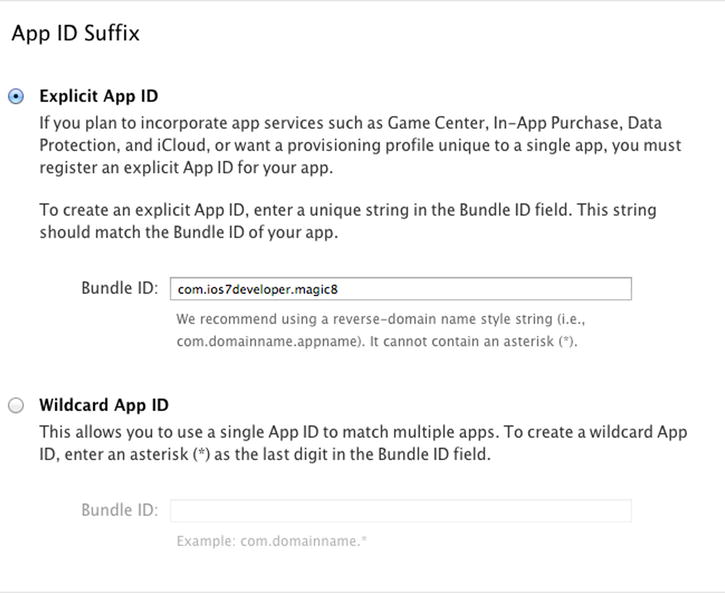
Figure 13-17. Setting the App ID suffix
As you’ve already used a reverse-domain-name approach to name your app, we’d recommend using an explicit App ID and using that name. In my case, the “Magic 8 Ball” app was called com.ios7developer.magic8, so we’d set that as the explicit App ID.
See Figure 13-17.
Next you’ll see App Services. By default you app is set to allow game center and in-app purchases. Depending on your app, you’ll use different settings. Pick what is appropriate for your app and click “Continue.” You can see these settings in Figure 13-18.
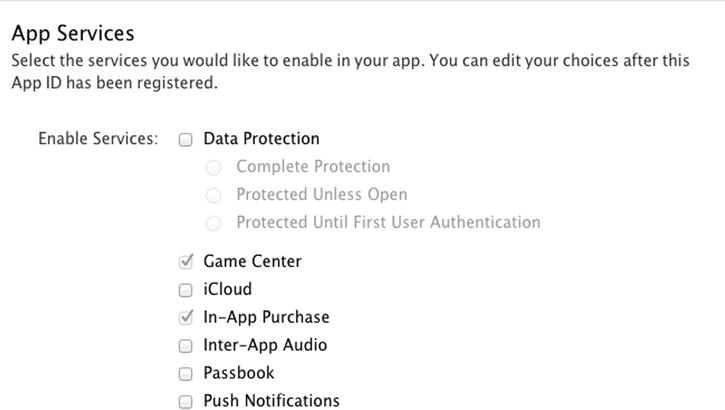
Figure 13-18. App Services
When you’re done, click the “Continue” button, and you’ll see a screen with your App ID details where you can confirm your App ID. You can see this in Figure 13-19.
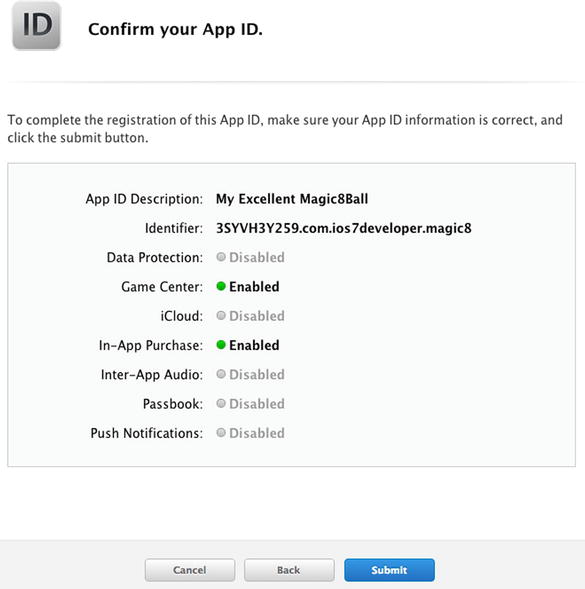
Figure 13-19. Confirming your App ID
If you’re happy with the settings, click “Submit” to continue. Your App ID will be created for you.
Now, if you return to the App Information screen, as in Figure 13-15, you’ll be able to specify this App ID as your bundle ID. If you don’t see it, just go back to the iTunes Connect portal and attempt to add a new app again.

When you’re done, click “Continue.” At this point, you’ll be taken to the availability date and pricing information for your app.

Set it the way that you want, including pricing and discounts, and click “Continue.”
You’ll then have to set various metadata for your app, including copyright and descriptions that will be used to set an app rating. See Figure 13-22.
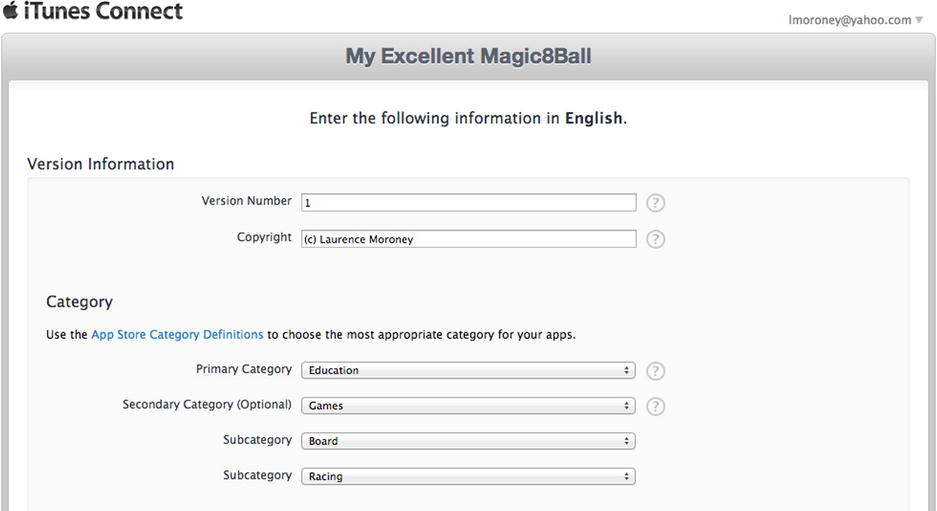
Figure 13-22. Setting your app metadata
Important For the “Version Number” setting, make sure you put exactly the same value as you put within the app settings in Xcode. So, if you used “1.0” in Xcode (see Figure 13-3), you should use “1.0” here. Or, if you have “1” here, then you should edit your Xcode settings to have a “1.”
For the “Category” section, you should pick what’s most appropriate for your app. Follow the guidelines given.
You’ll need to fill out the rest of the form with sensible data for your app, including metadata to describe it and contact information for you. The engineer who reviews the app may need to contact you. In one circumstance, we were asked to shoot a video of our app in action and send it to them. It’s good to put as many review notes in as possible, so that the reviewer has what they need to “pass” your app into the store.
Before finishing, you need a number of graphics.
First is the large app icon. This is a 1024x1024 image of at least 72 DPI (dots-per-inch). If you use Paintbrush, the default image created for you has this DPI, so you can easily create one.
Next are the 3.5-inch retina display screenshots. You can create these using the simulator. With your app running in the simulator, go to the File menu and select “Save Screen Shot.” The simulator will save a screen shot on your desktop called “IOS simulator screenshot” with the date of capture postfixed. You can save a few of these and upload them here.
Do the same for the 4-inch retina display screenshots and iPad screenshots. Just rerun your app in the simulator for those devices and take some screenshots.
Some apps can be restricted to only run within specific geographic locations. The “Routing App Coverage” file governs this. You can safely ignore that for now.
Click “Save” when you’re done. You’ll be returned to the iTunes Connect portal, and you’ll see that your app’s status is set to “Prepare for Upload.”
See Figure 13-23.
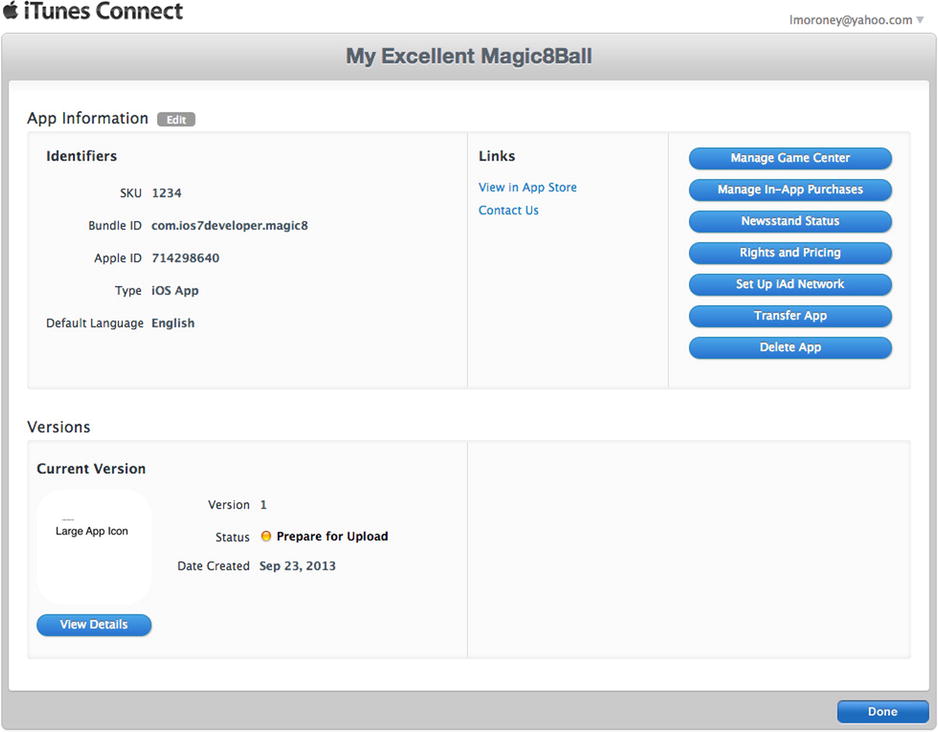
Figure 13-23. Your app has a “Prepare for Upload” status
Below your large app icon, you’ll see a button that reads “View Details.” Select this and you’ll be taken to the details screen for your app. See Figure 13-24.
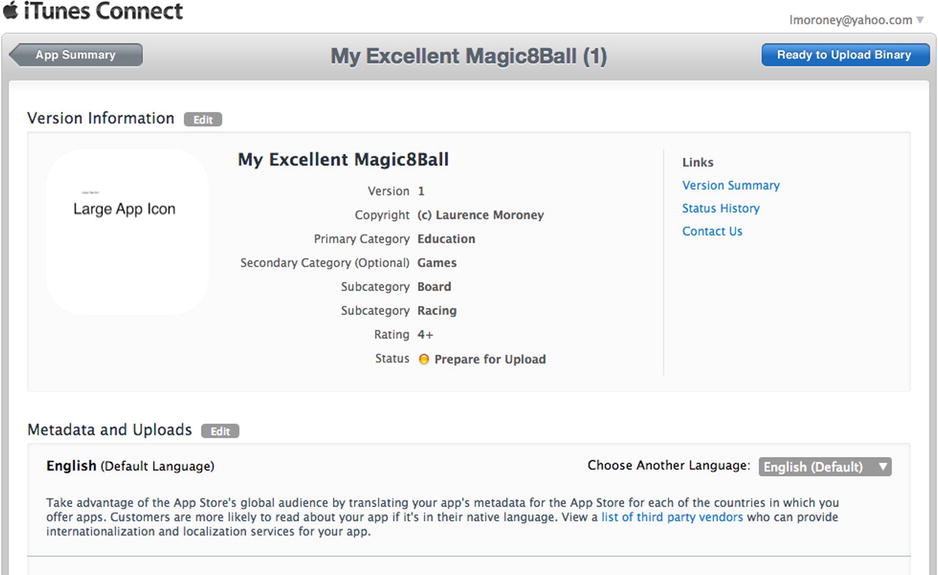
Figure 13-24. Getting your app ready for upload
On the top right-hand side, you can see a button that reads “Ready to Upload Binary.” Click this, and you’ll be asked some questions. First, you’ll be asked if your app is designed to use cryptography. If it is, say “yes.” In most cases it isn’t, in which case you’ll say “no.” For the magic 8-ball, no cryptography is used.
See Figure 13-25.
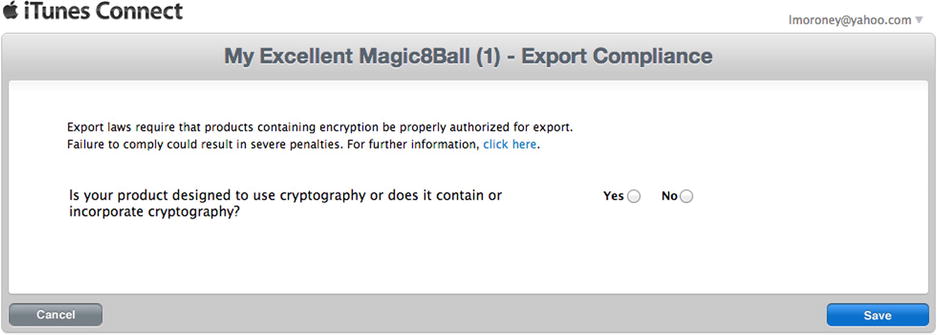
Figure 13-25. Export settings for your app
Once you’ve made your selection, click “Save.” You’ll see a message about uploading using “Application Loader.” As you are using Xcode 5, you’ll already have this. See Figure 13-26.
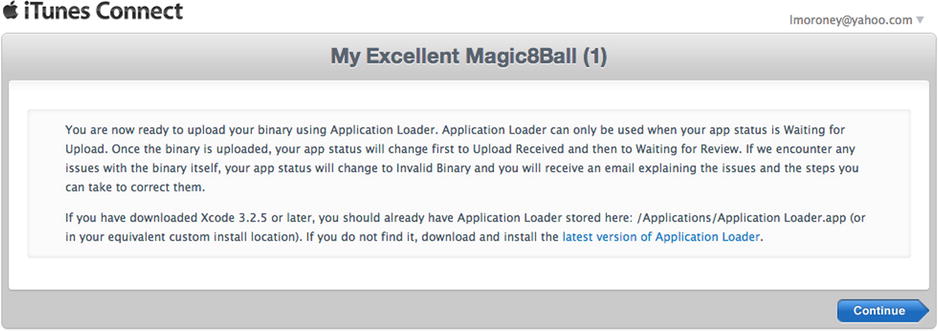
Figure 13-26. Getting ready to upload
Click “Continue,” and you’ll return to the details screen. You’ll see that the application is now in the “Waiting for Upload” state. See Figure 13-27.
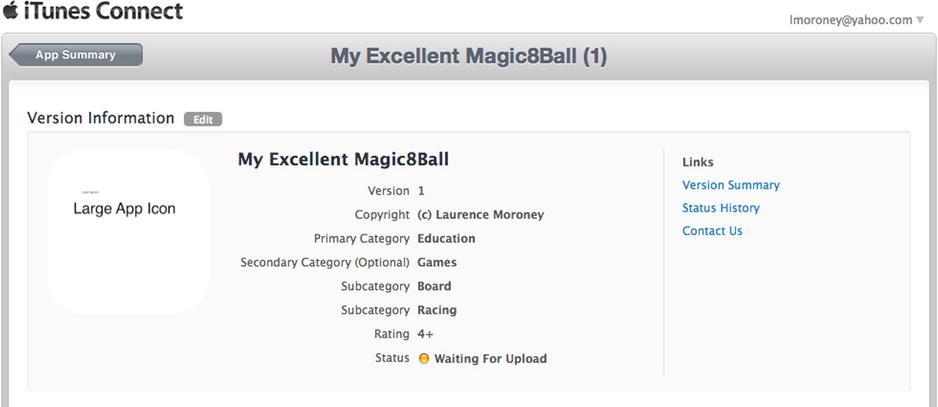
Figure 13-27. Your app is now waiting for upload
Now that the app store is waiting for you to upload, the next step will be to go back to Xcode and have it build, sign, and upload your app for store verification.
Building Your App for Store Distribution
Now that the app store is waiting for you to upload your app, the next and final step is to build your app, sign it for store delivery, and deploy it to the store.
To start, you’ll need a distribution certificate. With Xcode open, select “Preferences” on the File menu. From this, select the “Accounts” tab. See Figure 13-28.

Figure 13-28. The accounts settings
Select your name and a list of signing identities will pop up. Your development certificate that you created in Chapter 3 will be listed. Click the “+” button and you’ll see a list of potential certificates that you can add. Yours may be different, but you will see “iOS Distribution” as an option. See Figure 13-29.

Figure 13-29. Picking an iOS distribution certificate
A distribution certificate will be created for you and added to the list. You can see what it will look like in Figure 13-30.
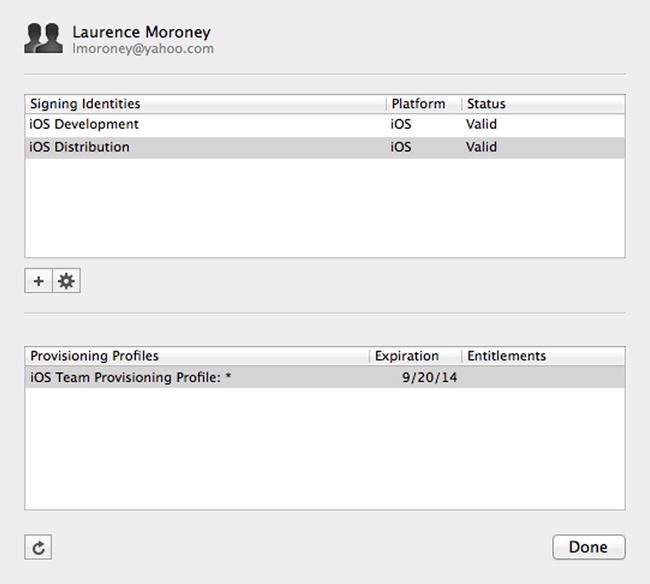
Figure 13-30. Creating a distribution certificate
Next you’ll need to create a store distribution profile. To do this, go back to the iOS dev center (https://developer.apple.com/devcenter/ios/index.action) online. On the right-hand side of the screen there’s a link to “Certificates, Identifiers & Profiles.” Select this and you’ll be taken to https://developer.apple.com/account/overview.action , from where you can select “Provisioning Profiles.”
You’ll be taken to the iOS Provisioning Profiles screen. See Figure 13-31.
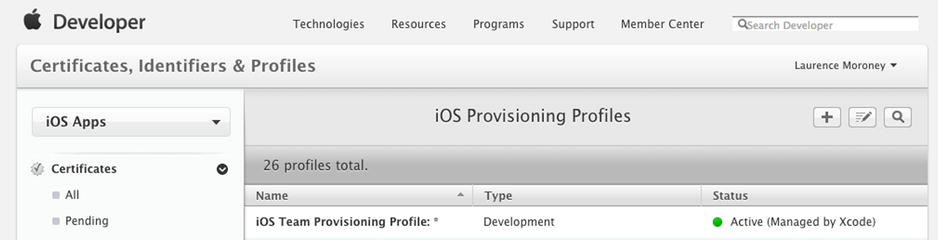
Figure 13-31. iOS Provisioning Profiles screen
At the top right-hand side of the screen, there’s a “+” button to allow you to add a new profile. You’ll be asked what type of provisioning profile you need. See Figure 13-32.
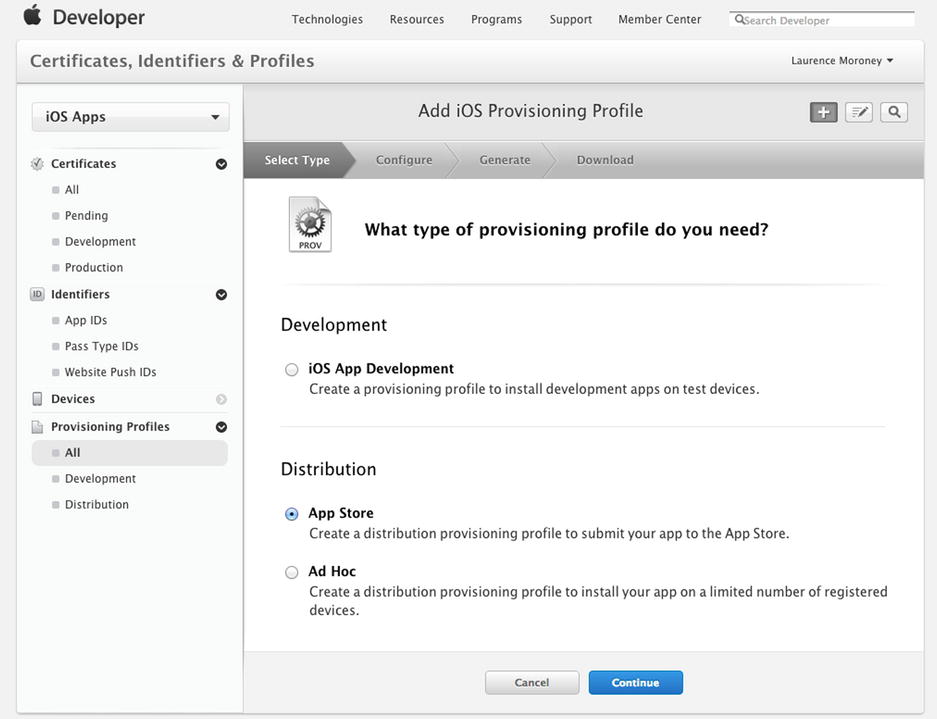
Figure 13-32. Setting the provisioning profile type
Select “App Store” as the distribution type and click “Continue.” You’ll be asked to select an App ID. Use the one that you created earlier. See Figure 13-33.
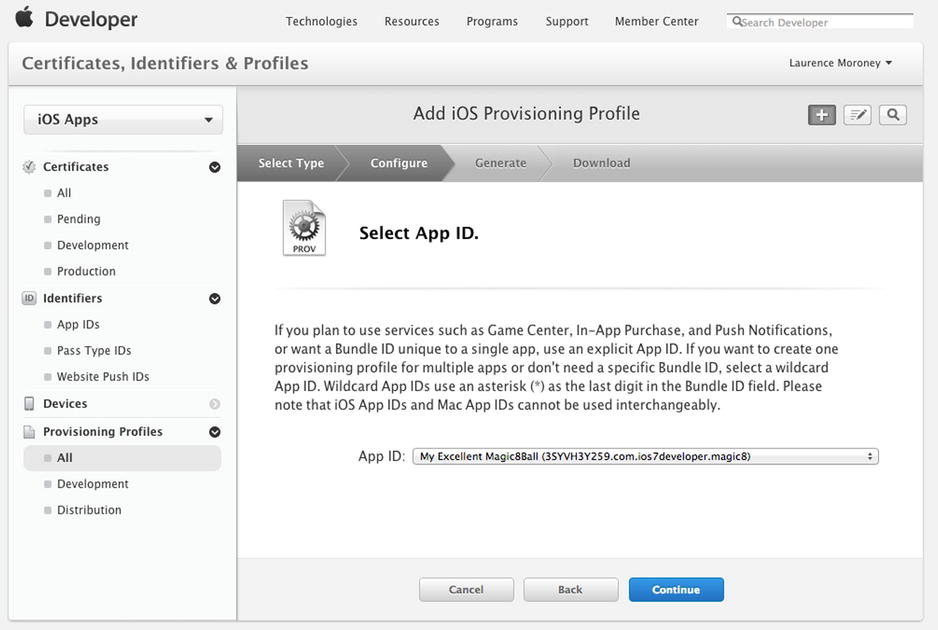
Figure 13-33. Selecting your App ID
You’ll be asked which certificate you want to include in the profile. The one you created earlier should be listed. See Figure 13-34.

Figure 13-34. Selecting your certificate
Select your certificate and click “Continue.” You’ll then be asked to name the profile and to generate it. See Figure 13-35.

Figure 13-35. Naming and generating a profile
Give it a name and click the “Generate” button. In this case, we used the name “8Ball.” The portal will work for a little while and then return with a screen telling you that your profile is ready, including a link to download and install it. See Figure 13-36.
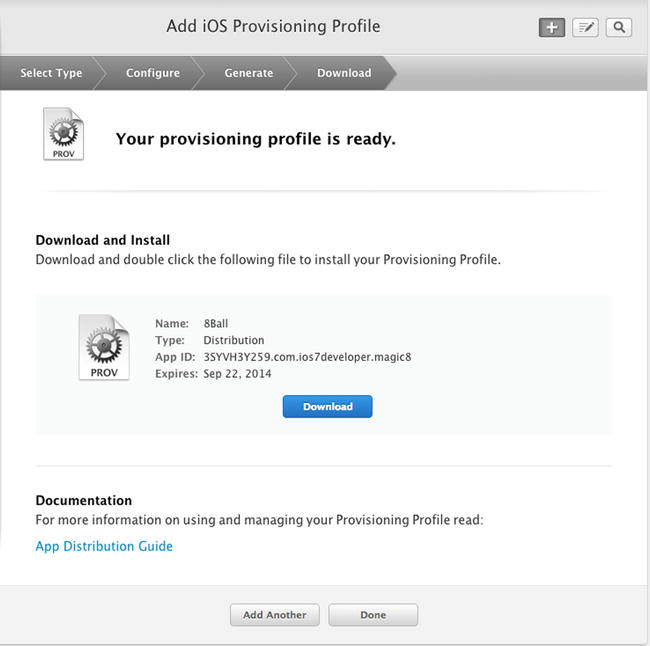
Figure 13-36. The provisioning profile is ready
Press the “Download” button, and your browser will download a file with the .mobileprovision extension; for example, if your name is “8Ball,” the file will be called “8Ball.mobileprovision.”
After it downloads double-click on it, and the provisioning profile will be opened by Xcode. You may not see anything happen, but it’s okay—the provisioning profile details are there.
Go back to Xcode, open your app, and ensure that it is selected to run on your device, as shown in Chapter 3. On the product menu, select “Archive,” and your app will be archived. You’ll be asked to sign the app with your certificate. Go ahead and do so. The archive will complete, and organizer will open with the “Archives” tab selected.
See Figure 13-37.
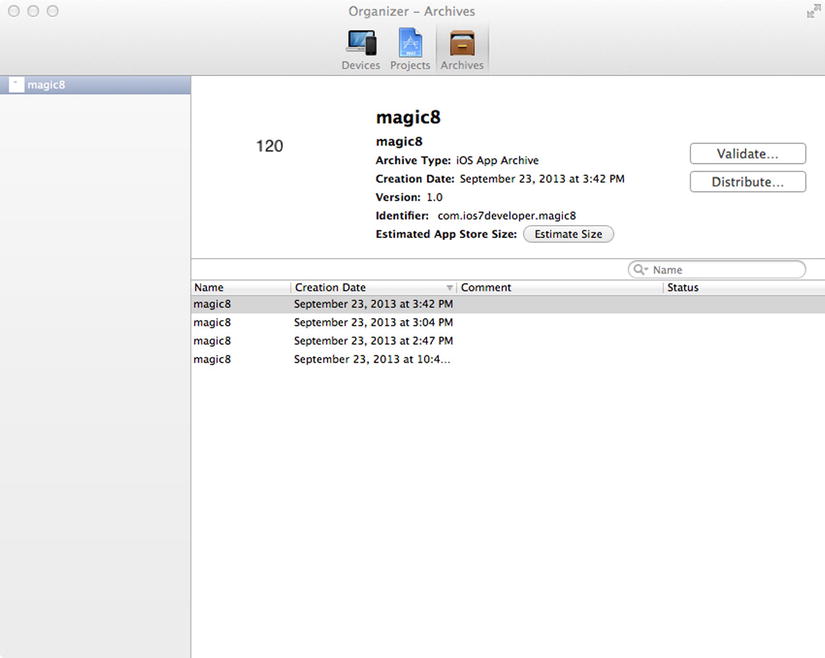
Figure 13-37. Archives in the organizer
Every time you archive, you’ll see an entry added to the list. In Figure 13-37, we have four of them listed. You’ll likely only have one at this point, and that’s fine. Select it and click the “Validate” button.
The app store requires your app to be fully validated before it can be submitted, so you do need to go through this process.
When you press the “Validate” button you’ll get a dialog asking you to log in to iTunes Connect. Use your developer credentials and click “Next.”
You should see the dialog from Figure 13-38, which shows you the provisioning profile. If you don’t see this, you’ll see a screen that gives you an option to import the profile. In that case, import the .mobileprovision that you created earlier.
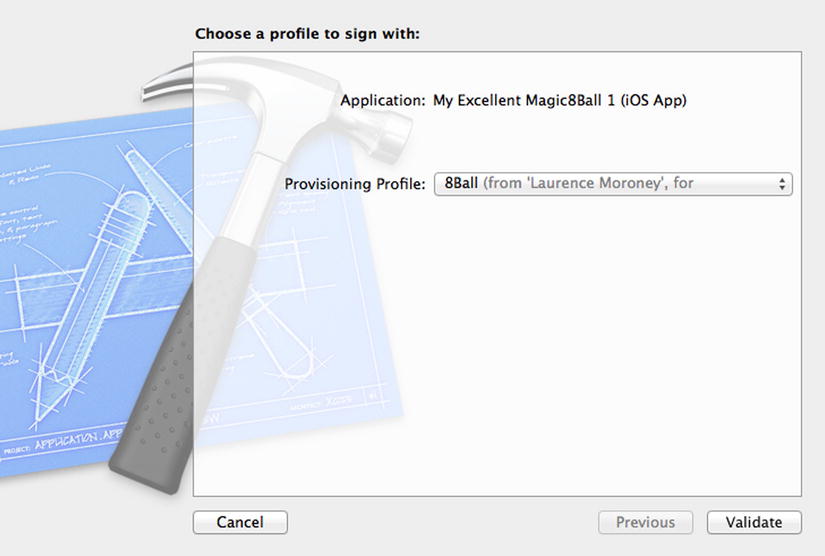
Figure 13-38. Choosing your profile
Click the “Validate” button and the process will begin. You’ll be asked to sign your app several times. If it validates successfully, you’ll see something like Figure 13-39.
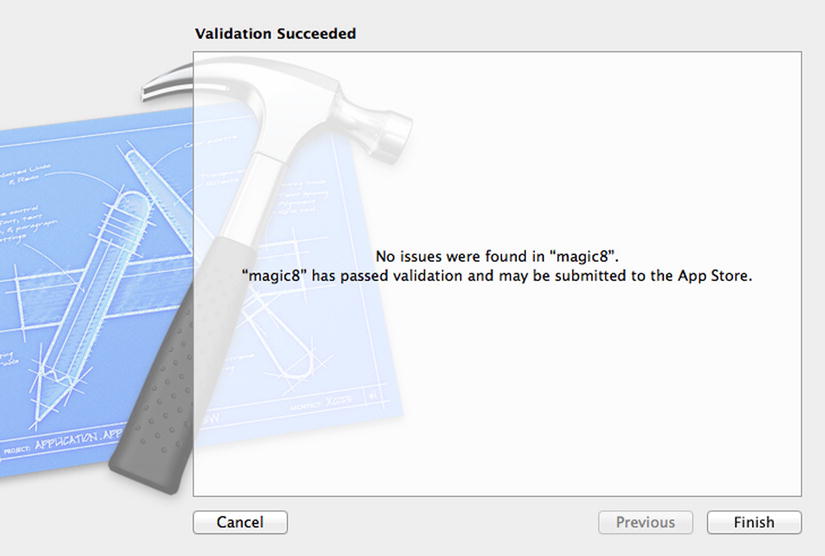
Figure 13-39. Validation has succeeded
There are some common errors you might encounter here, including a warning about version numbers not matching. If that is the case, you should ensure that your version setting in Xcode (see Figure 13-3) exactly matches your version setting on iTunes Connect. If this happens, change the setting, clean the project (select “Clean” on the “Product” menu), and try again.
Another error could be one saying that “The entitlements specified in your application’s code signing entitlements file do not match those specified in your provisioning profile,” or similar. If you see this, select your project in Xcode and select the project name as the target. Then, on the “Build Settings” tab, make sure that you have selected “iOS Distribution” in the “Code Signing Identity” section. See Figure 13-40.
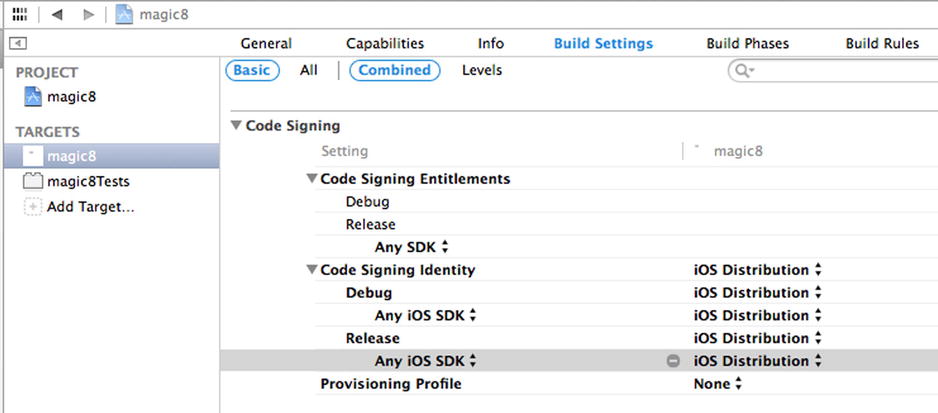
Figure 13-40. Ensuring your code signing identity is correct
Once you’ve passed validation, you can select “Distribute ...” on the organizer. You’ll be given the choice between submitting to the app store, saving for enterprise or ad hoc deployment, or exporting as an Xcode archive. See Figure 13-41.
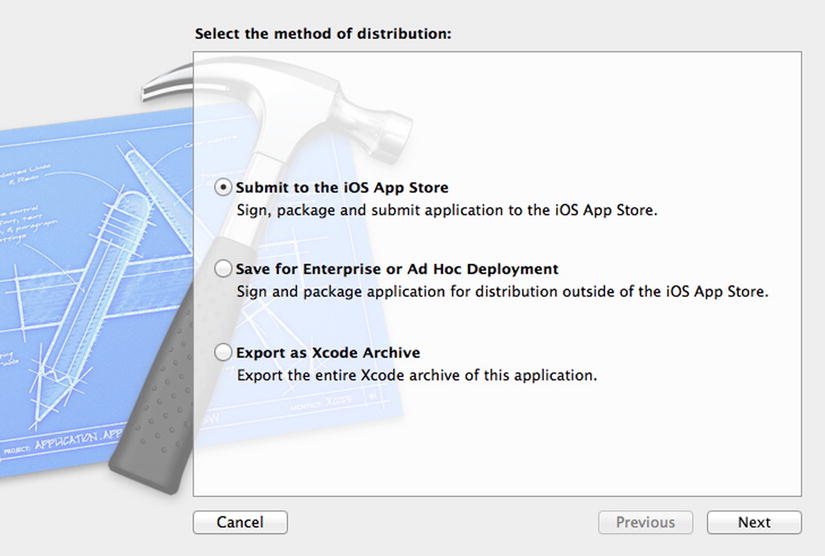
Figure 13-41. Selecting your distribution method
Select “Submit to the iOS App Store” and click “Next.” You’ll be asked to sign in to iTunes Connect. Use your developer ID and password. You’ll then be asked, as with validation, which profile to sign with. Use the provisioning profile that you created earlier and click the “Submit” button.
As you’ve already passed validation, the package will be created and then uploaded to the app store. When it’s done, and the submission succeeds, you’ll see something like Figure 13-42.

Figure 13-42. Submission to app store succeeds
Now it’s time to sit back and wait for the app store reviewer to give you feedback. Most apps get feedback within ten business days. Depending on issues found, you may go straight into the store; otherwise, they’ll give you feedback via the email address on your Apple ID. In that case, you’ll have to fix your app, rebuild it, and resubmit it.
Summary
Perhaps the hardest part of being an iOS developer is understanding all the concepts that you need to know in order to submit an app to the app store. This long chapter is a guided tour through the typical scenario. Don’t worry if you didn’t get it all the first time. As you deploy more apps, repetition will become the key in learning it all.
Congratulations on getting this far. You’re well on your way to being a professional iOS 7 developer!