Going Deeper: Patterns and Delegates
In the last few chapters, you’ve been looking at creating “Hello, World!”–style applications that perform basic tasks, using very simple controls—the button, the label, and the image view. These introduced you to some concepts of development, including actions and outlets. In this chapter, you’ll look into more of the concepts that are regularly used in iOS development and that you’ll use extensively in this book. They are the concepts of delegates, messages, and patterns.
It probably sounds very high level and confusing at the moment, and you may not grasp it all the first time through, but don’t worry—with practice it becomes easier. We’ll warn you that this might be the most difficult chapter of the book, particularly if you are new to programming. Don’t worry if you can’t get through it all. Skipping ahead is okay, but it would be good to come back here from time to time if you are stuck with some of these concepts in later chapters.
We’d also recommend, strongly, that you get very familiar with Chapter 2 and Chapter 4 in particular. In those chapters, you are taken step by step through everything needed to create the single view apps that you’ll be using in this chapter, as well as how to use the various tools in Xcode for designing your app. Some of the skills you’ll need in this chapter, such as placing and sizing controls, are covered in more detail there.
Don’t forget the videos accompanying this book, which are available at http://ios7developer.com/book. The videos will take you through these examples to help you better understand them.
Building an App for Text Input
The “Text Field” control could have several chapters all to itself, as there is so much to learn about it! In this section you’ll build it for a very simple scenario—one in which you can capture text input from the user with the iOS Keyboard, and then dismiss the keyboard when you are done. Despite its simplicity, this task is one that iOS developers commonly get tripped up on, so go through this example carefully and make sure you understand it before continuing.
Create and Design your App
To get started, create a new single view app called textFieldDemo. Make sure it’s an iPhone app. If you’re jumping into this chapter and aren’t sure of the steps, refer back to Chapter 2 to see how to create one of these apps.
When it’s done, open the Main. storyboard file in the editor. Your screen should look something like Figure 5-1.

Figure 5-1. The textFieldDemo project
Drag a button and a label to the design surface of your view and place them near the top. Change the button’s text to “Go” by double clicking the button and typing the new text, and then change the label’s text to “Output will go here” in the same way. Use Figure 5-2 as a guide for where you should place the controls and how you should size them.

Figure 5-2. Designing the text input app
Next, find the “Text Field” control in the assistant menu on the lower right-hand side of the screen. Take care, as there is a very similar control called “Text View.” Be sure to pick “Text Field,” or the following steps in this section may not work. You can see the “Text Field” option in Figure 5-3.

Figure 5-3. Finding the “Text Field” control
When you find it, drag it and drop it onto the design surface, fitting it above the label and to the left of the “Go” button, as in Figure 5-4.
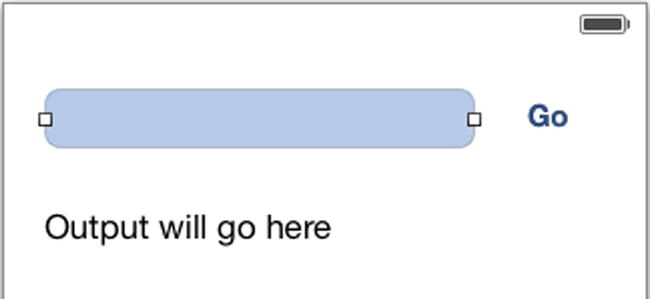
Figure 5-4. Designing your UI
Great! Now you’re ready to start wiring up your actions and outlets. Again, if this concept isn’t familiar to you, we strongly recommend you go back and take a look at the simple examples in Chapter 2 and Chapter 4 that introduced these.
Set Up Your Connections and Write Your Code
First, open the assistant and CTRL-drag the “Text Field” control onto the ViewController.h file, and create an outlet connection with the name txtInput.
You’ll see code like this placed in your .h file:
@property (strong, nonatomic) IBOutlet UITextField *txtInput;
Note that the control is called a UITextField. This is the name of the class that gives you the “Text Field” control. As you saw in Chapter 4, classes define how objects are built. The object type is a text field, but the class is the UITextField. As you do more programming, you’ll probably find yourself using this name instead of the control name.
Next, you should drag the label to the ViewController.h file, while pressing the “Control” key, and create an outlet connection with the name lblOutput.
Note This process is called “CTRL-Dragging,” so if you see that term in documentation, or in this book, just remember that it means holding down the “Control” key as you drag.
You’ll see code like this placed in your “.h” file.
@property (strong, nonatomic) IBOutlet UILabel *lblOutput;
Again, the “Label” control is declared using UILabel, the class within UIKit that gives you the label functionality.
The third and final UI step you’ll need to do is to create an action for the button. CTRL-drag the button to the header file and create an action connection by selecting “action” from the drop-down menu that appears. If you find this confusing, refer back to Chapter 2 and Chapter 4, in which you are taken through this process in a little more detail. Give the action the name btnGo, and you’ll see code like this in your .h file:
- (IBAction)btnGo:(id)sender;
In addition to this, you’ll see this code has been added to your “.m” file.
- (IBAction)btnGo:(id)sender {

}
As you saw in earlier chapters, any code that you write here will execute when the user presses the button.
Tip It’s important to note that when you create an outlet and give it a name, accessing that outlet requires you to prefix the name with an underscore. Thus, to access the lblOutput outlet in code, you use _lblOutlet.
Xcode helps you with writing your code. As you type, it tries to figure out what you’re typing and gives you hints about what you might want to do next. So, for example, if you go to the btnGo function in ViewController.m and start typing with an underscore (_) character, and then the letter “l” (lowercase “L”), a menu will pop up with everything your code can understand that starts with _l and guess that you want _lblOutput because that’s an outlet that you created. See Figure 5-5.

Figure 5-5. Xcode’s autocompletion helpers
Because the _lblOutput is selected, pressing the “tab” key will take you to the next chunk within your word. In code, words are divided by capital letters; for example, look at _lastKnownInterfaceOrientation , as shown in Figure 5-5. Pressing tab while _lblOutlet was selected will fill out the current word, and give you the same effect as if you typed _lbl. Once you do this, there’s only one option left on the list. See Figure 5-6.

Figure 5-6. Autocomplete highlights the _lblOutput when you press “tab” key
Consider how this would look if you had several labels, and you named them consistently with something like “lbl” in front of the name—the “tab” functionality would very quickly give you a list of the available objects that you might want to code against.
Select the object you want to insert in the code and press “tab” again; the object name will be filled in for you.
But auto completion doesn’t end there. This code is going to set the text property of the label, which can be accessed using the “dot” syntax. This syntax allows a property of an object to be addressed by selecting it with a dot, as in object.property. As a result, the text property of _lblOutput is _lblOutput.text.
Press the “.” key, and Xcode will give you a list of available properties. You can see this in Figure 5-7.

Figure 5-7. Properties auto completion and hints
You can see that the list is sorted alphabetically. A nice hint is the “M” to the left, indicating methods, and also a “P” for properties. Now press the “T” key, as the text property you want to set begins with that. The list will be filtered down to stuff that begins with “T,” and Xcode will make a guess about what you want, as “text” is the most common property used that begins with “T.” See Figure 5-8.
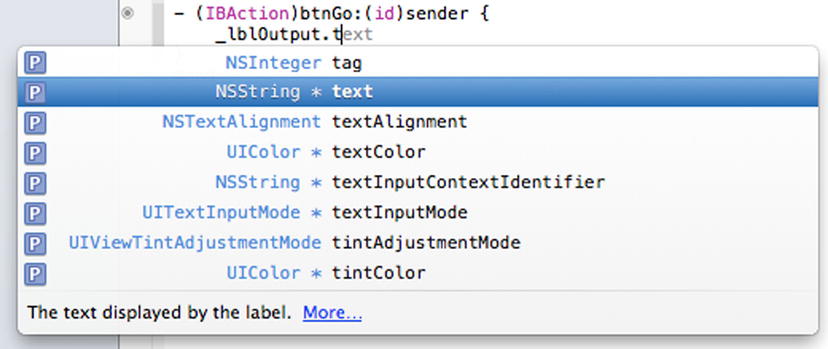
Figure 5-8. Using the properties editor to pick text
This is also a really useful way to learn the properties that are available. As you can see, the type of data is also listed; for example, “text” is an NSString type.
Press “tab” again, and the text property will be added.
Continue typing and using the popups until your code looks like this:
- (IBAction)btnGo:(id)sender {
    _lblOutput.text = _txtInput.text;
}
This code sets the content of the label to be whatever is typed into the text field once the user presses the button. Run it and give it a try. You can see it running in Figure 5-9.

Figure 5-9. Running your app
As soon as you select text field, the keyboard will appear on the simulator. The behavior is the same on a physical device. If you’re running the simulator, you don’t need to click on the keys—you can just type on your Mac keyboard and it will be mapped for you. Enter some text and press the button, and you’ll see the output.
Going Deeper into Text Field Behavior
The application you just built runs well, and you get the expected result. But there are two problems.
- You would expect that pressing the “Return” key on the keyboard would give the same behavior. Right now it does nothing.
- You can’t dismiss the keyboard. Once it’s there, it’s there. iOS apps usually dismiss the keyboard when you’re done with it. Clicking the “Go” button or pressing “Return” should give you your iOS display back!
So let’s look at solving these issues.
This action, while seemingly simple, uncovers some of the programming practices that, to a beginner, are very mysterious. Hopefully, by working through the example it will become a little easier to understand. In order to use the “Return” key, you will be introduced to a new concept in development called delegates.
Tip In real life, when you delegate work to somebody else, you are asking them to do something for you. You usually do this in a scenario where it makes sense to do so. Maybe they are more skilled at doing it, maybe you are too busy, or maybe it’s just the right thing for the other person to do the work. In programming, it’s very similar. An object can delegate work to another object, and this is usually done when it makes sense for the one receiving the work to do it.
Setting Up the Delegate
Consider an instance where your view (with its code in ViewController.h and ViewController.m, in this case) might have a lot of text field controls on it. It makes sense for there to be one location with the logic for managing the keyboard, such as making it appear and disappear. In this case, if each text field delegates control to the view, you can have the view manage the keyboard.
For that to happen, as a programmer you need to do two things.
- Tell the view that it’s going to get work delegated to it from text fields.
- Tell each text field that the view will be the delegate for their work.
To tell the view that it’s going to get work delegated to it from text fields, you edit your interface declaration in your ViewController.h file. Right now it looks like this:
@interface ViewController : UIViewController
To tell it that it’s a delegate for something, you append <> to this and list the things that will be delegated to it. In the case of a UITextField, the delegate is simply called UITextFieldDelegate . So, in order to meet the first criterion, telling the view that it’s getting delegated to, you would use code like this in ViewController.h:
@interface ViewController : UIViewController<UITextFieldDelegate>
Next, the text field has to be told who the work is being delegated to. For this you can use the self keyword. At first it’s a little confusing when you read code like this:
_txtInput.delegate = self;
It looks like we’re telling the code that its delegate is itself. But self refers to the class in which the code is being run, so if we add this code to ViewController.m, we’re actually saying that the delegate is ViewController.m. This is the right place for it to be, because we said in ViewController.h that this class will be the delegated class for UITextField.
The best place to put this code is in the viewDidLoad function . This function is called when the class is loaded and ready to go. If you look at your ViewController.m file, it’s already created for you, and looks something like this:
- (void)viewDidLoad
{
    [super viewDidLoad];
    // Do any additional setup after loading the view, typically from a nib.
}
The template already provided a hint—additional setup after loading the view. This is perfect for our needs, so we can edit the code to look like this:
- (void)viewDidLoad
{
    [super viewDidLoad];
    // Do any additional setup after loading the view, typically from a nib.
    _txtInput.delegate = self;
}
Your ViewController.m is now capable of taking text field delegates, and is configured to be the delegate for txtInput.
Writing the Delegate Function
Now that the view is a delegate, there are functions available that the view will call when text field events happen. Go right to the bottom of your ViewController.m file, and just above @end, start typing the characters “-te,” where “t” and “e” are the first letters in the word “text,” and “-” indicates that this is a function.
You’ll get a popup that looks something like Figure 5-10.
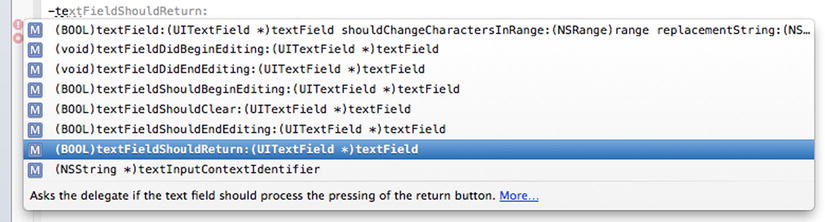
Figure 5-10. The popup for text field delegation
This lists everything that you could do as a delegate of functions from the text field. Also, helpfully, the most common one is highlighted, and this is textFieldShouldReturn. Not coincidentally, this is the one that you want!
So press “tab” a few times until the function is created.
Your screen will look something like Figure 5-11 when you’re done.

Figure 5-11. Inserting the delegate function
There seems to be a problem. This is code that Xcode generated for you, so it can’t be wrong, you might think. Thankfully, it isn’t—it’s just incomplete. But Xcode is still helpful here. Click the little exclamation mark, and the line will be highlighted and will display text telling you the problem. See Figure 5-12.

Figure 5-12. Xcode tells you what’s wrong
It says it expects a method body. Of course! You haven’t written any code yet, and your code always lives within braces—the “{“ and “}” characters. So add them and see what happens. Go to the empty line below—(BOOL)—and type the “{” character. You’ll see Xcode automatically adds the “}” for you that complements this.
But there’s still a red exclamation mark. Click it to see what the problem is now. You can see this in Figure 5-13.

Figure 5-13. Another problem is highlighted by Xcode
This text might be a little cryptic at first. Control reaches end of non-void function. In Chapter 4 we discussed functions and methods and how they are constructed. At the beginning of the function declaration there’s a variable type within graphics. In the case of textFieldShouldReturn, we can see that this is BOOL.
This specifies the return type, i.e., this function will always return a BOOL. When the function doesn’t return anything, it’s called a void function. Now, when we look at the text Control reaches end of non-void function, we can parse this as really saying This function is supposed to return something, in this case a BOOL, but it’s not returning anything.
A BOOL, as we saw earlier, has two values—true and false. So let’s make the function return true.
See Figure 5-14, where the code has been added, and the error has gone away.

Figure 5-14. Setting the return value for the function
Objective-C adds constants YES and NO that equate to true and false, respectively. You’ll often see these used in code, so don’t worry—it’s not something different, it’s just Objective-C trying to give you code that’s more readable. So, this code will do exactly the same as that in Figure 5-14:
-(BOOL)textFieldShouldReturn:(UITextField *)textField
{
    return YES;
}
@end
The error might be gone, but the function still needs to be filled out. Use the same code that you did earlier, and when you’re done the textFieldShouldReturn function should look like this:
-(BOOL)textFieldShouldReturn:(UITextField *)textField
{
    _lblOutput.text = _txtInput.text;
    return YES;
}
Run your application, and you should see that when you type in the text field and press “Return” on the virtual keyboard, the label gets updated, but the keyboard isn’t dismissed. We’ll discuss that later in this chapter.
Expanding on Delegates
Before going on to showing you how to do that, there’s an important concept you should explore first. Note that when you created the delegate function, the signature of the function referred to the text field like this:
-(BOOL)textFieldShouldReturn:(UITextField *)textField
This isn’t our _txtInput field. It also prefixed that with (UITextField *), which is funny-looking syntax. The “*” indicates that this is a pointer. So the value being passed into the function, according to this syntax, is a pointer to a UITextField, and not an actual UITextField. This is good, because we don’t have a UITextField called textField; ours is called _txtInput.
Pointers are interesting and difficult concepts to grasp, but with a little practice you’ll get it. Try and think of this function definition as follows: I’m working on a UITextField, and it’s the one that I’m pointing at. I’m not sure what it’s called, so I’ll just call it textField.
In the previous section, we ignored this, as we knew the name of the text field that we were using. It was called _txtInput, so our code just looked like this:
-(BOOL)textFieldShouldReturn:(UITextField *)textField
{
    _lblOutput.text = _txtInput.text;
    return YES;
}
This worked fine, but what if there are lots of text fields on our view? The point of delegates becomes apparent in a situation where we have lots of text fields. Instead of having a piece of code for each one, and probably repeating a lot of code, it’s great to have one place to do it all. When you use a delegate, the place to do so is in the view controller.
So we can change our code to this:
-(BOOL)textFieldShouldReturn:(UITextField *)textField
{
    _lblOutput.text = textField.text;
    return YES;
}
And it will still work! Now when _txtInput delegates action to the view controller, the pointer, called textField, is pointing at _txtInput. Within the function, if you say textField.text, you’re telling Objective-C that you want to get the text from the control that you’re pointing at.
So now if you were to add several more text fields to your storyboard, and if you were to create outlets for them, and then if you were set their delegates to self in the view controller, no matter which field you type in, and then press “Return,” the _lblOutput would be set to whatever text you typed into the field. We’ll explore how to fix that in the “Changing the App to Have More Controls” section later in this chapter.
There’s still a small problem—the keyboard doesn’t go away when you press the “Return” key. In Objective-C, when the operating system provides something for you, such as the keyboard for typing in text fields, the object that gets it is called the First Responder. If you don’t want that object to be the first responder any more, you can simply resign the status, and the operating system will know to go away.
So, in the case of the text field becoming first responder, our textFieldShouldReturn has a handy pointer to the text field. So we can say “you know the text field that you’re pointing to—resign first responder status on it” using code like this:
-(BOOL)textFieldShouldReturn:(UITextField *)textField
{
    _lblOutput.text = textField.text;
    [textField resignFirstResponder];
    return YES;
}
Now whenever you run your app, you’ll see that pressing the “Return” key will not only set the text of the output label, it’ll also make the keyboard go away.
The syntax used here, of square brackets and a space between the object and the command, is a new one. This is what Objective-C calls a message. It’s very similar to a method, and it’s probably the most confusing thing about programming with this language. Sometimes you use a method with the dot syntax (e.g., object.foo), and sometimes it’s the message syntax (e.g., [object foo]).
Picking the right syntax for the right scenario just comes with practice. If you’re using objects and classes that are already built for you, then you’ll just have to go with however they’re implemented and use that, be it a message or a method.
But there’s still a problem. We can resign first responder status in the textFieldShouldReturn function, but what happens when the user presses the “Go” button? As our view only has one field on it, called _txtInput, we could write code like this:
- (IBAction)btnGo:(id)sender {
    _lblOutput.text = _txtInput.text;
    [_txtInput resignFirstResponder];
}
And it would work. But again, think of the scenario in which there are several text fields. What would happen then? Only the _txtInput would have resigned first responder status. If the text is in a different field, the keyboard wouldn’t go away when we press the Go button. In this case we don’t have the handy pointer passed in, so we’d be stuck.
One solution to this would be to cheat a little bit. We know that we can refer to ViewController.m using the word self, and Objective-C will allow you to call functions on it, including resigning first responder status. The iOS operating system is smart enough to understand that if you resign first responder on the view, then any of the objects within that view that have first responder status will lose it.
It’s analogous to a room full of people, where one of them is the first responder. If you tell the room to no longer be the first responder, then the person within the room that has that status will resign it.
So you can change your code to this, and it will work for any text field that might be on our view.
- (IBAction)btnGo:(id)sender {

    _lblOutput.text = _txtInput.text;
    [self resignFirstResponder];
}
This works, but there’s one more minor issue, which we’ll explore in the next section, and which will be highlighted when we add more “Text Field” controls.
Changing the App to Have More Controls
In the previous sections you had an app with a single text field, a single label, and a single button. Let’s now add a few more text fields.
Open Main.storyboard and drag the label with the text “Output Goes Here” about halfway down the design surface. The arrow to the left will give you a rough idea of where it should go. See Figure 5-15.
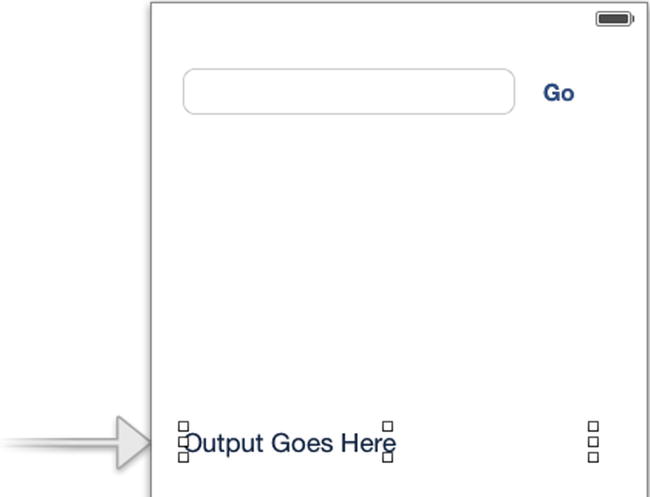
Figure 5-15. Changing the position of the label
Now drag three new “Text Field” controls onto the surface and make them the same width as the original text field. Space them out evenly so your screen looks like Figure 5-16.

Figure 5-16. Adding more “Text Field” controls to your storyboard
Now open the assistant, making sure that it’s displaying ViewController.h, and CTRL-drag these “Text Field” controls onto it, creating outlets and calling them, from top to bottom, txtInput2, txtInput3, and txtInput4, respectively. Figure 5-17 shows my screen when I’m dragging the last of the controls onto it.
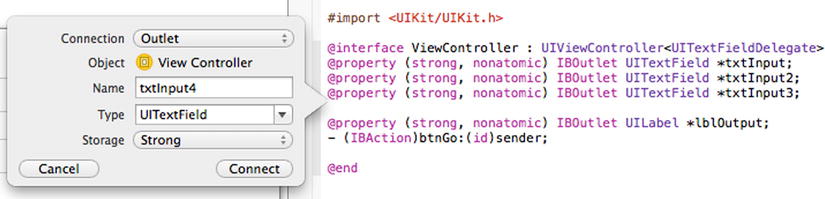
Figure 5-17. Creating the outlets for the new “Text Field” controls
When you’re done, your ViewController.h file should look like this:
#import <UIKit/UIKit.h>

@interface ViewController : UIViewController<UITextFieldDelegate>
@property (strong, nonatomic) IBOutlet UITextField *txtInput;
@property (strong, nonatomic) IBOutlet UITextField *txtInput2;
@property (strong, nonatomic) IBOutlet UITextField *txtInput3;
@property (strong, nonatomic) IBOutlet UITextField *txtInput4;

@property (strong, nonatomic) IBOutlet UILabel *lblOutput;
- (IBAction)btnGo:(id)sender;

@end
Remember earlier when you were learning about delegates, the first step was to tell the View Controller that it would be the delegate, and the second was to tell each text field that it would use the View Controller to delegate stuff to? To do this we went to the ViewController.m file and added code to the viewDidLoad function for txtInput. We’ll need to do the same for the new outlets too.
Here’s the code:
- (void)viewDidLoad
{
    [super viewDidLoad];
       // Do any additional setup after loading the view, typically from a nib.
    _txtInput.delegate = self;
    _txtInput2.delegate = self;
    _txtInput3.delegate = self;
    _txtInput4.delegate = self;
}
Now the whole pointer business in the textFieldShouldReturn function should make more sense. Regardless of which of the text fields is in use when the “Return” key is pressed, the pointer will point to it, and when we do something with the pointer, like reading its text or resigning its first responder, the action will happen on the appropriate text field.
Run the app and give it a try. As soon as you put the cursor into a text field the keyboard will appear, and depending on where you put the label, it might even obscure it. See Figure 5-18.
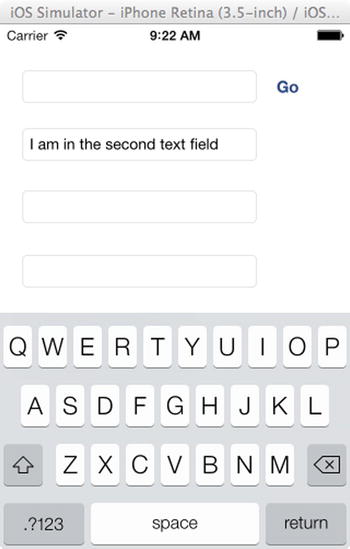
Figure 5-18. Running the app
Pressing the “Return” key will load the text into the label and dismiss the keyboard. This shows how using delegates can be a really nice way to avoid writing a lot of code to do the same thing over and over. While the concept of delegates might seem a little abstract, particularly if you’re just beginning programming, consider what you would have had to do in this scenario without delegates. Each text field would have to have an action created for it, and each action function would have to set the text of the label and resign first responder status. Your code would get big and complex very quickly.
Note Programmers often use a concept called DRY, which stands for Don’t Repeat Yourself, when writing code. It’s a great idea to get into this habit, because if you write the same code more than once, and you have a bug in the code that you need to fix, you need to fix it more than once.
But wait, you might ask—what about the button? The code for the button will only read the original text field and set the label from that. What should we do about it? There are two options: first, we can try to figure out which of the text fields we recently typed our text into and set the output label for that, or second, we can just get rid of the button.
It might seem flippant to remove the button, but when we consider the needs of this app, we realize that we don’t really need a button to set the text when the “Return” key on the keyboard does that for us now. When building mobile solutions, particularly phone ones, it’s probably best to use as little screen real estate as possible, and to avoid unnecessary controls. So, for this example, we think it’s better just to get rid of the button.
Doing this is easy. On the design surface we can just delete it and then resize the text fields to use the newly available width. See Figure 5-19.

Figure 5-19. Redesigning the app to not have a button
Next, since the button is gone, you don’t need the action any more. When you CTRL-dragged the button to the header file earlier in this chapter, this code was added to ViewController.h:
- (IBAction)btnGo:(id)sender;
You can safely delete it.
Next, you can get rid of the btnGo function from ViewController.m. It looked like this:
- (IBAction)btnGo:(id)sender {

    // [self changeText:_txtInput];

    _lblOutput.text = _txtInput.text;
    [self resignFirstResponder];
}
Go ahead and delete the first line. Run your app, and you’ll see that it’s more user friendly, as you have more screen real estate for your text, and the keyboard handles the actions for you, as it should. See Figure 5-20.
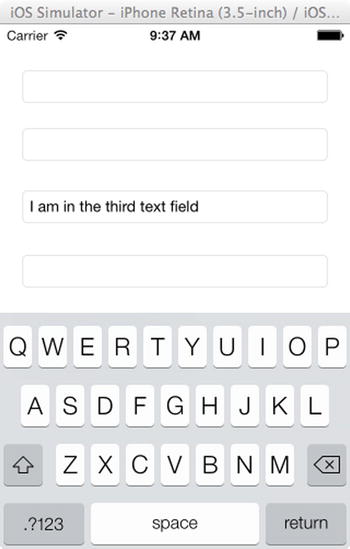
Figure 5-20. The newly redesigned app
If you’ve made it this far, congratulations! This is a very simple app, but it demonstrates some of the sophisticated programming patterns, such as delegates and DRY, that you’ll need in your toolbox to be a successful developer.
Summary
In this chapter you learned how to use a text field and how it manages keyboard input. You used this to delve into the concept of delegates, where one object can delegate responsibility to another. You explored an app in which you have multiple text fields. You used delegates to allow the code to handle keyboard input so that these text fields could be managed in a single location. It was a simple scenario and a simple app, but you were able to use it to uncover these complex concepts, and you’ll use these concepts extensively in iOS development. Before going further into iOS7 development and learning new controls, APIs, and other good stuff, there’s one more thing that you should look at, and that’s debugging your application. You’ll learn about Xcode’s tools for this in Chapter 6.