Your Second iOS App
Now that you’ve gotten your feet wet from programming your first two iPhone and iPad apps and running them not only on the simulator, but also on real hardware, the next step is to build some more apps that are a little more sophisticated.
The third “Hello, World!” app introduces you to some more user interaction, as well as if-else statements in code. Objective-C is a sophisticated and complex language, so we are going to take you through this little by little without throwing too many complex concepts at you.
Creating the Project and Adding a Graphic
In Chapter 2, you wrote helloWorld_01 as an iPhone app and helloWorld_02 as an iPad app. These were single view apps that housed a button, and when the user pressed the button, a label changed to say “Hello, World!” In this section we’ll expand on that by building a single view application that asks you if you are a geek and gives different responses as you touch it.
To get started, launch Xcode and create a new project. On the “Choose a template for your new project” screen, choose the “Single View Application” template, as shown in Figure 4-1.
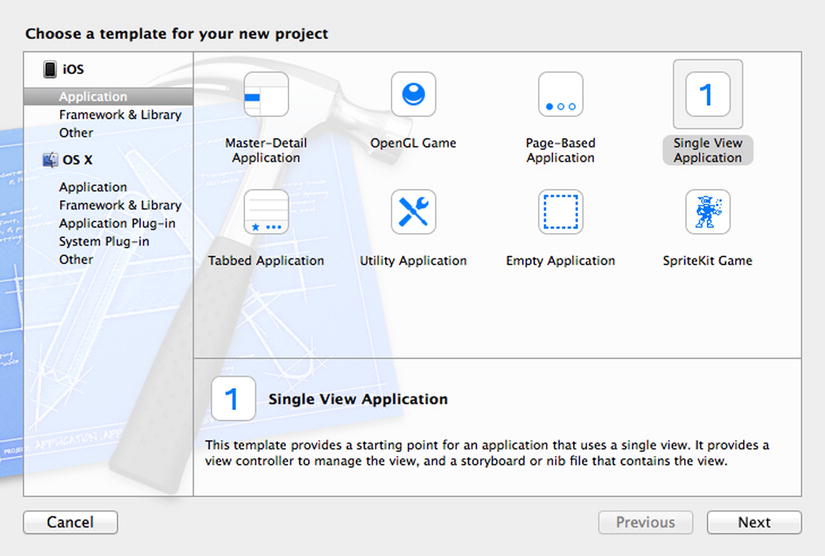
Figure 4-1. Starting your new project
As before, you’ll see the options dialog when you click “Next.” This will allow you to specify the Product Name, Organization Name, and Company Identifier. Set them up as in Figure 4-2, and make sure that the product name is helloWorld_03 and that the “Devices” setting is set to “iPhone.”
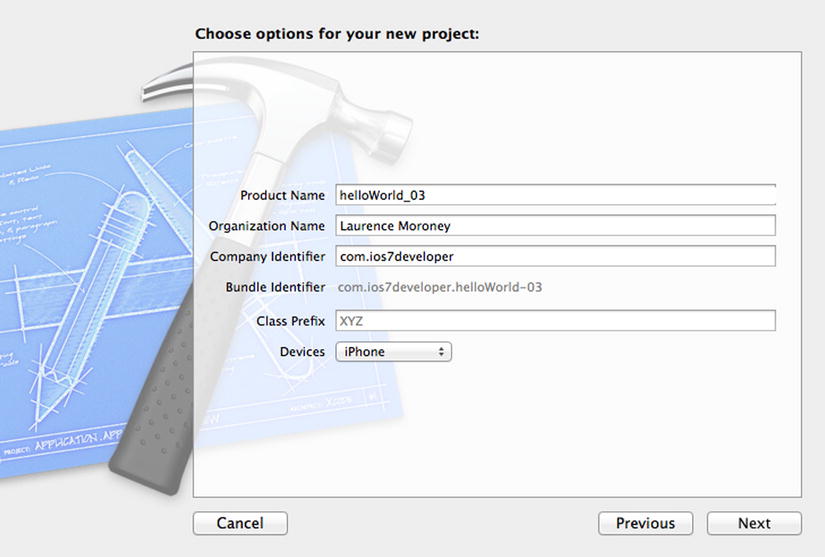
Figure 4-2. Your project settings
Click “Next” to be taken to the screen where you’ll save your code, which defaults to your desktop. If you want to leave it there, that’s fine. Just click “Next,” and Xcode will create your project, store it where you specified, and open it for you.
For the next step you’ll need a 320x480 image, preferably some type of portrait, in PNG format. If you don’t have one, or don’t have time to create one, I’ve created a couple of sample images that you can download and use.
If you prefer your image to be of a female, you can use the one stored at http://ios7developer.com/book/geek1.png. If you’d rather it were a male, you can use the one stored at http://ios7developer.com/book/geek2.png. For the rest of this chapter, I’ll be using geek1.png.
Make sure you save the image on your desktop. Using Safari or Chrome, you can do this by visiting your choice of the preceding URLs and right clicking on the image. You’ll see an option that says “Save Image As . . .”; you can click this to save the image to your desktop.
In Xcode, on the left-hand side of your screen, you can see all your project files. On this list, you’ll see a directory called “Supporting Files.” If you can’t see it, open the helloWorld_03 folder by clicking the little arrow beside it. See Figure 4-3.

Figure 4-3. Finding your supporting files folder
You can now drag from your desktop directly to Xcode, dropping your preferred image into the “Supporting Files” folder. If Xcode is taking up the entire screen, just move it until you can see the file and simply drag and drop the file. Of course, if it is in fullscreen mode, change it so that you can see the desktop too.
You’ll see a dialog that says “Choose options for adding these files” (Figure 4-4); make sure that you check the box that says “Copy items into destination group’s folder (if needed),” as shown.

Figure 4-4. Copy options for your image file
It’s very important to check that box for iOS applications. The reason for this is that when your app runs, it will need to read the image file. If the checkbox isn’t set, then running the app in the emulator will appear to work correctly, because the emulator is on your machine, and the image is on your desktop. The emulator can then read the file, and everything will look fine. As soon as you try to run the app somewhere else, such as on a device or someone else’s machine, it’ll fail, because they don’t have access to your desktop, where the image resides.
By checking the box, you’ve made a copy of the image in your source code, so that when the app compiles, it will take the image with it, embedded right within the app. Thus, if you distribute the app or the code, you’ll also distribute the image, and the app will work correctly.
Once you’ve copied the image over, you should see it in your “Supporting Files” folder. See Figure 4-5. If you can’t see it there, drag and drop again, but also see if you can find where you put it originally so that you can delete it from the wrong location.
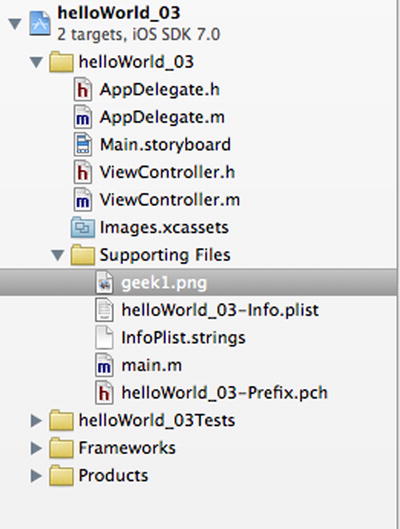
Figure 4-5. Adding the graphic to your “Supporting Files” folder
Creating the User Interface
Now that your app is created, it’s time to start designing the user interface. You’ll see a file called Main.storyboard in your project. Select it, and the storyboard editor will open. You’ll likely just see a blank screen with a menu to its left that reads “View Controller Scene.” Click the arrow beside it to open it, and you’ll see several items. One of these is “View Controller.” Click the arrow beside it, and you’ll see “View.” Select that to begin editing. Your screen should look like Figure 4-6.

Figure 4-6. Editing your storyboard
Note If you don’t see the full view controller, and instead the center area of your screen is all gray, click the “Zoom Out” button at the bottom of the screen. It looks like a magnifying glass with a “-” in its center.
Next, take a look at the Utilities pane to the right of the screen and make sure the controls list is visible. The small blue cube icon should be selected—you can see it in Figure 4-6. Scroll down the list until you see the “Image View” control. See Figure 4-7.

Figure 4-7. Selecting the image view
Drag and drop this to the “View Controller” gray area in the center of the designer. If you have trouble, you can also drag it directly to the “View” entry on the “View Controller Scene” list to the left of the window. See Figure 4-8, where the image view is added to the view, and where it is visible on the storyboard.
Tip You may notice when you try to drag the image view to the design surface that Xcode won’t let you, and the control bounces back. If this is the case, click the “View Controller” button beneath the image. You’ll see three colored buttons. Select the yellow one on the left, and the problem should go away.
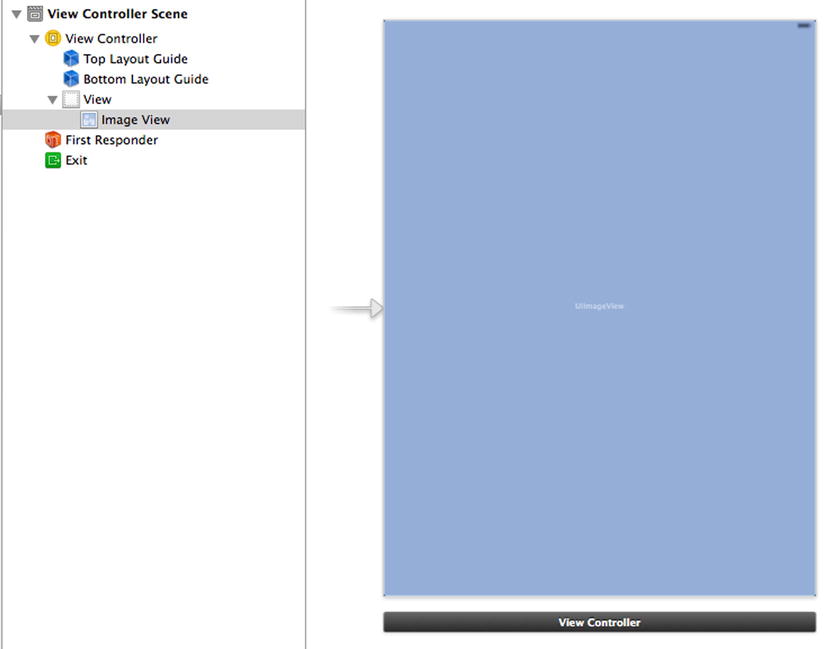
Figure 4-8. Adding an image view to the storyboard
With the image view selected, you should now look at the attributes inspector at the top-right-hand side of your Xcode window. You’ll see a list option called “Image.” See Figure 4-9.
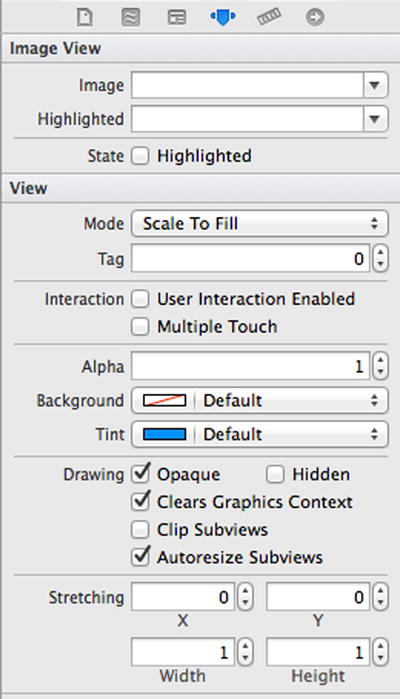
Figure 4-9. The attributes inspector for the image view
Drop down the list beside “Image” at the top, and you should see an item for the image you added earlier. We used “geek1.png,” so you can see that in Figure 4-10. When you select it, the image view will also load your picture and render it.

Figure 4-10. Setting the image on the image view
Next you should drag a label from the library onto the “view design” area, placing it near the center of the view, as shown in Figure 4-11. Make sure it’s centered as indicated by the blue line. Later you’ll be adding a button, and your code will invoke an action that will change the text on this label.

Figure 4-11. Adding a label to the bottom of the image
Note As before, you may notice that when you try to drag the label to the design surface Xcode won’t let you, and the label bounces back. If so, click the “View Controller” button beneath the image. You’ll see three colored buttons. Select the yellow one on the left, and the problem should go away.
The text is quite difficult to read, so let’s fix that. With the label selected, drag the corners to change the width of the label, making it wider, and then go to the attributes inspector and make three changes.
- Change the alignment to centered.
- Change the text color to white.
- Delete the default text (label).
You can see what the attributes inspector should look like for the label in Figure 4-12.

Figure 4-12. Setting the label attributes
Next up, you should drag a button to the design surface and center it horizontally. Double click it and you will get a chance to change its text. Set the text to “Are you a Geek?” as shown in Figure 4-13.

Figure 4-13. Setting the button text
In iOS7, buttons are flat and look like labels, so you’ll need to change the text of the button to make it more readable. As it’s set against a dark background, the only change you’ll need to make is to set the Text Color property on the attribute inspector. We set it to white, as you can see in Figure 4-14.
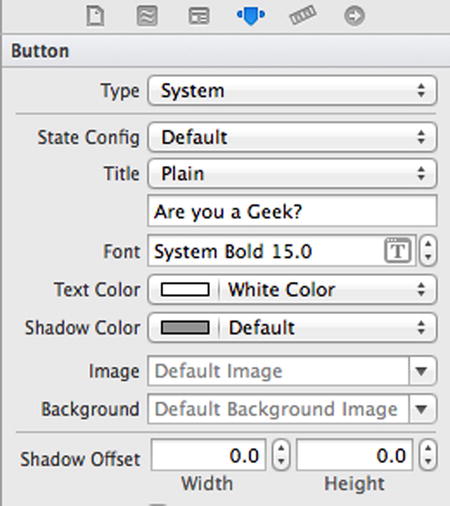
Figure 4-14. Setting the text color property of the button
Now that you’re done with designing the app, the next step is to add the code that you’ll use to bring it to life. You’ll see that in the next section.
Writing the Code for Your App
In the previous section you designed the “Are you a Geek?” app by adding an image to your source code and then using an image view on your app to render it. You also added a button and a label. Before writing any code, you’ll have to define an action for the button and an outlet for the label.
If you get stuck here, you should refer back to Chapter 2.
First, you should hide the attributes inspector by clicking the rightmost button on the toolbar (square with shaded right side) and then bring up the coding assistant by clicking on the secondmost-from-left button on the toolbar, which looks like a tuxedo. You can see these buttons at the top-right-hand side of your screen. They are also in Figure 4-15.

Figure 4-15. Toolbar buttons
Your screen should now show your files on the left, your design in the middle, and some code on the right-hand side. Ensure that your code shows your ViewController.h code and not your ViewController.m code. If it is incorrect, click ViewController.m at the top of the code window and a list will drop down. Select ViewController.h from that list. When you’re ready to set the outlet and action, your screen should look like Figure 4-16.

Figure 4-16. Xcode ready for outlet and action generation
Note The following few steps have you selecting the button and label control and CTRL-dragging them to the code window. If it’s hard to select them on the design surface because of the image, you can also select them on the “View Controller Scene” drop-down menu to the left of the design surface. Simply click the control there to highlight it, and CTRL-drag.
Select the button control, and while holding the “Control” key, drag and drop it onto the code window just below where it says @interface. A small menu will pop up. Make sure that on this menu you set the Connection type to “Action” and the Name type to “btnClick.” You can see this in Figure 4-17.
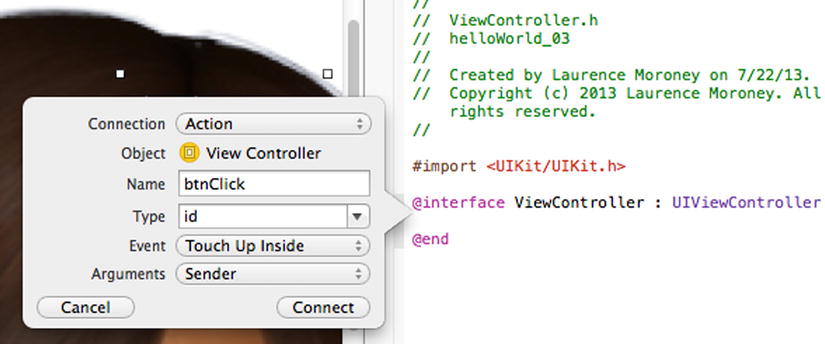
Figure 4-17. Setting the action for the button
Click “Connect” and some code will be generated for you in the ViewController.h file. Code will also be generated in the ViewController.m file, and you’ll see that in a moment.
Now, select the “Label” control, and while holding down the control key, drag it over the code window, just like you did with the button. If you’re having difficulty finding or selecting the label, use the View Controller Scene to the left of the design surface as noted in the preceding note. This time, on the popup menu, leave the Connection type as “Outlet,” and enter “geekLabel” in the Name field. This will allow you to refer to the label control in code as _geekLabel, making your code a little more readable than if you just used the generic “label” as the name. See Figure 4-18.
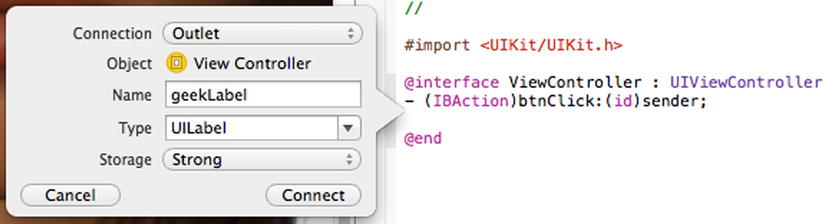
Figure 4-18. Adding the label outlet
If you’ve configured these steps correctly, you should have this code in your ViewController.h file. If not, delete what you have and go back and try again.
#import <UIKit/UIKit.h>

@interface ViewController : UIViewController
- (IBAction)btnClick:(id)sender;
@property (strong, nonatomic) IBOutlet UILabel *geekLabel;

@end
When you made the button an action, you created something very important: a method. A method is the code that runs in response to an action performed upon an object. In this case, the object is the button, and the action is the user clicking on it. You specify that the method to run in this instance is called btnClick.
A method is also a function, and a function has a return type. Consider something simple, like a function that adds two numbers together—you give it two numbers, and it returns one number, which is the result of the addition. You specify the return type in Objective-C by enclosing the return type in brackets before the method name declaration:
- (IBAction)btnClick:(id)sender;
In this case, the return type is IBAction, which is short for “Interface Builder Action,” which should make sense, as you specified that this function is an action when you dragged the button to the code surface.
This is a special type of return value, which you don’t have to explicitly set yourself. Objective-C now understands that this function is going to be used by controls you put on the designer.
The name of the method comes next. If the method requires values to be passed to it as parameters, the method name will be followed by a colon (“:”) and a list of those parameters. In this case the method is called btnClick.
- (IBAction)btnClick:(id)sender;
Last is the list of parameters or arguments that you send to the function. In this case you are sending an argument of type id, with the name “sender.” This just allows Objective-C to keep track of which object raised the method, because it knows its id.
- (IBAction)btnClick:(id)sender;
The method itself will be implemented in the ViewController.m file. You’ll see in a moment that an empty function was created for you there too that matches the declaration in the .h file.
Editing Your Code
The first step is to add some code to your header file. This will be used to track the state of how the user has pressed the button. The label is going to alternate between two messages, so you can use a Boolean variable, which has only two states, to keep track of them. Boolean variables can be set to false and true, so we’ll write some code that says, “If it’s true, make it false, and if it’s false, make it true.” So, in order to set the label to alternate between the two states, we can say, “If it is true, make the text this, otherwise, make the text that.”
Variables like this—that you use in your implementation (.m) file—can be defined in your header (.h) file. Thus, to declare a Boolean, you use bool, and give the variable a name. In this case we’ll call it ruaGeek.
#import <UIKit/UIKit.h>

bool ruaGeek;

@interface ViewController : UIViewController
- (IBAction)btnClick:(id)sender;
@property (strong, nonatomic) IBOutlet UILabel *geekLabel;

@end
Now, within your .m file, you can reference ruaGeek, and Objective-C will know that it’s a Boolean that can be true or false.
Open ViewController.m, and you’ll see the code that was generated for you when you created the action for the button. You called it btnClick , so the code will look like this:
- (IBAction)btnClick:(id)sender {
}
@end
Earlier, we mentioned that when the button is pressed, we’ll check ruaGeek, and if it is true, we’ll set the text to one value, otherwise we’ll set it to a different one. In Objective-C, rules like this are performed using an if-else statement.
The syntax for this statement looks like this in Objective-C:
if(condition)
{
    do something;
}
else
{
    do something else;
}
The condition is tested to see if it is true, and if it is, the first “do something” is executed, otherwise the “do something else” is executed. This is really convenient, because ruaGeek is a Boolean variable, which can either be true or false. In Objective-C, you use two “=” signs when you are checking if something is equal. This might look a little strange at first, but it’s a way to help the computer understand the difference between using “=” to set a value and using “==” to determine if values are equal.
In English, you can say “x=1” and you’d understand that you are making x have the value of one. You can also say if(x=1), and you’d understand that you are checking if x is 1 before going further. Computer languages can’t tell the difference here, so for checking if the value is equivalent, you use two “=” signs like this: if(x==1).
So, to check if ruaGeek is true, you can do this:
if(ruaGeek==true)
{
    do something;
}
else
{
    do something else;
}
A convenient shorthand is this: if you want to check if a condition is true, you don’t need to say ==true. This code is exactly the same:
if(ruaGeek)
{
    do something;
}
else
{
    do something else;
}
So now, let’s set the text of the labels according to the value of ruaGeek:
- (IBAction)btnClick:(id)sender {
    if(ruaGeek)
    {
_geekLabel.text = @"No you're not!";
    }
    else
    {
        _geekLabel.text = @"Definitely a geek!";

    }
So, what do you think would happen if you ran this code now? Run it and give it a try. The app will launch, you’ll press the button, and it will tell you that you’re definitely a geek. But then when you press the button again, nothing happens. Why?
Go back to look at the preceding code. When you first run the app, ruaGeek hasn’t been set, so it’s considered to be false. As a result, the text “Definitely a geek!” gets rendered. But ruaGeek is still false. So when you press it again, the same text is rendered. You have to change the value of ruaGeek in code when you click the button. You do this by setting it to true in the branch of the function where the code goes when ruaGeek is false, and vice versa.
Here’s the code:
- (IBAction)btnClick:(id)sender {
    if(ruaGeek)
    {
        _geekLabel.text=@"No, you're not!";
        ruaGeek = false;
    }
    else
    {
        _geekLabel.text=@"Definitely a geek!";
        ruaGeek = true;
    }
}
Now if you run the app, you’ll see that the label changes whenever you press the button.
Figure 4-19 shows the label upon pressing the button once.

Figure 4-19. Running the “Are You a Geek?” app
Pressing the button again, you’ll see that the label changes. See Figure 4-20.

Figure 4-20. Clicking the button again changes the label
Note In this application, the ruaGeek Boolean was never initialized—you checked its value before you ever set it. This is a really bad idea. In the case of Booleans, it’s okay, because it will initialize to false. But with most other data types, if you don’t initialize them, they will be null, and when you try to check if a null object equals something, the app will crash. A better practice would be to set ruaGeek to false explicitly in the viewDidLoad function.
And that’s it. You’ve now created an app that, as well as managing user I/O, has conditional logic within the code. It’s a quantum leap from your first “Hello, World!” app, but as you move through this book, you’ll get introduced to more and more concepts that build upon these foundations! You’re well on your way to being an iOS7 developer!
Pit Stop—Reviewing Some Concepts
Up to now you’ve had a whole lot of new concepts thrown your way. You may not have understood them all, and that’s okay. For now, take a little pit stop from the hands-on coding.
In this section, you’ll review some of the concepts you’ve touched on in this chapter, exploring what’s behind them in more detail. You’ll be introduced to more technical terms that you’ll use in future chapters and in communicating with other programmers.
In helloWorld_01 and helloWorld_02 you took your first steps into development. In helloWorld_03, you started looking beyond the mere basics. From a programming perspective, you looked into the most important parts of software development in Objective-C: methods, outlets, and actions.
There are a few other concepts that you should consider, including storyboards, classes, methods, and header files. You’ll explore them next.
Storyboards
A few times already you’ve done user-interface work by editing a file that ended with the extension .storyboard. This is a curious name for something that is your user interface—why is it called a storyboard? Well, the logic behind that is that it separates, in the developer’s mind, the actual user interface and the instructions that are used to construct that interface. In movie making, before the director films anything, the writer, director, and artists get together to sketch out the scenes and what they should look like in a process called storyboarding. When you storyboard a movie, you effectively make the entire movie on paper, showing each scene and how they are all connected. It’s similar in iOS user interfaces.
Apple introduced storyboards so that developers could design what they wanted their user interfaces (UI) to look like, and how they connected to each other, and Objective-C would use that to create the actual UI that ran. It’s no coincidence that your user interface “screen” that you’ve been building was called a “scene.” See Figure 4-21.
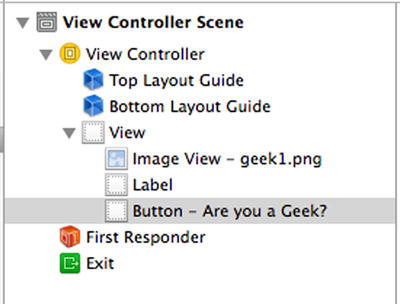
Figure 4-21. Scenes within a storyboard, just like a movie
Each app you’ve built so far is a single view app, so your storyboard had only one scene. It’s like a very short movie.
In this book, so far, you’ve opened your storyboards, and you’ve dragged and dropped controls onto them. This created the behind-the-scenes instructions that Objective-C uses to construct your user interface, and the storyboard editor gave a graphical interpretation of that to help you design your UI.
You can see what the scene really looks like by right clicking on the storyboard file in Xcode, and selecting “Source Code” on the “Open As . . .” menu that pops up. This code is written in a language called XML (Extensible Markup Language). Despite its name, XML isn’t really a language in which you can communicate actions, but more one in which data and its structure are expressed together. It’s a very useful way to define and exchange information.
Figure 4-22 shows some of this XML opened in the Xcode editor.

Figure 4-22. Storyboard open in XML view
XML is commonly used in development for storing data, and, as you can see, your user interface definition is just data. Tweaking the XML by hand is a neat way to quickly edit your user interface if you don’t want to use the assistants. But for now you won’t do anything with it. It’s just good to get an understanding of how the Objective-C compiler reads your design.
Classes
It’s almost impossible to avoid classes when writing software in just about any modern programming language for just about any platform, including iOS. You should think of a class as the set of instructions for building an object. An object that is built from a class is an instance of that class.
So, for example, if you were to define a cow, you would say that the class of a cow is that it’s an animal with four legs and a tail that makes a “moo” sound. It’s typically a certain size and produces milk and beef.
An instance of that class is any particular cow.
Of course there are lots of species of cow, so each of these can be designed as a different class. To get around having to define the same things again and again, object oriented (OO) programming provides things such as inheritance, where one class can borrow stuff from its parent class, and interfacing, where common stuff can be put into one class, and other classes extend on that. Indeed, our cow class has already inherited from a base class of type “animal,” which would distinguish it from a vegetable or mineral. But that’s getting into complex territory, so for now just think in terms of classes as defining objects. Everything in an iOS app is an object, so it’s important to start thinking in terms of the classes that define them. For example, in the app in this chapter, the button is a class, and you told the program to create an instance of the button class at runtime. You give it various attributes, such as its text (“Are you a Geek?”), and you listened for actions on that button. Ditto for the label, the image view, and even the view controllers. It’s classes all the way down . . .
Methods
A method is a function that you can call to act on an object. So, for example, if you define the class for a car, you’d likely define a method for “accelerate,” so that when there’s an object for the car, whoever is driving could push it forward by accelerating it. In a real-life car, the interface is the gas pedal, and by pushing on the gas pedal you are “calling the accelerate method.”
You saw how to declare a method earlier when you looked at a method and a method signature.
-(IBAction)btnClick:(id)sender
In this case, btnClick is the name that was chosen for the method. You could have called it anything you liked, as it’s not a reserved keyword. It’s good practice to give it a descriptive name like btnClick, geekButtonTouched, or btnGeekClicked. That way, when you read your code, you can glean an understanding for what triggered this event.
Tip It’s a bad idea to use a vague name like “button” or “monkey” because code like this would give you no idea what the function actually does, unless of course it’s a monkey in your app.
-(IBAction)monkey:(id)sender
Sometimes as you write code you’ll notice that there’s a “-” to the left of the method declaration, and sometimes there’s a “+.”
When there’s a “-,” that means it’s an instance method, where the method can be used on any object created from the class.
When there’s a “+,” that means it’s a class method, and the method is used on the class itself, typically when constructing an object. When you come across a class method being used later in the book, I’ll leave a note showing this.
Some programming languages—and Objective-C is one of them—like classes to be defined using two files—a header file (.h) and an implementation file (.m)—where the header file defines the data and methods that the class is going to use, and the implementation file implements them.
Let’s look at our ViewController.h a little more closely. Here’s the code:
#import <UIKit/UIKit.h>

bool ruaGeek;

@interface ViewController : UIViewController
@property (strong, nonatomic) IBOutlet UILabel *geekLabel;
- (IBAction)btnClick:(id)sender;

@end
There are lots of concepts here that you’ll understand in due course, but two important ones that you’ll use a lot are #import and @interface.
#import: Think about all the code that is used to draw the button, handle the messages from the user, lay out the user interface, draw the label, etc. This all seems to happen without you doing anything. That’s because you are just using an instance of a button, a label, and other controls, and their code is held elsewhere. Well, Objective-C isn’t smart enough to know where that elsewhere is, and that’s what the import statement is for. The iOS development environment has many libraries that you can use for different functions, and the library that supports the UI is naturally called UIKit. Thus, when you import the UI kit, you are telling Objective-C to look for code that you haven’t written, such as the class definitions for the UILabel and the UIButton as it compiles your app. Putting the # in front of import tells the compiler what to do, and isn’t code that will execute in your app.
@interface: Whenever you see an “@” in front of a command, it’s effectively a directive to Xcode to do something. In this case, you are defining the user interface of your application as a class called ViewController. The syntax for telling it what type of class it should be is a ”:” so the following line:
@interface ViewController : UIViewController
means “Define the interface with the ViewController class. This class inherits from the UIViewController.”
That’s a funny word: inherits. In the real world, you inherit something that belonged to somebody else, and they pass it on to you. In Objective-C it’s very similar. Consider a class of type “cow” as before, and then another class of type “Angus cow.” It would be best for “Angus cow” to have not only everything a cow has, but also some extra stuff that only an Angus cow has. That’s inheritance—your Angus cow class would inherit from the cow, but would have some extras.
Note You’ll also see the “@” character used in Objective-C in front of strings, so be sure to differentiate them.
In this case, your ViewController inherits from UIViewController, and your instance of the ViewController has some extras, such as the button, label, and image.
Summary
In this chapter you built a slightly more sophisticated “Hello, World!”–type app. You used this to learn many of the important concepts of Objective-C development, including adding functional logic code to your app and using primitive variables. We also looked a little deeper into storyboards, classes, methods, headers, interfaces, and inheritance.