Debugging iOS7 Apps
In the previous few chapters you built some basic applications and tested them by running them in the simulator. They didn’t really have a whole lot of sophisticated functionality, so playing with them in the simulator was enough. However, as your applications get more complex, you’ll need to take a look at them while they are running and inspect what is going on in order to find issues. This process is called debugging, in the sense of removing bugs from your applications. In this chapter you’ll take a look at the tools that are available to you to do this in Xcode, and while you are doing it, you are going to build a fun little Magic 8-ball app.
Creating the App
The Magic 8-ball app will be created as a single-view app, in the same way as all the other apps so far in this book.
To create this app, launch Xcode and select “Create a new Xcode Project.” When asked to choose a template for your new project, select a “Single View Application” and click “Next.”
When asked to “Choose options for your new project” give it the name “magic8” and specify it as an iPhone project. Click “Next.” Finally, click “Create” on the next dialog, and the code will be created for you. Xcode will launch and open your project.
Designing the Magic 8-ball App
In Xcode, click on“Main.storyboard” to open the design surface for your view. Drag a button and drop it on the design surface near the top. Change its caption to “Ask the 8 Ball.”Once you’ve done this, center the button. Use Figure 6-1 as a guideline.
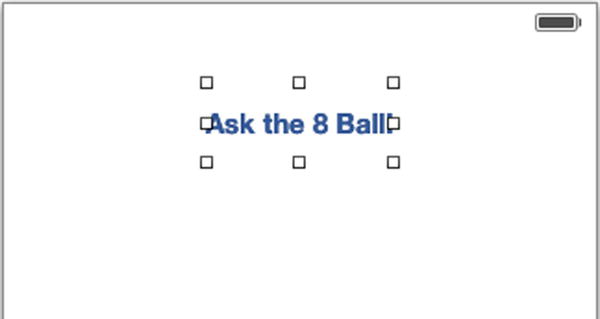
Figure 6-1. Laying out the button for the Magic 8-ball app
Once you’ve done this, it’s time to add two labels. Double click on the first and change its text to “The answer is:” as shown in Figure 6-2.

Figure 6-2. Adding the labels
For the second, double click and delete the text so that it’s completely blank.
Use the dots around the border of the label, also known as “sizing handles,” to change the location and shape of the label. Use Figure 6-2 as an example of something that looks good, but feel free to experiment on your own.
You now have all the controls that you need. In the next section you’ll wire up the controls and begin writing the code that you need for a Magic 8-ball.
Writing the Code
Before writing any code, you should set up your necessary outlets and actions from the storyboard editor. As you won’t be doing anything to the label that reads “Your answer is,” you won’t need an outlet for it.
You’ll need an outlet for the blank label, as that is what will render the answer from the Magic 8-ball. To do this, open the assistant and CTRL-drag the blank label to your “ViewController.h” file. You can access the assistant using the icon that looks like a tuxedo on the upper-right-hand side of the screen. The assistant will open on the right-hand side of your screen, showing some code. At the top of the assistant, you can see the code file that is open. If it isn’t ViewController.h, change it to be so.
Tip If this is unfamiliar to you, we recommend you go back to Chapter 2, where you’ll be given a step-by-step approach to doing this task.
Once you CTRL-drag the label onto the assistant, a menu like that in Figure 6-3 will pop up. Fill it out to create an outlet, called “lblOutput,” as shown in Figure 6-3.

Figure 6-3. Creating the outlet
Similarly, create an action by CTRL-dragging the button to the header. Call this "btnAsk ," as shown in Figure 6-4.
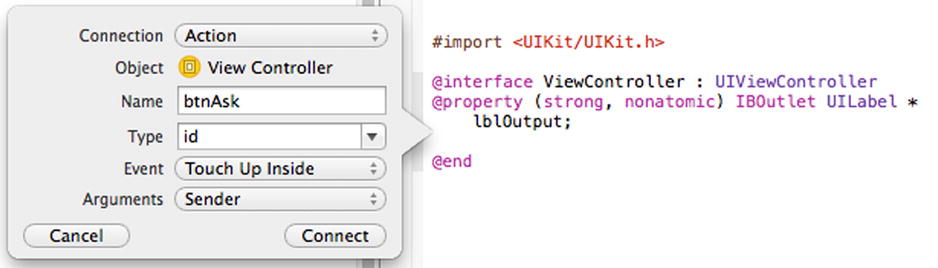
Figure 6-4. Creating the action
Now you are ready to begin writing the code for your application. Your first task is to create a module-level or class variable. This might sound like a bit of a mouthful, but it’s pretty straightforward. Typically in any programming language, when you create a variable it only lives within the function you created it in. So if you have a function called "foo() " and another called "bar() ," any variable that you create in foo() cannot be addressed in bar(). When you have a class, such as your “ViewController” class, the same applies. But you can create a variable on the class itself, so that every function in that class can use that variable.
To do this, you can declare it by inserting it just above the @implementation line for your class in the “ViewController.m” file. So, open ViewController.m and edit it to add the code NSMutableArray* magicStrings as a class variable. You can see what this looks like in Figure 6-5.

Figure 6-5. Placing a class variable
The code isn’t usually highlighted—that’s just something we put in for emphasis.
If you’ve never used a magic 8-ball before, the idea is that you ask it a question to which the answer would usually be “yes” or “no, “then you shake the ball, and it throws up a random answer. Behind the scenes, the ball has 20 answers, so the variable type that we’re using in the application is an array. An array allows you to store data in addressable slots. It’s a lot like mailboxes, where each mailbox has a number (i.e., address), and you put stuff in the box. When you want something for a specific box, you use its number to find it. In Objective-C, the NSMutableArray is a suitable object that allows you to do this. You can initialize this object with a capacity (i.e., 20) and address each element within the array with a square bracket syntax. In software, this is usually zero based, where the first item is number 0, the second is number 1, etc.
Here’s Objective-C code (also known as a method) that you can put in your app (put it right above the @end at the bottom), which will initialize the array to have 20 “mailboxes” and will put one of the 20 messages in each.
-(void)initializeStrings{
magicStrings = [[NSMutableArrayalloc] initWithCapacity:20];
magicStrings[0]=@"It is certain";
magicStrings[1]=@"It is decidedly so";
magicStrings[2]=@"Without a doubt";
magicStrings[3]=@"Yes, definitely";
magicStrings[4]=@"You may rely on it";
magicStrings[5]=@"As I see it, yes";
magicStrings[6]=@"Most likely";
magicStrings[7]=@"Outlook good";
magicStrings[8]=@"Yes";
magicStrings[9]=@"Signs point to yes";
magicStrings[10]=@"Reply hazy, try again";
magicStrings[11]=@"Ask again later";
magicStrings[12]=@"Better not tell you now";
magicStrings[13]=@"Cannot predict now";
magicStrings[14]=@"Concentrate and ask again";
magicStrings[15]=@"Don't count on it";
magicStrings[16]=@"My reply is no";
magicStrings[17]=@"My sources say no";
magicStrings[18]=@"Outlook not so good";
magicStrings[19]=@"Very doubtful";
}
In Objective-C you use an array with NSArray or NSMutableArray, with the difference being that the former is used for arrays that never change, whereas the latter is used for arrays in which you can add and take away elements (i.e., remove some mailboxes or add some others). For an app such as this, it would probably be better to use an NSArray, but we went with the NSMutableArray because it allows us to initialize our array with a fixed size, in this case 20 elements, as seen on this line:
magicStrings = [[NSMutableArray alloc] initWithCapacity:20];
Now, in our code, if we refer to magicStrings[9], we’ll get the string “Signs point to yes” returned to us.
This is great, because that’s what we want to display as our answer. Now all you need to do is figure out how to generate a random number. You’ll see that, along with your first bug, in the next section.
Debugging the App
Programs seldom run perfectly the first time you try them. In this section you’ll take a look at some of the common causes for errors and the tools that are available for you to fix them. These include the following:
- Handling a coding error. This is when you have written the logic of your code incorrectly, but its syntax is correct. In this case, your application doesn’t behave the way you’d expect, but it doesn’t crash.
- Handling a runtime error. This is when you’ve written something wrong in your code, which passes by the compiler, but when you try to run it, the operating system cannot handle it. In this case, your application crashes unexpectedly.
- Handling a compile time error. This is when your code is wrong to the extent that the compiler doesn’t understand it at all. In this case, you won’t have an app at all, because the compiler isn’t able to create it due to the errors.
In the next few sections, you’ll introduce errors to the magic 8-ball app in order to demonstrate these concepts and to explore the tools available in Xcode that allow you to find and fix them.
Handling a Coding Error
The C language, upon which Objective-C is based, has a function called arc4random_uniform(), which is perfect for this task. You give it a number—for example, 20—and it will return a random number between 0 and that number minus 1, or in this case between 0 and 19. This is exactly what we need, so go to the btnAsk function, which runs when you click the button, and add this line:
int r = arc4random_uniform(20);
This creates a random number and loads it into a variable of type “int” (meaning integer), which I called “r.” So now we can set the label to have the magicStrings at address r using magicStrings[r]. Here’s the full btnAsk code that achieves this:
- (IBAction)btnAsk:(id)sender {
int r = arc4random_uniform(20);
_lblOutput.text = magicStrings[r];
}
Now whenever we click the button, we will get a random number from 0 to 19, and we will then use that random number to get the string that we’ll load into the lblOutput.
Run the app in the simulator. You should see something like Figure 6-6.
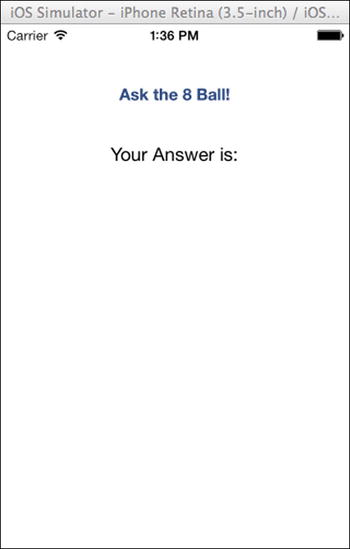
Figure 6-6. Running the Magic 8-ball app
Ask yourself a yes/no question, such as “Is this book awesome?” and click the “Ask the 8 Ball!”button.
You would expect an answer to appear, but nothing happens! Your app didn’t crash, you had no warnings or errors when you were compiling and running, but it doesn’t work properly. What could be wrong?
In order to figure that out, we need to see what happens when we click the button. To do this we’ll use a breakpoint in the btnAsk function.
Using Breakpoints
A breakpoint is an instruction that you add to Xcode telling it to stop executing your code at a specified location. You can then use the debugger to examine it while it’s stopped and see what’s really going on. You set a breakpoint in Xcode by clicking in the margin of your code window until a little blue arrow like the one in Figure 6-7 appears.

Figure 6-7. Setting a breakpoint
If you haven’t done so already, stop the application, return to Xcode, and put a breakpoint in the btnAsk function as shown in Figure 6-7.
Now run your application again and click the button. The simulator will stop, and you’ll be returned to Xcode, where you will see the line that you put the breakpoint on highlighted in green. This is called hitting the breakpoint. See Figure 6-8.

Figure 6-8. Hitting the breakpoint
The app was running in the simulator, but has now frozen, with its internals all wide open for you to inspect to see what’s going on. There are a number of great tools that allow you to do this.
First, you have a rollover view of the contents of variables. This line is after the one where r was initialized, so if you hover your mouse over r for a moment, a window will pop up with the contents of r. See Figure 6-9.

Figure 6-9. Inspecting variables in the debugger
You might see a different number here, because r is generated randomly, but it should always be greater than or equal to 0 and less than20.
In Figure 6-9, you can see that r is 16, which looks valid, and magicStrings[r], according to the initializeStrings function, is set to “My reply is no,” which is also good.
But, to double check, hover over magicStrings[r] on the breakpoint line.

Now that is unusual. It’s “nil,” which is another word for nothing or empty. You can click the eyeball icon to the right of nil to see more details. You’ll see this in Figure 6-11.

Figure 6-11. A more detailed inspection of our variable
We can see that the entire array is empty, because its value is all zeros. When we declared magicStrings, we used NSMutableArray* as its type, and if you remember from earlier chapters, when we put a * on a variable name, that means it’s a pointer. The pointer itself, if you inspect it, points to the memory location, where the data for the object is stored. When it’s all zeros like this, it means that the object hasn’t been initialized. Objective-C knows that you want an object, but until you initialize it, it just has an empty (or nil) pointer hanging around waiting for you to do something with it.
Why is that the case? Let’s take a look at our code again. We did write a function to initialize magicStrings
#import "ViewController.h"

@interfaceViewController ()

@end

NSMutableArray* magicStrings;
@implementation ViewController

- (void)viewDidLoad
{
    [superviewDidLoad];
        // Do any additional setup after loading the view, typically from a nib.
}

- (void)didReceiveMemoryWarning
{
    [superdidReceiveMemoryWarning];
// Dispose of any resources that can be recreated.
}

- (IBAction)btnAsk:(id)sender {
int r = arc4random_uniform(20);
_lblOutput.text = magicStrings[r];
}

-(void)initializeStrings{
magicStrings = [[NSMutableArrayalloc] initWithCapacity:20];
magicStrings[0]=@"It is certain";
magicStrings[1]=@"It is decidedly so";
magicStrings[2]=@"Without a doubt";
magicStrings[3]=@"Yes, definitely";
magicStrings[4]=@"You may rely on it";
magicStrings[5]=@"As I see it, yes";
magicStrings[6]=@"Most likely";
magicStrings[7]=@"Outlook good";
magicStrings[8]=@"Yes";
magicStrings[9]=@"Signs point to yes";
magicStrings[10]=@"Reply hazy, try again";
magicStrings[11]=@"Ask again later";
magicStrings[12]=@"Better not tell you now";
magicStrings[13]=@"Cannot predict now";
magicStrings[14]=@"Concentrate and ask again";
magicStrings[15]=@"Don't count on it";
magicStrings[16]=@"My reply is no";
magicStrings[17]=@"My sources say no";
magicStrings[18]=@"Outlook not so good";
magicStrings[19]=@"Very doubtful";
}

@end
Have you spotted the problem yet? Why is magicStrings empty? The answer is that even if we created a function to initialize it, we’ve never actually called that function. Objective-C and iOS7 aren’t quite smart enough to figure that out for themselves. So let’s call that function when the view loads, as we only need to call it once. Stop your application and update your viewDidLoad function to make the call to initialize the strings.
Here’s the code:
- (void)viewDidLoad
{
  [superviewDidLoad];
// Do any additional setup after loading the view, typically from a nib.
[self initializeStrings];
}
Now run the app and click the button again.
You’ll hit the breakpoint once more. Hover over magicStrings and see what happens.
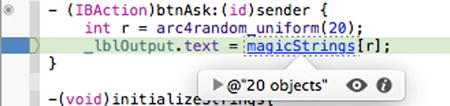
Figure 6-12. Inspecting magicStrings after we fixed the bug
Now we can see that magicStrings is no longer empty. There are 20 objects inside it, which is what we’d expect as we loaded it with 20 strings. Remember each string is an object.
Clicking the eyeball to inspect it a little deeper shows us more information. See Figure 6-13.

Figure 6-13. Deeper inspection of the fixed code
Now we see that our pointer points to an actual place in memory, in this case address 0x08e22700, so we know at least something is working. Objective-C has initialized our NSMutableArray, put 20 strings into it, and told the pointer where in the computer’s memory it lives. This is good.
To see if your app works, you want to continue execution past your breakpoint. You might be tempted to think that the way to do this is to run the code again, but it isn’t. Whatever you do, make sure that you don’t hit the “Run” button. This will actually stop your code from running; instead it will compile it and run it again.
Instead, look towards the bottom of the Xcode screen, and you’ll see the debug window is open. It looks like Figure 6-14.
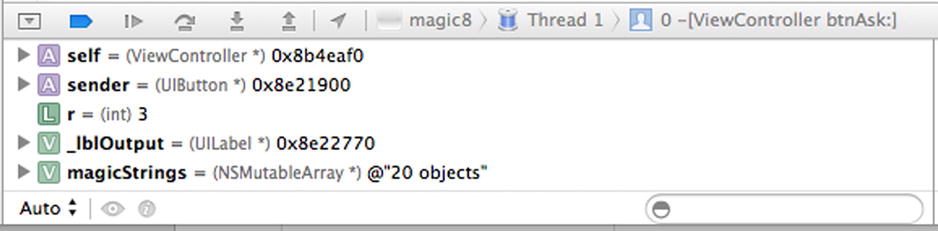
Figure 6-14. The debug window
To continue execution, click the “Continue” button. It’s the third from the left at the top of the bar, and looks like a “Play” button with a vertical line beside it.
Click this, and execution of code returns to the simulator. Take a look to see if your app worked. You can see what happened to us in this session in Figure 6-15.
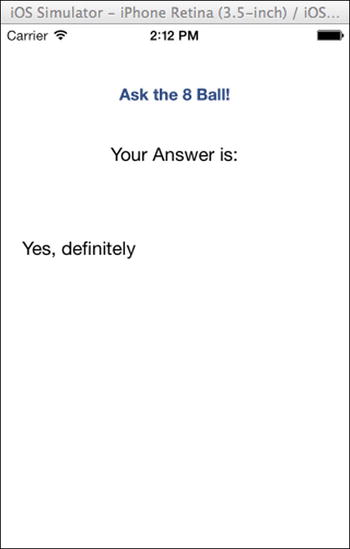
Figure 6-15. The working 8-ball app!
Now, the debug window had some really nice tools. We should take a look at them. Stop your application and make a new breakpoint on the first line of the initializeStrings function. Your screen should look like Figure 6-16.

Figure 6-16. Setting a new breakpoint
Run the app again, and you’ll hit this breakpoint right away. This is because initializeStrings is called as part of your ViewDidLoad: function, which, as its name suggests, gets called when the view is loaded into memory.
Your debug window will look something like Figure 6-17.

Figure 6-17. The debug window when you hit your second breakpoint
To the right of the “Continue” button that you used earlier, there’s a button that looks like an arrow curving over a line. This tells the runtime to move forward by one line of code, in a process typically called stepping . Click it once, and a few interesting things will happen.
First, the green highlight over the line of code where you have your breakpoint will step to the next line. See Figure 6-18.

Figure 6-18. Stepping forward one line
Additionally, the debug window will update with any new data. If you look at figure 6-17, magicStrings was nil, but the line of code that we stepped over was the one that allocated it and told it to have a capacity of 20 strings. So, look at what happened in the debug window. You can see it in Figure 6-19.

Figure 6-19. Inspecting the variables on stepping through the code
Now it shows us that magicStrings has been initialized, but there’s nothing in it yet. Click the “Step” button one more time. You’ll see that the green line steps down to the next line, which begins with magicStrings[1]=, having executed the line that says magicStrings[0]=. Thus, one object has been loaded into magicStrings.
Figure 6-20 shows what the debug window will look like at this point.
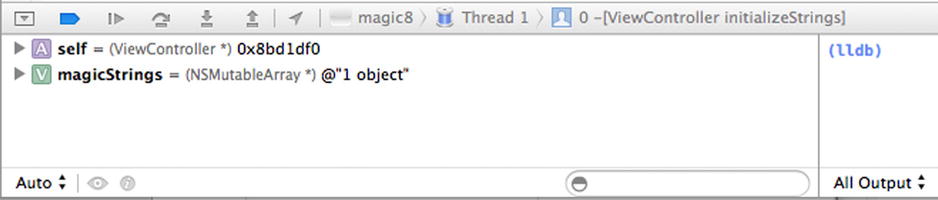
Figure 6-20. Inspecting the variables after another step
As you can see, magicStrings now has one object in it. As you keep stepping, you’ll see the result of the commands being executed, which in this case means that magicStrings will keep growing.
When you’re satisfied, click the “Continue” button to continue execution, and the app will launch.
Stepping through code like this will prove to be invaluable as you write more and more complex and sophisticated apps. To be able to break open your app and look at the code while it is executing, seeing what the data looks like and comparing it against what you’d expect, is vital to being an iOS developer.
The type of bug that you just hit can be very insidious, because your app doesn’t crash or give you any kind of warning.
The app ran perfectly happily—but it didn’t do what it was supposed to. It’s really important to deal with this type of error, because it can be far more dangerous than one that causes a crash. Consider, for example, an app that would be used in healthcare, where it monitors heart rate. If it doesn’t correctly report a dangerous heart rate, but instead continues running without any issues, it could be very damaging for the patient.
Handling Runtime Errors
In this section, we’ll take a look at the type of bug that your app can’t handle, leading to what is typically called a crash .
Our Magic 8-ball app works well, so let’s deliberately introduce a coding error in order to examine a crash.
First, delete the breakpoints that you put in the app in the previous section. To do this, either right click, or hold down “CTRL,” while you click on the blue arrow that denotes the breakpoint. You’ll see a menu of options popup. One of these is “Delete Breakpoint.” See Figure 6-21.
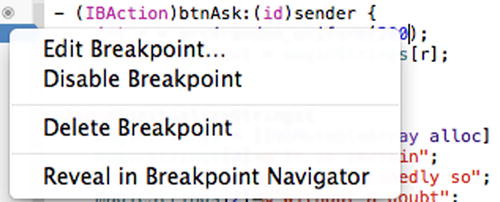
Figure 6-21. Deleting a breakpoint
Repeat this for all breakpoints in your app.
Next, we’ll introduce a coding error. In the btnAskfunction, we used the arc4random_uniform function, passing it a value of 20, which would return a value between 0 and 19.
- (IBAction)btnAsk:(id)sender {
int r = arc4random_uniform(20);
_lblOutput.text = magicStrings[r];
}
This was the perfect shape for our magicStrings array.
However, consider what happens if the value passed in to arc4random_uniformis much bigger than 20. If you use 200, then it will return a value between 0 and 199. So, for example, if it returned 147, we could end up assigning _lblOutput.text to magicStrings[147], which doesn’t exist.
Update the code to look like this:
- (IBAction)btnAsk:(id)sender {
    int r = arc4random_uniform(200);
_lblOutput.text = magicStrings[r];
}
Now run your app and click the button. If it works, keep clicking the button until your app crashes. A crash should cause your app to trigger Xcode to reactivate with the file “main.m” opened and the green execution line highlighted. You can see an example of this in Figure 6-22.

Figure 6-22. Catching a runtime crash
If you look at the right of Figure 6-22, you’ll see that the signal (or message) that was sent is SIGABRT, meaning that the operating system has told the app to abort execution. Something has gone wrong, so the app has to die.
If you look at the debug window at the bottom of the screen, on the right-hand side is the output window. A quick look at this might give some hints as to the error. See Figure 6-23.
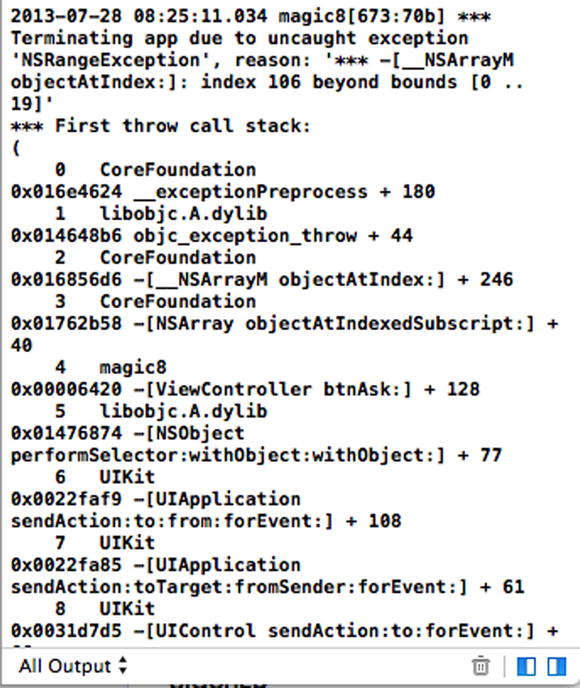
Figure 6-23. The debug output
The debug output window lists everything that was happening prior to the crash. In other words, the function that called the function that called the function, etc. When you get a crash like this, you can look through it to see if any of your code is in there. And in this case, it is. Look at Line 4 in Figure 6-23, and you’ll see that [ViewController btnAsk] is listed. The next item in the stack, in other words, the function that btnAsk called, is in the next line—in this case, Line 5. Your line numbers might be different, and that’s fine—it’s the content that matters.
Note You may have heard the term call stack being used by developers in debugging their applications. The call stack is the list of code functions that your app calls, in the order in which they are called. You can look through the stack to trace how your app executes. The debug window output here is an example of a call stack.
You can see that the function called was to performSelector on an object using another object (performSelector:withObject:withObject in the debug window), which looks remarkably like our line _lblOutput.text = magicStrings[r]; where we are taking an object (magicStrings) and performing a selection on it using another object, in this case the integer r. This helps us find the line that causes the error, so, a good next step in debugging would be to put a breakpoint on that line and inspect the variables within it.
Do this, and then stop and restart your app.
The first sign that you’ve at least taken the first step towards finding the bug is that the app doesn’t crash when you click the button, and instead stops execution at the breakpoint. See Figure 6-24.

Figure 6-24. Hitting our breakpoint again
If you inspect the value of “r,” and it is greater than 19, click the “Step Over” button to advance to the next line of code, and you’ll see that the exception gets triggered again, telling us that this line is the one that caused the error.
In this case, we cheated a little, because we introduced the error and knew where it was. But hopefully the techniques used to find it make sense to you. They’ll be very useful when an error that you did not introduce intentionally happens in your apps.
Handling Compile-time Errors
Both of the error types that we’ve seen in this chapter are run time errors, where the error occurs while the application is running. The first was when the app didn’t behave as expected, and the second was when it crashed. The third, and perhaps the most common, form of error you’ll encounter is a coding error that prevents your app from compiling. In this section, we’ll see how you can fix this type of error.
First of all, let’s introduce a few errors to our app code and see what happens when we try to compile.
Change the code of the btnAsk function so that it looks like this:
- (IBAction)btnAsk:(id)sender {
int r = arc4randoms_uniform(2o);
_lblOutupt.text = magicStrings[r];
}
The steps to do this are:
- Change the "20" to "2o" (letter “o” instead of a zero)
- Mistype the name of _lblOutput, so it reads_lblOutupt
- Change the name of the function arcrandom_uniform to arcrandoms_uniform
You’ll see some hints appear to the left of your code to let you know something is wrong. Ignore them for now. Xcode is actually taking a step ahead of you here and testing the validity of your code using the same process the compiler does. It does this while you work on it and lets you know the problems that it sees.
Try to run the application. It will fail to run, and at the top of Xcode you’ll see a notification of the errors. See Figure 6-25.

Figure 6-25. Xcode fails to compile your app
You’ll see that the message indicates that your app failed, and on the right you’ll see the number of warnings (yellow triangle) and the number of errors (red circle) that the compiler encountered. To get more details, click the tool that represents the issue navigator in the project window at the left, where your files are listed. It is the fourth from the left and looks like an exclamation mark (!) inside a triangle. You can see it selected in Figure 6-26.
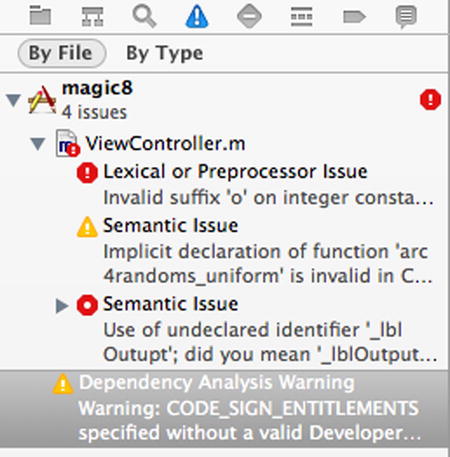
Figure 6-26. Showing the issue navigator
Using this navigator, we can see where the errors and warnings occur. In this case, there are three issues detected in ViewController.m—as we’d expect because we introduced three errors. Let’s look at these one by one.
The first is a lexical or preprocessor issue. This happened because the compiler had no idea what you meant in your code. Of course the arcrandom_uniform function expects an integer value passed to it, but you typed“2o.” Within the navigator, click the “Lexical or Preprocessor Issue” line. The code editor will jump to the line in question, allowing you to fix it. It even points to where it thinks the problem is. See the little triangle under the “o” in Figure 6-27.

Figure 6-27. Fixing the lexical or preprocessor compiler error
Change the “o” back to a “0” (zero), and the code will be retested in the background. The error will go away, and your issue navigator should now only have two errors in it. See Figure 6-28.

Figure 6-28. Updated issue navigator
Note Semantic issues occur when the compiler doesn’t understand what you mean. It’s smart enough to think it knows what you want, so gives you a hint as to what you might have really meant to type.
These are quite interesting, because the first one is just a warning, and the second is an actual error. This is because the first one is in a function, and the compiler is smart enough to know that sometimes function declarations are implicit. In this case it doesn’t think so, but it will let it pass with a warning. The second one is flagged as an error because we are referring to a property on an object called “lblOutupt,” which doesn’t exist. It’s smart enough to find what it thinks you are referring to, and in this case it’s right.
Click on the second semantic issue, the one with the red circle beside it. You’ll be taken to the code, and a little pop-up window will give you the option to fix it the way it thinks it should be fixed. See Figure 6-29.

Figure 6-29. Automatically fixing compiler errors
If the hint on the blue fix-it line is the right answer, double click the line, and Xcode will fix that line of code for you. Now your issue navigator should have just two warnings, and no errors.
Usually an app will run if it compiles without errors, but only if you do a full compile/link cycle, which is what happens when you build the entire app. Remember the hints you’ve been getting thus far are from Xcode, which is looking ahead to see what type of errors you might get. When you try to run the app, you’ll see that in addition to the two warnings, you now have two additional errors, and your app won’t run. See Figure 6-30.
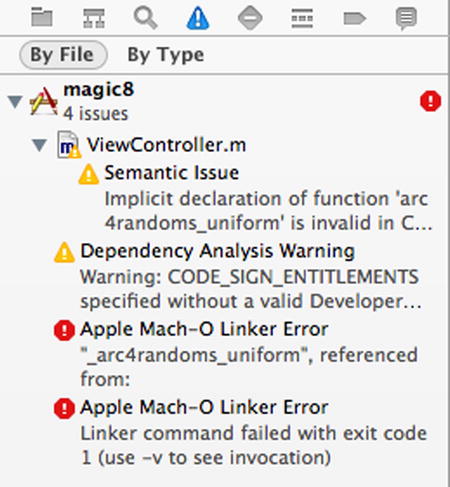
Figure 6-30. Additional errors when you try to run the app
Here, the rubber has hit the road, and instead of Xcode looking ahead to try and figure out what the errors might be, it has done a full compile of your app and gotten stuck. Naming the arc4random_uniform function incorrectly has caused a serious problem that stops your app from compiling altogether. Go ahead and fix the issue by changing the function name back to arc4random_uniform instead of arc4randoms_uniform, and you’ll be good to continue.
Note There’s another warning shown in many of the screen shots of this chapter, where the CODE_SIGN_ENTITLEMENTS is specified. This error occurs because the code hasn’t been signed by the developer. In order to run code on a device (see Chapter 3), some certificates and signatures are needed, but for the emulator they aren’t. For ease of development, we generally don’t sign apps until we are ready to run and test them in the emulator, so this warning is quite common. It’ll go away as you sign your apps for deployment.
Summary
In this chapter you learned how faults in your app can be found and fixed. You saw how to build a simple app that gives you a Magic 8-ball, and how you can have different types of errors in this application. These include coding errors that stop the app from working, but don’t crash it; errors that cause crashes; and errors that prevent the app from compiling at all. You worked through Xcode’s tools for each of these errors in order to fix your app completely. Hopefully the skills you’ve learned in this chapter will help you with any issues you encounter with the apps that we build in the rest of the book!