
Chapter 1: Running the Desktop from Start to Finish
In This Chapter
![]() Re-introducing the hot spots and corners
Re-introducing the hot spots and corners
![]() Discovering Aero Snap
Discovering Aero Snap
![]() Navigating
Navigating
![]() Working with File Explorer, files, and folders
Working with File Explorer, files, and folders
![]() Viewing
Viewing
![]() Sharing folders
Sharing folders
![]() Touching on the taskbar
Touching on the taskbar
![]() Recycling
Recycling
![]() Creating shortcuts
Creating shortcuts
This chapter explains how to find your way around the windows on the desktop — the part of Windows 8.1 that isn’t controlled by the tiled Metro Start screen (and, thus, isn’t really cool). If you’re an old hand at Windows, you know most of this stuff — such as mousing and interacting with dialog boxes — but Windows 8.1 puts a whole new slant on things, whether you’re touch-enabled or not.
This chapter also shows you the Windows 8.1 way to move around your files and folders, navigate the taskbar, create shortcuts, and more. It also shows you how to work around some of the more intrusive “improvements” made in Windows 8.
 Most of all, you need to understand that Windows 8.1 has almost everything that was in Windows 7 — you just need to find it. In most cases, the new tiled, immersive stuff kind of floats alongside the old-fashioned Windows 7 desktop. By and large, if you’re comfortable with the desktop — whether from years of experience, because you need to do the kinds of things that are best adapted to a keyboard and mouse, or just because you don’t like the touchy tiles — you can spend most of your time on the desktop.
 If you’ve used an earlier version of Windows and spent any time at all with Windows 8 or 8.1, you’re probably wondering where Microsoft hid all the programs that used to sit on the Start menu. In the Windows 8.1 scheme of things, you have to know how to find those programs and stick them someplace usable. I have complete instructions for finding your long-lost programs and pinning them either to the tiled Metro Start screen or the desktop Toolbar in Book VI, Chapter 3.
If you’re looking for a tour of the Windows 8.1 desktop interface, read on.
Getting Around
Your PC is a big place, and you can get lost easily. Microsoft has spent hundreds of millions of dollars to make sure that Windows 8.1 points you in the right direction and keeps you on track through all sorts of activities.
Amazingly, some of it actually works.
Knowing the desktop’s hot spots
In Book II, Chapter 1, I talk about getting around Windows, both with your fingers and with a mouse and keyboard.
I won’t dwell on what’s come before, but I do want to give you a quick refresher on navigating the desktop using just the mouse and keyboard. For most people who use Windows to get “real work” done (definitions vary, mutatis mutandis), the mouse and keyboard — and increasingly the microphone — are the tools of choice.
 Here are the crucial key combinations for navigation. It would be worth your while to memorize the following keystrokes (I find myself using these all the time):
![]() Tap the Windows key to cycle between the tiled Start screen and the last app that you were using. If the last app you used was on the desktop, you get your entire desktop back in the state it was in when you left.
Tap the Windows key to cycle between the tiled Start screen and the last app that you were using. If the last app you used was on the desktop, you get your entire desktop back in the state it was in when you left.
![]() Alt+Tab invokes the Cool Switch.
Alt+Tab invokes the Cool Switch.
If you don’t want to hunt around for the mouse — or if your mouse has suddenly gone out to lunch — Windows 8.1 has the Cool Switch feature, which lets you switch among running programs while (insert your best W.C. Fields impression here) your fingers never leave your hands . . . er, your fingers never leave the keyboard. Wink, wink. Just hold down Alt and press Tab. When you see the program you want, release Alt. Bam!
![]() Windows key+D brings up the old-fashioned desktop.
Windows key+D brings up the old-fashioned desktop.
![]() Windows key+C brings up the Charms bar on the right, the current time and date, and the major notification icons that appear on your logon screen.
Windows key+C brings up the Charms bar on the right, the current time and date, and the major notification icons that appear on your logon screen.
When you’re looking at the desktop, the four corners are hot. In particular, here’s what you see when you hover your mouse in each corner:
![]() Upper left: A thumbnail of the last app you ran appears. (By “app” I mean either one of the tiled, immersive Metro apps, or the entire old-fashioned desktop, which counts as one “app.”) Slide the mouse down the left, and you get the Running Apps bar, shown in Figure 1-1.
Upper left: A thumbnail of the last app you ran appears. (By “app” I mean either one of the tiled, immersive Metro apps, or the entire old-fashioned desktop, which counts as one “app.”) Slide the mouse down the left, and you get the Running Apps bar, shown in Figure 1-1.
You can click any thumbnail to flip over to that program, or click and drag the thumbnail to the right to set up the rigid, tiled Snap, which I describe in Book III, Chapter 1.
![]() Upper right: The Charms bar appears. Move your mouse down into the Charms bar, and the background turns black, solidifying the Charms, as shown in Figure 1-2. Turning the Charms bar black also brings up the current time.
Upper right: The Charms bar appears. Move your mouse down into the Charms bar, and the background turns black, solidifying the Charms, as shown in Figure 1-2. Turning the Charms bar black also brings up the current time.

Figure 1-1: The Running Apps bar on the left has one thumbnail for each app that’s currently running; the desktop counts as one app.
You may find yourself using the Charms Search function while on the desktop but probably won’t use the other Charms after you’ve tricked out your desktop with the customizations in Book VI, Chapter 3.
![]() Lower right: The Charms bar appears here, too, but strangely, all your desktop windows also turn into silhouettes (an old Vista/Win7 trick known as Aero Peek). So you can see your Charms but not your windows. Give it a try, and you’ll see what I mean.
Lower right: The Charms bar appears here, too, but strangely, all your desktop windows also turn into silhouettes (an old Vista/Win7 trick known as Aero Peek). So you can see your Charms but not your windows. Give it a try, and you’ll see what I mean.
![]() Lower left: Although it can be hard to coax the beast into appearing on the Metro side, hover your mouse in the lower-left corner of any Metro app, and the Start screen appears. On the old-fashioned desktop, the Start screen is at the lower left, on the left edge of the taskbar. Click it if you prefer this method of switching back to the tiled Metro Start screen, over pressing the Windows key.
Lower left: Although it can be hard to coax the beast into appearing on the Metro side, hover your mouse in the lower-left corner of any Metro app, and the Start screen appears. On the old-fashioned desktop, the Start screen is at the lower left, on the left edge of the taskbar. Click it if you prefer this method of switching back to the tiled Metro Start screen, over pressing the Windows key.
Also awaiting if you right-click the Start screen is a cool set of shortcuts called the Power User Menu, shown in Figure 1-3. You see the same menu if you press Windows key+X.
Of course, Windows 8.1 has zillions of key shortcuts, clicks, taps, and combinations thereof, but these are the ones I use the most.
![]()
Figure 1-2: The Charms bar has limited usefulness if you spend most of your time on the desktop, although Search comes in handy.

Figure 1-3: The Power User Menu appears if you right-click in the lower-left corner.
Cooling down the desktop’s hot spots
Windows 8.1 finally (finally!) lets you tone down Windows’ incessant flittering of bars and apps. Specifically, you can tell Windows to stop flashing the Running Apps bar (Figure 1-1) and the Charms bar (Figure 1-2) when you hover the mouse in upper-left or upper-right corners of the old-fashioned desktop. For those of us who like to flick the mouse to the upper right to close out of a window or go to the upper left to use, for example, the Office Quick Access Toolbar, accidentally bringing up the Running Apps bar or the Charms bar serves as a monumental, time-sucking distraction — and serves up yet one more reminder that we aren’t running good ol’ Windows 7.
If you want to tell Windows 8.1 to shut up — er, to prevent Windows 8.1 from showing the Charms bar and/or the Running Apps bar, here’s how to do it from the desktop side.
1. Right-click or click and hold any open spot on the Taskbar (at the bottom) and choose Properties.
The Taskbar and Navigation Properties dialog box appears.
2. Tap or click the Navigation tab.
You see the Navigation options shown in Figure 1-4.

Figure 1-4: Tell Windows to back off its intrusive sliding screens.
3. If you don’t want hovering in the upper-right corner to suddenly pave the right side of your screen with a black strip of charms, deselect the first box. If you don’t want hovering in the upper left to bring up your running apps, deselect the second box.
It’s hard for me to imagine why anybody with a mouse would want either, but de gustibus non est disputandum, eh?
4. Click OK.
Your changes take place immediately. Try it, you’ll see. Just remember that Windows key+C brings up the charms, and Alt+Tab cycles among programs as it always has.
(There’s a similar procedure for the same settings on the Metro side: Click or tap on the Settings charm, choose Change PC Settings at the bottom. On the left, choose PCs & Devices. Then choose Corners & Edges.)
I talk about this and other settings you’ll want to change if you use a mouse in Book VI, Chapter 3.
Snapping windows into place
Windows 8.1, like Windows 7, includes several “gesture” features that can save you a lot of time. Foremost among them is Aero Snap, a Windows 8.1 feature that’s been inherited from Windows 7 and works great.
On the desktop, Aero Snap is an easy way to place windows side by side, by using a mouse or your finger:
1. Click the title bar of a window and drag the window a-a-all the way to the left side of the screen.
As soon as the mouse (finger) hits the edge of the screen, Windows 8.1 resizes the window so that it occupies the left half of the screen and docks the window on the far left side.
2. Repeat Step 1 but drag a different window to the right side of the screen.
That makes it two-drag easy to put a Word document and a spreadsheet side by side, or a web page and File Explorer side by side, as shown in Figure 1-5. With the two windows side by side, you can easily click and drag between them and resize, minimize, maximize, and do all the other things Windows does with windows.

Figure 1-5: Two drags and you can have Windows arrange two programs side by side on the old-fashioned desktop.
Aero Snap isn’t the only desktop gesture. Check out these window tricks:
![]() If you drag a window to the top of the screen, it’s maximized, so it occupies the whole screen. (Yeah, I know: You always did that by double-clicking the title bar.)
If you drag a window to the top of the screen, it’s maximized, so it occupies the whole screen. (Yeah, I know: You always did that by double-clicking the title bar.)
![]() This only works if you have a mouse: Click a window’s title bar and shake it, all other windows on the screen move out of the way. They minimize themselves on the toolbar.
This only works if you have a mouse: Click a window’s title bar and shake it, all other windows on the screen move out of the way. They minimize themselves on the toolbar.
If you have “rodentophobia,” you can also do the mouse tricks explained in this section by pressing the following key combinations:
![]() Aero Snap left:
Aero Snap left: ![]() +←
+←
![]() Aero Snap right:
Aero Snap right: ![]() +→
+→
![]() Maximize:
Maximize: ![]() +
+![]()
There’s another snap in Windows 8.1, and it only works on the tiled side of the fence. Most of the time, Microsoft calls this other snap, confusingly, “Snap.” I call the tiled way of snapping “Metro Tiled Snap.” Not exactly rocket science, but it gets the point across.
 Microsoft is trying to get rid of the name “Aero.” For those of you who were raised to believe that Aero was one of the great selling points and big benefits of Windows 7, well, Microsoft killed Aero in Windows 8, and it’s still dead in Windows 8.1. (I hold out hope for Windows 9.) The old Aero you may remember — see-through window outlines, “X” boxes that light up, cool 3D effects around windows — are all gone, replaced by the tiled vision of regimented straight lines and lifeless boxes. Little pieces of Aero live on, though, and Aero Snap is one of them.
Tiled Metro Snap is a rather lame way of putting two apps side-by-side on the screen. As you can see in Figure 1-6, one of the “apps” can be the whole Windows 7–style desktop. You can’t drag stuff between the two Metro Snapped apps, can’t resize them, can’t do much at all. Read all about it in Book III, Chapter 1.
 Are you thinking, “Aero snap, tiled snap, what’s the difference?” The snap terminology can be confusing. Here’s the big difference: On the desktop side of the fence, the two Aero Snapped windows can interact. You can drag things from one window to another. On the tiled side, the Tiled Metro Snapped programs don’t interact at all. Each lives in its own little Windows world.

Figure 1-6: Tiled Metro Snap lets you put a tiled app and the desktop next to each other or two tiled apps side-by-side, but there’s no interaction.
Changing the mouse
If you’re left-handed, you can interchange the actions of the left and right mouse buttons. That is, you can tell Windows that it should treat the left mouse button as though it were the right button and treat the right button as though it were the left. The swap comes in handy for some left-handers, but most southpaws I know (including my number-one son) prefer to keep the buttons as is because it’s easier to use other computers if your fingers are trained for the standard setting.
The Windows ClickLock feature can come in handy if you have trouble holding down the left mouse button and moving the mouse at the same time — a common problem for notebook users who have fewer than three hands. When Windows uses ClickLock, you hold down the mouse button for a while (you can tell Windows exactly how long), and Windows locks the mouse button so that you can concentrate on moving the mouse without having to hold down the button.
To switch left and right mouse buttons or turn on ClickLock, follow these steps:
1. Right-click in the lower-left corner to bring up the Power User Menu (refer to Figure 1-3) and choose Control Panel.
You can also search for “Mouse Settings” from the Start screen or you can go to the Metro side, bring up Change PC Settings, choose PC & Devices, then Mouse & Touchpad.
2. In Control Panel, click the link for Hardware and Sound, then, under Devices and Printers, click the link that says Mouse.
You see the Mouse Properties dialog box shown in Figure 1-7.

Figure 1-7: Reverse the left and right mouse buttons with one click.
3. If you want to switch the functions of the left and right mouse buttons, select the Switch Primary and Secondary Buttons check box.
Note that the function of the right and left buttons changes immediately, so you may have to right-click to deselect the box!
4. If you want to turn on ClickLock, check the Turn On ClickLock box and immediately click the Settings button.
You can then click the Settings button to adjust the length of time you need to hold down the mouse button for ClickLock to kick in.
5. Click OK.
The changes take place immediately.
Exploring Files and Folders
“What’s a file?” Man, I wish I had a nickel for every time I’ve been asked that question.
A file is a, uh, thing. Yeah, that’s it. A thing. A thing that has stuff inside it. Why don’t you ask me an easier question, like “What is a paragraph?” or “What is the meaning of life, the universe, and everything?”
Seriously, though, this section answers your questions about the basics of the Windows 8.1 interface: basic terms, basic navigation techniques, basic ways to organize the 76 items you’ve saved to the desktop, and more.
Nailing the basic terminology
A file is a fundamental chunk of stuff. Like most fundamental chunks of stuff (say, protons or Congressional districts), any attempt at a definitive definition gets in the way of understanding the thing itself. Suffice it to say that a Word document is a file. An Excel workbook is a file. That photograph your cousin e-mailed you the other day is a file. Every track on the latest Run-D.M.C. album is a file, but so is every track on every audio CD ever made. Darryl McDaniels isn’t that special.
Filenames and folder names can be very long, but they can’t contain the following characters:
/ : * ? “ < > |
Files can be huge. They can be tiny. They can even be empty, but don’t short-circuit any gray cells on that observation.
Folders hold files and other folders. Folders can be empty. A single folder can hold millions — yes, quite literally millions — of files and other folders.
If you’re going to get any work done with those files and folders, you have to interact with File Explorer, formerly known as Windows Explorer, the slow-beating heart of the user experience (or, the way Windows interacts with people). Gad. When you want to work with Windows, such as ask it where it stuck your wedding pictures, show it how to mangle your files, or tell it (literally) where to go, you usually use File Explorer.
If you click the icon at the bottom of the desktop, the one that looks like a file folder, you get tossed into File Explorer, with Explorer set up to look at your libraries. File Explorer comes up looking like Figure 1-8.
See the first line of text in the windows, the line that says, File, Computer, View? It’s way up at the top, just below the top bar that says “This PC.” If you click any of those, Explorer brings up an icon-laden strip that offers various options. That’s the File Explorer Ribbon. You can turn it on full-time by clicking the down-wedge icon in the upper-right corner. That brings up the Ribbon shown in Figure 1-9.

Figure 1-8: File Explorer in its native state.

Figure 1-9: The File Explorer Ribbon.
Some people hate the Ribbon, some people love it. I, personally, turn it off when I’m jumping in and out of File Explorer to get some work done — copying files, say, or moving or renaming. But if I need to do something that I don’t usually do and I need a little help, I turn the Ribbon on. That makes me a pariah in some geeky circles; real geeks don’t use Ribbons, or so I’m told. So be it. Sometimes I’m a dummy, just like everybody else.
If you’ve used Windows 7 or Windows 8, you may be looking for your Libraries — groups of folders that are organized so you can get into all of them at the same time or move among them readily. Windows 8.1 still has Libraries, but you have to bring them out and set them up. I explain how to do that in Book VII, Chapter 3.
Why did Microsoft hide Libraries in Windows 8.1? Easy question. It wants you to put everything in SkyDrive, so Microsoft can start charging you for online storage space, of course. Microsoft’s profit margins on billed-out cloud storage space are enormous: That $25 per year you pay for 50GB of SkyDrive storage probably cost Microsoft just a buck or two — assuming you use more than a tiny percentage of what you’re paying for. Silly customer.
Navigating
As you can see in Figure 1-10, File Explorer arrives chock full of options, many of which have to do with getting around. File Explorer helps you get around in the following ways:

Figure 1-10: File Explorer helps you move around.
![]() Click a folder to see the folders and files inside that folder. On the left side of the File Explorer window (refer to Figure 1-9), you can click a real folder (such as Desktop or Downloads); a shortcut you dragged to the Favorites list on the left (InfoWorld Tech Brief, for example); your SkyDrive storage, if you’re logged in (the “X” in Figure 1-10 means that I’m not logged in to SkyDrive); other computers in your Homegroup; other drives on your computer (click This PC); or other computers on the network.
Click a folder to see the folders and files inside that folder. On the left side of the File Explorer window (refer to Figure 1-9), you can click a real folder (such as Desktop or Downloads); a shortcut you dragged to the Favorites list on the left (InfoWorld Tech Brief, for example); your SkyDrive storage, if you’re logged in (the “X” in Figure 1-10 means that I’m not logged in to SkyDrive); other computers in your Homegroup; other drives on your computer (click This PC); or other computers on the network.
![]() Use the “cookie crumb” navigation bar or the up arrow to move around. At the top of the File Explorer window (refer to Figure 1-10), you can click the wedges to select from available folders, or click the up arrow to move “up” one level in the folder hierarchy.
Use the “cookie crumb” navigation bar or the up arrow to move around. At the top of the File Explorer window (refer to Figure 1-10), you can click the wedges to select from available folders, or click the up arrow to move “up” one level in the folder hierarchy.
![]() Details appear below. If you click a file once in the big area on the right, the size of the file appears in the Details box at the bottom of the File Explorer window. If you double-click a folder on the right, the folder becomes the current folder, which means you can see its contents. If you double-click a document, it opens. (For example, if you double-click a Word document, Windows fires up Word and has it start with that document open and ready for work.)
Details appear below. If you click a file once in the big area on the right, the size of the file appears in the Details box at the bottom of the File Explorer window. If you double-click a folder on the right, the folder becomes the current folder, which means you can see its contents. If you double-click a document, it opens. (For example, if you double-click a Word document, Windows fires up Word and has it start with that document open and ready for work.)
![]() Almost all the actions you may want to perform on files or folders show up in the Ribbon at the top. You may have to click the tabs to move from Home to Share to View to Manage. Many of the actions you may want to perform are accessible by right-clicking the file or folder. Some people find it easier to use the Ribbon; others prefer a right-click.
Almost all the actions you may want to perform on files or folders show up in the Ribbon at the top. You may have to click the tabs to move from Home to Share to View to Manage. Many of the actions you may want to perform are accessible by right-clicking the file or folder. Some people find it easier to use the Ribbon; others prefer a right-click.
![]() Open as many copies of File Explorer as you like. That can be very helpful if you’re scatterbrained like I am . . . I mean if you like to multitask and you want to look in several places at once. Simply tap and hold or right-click the File Explorer icon down on the taskbar, choose File Explorer, and a totally independent copy of File Explorer appears, ready for your finagling.
Open as many copies of File Explorer as you like. That can be very helpful if you’re scatterbrained like I am . . . I mean if you like to multitask and you want to look in several places at once. Simply tap and hold or right-click the File Explorer icon down on the taskbar, choose File Explorer, and a totally independent copy of File Explorer appears, ready for your finagling.
Viewing and Filename Extensions
Large Icons view (refer to Figure 1-10) is, at once, visually impressive and cumbersome. If you grow tired of scrolling (and scrolling and scrolling) through those icons, down in the lower-right corner, click the icon that looks like dots and dashes. You see the succinct list shown in Figure 1-11.
Windows offers several picturesque views — dubbed Extra Large Icons, Large Icons, Medium Icons, Small Icons, and Infinitesimal Eyestraining Icons (okay, I got carried away a bit) that can come in handy if you’re looking through a bunch of pictures. In most other cases, though, the icons only get in the way. Besides, if you’re looking at a lot of pictures, you’re probably going to want to use the Windows Photo Gallery program (Book VI, Chapter 5) or maybe even delve in to the tiled Metro Photos app (see Book IV, Chapter 3) — although the latter is a bit of a stretch.
In Details view, you can sort the list of files by clicking on one of the column headings (Name or Date Modified, for example). You can right-click one of the column headings and choose More to change what the view shows (get rid of Type, for example, and replace it with Tags).
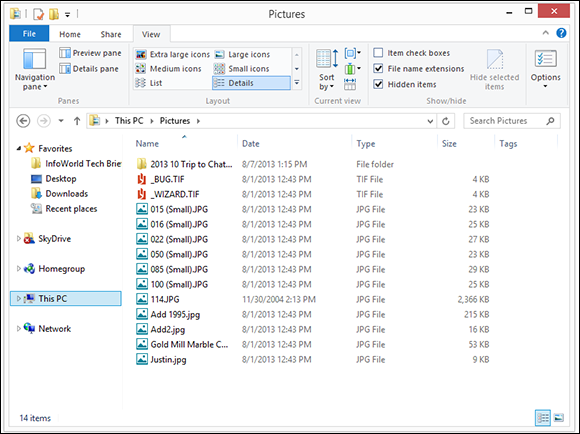
Figure 1-11: Details view has more meat, less sizzle.
Previewing
File Explorer’s View tab has a button on the left that lets you turn on the Preview pane: It’s a strip along the right side of the window that, in many cases, shows a preview of the file you selected. See Figure 1-12.
Some people love the preview feature. Others hate it. A definite speed hit is associated with previewing: You may find yourself twiddling your thumbs as Windows gets its previews going. The best solution is to turn off the preview unless you absolutely need it. And use the right tool for the job: If you’re previewing a lot of picture files and don’t need to drag them anywhere, use Windows Photo Gallery, Flickr, or fire up the tiled Metro Photos app from the Start screen.
Creating files and folders
Usually, you create new files and folders when you’re using a program. You make new Word documents when you’re using Word, say, or come up with a new folder to hold all your offshore banking spreadsheets when you’re using Excel. Programs usually have the tools for making new files and folders tucked away in the File⇒Save and File⇒Save As dialog boxes. Click around a bit, and you’ll find them.

Figure 1-12: The File Preview pane on the right previews some files’ contents.
You can also quite easily create a new file or folder directly in an existing folder without going through the hassle of cranking up a 900-pound gorilla of a program. Follow these steps:
1. In File Explorer, move to the location where you want to put the new file or folder.
For example, if you want to stick the new folder Revisionist Techno Grunge in your Music folder, click the Music link under Libraries.
2. Tap or click the Home tab.
You see the Home Ribbon, shown in Figure 1-13.
3. Choose New Folder.
Windows creates the new file or folder and leaves it with the name highlighted so that you can rename it by simply typing.
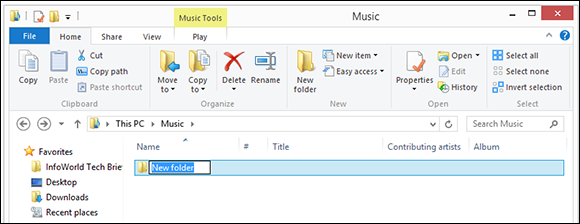
Figure 1-13: Create a new file or folder from the New Folder button or the New Item drop-down list.
Copying, moving, and modifying files and folders
As long as you have permission (see the section “Sharing Folders in the Public Folder,” later in this chapter), modifying files and folders (renaming, deleting, moving, or copying them) is easy if you use the Home Ribbon.
Here’s how to copy or move one or more files or folders:
1. To bring up File Explorer on the desktop, click the folder icon down on the Taskbar.
2. When File Explorer is up, click the Home tab.
That brings up the Home Ribbon (refer to Figure 1-13).
3. Navigate to the location of the file(s) and/or folder(s) you want to move or copy.
If you want to move or copy folders or files from more than one location, repeat Steps 3 through 6, gathering folders and files like flowers in May.
4. Select the folder(s) or file(s) that you want to move or copy.
You can use the usual Windows selection tricks:
• Select a single file or folder by clicking or tapping it.
• Hold down the Ctrl key to select multiple items that aren’t next to each other. (If you’re tapping, tap one, then the next, then the next.)
• Hold down the Shift key to select a group of contiguous items (ones that are next to each other). Just click the first item, hold down the Shift key, and click the last item.
• You can even “lasso” items by drawing a box around the stuff you want to select.
5. On the Home Ribbon, click the Copy To or Move To icon.
Your screen should look like Figure 1-14.

Figure 1-14: Easy way to copy or move with the Home Ribbon.
6. If the destination location you want is on the list, select it. Otherwise, at the bottom select Choose Location.
Choose Location brings up a Copy Items or Move Items dialog box that lets you select where you want to copy or move the folders and files.
The preceding steps explain the simplest way to move or copy. This isn’t the fastest way, though. If you want fast (and most people do after they’ve copied or moved a couple hundred files), and you have a keyboard, all you need to remember is the most-commonly used key combinations in Windows:
![]() Select the files or folders and press Ctrl+C to copy them (which is to say, hold down the Ctrl key, then press the C key).
Select the files or folders and press Ctrl+C to copy them (which is to say, hold down the Ctrl key, then press the C key).
![]() Select the files or folders and press Ctrl+X to “cut” them.
Select the files or folders and press Ctrl+X to “cut” them.
![]() Go to the place you want to hold the files or folders and press Ctrl+V to paste them. If you Ctrl+C copied the files, you’ll have two copies, one in the original location. If you Ctrl+X “cut” the files, they’ll be moved to the destination and deleted from the original location.
Go to the place you want to hold the files or folders and press Ctrl+V to paste them. If you Ctrl+C copied the files, you’ll have two copies, one in the original location. If you Ctrl+X “cut” the files, they’ll be moved to the destination and deleted from the original location.
Similarly, if you have a mouse, you can right-click a file or group of files or folders, and choose Copy or Cut, then move to the destination, right-click, and choose Paste.
If you have a file that needs to be organized in a few different ways on your computer and/or home network, don’t copy and paste to several different locations. Instead, save the file in the best location and use libraries to create a single place where you can find files that are saved throughout your system or network. Libraries may sound complicated, but I think you’ll be happy you checked them out. Book VII, Chapter 3 has all the details about Libraries.
Handling copy and paste conflicts
Before Windows starts copying or moving files, it compares the filenames of the files you’re copying with the names of the files (and folders) in the destination folder. If you’re trying to copy a file named Mxyzptlk.xlsx into a folder that already has a file named Mxyzptlk.xlsx, Windows has a problem. You may have a problem, too. Hard to say.
If Windows hits a duplicated filename, it tosses up the Replace or Skip Files dialog box shown in Figure 1-15, with the following options:

Figure 1-15: Windows needs you to tell it what you want to do with files that have the same filename.
![]() Replace the Files in the Destination Folder: Choose this, and your old files are overwritten with the new ones with matching names.
Replace the Files in the Destination Folder: Choose this, and your old files are overwritten with the new ones with matching names.
![]() Skip These Files: The old files remain intact. Or you can choose Behind Door Number Three, Monte, and pick and choose which files get bumped.
Skip These Files: The old files remain intact. Or you can choose Behind Door Number Three, Monte, and pick and choose which files get bumped.
![]() Choose the Files to Keep in the Destination Folder: This option opens a File Conflicts dialog box like the one in Figure 1-16. Yes, files can have conflicts, too. Windows doesn’t ask you to resolve conflicting folder names: It will create new folders or add to existing folders without being directed. But you do have to pick which individual files you want to keep and which to leave behind.
Choose the Files to Keep in the Destination Folder: This option opens a File Conflicts dialog box like the one in Figure 1-16. Yes, files can have conflicts, too. Windows doesn’t ask you to resolve conflicting folder names: It will create new folders or add to existing folders without being directed. But you do have to pick which individual files you want to keep and which to leave behind.
In the File Conflicts dialog box, you can:
• Check a box at the top to choose all the files from the source location or from the destination location.
• Check a box next to each individual file you want to keep. The unchecked files are discarded.

Figure 1-16: Resolving the conflicts by hand; choose which files you want.
![]() Check the box next to each file in the match-up (for example, in Figure 1-16, if you check the box next to the frog on the left and the one on the right). If you elect to keep both, Windows puts a
Check the box next to each file in the match-up (for example, in Figure 1-16, if you check the box next to the frog on the left and the one on the right). If you elect to keep both, Windows puts a (1), including the parentheses, on the end of the name of the file from the source location.
![]() Check the box at the bottom to skip files with the same date and time. If you have files with the same name but different dates/times, Windows copies the files across and puts a
Check the box at the bottom to skip files with the same date and time. If you have files with the same name but different dates/times, Windows copies the files across and puts a (1) (or (2), or (3), and so forth) at the end of the copied file's name.
Piloting the new copy manager
Windows 8.1 has a great copy manager that helps you keep track of longer copy (and move) jobs. The copy manager is mostly eye candy, but it does have one important function: It lets you pause or cancel a specific copy (or move).
That’s an important capability because, as you’ll soon discover, if you try to run two copies/moves on the same device, both slow down to a crawl. The effect is particularly noticeable on hard drives, where the heads have to dance the Texas Two Step to keep up, and on USB drives and other devices with limited bandwidth. Simply pausing one of the copy/move jobs will speed the other one up enormously.
Here’s how the copy manager works:
1. When you have a copy/move in progress, you see a progress indicator dialog box. Click the More Details link at the bottom.
You see the Running Actions dialog box shown in Figure 1-17.
2. To pause a particular copy/move activity, click the double-hash Pause icon. To cancel it completely, click the X.
Deleting and renaming files
Deleting or renaming a file is very easy, with the Home Ribbon (refer to Figure 1-13). Just select the files or folders that you want to delete and tap or click the Delete icon, which is just to the right of the Copy icon.
Or you can just hit the Del key. Or right-click and choose Delete.
If you use the Delete icon, you have two choices: Recycle and Permanently Delete. When you Recycle, you don’t actually delete anything: You just send it to the Recycle Bin, which I discuss in the section called “Recycling,” later in this chapter.
Even if you Permanently Delete a file or folder, guess what: It’s still on your hard drive, and anyone who can get on your computer can probably bring it back using an “undelete” utility such as Recuva. See my discussion of Recuva in Book X, Chapter 5.

Figure 1-17: When a copy or move is in progress, you can see the full details.
Sharing Folders in the Public Folder
Sharing is good, right? Your mom taught you to share, didn’t she? Everything you need to know about sharing you learned in kindergarten — like how you can share your favorite crayon with your best friend and get back a gnarled blob of stunted wax, covered in mysterious goo.
Microsoft wants you to share files by buying space on SkyDrive, so it goes to great lengths to hide the Public folders. But they’re there.
Windows supports two very different ways for sharing files and folders:
![]() Move the files or folders that you want to share into the Public folder. The Public folder is kind of a big cookie jar for everybody who uses your PC: Put a file or folder in the Public folder so that all the other people who use your computer can get at it. The Public folder is available to other people in your HomeGroup, if you have one, but you have little control over who, specifically, can get at the files and folders. (HomeGroups make it easier to set up sharing among Windows computers on a network; see Book VII, Chapter 5 for details.)
Move the files or folders that you want to share into the Public folder. The Public folder is kind of a big cookie jar for everybody who uses your PC: Put a file or folder in the Public folder so that all the other people who use your computer can get at it. The Public folder is available to other people in your HomeGroup, if you have one, but you have little control over who, specifically, can get at the files and folders. (HomeGroups make it easier to set up sharing among Windows computers on a network; see Book VII, Chapter 5 for details.)
![]() Share individual files or folders without moving them anywhere. When you share a file or folder, you can tell Windows to share the folder with everyone in your HomeGroup and with other users who log on to your computer, or you can specify exactly who can access the file or folder and whether they can just look at it or change or delete it. This detailed level of permissions is beyond the scope of this chapter, but I do cover it in Book VII, Chapter 5, along with HomeGroups.
Share individual files or folders without moving them anywhere. When you share a file or folder, you can tell Windows to share the folder with everyone in your HomeGroup and with other users who log on to your computer, or you can specify exactly who can access the file or folder and whether they can just look at it or change or delete it. This detailed level of permissions is beyond the scope of this chapter, but I do cover it in Book VII, Chapter 5, along with HomeGroups.
This section focuses on sharing folders and files via the Public folder.
You may think that simply moving a file or folder to the Public folder would make it, well, public. At least to a first approximation, that’s exactly how things work.
Any file or folder that you put in the Public folder, or any folder inside the Public folder, can be viewed, changed, or deleted by anybody who’s using your computer, regardless of which kind of account she may have and whether she is required to log on to your computer. In addition, anybody who can get into your computer through the network will have unlimited access. The Public folder is (if you’ll pardon a rather stretched analogy) a big cookie jar, open to everybody who is in the kitchen.
For more details and important information about public networks and big-company domains, check out Networking All-In-One For Dummies, by Doug Lowe (published by John Wiley & Sons).
Say you have an album in your Music folder that you want to be available to everybody who has access to your computer, either by logging on to your computer with a different account or by being attached to your Homegroup. The easiest way to share that folder or album is by moving it to your PublicMusic folder. (You can put it in your SkyDrive folder, covered in Book V, Chapter 1, but then you have to manage permissions for who can get into it and when.) Here’s how to move a file into one of the Public folders:
1. Start File Explorer.
If you’re on the desktop, tap or click the icon down on the Taskbar that looks like a file folder. If you’re on the Start screen, click the tile for the desktop, then choose File Explorer.
2. Navigate to the folder or file that you want to put in one of your Public folders. Right-click it (or tap and hold) and choose Copy.
In Figure 1-18, I navigate to my Music folder, where I have a folder called Alicia Keys.
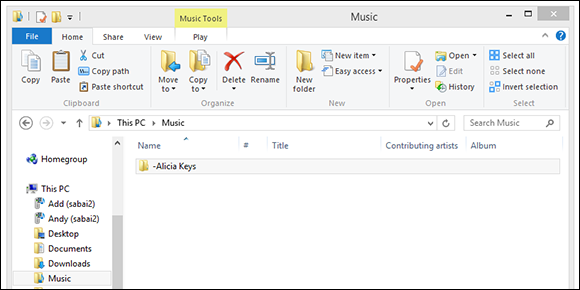
Figure 1-18: Sharing a file or folder by moving it into one of the Public folders is difficult because you have to find the folder.
3. Here’s the tricky part. You want to navigate to the folder PublicMusic. To do so, on the left, double-click or tap This PC then, near the bottom of the list, double-click on Local Disk (C:). Double-click on Users, then Public, then Public Music.
The Public folders are all hidden well away.
4. Press Ctrl+V or right-click and choose Paste to paste the folder into the Public Music folder.
From that point, anybody who has access to my Public Music folder can play the songs on the album.
Files and folders in the Public folder may also be accessible to other computers connected to your network, workgroup, or domain, depending on various network settings. See Book VII, Chapter 5, and Networking All-In-One For Dummies for specific examples.
Microsoft has made it extraordinarily difficult to get into your Public folders. That’s a shame, really, but it certainly does want to sell you SkyDrive space, by golly. I recommend that you put a link to your Public folders in the File Explorer Favorites list. To do so, follow Step 3 above. When you see the Public folder on the right, just right-click it and drag it to the Favorites list on the left. See Figure 1-19.

Figure 1-19: Drag and drop your computer’s Public folder on the Favorites list to make it easier to get to items in the Public folder.
Touching on the Taskbar
Windows sports a highly customizable, if not a bit ugly, taskbar at the bottom of the screen, shown in Figure 1-20. I go into detail in Book II, Chapter 2.

Figure 1-20: The Windows 8.1 taskbar.
The taskbar takes on new importance in Windows 8.1 because there’s no Start menu on which to pin your hopes (or your programs or folders, much less your dreams). If you want to stay inside the desktop without venturing to the Start screen, you better get used to pinning things on the taskbar.
Keep these points in mind when considering the taskbar:
![]() Hover your mouse over an icon to see what the program’s running. For example, in Figure 1-20, I hover my mouse over the Internet Explorer icon and see that I have two tabs open. I can click either thumbnail to bring up the appropriate tab.
Hover your mouse over an icon to see what the program’s running. For example, in Figure 1-20, I hover my mouse over the Internet Explorer icon and see that I have two tabs open. I can click either thumbnail to bring up the appropriate tab.
![]() Right-click an icon or tap and hold, and you see the application’s Jump List. The Jump List may show an application’s most recently opened documents. It may show a browser’s history list. Implementation of Jump Lists has been spotty, but it’s bound to improve with the Taskbar’s newfound importance.
Right-click an icon or tap and hold, and you see the application’s Jump List. The Jump List may show an application’s most recently opened documents. It may show a browser’s history list. Implementation of Jump Lists has been spotty, but it’s bound to improve with the Taskbar’s newfound importance.
If you click an icon, the program opens, as you would expect. But if you want to open a second copy of a program — say, another copy of Firefox — you can’t just click the icon. You have to right-click and choose the application’s name.
![]() You can move the icons on the taskbar by simply clicking and dragging.
You can move the icons on the taskbar by simply clicking and dragging.
The Windows taskbar has many tricks up its sleeve, but it has one capability that you may need, if screen real estate is at a premium. (Hey, you folks with 30-inch monitors need not apply, okay?)
The taskbar has an Auto-Hide feature that shrinks the taskbar to a thin line until you bump the mouse pointer way down at the bottom of the screen. As soon as the mouse pointer hits bottom, the taskbar pops up. Here’s how to teach the taskbar to auto-hide:
1. Right-click an empty part of the taskbar.
2. Choose Properties.
The Taskbar tab should be visible.
3. Select the Auto-Hide the Taskbar check box and then click OK.
The taskbar holds many surprises. See Book II, Chapter 2.
Recycling
When you delete a file, it doesn’t go to that Big Bit Bucket in the Sky. An intermediate step exists between deletion and the Big Bit Bucket. It’s called purgatory. Oops. Wait a sec. Wrong book. (Existentialism For Dummies, anybody?) Let me try that again. Ahem.
The step between deletion and the Big Bit Bucket is the Recycle Bin.
When you delete a file or folder from your hard drive — whether by selecting the file or folder in File Explorer and pressing Delete, using the File Explorer Home Ribbon’s Delete button, or by right-clicking and choosing Delete — Windows doesn’t actually delete anything. It marks the file or folder as being deleted but, other than that, doesn’t touch it.
Files and folders on key drives, SD cards, and network drives don’t go into limbo when they’re deleted. The Recycle Bin doesn’t work on key drives, SD cards, or drives attached to other computers on your network. That said, if you accidentally wipe out the data on your key drive or camera memory card, there is hope. See my discussion of the program called Recuva in Book X, Chapter 5.
To rummage around in the Recycle Bin and possibly bring a file back to life, follow these steps:
1. Double-click the Recycle Bin icon on the Windows desktop.
File Explorer opens to the Recycle Bin, shown in Figure 1-21.
2. To restore a file or folder, select the file or folder and then click the Restore the Selected Items icon.

Figure 1-21: Restore files one at a time or en masse.
If you can’t find what you want in the Recycle Bin, follow the steps in Book VIII, Chapter 1 to see whether you can dig something out of the Windows File History feature. If you don’t have File History running, right now is a good time to start.
To reclaim the space that the files and folders in the Recycle Bin are using, click the Empty the Recycle Bin icon. Windows asks whether you really, truly want to get rid of those files permanently. If you say Yes, they’re gone . . . except Recuva may be able to bring them back.
Creating Shortcuts
Sometimes life is easier with shortcuts. (As long as the shortcuts work, anyway.) So, too, in the world of Windows, where shortcuts point to things that can be started. You may set up a shortcut to the Calculator, say, and put it on your desktop. Double-click the shortcut, and the Calculator starts, the same way as if you had gone out to the Start screen, typed calc and pressed Enter.
You can set up shortcuts that point to the following items:
![]() Programs of any kind
Programs of any kind
![]() Web addresses, such as
Web addresses, such as www.dummies.com
![]() Documents, spreadsheets, databases, PowerPoint presentations, and anything else that can be started in File Explorer by double-clicking it
Documents, spreadsheets, databases, PowerPoint presentations, and anything else that can be started in File Explorer by double-clicking it
![]() Specific chunks of text (called scraps) inside documents, spreadsheets, databases, and presentations, for example
Specific chunks of text (called scraps) inside documents, spreadsheets, databases, and presentations, for example
![]() Folders (including the weird folders inside digital cameras, the Fonts folder, and others that you may not think of)
Folders (including the weird folders inside digital cameras, the Fonts folder, and others that you may not think of)
![]() Drives (hard drives, CD drives, and key drives, for example)
Drives (hard drives, CD drives, and key drives, for example)
![]() Other computers on your network, and drives and folders on those computers, as long they’re shared
Other computers on your network, and drives and folders on those computers, as long they’re shared
![]() Printers (including printers attached to other computers on your network), scanners, cameras, and other pieces of hardware
Printers (including printers attached to other computers on your network), scanners, cameras, and other pieces of hardware
![]() Network connections, interface cards, and the like
Network connections, interface cards, and the like
You have many different ways to create shortcuts.
Say that you use the Windows Calculator all the time, and you want to put a shortcut to the Windows Calculator on your desktop’s taskbar. Here’s an easy way to do it:
1. Hit the Windows key (or on a tablet, tap the Windows button) to flip over to the tiled Metro Start screen.
Yes, I promised that I wouldn’t use the Start screen in this chapter, but this really is the easiest way to set up the shortcut. Trust me. (You can also hover your mouse in the upper-right corner, and choose Search from the Charms bar.)
2. Immediately type calc.
Windows finds two Calculators for you and shows them on the tiled Metro Start screen, as shown in Figure 1-22. The first Calculator is for the old-fashioned desktop side of Windows. The second calculator (which is boxier and considerably more Metro-like) is for the Metro tiled calculator.

Figure 1-22: The search results when you type in calc.
3. Right-click the top Calculator.
Windows brings up a list of options.
4. Choose Pin to Taskbar.
A shortcut to the Calculator appears on your taskbar.
I find the File Explorer Home Ribbon confusing when it comes to shortcuts, which is why I didn’t show that method here. If you really want to use the Ribbon, you can navigate to the location of the Calculator program, select the Calculator, then copy it (using Ctrl+C or right-click then copy). Move to whatever folder you want to hold the shortcut, and click Paste Shortcut. The complicated part is that you have to copy the whole program before it’ll work; copying the path, for example, isn’t sufficient.
Believe it or not, Windows thrives on shortcuts. They’re everywhere, lurking just beneath the surface. For example, every single icon on the taskbar is a shortcut. As you may have noticed, the programs that you find when you run a search on the tiled Metro Start screen are frequently shortcuts. Most of the Metro Start screen is based on shortcuts, although they’re hidden where you can’t reach them. So don’t be afraid to experiment with shortcuts. In the worst-case scenario, you can always delete them. Doing so gets rid of the shortcut but doesn’t touch the original file.
Sleep: Perchance to Dream
Windows 8.1 has been designed so that it doesn’t need to be turned off.
Okay, that’s a bit of an overstatement. Sometimes you have to re-start your computer to let patches kick in. Sometimes you’re going to be gone for a week and need to give the beast a blissful rest. But by and large, there isn’t a whole lot of reason for shutting off a Windows 8 or Windows 8.1 computer — the power management schemes are very green.
The only power setting most people need to fiddle with is the length of time Windows allows before it turns the screen black. On the desktop, that’s tied in with the screen saver because activating a screen saver may keep the computer going for a long time. Here’s the easy way to adjust your screen blackout time:
1. Right-click any empty part of the desktop and choose Personalize.
Windows brings up the Personalization dialog box.
2. In the lower-right corner, choose Screen Saver.
You see the Screen Saver Settings dialog box, which I discuss in Book VI, Chapter 2.
3. In the lower-left corner, click the link to Change Power Settings.
Windows shows the Power Options dialog box, shown in Figure 1-23.

Figure 1-23: Set the power options.
4. Choose one of the power options.
The only substantial difference between Balanced and Power Saver, on a desktop computer, is the length of time Windows waits before turning the screen black: With the Balanced plan, it goes out in ten minutes; with the Power Saver plan, it goes out in five minutes. They both spin down the hard drive after 20 minutes.
If you want to look at the details, click one of the links to Change Plan Settings.
5. Close out of the Power Options dialog box by clicking X.
Your changes take effect immediately.
Although Microsoft has published voluminous details about the power down and power up sequences, including the new sleep state, I haven’t seen any details about how long it takes before your PC actually goes to sleep. In theory, that shouldn’t matter too much because the wake-ups are so fast.
Microsoft recently published some recommendations that I found fascinating. To truly conserve energy with a desktop computer, be aggressive with the monitor idle time (no longer than two minutes), and make sure that you don’t have a screen saver enabled. If you want to conserve energy with a notebook or netbook, your top priority is to reduce the screen brightness!
I talk about power conservation and the many paths to greenness in Green Home Computing For Dummies (published by John Wiley & Sons), which I co-wrote with fellow Dummy Katherine Murray. (Hi, Kathy!) It’s packed with important information for anybody with a PC and a conscience.