
Chapter 5: Getting the Most from HomeGroups
In This Chapter
![]() Setting up the prerequisites for HomeGroups
Setting up the prerequisites for HomeGroups
![]() Joining, sharing, and navigating a HomeGroup
Joining, sharing, and navigating a HomeGroup
![]() Making changes to your HomeGroup
Making changes to your HomeGroup
![]() Sharing with Windows XP and Vista and with a Mac
Sharing with Windows XP and Vista and with a Mac
If you’ve ever used a house key, you know how to use HomeGroups. Okay, that’s Microsoft’s analogy, and the process isn’t quite that easy, but it’s close.
The HomeGroup bundles a bunch of settings in quite a handy — I’m tempted to use the word brilliant — way. When your PC joins a HomeGroup, Windows strips away a lot of the hassle and mind-numbing details generally associated with sharing folders and printers and replaces the mumbo jumbo with a cookie-cutter method of sharing that works quite well, in almost all home and many small-business networks.
All the computers in a HomeGroup share their Pictures, Music, and Videos Libraries, and with an extra click, you can share your Documents Library as well. (See Book VII, Chapter 3 for a discussion of Libraries and instructions on how to make them visible.) The computers also share printers and some other peripherals. All it takes is a couple of taps. Or clicks.
 Don’t be put off by the term HomeGroup. If you have a business and need to share information, a HomeGroup may provide exactly what you want.
Preparing a PC for a HomeGroup
When you first establish a network connection, Windows asks whether you want to turn on sharing and connect to devices, per Figure 5-1.

Figure 5-1: Tell Windows if you’re connected to a friendly network or one that may include a lot of bad PCs.
If you turn on sharing and connect to devices, your Windows 8.1 PC can participate in a HomeGroup. All you need is the password of an existing HomeGroup. Microsoft likens it to having a key to a house. At the risk of stretching a metaphor, if you have the key to the house (the HomeGroup password), you can get into anything in the house (printers, folders, and files inside those folders, in particular). If you don’t have the password or if there’s no HomeGroup on your network, you can create a new HomeGroup and set a new password. Find out how in the upcoming section, “Setting up a new HomeGroup.”
 A few points to remember as you’re getting a PC ready for the HomeGroup:
![]() HomeGroups work only with Windows 7, 8, and Windows 8.1 computers. You can have a zillion computers on your home or office network, running Windows, OS X, Linux, iOS, and Android, laughing and printing and crashing together, but only the ones running Windows 8 or 8.1 with sharing turned on and Windows 7 PCs with a designated Home network type can participate in a HomeGroup. (See the sidebar “What happened to home, work, and public networks?”)
HomeGroups work only with Windows 7, 8, and Windows 8.1 computers. You can have a zillion computers on your home or office network, running Windows, OS X, Linux, iOS, and Android, laughing and printing and crashing together, but only the ones running Windows 8 or 8.1 with sharing turned on and Windows 7 PCs with a designated Home network type can participate in a HomeGroup. (See the sidebar “What happened to home, work, and public networks?”)
![]() HomeGroups can exist within a bigger network of HomeGroup-incompatible computers. If you have computers that run something other than Windows 7 or 8, you have Windows 7 computers that are set up with work or public networks, or you have Windows 8 or 8.1 computers without sharing turned on, you can think of a HomeGroup as a clique inside your network. See “Venturing beyond HomeGroups” for details.
HomeGroups can exist within a bigger network of HomeGroup-incompatible computers. If you have computers that run something other than Windows 7 or 8, you have Windows 7 computers that are set up with work or public networks, or you have Windows 8 or 8.1 computers without sharing turned on, you can think of a HomeGroup as a clique inside your network. See “Venturing beyond HomeGroups” for details.
Connecting to a HomeGroup
Every time you attach a Windows 8.1 PC to a network and you tell Windows Yes, Turn On Sharing and Connect to Devices (refer to 5-1), Windows starts sniffing around the network to see whether any Windows 7 or 8 or 8.1 PCs are attached to the network and, if so, whether any of them belong to a HomeGroup.
When Windows is done sniffing around, here’s what you may see and a tip or two about your next best step toward a HomeGroup connection:
![]() You see a message that says the HomeGroup isn’t available because you’re not connected to your Home network. Realize that Windows is just guessing. It doesn’t really know whether you’re connected to your Home network: There’s no Orwellian camera looking to see where you’re sitting. What it’s really saying is, “You didn’t turn on sharing and connecting to devices, so you can’t participate in a HomeGroup.” In order to right the wrong, tap or click the Change Network Location link. That brings up the friendly network notification, as shown in Figure 5-1. Select Yes, Turn On Sharing and Connect to Devices, and you should be on your way.
You see a message that says the HomeGroup isn’t available because you’re not connected to your Home network. Realize that Windows is just guessing. It doesn’t really know whether you’re connected to your Home network: There’s no Orwellian camera looking to see where you’re sitting. What it’s really saying is, “You didn’t turn on sharing and connecting to devices, so you can’t participate in a HomeGroup.” In order to right the wrong, tap or click the Change Network Location link. That brings up the friendly network notification, as shown in Figure 5-1. Select Yes, Turn On Sharing and Connect to Devices, and you should be on your way.
 Several of you have written to me and complained that PCs newly attached to a network don’t discover an existing HomeGroup. The most common reason? All the PCs in the HomeGroup are sleeping. To solve the problem, make sure at least one of the PCs that belongs to the HomeGroup wakes up. It only takes one.
![]() Windows doesn’t detect any kindred spirits on the network connected to a HomeGroup, and it offers to set up a HomeGroup for you, as shown in Figure 5-2. If no existing HomeGroup is detected and you know a HomeGroup is on your network, make sure that at least one of the PCs in the HomeGroup is up, awake, and alive.
Windows doesn’t detect any kindred spirits on the network connected to a HomeGroup, and it offers to set up a HomeGroup for you, as shown in Figure 5-2. If no existing HomeGroup is detected and you know a HomeGroup is on your network, make sure that at least one of the PCs in the HomeGroup is up, awake, and alive.
![]() Windows detects a HomeGroup. In this case, you see the notification shown in Figure 5-3. Jump to the section “Joining an existing HomeGroup” later in this chapter.
Windows detects a HomeGroup. In this case, you see the notification shown in Figure 5-3. Jump to the section “Joining an existing HomeGroup” later in this chapter.
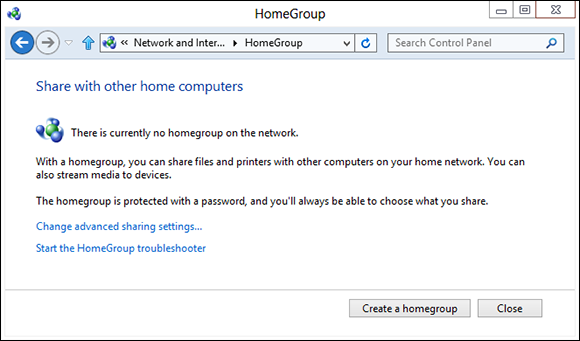
Figure 5-2: Windows offers to set up a HomeGroup.

Figure 5-3: A HomeGroup exists; you just need the right password to get in.
Setting up a new HomeGroup
So you have the first PC in your network that’s going to have a HomeGroup. Here’s how to set it up if Windows hasn’t found a HomeGroup:
1. Tap or click Create a HomeGroup in the dialog box (see Figure 5-2).
Windows tells you a little bit about HomeGroups and tells you that it’s protected with a password.
2. Tap or click Next.
The Create a HomeGroup dialog box appears, as shown in Figure 5-4.
3. Select which Libraries to offer to other PCs.
For most people, the big question about HomeGroups is whether you want to share your Documents Library with other PCs attached to the HomeGroup. By default, Windows doesn’t put your Documents Library out for sharing. You can, if you want. I do.
4. Tap or click Next.
Windows sets up the HomeGroup and generates a random password. The password appears in the Use This Password dialog box. You can safely ignore it — no need to write down the password because you’re going to change it.
5. Tap or click Finish.
The Change HomeGroup Settings dialog box appears, as shown in Figure 5-5.

Figure 5-4: Pick the Libraries (and printers) that you want to share.

Figure 5-5: Before you go, change the password to something you’ll remember.
6. Tap or click the Change the Password link.
Windows warns you that changing the HomeGroup password will disconnect everyone. Of course, there isn’t an “everyone” — you just set up the HomeGroup. Now you’re going to change the password from the monstrosity that Windows pulled out of thin air and turn it into a password that you can remember.
7. Tap or click Change the Password (again).
Windows offers you a box in which you can type your own password.
8. Type a new password — one that you can remember — and tap or click Next.
No need to be Sherlock Holmes about it. Remember this password applies only to people who are already connected to your home (or office) network.
Windows treats you to another shhhhh-super-secret password box like the one in Step 4. You know the password now. And you can always retrieve it. So fuhgeddaboutit.
 More than one HomeGroup can exist on a single network, but things get complicated quickly. A particular computer can only be part of one HomeGroup at a time: You can leave one HomeGroup and join another one, but you can’t do two at once. By the by, HomeGroups work great with Windows Home Server.
Joining an existing HomeGroup
If Windows found an existing HomeGroup, here’s how to get in:
1. At the bottom of the Share with Other Home Computers or the top of the Change HomeGroup Settings dialog box, as shown in Figure 5-3, tap or click the Join Now button.
Windows tells you that you can join, but you need a password.
2. Tap or click Next.
You see a Share with Other HomeGroup Members dialog box, similar to the one in Figure 5-4.
3. Choose which Libraries you want to share and whether you want to share printers; then tap or click Next.
I always share everything, including the Documents Library. Isn’t that what sharing’s all about?
Windows asks you for the HomeGroup’s password. Note that HomeGroups don’t have names — they only have passwords.
4. Type the password for the HomeGroup, and tap or click Next.
Windows advises that you have joined the HomeGroup.
5. Tap or click Finish, and then close the HomeGroup Settings dialog box, if you see one.
If you have the password, joining the HomeGroup’s very easy. If you don’t have the password, go to one of the other PCs in the HomeGroup, bring up Control Panel, and tap or click Change HomeGroup Settings on the left under Network and Internet. Then tap or click the View or Print the HomeGroup Password link. The instructions are the same for both Windows 7 and 8.
Sharing Files and Printers in a HomeGroup
HomeGroups are great, and there’s more to them than meets the eye. When you dig a little deeper, here’s what you find:
![]() A HomeGroup connects computers and printers, but users have to give their permission to share Libraries. If you attach a Windows PC to a HomeGroup, all the people using that PC — all its user accounts — gain access to the data that’s available to the HomeGroup. They also get access to any printers in the HomeGroup. But it doesn’t work the other way. Each user, individually, has to give permission for their Libraries to appear in the HomeGroup.
A HomeGroup connects computers and printers, but users have to give their permission to share Libraries. If you attach a Windows PC to a HomeGroup, all the people using that PC — all its user accounts — gain access to the data that’s available to the HomeGroup. They also get access to any printers in the HomeGroup. But it doesn’t work the other way. Each user, individually, has to give permission for their Libraries to appear in the HomeGroup.
![]() Although you can override the default choices (see Figure 5-4), when you join your PC to a HomeGroup, you make all Pictures, Music, and Videos Libraries and printers on your PC available to other PCs in the HomeGroup.
Although you can override the default choices (see Figure 5-4), when you join your PC to a HomeGroup, you make all Pictures, Music, and Videos Libraries and printers on your PC available to other PCs in the HomeGroup.
I said Libraries, not folders. (I talk about Libraries in Book VII, Chapter 3.) If you share the Pictures Libraries on your PC with the HomeGroup, for example, all folders in your Pictures Library are shared. If you add a folder from a Windows XP computer to your Pictures Library and your PC is in a HomeGroup, that folder on the Windows XP computer becomes accessible to every user on every computer in the HomeGroup. That’s a very powerful capability, almost as good as connecting an XP computer to the HomeGroup (even though XP computers can’t participate in HomeGroups).
More than that, you can put folders from other HomeGroup computers’ Libraries into your Libraries. So if a computer in your HomeGroup has a Pictures Library that includes a folder from a Windows XP PC, you can simply copy that folder into your Pictures Library, and it works like any other folder in your Pictures Library. Combining HomeGroups and Libraries leads to enormously powerful capabilities.
When you share a file, it’s important to understand whether other people in your HomeGroup can open the file, modify its contents, or delete it. The default permissions level for HomeGroup-shared folders is a bit convoluted, but it makes sense. Unless you specifically modify the permissions (more about that in the “Caring for Your HomeGroup” section, later in this chapter), here’s what you get:
![]() Other users in your HomeGroup can open all files in your Libraries (Pictures, Music, Videos, and optionally, Documents).
Other users in your HomeGroup can open all files in your Libraries (Pictures, Music, Videos, and optionally, Documents).
![]() Other users in your HomeGroup can’t change files in your personal folders (your Pictures, Music, Videos, and, optionally, Documents folders). But they can change or delete files in your computer’s Public folders (PublicPictures, PublicMusic, PublicVideos, and optionally, PublicDocuments). They can also add new files to the public folders. Book VI, Chapter 1 introduces you to personal versus public folders.
Other users in your HomeGroup can’t change files in your personal folders (your Pictures, Music, Videos, and, optionally, Documents folders). But they can change or delete files in your computer’s Public folders (PublicPictures, PublicMusic, PublicVideos, and optionally, PublicDocuments). They can also add new files to the public folders. Book VI, Chapter 1 introduces you to personal versus public folders.
![]() If you have other folders in your Libraries, the folders inherit the restrictions that are set on the computer containing the folders.
If you have other folders in your Libraries, the folders inherit the restrictions that are set on the computer containing the folders.
You can change the permissions level at any time — restrict access to folders, or add new folders on your PC to the HomeGroup, for example. I show you how, in the section “Caring for Your HomeGroup,” later in this chapter.
You can hook up to printers on HomeGroup computers just as easily as you set up a printer on your own computer. Printers on a HomeGroup-connected computer are shared automatically with all other Windows computers on the HomeGroup. You may be asked for permission to copy drivers from a different PC in your HomeGroup, but it’s very easy.
Navigating to a HomeGroup Folder
Navigating to a folder or file in a shared Library in a HomeGroup, is as easy as navigating to a folder or file on your computer. When your computer is attached to a HomeGroup, you see a direct link to the HomeGroup on the left side of the File Explorer window (see Figure 5-6). From that jumping-off point, you can easily look at all shared folders on all computers in your HomeGroup.
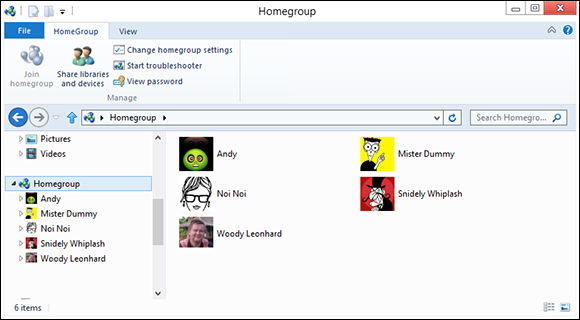
Figure 5-6: Your HomeGroup appears on the left side of the Explorer window.
HomeGroups are also baked into every nook and cranny of Windows:
![]() Windows Media Player: HomeGroup links appear in the Navigation pane on the left. Media streaming from HomeGroup computers works in a flash.
Windows Media Player: HomeGroup links appear in the Navigation pane on the left. Media streaming from HomeGroup computers works in a flash.
![]() Windows Media Center: Look for a HomeGroup link in the shared section of the browser.
Windows Media Center: Look for a HomeGroup link in the shared section of the browser.
![]() Office applications: If you fire up Word and choose File⇒Open, for example, the HomeGroups are right there.
Office applications: If you fire up Word and choose File⇒Open, for example, the HomeGroups are right there.
After the hassles people have had sharing files and printers over the years, I bet you’ll find HomeGroups like a breath of fresh air. Finally.
Caring for Your HomeGroup
So you have a HomeGroup with one or more PCs connected to it. This section explains how to change your HomeGroup so it suits you to a T.
Using the tiled HomeGroup interface
Microsoft built a very serviceable interface for HomeGroups for the tiled Metro side of the Windows 8.1 fence. You can use the full-screen HomeGroup Settings screen to join a HomeGroup, change which folders you’re sharing, and leave the HomeGroup.
The tiled side’s HomeGroup settings can be very handy if you don’t want to use a mouse and keyboard. Here’s how to get it working:
1. Bring up the Metro Start screen.
If you’re looking at the desktop, press the Windows key.
2. Swipe from the right to bring up the Charms bar and tap the Settings icon at the bottom of the list.
A PC Settings panel appears on the right.
3. At the bottom, tap Change PC Setting; on the left, tap Network and then HomeGroup.
The full-screen version of the HomeGroup Settings dialog box appears, as shown in Figure 5-7.
As with many things on the tiled side of Windows 8.1, this screen hits almost everything you’ll ever need with HomeGroups. You can bring up the desktop version of Windows to access all the options.
Operationally, there’s only one big difference: When you join a HomeGroup using the desktop interface, by default, you elect to share your Music, Pictures, and Videos Libraries and share your printers. The full-screen version doesn’t share anything by default: You have to choose each item, one at a time.
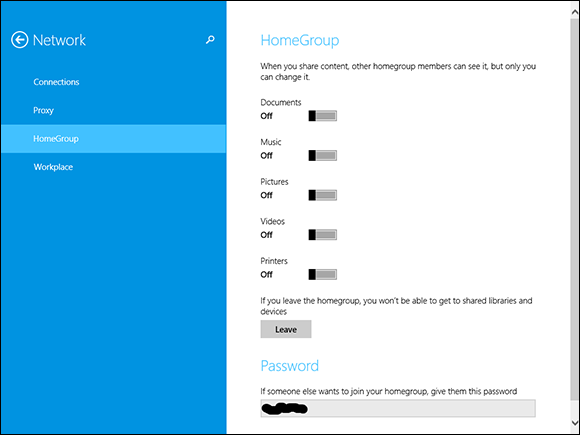
Figure 5-7: Most HomeGroup settings can be handled with the full-screen interface.
Changing the HomeGroup password
Want to know why Windows automatically generates that gargantuan password every time you start a new HomeGroup? Because early testers needed it. When the folks at Microsoft watched people trying to use HomeGroups for the first time, they discovered that many people would stop, worry, and fret about typing a password. In many cases, that’s because the person setting up the HomeGroup uses only a small set of passwords, and he didn’t want to hand out those passwords to everyone in the house or company. So the testers spent quite a bit of time trying to figure out whether they should create a completely new password and, if so, which one to use. Brain overload.
To make your life easier, Windows assigns a somewhat arbitrary password when you create a HomeGroup. If you’re smart, you’ll change it before you add any more PCs to the HomeGroup. That’s precisely the procedure I describe in the “Setting up a new HomeGroup” section earlier in this chapter.
In fact, you can change a HomeGroup’s password any time, and it’s easy as long as all the computers in the HomeGroup are turned on and you can log on to them all.
To change the HomeGroup password, proceed thusly:
1. Bring up the Control Panel.
In Windows 8.1, right-click the Start screen in the lower-left corner of the screen and choose Control Panel. (If you don’t have a mouse, go to the old-fashioned desktop, swipe from the right, choose the Settings charm, and then at the top choose Control Panel.) In Windows 7, choose Start⇒Control Panel.
2. In the Network and Internet section, tap or click the Choose HomeGroup and Sharing Options link; then tap or click the Change the Password link.
Windows warns you that changing the HomeGroup password will disconnect everyone. Well, yes, you know that. That’s why you’ve made sure that all the PCs in your HomeGroup are awake and that you can log on to them all. If not, well . . . .
3. Make sure that all computers in your HomeGroup are awake (not hibernating or asleep) and make sure that you can log on to them all. When you’re ready, tap or click Change the Password.
Windows offers a new password for you to use, or you can type one of your own.
4. Tap or click Next.
Your HomeGroup password changes dutifully.
5. One by one, go to each of the other computers in your HomeGroup and follow Steps 1 and 2 to Choose HomeGroup and Sharing Options.
The warning shown in Figure 5-8 appears. Some scurvy brigand has changed the password on your HomeGroup! Avast and alack, and buckle my swash . . . .

Figure 5-8: Change the HomeGroup password for each computer.
6. Tap or click the Type New Password button and do precisely that.
You reconnect to the HomeGroup. By supplying the correct password — the new one — your PC hooks up with the new HomeGroup, and all your settings carry across.
If you have problems reconnecting to the HomeGroup, tap or click the link (refer to Figure 5-8) to leave the HomeGroup, and then tap or click the Join Now button. Continue with Step 2 in the instructions in the “Joining an existing HomeGroup” section, earlier in this chapter.
To change the password using the Metro full-screen interface (which I describe in the section “Using the tiled HomeGroup interface” earlier in this chapter), you have to go through two steps. To do so, at the bottom, tap or click the Leave button for the HomeGroup; then type the HomeGroup password and tap or click Join.
Adding or blocking folders in the HomeGroup
If you want to make a folder available to everyone in your HomeGroup, the simplest approach is to add it to one of your shared Libraries. See Book VII, Chapter 3 for details.
If you share your Documents Library, for example, adding a folder to your personal Documents folder makes the folder available so that anybody attached to the HomeGroup can open and read the items in it. Adding the folder to your Public Documents folder allows everyone in the HomeGroup to read, modify, or delete the items in the folder.
Sometimes, though, you just want to make a folder available to the HomeGroup, and you don’t want to go through the steps to add it to a shared Library. For example, I like to share my Downloads folder so that other people in my HomeGroup can easily copy or run the files I download.
Here’s how to add the Downloads folder to your HomeGroup, without adding the Downloads folder to any of your shared Libraries:
1. Navigate to the folder you want to put in the HomeGroup.
In Figure 5-9, I started File Explorer and clicked the Downloads link on the left.
2. At the top, tap or click the Share tab.
3. On the Share Ribbon, choose HomeGroup (View) if you want to give everyone in your HomeGroup read access to the files, or choose HomeGroup (View and Edit) if you trust them not to delete or otherwise clobber the files.
It can take a few minutes, but eventually the shared folder becomes available across the HomeGroup, as shown in Figure 5-10.

Figure 5-9: Adding a folder to your HomeGroup is easy, if you know the trick.

Figure 5-10: The Downloads folder becomes available on all computers that belong to the HomeGroup.
Venturing beyond HomeGroups
If you have computers on your network that don’t work with HomeGroups, this section is for you. You find out how to set up fine-grained permissions for folders and documents, whether or not they’re in a HomeGroup (a task not for the faint of heart). This chapter wraps up with a section about sharing across a mixed network that has computers in and out of a HomeGroup clique.
Sharing and granting permissions
Using the Public folder to share files, as described in Book VI, Chapter 1, constitutes a quick ’n’ dirty approach to sharing: Everybody using your computer gets full access to all the Public files, and people coming from the network either get in or they don’t. You have a little bit of fine control over who gets in and what they can do, but by and large, Public is a blunt object.
The Windows ability to establish sharing permissions for individual files and folders on your PC gives you much finer control than the plain ol’ Public folder method. You can assign fine-grained permissions for your HomeGroup or for individual users with Windows built-in permission levels.
The permission levels come in two flavors:
![]() View allows the chosen individuals or groups to open or copy the file, but not change or delete them.
View allows the chosen individuals or groups to open or copy the file, but not change or delete them.
![]() Edit lets the designated user or group do anything such as open, change, delete, or move the files.
Edit lets the designated user or group do anything such as open, change, delete, or move the files.
 This kind of fine-grained sharing is a minefield that you should not undertake unless you’re willing to keep permissions updated. You should also be tolerant of many potential problems because I guarantee you’ll bump into them. Rather than assign detailed sharing permissions to a folder, you may find it smarter (and much easier) to put the files you want to share in Public and use the application that created the files to assign read-only or read/write passwords, controlling access to the data in those files. All Office applications, and many others, have heavy-duty password protection available.
If you’re convinced that using file/folder sharing permissions is the way to go, here’s how to set up fine-grained sharing for a file or folder that’s not in the Public folder:
1. Navigate to the file or folder you want to share. Tap or click the Share tab to bring up the Share Ribbon.
In Figure 5-11, I went to the Software folder within the Downloads folder.
2. Choose one of these options:
• HomeGroup (View) so that anyone in the HomeGroup can open or copy the file.
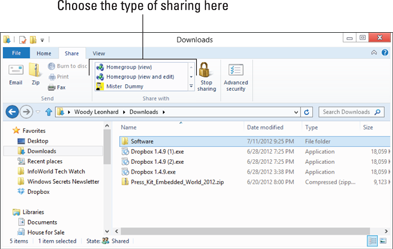
Figure 5-11: You can easily assign sharing restrictions for any file or folder, but it’s a bear keeping them up to date.
• HomeGroup (View and Edit) so that anyone in the HomeGroup can open, copy, change, or delete the file.
• One of the listed users, who is then granted the View (not edit) permission.
3. Click the Specific People link at the bottom of the list to bring up the File Sharing dialog box, as shown in Figure 5-12.
Anyone accessing your computer from the network who isn’t in the HomeGroup has to know a username and password that works on your computer. That’s the username that Windows uses to assign permissions in the File Sharing dialog box.

Figure 5-12: You can set sharing permissions for each individual, if you like.
4. To stop sharing the file or folder, select it (see Figure 5-11) and tap or click the Stop Sharing icon at the top.
Sharing on mixed HomeGroup, workgroup, and Apple networks
Sharing with the Public folder is quick and dirty. As long as the person trying to get into your Public folder is connected to your network and he can supply a valid username and password — one that will log on to your computer — he can get at the contents of Public. (Find out about the Public folder in Book VI, Chapter 1.)
As I mention earlier in this chapter, HomeGroups work only with Windows 7, 8, and Windows 8.1 computers. That’s it. If you have a Vista or (shudder!) XP PC on your network, it can’t join the HomeGroup so it has to access the shared data directly. Toss a Mac into the mix and, oy vez!
Sharing with XP and Vista computers
Windows XP and Vista support workgroups, which aren’t nearly as fancy as HomeGroups. Workgroups and HomeGroups co-exist peacefully, but you have to jump through some extra hoops to cross from one to another. Here’s how:
![]() If you try to connect a Windows XP or Vista PC to a Windows 7 or 8 or 8.1 PC, you get a challenge like the one in Figure 5-13. The person using the Windows XP PC has to provide a valid username and password for the machine that she’s trying to get into.
If you try to connect a Windows XP or Vista PC to a Windows 7 or 8 or 8.1 PC, you get a challenge like the one in Figure 5-13. The person using the Windows XP PC has to provide a valid username and password for the machine that she’s trying to get into.

Figure 5-13: Windows XP PCs can’t get into your HomeGroup-protected PC, unless they can provide a username and password.
![]() If you’re using Windows 7 or 8 or 8.1 and trying to get into a PC that isn’t in your HomeGroup, you see a challenge like the one in Figure 5-14. Again, the person using the PC has to provide a username and password that’s valid on the PC that he’s trying to access.
If you’re using Windows 7 or 8 or 8.1 and trying to get into a PC that isn’t in your HomeGroup, you see a challenge like the one in Figure 5-14. Again, the person using the PC has to provide a username and password that’s valid on the PC that he’s trying to access.

Figure 5-14: Windows 7 and 8 PCs also get challenged if they aren’t part of the same HomeGroup.
Sharing with a Mac
Surprisingly, connecting a Mac to a Windows 7, 8, or 8.1 PC is quite similar. The Mac can’t join your HomeGroup, no way no how, but it can get into the Public folder of a specific PC. Here’s how:
1. In the Mac OS X Finder, choose Go⇒Connect to Server.
The Mac responds with the Connect to Server dialog box, shown in Figure 5-15.
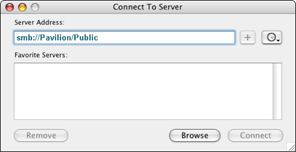
Figure 5-15: Connecting from a Mac to a Windows PC is fairly straight-forward.
2. In the Server Address box, type smb:// followed by the name of the PC you’re trying to connect to, then /Public. Click Connect.
In Figure 5-15, I connected from OS X Lion to a Windows 8.1 PC called Pavilion.
3. When you see the challenge, enter a username and password that’s valid on the computer you’re trying to get into. If you’re asked for a workgroup name, type workgroup.
You end up in the Public folder.
You can also enable Windows-style file sharing on your Mac, so you can pull files from the Mac into your PC. At least, theoretically. See www.dummies.com/how-to/content/how-access-file-shares-on-windows-computers-from-y.html for details.