
Chapter 4: Controlling Users
In This Chapter
![]() Choosing an account type
Choosing an account type
![]() The pros and cons of Microsoft accounts
The pros and cons of Microsoft accounts
![]() Adding a new user
Adding a new user
![]() Changing accounts
Changing accounts
![]() Switching between users
Switching between users
Microsoft reports that 70 percent of all Windows PCs have just one user account. That’s a startling figure. It means that 70 percent of all Windows PCs run at the most permissive security level, all the time. It means that, on 70 percent of all Windows PCs, little Billy can install Internet Antivirus 2009 — a notorious piece of scumware — and have it bring down the whole family with a couple of simple clicks. “Sorry, Dad, but it’s an antivirus program, and it said that we really need to install it, and it’s just $49.95 for a three-month subscription. I thought you said that antivirus was good. They wouldn’t lie about stuff like that, would they?”
 Although it’s undoubtedly true that many PCs are each used by just one person, I think it’s highly likely that people don’t set up multiple user accounts on their PCs because they’re intimidated. Not to worry. I take you through the ins and outs.
Even if you’re the only person who ever uses your PC, you may want to create a second account — another user, as it were — even if the second user is just you. (As Pogo said, “We have met the enemy, and he is us.”) Then again, you may not. And therein lies this chapter’s story.
 If you’re running Windows 8.1 Pro or Enterprise and your PC is connected to a big corporate network (in the parlance, a domain), you have little or no control over who can log on to your computer and what a logged-on user can do after she’s on the machine. That’s a Good Thing, at least in theory: Your company’s network administrator gets to worry about all the security issues, relieving you of the hassles of figuring out whether the guy down the hall should be able to look at payroll records or the company Christmas card list. But it can also be a pain in the neck, especially if you have to install a program, like, right now, and you don’t have a user account with sufficient capabilities. If your computer is attached to a domain, your only choice is to convince (or bribe) the network admin to let you in.
The nostrums in this chapter apply only to PCs that are connected to small networks or to standalone PCs. If you’re on a big network, you must pay homage to the network gods. Pizza, beer, and a smile can help.
Windows 8.1 has two separate locations that control user accounts. If you only want to do some simple stuff — create a new account, change the password, or switch to a picture password, say — you can do it all on the touch-friendly Metro tiled side of Windows 8.1. On the other hand, if you want to do something more challenging — enable the built-in Guest Account or set the User Account Control trigger levels — you have to work with the old-fashioned Windows 7–style desktop’s Control Panel. I show you how to use both in this chapter.
User Account Control is a security topic, only tangentially related to user accounts. I talk about it in Book IX, Chapter 3.
Why You Need Separate User Accounts
Windows assumes that, sooner or later, more than one person will want to work on your PC. All sorts of problems crop up when several people share a PC. I set up my screen just right, with all my icons right where I can find them, and then my son comes along and plasters the desktop with a shot of Alpha Centauri. He puts together a killer teen Media Player playlist and “accidentally” deletes my Grateful Dead playlist in the process.
It’s worse than sharing a TV remote.
Windows helps keep peace in the family — and in the office — by requiring people to log on. The process of logging on (also called signing on) lets Windows keep track of each person’s settings: You tell Windows who you are, and Windows lets you play in your own sandbox.
Having personal settings that are activated whenever you log on to Windows doesn’t create heavy-duty security. Unless your PC is a slave to a big Active Directory domain network, your settings can get clobbered and your files deleted, if someone else with access to your computer or your network tries hard enough. But as long as you’re reasonably careful and follow the advice in this chapter, Windows security works surprisingly well.
 If someone else can put his hands on your computer, it isn’t your computer any more. That can be a real problem if someone swipes your laptop, if the cleaning staff uses your PC after hours, or if a snoop breaks into your study. Unless you use BitLocker (in Windows 8.1 Pro), anybody who can restart your PC can look at, modify, or delete your files or stick a virus on the PC. How? In many cases, a miscreant can bypass Windows directly and start your PC with another operating system. With Windows out of the picture, compromising a PC doesn’t take much work.
Choosing Account Types
When dealing with user accounts, you bump into one existential fact of Windows life over and over again: The type of account you use puts severe limitations on what you can do.
Unless you’re hooked up to a big corporate network, user accounts can generally be divided into two groups: the haves and the have-nots. (Users attached to corporate domains are assigned accounts that can exist anywhere on the have-to-have-not spectrum.) The have accounts are administrator accounts. The have-nots are standard accounts. That’s it. “Standard.” Kinda makes your toes curl just to think about it.
What’s a standard account?
A person running with a standard account can do only, uh, standard tasks:
![]() Run programs that are installed on the computer, including programs on USB/key drives.
Run programs that are installed on the computer, including programs on USB/key drives.
![]() Use hardware that’s already installed on the computer.
Use hardware that’s already installed on the computer.
![]() Create, view, save, modify and use documents, pictures, and sounds in the Documents, Pictures, or Music folders as well as in the PC’s Public folders.
Create, view, save, modify and use documents, pictures, and sounds in the Documents, Pictures, or Music folders as well as in the PC’s Public folders.

![]() If your computer is part of a HomeGroup (see Book VII, Chapter 5), a standard user can also create, view, save, modify, and use any files in the Public folders of computers that are part of your Homegroup. A standard user can also access any shared folders on other computers in the HomeGroup.
If your computer is part of a HomeGroup (see Book VII, Chapter 5), a standard user can also create, view, save, modify, and use any files in the Public folders of computers that are part of your Homegroup. A standard user can also access any shared folders on other computers in the HomeGroup.
![]() Change his password or switch back and forth between requiring and not requiring a password for his account. He can also add a picture or PIN password.
Change his password or switch back and forth between requiring and not requiring a password for his account. He can also add a picture or PIN password.
![]() Switch between a local account and a Microsoft account. I talk about both in the next section of this chapter.
Switch between a local account and a Microsoft account. I talk about both in the next section of this chapter.
![]() Change the picture that appears next to his name on the Welcome screen and the Start screen, change the desktop wallpaper, resize the Windows toolbar, add items to the old-fashioned desktop toolbar and Metro Start screen, and make other small changes that don’t affect other user accounts.
Change the picture that appears next to his name on the Welcome screen and the Start screen, change the desktop wallpaper, resize the Windows toolbar, add items to the old-fashioned desktop toolbar and Metro Start screen, and make other small changes that don’t affect other user accounts.
In most cases, a standard user can change system-wide settings, install programs, and the like, but only if he can provide the user name and password of an administrator account.
If you’re running with a standard account, you can’t even change the time on the clock. It’s quite limited.
There’s also a special, limited version of the standard account called a child account. As the name implies, child accounts can be controlled and monitored by those with standard and administrator accounts. See the sidebar.
What’s an administrator account?
People using administrator accounts can change almost anything, anywhere, at any time. (Certain folders remain off limits, even to administrator accounts, and you have to jump through some difficult hoops to work around the restrictions.) People using administrator accounts can even change other Local accounts’ passwords — a good thing to remember if you ever forget your password.
If you start Windows with a standard account and you accidentally run a virus, a worm, or some other piece of bad computer code, the damage is usually limited: The malware can delete files in your Documents folder, and probably in the Public folders, but that’s about the extent of the damage. Usually. Unless it’s exceedingly clever, the virus can’t install itself into the computer, so it can’t run repeatedly, and it may not be able to replicate. Poor virus.
Someone with an administrator account can get into all the files owned by other users: If you thought that attaching a password to your account and putting a top-secret spreadsheet in your Documents folder would keep it away from prying eyes, you're in for a rude surprise. Anybody who can get into your machine with an administrator account can look at it. Standard users, on the other hand, are effectively limited to looking only at their own files.
Choosing between standard or administrator accounts
The first account on a new PC is always an administrator account. If you bought your PC with Windows pre-installed, the account that you have — the one you probably set up shortly after you took the computer out of the box — is an administrator account. If you installed Windows on a PC, the account you set up during the installation is an administrator account.
When you create new accounts, on the other hand, they always start out as standard accounts. That’s as it should be.
Administrator accounts and standard accounts aren’t set in concrete. In fact, Windows helps you shape-shift between the two as circumstances dictated:
![]() If you’re using a standard account and try to do something that requires an administrator account, Windows prompts you to provide an administrator account’s name and password (see Figure 4-1).
If you’re using a standard account and try to do something that requires an administrator account, Windows prompts you to provide an administrator account’s name and password (see Figure 4-1).

Figure 4-1: Windows asks permission before performing administra-tive actions.
If the person using the standard account selects an administrator account without a password, simply clicking the Yes button allows the program to run.
![]() Even if you’re using an administrator account, Windows normally runs as though you had a standard account, in some cases adding an extra hurdle when you try to run a program that can make substantial changes to your PC — and substantial is quite a subjective term. You have to clear the same kind of hurdle if you try to access folders that aren’t explicitly shared (see Figure 4-2). That extra hurdle helps prevent destructive programs from sneaking into your computer and running with your administrator account, doing their damage without your knowledge or permission.
Even if you’re using an administrator account, Windows normally runs as though you had a standard account, in some cases adding an extra hurdle when you try to run a program that can make substantial changes to your PC — and substantial is quite a subjective term. You have to clear the same kind of hurdle if you try to access folders that aren’t explicitly shared (see Figure 4-2). That extra hurdle helps prevent destructive programs from sneaking into your computer and running with your administrator account, doing their damage without your knowledge or permission.

Figure 4-2: Windows lays down a challenge before you dive in to another user’s folder.
Most experts recommend that you use a standard account for daily activities and switch to an administrator account only when you need to install software or hardware or access files outside the usual shared areas. Most experts ignore their own advice: It’s the old do-as-I-say-not-as-I-do syndrome.
I used to recommend that people follow the lead of the do-as-I-say crowd and simply set up every knowledgeable user with an administrator account. Times change, and Windows has changed: It’s rare that you actually need an administrator account to accomplish just about anything in “normal” day-to-day use. (One exception: You can add new users only if you’re using an administrator account.) For that reason, I’ve come to the conclusion that you should save that one administrator account for a rainy day, and set up standard accounts for yourself and anyone else who uses the PC. Run with a standard account, and I bet you almost never notice the difference.
What’s Good and Bad about Microsoft Accounts
In addition to administrator and standard accounts (and child accounts, which are a subset of standard accounts), Microsoft also has another pair of account types, Microsoft accounts and Local accounts. You can have an administrator account that’s a Microsoft account, or a standard account that’s a Microsoft account, or an administrator account that’s a local account, and so on. If you aren’t confused, you obviously don’t understand. Heh heh heh.
The basic differentiation goes like this:
![]() Microsoft accounts are registered with Microsoft. Most people use their
Microsoft accounts are registered with Microsoft. Most people use their @hotmail.com or @live.com or outlook.com e-mail addresses, but in fact, you can register any e-mail address at all as a Microsoft account (details in Chapter 5 of this minibook). Microsoft accounts must have a password.
When you log on to Windows 8.1 with a Microsoft account, Windows goes out to Microsoft’s computer in the clouds and verifies your password, and then pulls down many of your major Windows settings (background, Metro Start screen tile layout, and Internet Explorer favorites, among others) and transfers them to the PC you just logged on to. If you change, say, your background, the next time you log on to Windows 8.1 — from any machine, anywhere in the world — you see the new background. More than that, if the Microsoft account is set up to do so, you can get immediate access to all your music, e-mail, SkyDrive storage, and other Windows features without logging in again.
![]() Local accounts are regular, old-fashioned accounts that exist only on this PC. They don’t save or retrieve your settings from Microsoft’s computers. Local accounts may or may not have a password.
Local accounts are regular, old-fashioned accounts that exist only on this PC. They don’t save or retrieve your settings from Microsoft’s computers. Local accounts may or may not have a password.
On a single PC, administrator accounts can add new users, delete existing users, or change the password of any Local account on the computer. They can’t change the password of any Microsoft accounts.
As you may imagine, privacy is among the several considerations for both kinds of accounts. I go into the details in Book II, Chapter 5.
Adding Users
After you log on to an administrator account, you can add more users quite easily. Here’s how:
1. On the Start screen, swipe from the right or hover your mouse in the upper-right corner (or type Windows key+C) to bring up the Charms bar. At the bottom, choose the Settings charm.
2. At the bottom of the Start Settings pane, tap or click the Change PC Settings link and then select Accounts on the left.
The Accounts screen appears, as shown in Figure 4-3.

Figure 4-3: The Accounts options.
3. Under Other Accounts, choose Add a User.
You see the challenging How Will This Person Sign In? dialog box, as shown in Figure 4-4.

Figure 4-4: Microsoft really wants you to set up a Microsoft account.
I don’t recommend that you set up a child account using the Add a Child’s Account link in the Figure 4-4 pane. If you want to set up an account for your child, start by setting up a standard account, and later (using the technique in the section “Changing Accounts” later) switch from a standard account to a child account.
4. If you already have a Microsoft account (or an @hotmail.com or @live.com or @outlook.com e-mail address — which are automatically Microsoft accounts), and you don't mind Microsoft keeping information about when you log in to Windows (see Book II, Chapter 5), type the address in the box at the top and then tap or click Next. Then skip to Step 7.
Windows sets up your account.
Don’t get me wrong. There are good reasons for using a Microsoft account — a Microsoft account makes it much easier and faster to retrieve your mail and calendar entries, for example, bypassing individual account logins. It’ll automatically connect you to your SkyDrive account. Only you can decide if the added convenience is worth the decreased privacy. Book II, Chapter 5 covers the details.
5. On the other hand, if you’re skeptical about using a Microsoft account, waaaaaay down at the bottom, click or tap the link that says Take Your Microsoft Account and Shove It (otherwise known as Sign In Without a Microsoft Account (Not Recommended).
Windows helpfully gives you yet another opportunity to set up a Microsoft account, as shown in Figure 4-5.
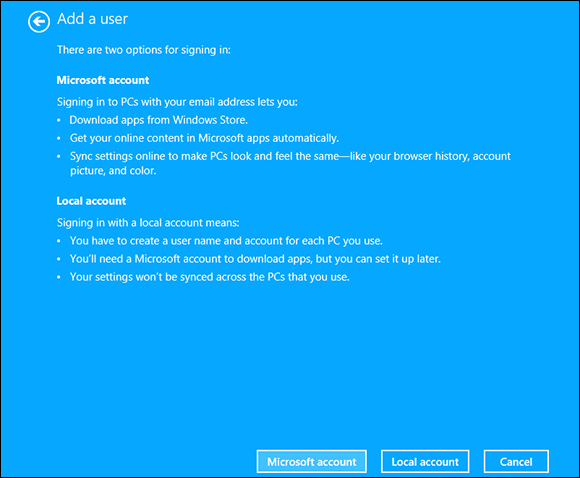
Figure 4-5: Here’s the second time Microsoft asks whether you want to set up a Microsoft account.
6. At the bottom, click or tap the Local Account box. Sheesh.
Windows (finally!) asks you about a Local account name and password. See Figure 4-6.

Figure 4-6: Now you get to the “adding a new account” part.
7. Type a name for the new account.
You can give a new account just about any name you like: first name, last name, nickname, titles, abbreviations . . . No sweat, as long as you don’t use the characters / [ ] “ ; : | < > + = , ? or *.
8. (Optional) Type a password twice and then add a password hint.
If you leave these fields blank, the user can log on directly by simply tapping or clicking the account name on the logon screen.
Note that the password hint can be seen by anybody on the computer, so avoid that NSFW (Not Suitable For Work) hint you were thinking about.
9. Click or tap Next; then click or tap Finish.
You’re done. Rocket science. You have a new standard account, and its name now appears on the Welcome screen.
If you want to turn the new account into an administrator account or a child account, follow the steps in the section, “Changing Accounts,” later in this chapter. To add an account picture for the logon screen and Start screen, flip to Book III, Chapter 1.
 This topic is more than a bit confusing, but you aren’t allowed to create a new account named Administrator. There’s a good reason why Windows prevents you from making a new account with that name: You already have one. Even though Windows goes to great lengths to hide the account named Administrator, it’s there, and you may encounter it one night when you’re exploring a blind alley. For now, don’t worry about the ambiguous name and the ghostly appearance. Just refrain from trying to create a new account named Administrator.
Enabling the Guest Account
The Guest account is a special standard account that comes in handy if many people need to use a computer but you don’t want any of them to be able to get at important information — or run potentially destructive programs. To make the Guest account available on your computer, follow these steps:
1. Bring up the Control Panel by going to the old-fashioned desktop, right-clicking the Windows icon in the lower left, and choosing Control Panel.
If it’s too hard to type, you can also bring up the Control Panel with your fingers: Tap on the Desktop tile, swipe from the right, choose the Settings charm, and then at the top, choose Control Panel.
2. In the upper right, under User Accounts and Family Safety, click or tap the Change Account Type link.
The Manage Accounts dialog box appears, with the Guest account turned off, as shown in Figure 4-7. (I have no idea why Microsoft calls this Change Account Type, but nevermind.)

Figure 4-7: The Guest account is turned off until you turn it on.
3. Click or tap the Guest account icon and then select Turn On.
From that point, Windows shows Guest as an account on the Welcome screen. It behaves just like any other standard account.
If you only have a few people who sporadically use your PC, set up standard accounts for each of them. That way, your PC can save their settings and make them available the next time each person logs on. But if you have more than a handful of guests, enable the Guest account and have them all use the Guest account.
Don’t enable the Guest account unless you need it. One more account is just one more potential hole for a slobbering cretin virus writer to exploit.
If you ever encounter instructions on the Internet that show you how to get rid of the Guest account, ignore them. The Guest account, which exists on every Windows PC, is used for all sorts of behind-the-scenes stuff. You need the Guest account lurking in the background, even if you don’t enable it and it isn’t visible on the Logon screen — no matter what those self-appointed experts may say.
Changing Accounts
If you have an administrator account, you can reach in and change every detail of every single account on the computer — except one.
Changing other users’ settings
If you can’t already see the Manage Accounts window (refer to Figure 4-7), log on to Windows with an administrator account and follow the steps in the preceding section, “Enabling the Guest Account,” to bring up the Manage Accounts dialog box.
In the Manage Accounts dialog box, click the account you want to change. Windows immediately presents you with several options (see Figure 4-8).

Figure 4-8: Maintain another user’s account.
Here’s what the options entail:
![]() Change the Account Name: This option appears only for Local accounts. (It’d be kind of difficult if Windows let you change someone’s Microsoft account, eh?) Selecting this option modifies the name displayed on the Logon screen and at the top of the Start screen while leaving all other settings intact. Use this option if you want to change only the name on the account — for example, if Little Bill wants to be called Sir William.
Change the Account Name: This option appears only for Local accounts. (It’d be kind of difficult if Windows let you change someone’s Microsoft account, eh?) Selecting this option modifies the name displayed on the Logon screen and at the top of the Start screen while leaving all other settings intact. Use this option if you want to change only the name on the account — for example, if Little Bill wants to be called Sir William.
![]() Create/Change/Remove a Password: Again, this appears only for Local accounts. If you create a password for the chosen user, Windows requires a password to crank up that user account. You can’t get past the Logon screen (using that account) without it. This setting is weird because you can change it for other people: You can force Bill to use a password when none was required before, you can change Bill’s password, or you can even delete the password.
Create/Change/Remove a Password: Again, this appears only for Local accounts. If you create a password for the chosen user, Windows requires a password to crank up that user account. You can’t get past the Logon screen (using that account) without it. This setting is weird because you can change it for other people: You can force Bill to use a password when none was required before, you can change Bill’s password, or you can even delete the password.
If you change someone’s password, do her a big favor and tell her how to create a Password Reset Disk. See Book VI, Chapter 4.
Passwords are cAse SenSitive — you must enter the password, with uppercase and lowercase letters, precisely the way it was originally typed. If you can’t get the computer to recognize your password, make sure that the Caps Lock setting is off. That’s the number-one source of logon frustration.
Much has been written about the importance of choosing a secure password, mixing upper- and lowercase letters with punctuation marks, ensuring that you have a long password, blah blah blah. I have only two admonitions: First, don't write your password on a yellow sticky note attached to your monitor; second, don't use the easily guessed passwords that the Conficker worm employed to crack millions of systems (see Table 4-1, at the end of this list). Good advice from a friend: Create a simple sentence you can remember, and swap out some letters for numbers (G00dGr1efSteve) or think of a sentence and only use the first letters! (toasaoutfl!)
![]() Set Up Family Safety: This link takes you to a stunted set of controls for limiting the times a user can use the computer, turn off games, or block specific programs. While the control can be wielded by administrator or standard accounts, only child accounts can be subjugated. Your kids probably know how to bypass it already.
Set Up Family Safety: This link takes you to a stunted set of controls for limiting the times a user can use the computer, turn off games, or block specific programs. While the control can be wielded by administrator or standard accounts, only child accounts can be subjugated. Your kids probably know how to bypass it already.
![]() Change the Account Type: You can use this option to change accounts from administrator to standard and back again. The implications are somewhat complex; I talk about them in the section “Choosing Account Types,” earlier in this chapter.
Change the Account Type: You can use this option to change accounts from administrator to standard and back again. The implications are somewhat complex; I talk about them in the section “Choosing Account Types,” earlier in this chapter.


Here in the Control Panel, you can only change from Administrator to Standard account type and back again. In order to change an account type to Child, you have to venture out to the Metro tiled side of Windows 8. Surprisingly, in the Metro version of the account type switcher, you can switch between all three types of accounts — Administrator, Standard, and Child.
To get to the Metro, tiled account-type switcher, bring up the Charms bar (swipe from the right, or Windows key+C), choose Change PC Settings, and then, on the left, choose Accounts. Then choose Other Accounts, click or tap on the account you want to change, click or tap Edit, under Account Type choose Child, and then click OK.
![]() Delete the Account: Deep-six the account, if you're that bold (or mad, in all senses of the term). Windows offers to keep copies of the deleted account's
Delete the Account: Deep-six the account, if you're that bold (or mad, in all senses of the term). Windows offers to keep copies of the deleted account's Documents folder and desktop, but warns you quite sternly and correctly that if you snuff the account, you rip out all the e-mail messages, Internet Favorites, and other settings that belong to the user — definitely not a good way to make friends. Oh. And you can't delete your own account, of course.
Changing your own settings
Changing your own account is just a little different from changing other users’ accounts. Follow these steps:
1. Bring up the Control Panel.
To do so, go to the old-fashioned desktop, right-click the Windows icon in the lower-left corner and choose Control Panel.
2. In the upper right, under User Accounts and Family Safety, and then click or tap the Change Account Type link.
The Manage Accounts dialog box displays (refer to Figure 4-7).
3. Click or tap your own user name.
The Change an Account dialog box appears.
Most of the options for your own account mirror those of other users’ accounts, as described in the preceding section. If you have the only administrator account on the PC, you can’t delete your own account and you can’t turn yourself into a standard user. Makes sense: Every PC must have at least one user with an administrator account. If Windows lost all its administrators, no one would be around to add users or change existing ones, much less to install programs or hardware, right?
Switching Users
Windows allows you to have more than one person logged on to a PC simultaneously. That’s convenient if, say, you’re working on the family PC and checking Billy’s homework when you hear the cat screaming bloody murder in the kitchen and your wife wants to put digital pictures from the family vacation on SkyDrive while you run off to check the microwave.
The ability to have more than one user logged on to a PC simultaneously is Fast User Switching, and it has advantages and disadvantages:
![]() On the plus side: Fast User Switching lets you keep all your programs going while somebody else pops on to the machine for a quick jaunt on the keyboard. When she’s done, she can log off, and you can pick up precisely where you left off before you got bumped.
On the plus side: Fast User Switching lets you keep all your programs going while somebody else pops on to the machine for a quick jaunt on the keyboard. When she’s done, she can log off, and you can pick up precisely where you left off before you got bumped.
![]() On the minus side: All idle programs left sitting around by the inactive (“bumped”) user can bog things down for the active user, although the effect isn’t drastic. You can avoid the overhead by logging off before the new user logs on.
On the minus side: All idle programs left sitting around by the inactive (“bumped”) user can bog things down for the active user, although the effect isn’t drastic. You can avoid the overhead by logging off before the new user logs on.
To switch users, go to the Metro Start screen, click or tap on your picture, and choose either the name of the user you want to switch to or Sign Out. If you choose the latter, you’re taken to the sign in screen, where you can choose from any user on the computer.