
Chapter 3: The Windows 8.1 Photos App
In This Chapter
![]() Taking a tour of the Metro Photos app
Taking a tour of the Metro Photos app
![]() Adding photos in various ways
Adding photos in various ways
![]() Pinning your photos
Pinning your photos
Windows 8.1’s Metro Photos app is meant to be a pleasing, full-screen way to look at your picture collection, coupled with some easy-to-use photo editing capabilities. If your expectations go a little bit outside that box, you’re going to be very disappointed.
In this chapter, you find an introduction to what Photos can and can’t do. A quick tour shows you how to navigate around the Photos app. Then I explain how to edit with the simple but surprisingly powerful Metro Photo tools, and how to import images from your camera (or phone) with Photos.
Discovering What Metro Photos App Can Do
Photos has a very simple layout for viewing your photos. Here’s what you get:
![]() A central place to view photos from your computer or from your SkyDrive account
A central place to view photos from your computer or from your SkyDrive account
![]() Help searching for a photo
Help searching for a photo
![]() A way to show your photos organized by date
A way to show your photos organized by date
The next section, “Touring Photos,” explains the photo sources and how to search or change the display of your photos. “Editing Photos” shows how to apply Metro Photos’ built-in editing tools to the photo of your choice. The section “Adding Photos” later in this chapter explains how to connect Photos with the web.
 The new Metro Photos app is reasonably capable, but it suffers from the same clunky navigation problems that plague all of the Metro side of Windows 8.1: Try to copy a handful of photos from one folder to another, for example, and your finger could fall off.
Touring Photos
To take a walk around the Photos app:
1. From the Start screen, tap or click the Metro Photos tile.
The main screen of the Photos app appears, showing you the Pictures Library as shown in Figure 3-1.
 Microsoft is actively burying and killing Libraries in Windows 8.1. If you haven’t yet taken control of your Pictures Library (see Book VII, Chapter 3), the only folder in the Library is your personal Pictures folder. What you see on the main Metro Pictures screen is a list of all the folders inside your personal Pictures folder, with a representative picture from each folder emblazoned on the front.
2. If you’re connected to SkyDrive (which normally is the case if you logged in to Windows with a Microsoft account), tap or click the down arrow to the right of the Pictures Library tile and choose SkyDrive.
Metro Photos likely shows you a very uninspiring tile that says, simply, Pictures.
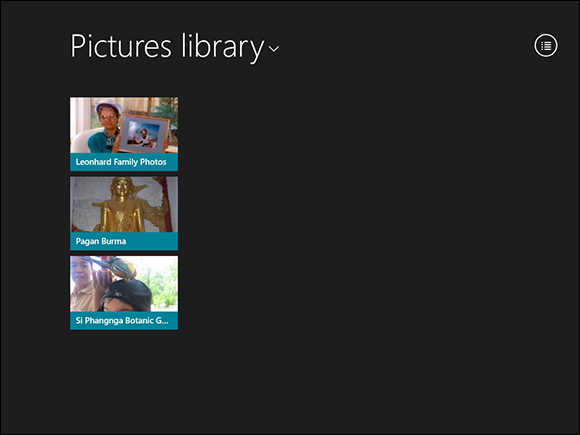
Figure 3-1: The Photos app can bring in files from your Pictures Library and from SkyDrive.
3. If you have any files inside the Pictures Library on SkyDrive, tap or click the Pictures folder.
The contents of that folder and any other folders inside it appear inside the SkyDrive list. You see something like Figure 3-2.
 The little clocks you see in the lower-right corner of the pictures in Figure 3-2 indicate that the file isn’t on your computer — at least, not yet. SkyDrive has pulled down a thumbnail, not the whole file.
If you have any, double-click to open sub-folders to reveal more folders within — ad infinitum.
4. To perform your own search, swipe from the right or hover your mouse in the upper-right corner and choose the Search charm. Type your search term in the box and tap or click the magnifying glass.
If you have Smart Search enabled (which I strongly recommend against, see Book II, Chapter 3) your results should look like Figure 3-3.

Figure 3-2: Pictures in my SkyDrive Pictures folder.
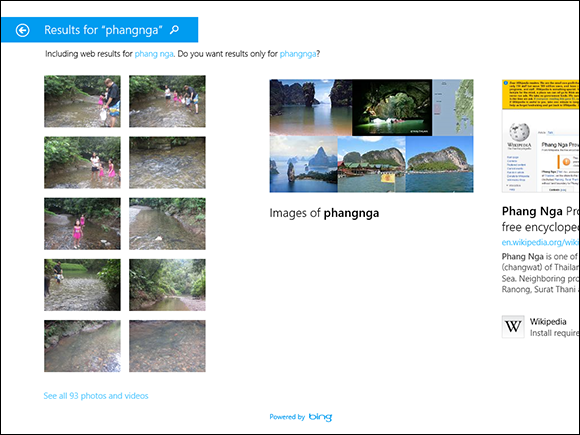
Figure 3-3: Searching for photos through the Search charm brings in all sorts of Smart Search–induced extraneous garbage.
If you just want to see the photos you have that match the search criteria, in the results page, click or tap the link below your photos that says See All XXX Photos and Videos.
5. To get back to the main Photos screen (Figure 3-1), in the upper-left corner, tap or click the back arrow repeatedly.
Sometimes I get to a page that doesn’t have a back arrow. In that case, you have no choice but to swear at the stupid app, hit the Windows key, and click or tap on the Metro Photos app once again.
 The Photos app can display an enormous variety of picture and video formats, including AVI, BMP, GIF, JPG, MOV, MP4, MPEG, MPG, PCX, PNG, many kinds of RAW (high-quality photos), TIF, WMF, and WMV files. That covers most picture and movie formats you’re likely to encounter.
Seeing videos and network-attached folders
In Photos, you see some videos and photos, but not others. The reason has to do with the nuances of how Photos works behind the scenes to show you images. The following points may clear up a few mysteries for you:
![]() Photos shows all the picture or video files in your Windows Pictures Library. Although Photos does show videos, the videos need to be in your Pictures Library (not your Videos Library) in order to appear in Photos. Your video files in the Windows Video Library don’t appear in Photos at all — odd, but true. This is a good place to note that the Metro Video app isn’t anything at all like the Metro Photos app: Video shows a tiny slice of your videos wedged in between mountains of marketing aimed at getting you to rent or buy movies. For more on the Metro Video app, flip to Book IV, Chapter 4.
Photos shows all the picture or video files in your Windows Pictures Library. Although Photos does show videos, the videos need to be in your Pictures Library (not your Videos Library) in order to appear in Photos. Your video files in the Windows Video Library don’t appear in Photos at all — odd, but true. This is a good place to note that the Metro Video app isn’t anything at all like the Metro Photos app: Video shows a tiny slice of your videos wedged in between mountains of marketing aimed at getting you to rent or buy movies. For more on the Metro Video app, flip to Book IV, Chapter 4.
![]() But . . . if you have a network-attached folder in your Windows Pictures Library, Photos won’t look at it. That means you can’t put a bunch of photos on a Windows Home Server, a network attached server, or even a different PC in your home network and have the pictures appear in Metro Photos — even if you add the folder to your Pictures Library. Worse, Photos can’t even see photos inside your HomeGroup. Book VII, Chapter 3 explains how to put network folders in your Libraries.
But . . . if you have a network-attached folder in your Windows Pictures Library, Photos won’t look at it. That means you can’t put a bunch of photos on a Windows Home Server, a network attached server, or even a different PC in your home network and have the pictures appear in Metro Photos — even if you add the folder to your Pictures Library. Worse, Photos can’t even see photos inside your HomeGroup. Book VII, Chapter 3 explains how to put network folders in your Libraries.
Editing Photos
If you can find a photo you want to edit, in spite of Metro Photo’s truly incapable search capabilities, editing it is quite easy — and the tools at hand, while rudimentary, are quite powerful. Here’s how:
1. Navigate to the photo and right-click or tap and nudge it down.
The App bar appears at the bottom, as shown in Figure 3-4.
2. As noted in the App bar at the bottom, you can delete the photo, copy it, cut it, rename it, open it in another program (typically one on the old-fashioned desktop), or work with the selection.
In short, it’s a typical ham-fisted approach to working with files, without the aid of File Explorer.
Note that Edit isn’t one of the options in the App bar (!), at least on narrower screens.
3. If you want to edit one of the photos, double-click or tap on it.
The photo appears against a black screen. Hang on. You aren’t there yet.
4. Right-click or tap and hold on the screen.
Yet another App bar appears, this time with your editing commands. See Figure 3-5.

Figure 3-4: Select a photo (with a check mark) to start working on it.

Figure 3-5: It takes a long time to get to the editing tools, but here they are at long last.
5. Once again, you’re given the choice to Delete or Open With. The Set As icon lets you pick the photo as your Windows Lock Screen or use it as the picture on the Metro Start menu’s Photos tile. The Slide Show icon starts a slide show with all the photos in the current folder. Rotate and Crop hold no surprises.
But the Edit icon — that’s a horse of a different color.
6. Click or tap the Edit icon.
The Metro Photos editor finally appears. See Figure 3-6.
On the left, the Auto Fix button is selected. Along the right side is a collection of photos that apply varying kinds and levels of fixing.
7. If one of the shots on the right appeals to you, pick it. Tap or click Basic Fixes and choose from Rotate, Crop, Red Eye (choose the eye to fix with the big purple circle), or Retouch (blur and blend the shot with a different big purple circle).
You may be done, but just for a moment, take a look at the other tools.
8. On the left, click or tap Light. Then click on the first icon on the right — it’s labelled Brightness — and drag the white little circle around the big circle.
You can see how the circular control gradually makes the picture darker and lighter, as you drag the little circle around the big circle. See Figure 3-7.

Figure 3-6: And now you’re ready to edit.

Figure 3-7: The new circular controls are easy to use with a mouse or a finger.
9. Experiment with the Color icon (adjust temperature, tint, saturation, or enhance the color) and the Effects icon (vignette to lighten the area around the outside of the picture, and selective focus to blur outside the chosen area).
If you hover your mouse on the bottom edge, you see + and – signs, which you can click or tap to zoom in or out of the picture.
10. When you’re done, right-click or slide from the top to get yet another App bar.
This one includes options to undo everything you’ve done; to save a copy of what you’ve done without disturbing the original, or to replace the original with the changes you’ve made. You can also Cancel out of editing entirely, and no changes will be made.
When you’re ready to go back to the Pictures Library (or SkyDrive Pictures folder), right-click or slide from the bottom and click or tap on the back arrow.
Adding Photos
You can add pictures to your collection in Photos in four ways:
![]() Add photos to SkyDrive: On the tiled Metro side of Windows, adding photos with the Metro SkyDrive app takes dexterity and perseverance. On the old-fashioned desktop, putting photos into the SkyDrive Photos folder is a simple drag and drop.
Add photos to SkyDrive: On the tiled Metro side of Windows, adding photos with the Metro SkyDrive app takes dexterity and perseverance. On the old-fashioned desktop, putting photos into the SkyDrive Photos folder is a simple drag and drop.
![]() Use the Fetch feature in SkyDrive: It’s a bit complicated, but Fetch lets you go out to other computers using SkyDrive and retrieve files from those other computers. That’s quite different from connecting to SkyDrive itself and pulling in the photos already stored on SkyDrive. See Book V, Chapter 1 for details.
Use the Fetch feature in SkyDrive: It’s a bit complicated, but Fetch lets you go out to other computers using SkyDrive and retrieve files from those other computers. That’s quite different from connecting to SkyDrive itself and pulling in the photos already stored on SkyDrive. See Book V, Chapter 1 for details.
![]() Use the Photos Import app: You can import pictures from a camera or any removable device, including a USB drive, SD card, or even a big honking external hard drive. See the section “Importing Pictures from a Camera or External Drive” for details.
Use the Photos Import app: You can import pictures from a camera or any removable device, including a USB drive, SD card, or even a big honking external hard drive. See the section “Importing Pictures from a Camera or External Drive” for details.
![]() Add pictures to your Pictures Library: I call this the old-fashioned way, and it’s how I add pictures to the Photos app (in addition to SkyDrive). Simply flip over to the desktop and use File Explorer to stick photos in your Pictures Library (see Book VII, Chapter 3).
Add pictures to your Pictures Library: I call this the old-fashioned way, and it’s how I add pictures to the Photos app (in addition to SkyDrive). Simply flip over to the desktop and use File Explorer to stick photos in your Pictures Library (see Book VII, Chapter 3).
Importing Pictures from a Camera or External Drive
The Metro Photos app has a very, very limited picture-import capability. You’re much better off using Windows Photo Gallery (flip to Book VI, Chapter 5) or any of the many photo apps.
If you really want to use Metro Photos to import pictures from your phone, camera, USB drive, SD card, or just about any external hard drive, here’s how to do it:
1. Tap or click the Photos tile on the Start screen.
The main Photos page appears (refer to Figure 3-1).
2. Plug in your phone, camera, USB drive, SD card, or external hard drive to your computer.
Windows probably shows you a toaster notification. Depending on what kind of camera you attached, you may get a generic notification that says something like, Removable Disk (X:) / Tap to Choose What Happens with Removable Drives. (X is the drive letter.) Or you may get a more specific notification, like the one in Figure 3-8.

Figure 3-8: Attaching an iPhone to a Windows 8.1 computer.
3. Tap or click the notification.
A dialog box appears, as shown in Figure 3-9.
If the notification appears and then disappears too fast, just unplug the device and plug it back in again, but this time have your mouse or finger ready to pounce while the dern little thing is on the screen.

Figure 3-9: Windows gives you a chance to do all sorts of things with an inserted camera, phone, or drive.
4. If you’re feeling very brave, and the option is offered, you can tap or click Import Photos and Videos. If everything works properly and the import starts, skip down to Step 9a. (If everything goes to Hades in a handbasket, start all over at Step 1.)
If you aren’t feeling so lucky (remember Dirty Harry?), choose Open Folder to View Files and continue to Step 5.
Windows flips to the desktop and opens the drive.
5. Note the drive letter that appears on the File Explorer location bar next to Removable Disk, and then go back to Photos.
To return to Photos, you may need to tap the Windows button on the tablet or press the Windows key on the keyboard. Then tap or click the Photos tile.
6. Swipe up from the bottom of the screen or right-click the screen.
The App bar appears at the bottom.
7. Tap or click the Import icon on the right.
Photos responds with a Choose a Device to Import From pane, which contains a list of external devices, many of which probably don’t exist (see Figure 3-10).
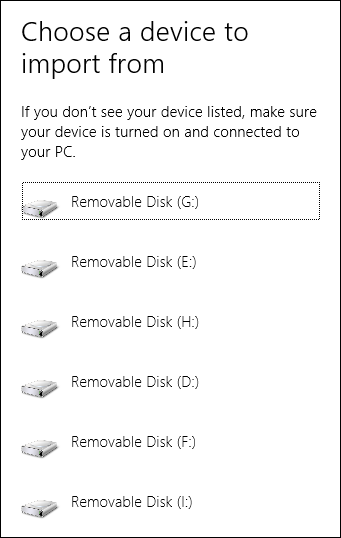
Figure 3-10: This is why you need to know the drive letter.
8. Tap or click the drive letter that corresponds to the device you plugged in to the computer.
The Photos app scans the phone, camera, or drive and then shows you all the pictures that it found, as shown in Figure 3-11.
9a. If you want to import all the pictures, leave them selected.
9b. If you want to select individual pictures to import, tap or click Clear Selection and then select the pictures you want to go into your machine.
Photos does not delete any pictures that it finds. They’re still on your camera or external drive, gathering dust — or at least taking up space — until you go in with a real tool, such as File Explorer, and delete them.

Figure 3-11: A visual list of all the pictures that were found.
10. Type the name of a folder that you want to create to hold the pictures.
This folder is actually placed in your Pictures folder, if you need to find it in the future. Because the folder is in your Pictures folder, the folder appears as a separate folder in the Photos Pictures library list (refer to Figure 3-2).
11. When you’re happy with the selection and with the folder location, tap or click Import.
The Win8.1 Photos app dutifully imports the pictures — without deleting them on your camera or external drive — and sticks them in the indicated folder, tells you you’re done, and then offers to open the album.
12. (Optional) Tap or click Open Album.
The Photos Pictures library list appears, with the imported folder open (see Figure 3-12).

Figure 3-12: A newly imported folder of shots from my Samsung phone.